
一、准备
Gitlab简介
GitLab 是由 GitLabInc.开发,使用 MIT 许可证的基于网络的** Git 仓库管理工具**,且具有 wiki 和 issue 跟踪功能。使用 Git 作为代码管理工具,并在此基础上搭建起来的 web 服务。 GitLab 由乌克兰程序员 DmitriyZaporozhets 和 ValerySizov 开发,它使用 Ruby 语言写 成。后来,一些部分用 Go 语言重写。截止 2018 年 5 月,该公司约有 290 名团队成员,以 及 2000 多名开源贡献者。GitLab 被 IBM,Sony,JülichResearchCenter,NASA,Alibaba, Invincea,O’ReillyMedia,Leibniz-Rechenzentrum(LRZ),CERN,SpaceX 等组织使用。
服务器准备
**CentOS7 **版本的服务器,
内存 4G
磁盘 50G
关闭防火墙 service firewalld stop
配置好主机名和 IP,保证服务器可以上网。(详见上节虚拟机配置桥接)
安装包准备
gitlab/gitlab-ce - Packages · packages.gitlab.com
本次使用版本 gitlab-ce-15.7.8-ce.0.el7.x86_64.rpm
将文件上传至虚拟机 /opt/module目录下(详见上节)
cd 虚拟机目录
**lcd **本地目录
put 文件
二、Gitlab配置(可在开始前对虚拟机进行快照--便于恢复)
安装包在/opt/module/目录
输入下列命令
可通过xshell的 sftp服务---传送文件及ssh服务---执行命令(详见上节)
或
将下列命令写进gitlab_install.sh文件 通过 ./gitlab_install安装
sudo rpm -ivh /opt/module/gitlab-ce-13.10.2-ce.0.el7.x86_64.rpm
sudo yum install -y curl policycoreutils-python openssh-server cronie
yum install lokkit
sudo lokkit -s http -s ssh
sudo yum install -y postfix
sudo service postfix start
sudo chkconfig postfix oncurl https://packages.gitlab.com/install/repositories/gitlab/gitlabce/script.rpm.sh | sudo bash sudo EXTERNAL_URL="http://gitlab.example.com" yum -y install gitlabce
常见错误
%pre(gitlab-ce-15.9.2-ce.0.el7.x86_64) scriptlet failed, exit status 1
xxxxxxx was supposed to be removed but is not!
原因:文件之前下载过但失败了
解决方案:删除gitlab-ce-15.9.2-ce.0.el7.x86_64及相关文件重新执行命令
Error in PREIN scriptlet in rpm package
原因:chattr给文件加了i属性问题导致(chattr改变文件属性 +i为禁止修改)
解决方案:**chattr -i /opt/module ** (删除文件i属性,使其可以被修改)
**未预期的符号 `newline‘ **
原因:无法处理html文件
解决方案:
#获取以下网址文件
#https://packages.gitlab.com/install/repositories/gitlab/gitlabce/script.rpm.sh
bash script.rpm.sh没有可用软件包 xxx
原因:yum包相关的版本问题
解决方案:
yum -y update #升级所有包同时也升级软件和系统内核;(执行当前命令)
**yum -y upgrade ** #只升级所有包,不升级软件和系统内核(知识扩展,不用执行)
初始化及启动
gitlab-ctl reconfigure
gitlab-ctl start
浏览器域名配置
C:\Windows\System32\drivers\etc\hosts
修改hosts文件如下配置gitlab-server

访问gitlab
如果直接让输入账户名和密码,没有设置过程则可以进行密码重置
进入gitlab控制台
** gitlab-rails console -e production **
查看所有的用户
**User.all**定位到管理员账户
**user=User.where(id:1).first**设置密码
<1>至少8个字符 <2>必须包含大、小写字母、数字 <3>不能与用户名相同
    **user.password**='xxxxxxxx'

    **user.password_confirmation**='xxxxxxxx'
保存密码
** user.save!**
退出控制台
**quit/exit**扩展(通过邮箱获取用户信息)
**user=User.where(email:'[email protected]').first**
git提交到gitlab常见问题
** commit一直pending**
原因:
从8.0版开始,GitLab 持续集成(CI)完全集成到GitLab本身,并在所有项目中默认启用。
解决方案:
Settings—>CI/CD—>Auto DevOp—>
取消Default to Auto DevOps pipeline的选择框,点击保存
如果还是pending则可能是遇到了冲突,需手动解决冲突
三、idea配置
安装gitlab插件
ctrl+alt+s(settings)----->plugins----->在搜索栏搜索gitlab
安装下图gitlab projects 2020

配置gitlab账户
** Version Control----->gitlab----->add new gitlab server**
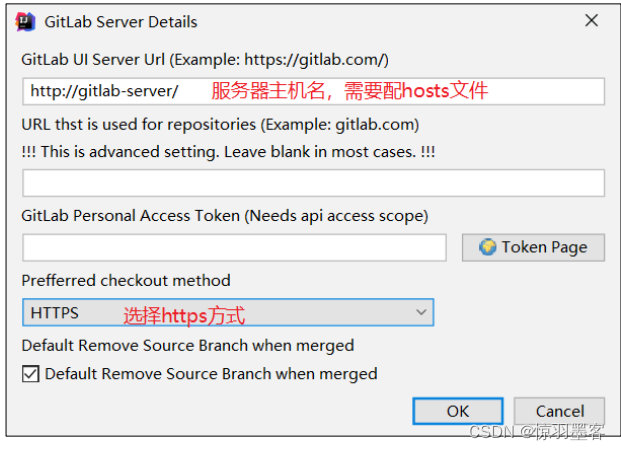
配置gitlab项目地址
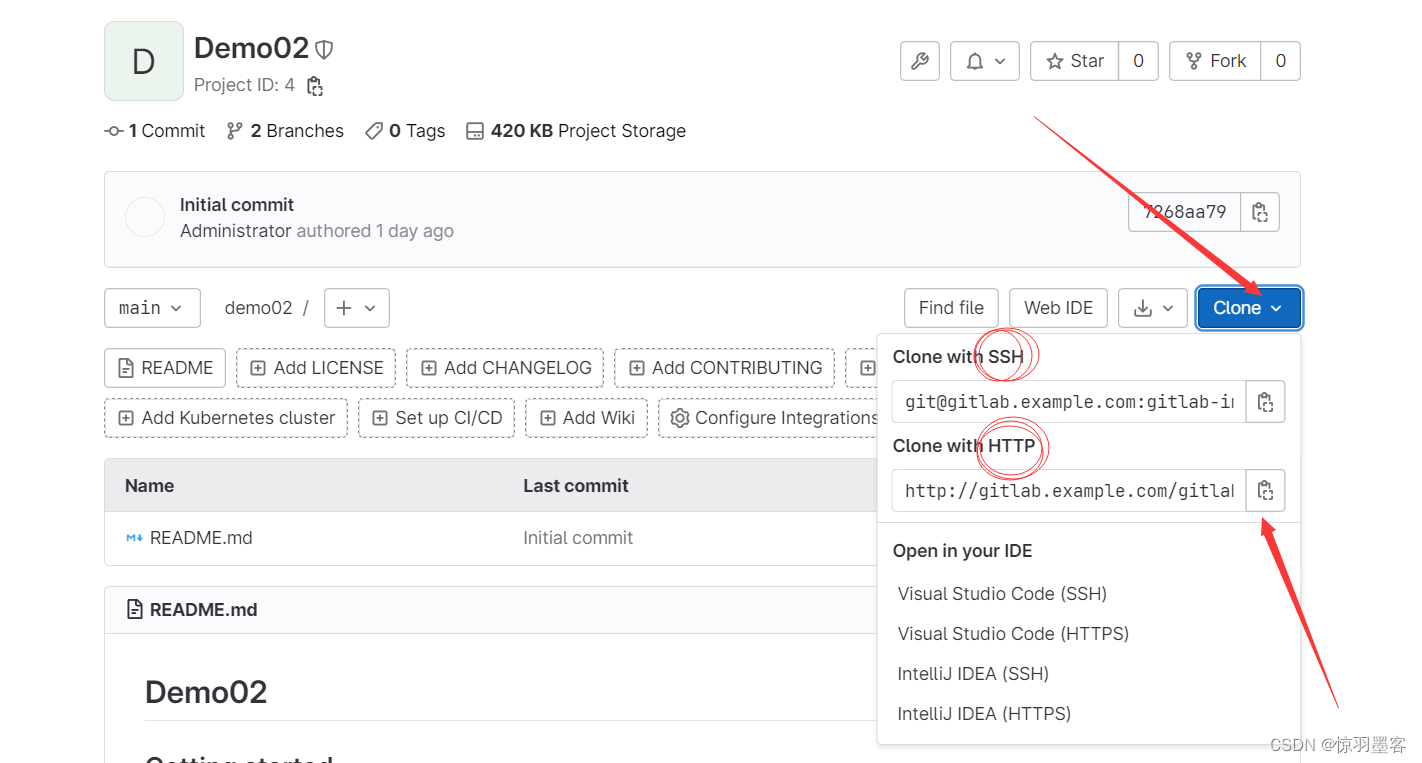
git----->push----->Define remote

复制项目地址(根据连接方式是SSH还是http选择)
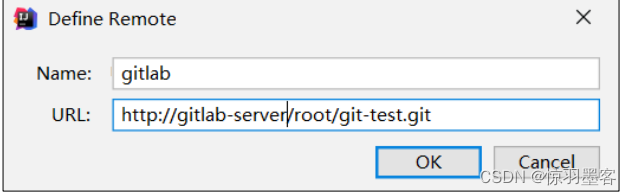
设置remote名称及坐标
**  **
**
** 注意:**
**gitlab 网页上复制过来的连接是:http://gitlab.example.com/root/git-test.git, 需要手动修改为:http://gitlab-server/root/git-test.git **
版权归原作者 惊羽墨客 所有, 如有侵权,请联系我们删除。