
📢📢📢📣📣📣
哈喽!大家好,我是【一心同学】,一位上进心十足的【Java领域博主】!😜😜😜
✨【一心同学】的写作风格:喜欢用【通俗易懂】的文笔去讲解每一个知识点,而不喜欢用【高大上】的官方陈述。
✨【一心同学】博客的领域是【面向后端技术】的学习,未来会持续更新更多的【后端技术】以及【学习心得】。
✨如果有对【后端技术】感兴趣的【小可爱】,欢迎关注【一心同学】💞💞💞
❤️❤️❤️感谢各位大可爱小可爱!❤️❤️❤️
前言
回想我们之前进行开发的过程,首先我们需要编写与数据库表对应的实体类,接着再进行创建各种层次的包(mapper,service,impl),这个过程是不是感觉特别漫长呢,而现在一款神器登场了,它就是:MpBatis-Plus的代码自动生成器。
一、介绍
代码自动生成器非常好用,我们只需要提供我们数据库的表名,然后就可以让生成器自动帮我们完成各种代码的创建,整个过程非常清爽,可以说是加班人的福利!
现在我们就来讲解怎么搭建这个代码自动生成器!
二、代码自动生成器搭建
准备工作
CREATE DATABASE mybatis_plus_db;
USE `mybatis_plus_db`;
DROP TABLE IF EXISTS `user`;
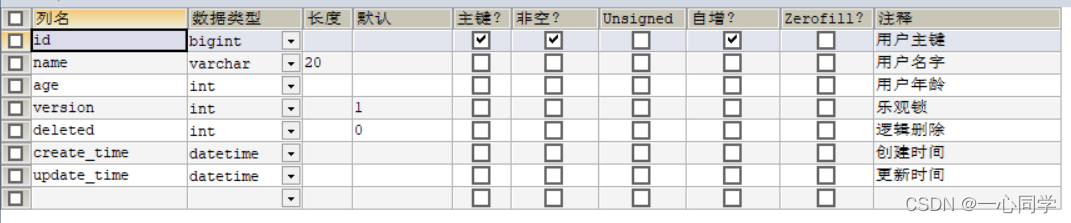
CREATE TABLE `user` (
`id` bigint NOT NULL AUTO_INCREMENT COMMENT '用户主键',
`name` varchar(20) DEFAULT NULL COMMENT '用户名字',
`age` int DEFAULT NULL COMMENT '用户年龄',
`version` int DEFAULT '1' COMMENT '乐观锁',
`deleted` int DEFAULT '0' COMMENT '逻辑删除',
`create_time` datetime DEFAULT NULL COMMENT '创建时间',
`update_time` datetime DEFAULT NULL COMMENT '更新时间',
PRIMARY KEY (`id`)
) ENGINE=InnoDB AUTO_INCREMENT=1482996505408204804 DEFAULT CHARSET=utf8mb4 COLLATE=utf8mb4_0900_ai_ci;
数据库结构如下:
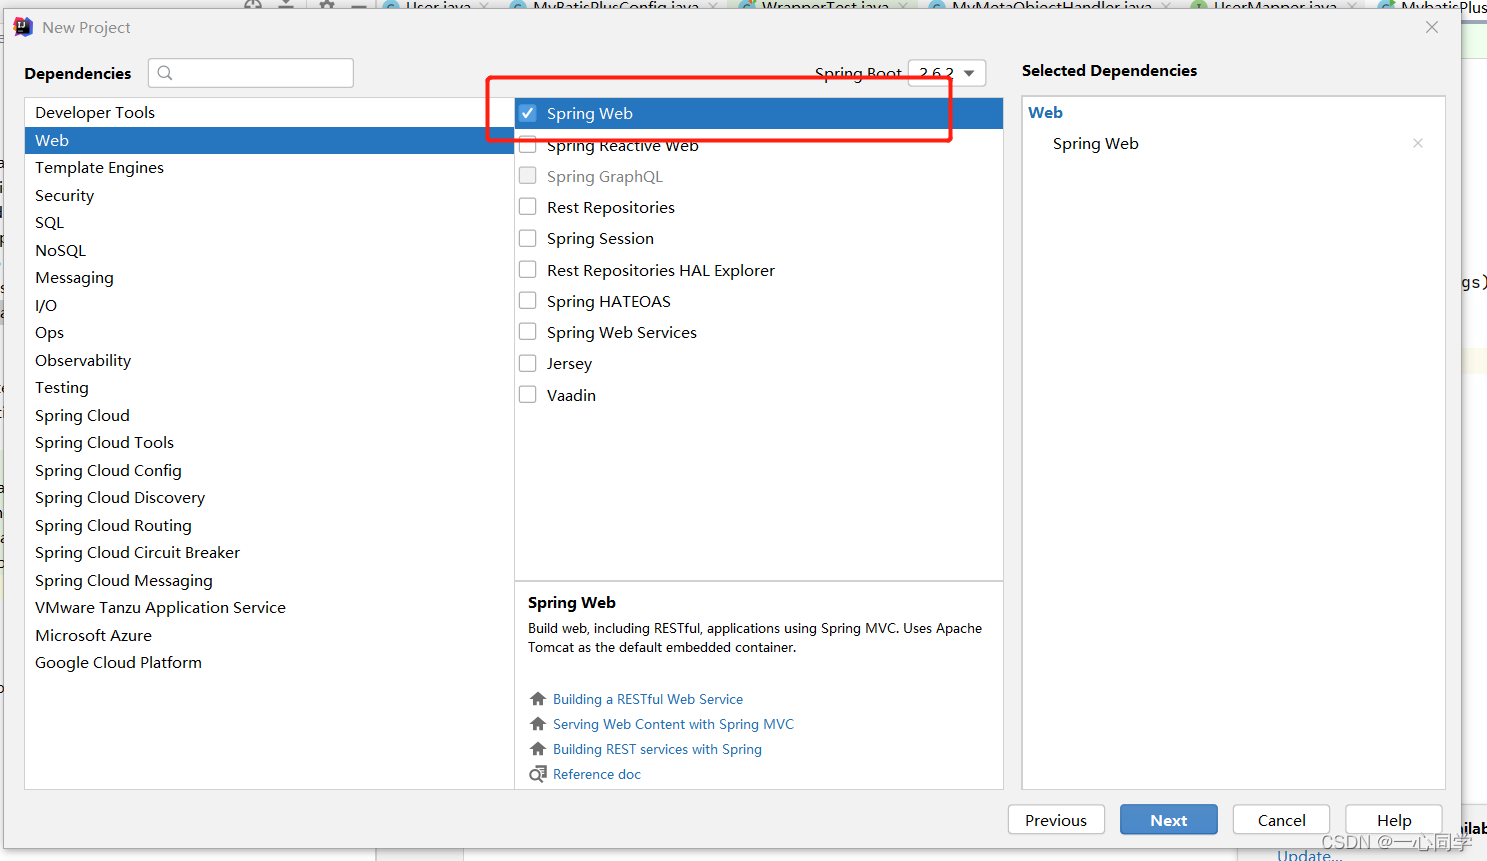
2.1 创建一个SpringBoot项目。
选择web依赖。
2.2 导入依赖
        <!-- 数据库驱动 -->
        <dependency>
            <groupId>mysql</groupId>
            <artifactId>mysql-connector-java</artifactId>
        </dependency>

        <!-- lombok -->
        <dependency>
            <groupId>org.projectlombok</groupId>
            <artifactId>lombok</artifactId>
        </dependency>

        <!-- mybatis-plus -->
        <dependency>
            <groupId>com.baomidou</groupId>
            <artifactId>mybatis-plus-boot-starter</artifactId>
            <version>3.0.5</version>
        </dependency>

        <!-- 代码自动生成器依赖-->
        <dependency>
            <groupId>com.baomidou</groupId>
            <artifactId>mybatis-plus-generator</artifactId>
            <version>3.0.5</version>
        </dependency>

        <dependency>
            <groupId>org.apache.velocity</groupId>
            <artifactId>velocity-engine-core</artifactId>
            <version>2.2</version>
        </dependency>
2.3 编写配置文件
application.properties:
# mysql 5 驱动不同 com.mysql.jdbc.Driver
# mysql 8 驱动不同com.mysql.cj.jdbc.Driver、需要增加时区的配置 serverTimezone=GMT%2B8
spring.datasource.username=root
spring.datasource.password=123456
spring.datasource.url=jdbc:mysql://localhost:3306/mybatis_plus_db?useUnicode=true&characterEncoding=utf-8&serverTimezone=GMT%2B8
spring.datasource.driver-class-name=com.mysql.cj.jdbc.Driver

# 配置日志
mybatis-plus.configuration.log-impl=org.apache.ibatis.logging.stdout.StdOutImpl

# 配置逻辑删除
mybatis-plus.global-config.db-config.logic-delete-value=1
mybatis-plus.global-config.db-config.logic-not-delete-value=0
2.4 搭建代码自动生成器
package com.yixin;

import com.baomidou.mybatisplus.annotation.DbType;
import com.baomidou.mybatisplus.annotation.FieldFill;
import com.baomidou.mybatisplus.annotation.IdType;
import com.baomidou.mybatisplus.core.exceptions.MybatisPlusException;
import com.baomidou.mybatisplus.generator.AutoGenerator;
import com.baomidou.mybatisplus.generator.config.DataSourceConfig;
import com.baomidou.mybatisplus.generator.config.GlobalConfig;
import com.baomidou.mybatisplus.generator.config.PackageConfig;
import com.baomidou.mybatisplus.generator.config.StrategyConfig;
import com.baomidou.mybatisplus.generator.config.po.TableFill;
import com.baomidou.mybatisplus.generator.config.rules.DateType;
import com.baomidou.mybatisplus.generator.config.rules.NamingStrategy;
import org.junit.platform.commons.util.StringUtils;

import java.util.ArrayList;
import java.util.Scanner;

public class CodeGenerator {

    public static String scanner(String tip) {
        Scanner scanner = new Scanner(System.in);
        StringBuilder help = new StringBuilder();
        help.append("请输入" + tip + ":");
        System.out.println(help.toString());
        if (scanner.hasNext()) {
            String ipt = scanner.next();
            if (StringUtils.isNotBlank(ipt)) {
                return ipt;
            }
        }
        throw new MybatisPlusException("请输入正确的" + tip + "!");
    }

    public static void main(String[] args) {
        // 代码生成器
        AutoGenerator mpg = new AutoGenerator();

        // 全局配置
        GlobalConfig gc = new GlobalConfig();
        String projectPath = System.getProperty("user.dir");
        gc.setOutputDir(projectPath + "/src/main/java");//设置代码生成路径
        gc.setFileOverride(true);//是否覆盖以前文件
        gc.setOpen(false);//是否打开生成目录
        gc.setAuthor("yixin");//设置项目作者名称
        gc.setIdType(IdType.AUTO);//设置主键策略
        gc.setBaseResultMap(true);//生成基本ResultMap
        gc.setBaseColumnList(true);//生成基本ColumnList
        gc.setServiceName("%sService");//去掉服务默认前缀
        gc.setDateType(DateType.ONLY_DATE);//设置时间类型
        mpg.setGlobalConfig(gc);

        // 数据源配置
        DataSourceConfig dsc = new DataSourceConfig();
        dsc.setUrl("jdbc:mysql://localhost:3306/mybatis_plus_db?useUnicode=true&characterEncoding=utf-8&serverTimezone=GMT%2B8");
        dsc.setDriverName("com.mysql.cj.jdbc.Driver");
        dsc.setUsername("root");
        dsc.setPassword("123456");
        mpg.setDataSource(dsc);

        // 包配置
        PackageConfig pc = new PackageConfig();
        pc.setParent("com.yixin");
        pc.setMapper("mapper");
        pc.setXml("mapper.xml");
        pc.setEntity("pojo");
        pc.setService("service");
        pc.setServiceImpl("service.impl");
        pc.setController("controller");
        mpg.setPackageInfo(pc);

        // 策略配置
        StrategyConfig sc = new StrategyConfig();
        sc.setNaming(NamingStrategy.underline_to_camel);
        sc.setColumnNaming(NamingStrategy.underline_to_camel);
        sc.setEntityLombokModel(true);//自动lombok
        sc.setRestControllerStyle(true);
        sc.setControllerMappingHyphenStyle(true);

        sc.setLogicDeleteFieldName("deleted");//设置逻辑删除

        //设置自动填充配置
        TableFill gmt_create = new TableFill("create_time", FieldFill.INSERT);
        TableFill gmt_modified = new TableFill("update_time", FieldFill.INSERT_UPDATE);
        ArrayList<TableFill> tableFills=new ArrayList<>();
        tableFills.add(gmt_create);
        tableFills.add(gmt_modified);
        sc.setTableFillList(tableFills);

        //乐观锁
        sc.setVersionFieldName("version");
        sc.setRestControllerStyle(true);//驼峰命名

      //  sc.setTablePrefix("tbl_"); 设置表名前缀
        sc.setInclude(scanner("表名,多个英文逗号分割").split(","));
        mpg.setStrategy(sc);

        // 生成代码
        mpg.execute();
    }

}
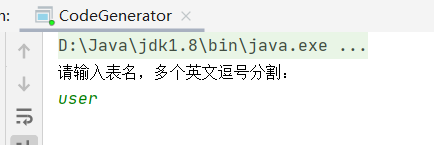
2.5 启动运行代码生成器类
在控制台输入我们的表名:user
接着就完成啦!
看效果:
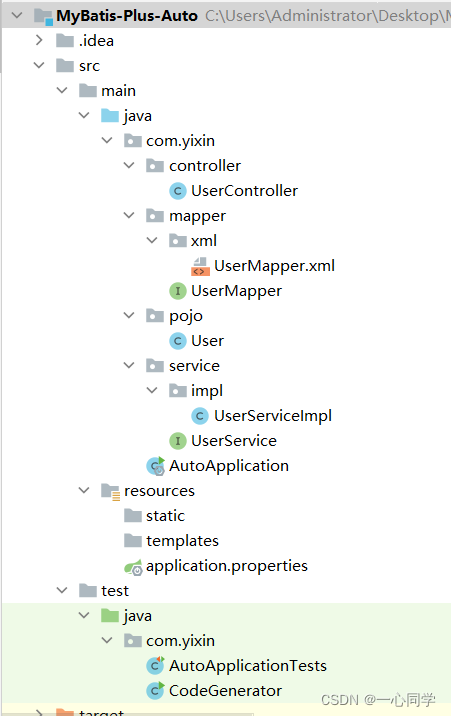
对于java下的所有包都不是我们自己写的,而是代码生成器自动帮我们搭建好了!
2.6 编写自动填充处理器
我们在代码生成器给我们搭建的基础上,只需像之前一样,编写自动填充的处理器类即可。
package com.yixin.handler;

import com.baomidou.mybatisplus.core.handlers.MetaObjectHandler;
import lombok.extern.slf4j.Slf4j;
import org.apache.ibatis.reflection.MetaObject;
import org.springframework.stereotype.Component;

import java.util.Date;

@Slf4j
@Component // 一定不要忘记把处理器加到IOC容器中!
public class MyMetaObjectHandler implements MetaObjectHandler {
    // 插入时的填充策略
    @Override
    public void insertFill(MetaObject metaObject) {
        log.info("start insert fill.....");
        // setFieldValByName(String fieldName, Object fieldVal, MetaObject metaObject
        this.setFieldValByName("createTime",new Date(),metaObject);
        this.setFieldValByName("updateTime",new Date(),metaObject);
    }

    // 更新时的填充策略
    @Override
    public void updateFill(MetaObject metaObject) {
        log.info("start update fill.....");
        this.setFieldValByName("updateTime",new Date(),metaObject);
    }
}
2.7 乐观锁和逻辑删除配置
package com.yixin.config;

import com.baomidou.mybatisplus.core.injector.ISqlInjector;
import com.baomidou.mybatisplus.extension.injector.LogicSqlInjector;
import com.baomidou.mybatisplus.extension.plugins.OptimisticLockerInterceptor;
import org.mybatis.spring.annotation.MapperScan;
import org.springframework.context.annotation.Bean;
import org.springframework.context.annotation.Configuration;
import org.springframework.transaction.annotation.EnableTransactionManagement;

// 扫描我们的 mapper 文件夹
@MapperScan("com.yixin.mapper")
@EnableTransactionManagement
@Configuration // 配置类
public class MyBatisPlusConfig {

    // 注册乐观锁插件
    @Bean
    public OptimisticLockerInterceptor optimisticLockerInterceptor() {
        return new OptimisticLockerInterceptor();
    }

    // 逻辑删除组件!
    @Bean
    public ISqlInjector sqlInjector() {
        return new LogicSqlInjector();
    }

}
这样就大功告成啦!我们去编写测试类测试一下。
2.8 测试
(1)测试添加数据
package com.yixin;

import com.yixin.pojo.User;
import com.yixin.service.UserService;
import org.junit.jupiter.api.Test;
import org.springframework.beans.factory.annotation.Autowired;
import org.springframework.boot.test.context.SpringBootTest;

@SpringBootTest
class AutoApplicationTests {

    @Autowired
    private UserService userService;

    @Test
    void test1() {

        User user=new User();
        user.setName("yixin");
        user.setAge(18);

        boolean flag=userService.save(user);
        System.out.println(flag);
    }
}
输出:
可以发现,成功插入一条数据。

(2)测试controller层获取数据
package com.yixin.controller;

import com.yixin.pojo.User;
import com.yixin.service.UserService;
import org.springframework.beans.factory.annotation.Autowired;
import org.springframework.web.bind.annotation.RequestMapping;

import org.springframework.web.bind.annotation.ResponseBody;
import org.springframework.web.bind.annotation.RestController;

import java.util.List;

/**
 * <p>
 *  前端控制器
 * </p>
 *
 * @author yixin
 * @since 2022-01-17
 */
@RestController
@RequestMapping("/user")
public class UserController {

    @Autowired
    private UserService userService;

    @ResponseBody
    @RequestMapping("/all")
    public List<User> get(){

        return  userService.list(null);
    }

}
启动主启动类:
package com.yixin;

import org.mybatis.spring.annotation.MapperScan;
import org.springframework.boot.SpringApplication;
import org.springframework.boot.autoconfigure.SpringBootApplication;

@SpringBootApplication
@MapperScan("com.yixin.mapper")
public class AutoApplication {

    public static void main(String[] args) {
        SpringApplication.run(AutoApplication.class, args);
    }

}
在浏览器输入:http://localhost:8080/user/all
成功获取到我们的数据了。

三、Service中的CRUD
3.1 插入操作
**Save **
// 插入一条记录(选择字段,策略插入)
boolean save(T entity);
// 插入(批量)
boolean saveBatch(Collection<T> entityList);
参数说明
类型参数名描述Tentity实体对象Collection<T>entityList实体对象集合
使用
(1)插入一条数据
    @Test
    void contextLoads() {

        User user=new User();
        user.setName("yixin");
        user.setAge(18);

        boolean flag=userService.save(user);
        System.out.println(flag);
    }
(2)批量插入数据
    @Test
    void test3() {

        List<User> userList=new ArrayList<>();

        User user=new User();
        user.setName("zhangsan");
        user.setAge(26);

        User user2=new User();
        user2.setName("lisi");
        user2.setAge(27);

        userList.add(user);
        userList.add(user2);

        boolean flag=userService.saveBatch(userList);
        System.out.println(flag);
    }
3.2 插入或更新操作
SaveOrUpdate
// TableId 注解存在更新记录,否插入一条记录
boolean saveOrUpdate(T entity);
// 根据updateWrapper尝试更新,否继续执行saveOrUpdate(T)方法
boolean saveOrUpdate(T entity, Wrapper<T> updateWrapper);
// 批量修改插入
boolean saveOrUpdateBatch(Collection<T> entityList);
参数说明
类型参数名描述Tentity实体对象Wrapper<T>updateWrapper实体对象封装操作类 UpdateWrapperCollection<T>entityList实体对象集合
使用
需求:插入一条数据,如果这条数据在数据库中存在,那么进行更新操作,如果不存在则进行插入操作。
    @Test
    void test5() {

        User user=new User();
        user.setName("wangwu");
        user.setAge(18);

        boolean flag=userService.saveOrUpdate(user);
        System.out.println(flag);

    }
3.3 删除操作
Remove
// 根据 entity 条件,删除记录
boolean remove(Wrapper<T> queryWrapper);
// 根据 ID 删除
boolean removeById(Serializable id);
// 根据 columnMap 条件,删除记录
boolean removeByMap(Map<String, Object> columnMap);
// 删除(根据ID 批量删除)
boolean removeByIds(Collection<? extends Serializable> idList);
参数说明
类型参数名描述Wrapper<T>queryWrapper实体包装类 QueryWrapperSerializableid主键 IDMap<String, Object>columnMap表字段 map 对象Collection<? extends Serializable>idList主键 ID 列表
使用
需求:删除所有名字带“lisi"的用户信息。
    @Test
    void test6() {

        QueryWrapper<User> wrapper=new QueryWrapper<>();
        wrapper.like("name","lisi");

        boolean flag=userService.remove(wrapper);
        System.out.println(flag);

    }
3.4 更新操作
**Update **
// 根据 UpdateWrapper 条件,更新记录 需要设置sqlset
boolean update(Wrapper<T> updateWrapper);
// 根据 whereWrapper 条件,更新记录
boolean update(T updateEntity, Wrapper<T> whereWrapper);
// 根据 ID 选择修改
boolean updateById(T entity);
// 根据ID 批量更新
boolean updateBatchById(Collection<T> entityList);
参数说明
类型参数名描述Wrapper<T>updateWrapper实体对象封装操作类 UpdateWrapperTentity实体对象Collection<T>entityList实体对象集合
使用
需求:将用户名为”yixin"的用户更改为“一心同学”。
    @Test
    void test7() {

        QueryWrapper<User> wrapper=new QueryWrapper<>();
        wrapper.eq("name","yixin");

        User user =userService.getOne(wrapper);
        user.setName("一心同学");

        boolean flag=userService.updateById(user);
        System.out.println(flag);
    }
3.5 查询操作
3.5.1 单条查询
Get
// 根据 ID 查询
T getById(Serializable id);
// 根据 Wrapper,查询一条记录。结果集,如果是多个会抛出异常,随机取一条加上限制条件 wrapper.last("LIMIT 1")
T getOne(Wrapper<T> queryWrapper);
// 根据 Wrapper,查询一条记录
T getOne(Wrapper<T> queryWrapper, boolean throwEx);
// 根据 Wrapper,查询一条记录
Map<String, Object> getMap(Wrapper<T> queryWrapper);
参数说明
类型参数名描述Serializableid主键 IDWrapper<T>queryWrapper实体对象封装操作类 QueryWrapperbooleanthrowEx有多个 result 是否抛出异常Tentity实体对象
使用
需求:查询名字带“一心”的一名用户,记住,只要一名。
    @Test
    void test8() {

        QueryWrapper<User> wrapper=new QueryWrapper<>();
        wrapper.like("name","一心").last("LiMIT 1");

        User user=userService.getOne(wrapper);
        System.out.println(user);
    }
3.5.2 批量查询操作
**List **
// 查询所有
List<T> list();
// 查询列表
List<T> list(Wrapper<T> queryWrapper);
// 查询(根据ID 批量查询)
Collection<T> listByIds(Collection<? extends Serializable> idList);
// 查询(根据 columnMap 条件)
Collection<T> listByMap(Map<String, Object> columnMap);
// 查询所有列表
List<Map<String, Object>> listMaps();
// 查询列表
List<Map<String, Object>> listMaps(Wrapper<T> queryWrapper);
// 查询全部记录
List<Object> listObjs();
// 根据 Wrapper 条件,查询全部记录
List<Object> listObjs(Wrapper<T> queryWrapper);
参数说明
类型参数名描述Wrapper<T>queryWrapper实体对象封装操作类 QueryWrapperCollection<? extends Serializable>idList主键 ID 列表Map<?String, Object>columnMap表字段 map 对象
使用
需求:查询所有名字带“一心”的用户信息.
    @Test
    void test9() {

        QueryWrapper<User> wrapper=new QueryWrapper<>();
        wrapper.like("name","一心");

        List<User> userList=userService.list(wrapper);
        System.out.println(userList);
    }
3.5.3 查询数量
**Count **
// 查询总记录数
int count();
// 根据 Wrapper 条件,查询总记录数
int count(Wrapper<T> queryWrapper);
参数说明
类型参数名描述Wrapper<T>queryWrapper实体对象封装操作类 QueryWrapper
使用
需求:查询所有年龄为18岁的用户数量。
    @Test
    void test10() {

        QueryWrapper<User> wrapper=new QueryWrapper<>();
        wrapper.eq("age",18);

        int count=userService.count(wrapper);

        System.out.println(count);
    }
小结
以上就是【一心同学】整理的如何【搭建代码自动生成器】以及在【Service层】中的【CRUD操作】,学到这里,相信大家对MyBatis-Plus越来越能感觉到其的【高效率】性了,在我们的开发当中,这确实能帮我们省了不少力气呀!
如果这篇【文章】有帮助到你,希望可以给【一心同学】点个赞👍,创作不易,相比官方的陈述,我更喜欢用【通俗易懂】的文笔去讲解每一个知识点,如果有对【后端技术】感兴趣的小可爱,也欢迎关注❤️❤️❤️ 【一心同学】❤️❤️❤️,我将会给你带来巨大的【收获与惊喜】💕💕!
版权归原作者 一心同学 所有, 如有侵权,请联系我们删除。