
1.界面布局概述
1.1View和ViewGroup概述
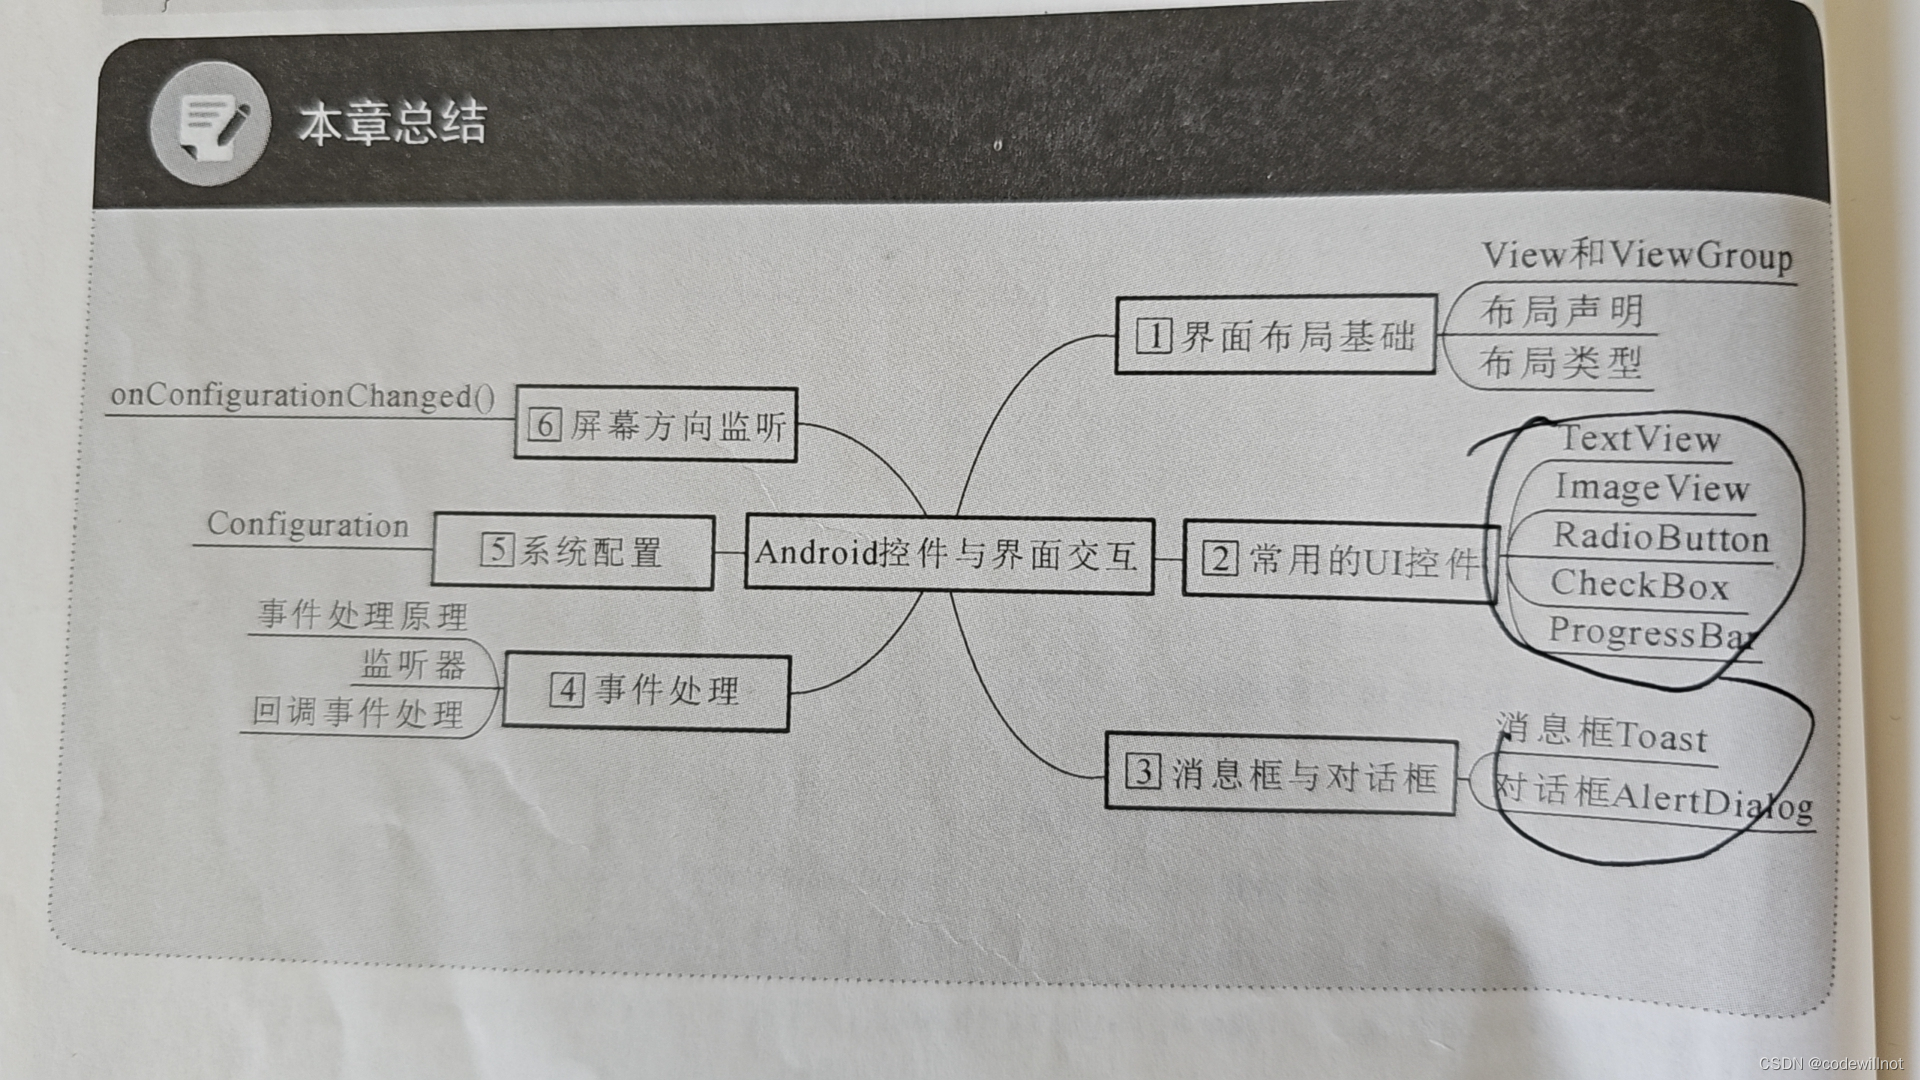
Android界面布局就是定义应用中的界面结构(例如Activity的界面结构)。界面布局中的所有元素均使用View和ViewGroup对象的层次结构进行构建。View通常用于绘制用户可查看并进行交互的内容。然而,ViewGroup是不可见容器,用于定义View和其他ViewGroup对象的布局结构,如图2.1所示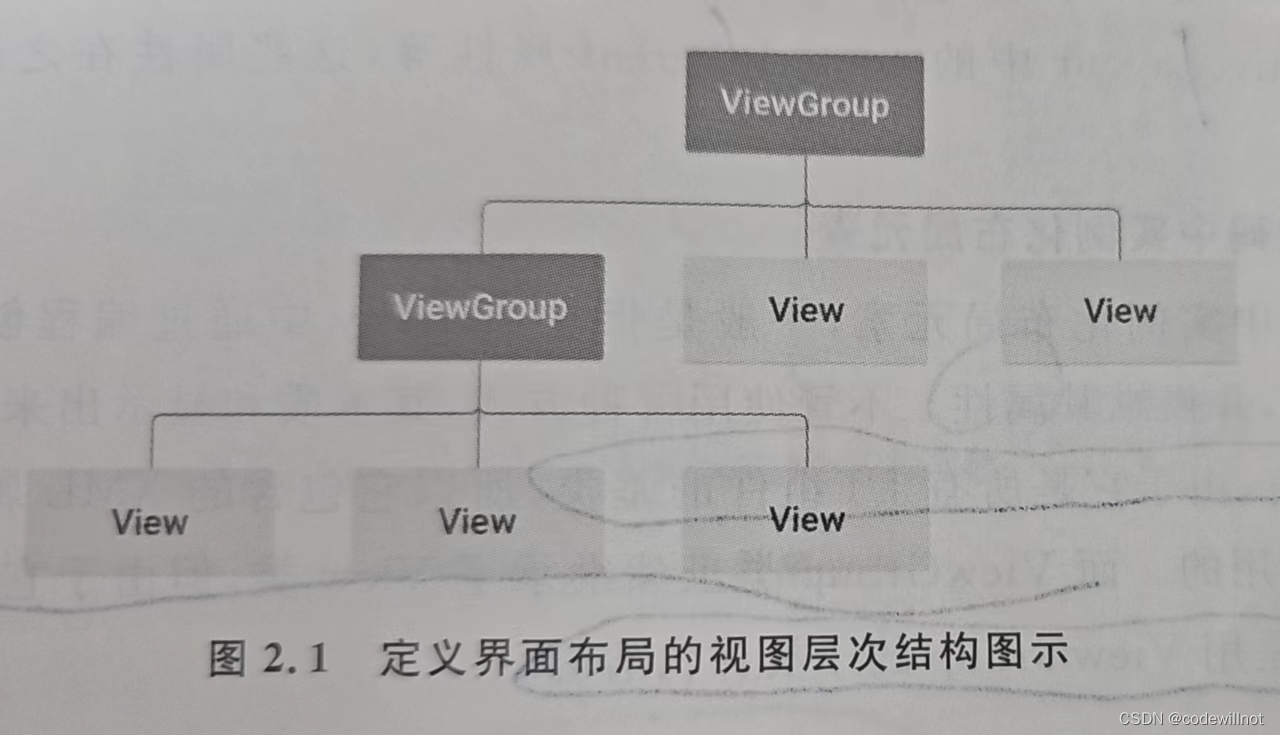 从图2.1中可以看出,多个视图组件(View)可以存放在一个视图容器(ViewGroup)中,该容器可以与其他视图组件共同存放在另外一个视图容器当中,但是一个界面文件必须有且仅有一个容器作为根节点。
Android应用的界面都是由View和ViewGroup对象构建的,ViewGroup继承了View类,也可以当成普通的View来使用,但主要还是当成容器来使用。Android应用的绝大部分UI控件组件都放在android.widget包和android.View包中。
View对象通常称为UI控件,例如Button,TextView都属于View子类。ViewGroup对象通常称为布局,用于定义界面的布局结构,例如LinearLayout、ConstraintLayout都属于ViewGroup。
1.2布局声明
Android讲究逻辑层和视图层分离,开发中一般不在Activity中直接编写界面,而是在布局文件中编写。Android程序中可以通过以下两种方式声明布局:
1.2.1用XML文件声明布局
XML布局文件即前面说的layout文件,在文件中通过XML声明布局元素,设置其属性。Android推荐使用XML布局文件方式来控制视图,因为这样不仅简单直接,而且将视图控制逻辑从Java代码中分离出来,单独在XML文件中控制,更好地体现了MVC原则。
在第一章介绍项目的结构目录时,布局文件是放在app\src\main\res\layout文件夹下面,然后通过Java代码中setContentView()方法在Activity中显示该视图的。
在实际开发中,当遇到有很多UI组件时(实际上这种情况很常见),各个组件会通过android:id属性给每个组件设置一个唯一的标识。当需要再代码中访问指定的组件时(例如设置单击事件),就可以通过id值,利用方法findViewById(R.id.id值)来访问。
在设置UI控件时有两个属性值特别常用android:layout_height、android:layout_width.这两个属性支持以下两种属性值:
(1)match_parent:指定子组件的高度和宽度与父组件的高度和宽度相同(实际还有填充的空白距离)。
(2)wrap_content:指定组件的大小恰好能包裹它的内容。
Android机制决定了UI组件的大小不仅受它实际宽度和高度的控制,还受它所在布局高度和宽度控制,所以在设置组件的宽度和高度时还要考虑布局的宽度和高度,
其实在XML文件中编写界面还有很多属性,比如gravity,LinearLayout中的orientation,RelativeLayout中的centerInParent属性等,这些属性在之后的内容中都会讲到。
1.2.2在Java代码中实例化布局元素
在Java代码中实例化布局元素,一般是指在Activity中通过编程创建View对象和ViewGroup对象,并操纵其属性。不管使用哪种方式,其本质和显示出来的效果是一样的。UI组件都可以使用的。而ViewGroup类虽然继承了View类,但由于它是抽象类,因此实际使用中通常只是用ViewGroup的子类作为容器。
1.3布局类型
一个优秀的布局设计对UI界面起到重要的作用。在Android中常用布局主要有7种,经常使用的有5种布局,分别是:
(1)线性布局(LinearLayout),以水平或垂直方向排列。
(2)相对布局((RelativeLayout),通过相对定位排列。
(3)表格布局(TableLayout),以表格形式排列。
(4)帧布局(FrameLayout),开辟空白区域,帧里的控件(层)叠加。
(5)约束布局(ConstraintLayout),以可视化的方式编写布局。
Andorid系统提供的5种常用布局直接或者间接继承自ViewGroup,因此它们也支持在ViewGroup中定义的属性,这些属性可以看作布局的通用属性,如表2.1所示。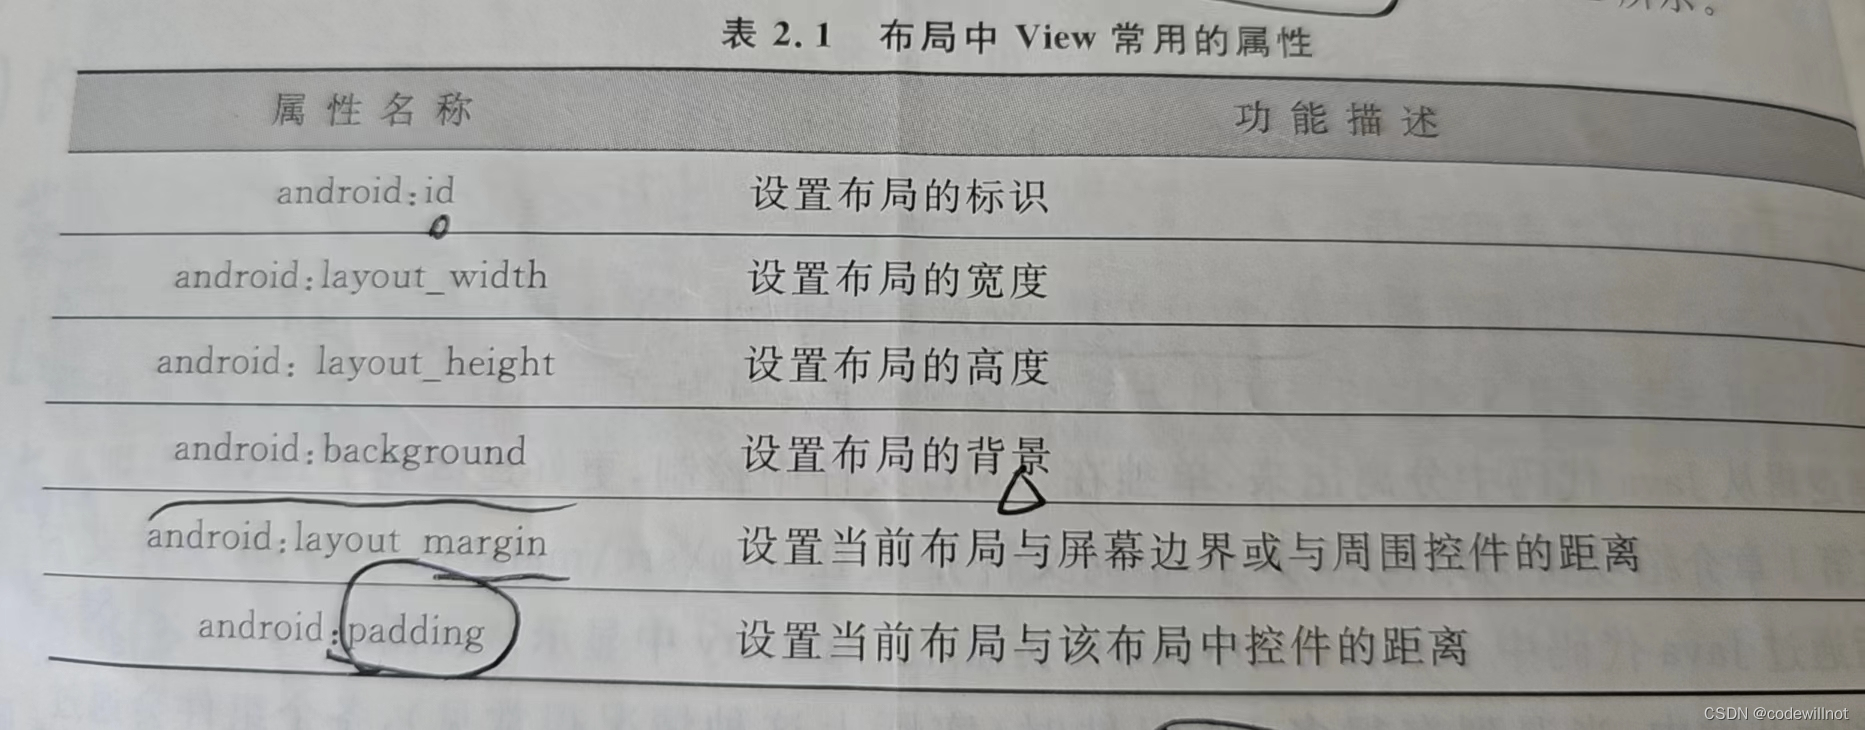 在Android程序中创建布局文件后就可以添加布局视图了。创建布局文件的步骤如下:
1.打开项目
找到layout文件夹,右键点击New->XML->Layout XML File,就会创建一个新的布局文件,如下图所示。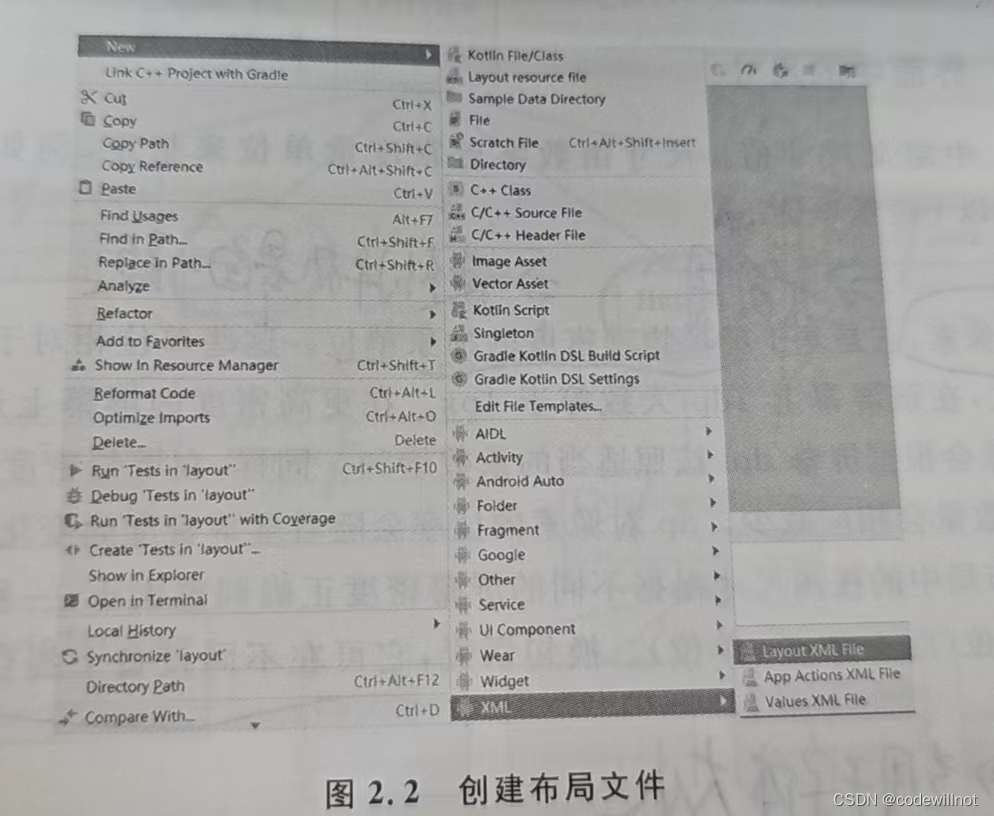 2.添加组件
在新创建的布局文件中添加布局容器组件和UI控件。为了方便可以直接在设计视图上对控件进行拖拉操作,将其放置在界面中,然后再次通过代码进行调整,这种可视化的方式减少了用户编写的代码量。
例如在布局文件中使用ConstraintLayout布局,然后添加一个文本框控件,代码如下:
<?xml version="1.0" encoding="utf-8"?><androidx.constraintlayout.widget.ConstraintLayout xmlns:android="http://schemas.android.com/apk/res/android"
    xmlns:app="http://schemas.android.com/apk/res-auto"
    xmlns:tools="http://schemas.android.com/tools"
    android:layout_width="match_parent"
    android:layout_height="match_parent"
    android:orientation="vertical"
    tools:context=".MainActivity"><TextView
    android:layout_width="wrap_content"
    android:layout_height="wrap_content"
    android:text="Hello World"
    app:layout_constraintBottom_toBottomOf="parent"
    app:layout_constraintLeft_toLeftOf="parent"
    app:layout_constraintRight_toRightOf="parent"
    app:layout_constraintTop_toTopOf="parent"/></androidx.constraintlayout.widget.ConstraintLayout>
3.使用布局文件
如果要显示布局文件,需要在Activity中加入如下代码:
setContentView(R.layout.activity_main);
1.4界面中的尺寸
在XML中定义尺寸值。尺寸由数字后跟度量单位来指定,例如10px、2in、5sp。Android支持以下度量单位:
1.dp
密度无关像素,它是基于屏幕物理密度的抽象单位。这些单位相对于160dpi(每英寸点数)屏幕确立,在该屏幕上1dp大致等于1px。在更高密度的屏幕上运行时,用于绘制1dp的像素数量会根据屏幕dpi按照适当的系数增加。同样在更低密度的屏幕上,用于绘制1dp的像素数量会相应减少。dp对像素的比率会随着屏幕密度的变化而变化,但不一定成正比。要使布局中的视图尺寸根据不同的屏幕密度正确调整大小,一种简单的解决办法就是使用dp单位(而不是px单位)。换句话说,它可在不同设备上提供一致的界面元素大小。
2.sp
缩放无关元素,它和dp单位类似,但它也会根据用户的字体大小偏好设置进行缩放。建议在指定字体大小时使用此单位,以便字体大小会根据屏幕密度和用户偏好设置进行调整。
3.pt
点,1/72英寸,基于屏幕的物理尺寸,假设屏幕密度为72dpi。
4.px
像素,它对应于屏幕上的实际像素数。建议不要使用这种度量单位,因为不同设备的实际呈现效果可能不同;每台设备的每英寸像素数可能不同,屏幕上的总像素数也可能有差异。
5.mm
毫米,基于屏幕的物理尺寸。
6.in
英寸,基于屏幕的物理尺寸。
2常见的UI控件
2.1TextView及其子类
TextView直接继承了View,并且它还是EditText和Button两个组件的父类。TextView类图如图2.3所示。TextView的作用就是在界面上显示文本,只是Android关闭了它的文字编辑功能,EditText才有编辑功能。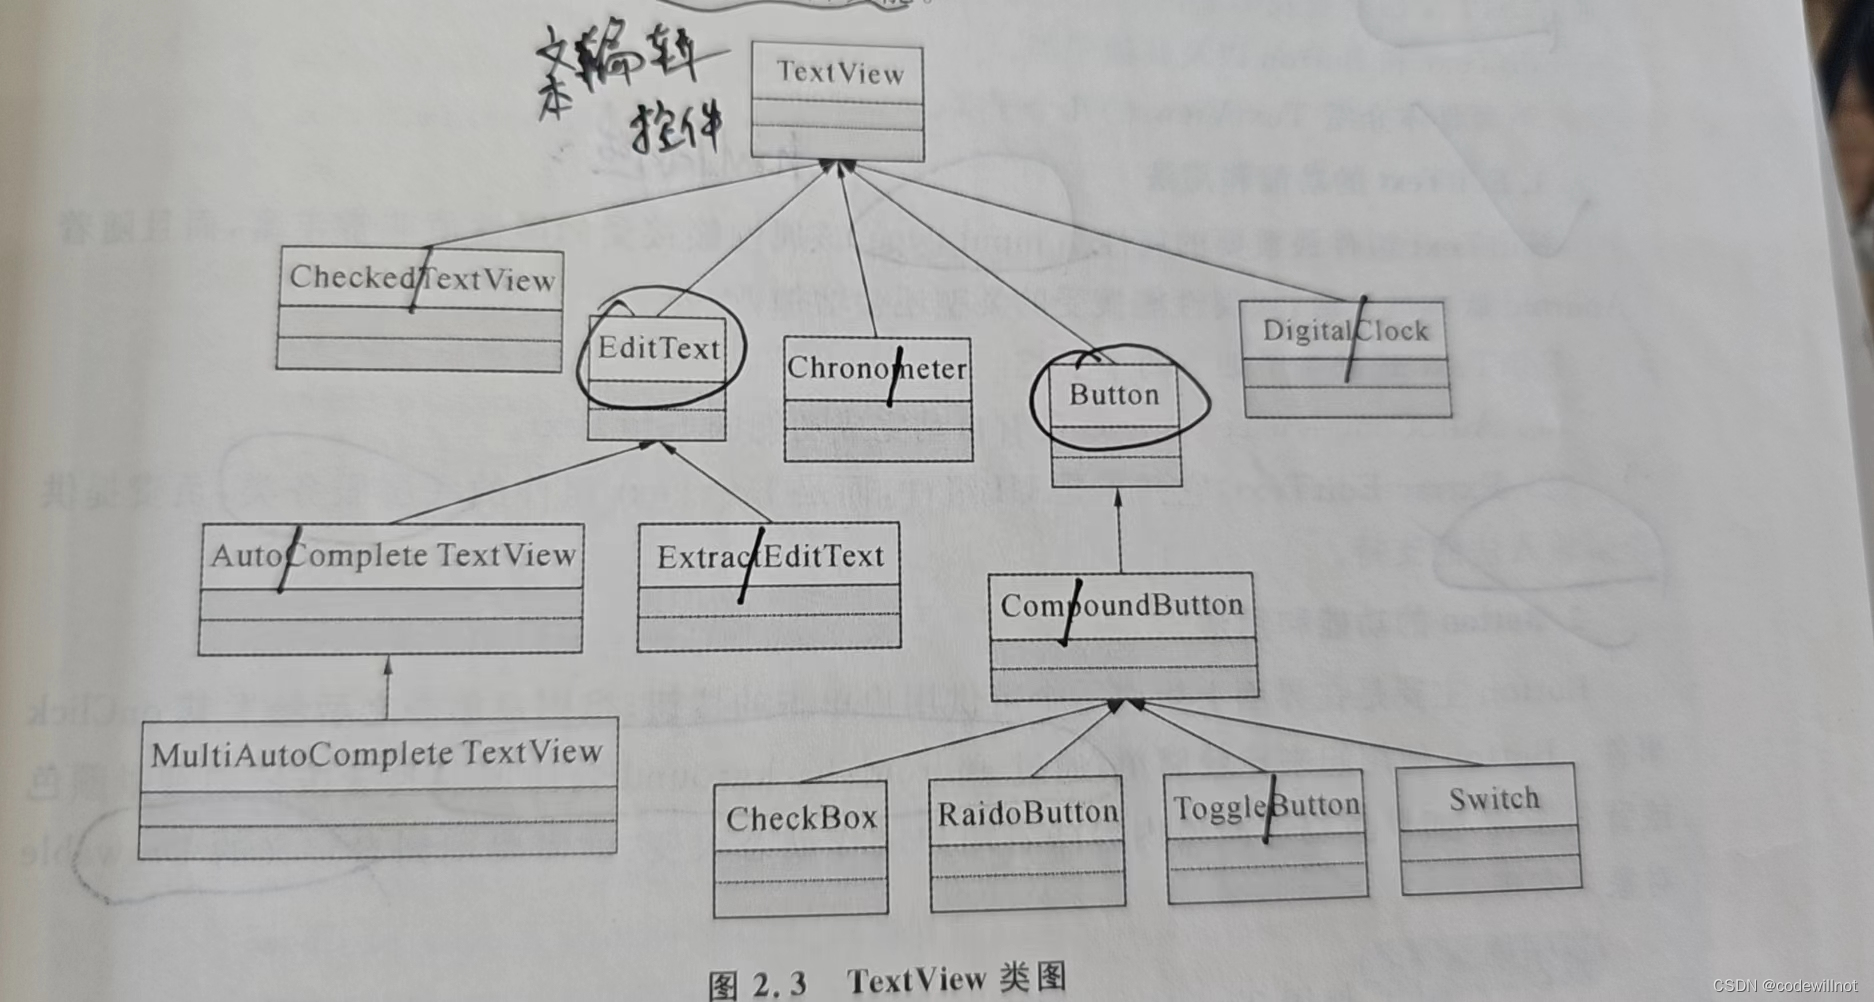 在图2.3中可以看到,TextView派生了5个类,除了常用的EditText和Button类之外,还有CheckedTextView,CheckedTextView增加了checked状态,开发者可以通过setChecked(boolean)和isChecked()方法来改变和访问checked状态。
TextView和EditText有很多相似的地方,它们之间最大的区别就是TextView不允许用户编辑文本内容,而EditText则可以。
Text提供了大量XML属性,这些属性不仅适用于TextView本身,也同样适用于它的子类(EditText、Button等)。TextView常用的属性,如下表所示。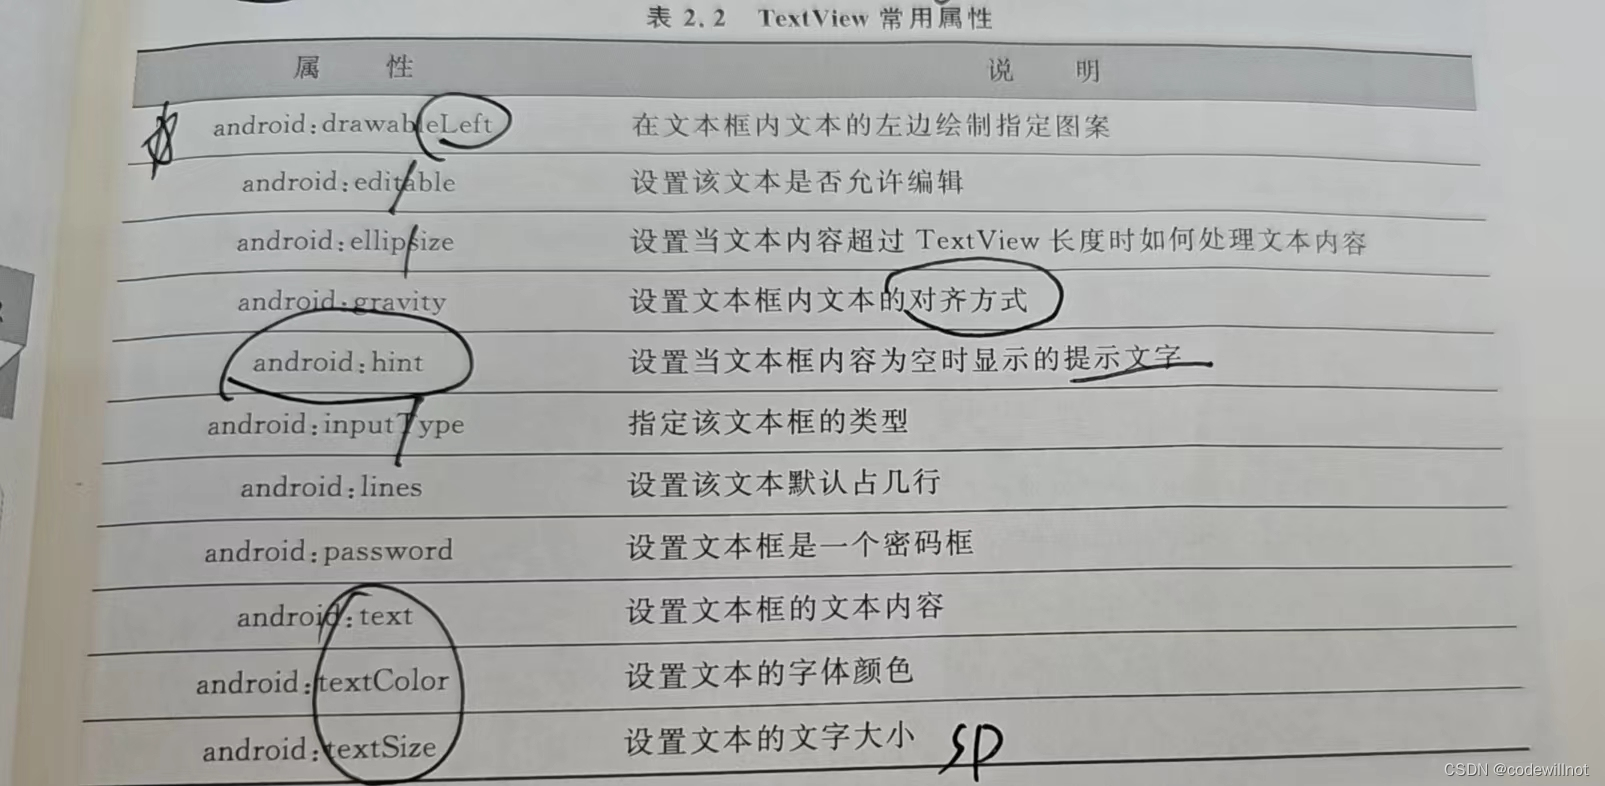 当然TextView的属性并不止这些,还有很多属性并没有写出来,在实际开发中,可以通过API文档来查找需要的属性。这里介绍的部分TextView的属性使用方式,同样适用于EditText和Button以及其他子类。
下面具体介绍TextView的几个子类
1.EditText的功能和用法
EditText组件最重要的属性是inputType。该属性能接受的属性值非常丰富,而且随着Android版本的升级,该属性能接受的类型还会增加。
EditText还派生了如下两个子类:
(1)AutoCompleteTextView:带有自动完成功能的EditText。
(2)ExtractDEditText:它不是UI组件,而是EditText组件的底层服务类,负责提供全屏输入法的支持。
2.Button的功能和用法
Button主要是在界面上生成一个可供用户单击的按钮,当用户单击之后触发其onClick事件。Button使用起来比较简单,通过android:background属性可以改变按钮的背景颜色或背景图片,如果想要这两项内容随着用户动作动态改变,就需要用到自定义的Drawable对象来实现。
示例1 使用TextView,EditText和Button控件制作简易的登录界面。
<?xml version="1.0" encoding="utf-8"?><LinearLayout xmlns:android="http://schemas.android.com/apk/res/android"
    xmlns:app="http://schemas.android.com/apk/res-auto"
    xmlns:tools="http://schemas.android.com/tools"
    android:orientation="vertical"
    android:layout_width="match_parent"
    android:layout_height="match_parent"
    tools:context=".LoginActivity"><TextView
        android:layout_width="match_parent"
        android:layout_height="wrap_content"
        android:id="@+id/txtLogin"
        android:text="用户登录"
        android:textSize="22sp"
        android:paddingLeft="20dp"
        android:gravity="center"/><EditText
        android:id="@+id/edLoginname"
        android:layout_width="match_parent"
        android:layout_height="wrap_content"
        android:layout_marginTop="20dp"
        android:textSize="20sp"
        android:singleLine="true"
        android:hint="输入用户名"/><EditText
        android:id="@+id/edLoginpassword"
        android:inputType="textPassword"
        android:layout_width="match_parent"
        android:layout_height="wrap_content"
        android:layout_marginTop="10dp"
        android:textSize="20sp"
        android:singleLine="true"
        android:hint="输入密码"/><Button
        android:id="@+id/btnlogin"
        android:layout_width="match_parent"
        android:layout_height="wrap_content"
        android:layout_marginTop="20dp"
        android:textSize="20sp"
        android:text="登录"
        android:gravity="center"/><Button
        android:id="@+id/btnReg"
        android:layout_width="match_parent"
        android:layout_height="wrap_content"
        android:layout_marginTop="10dp"
        android:textSize="20sp"
        android:gravity="center"
        android:text="注册"/></LinearLayout>
在示例中使用了线性布局LinearLayout,设置其为垂直方向vertical,里面放了一个TextView,两个EditText和两个Button。运行APP,界面显示效果如下图所示。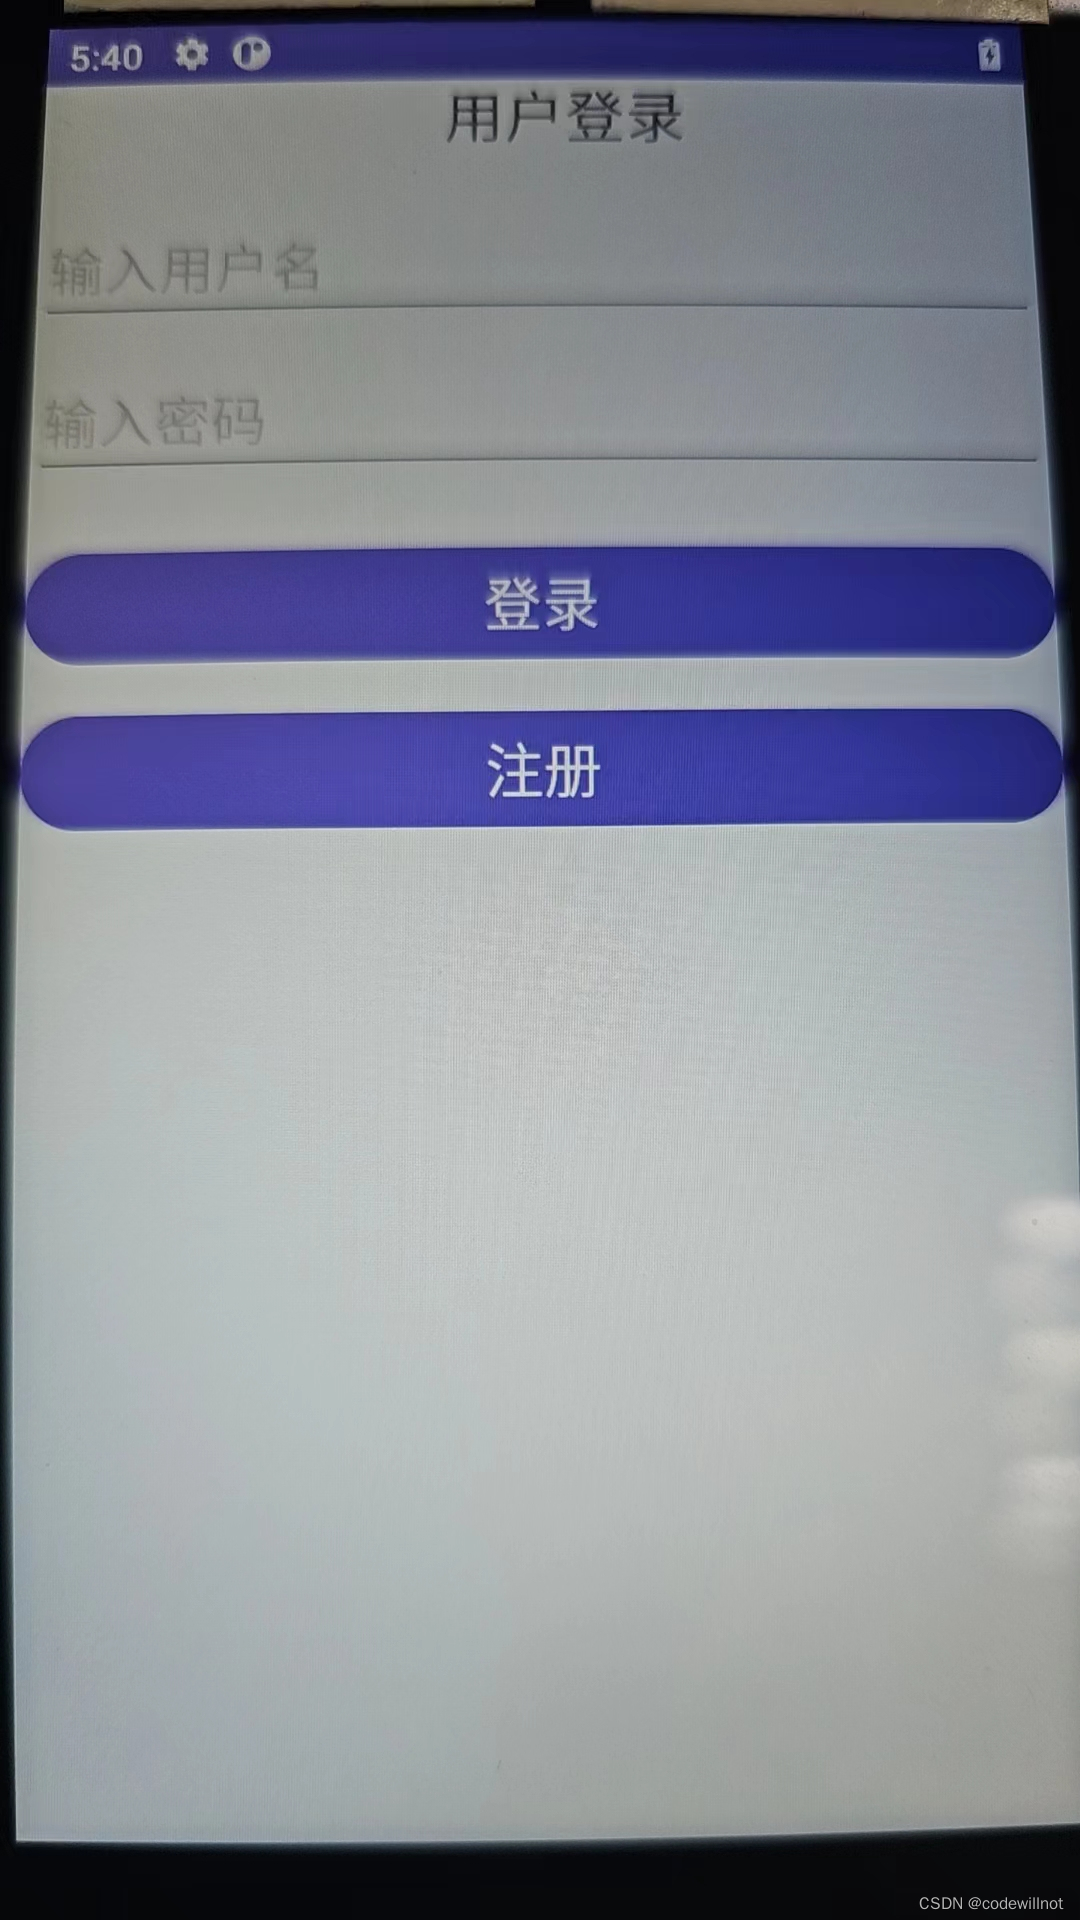
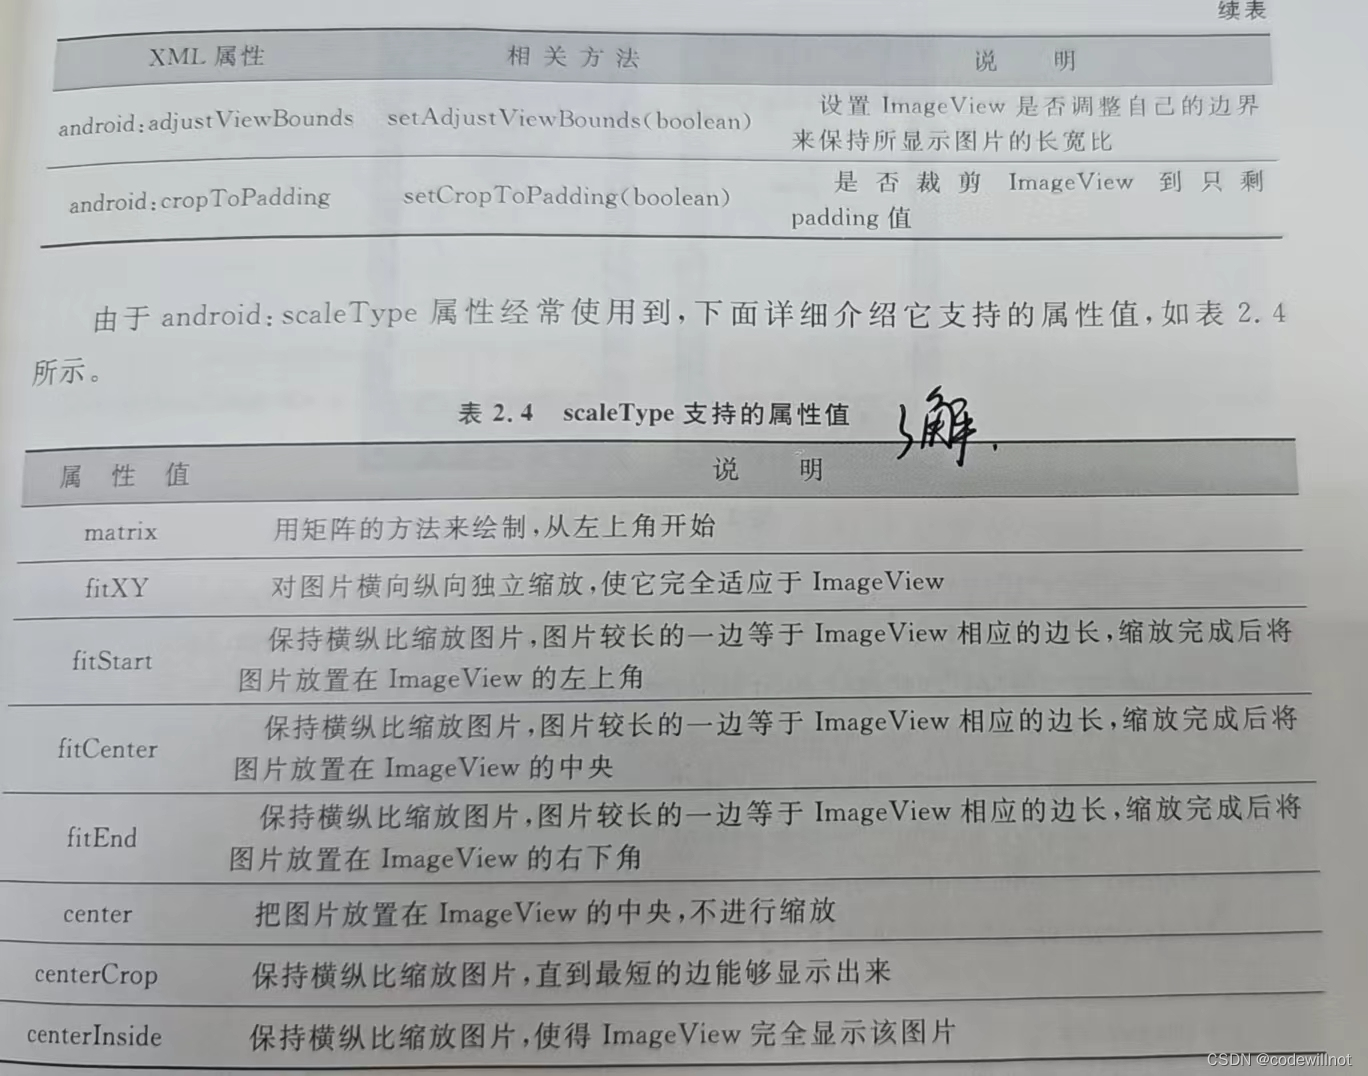
2.2ImageView及其子类
IamgeView用于显示Drawable中的对象,该对象称为可绘制的对象。要使用图片资源,请将相应文件添加到项目的res/drawable目录下,这样就可以通过资源图片创建可绘制的对象。支持的文件类型包括PNG(首选)、JPG(可接受)和GIF(不推荐)。这种方法非常适合添加应用图标、徽标和其他图形(例如游戏中使用的图形)。
在项目中,可以通过引用项目资源中的图片文件向应用添加图形。项目中可以使用代码方式或在XML布局文件中引用图片资源。无论是哪种方式,都是通过资源ID(不包括文件类型扩展名的文件名)引用的。
ImageView派生了ImageButton、QuickContactBadge等组件,如下图所示。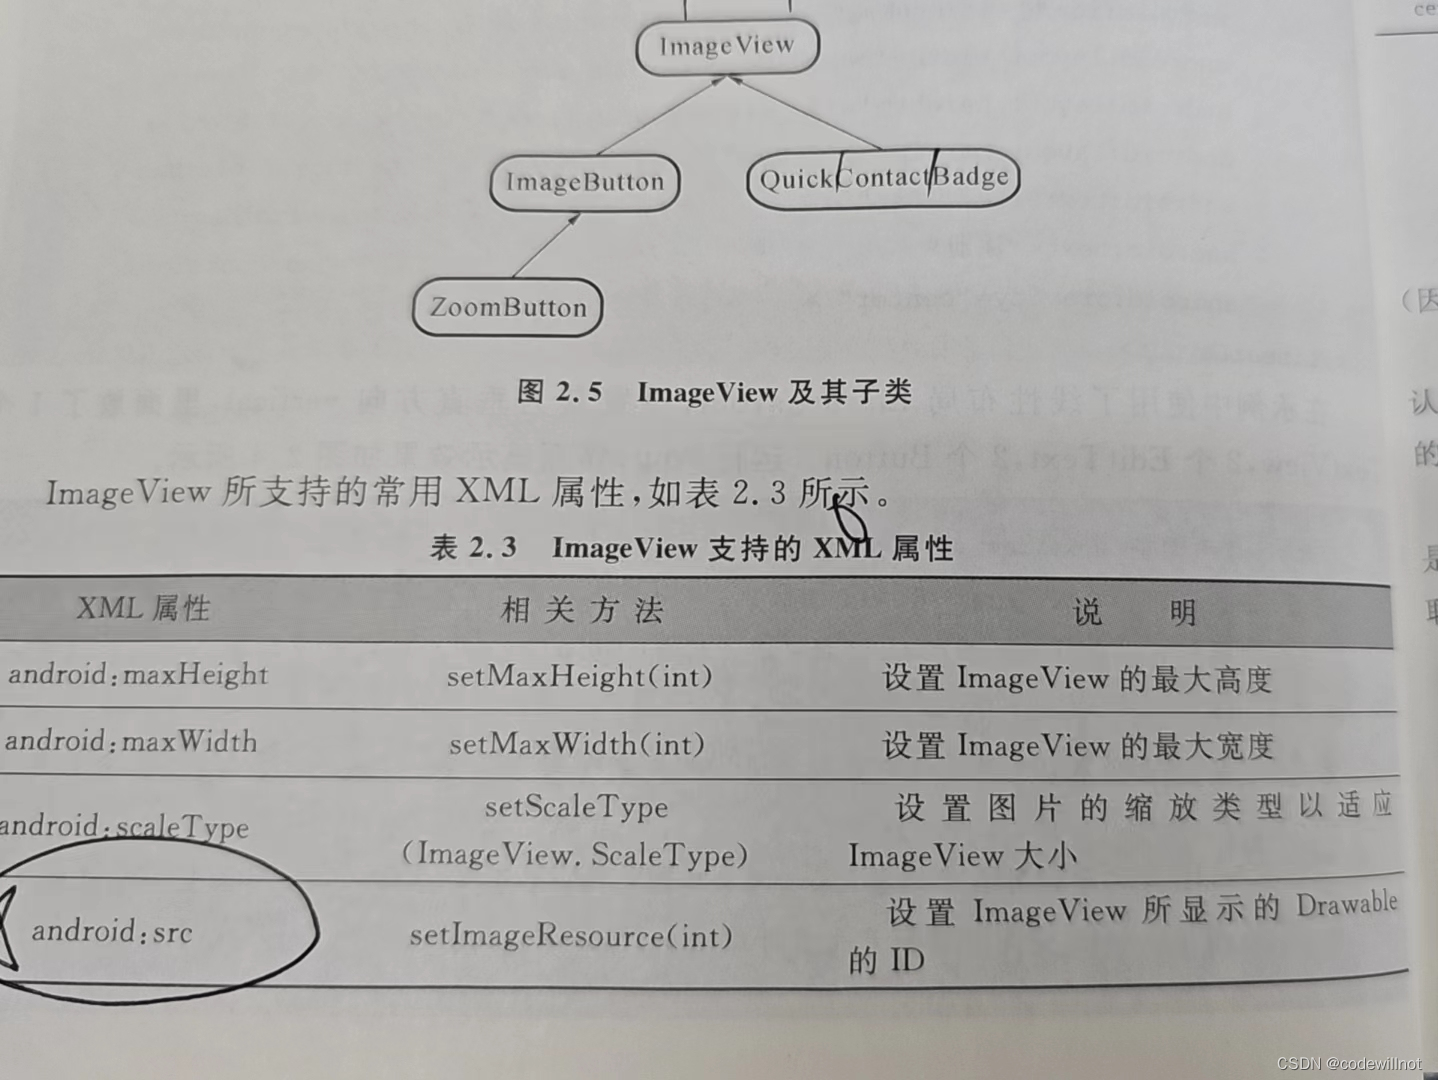
 ImageView派生了两个子类:
(1)ImageButton:图片按钮。
(2)QuickContactBadge:显示关联到特定联系人的图片。
Button与ImageBadge的区别在于,Button按钮显示文字,而ImageButton显示图片(因为ImageButton)本质上还是ImageView)。
ImageButton派生了一个ZoomButton类,它代表“放大”缩小”两个按钮,Android默认为ZoomButton提供了"btn_plus""btn_minus"两个属性值,只要设置它们到ZoomButton的android:src属性中,就可实现放大,缩小功能。
QuickContactBadge本质上也是图片按钮,也可以通过android:src属性设置图片。但是它可以关联到手机中指定的联系人,当用户单击该图片时,系统会自动打开相应联系人的联系方式界面。
示例2创建图片浏览器
创建一个图片浏览界面,界面分为图片显示区和图片浏览器翻页按钮。App运行效果如下图所示。
(1)在Drawable中添加4张Android机器人的图片。(网上找的图片)


(2)编写activity_photo.xml文件的代码:
<?xml version="1.0" encoding="utf-8"?><LinearLayout xmlns:android="http://schemas.android.com/apk/res/android"
    xmlns:app="http://schemas.android.com/apk/res-auto"
    xmlns:tools="http://schemas.android.com/tools"
    android:layout_width="match_parent"
    android:layout_height="match_parent"
    android:orientation="vertical"
    tools:context=".MainActivity"><ImageView
        android:id="@+id/image1"
        android:src="@drawable/photo1"
        android:layout_width="200dp"
        android:layout_height="200dp"
        android:layout_gravity="center"/><LinearLayout
        android:layout_width="match_parent"
        android:layout_height="wrap_content"
        android:orientation="horizontal"><Button
            android:id="@+id/btn1"
            android:layout_width="0sp"
            android:layout_height="wrap_content"
            android:layout_weight="1"
            android:gravity="center"
            android:text="上一张"
            android:textSize="18sp"
            android:layout_marginLeft="10dp"/><Button
            android:id="@+id/btn2"
            android:layout_width="0sp"
            android:layout_height="wrap_content"
            android:layout_weight="1"
            android:layout_marginLeft="10dp"
            android:textSize="18sp"
            android:text="下一张"
            android:gravity="center"/></LinearLayout></LinearLayout>
(3)编写PhotoActivity中的代码如下:
packagecom.example.chapter2;importstaticandroidx.constraintlayout.helper.widget.MotionEffect.TAG;importandroidx.appcompat.app.AppCompatActivity;importandroid.os.Bundle;importandroid.util.Log;importandroid.view.View;importandroid.widget.Button;importandroid.widget.ImageView;publicclassMainActivityextendsAppCompatActivity{int index=0;//显示图片对应索引//声明图片资源int[]imgs={R.drawable.photo1,R.drawable.photo2,R.drawable.photo3,R.drawable.photo4};@OverrideprotectedvoidonCreate(Bundle savedInstanceState){super.onCreate(savedInstanceState);setContentView(R.layout.activity_main);//声明并绑定控件Button btn1 =findViewById(R.id.btn1);Button btn2 =findViewById(R.id.btn2);ImageView image1=findViewById(R.id.image1);
        image1.setImageResource(imgs[index]);//上一张按钮触发监听器
    btn1.setOnClickListener(newView.OnClickListener(){@OverridepublicvoidonClick(View view){if(index>0){
                index=index-1;}else{
                index=imgs.length-1;}
            image1.setImageResource(imgs[index]);Log.d(TAG,"onClick:"+index);}});//下一张按钮触发监听器
        btn2.setOnClickListener(newView.OnClickListener(){@OverridepublicvoidonClick(View view){if(index<imgs.length-1){
                    index=index+1;}else{
                    index=0;}
                image1.setImageResource(imgs[index]);Log.d(TAG,"onClick:"+index);}});}}
效果如下图所示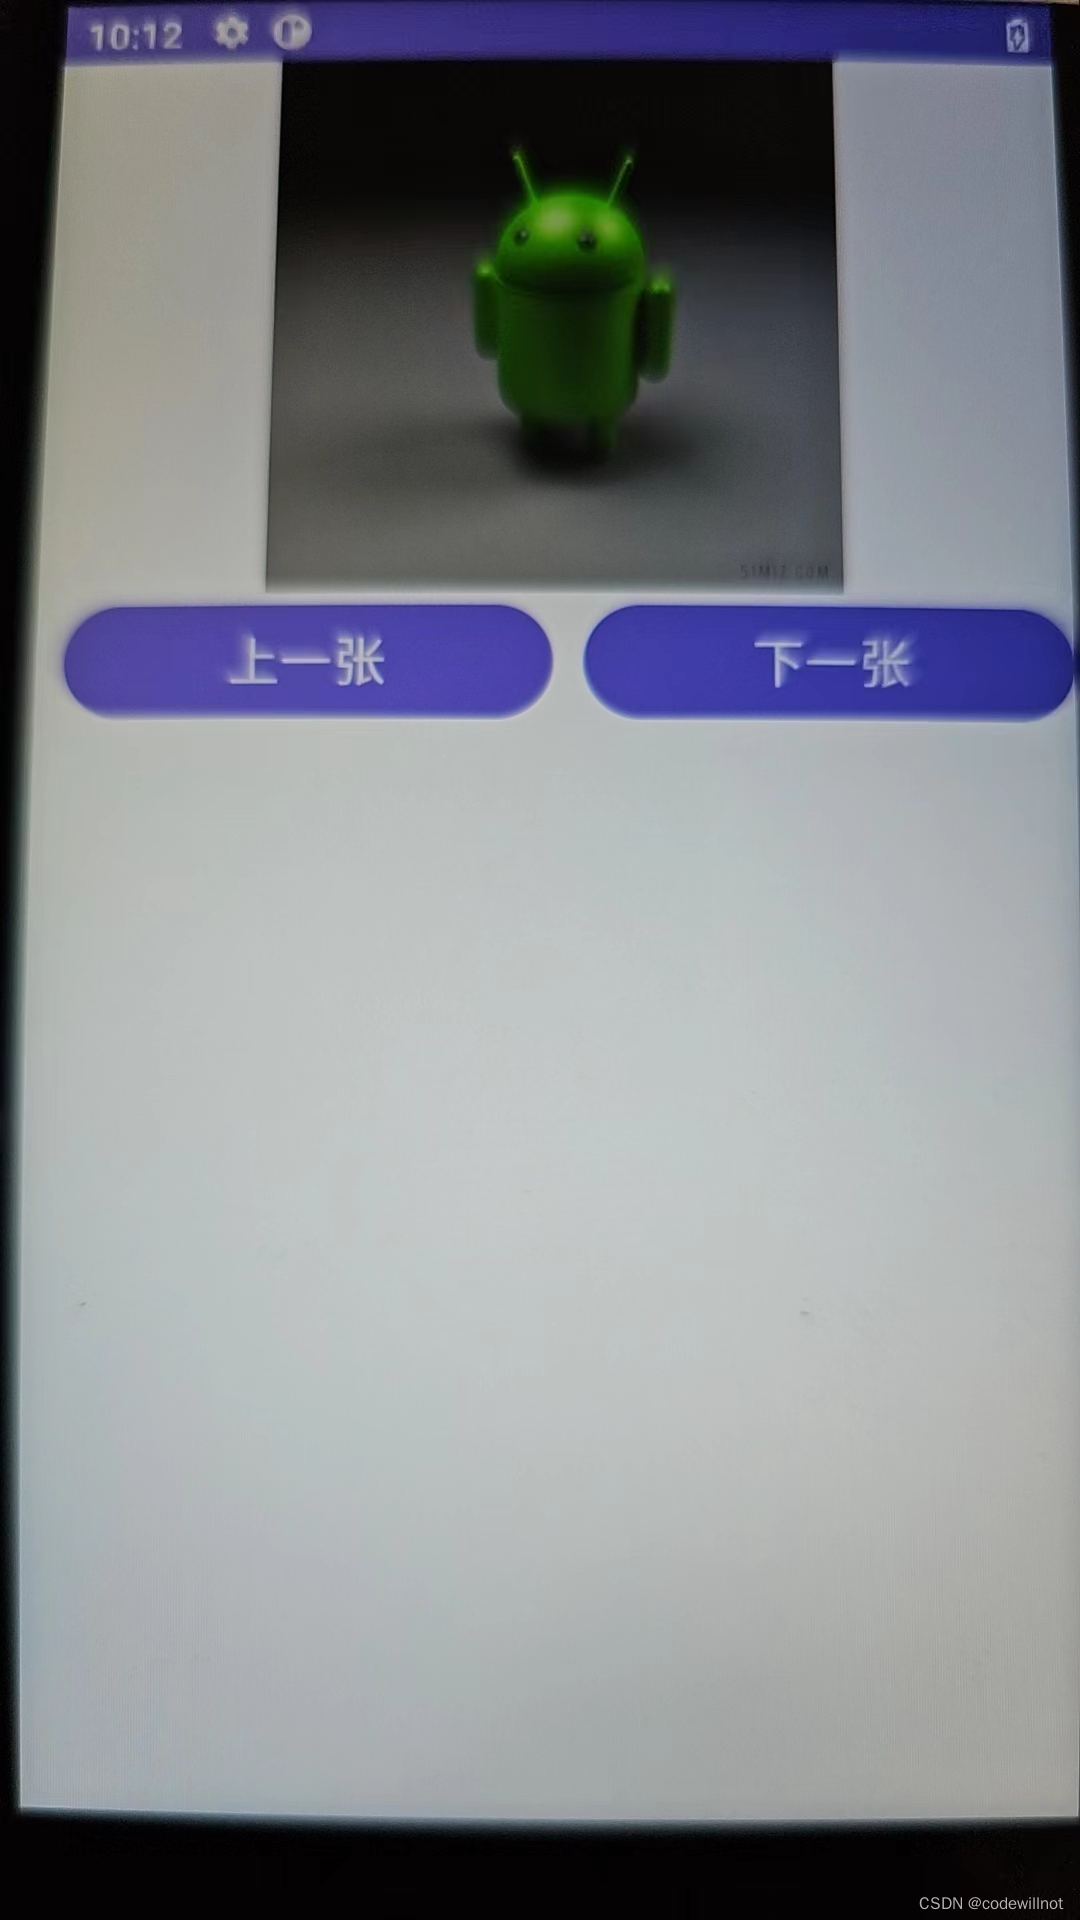
2.2.3 RadioButton和CheckBox
单选按钮(RadioButton)和复选框(CheckBox)是用户界面中非常普通的UI组件,它们都继承自Button类,因此可以直接使用Button支持的各种属性和方法。
RadioButton和CheckBox都多了一个可选中的功能,因此可以额外指定一个android:checked属性,用于指定RadioButton和CheckBox初始时是否被选中。
RadioButton和CheckBox的不同之处在于,一组RadioButton只能选中其中一个,因此RadioButton通常要和RadioGroup一起使用,用于定义一组单选按钮。
示例2.3制作简易的问卷界面。
使用单选按钮和复选框实现简易的调查问卷,运行效果如下图所示。
<?xml version="1.0" encoding="utf-8"?><LinearLayout xmlns:android="http://schemas.android.com/apk/res/android"
    xmlns:app="http://schemas.android.com/apk/res-auto"
    xmlns:tools="http://schemas.android.com/tools"
    android:layout_width="match_parent"
    android:layout_height="match_parent"
    android:orientation="vertical"
    tools:context=".MainActivity"><TextView
        android:layout_width="match_parent"
        android:layout_height="wrap_content"
        android:text="调查问卷"
        android:textSize="18sp"
        android:gravity="center"/><View
        android:layout_width="match_parent"
        android:layout_height="1dp"
        android:background="@color/design_default_color_primary_dark"/><LinearLayout
        android:layout_width="match_parent"
        android:layout_height="wrap_content"
        android:layout_marginTop="20dp"
        android:orientation="vertical"><TextView
            android:layout_width="match_parent"
            android:layout_height="wrap_content"
            android:text="1.选择你就读的年级?"
            android:textSize="18sp"
            android:gravity="left"/><View
            android:layout_width="match_parent"
            android:layout_height="1dp"
            android:layout_marginBottom="10dp"
            android:background="#ccc"/><RadioGroup
            android:layout_width="match_parent"
            android:layout_height="wrap_content"><RadioButton
            android:layout_width="match_parent"
            android:layout_height="wrap_content"
            android:textSize="15sp"
            android:text="大一"/><RadioButton
            android:layout_width="match_parent"
            android:layout_height="wrap_content"
            android:textSize="15sp"
            android:text="大二"/><RadioButton
            android:layout_width="match_parent"
            android:layout_height="wrap_content"
            android:textSize="15sp"
            android:text="大三"/><RadioButton
            android:layout_width="match_parent"
            android:layout_height="wrap_content"
            android:textSize="15sp"
            android:text="大四 "/></RadioGroup></LinearLayout><LinearLayout
        android:layout_width="match_parent"
        android:layout_height="wrap_content"
        android:layout_marginTop="20dp"
        android:orientation="vertical"><TextView
            android:layout_width="match_parent"
            android:layout_height="wrap_content"
            android:text="2.你的兴趣爱好?"
            android:textSize="18sp"
            android:gravity="left"/><View
            android:layout_width="match_parent"
            android:layout_height="1dp"
            android:layout_marginBottom="10dp"
            android:background="#ccc"/><CheckBox
           android:layout_width="match_parent"
           android:layout_height="wrap_content"
           android:textSize="15sp"
           android:text="篮球"/><CheckBox
            android:layout_width="match_parent"
            android:layout_height="wrap_content"
            android:textSize="15sp"
            android:text="足球"/><CheckBox
            android:layout_width="match_parent"
            android:layout_height="wrap_content"
            android:textSize="15sp"
            android:text="羽毛球"/><CheckBox
            android:layout_width="match_parent"
            android:layout_height="wrap_content"
            android:textSize="15sp"
            android:text="乒乓球"/></LinearLayout><Button
        android:id="@+id/btnSubmit"
        android:layout_width="match_parent"
        android:layout_height="wrap_content"
        android:text="提交"
        android:textSize="20sp"/></LinearLayout>
2.2.4 ProgressBar及其子类
ProgressBar也是一组重要的组件,ProgressBar本身代表了进度条组件,它还派生了两个常用的组件:seekBar和RatingBar。ProgressBar及其子类十分相似,只是在显示上有一定的区别。ProgressBar的常用属性如表2.5所示。
进度条通常用于向用户显示某个耗时操作完成的百分比。进度条可以动态地显示进度,因此避免长时间地执行某个耗时操作时,让用户感觉程序失去了响应,从而带给用户更好的体验。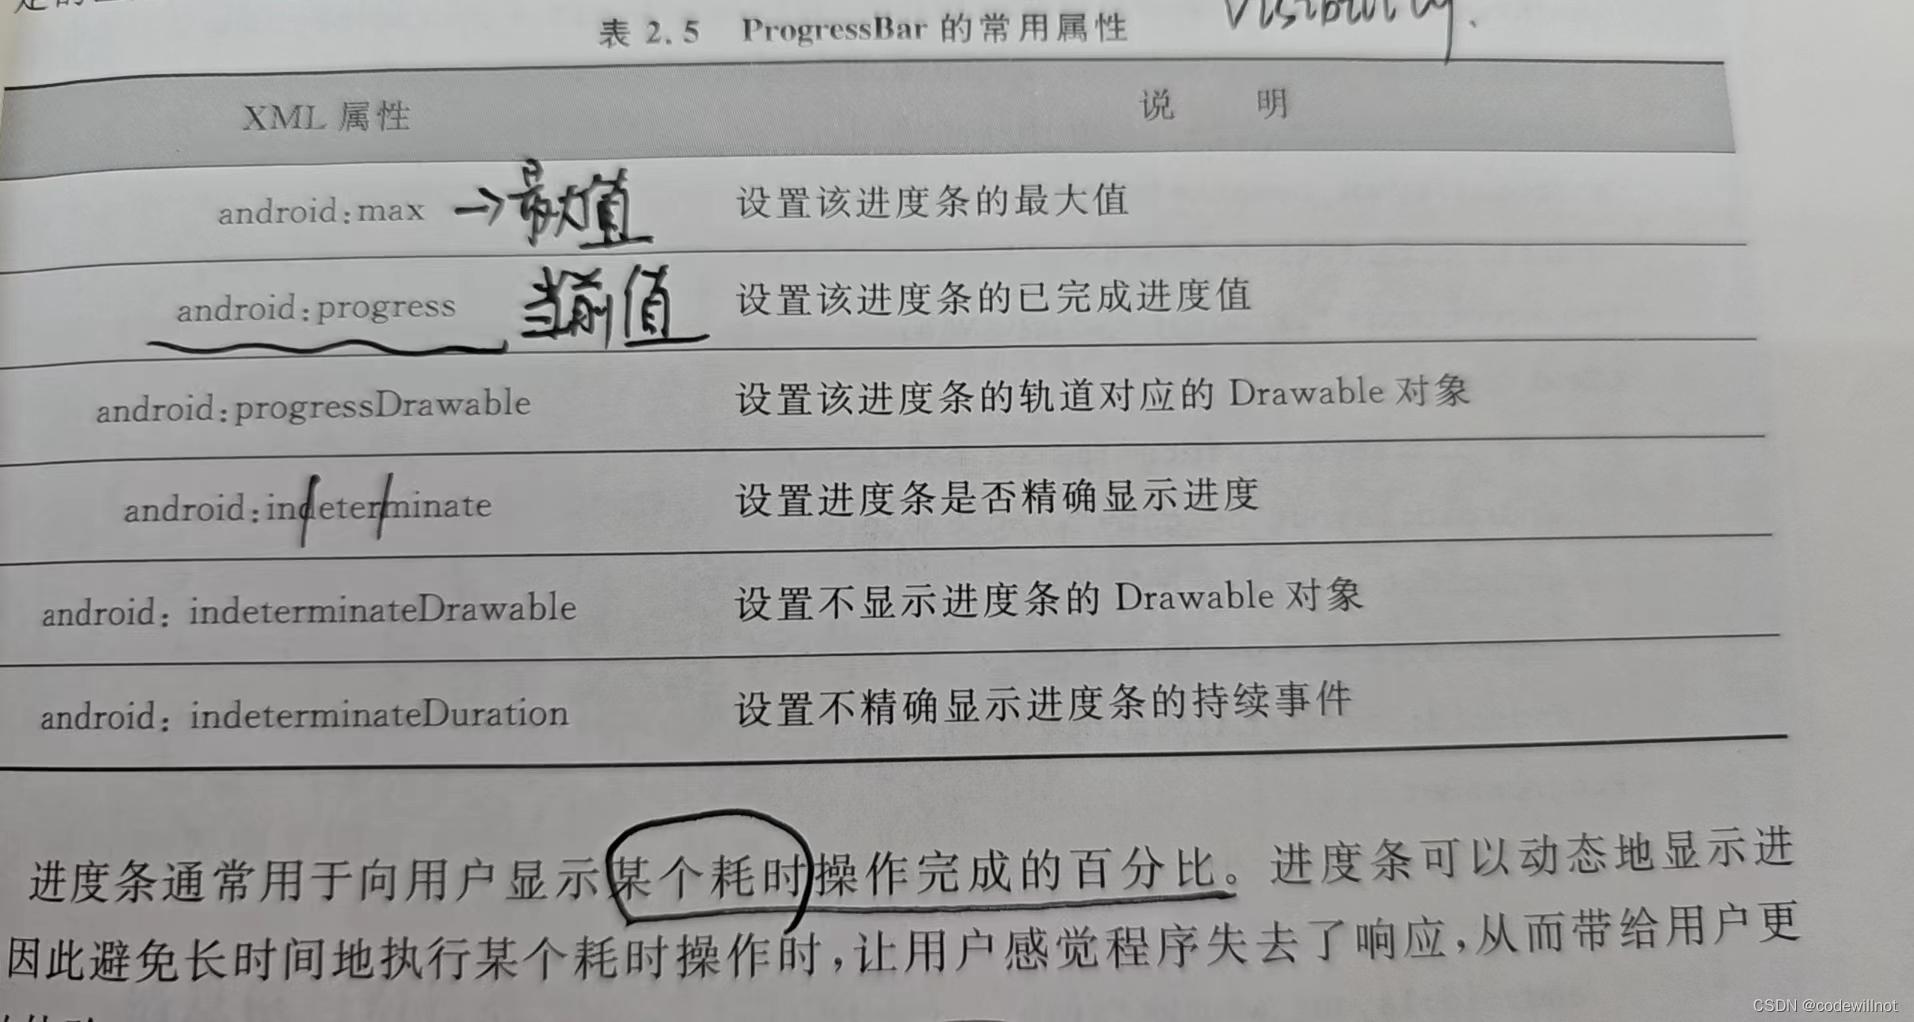
Android支持多种风格的进度条,通过style属性可以为ProgressBar指定风格。该属性的取值表如表2.6所示。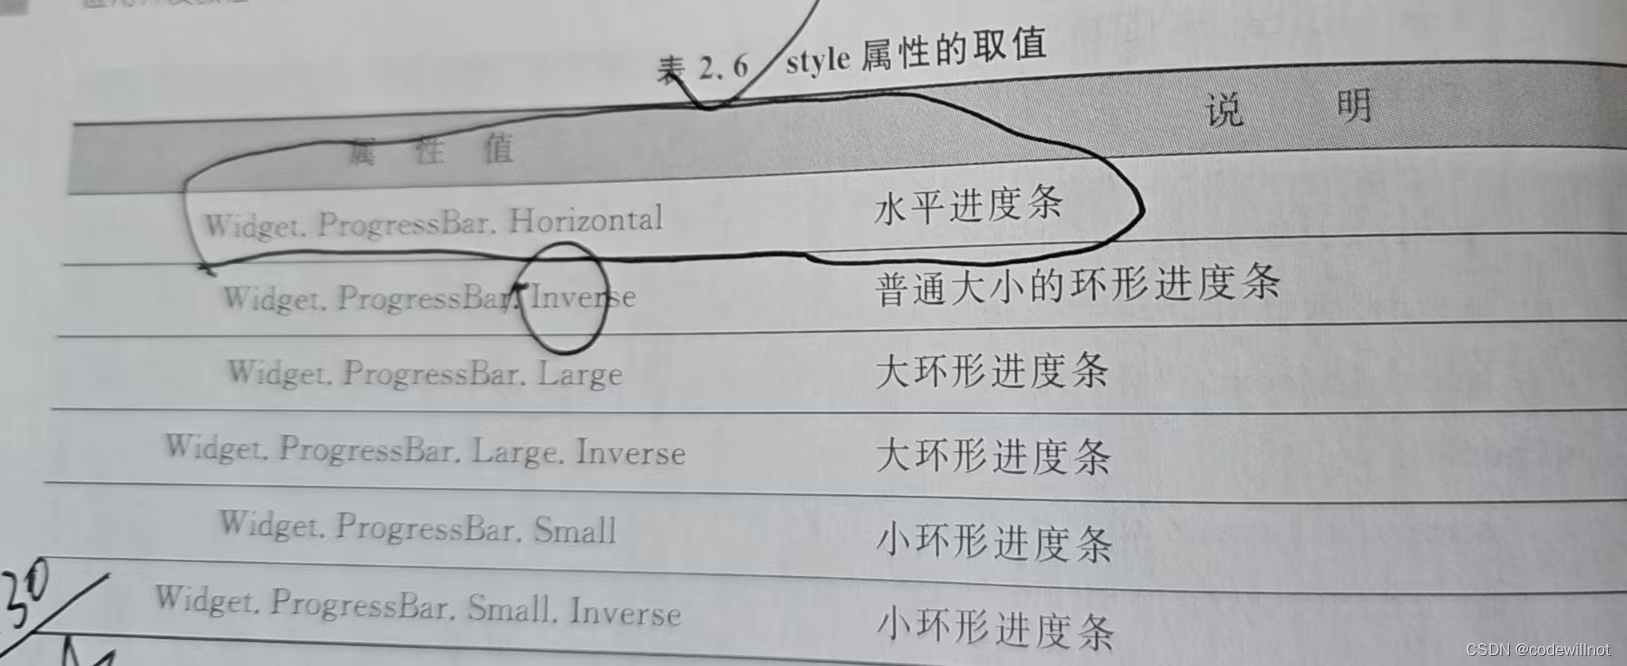 拖动条(SeekBar)与进度条非常相似,只是进度条采用颜色填充来表示进度完成的程度,而拖动条则通过滑块的位置来标识数字。拖动条允许用户拖动滑块来改变值,因此拖动条常用于对系统的某种数值进行调节,比如音量调节等。
由于拖动条继承了进度条,因此进度条所支持的XML属性和方法同样适用于拖动条。进度条允许用户改变拖动条的滑块外观,滑块外观通过android:thumb属性来指定,这个属性指定一个Drawable对象,该对象将作为自定义滑块。为了让程序能够响应拖动条滑块位置的改变,程序可以为它绑定一个OnSeekBarChangeListener监听器。
示例2.4 ProgressBar 及其子类的使用。
布局文件的代码如下:
<?xml version="1.0" encoding="utf-8"?><LinearLayout xmlns:android="http://schemas.android.com/apk/res/android"
    xmlns:app="http://schemas.android.com/apk/res-auto"
    xmlns:tools="http://schemas.android.com/tools"
    android:layout_width="match_parent"
    android:layout_height="match_parent"
    android:orientation="vertical"
    tools:context=".ProgressBarActivity"><TextView
        android:layout_width="match_parent"
        android:layout_height="wrap_content"
        android:text="环形进度条"
        android:textSize="20sp"
        android:layout_marginTop="20dp"/><ProgressBar
        android:id="@+id/loading_spinner"
        android:layout_width="wrap_content"
        android:layout_height="wrap_content"
        style="?android:progressBarStyle"/><TextView
        android:layout_width="match_parent"
        android:layout_height="wrap_content"
        android:text="水平进度条"
        android:textSize="20sp"
        android:layout_marginTop="20dp"/><ProgressBar
        android:id="@+id/progress_bar"
        android:layout_width="match_parent"
        android:layout_height="wrap_content"
        android:indeterminate="false"
        android:max="100"
        android:progress="40"
        style="?android:progressBarStyleHorizontal"/><TextView
        android:layout_width="match_parent"
        android:layout_height="wrap_content"
        android:text="拖动条"
        android:textSize="20sp"
        android:layout_marginTop="20dp"/><SeekBar
        android:id="@+id/seek_bar"
        android:layout_width="match_parent"
        android:layout_height="wrap_content"/><TextView
        android:layout_width="match_parent"
        android:layout_height="wrap_content"
        android:text="评分等级"
        android:textSize="20sp"
        android:layout_marginTop="20dp"/><RatingBar
        android:layout_width="wrap_content"
        android:layout_height="wrap_content"
        android:id="@+id/rating_bar"
        style="?android:attr/ratingBarStyleSmall"
        android:numStars="5"
        android:rating="2.5"
        android:stepSize="0.5"/></LinearLayout>
显示的界面如下图所示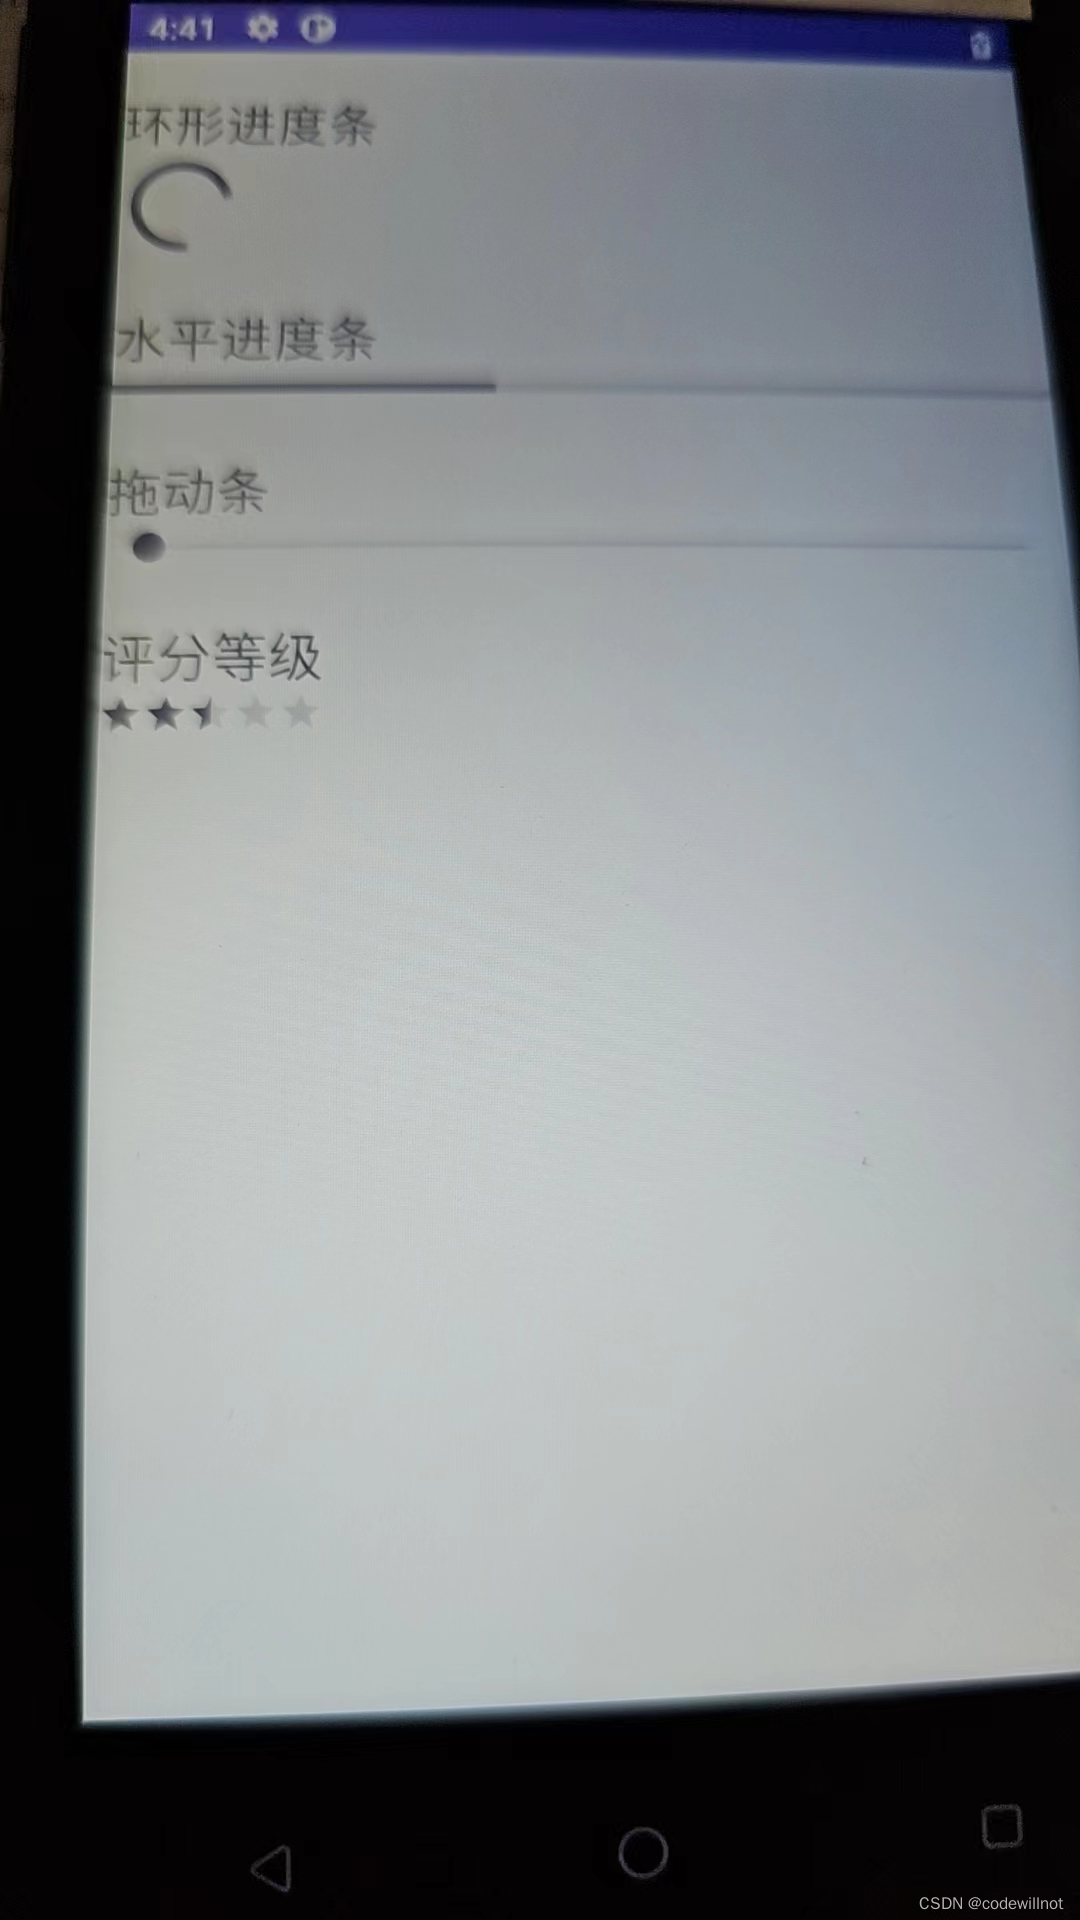
2.3消息框与对话框
2.3.1消息框
消息框可以在一个小型弹出式窗口中提供与操作有关的简单反馈。它仅会填充消息所需的空间大小,并且当前Activity会一直显示并供用户与之互动。超时后,消息框会自动消失。如当点击[登录]后弹出“正在登录…”的消息,效果如图2.9所示。
在Android中使用Toast组件实现该功能,Toast会显示一个消息在屏幕上告诉用户一些信息,并且在短暂的时间后会自动消失。使用Toast需要掌握两个方法,分别是组件的上下文环境、要显示的文字、显示时间的长短。语法如下:
Toast.makeText(context,text,duration).show();
图2.9实现的完整代码如下:
Toast.makeText(getApplicationContext(),“正在登录…”,Toast.LENGTH_LONG).show();
显示时间的长短通常使用Toast.LENGTH_SHORT和Toast.LENGTH_LONG表示,也可以使用0和1分别表示SHORT和LONG。
2.3.2对话框
在Android开发中,经常需要在Android界面上弹出一些对话框,比如询问用户或者让用户选择。实现这些功能的组件称为Android Dialog对话框。Android中提供了丰富的对话框支持,日常开发中会经常使用到如表2.7所示的4种对话框。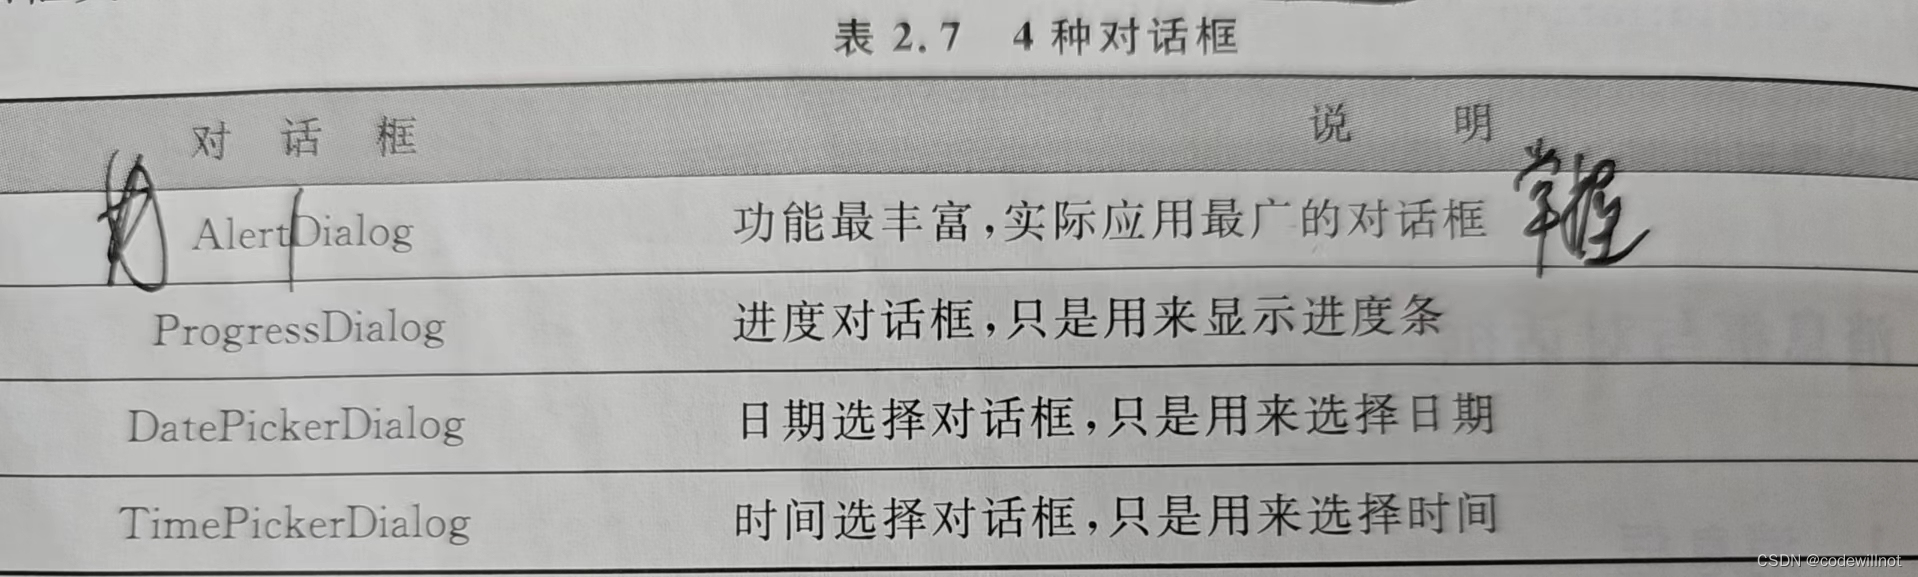 下面仅介绍使用AlertDialog建立对话框的内容。
AlertDialog是上述4种对话框中功能最强大、用法最灵活的一种,同时也是其他3中对话框的父类。
使用AlertDialog生成的对话框样式多变,但是基本样式总会包含4个区域,即图标区、标题区、内容区、按钮区,如下图所示。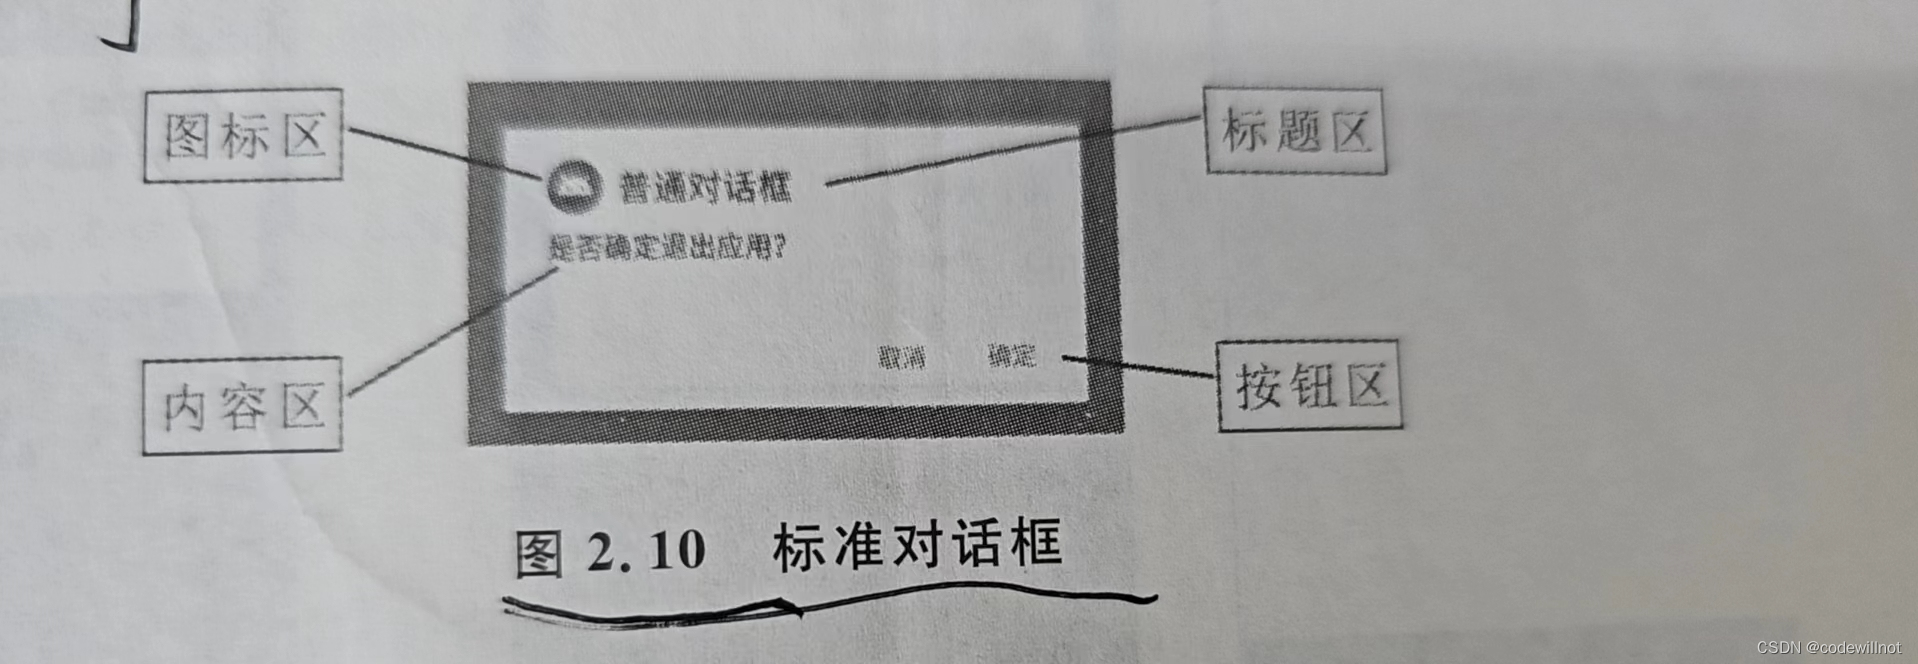 创建一个AlertDialog一般需要如下几个步骤:
- 调用AlertDialog的静态内部类Builder创建AlertDialog.Builder的对象。
- 调用AlertDialog.Builder的setTitle()和setIcon()方法分别设置AlertDialog对话框的标题名称和图标。
- 调用AlertDialog.Builder的setMessage()、setSingleChoiceItems()或者setMultiChoiceItems()方法设置AlertDialog对话框的内容为简单文本、单选列表或者多选列表。
- 调用AlertDialog.Builder的setPositiveButton()和setNegativeButton()方法设置AlertDialog对话框的确定和取消按钮。
- 调用AlertDialog.Builder的create()方法创建AlertDialog对象。
- 调用AlertDialog对象的show()方法显示该对话框。
- 调用AlertDialog对象的dismiss()方法取消该对话框。
AlertDialog的样式多变,就是因为设置对话框内容时的样式多变。AlertDialog提供了6种方法来设置对话框的内容,如表2.8所示。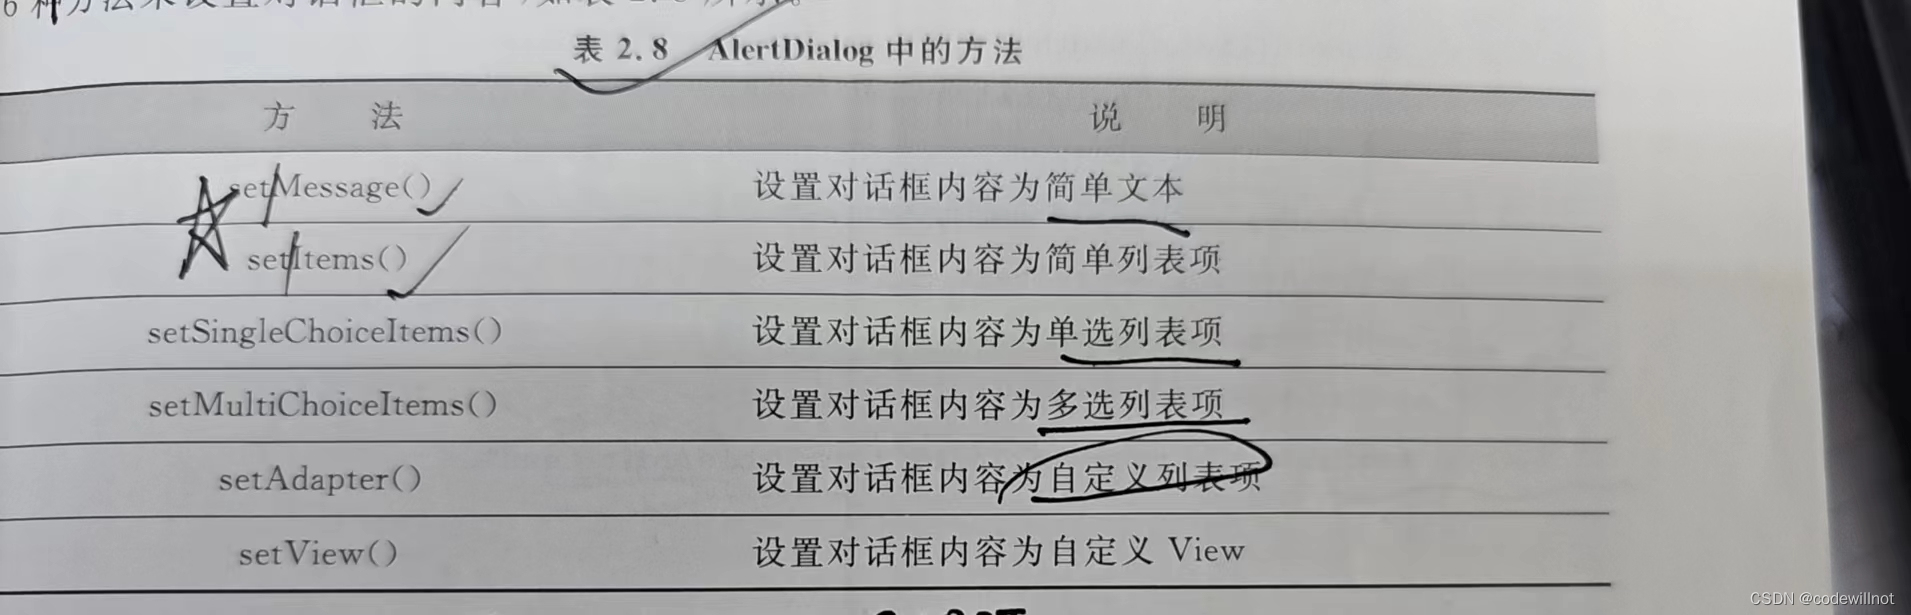 示例2.5 弹出对话框的使用。
点击【设置字体大小】按钮时弹出单选对话框[设置字体大小],设置后文本编辑框中字体大小改变,如图2.11所示。
当用户按返回键时弹出提示对话框,效果如图2.12所示。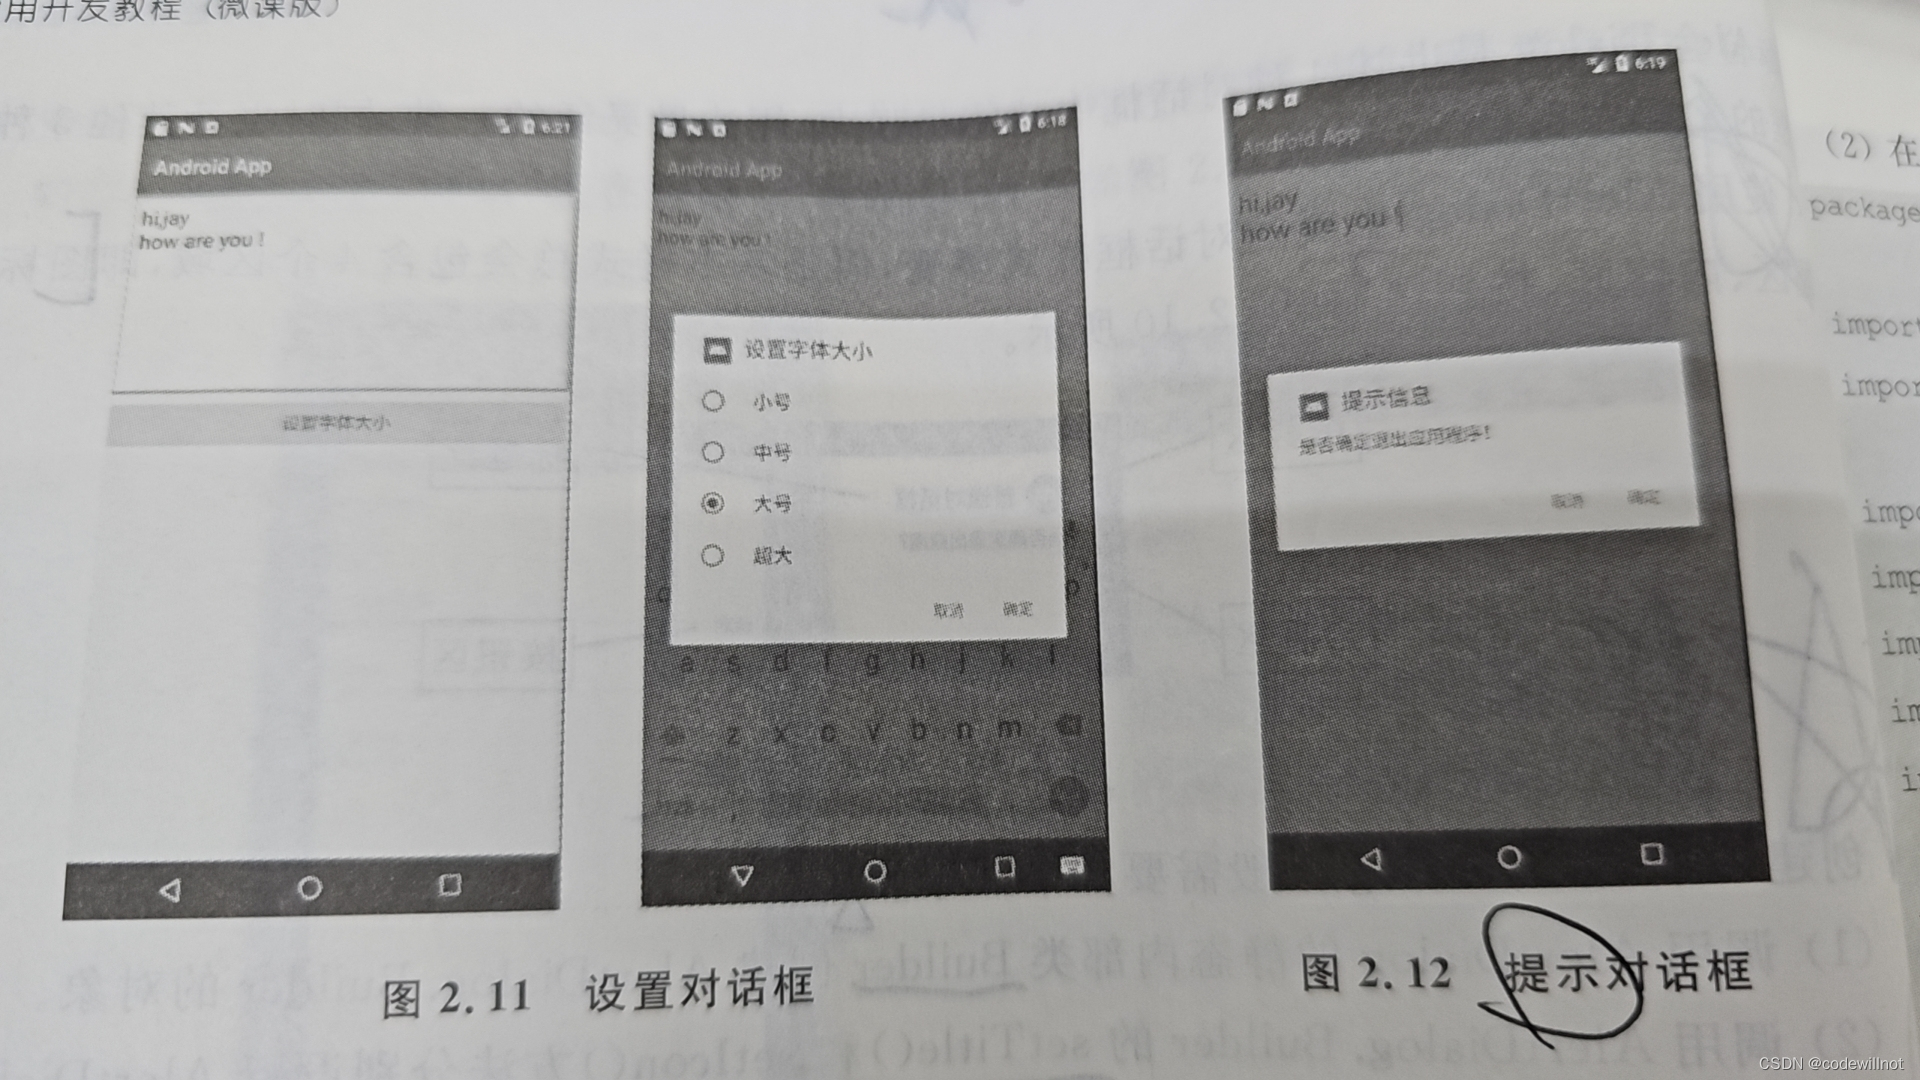 (1)创建布局文件添加文本编辑框和字体大小设置按钮,代码如下:
packagecom.example.chapter2;importandroidx.appcompat.app.AlertDialog;importandroidx.appcompat.app.AppCompatActivity;importandroid.app.DatePickerDialog;importandroid.content.DialogInterface;importandroid.os.Bundle;importandroid.view.View;importandroid.widget.Button;importandroid.widget.EditText;publicclassDialogActivityextendsAppCompatActivity{privateint[] sizeArr={10,20,25,30};privateString[] sizeStr={"小号","中号","大号","超大"};int index=0;@OverrideprotectedvoidonCreate(Bundle savedInstanceState){super.onCreate(savedInstanceState);//声明并绑定控件setContentView(R.layout.activity_dialog);Button btnsetsize =findViewById(R.id.btnSetSize);EditText text=findViewById(R.id.et_cnt);//设置字体大小点击事件的处理
        btnsetsize.setOnClickListener(newView.OnClickListener(){@OverridepublicvoidonClick(View view){//创建AlertDialog.Builder对象AlertDialog.Builder builder =newAlertDialog.Builder(DialogActivity.this);//设置内容
                builder.setIcon(R.mipmap.ic_launcher).setTitle("设置字体大小").setSingleChoiceItems(sizeStr, index,newDialogInterface.OnClickListener(){@OverridepublicvoidonClick(DialogInterface dialogInterface,int which){
                                index = which;//获取选项index}}).setPositiveButton("确定",newDialogInterface.OnClickListener(){@OverridepublicvoidonClick(DialogInterface dialog,int which){
                                dialog.dismiss();
                                text.setTextSize(sizeArr[index]);}}).setNegativeButton("取消",newDialogInterface.OnClickListener(){@OverridepublicvoidonClick(DialogInterface dialog,int which){
                                dialog.dismiss();}});//创建AlertDialogAlertDialog dialog = builder.create();//显示对话框
                dialog.show();}});}@OverridepublicvoidonBackPressed(){//创建AlertDialog.Builder对象AlertDialog.Builder builder =newAlertDialog.Builder(this);//设置内容
        builder.setIcon(R.mipmap.ic_launcher).setTitle("提示信息").setMessage("是否确定退出应用程序!").setPositiveButton("确定",newDialogInterface.OnClickListener(){@OverridepublicvoidonClick(DialogInterface dialog,int which){
                        dialog.dismiss();DialogActivity.this.finish();}}).setNegativeButton("取消",newDialogInterface.OnClickListener(){@OverridepublicvoidonClick(DialogInterface dialog,int which){
                        dialog.dismiss();}});//创建AlertDialogAlertDialog dialog = builder.create();//显示对话框
        dialog.show();}}
注意:使用对话框时,要注意内存泄漏问题。因为对话框是附属在Activity上的,所以在Activity调用finish()之前,必须通过dismiss()回收所有对话框。
2.3.3其他对话框
1.DatePickerDialog与TimePickerDialog对话框
DatePickerDialog与TimePickerDialog的功能较为简单,使用步骤如下:
(1)通过new关键字创建DatePickerDialog、TimePickerDialog实例,然后调用它们自带对的show()方法即可将这两种对话框显示出来。
(2)为DatePickerDialog、TimePickerDialog绑定监听器,这样可以保证用户通过DatePickerDialog、TimePickerDialog设置事件时触发监听器,从而通过监听器来获取用户设置的事件。
2.ProgressDialog进度对话框
程序中只要创建了ProgressDialog实例并且调用show()方法将其显示出来,进度对话框就已经创建完成。在实际开发中,会经常对进度对话框中的进度条进行设置,设置的方法如下表所示。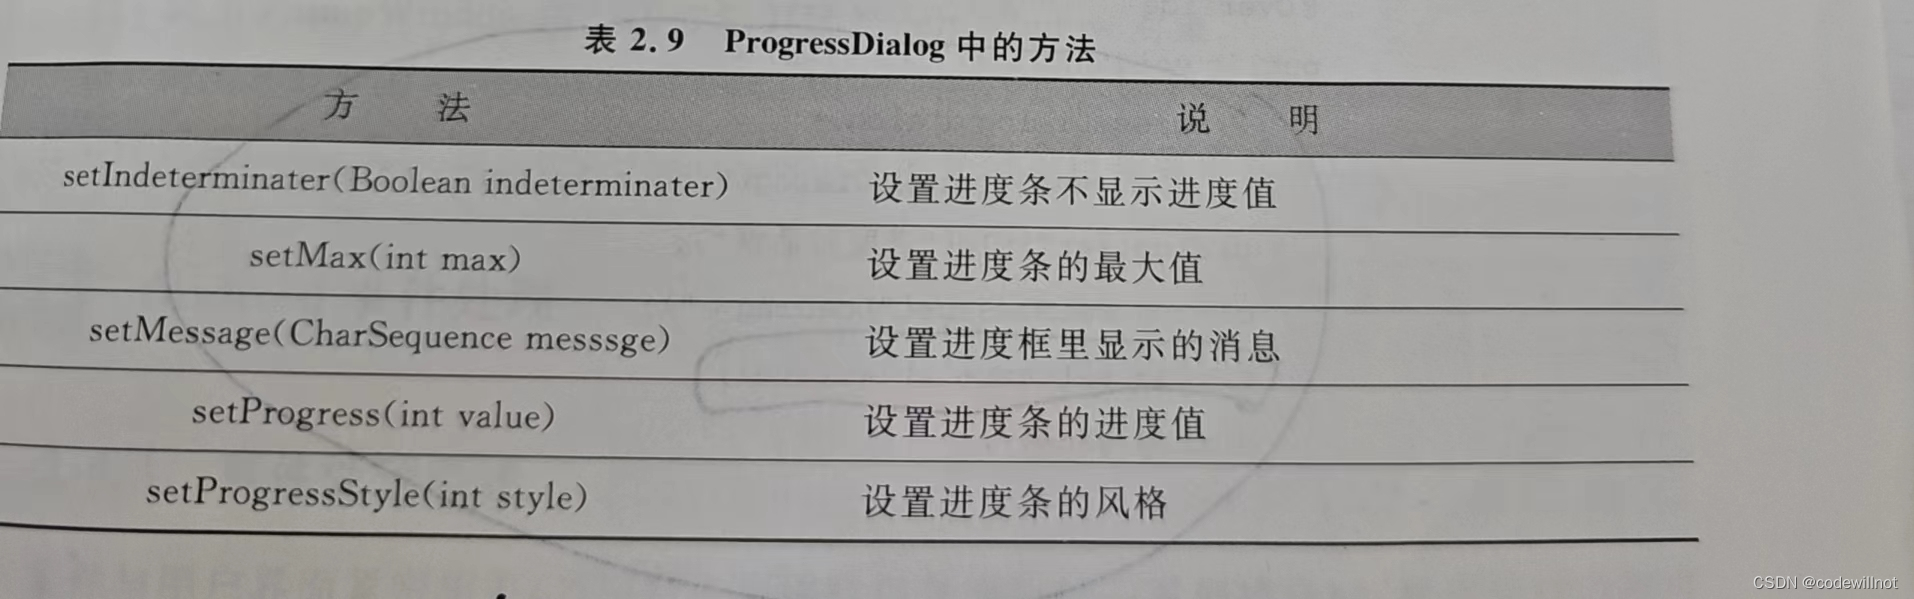 ProgressDialog和AlertDialog有点类似,都可以在界面上弹出一个对话框,都能够屏蔽掉其他控件的交互能力。不同的是,ProgressDialog会在对话框中显示一个进度条,一般由于当前操作比较耗时,让用户耐心等待。它的用法和AlertDialog也比较类似,下面通过一个案例来介绍ProgressDialog的用法。
示例2.6 ProgressDialog的使用
(1)编写XML布局配置文件,在RealativeLayout布局中添加一个Button控件,点击Button按钮时弹出ProgressDialog对话框。
<?xml version="1.0" encoding="utf-8"?><RelativeLayout xmlns:android="http://schemas.android.com/apk/res/android"
    xmlns:app="http://schemas.android.com/apk/res-auto"
    xmlns:tools="http://schemas.android.com/tools"
    android:layout_width="match_parent"
    android:layout_height="match_parent"
    android:orientation="vertical"
    tools:context=".ProgressDialogActivity"><Button
        android:id="@+id/btndialog"
        android:layout_width="wrap_content"
        android:layout_height="wrap_content"/></RelativeLayout>
(2)编写Activity类,在onCreate()方法中添加代码。代码如下:
packagecom.example.chapter2;importandroidx.appcompat.app.AppCompatActivity;importandroid.app.ProgressDialog;importandroid.os.Bundle;importandroid.view.View;importandroid.widget.Button;publicclassProgressDialogActivityextendsAppCompatActivity{@OverrideprotectedvoidonCreate(Bundle savedInstanceState){super.onCreate(savedInstanceState);setContentView(R.layout.activity_progress_dialog);Button btnprocess =findViewById(R.id.btndialog);
        btnprocess.setOnClickListener(newView.OnClickListener(){@OverridepublicvoidonClick(View view){ProgressDialog dialog=newProgressDialog(ProgressDialogActivity.this);
                dialog.setTitle("进度对话框");
                dialog.setMessage("Loading...");
                dialog.setCancelable(true);
                dialog.show();}});}}
(3)运行程序,查看运行结果。ProgressDialog对话框的运行效果,如下图所示。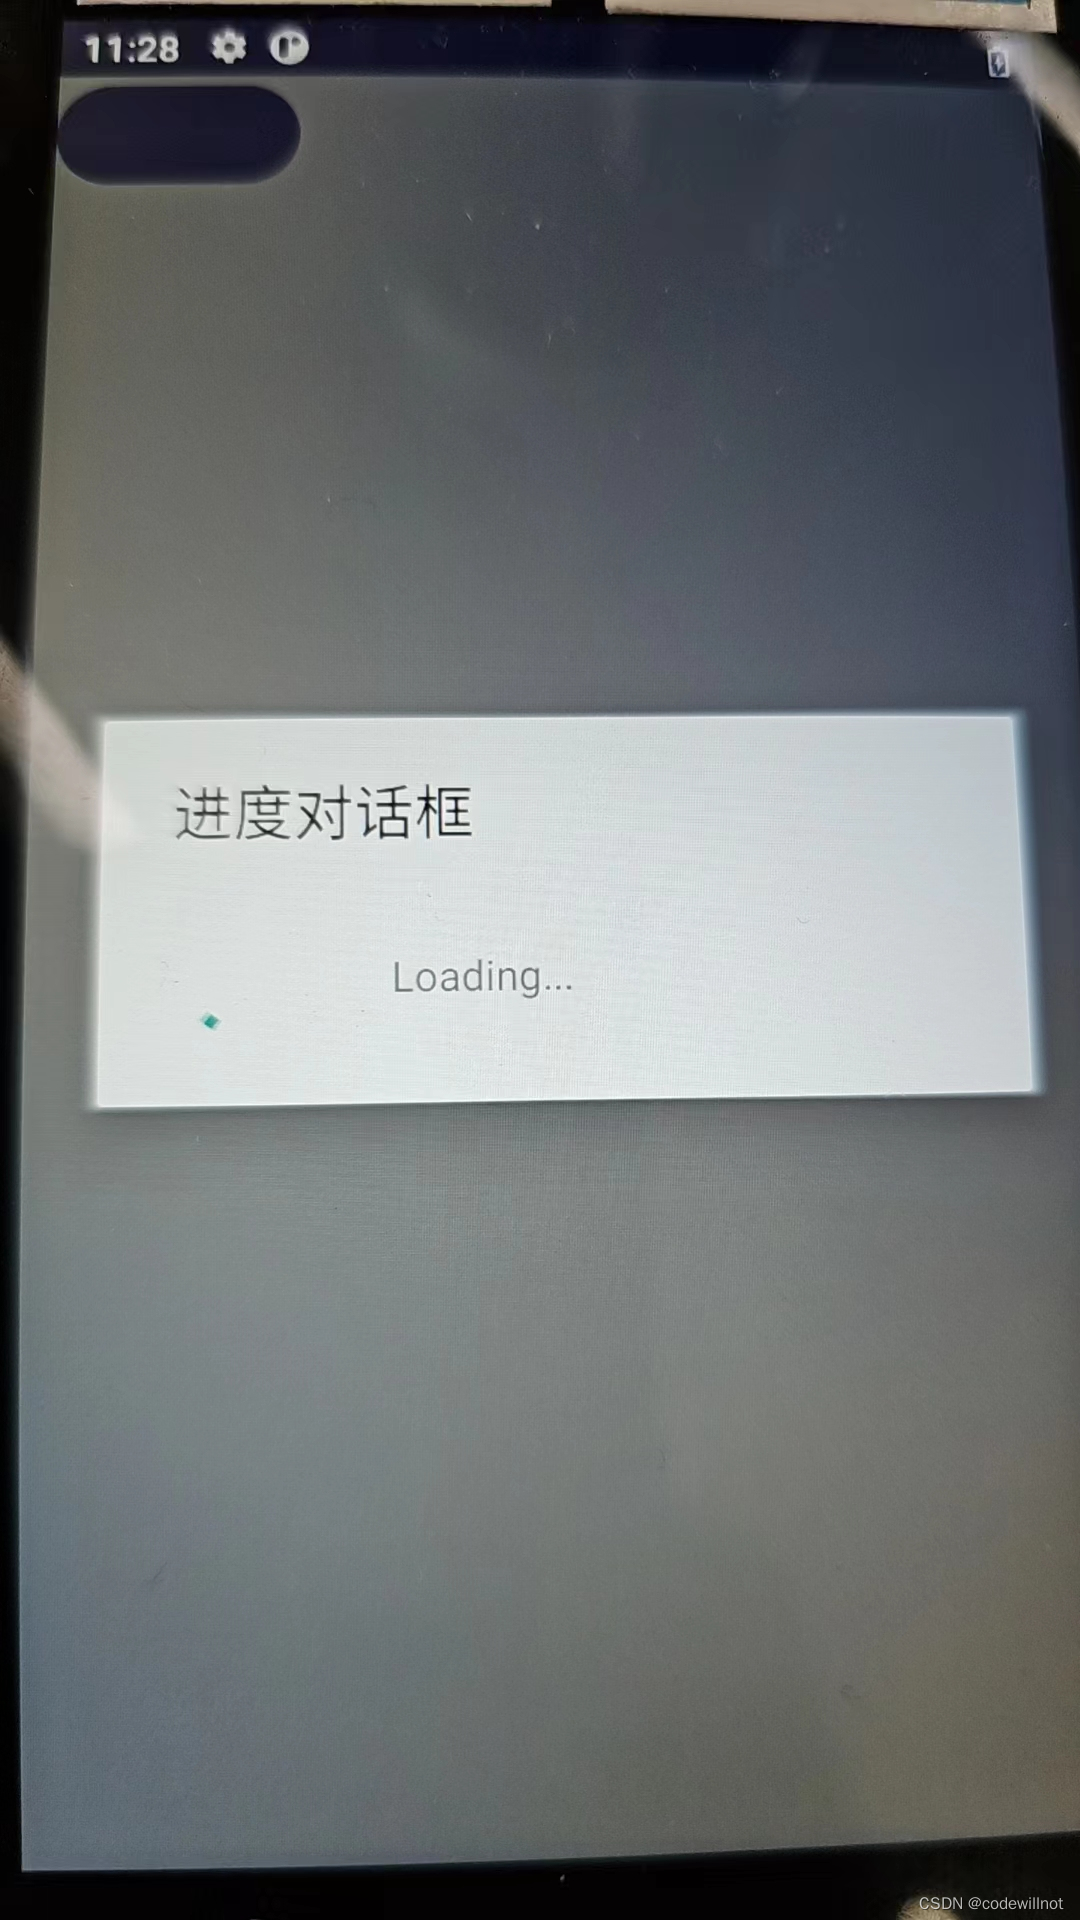
代码中首先构建一个ProgressDialog对象,然后可以设置标题、内容、可否取消等属性,最后也是通过调用show()方法将ProgressDialog显示出来。
注意:如果在setCancelable中传入了false,表示ProgressDialog是不能通过Back键取消掉的,这时一定要在代码中做好控制,当数据加载完成后必须调用ProgressDialog的dismiss()方法来关闭对话框,否则ProgressDialog将会一直存在。
3.PopupWindow及DialogTheme窗口
PopupWindow,顾名思义,是弹出式窗口,它的风格与对话框很像,所以和对话框放在一起来说明。使用PopupWindow创建一个窗口的步骤如下:
(1)调用PopupWindow的构造方法创建PopupWindow对象。
(2)调用其自带的showAsDropDown(View view)方法将PopupWindow作为Viw的下拉组件显示出来,或调用showAtLocation()方法在指定位置显示该窗口。
2.4Android事件处理
2.4.1 事件处理概述
事件与用户界面紧密相关,当用户在应用程序界面执行一系列操作时,程序要响应用户的各种事件,如点击、长按、触碰、键盘输入等,响应这些动作就需要事件来完成。这种事件与Java中的Swing GUI事件处理机制相同,并且Android中提供两套完善的事件处理机制,说明如下:
(1)基于监听的事件处理,它是基于面向对象的事件处理机制,这种方式与Swing的处理方式完全相同。由三类对象组成;
①事件源:产生事件的来源,通常是各个组件,如按钮、窗口、菜单等。
②事件:封装了界面组件上发生的特定事件的具体信息(如点击、长按、触摸等),如果监听器需要获取界面组件上所发生事件的相关信息,一般通过事件Event对象来传递。
③事件监听器:负责监听事件源发生的事件,并对不同的事件做相应的处理,如点击、长按、触碰等。
基于监听的事件处理是一种委派式Delegation的事件处理方式,事件源将整个事件委托给事件监听器,由监听器对事件进行响应式处理。这种处理方式将事件源和事件监听器分离,有利于提高程序的可维护性。
(2)基于回调的事件处理,它的事件源和事件监听器是合一的,没有独立的事件监听器存在。当用户在GUI组件上触发某事件时,由该组件自身特定的函数负责处理该事件。
2.4.2基于监听的事件处理
所谓事件监听器,即实现了特定接口的Java类的实例。例如,setOnTouchListener事件监听方法要接收View.OnTouchListener事件监听接口。在程序中通常有以下五种基于的监听器:
1.匿名内部类作为事件监听器类
多数情况下,事件监听器都不会重用。因此,一般情况下事件监听器只是临时使用,所以使用匿名内部类形式的事件监听器更加合适。目前,这是最为广泛使用的形式。代码结构如下:
btn.setOnClickListener(newView.OnClickListener(){@OverridepublicvoidonClick(View view){//代码.........}});
2.内部类作为事件监听器
使用内部类作为事件监听器主要出于重用方面的考虑,当多个事件源共享一个事件监听器时使用。例如,在Android应用中有多个分享按钮,该业务由同一个事件监听器处理。
代码结构如下:
注册监听器:
btn.setOnClickListener(newMyBtnClick());
事件监听器:
publicclassMyBtnClickimplementsView.OnClickListener{@OverridepublicvoidonClick(View v){//代码........}}
3.Activity类本身作为事件监听器
使用Activity本身作为监听器类,可以直接在Activity类中定义事件监听器方法,这种形式原本非常简洁。但是,当Activity处理业务功能时,Activity的初始化方法和事件监听器方法编写一个类中,会造成程序结构混乱。代码结构如下:
publicclassMainActivityextendsAppCompatActivityimplementsView.onClickListener{
   @Override
   publicvoidonClick(View v){//代码.....}}
4.外部类作为监听器
使用外部类定义事件监听器类,由于它不利于提高程序的内聚性,所以这种形式较少使用。但是,如果外部事件监听器被多个Activity界面所共享,且具有相同的业务逻辑,则可以考虑使用外部类的形式来定义事件监听器类,代码结构如下:
时间监听器:
classMyClickListenerimplementsView.onClickListener{@OverridepublicvoidonClick(View v){//代码.....}}
注册监听器:
btn.setOnclickListener(newMyClickListener());
5.直接绑定到标签
直接绑定到标签的方式是最简单的绑定事件监听器的方式,直接在Activity布局文件中为指定标签绑定事件处理方法。由于方法名可以自定义,所以直接绑定到标签的做法能提高程序的可读性。代码结构如下:
Activity布局文件:
<Button
        android:onClick="doLogin"
        android:layout_width="match_parent"
        android:layout_height="wrap_content"/>
时间监听器:
publicvoiddoLogin(View v){//代码........}
经验:在开发中,最常用的监听器编写方法是匿名内部类作为事件监听器类、内部类作为事件监听器和Activity类本身作为事件监听器。
事件监听的处理模型说明:
在事件监听的处理模型中,主要涉及三类对象。
(1)Event Source(事件源):一般指各个组件。
(2)Event(事件):一般是指用户操作,该事件封装了界面组件上发生的各种特定事件。
(3)Event Listener(事件监听器):负责监听事件源所发生的事件,并对该事件做出响应。
实际上,事件响应的动作就是一组程序语句,通常以方法的形式组织起来。Android利用的是Java语言开发,其面向对象的本质没有改变,所以方法必须依附于类才可以使用。而事件监听器的核心就是它所包含的方法,这些方法也被称为事件处理器(Event Handler)。
事件监听的处理模型可以这样描述:当用户在程序界面操作时,会激发一个相应的事件,该事件就会触犯事件源上注册事件监听器,事件监听器再调用对应的事件处理器做出相应的反应。
Android的事件处理机制采用了一种委派式的事件处理方式:普通组件(事件源)将整个事件处理委派给特定的对象(事件监听器),当该组件发生指定的事件时,就通知所委托的事件监听器,由该事件监听器处理该事件。监听事件处理流程如下图所示。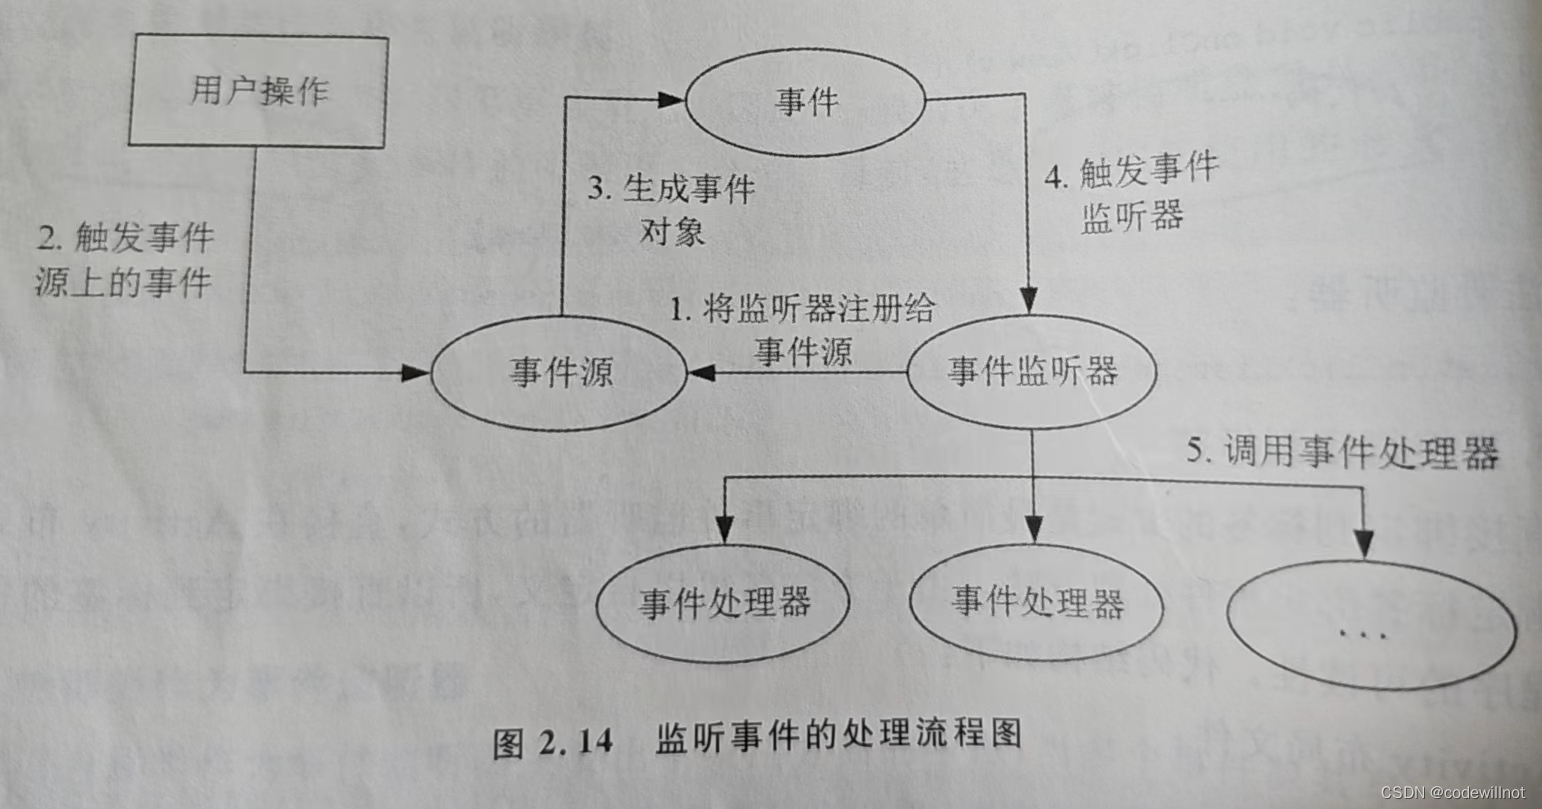 这种委派式的处理方式很类似于人类社会的分工合作。举一个简单例子,当人们想邮寄一份快递(事件源)时,通常是将该快递交给快递点(事件监听器)来处理,再由快递点通知物流公司(事件处理器)运送快递,而快递点也会监听多个物流公司的快递,进而通知不同的物流公司。这种处理方式将事件源和事件监听器分离,从而提供更好的程序模型,有利于提高程序的可维护性。
基于上面程序可以总结出基于监听的事件处理模型的编程步骤:
(1)获取要被监听的组件(事件源);
(2)实现事件监听器类,该类是一个特殊的Java类,必须实现一个XxxListener接口;
(3)调用事件源的setXxxListener方法将事件监听器对象注册给事件源。
当用户操作应用界面,触发事件源上指定的事件时,Android会触发事件监听器,然后由该事件监听器调用指定的方法(事件处理器)来处理事件。
实际上,对于上述三个步骤,最关键的步骤是实现事件监听器类。实现事件监听器其实就是实现了特定接口的Java类实例。在程序中实现事件监听器,通常由如下几种形式:
(1)内部类形式:将时间监听器类定义成当前类的内部类。
(2)外部类形式:将事件监听器类定义成一个外部类。
(3)Activity本身作为事件监听器类:让Activity本身实现监听器接口,并实现事件处理方法。
(4)匿名内部类形式,使用匿名内部类创建事件监听器对象。
示例2.7
外部类形式创建监听器。
创建监听器的代码如下:
BtnClickListener.java
packagecom.example.chapter2;importandroid.app.Activity;importandroid.view.View;importandroid.widget.TextView;importandroid.widget.Toast;publicclassBtnClickListenerimplementsView.OnClickListener{privateActivity activity;privateTextView textView;publicBtnClickListener(Activity activity,TextView textView){this.activity=activity;this.textView=textView;}@OverridepublicvoidonClick(View v){
        textView.setText("外部类创建监听器");Toast.makeText(activity,"触发了onClick方法",Toast.LENGTH_LONG).show();}}
上面的事件监听器类实现了View.OnClickListener接口,创建该监听器时需要加入一个Activity和一个TextView,来看具体Java代码:
EventActivity.java
packagecom.example.chapter2;importandroidx.appcompat.app.AppCompatActivity;importandroid.os.Bundle;importandroid.view.View;importandroid.widget.Button;importandroid.widget.TextView;publicclassEventActivityextendsAppCompatActivity{@OverrideprotectedvoidonCreate(Bundle savedInstanceState){super.onCreate(savedInstanceState);setContentView(R.layout.activity_event);Button btnevent =findViewById(R.id.btnevent);TextView textevent =findViewById(R.id.eventtext);
        btnevent.setOnClickListener(newBtnClickListener(this,textevent));}}
activityevent.xml
<?xml version="1.0" encoding="utf-8"?><LinearLayout xmlns:android="http://schemas.android.com/apk/res/android"
    xmlns:app="http://schemas.android.com/apk/res-auto"
    xmlns:tools="http://schemas.android.com/tools"
    android:layout_width="match_parent"
    android:layout_height="match_parent"
    android:orientation="vertical"
    tools:context=".EventActivity"><TextView
        android:id="@+id/eventtext"
        android:layout_width="match_parent"
        android:layout_height="40sp"/><Button
        android:id="@+id/btnevent"
        android:layout_width="match_parent"
        android:layout_height="wrap_content"
        android:text="测试监听器"
        android:textSize="20sp"/></LinearLayout>
运行程序得到下图所示效果。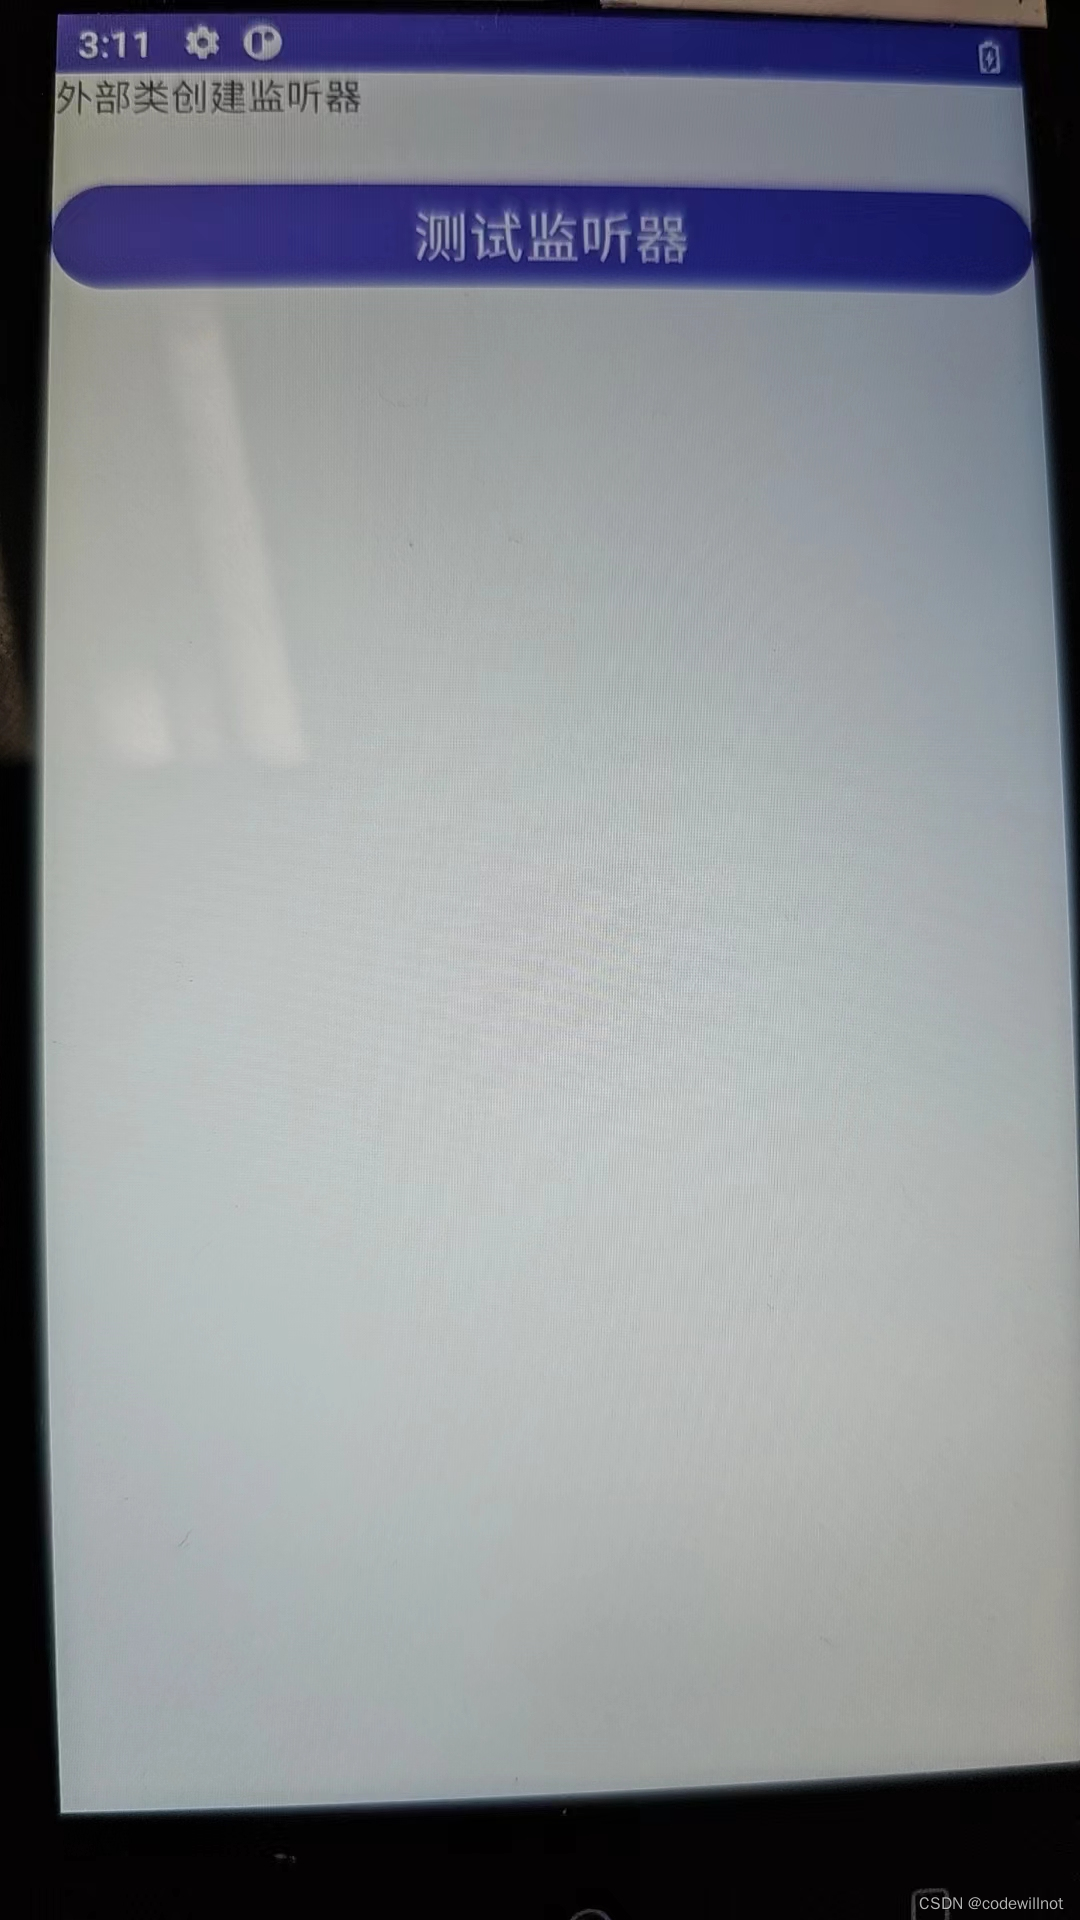 上面程序btnShow.setOnClickListener(new BtnClickListener(this.textevent))用于给按钮的点击事件绑定监听器,当用户点击按钮时,就会触发监听器BtnClickListener,从而执行监听器里面的方法。
外部类形式的监听器基本就是这样实现,专门定义一个外部类用于实现事件监听类接口作为事件监听器,之后在对应的组件中注册该监听器。
示例2.8
创建TesteventActivity来实现View.OnClickListener将Activity作为监听器并重写onClick方法,代码如下:
TesteventActivity.java
packagecom.example.chapter2;importandroidx.appcompat.app.AppCompatActivity;importandroid.os.Bundle;importandroid.view.View;importandroid.widget.Button;importandroid.widget.TextView;publicclassTesteventActivityextendsAppCompatActivityimplementsView.OnClickListener{privateTextView textView;privateButton bt;@OverrideprotectedvoidonCreate(Bundle savedInstanceState){super.onCreate(savedInstanceState);setContentView(R.layout.activity_testevent);
        bt=findViewById(R.id.bt);
        textView=findViewById(R.id.tv);
        bt.setOnClickListener(this);}@OverridepublicvoidonClick(View v){
        textView.setText("Activity作为事件监听类");}}
activity_testevent.xml
<?xml version="1.0" encoding="utf-8"?><LinearLayout xmlns:android="http://schemas.android.com/apk/res/android"
    xmlns:app="http://schemas.android.com/apk/res-auto"
    xmlns:tools="http://schemas.android.com/tools"
    android:layout_width="match_parent"
    android:layout_height="match_parent"
    android:orientation="vertical"
    tools:context=".TesteventActivity"><TextView
        android:id="@+id/tv"
        android:layout_width="match_parent"
        android:layout_height="40sp"
        android:textSize="20sp"/><Button
        android:id="@+id/bt"
        android:layout_width="match_parent"
        android:layout_height="wrap_content"/></LinearLayout>
效果如下图所示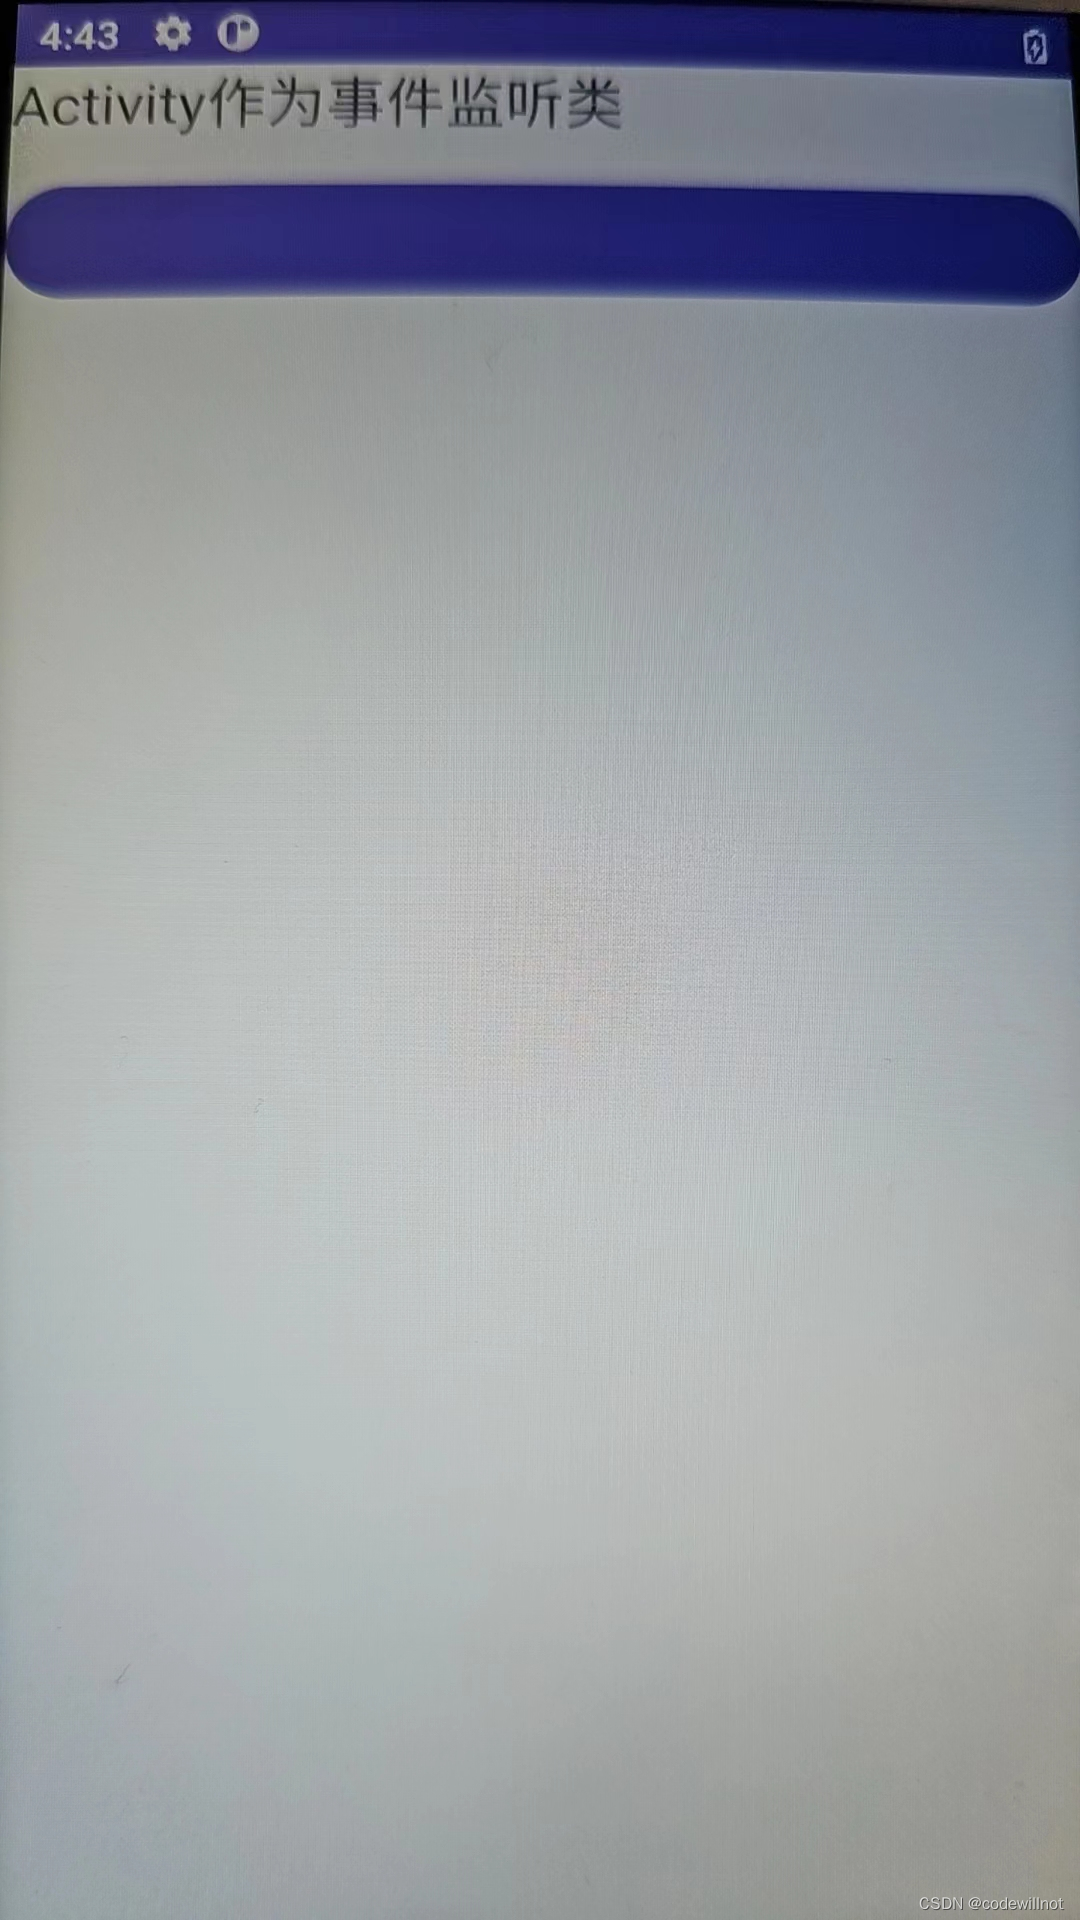
上面程序中Activity直接实现了View.OnClickListener接口,从而可以直接在该Activity中定义事件处理器方法:onClick(View v)。当为某个组件添加该事件监听器的时候,直接使用this关键字作为事件监听器即可。
示例2.9
匿名内部类作为事件监听器。
在设置监听器的同时创建匿名监听器内部类,代码如下:
activity_internalevent.xml
<?xml version="1.0" encoding="utf-8"?><LinearLayout xmlns:android="http://schemas.android.com/apk/res/android"
    xmlns:app="http://schemas.android.com/apk/res-auto"
    xmlns:tools="http://schemas.android.com/tools"
    android:layout_width="match_parent"
    android:layout_height="match_parent"
    android:orientation="vertical"
    tools:context=".InternaleventActivity"><TextView
        android:id="@+id/internaltv"
        android:layout_width="match_parent"
        android:layout_height="40sp"
        android:textSize="20sp"/><Button
        android:id="@+id/internalbt"
        android:layout_width="match_parent"
        android:layout_height="wrap_content"/></LinearLayout>
InternaleventActivity.java
packagecom.example.chapter2;importandroidx.appcompat.app.AppCompatActivity;importandroid.os.Bundle;importandroid.view.View;importandroid.widget.Button;importandroid.widget.TextView;publicclassInternaleventActivityextendsAppCompatActivity{privateTextView internal1;privateButton intern2;@OverrideprotectedvoidonCreate(Bundle savedInstanceState){super.onCreate(savedInstanceState);setContentView(R.layout.activity_internalevent);
        internal1=findViewById(R.id.internaltv);
        intern2=findViewById(R.id.internalbt);
                intern2.setOnClickListener(newView.OnClickListener(){@OverridepublicvoidonClick(View view){
                        internal1.setText("匿名内部类作为事件监听器");}});}}
效果如下图所示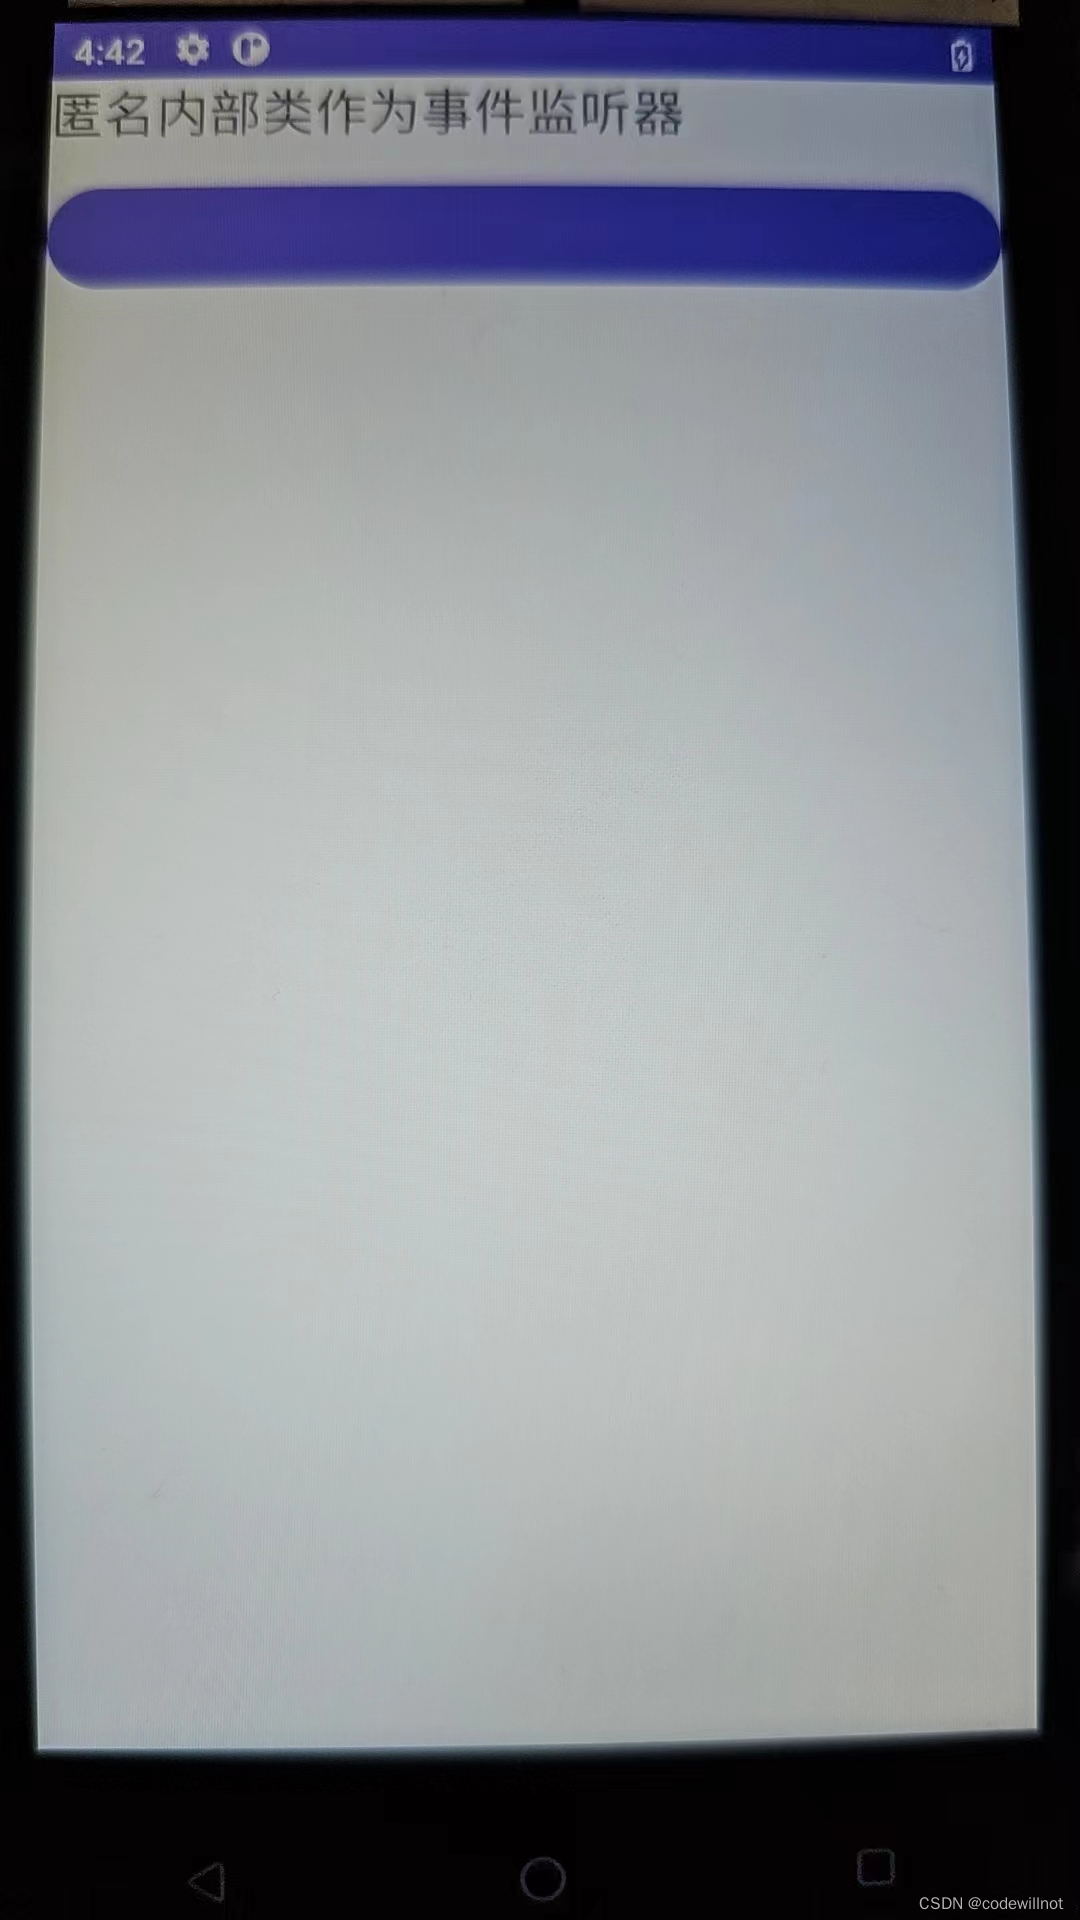
可以看出匿名内部类的语法结构比较怪异,除了这个缺点,匿名内部类相比于其他方式比较有优势,一般建议使用匿名内部类的方式创建监听器类。
2.4.3 基于回调事件处理
1.回调机制
前面提到的监听机制是一种委派式的事件处理机制,事件源与事件监听器分离,用户触发事件源指定的事件之后,交给事件监听器处理相应的事件。而回调机制则完全相反,他的事件源与事件监听器是统一的,或者可以说,它没有事件监听器的概念。因为它可以通过回调自身特定的方法处理相应的事件。
为了实现回调机制的事件处理,需要继承GUI组件类,并重写对应的事件处理方法,其实就是自定义UI组件的方法。Android为所有的GUI组件提供了一些事件处理的回调方法,以View类为例,该类包含如表2.10所示的方法。
从代码实现的角度而言,基于回调的事件处理模型更加简单。
2.基于回调的事件传播
开发者可控制基于回调的事件传播,几乎所有基于回调的事件处理方法都有一个boolean类型的返回值,该返回值决定了对应的处理方法能否完全处理该事件。当返回值为false时,表明该处理方法并未完全处理该事件,事件会继续向下传播;返回值为true时,表明该处理方法已完全处理该事件,该事件不会继续传播。因此,对于基于回调的事件处理方式而言,某组件上所发生的事件不仅会激发该组件上的回调方法,也会触发所在Activity的回调方法,只要该事件能传播到该Activity。
当Button上某个按键被按下时,上面程序的执行顺序是最先触发按钮上绑定的事件监听器,然后触发该组件提供的事件回调方法,最后传播到该组件所在的Activity。但如果改变某个方法的返回值,使其返回true,则该事件不会传播到下一层,相应的输出日志也会改变。
基于回调的事件处理模型与基于监听的事件处理模型对比,可以看出基于监听的事件处理模型比较有优势:
(1)分工明确,事件源与事件监听器分开实现,可维护性较好。
(2)优先被触发。
但在某些特定情况下,基于回调的事件处理机制能更好地提高程序的内聚性,通过为View提供事件处理的回调方法,可以很好地把事件处理方法封装在该View内部,从而提高程序的内聚性。
2.5系统配置与屏幕方向监听
2.5.1 响应系统设置的机制和方法
在实际开发中,经常会遇到横竖屏切换的问题,在Android应用中横竖屏切换并不仅仅是设备屏幕的横竖屏切换,它还涉及Activity生命周期的销毁与重建的问题。所以,当遇到类似横竖屏切换这样的系统设置问题时,应用程序需要根据系统的设置做出相应的改变,这就是本节要讲述的内容。
Android中提供了针对设备本身Configuration(配置信息)的类。Configuration类能够获得设备的配置信息,包括横竖屏、电讯运营商、是否支持某些传感器等。
1.Configuration类简介
Configuration类专门用来描述Android手机的设备信息,这些配置信息既包括用户特定的配置项,也包括系统的动态设备配置。
获取Configuration对象的方式很简单,只需要一行代码就可以实现;
Configuration cfg=getResource().getConfiguration();
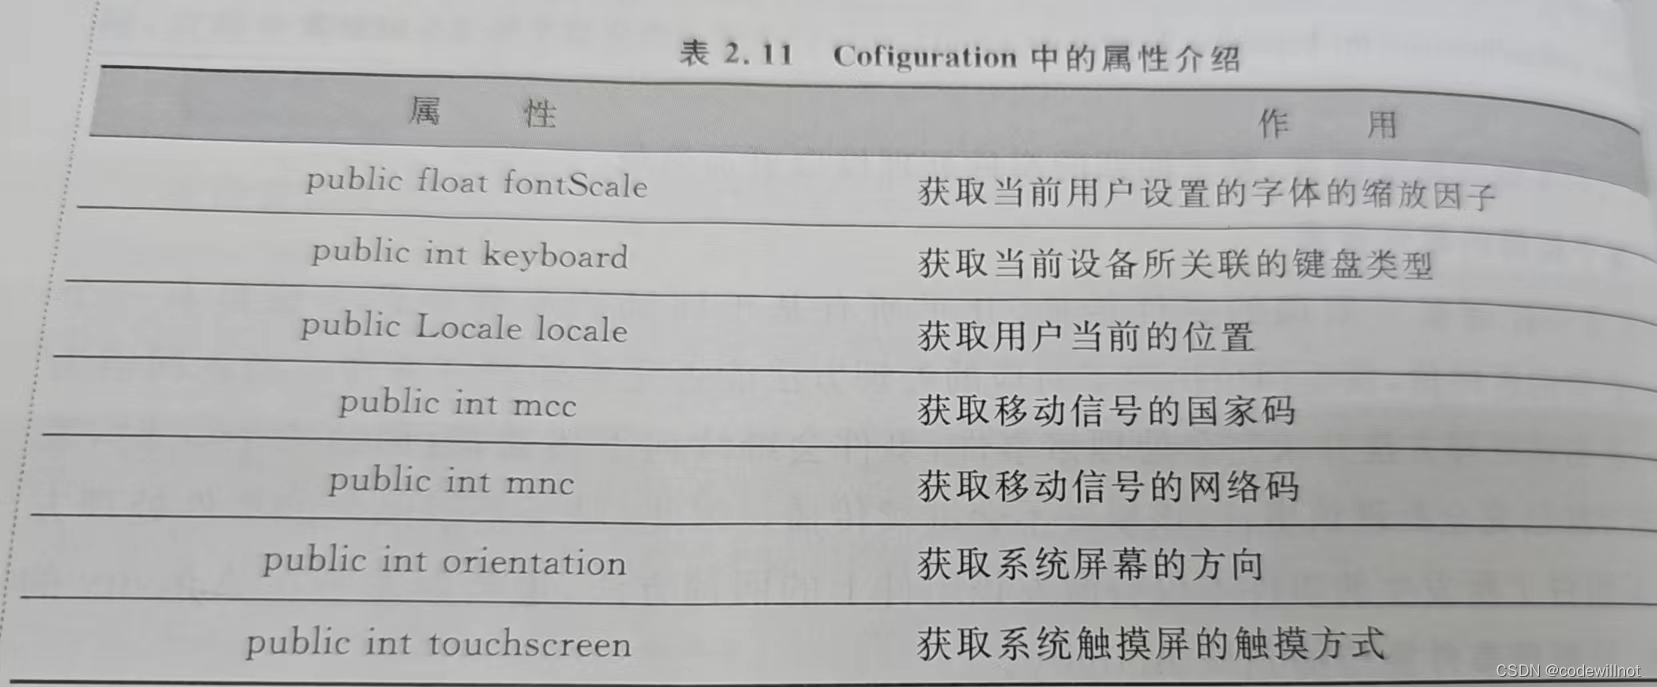
获取了该对象之后,就可以通过该对象提供的表2.11所示的属性来获取系统的配置信息。
 2.onConfigurationChanged
在Android应用中,经常会看到应用程序为适应手机屏幕的横竖屏切换,也切换了横竖屏的显示方式。实现此功能需要对屏幕的横竖屏变化进行监听,可以通过重写Activity的onConfigurationChanged(Configuration newConfig)方法实现监听。该方法是一个基于回调的事件处理方法,当系统设置发生变化时,该方法会被自动触发。
需要注意的是,为了让该Activity能监听到屏幕方向更改的事件,需要在配置该Activity时(Mainfest.xml)指定android:configChanges属性,并将属性值设为orientation|screenSize时才能监听到系统屏幕改变的事件。除了该属性值外,还可以设置为mmc、mnc、locale、touchscreen、keyboard、keyboardHidden、navigaiton、screenLayout、uiMode、smallestScreenSize、fontScale等属性值。
示例2.10
使用Configuration获取设备的配置信息。
本示例使用设备配置信息类Configuration获取设备的配置信息。运行效果,如下图所示。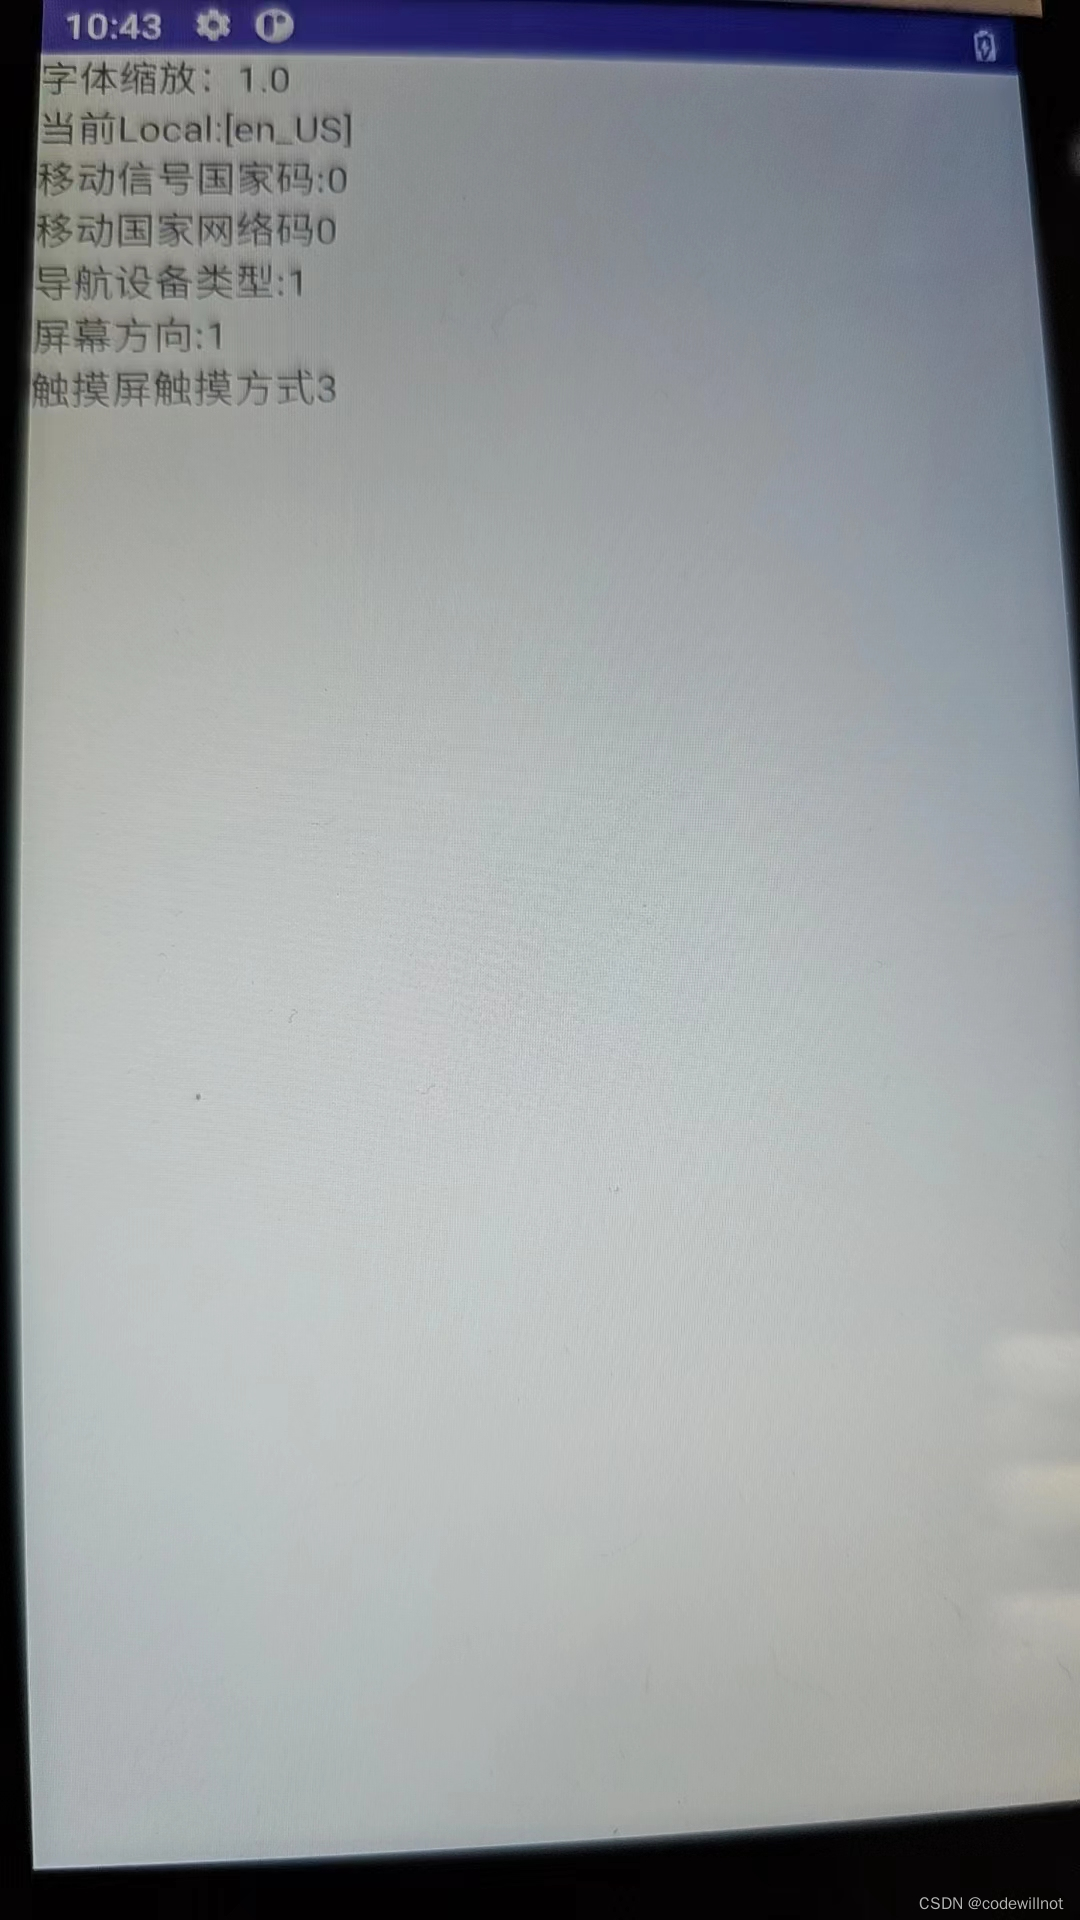
(1)创建布局文件,添加TextView控件。参考代码如下:
<?xml version="1.0" encoding="utf-8"?><LinearLayout xmlns:android="http://schemas.android.com/apk/res/android"
    xmlns:app="http://schemas.android.com/apk/res-auto"
    xmlns:tools="http://schemas.android.com/tools"
    android:layout_width="match_parent"
    android:layout_height="match_parent"
    tools:context=".ConfigurationActivity"><TextView
        android:id="@+id/txtConfig"
        android:layout_width="match_parent"
        android:layout_height="wrap_content"/></LinearLayout>
(2)修改MainActivity中onCreate()方法的代码,参考代码如下:
packagecom.example.chapter2;importandroidx.appcompat.app.AppCompatActivity;importandroid.content.res.Configuration;importandroid.os.Bundle;importandroid.widget.TextView;publicclassConfigurationActivityextendsAppCompatActivity{@OverrideprotectedvoidonCreate(Bundle savedInstanceState){super.onCreate(savedInstanceState);setContentView(R.layout.activity_configuration);TextView txtConfig=findViewById(R.id.txtConfig);Configuration configuration=getResources().getConfiguration();
        txtConfig.setText("字体缩放:"+configuration.fontScale+"\n当前Local:"+configuration.getLocales()+"\n移动信号国家码:"+configuration.mcc+"\n移动国家网络码"+configuration.mnc+"\n导航设备类型:"+configuration.navigation+"\n屏幕方向:"+configuration.orientation+"\n触摸屏触摸方式"+configuration.touchscreen
        );}}
2.5.2监听屏幕方向的改变
在Android中,一些应用程序可以在运行时随着用户的使用习惯调整屏幕的显示朝向,这种应用程序就是随着系统设置而产生事件。上一小节中通过Configuration类获得屏幕的当前朝向,它对设计拥有横竖屏显示功能的程序作用非常大。但是,在使用时还需要结合Activity的onConfigurationChanged()方法监听屏幕改变。
示例2.11
(1)编写XML布局配置文件,在RelativeLayout布局中添加ImageView控件代码如下:
<?xml version="1.0" encoding="utf-8"?><RelativeLayout xmlns:android="http://schemas.android.com/apk/res/android"
    xmlns:app="http://schemas.android.com/apk/res-auto"
    xmlns:tools="http://schemas.android.com/tools"
    android:layout_width="match_parent"
    android:layout_height="match_parent"
    tools:context=".ConfigurationChangedActivity"><TextView
     android:text="监听屏幕方向改变"
     android:layout_width="match_parent"
     android:layout_height="wrap_content"/><Button
      android:text="屏幕中心的按钮"
      android:layout_centerVertical="true"
      android:layout_centerHorizontal="true"
      android:layout_width="wrap_content"
      android:layout_height="wrap_content"/></RelativeLayout>
(2)编写Activity类,在onConfigurationChanged()方法中添加代码。代码如下:
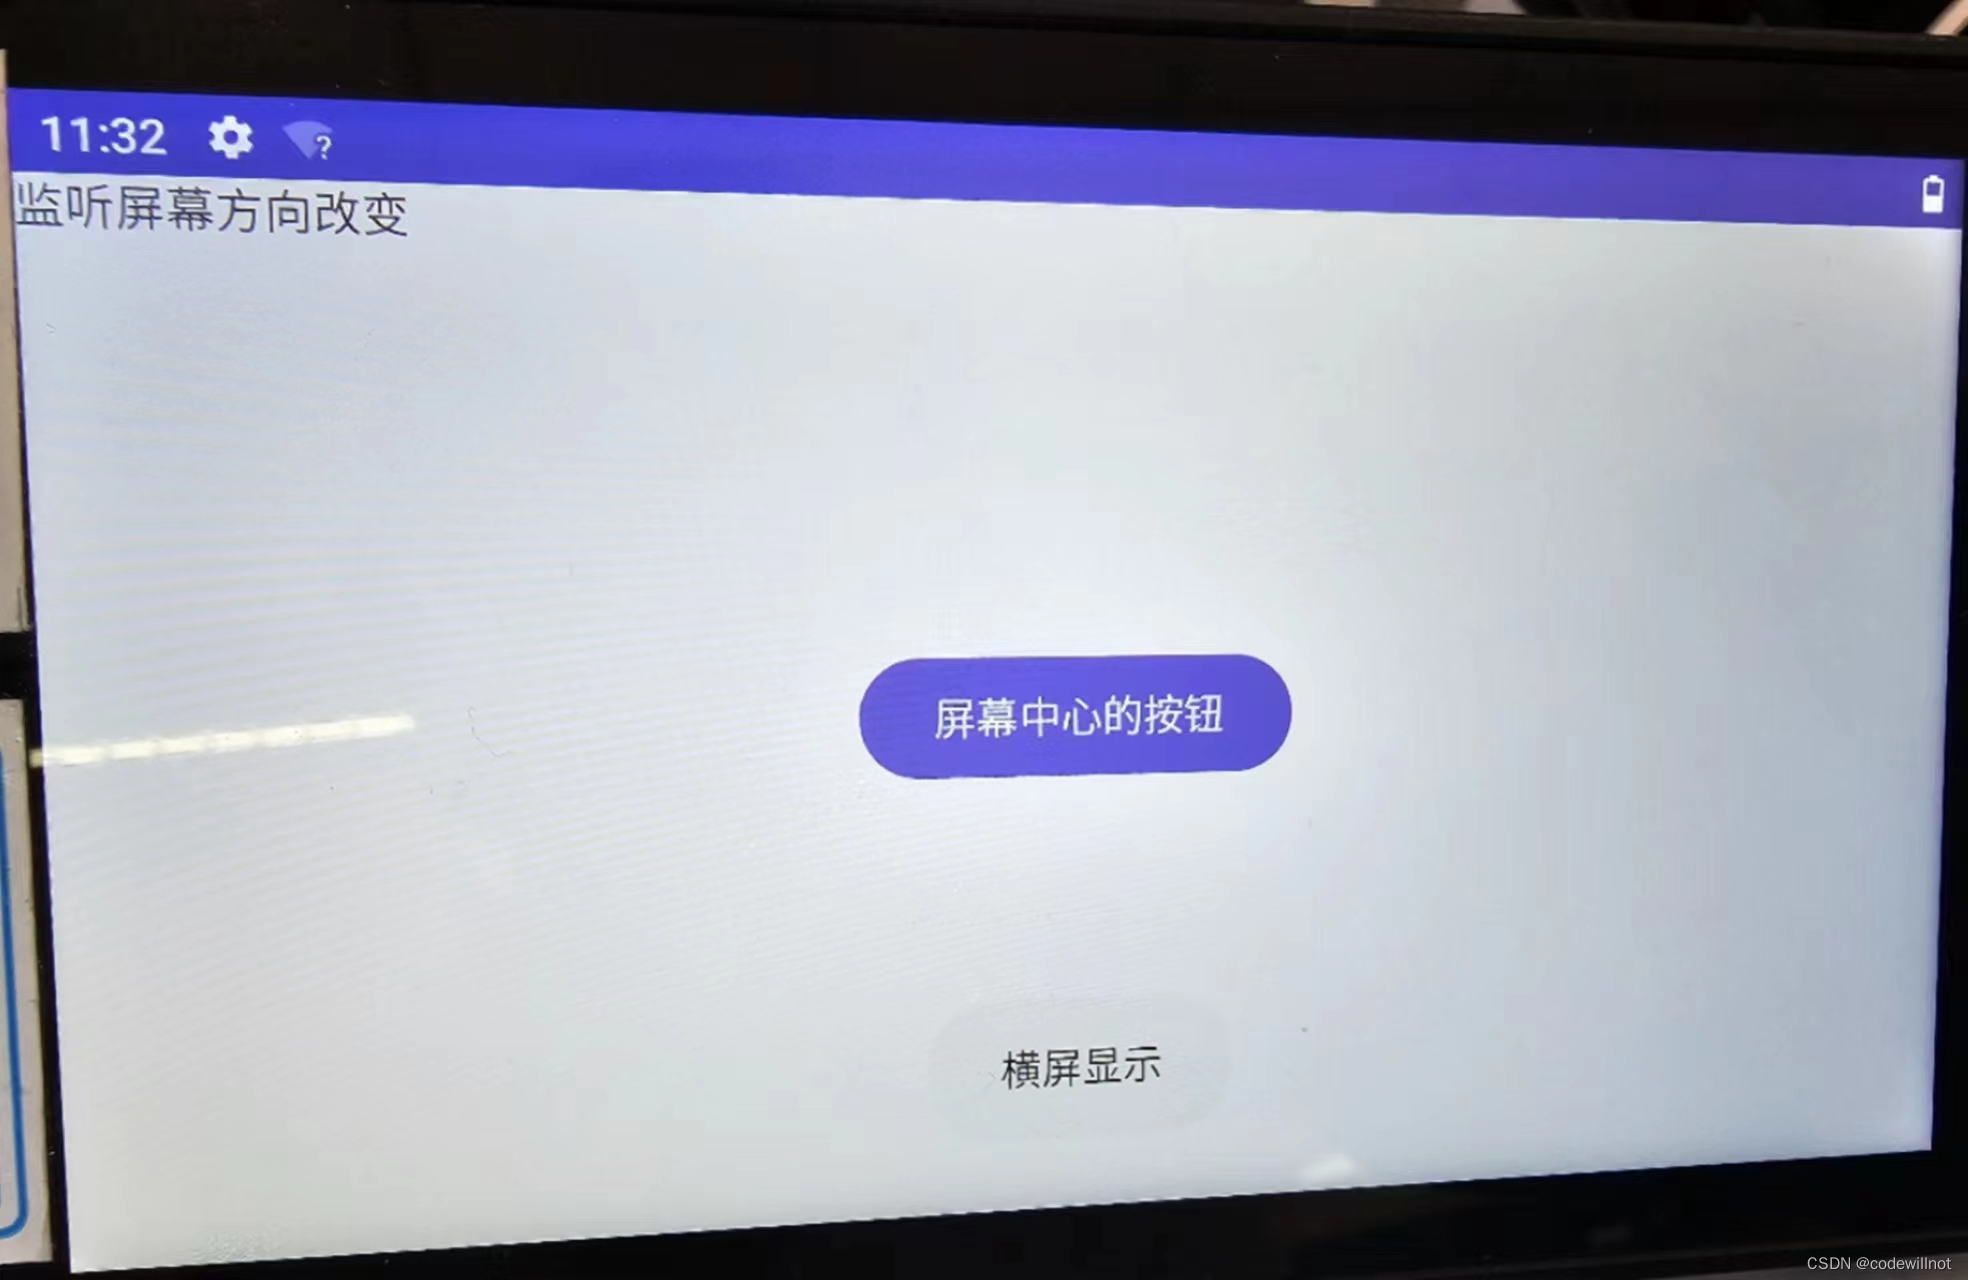
packagecom.example.chapter2;importandroidx.appcompat.app.AppCompatActivity;importandroid.content.res.Configuration;importandroid.os.Bundle;importandroid.widget.Toast;publicclassConfigurationChangedActivityextendsAppCompatActivity{@OverrideprotectedvoidonCreate(Bundle savedInstanceState){super.onCreate(savedInstanceState);setContentView(R.layout.activity_configuration_changed);}@OverridepublicvoidonConfigurationChanged(Configuration newConfig){super.onConfigurationChanged(newConfig);//判断屏幕朝向if(newConfig.orientation==Configuration.ORIENTATION_PORTRAIT){Toast.makeText(ConfigurationChangedActivity.this,"竖屏显示",Toast.LENGTH_SHORT).show();}if(newConfig.orientation==Configuration.ORIENTATION_LANDSCAPE){Toast.makeText(ConfigurationChangedActivity.this,"横屏显示",Toast.LENGTH_SHORT).show();}}}
(3)修改AndroidMainifest.xml文件,设置Activity可以监听屏幕方向改变的事件,代码如下:
<activity
            android:name=".ConfigurationChangedActivity"
            android:label="@string/app_name"
            android:configChanges="orientation|screenSize"
            android:exported="true"><intent-filter><action android:name="android.intent.action.MAIN"/><category android:name="android.intent.category.LAUNCHER"/></intent-filter></activity>
(4)运行程序,在竖屏显示和屏幕旋转后横屏显示的效果中可以看出按钮显示在屏幕中心。这是因为屏幕使用相对布局,所以在屏幕旋转时,控件仍然保持一致的相对位置。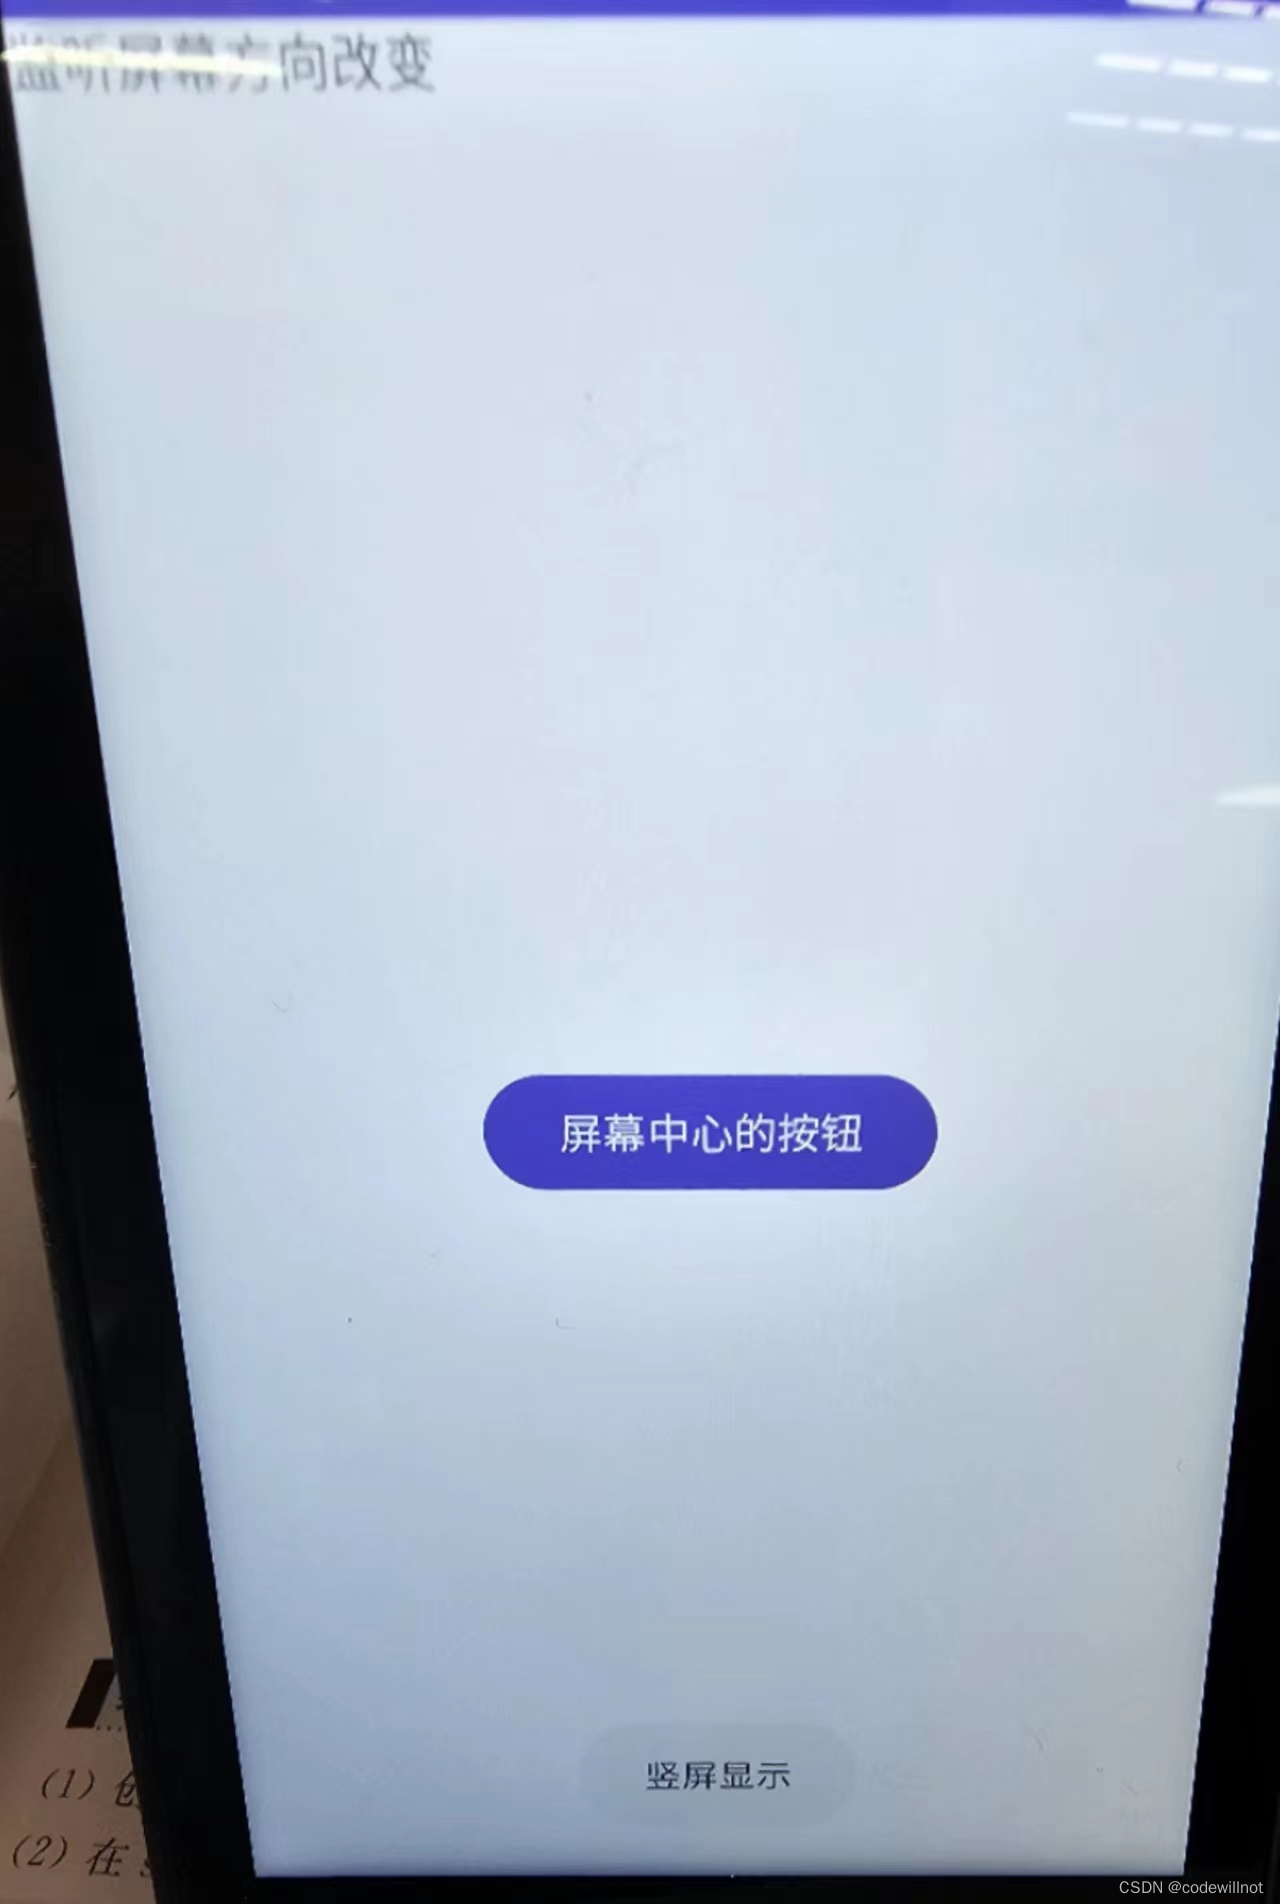
2.6实践任务
任务1 点餐界面设计
需求分析
用户输入姓名、性别、口味喜好及预算金额完成个性化点餐功能,系统根据用户输入的信息推荐菜品,显示符合客户的菜品供客户选择。点餐界面效果如下所示。
实现步骤
(1)创建FoodActivity和布局文件。
(2)在string.xml文件中添加需要用到的字符串信息,代码如下:
<resources><string name="app_name">OrderingSystem</string><string name="start_select_food">开始选餐</string><string name="name">姓名</string><string name="edit_text_input_hint_name">请输入姓名</string><string name="sex">性别</string><string name="male">男</string><string name="female">女</string></resources>
(3)在布局文件中添加控件,代码如下:
<?xml version="1.0" encoding="utf-8"?><LinearLayout xmlns:android="http://schemas.android.com/apk/res/android"
    xmlns:tools="http://schemas.android.com/tools"
    android:layout_width="match_parent"
    android:layout_height="match_parent"
    android:orientation="vertical"
    tools:context=".FoodActivity"><TextView
        android:textColor="#FFFF00"
        android:background="#0000FF"
        android:textAlignment="center"
        android:textStyle="bold"
        android:typeface="monospace"
        android:text="@string/start_select_food"
        android:textSize="30sp"
        android:layout_marginBottom="10dp"
        android:layout_width="match_parent"
        android:layout_height="wrap_content"/><LinearLayout
        android:layout_width="match_parent"
        android:layout_height="0dp"
        android:layout_weight="1"
        android:orientation="vertical"><LinearLayout
        android:layout_width="match_parent"
        android:layout_height="45dp"
        android:layout_marginLeft="15dp"
        android:gravity="center_vertical"
        android:orientation="horizontal"><TextView
        android:text="@string/name"
        android:textSize="22sp"
        android:layout_width="wrap_content"
        android:layout_height="wrap_content"/><EditText
        android:id="@+id/nameEditText"
        android:layout_width="200dp"
        android:hint="@string/edit_text_input_hint_name"
        android:layout_height="wrap_content"/></LinearLayout><LinearLayout
    android:orientation="horizontal"
     android:gravity="center_vertical"
     android:layout_marginLeft="15dp"
     android:layout_width="match_parent"
     android:layout_height="45dp"><TextView
        android:text="@string/sex"
        android:textSize="22sp"
        android:layout_width="wrap_content"
        android:layout_height="wrap_content"/><RadioGroup
        android:id="@+id/sexRadioGroup"
        android:orientation="horizontal"
        android:layout_width="match_parent"
        android:layout_height="wrap_content"><RadioButton
            android:id="@+id/maleRadioButton"
            android:textSize="22sp"
            android:layout_width="75dp"
            android:layout_height="wrap_content"
            android:text="@string/male"/><RadioButton
            android:id="@+id/femaleRadioButton"
            android:textSize="22sp"
            android:layout_width="75dp"
            android:layout_height="wrap_content"
            android:text="@string/female"/></RadioGroup></LinearLayout><LinearLayout
        android:layout_width="match_parent"
        android:layout_height="45dp"
        android:layout_marginLeft="15dp"
        android:gravity="center_vertical"
        android:orientation="horizontal"><TextView
            android:layout_width="wrap_content"
            android:layout_height="wrap_content"
            android:textSize="22sp"
            android:text="喜好"/><LinearLayout
       android:layout_width="match_parent"
       android:layout_height="wrap_content"
       android:orientation="horizontal"><CheckBox
           android:id="@+id/hotCheckBox"
           android:layout_width="65dp"
           android:layout_height="wrap_content"
           android:text="辣"
           android:textSize="22sp"/><CheckBox
           android:id="@+id/fishCheckBox"
           android:layout_width="100dp"
           android:layout_height="wrap_content"
           android:text="海鲜"
           android:textSize="22sp"/><CheckBox
           android:id="@+id/sourceCheckBox"
           android:layout_width="65dp"
           android:layout_height="wrap_content"
           android:text="酸"
           android:textSize="22sp"/></LinearLayout></LinearLayout><LinearLayout
        android:layout_width="match_parent"
        android:layout_height="45dp"
        android:layout_marginLeft="15dp"
        android:gravity="center_vertical"
        android:orientation="horizontal"><TextView
          android:layout_width="wrap_content"
          android:layout_height="wrap_content"
          android:textSize="22sp"
          android:text="预算"/><LinearLayout
            android:orientation="horizontal"
            android:layout_width="match_parent"
            android:layout_height="wrap_content"><TextView
               android:text="0元"
               android:textSize="22sp"
               android:layout_width="wrap_content"
               android:layout_height="wrap_content"/><SeekBar
                android:id="@+id/seekBar"
                android:max="100"
                android:textSize="22sp"
                android:layout_width="220dp"
                android:layout_height="wrap_content"/><TextView
                android:text="100元"
                android:textSize="22sp"
                android:layout_width="wrap_content"
                android:layout_height="wrap_content"/></LinearLayout></LinearLayout><Button
            android:id="@+id/searchButton"
            android:layout_width="300dp"
            android:layout_height="50dp"
            android:text="寻找菜品"
            android:layout_gravity="center_horizontal"
            android:gravity="center_horizontal"
            android:textSize="22sp"/></LinearLayout><LinearLayout
        android:orientation="vertical"
        android:layout_width="match_parent"
        android:layout_weight="1"
        android:layout_height="0dp"><ImageView
            android:id="@+id/foodImageView"
            android:src="@drawable/ic_launcher_foreground"
            android:layout_width="match_parent"
            android:layout_height="0dp"
            android:layout_weight="3"/><ToggleButton
            android:id="@+id/showToggleButton"
            android:textOff="下一个"
            android:textOn="显示信息"
            android:layout_gravity="center_horizontal"
            android:gravity="center_horizontal"
            android:textSize="22sp"
            android:layout_width="300dp"
            android:layout_height="50dp"/></LinearLayout></LinearLayout>
任务2 实现查找菜品功能
需求分析
初始化系统中的菜品信息,当用户输入姓名、性别、喜好和设置好预算后,系统根据用户输入的信息查找出相应的菜品推荐给用户,用户根据系统推荐的菜品,来浏览菜品的信息和图片。整个操作过程如下:
(1)用户输入姓名、性别、喜好、设置预算,如下图所示。
(2)用户点击【寻找菜品】按钮后开始搜索,显示如下图所示的结果。
点击【显示信息】后输出菜品的名称。
实现步骤
(1)创建好Food和Person实体类。
Food类的代码如下:
packagecom.example.orderingsystem;publicclassFood{privateString name;privateint price;privateint pic;privateboolean hot;privateboolean fish;privateboolean sour;publicFood(String name,int price,int pic,boolean hot,boolean fish,boolean sour){this.name=name;this.price=price;this.pic=pic;this.hot=hot;this.fish=fish;this.sour=sour;}publicStringgetName(){return name;}publicvoidsetName(){this.name =name;}publicintgetPrice(){return price;}publicvoidsetPrice(){this.price=price;}publicintgetPic(){return pic;}publicvoidsetPic(){this.pic=pic;}publicbooleanisHot(){return hot;}publicvoidsetHot(boolean hot){this.hot=hot;}publicbooleanisFish(){return fish;}publicvoidsetFish(boolean fish){this.fish=fish;}publicbooleanisSour(){return sour;}publicvoidsetSour(boolean sour){this.sour=sour;}@OverridepublicStringtoString(){return"Food{"+"name='"+name+'\''+",price='"+price+'\''+",pic="+pic+",hot="+hot+",fish="+fish+",sour="+sour+'}';}}
Person类的代码如下:
packagecom.example.orderingsystem;publicclassPerson{privateString name;privateString sex;privateFood food;publicStringgetName(){return name;}publicvoidsetName(String name){this.name = name;}publicStringgetSex(){return sex;}publicvoidsetSex(String sex){this.sex = sex;}publicFoodgetFood(){return food;}publicvoidsetFood(Food food){this.food=food;}}
(2)在FoodActivity中添加寻找菜品的功能,代码如下:
packagecom.example.orderingsystem;importandroidx.appcompat.app.AppCompatActivity;importandroid.os.Bundle;importandroid.view.View;importandroid.widget.Button;importandroid.widget.CheckBox;importandroid.widget.CompoundButton;importandroid.widget.EditText;importandroid.widget.ImageView;importandroid.widget.RadioGroup;importandroid.widget.SeekBar;importandroid.widget.Toast;importandroid.widget.ToggleButton;importjava.util.ArrayList;importjava.util.List;publicclassFoodActivityextendsAppCompatActivity{privateCheckBox hotcheckbox,fishcheckbox,sourcecheckbox;privateRadioGroup sexradiogroup;privateEditText name;privateSeekBar seekBar;privateButton button;privateImageView foodimageview;privateToggleButton showToggleButton;privateList<Food> mFoods;privateList<Food> mFoodsResult;privatePerson mperson;privateboolean mishot;privateboolean misfish;privateboolean missour;privateint mprice;privateint mCurrentindex;@OverrideprotectedvoidonCreate(Bundle savedInstanceState){super.onCreate(savedInstanceState);setContentView(R.layout.activity_food);//初始化控件findView();//初始化数据initData();//为控件添加监听器,实现基本功能setListeners();}privatevoidinitData(){
mFoods=newArrayList<>();
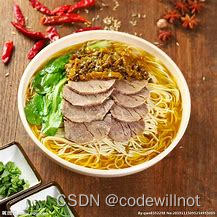
mFoods.add(newFood("麻辣香锅",55,R.drawable.one,true,false,false));
mFoods.add(newFood("水煮鱼",48,R.drawable.two,true,true,false));
mFoods.add(newFood("麻辣火锅",80,R.drawable.three,true,true,false));
mFoods.add(newFood("清真鲈鱼",68,R.drawable.four,false,true,false));
mFoods.add(newFood("桂林米粉",15,R.drawable.five,false,false,false));
mFoods.add(newFood("上汤娃娃菜",28,R.drawable.six,false,false,false));
mFoods.add(newFood("红烧肉",60,R.drawable.seven,false,false,false));
mFoods.add(newFood("木须肉",40,R.drawable.eight,false,false,false));
mFoods.add(newFood("酸菜牛肉面",35,R.drawable.nine,false,false,true));
mFoods.add(newFood("西芹炒百合",38,R.drawable.ten,false,false,false));
mFoods.add(newFood("酸辣汤",40,R.drawable.eleven,true,false,true));
mperson=newPerson();
mFoodsResult=newArrayList<>();}privatevoidfindView(){
name =findViewById(R.id.nameEditText);
sexradiogroup =findViewById(R.id.sexRadioGroup);
hotcheckbox=findViewById(R.id.hotCheckBox);
fishcheckbox=findViewById(R.id.fishCheckBox);
sourcecheckbox=findViewById(R.id.sourceCheckBox);
seekBar=findViewById(R.id.seekBar);
seekBar.setProgress(30);//设置进度条为30
button=findViewById(R.id.searchButton);
foodimageview=findViewById(R.id.foodImageView);
showToggleButton=findViewById(R.id.showToggleButton);
showToggleButton.setChecked(true);}privatevoidsetListeners(){
sexradiogroup.setOnCheckedChangeListener(newRadioGroup.OnCheckedChangeListener(){@OverridepublicvoidonCheckedChanged(RadioGroup radioGroup,int checkedid){if(checkedid ==R.id.maleRadioButton){
mperson.setSex("男");}elseif(checkedid ==R.id.femaleRadioButton){
mperson.setSex("女");}}});//设置复选框listener;
fishcheckbox.setOnCheckedChangeListener(newCompoundButton.OnCheckedChangeListener(){@OverridepublicvoidonCheckedChanged(CompoundButton compoundButton,boolean ischecked){
misfish=ischecked;}});
sourcecheckbox.setOnCheckedChangeListener(newCompoundButton.OnCheckedChangeListener(){@OverridepublicvoidonCheckedChanged(CompoundButton compoundButton,boolean ischecked){
missour=ischecked;}});
hotcheckbox.setOnCheckedChangeListener(newCompoundButton.OnCheckedChangeListener(){@OverridepublicvoidonCheckedChanged(CompoundButton compoundButton,boolean ischecked){
mishot=ischecked;}});
seekBar.setOnSeekBarChangeListener(newSeekBar.OnSeekBarChangeListener(){@OverridepublicvoidonProgressChanged(SeekBar seekBar,int progress,boolean fromUser){}@OverridepublicvoidonStartTrackingTouch(SeekBar seekBar){}@OverridepublicvoidonStopTrackingTouch(SeekBar seekBar){
mprice=seekBar.getProgress();Toast.makeText(FoodActivity.this,"价格"+mprice,Toast.LENGTH_SHORT).show();}});
button.setOnClickListener(newView.OnClickListener(){@OverridepublicvoidonClick(View view){search();}});
showToggleButton.setOnClickListener(newView.OnClickListener(){@OverridepublicvoidonClick(View view){if(showToggleButton.isChecked()){//下一个菜
mCurrentindex++;if(mCurrentindex<mFoodsResult.size()){
foodimageview.setImageResource(mFoodsResult.get(mCurrentindex).getPic());}else{Toast.makeText(FoodActivity.this,"没有啦",Toast.LENGTH_SHORT).show();}}else{//显示信息:菜的名称if(mCurrentindex<mFoodsResult.size()){Toast.makeText(FoodActivity.this,"菜名:"+mFoodsResult.get(mCurrentindex).getName(),Toast.LENGTH_SHORT).show();}else{Toast.makeText(FoodActivity.this,"没有啦"+mFoodsResult.get(mCurrentindex).getName(),Toast.LENGTH_SHORT).show();}}}});}privatevoidsearch(){//结果列表每次都清空//遍历所有菜//如果符合条件,则加入结果列表中//如果为空,先初始化if(mFoodsResult ==null){
mFoodsResult=newArrayList<>();}//先清除之前的结果
mFoodsResult.clear();//当前显示的是结果中的第几个菜
mCurrentindex=0;for(int index=0;index< mFoods.size();index++){Food food=mFoods.get(index);if(food!=null){//价格要小于设定的价格//是顾客选择的口味if(food.getPrice()<mprice&&(food.isHot()==mishot||food.isFish()==misfish||food.isSour()==missour)){
mFoodsResult.add(food);}}}//显示第一张图片if(mCurrentindex<mFoodsResult.size()){
foodimageview.setImageResource(mFoodsResult.get(mCurrentindex).getPic());}else{
foodimageview.setImageResource(R.drawable.ic_launcher_foreground);}}}


版权归原作者 codewillnot 所有, 如有侵权,请联系我们删除。