springboot 连接 kafka集群
一、环境搭建
1.1 springboot 环境
JDK 11+
Maven 3.8.x+
springboot 2.5.4 +
1.2 kafka 依赖
springboot的pom文件导入
<dependency><groupId>org.springframework.kafka</groupId><artifactId>spring-kafka</artifactId></dependency><dependency><groupId>org.springframework.kafka</groupId><artifactId>spring-kafka-test</artifactId><scope>test</scope></dependency><dependency><groupId>org.apache.kafka</groupId><artifactId>kafka-clients</artifactId><version>3.4.0</version></dependency>
二、 kafka 配置类
2.1 发布者
2.1.1 配置
发布者我们使用 KafkaTemplate 来进行消息发布,所以需要先对其进行一些必要的配置。
@Configuration@EnableKafkapublicclassKafkaConfig{/***** 发布者 *****///生产者工厂@BeanpublicProducerFactory<Integer,String>producerFactory(){returnnewDefaultKafkaProducerFactory<>(producerConfigs());}//生产者配置@BeanpublicMap<String,Object>producerConfigs(){Map<String,Object> props =newHashMap<>();
        props.put(ProducerConfig.BOOTSTRAP_SERVERS_CONFIG,"192.168.2.83:9092,192.168.2.84:9092,192.168.2.86:9092");
        props.put(ProducerConfig.KEY_SERIALIZER_CLASS_CONFIG,IntegerSerializer.class);
        props.put(ProducerConfig.VALUE_SERIALIZER_CLASS_CONFIG,StringSerializer.class);return props;}//生产者模板@BeanpublicKafkaTemplate<Integer,String>kafkaTemplate(){returnnewKafkaTemplate<>(producerFactory());}}
2.1.2 构建发布者类
配置完发布者,下来就是发布消息,我们需要继承 ProducerListener<K, V> 接口,该接口完整信息如下:
publicinterfaceProducerListener<K,V>{voidonSuccess(ProducerRecord<K,V> producerRecord,RecordMetadata recordMetadata);voidonError(ProducerRecord<K,V> producerRecord,RecordMetadata recordMetadata,Exception exception);}
实现该接口的方法,我们可以获取包含发送结果(成功或失败)的异步回调,也就是可以在这个接口的实现中获取发送结果。
我们简单的实现构建一个发布者类,接收主题和发布消息参数,并打印发布结果。
@ComponentpublicclassKafkaProducerimplementsProducerListener<Object,Object>{privatestaticfinalLogger producerlog =LoggerFactory.getLogger(KafkaProducer.class);privatefinalKafkaTemplate<Integer,String> kafkaTemplate;publicKafkaProducer(KafkaTemplate<Integer,String> kafkaTemplate){this.kafkaTemplate = kafkaTemplate;}publicvoid producer (String msg,String topic){ListenableFuture<SendResult<Integer,String>> future = kafkaTemplate.send(topic,0, msg);
        future.addCallback(newKafkaSendCallback<Integer,String>(){@OverridepublicvoidonSuccess(SendResult<Integer,String> result){
                producerlog.info("发送成功 {}", result);}@OverridepublicvoidonFailure(KafkaProducerException ex){ProducerRecord<Integer,String> failed = ex.getFailedProducerRecord();
                producerlog.info("发送失败 {}",failed);}});}}
2.1.3 发布消息
写一个controller类来测试我们构建的发布者类,这个类中打印接收到的消息,来确保信息接收不出问题。
@RestControllerpublicclassKafkaTestController{privatestaticfinalLogger kafkaTestLog =LoggerFactory.getLogger(KafkaTestController.class);@ResourceprivateKafkaProducer kafkaProducer;@GetMapping("/kafkaTest")publicvoidkafkaTest(String msg,String topic){
        kafkaProducer.producer(msg,topic);
        kafkaTestLog.info("接收到消息 {} {}",msg,topic);}}
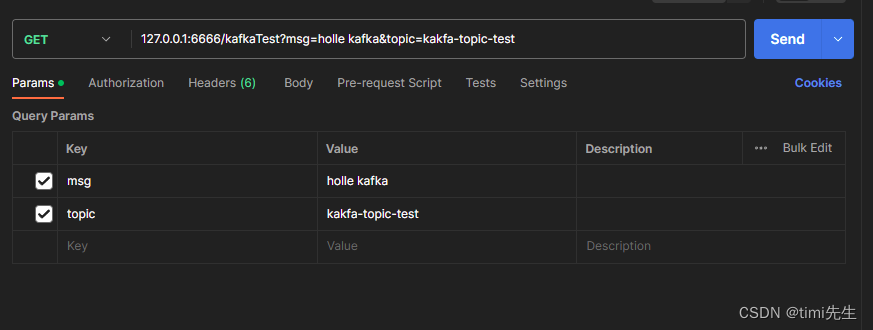
一切准备就绪,我们启动程序利用postman来进行简单的测试。
进行消息发布:
发布结果:
可以看到消息发送成功。
我们再看看kafka消费者有没有接收到消息:

看以看到,kakfa的消费者也接收到了消息。
2.2 消费者
2.2.1 配置
消息的接受有多种方式,我们这里选择的是使用 @KafkaListener 注解来进行消息接收。它的使用像下面这样:
publicclassListener{@KafkaListener(id ="foo", topics ="myTopic", clientIdPrefix ="myClientId")publicvoidlisten(String data){...}}
看起来不是太难吧,但使用这个注解,我们需要配置底层 ConcurrentMessageListenerContainer.kafkaListenerContainerFactor。
我们在原来的kafka配置类 KafkaConfig 中,继续配置消费者,大概就像下面这样
@Configuration@EnableKafkapublicclassKafkaConfig{/***** 发布者 *****///生产者工厂@BeanpublicProducerFactory<Integer,String>producerFactory(){returnnewDefaultKafkaProducerFactory<>(producerConfigs());}//生产者配置@BeanpublicMap<String,Object>producerConfigs(){Map<String,Object> props =newHashMap<>();
        props.put(ProducerConfig.BOOTSTRAP_SERVERS_CONFIG,"192.168.2.83:9092,192.168.2.84:9092,192.168.2.86:9092");
        props.put(ProducerConfig.KEY_SERIALIZER_CLASS_CONFIG,IntegerSerializer.class);
        props.put(ProducerConfig.VALUE_SERIALIZER_CLASS_CONFIG,StringSerializer.class);return props;}//生产者模板@BeanpublicKafkaTemplate<Integer,String>kafkaTemplate(){returnnewKafkaTemplate<>(producerFactory());}/***** 消费者 *****///容器监听工厂@BeanKafkaListenerContainerFactory<ConcurrentMessageListenerContainer<Integer,String>>kafkaListenerContainerFactory(){ConcurrentKafkaListenerContainerFactory<Integer,String> factory =newConcurrentKafkaListenerContainerFactory<>();
        factory.setConsumerFactory(consumerFactory());
        factory.setConcurrency(3);
        factory.getContainerProperties().setPollTimeout(3000);return factory;}//消费者工厂@BeanpublicConsumerFactory<Integer,String>consumerFactory(){returnnewDefaultKafkaConsumerFactory<>(consumerConfigs());}//消费者配置@BeanpublicMap<String,Object>consumerConfigs(){Map<String,Object> props =newHashMap<>();
        props.put(ConsumerConfig.BOOTSTRAP_SERVERS_CONFIG,"192.168.2.83:9092,192.168.2.84:9092,192.168.2.86:9092");
        props.put(ConsumerConfig.VALUE_DESERIALIZER_CLASS_CONFIG,ErrorHandlingDeserializer.class);
        props.put(ConsumerConfig.KEY_DESERIALIZER_CLASS_CONFIG,ErrorHandlingDeserializer.class);
        props.put(ErrorHandlingDeserializer.KEY_DESERIALIZER_CLASS,JsonDeserializer.class);
        props.put(ErrorHandlingDeserializer.VALUE_DESERIALIZER_CLASS,JsonDeserializer.class.getName());
        props.put(ConsumerConfig.REQUEST_TIMEOUT_MS_CONFIG,3000);return props;}}
注意,要设置容器属性必须使用getContainerProperties()工厂方法。它用作注入容器的实际属性的模板
2.2.2 构建消费者类
配置好后,我们就可以使用这个注解了。这个注解的使用有多种方式:
1、用它来覆盖容器工厂的concurrency和属性
@KafkaListener(id ="myListener", topics ="myTopic",
        autoStartup ="${listen.auto.start:true}", concurrency ="${listen.concurrency:3}")publicvoidlisten(String data){...}
2、可以使用显式主题和分区(以及可选的初始偏移量)
@KafkaListener(id ="thing2", topicPartitions ={@TopicPartition(topic ="topic1", partitions ={"0","1"}),@TopicPartition(topic ="topic2", partitions ="0",
             partitionOffsets =@PartitionOffset(partition ="1", initialOffset ="100"))})publicvoidlisten(ConsumerRecord<?,?>record){...}
3、将初始偏移应用于所有已分配的分区
@KafkaListener(id ="thing3", topicPartitions ={@TopicPartition(topic ="topic1", partitions ={"0","1"},
             partitionOffsets =@PartitionOffset(partition ="*", initialOffset ="0"))})publicvoidlisten(ConsumerRecord<?,?>record){...}
4、指定以逗号分隔的分区列表或分区范围
@KafkaListener(id ="pp", autoStartup ="false",
        topicPartitions =@TopicPartition(topic ="topic1",
                partitions ="0-5, 7, 10-15"))publicvoidprocess(String in){...}
5、可以向侦听器提供Acknowledgment
@KafkaListener(id ="cat", topics ="myTopic",
          containerFactory ="kafkaManualAckListenerContainerFactory")publicvoidlisten(String data,Acknowledgment ack){...
    ack.acknowledge();}
6、添加标头
@KafkaListener(id ="list", topics ="myTopic", containerFactory ="batchFactory")publicvoidlisten(List<String> list,@Header(KafkaHeaders.RECEIVED_KEY)List<Integer> keys,@Header(KafkaHeaders.RECEIVED_PARTITION)List<Integer> partitions,@Header(KafkaHeaders.RECEIVED_TOPIC)List<String> topics,@Header(KafkaHeaders.OFFSET)List<Long> offsets){...}
我们这里写一个简单的,只用它来接受指定主题的数据:
@ComponentpublicclassKafkaConsumer{privatestaticfinalLogger consumerlog =LoggerFactory.getLogger(KafkaConsumer.class);@KafkaListener(topicPartitions  =@TopicPartition(topic ="kafka-topic-test",
            partitions ="0"))publicvoid consumer (String data){
        consumerlog.info("消费者接收数据 {}",data);}}
这里解释一下,因为我们进行了手动分配主题/分区,所以 注解中group.id 可以为空。若要指定group.id请在消费者配置中加上props.put(ConsumerConfig.GROUP_ID_CONFIG, “bzt001”); 或在 @TopicPartition 注解后加上 groupId = “组id”
2.2.3 进行消息消费
继续使用postman调用我们写好的发布者发布消息,观察控制台的消费者类是否有相关日志出现。
版权归原作者 timi先生 所有, 如有侵权,请联系我们删除。