
playwright上手
内网如何安装项目依赖
注意:想运行
playwright
需要下载相关浏览器的二进制文件
由于默认情况下,Playwright 会从 Microsoft CDN 下载浏览器二进制文件。
公司内网会阻止对公共资源的直接访问,所以不能直接通过内网进行下载。
解决办法:
- 在外网,创建一个文件夹随后在该目录下呼出命令行并输入
npm i -D @playwright/test
页面目录发生变化,并且命令行出现
added 193 packages in 15s
代表下载完成
- 随后命令行输入
npx playwright install开始安装浏览器二进制依赖 - 待下载完成后进入到对应的目录,示例为:C:\Users\winches\AppData\Local\ms-playwright
将如图所示4个文件选中复制
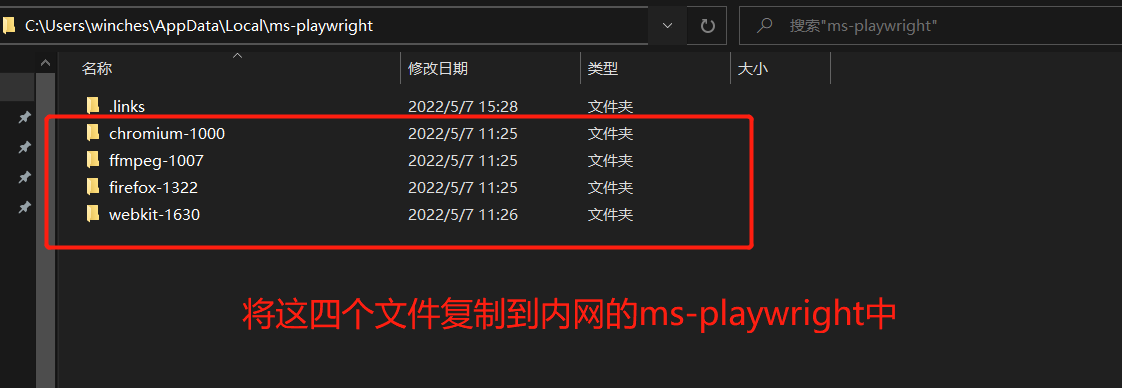
- 将选中的4个文件粘贴到内网中的
ms-playwright文件下

playwright 快速上手
Playwright介绍
Playwright是一个测试和自动化框架,可以实现网络浏览器的自动化交互。简而言之,您可以编写打开浏览器的代码,用代码实现使用所有网络浏览器的功能。自动化脚本可以实现导航到URL、输入文本、单击按钮和提取文本等功能。Playwright最令人惊喜的功能是它可以同时处理多个页面且不用等待,也不会被封锁。
Playwright支持大多数浏览器,例如Google Chrome、Firefox、使用Chromium内核的Microsoft Edge和使用WebKit内核的Safari。跨浏览器的网络自动化是Playwright的强项,可以为所有浏览器有效地执行相同的代码。此外,Playwright支持各种编程语言,例如Node.js、Python、Java和.NET。您可以编写代码用于打开网站并使用这些语言中的任何一种与之交互。
使用
Node.js
创建
playwright
项目
Playwright 有自己的 test runner用于端对端测试,我们称之为 Playwright Test.
- 初始化项目并安装
playwright/test库,只需要两个简单的命令既可以完成
npm init -y
npm i -D @playwright/test
- 创建一个简单的脚本
test-1.spec.ts
const{ test, expect }=require('@playwright/test');// 测试用例test('basic test',async({ page })=>{// 打开一个页面并跳转到 https://playwright.dev/await page.goto('https://playwright.dev/');// 通过类选择器,选中类目为navbar__title的元素的innerTextconst name =await page.innerText('.navbar__title');// 断言校验是否匹配expect(name).toBe('Playwright');});
- 现在运行你的测试脚本
npm playwright test
Playwright Test 刚刚使用 Chromium 浏览器以无GUI(headless)的方式运行了一个测试(Playwright Test)。让我们告诉它使用有GUI(headed)模式运行浏览器:
npx playwright test --headed
其他浏览器呢?让我们使用 Firefox 运行相同的测试(Playwright Test):
npx playwright test --browser=firefox
最后,在所有三个浏览器上:
npx playwright test --browser=all
配置文档
要享受 Playwright Test 提供的所有功能,还需要创建一个配置文件 playwright.config.ts(或 playwright.config.js)。
下面是一些示例配置的介绍:
playwright.config.ts
import{ PlaywrightTestConfig }from"@playwright/test";letconfig: PlaywrightTestConfig ={timeout:6*60*1000,// 每个测试用例超时 globalTimeout:60*1000,// 总超时 testDir:"./demo",//测试目录 reporter:[["html",{outputFolder:"./",open:"always"}]],//测试报告 use:{launchOptions:{headless:false,//不是无头模式},contextOptions:{viewport:{//窗口视野大小 width:1400,height:900,},},//baseURL: process.env.TENANT_URL, // 基础URL screenshot:"only-on-failure",// 失败时截屏 trace:"retain-on-failure",// 失败时跟踪记录 browserName:"webkit",// 测试浏览器 },};exportdefault config;
也可以通过
npm init playwright@latest 项目名
一键生成项目及配置
里面有开箱即用的配置
playwright.config.ts
import type { PlaywrightTestConfig }from'@playwright/test';import{ devices }from'@playwright/test';constconfig: PlaywrightTestConfig ={/* 测试包含的目录 */testDir:'./tests',/* 一个测试可以运行expect()应等待满足条件的最长时间的最长时间 */timeout:30*1000,expect:{/**
     * expect()应等待满足条件的最长时间
     * 例如,在'await expect(locator).toHaveText()'
     */timeout:5000},/* 如果意外退出测试,则无法在CI上构建。只有在源代码中 */forbidOnly:!!process.env.CI,/* 仅在CI上重试 */retries: process.env.CI?2:0,/* 选择退出CI的并行测试 */workers: process.env.CI?1:undefined,/* Reporter to use. See https://playwright.dev/docs/test-reporters */reporter:'html',/* 下面所有项目的共享设置。 See https://playwright.dev/docs/api/class-testoptions. */use:{/* 每个操作(如“click()”)可以花费的最长时间。默认值为0(无限制) */actionTimeout:0,/* 在“等待页面”等操作中使用的基本URL。转到(“/”) */// baseURL: 'http://localhost:3000',/* 在重试失败的测试时收集跟踪. See https://playwright.dev/docs/trace-viewer
更多配置的信息可以查看:配置信息
Test fixtures
Test fixtures官网跳转
您注意到上面的测试脚本可以访问的参数
{page}
:
test('basic test',async({ page })=>{...}
我们称这些参数为
fixtures
.。Fixtures 是为每次测试运行创建的对象。Playwright Test 加载了这些 fixtures,您也可以添加自己的 fixtures。在运行测试时,Playwright Test 会查看每个测试声明,分析测试所需的 fixtures 并专门为测试准备这些 fixtures 。
以下是您可能常用的预定义 fixtures 的列表:
FixtureTypeDescriptionpagePage此测试运行的独立页面。contextBrowserContext此测试运行的隔离上下文。
page
也属于这种情况。了解如何配置上下文。browserBrowser浏览器在测试之间共享以优化资源。了解如何配置浏览器。browserNamestring当前运行测试的浏览器的名称。要么
chromium
,
firefox
要么
webkit
。
测试和断言特性
如果您熟悉 Jest、Mocha 和 Ava 等测试运行程序,您会发现 Playwright Test 语法很熟悉。
Playwright Test 使用expect库进行测试断言。它使用特定于 Playwright 的匹配器对其进行了扩展,以实现更大的测试工程。
这些是您可以通过测试执行的基本操作:
聚焦测试
你可以集中一些测试。当有重点测试时,只有它们运行。
test.only('focus this test',async({ page })=>{// 在整个项目中只运行重点测试。});
跳过测试
你可以通过设置一些条件来跳过测试:
test('skip this test',async({ page, browserName })=>{
  test.skip(browserName ==='firefox','Still working on it');});
分组测试
您可以对测试进行分组以给它们一个逻辑名称或将范围之前/之后关联到组。
const{ test, expect }=require('@playwright/test');

test.describe('two tests',()=>{test('one',async({ page })=>{// ...});test('two',async({ page })=>{// ...});});
测试钩子(test hooks)
您可以使用
test.beforeAll
和
test.afterAll
钩子来设置和拆除测试之间共享的资源。您可以使用
test.beforeEach
和
test.afterEach
钩子分别为每个测试设置和拆除资源。
// example.spec.jsconst{ test, expect }=require('@playwright/test');

test.describe('feature foo',()=>{
  test.beforeEach(async({ page })=>{// 在每次测试之前转到起始 url。await page.goto('https://my.start.url/');});test('my test',async({ page })=>{// 断言使用 expect API。expect(page.url()).toBe('https://my.start.url/');});});
写断言(expect)
Playwright Test 使用 expect 库进行测试断言。它提供了很多匹配器,
toEqual
,
toContain
,
toMatch
,
toMatchSnapshot
等等。
将 expect 与各种 Playwright 方法相结合,来实现测试目标:
- page.isVisible(selector[, options])#
- page.waitForSelector(selector[, options])#
- page.textContent(selector[, options])#
- page.getAttribute(selector, name[, options])#
- page.screenshot([options])#
- 在断言指南中了解更多信息
// example.spec.tsimport{ test, expect }from'@playwright/test';test('my test',async({ page })=>{await page.goto('https://playwright.dev/');// 期望标题“包含”子字符串。awaitexpect(page).toHaveTitle(/Playwright/);// 期望属性“严格等于”该值。awaitexpect(page.locator('text=Get Started').first()).toHaveAttribute('href','/docs/intro');await page.click('text=Get Started');// 期望一些文本在页面上可见。awaitexpect(page.locator('text=Introduction').first()).toBeVisible();});
注意运行这个测试是如何输出的:

学习命令行
这里有常见的命令行参数.
- Run tests in headed browsers(带浏览器UI模式运行)
npx playwright test --headed
- Run tests in a particular browser(以指定的浏览器运行)
npx playwright test --browser=webkit
- Run tests in all browsers(在所有浏览器运行测试)
npx playwright test --browser=all
- Run a single test file(单测试文件)
npx playwright test tests/todo-page.spec.ts
- Run a set of test files(多测试文件)
npx playwright test tests/todo-page/ tests/landing-page/
- Run a test with specific title(使用特定的标题运行测试)
npx playwright test -g "add a todo item"
- Run tests in parallel - that’s the default(并行测试-默认)
npx playwright test
- Disable parallelization(禁用并行)
npx playwright test --workers=1
- Choose a reporter
npx playwright test --reporter=html
- Ask for help (请求帮忙)
npx playwright test --help
在调试模式下运行(GUI工具)
Playwright Inspector 是一个 GUI 工具,可帮助创作和调试 Playwright 脚本。
# Linux/macOSPWDEBUG=1 npx playwright test# Windows with cmd.exesetPWDEBUG=1
npx playwright test# Windows with PowerShell$env:PWDEBUG=1
npx playwright test
自动生成测试代码
使用
Playwright
无需写一行代码,我们只需手动操作浏览器,它会录制我们的操作,然后自动生成代码脚本。
下面就是录制的命令
codegen
,仅仅一行。
npx playwright codegen wikipedia.org
执行
codegen
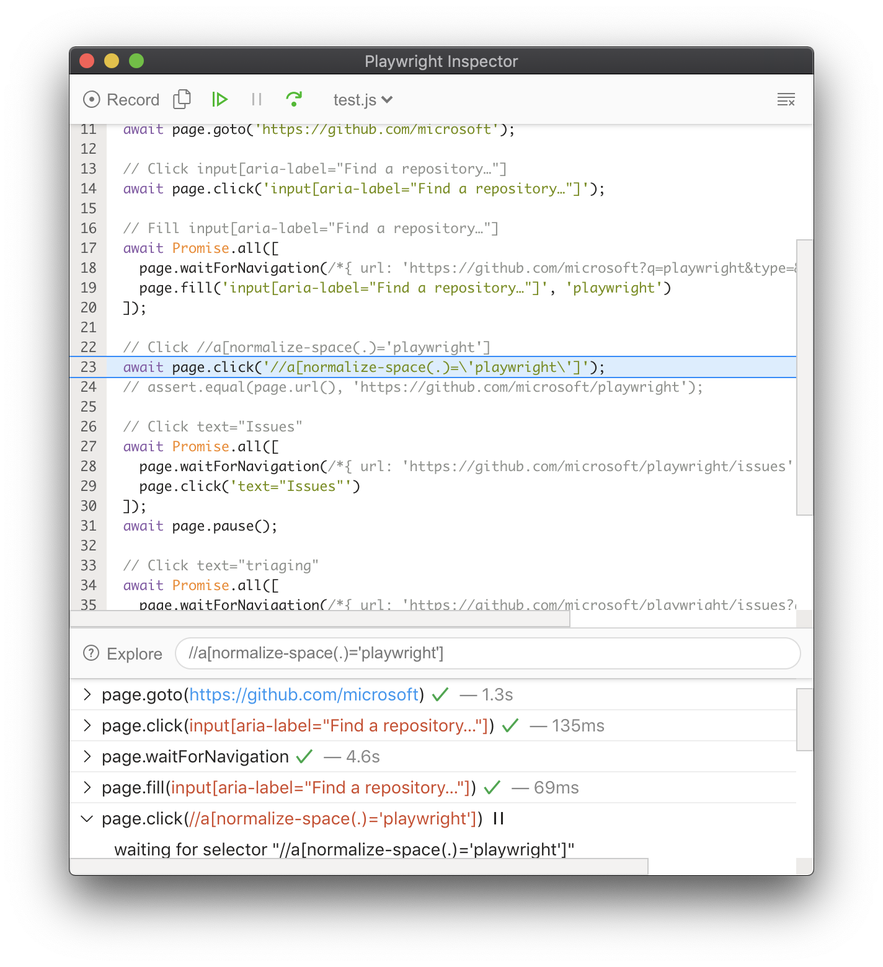
并运行浏览器。 Playwright Inspector 将记录用户交互动作并生成JavaScript代码
codegen
将尝试生成基于文本的弹性选择器。
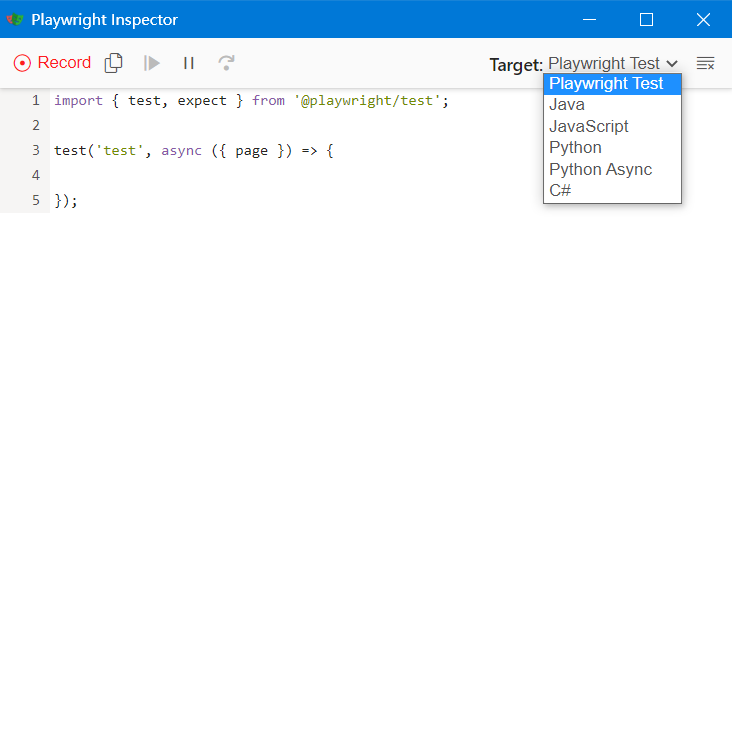
(图示为)Playwright Inspector
codegen
的用法可以使用
--help
查看,如果简单使用就是直接在命令后面加上
url
链接,如果有其他需要可以添加
options
。
options含义:
- -o:将录制的脚本保存到一个文件
- –target:规定生成脚本的语言,默认为
Playwright Test - -b:指定浏览器驱动
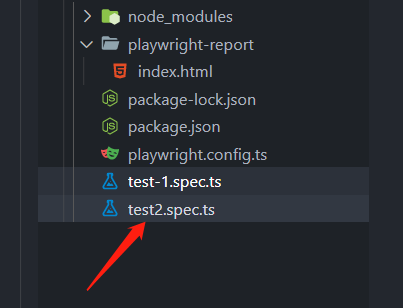
比如,我要在
baidu.com
搜索,用
chromium
驱动,将结果保存为
test1.spec.ts
的
ts
文件。
npx playwright codegen -b chromium -o ./test2.spec.ts --target=javascript
命令行输入后会自动打开浏览器,然后可以看见在浏览器上的一举一动都会被自动翻译成代码,如下所示。

通过
vscode Playwright Test for VScode
插件生成代码
通过在浏览器中执行测试操作来记录新的测试。


保留已验证状态
执行
codegen
并指定
--save-storage
参数来保存 cookies 和 localStorage。 这对于单独记录身份验证步骤并在以后负复用它非常有用。
npx playwright codegen --save-storage=auth.json
# Perform authentication and exit.# auth.json will contain the storage state.
使用
--load-storage
参数来加载先前的存储。通过这种方式,所有的 cookies 和 localStorage 将被恢复,使大多数web应用程序进入认证状态。
npx playwright open --load-storage=auth.json my.web.app
npx playwright codegen --load-storage=auth.json my.web.app
# Perform actions in authenticated state.
具有自定义设置的Codegen
如果你想在一些非标准的设置中使用codegen (例如, 使用 browserContext.route(url, handler)), 可以调用 page.pause() ,它将打开一个带有代码生成控件的单独窗口。
const{ chromium }=require('playwright');(async()=>{// Make sure to run headed.const browser =await chromium.launch({headless:false});// Setup context however you like.const context =await browser.newContext({/* pass any options */});await context.route('**/*',route=> route.continue());// Pause the page, and start recording manually.const page =await context.newPage();await page.pause();})();
检查选择器(selectors)
在
open
或
codegen
期间,您可以在任何浏览器的developer tools控制台中使用以下API。
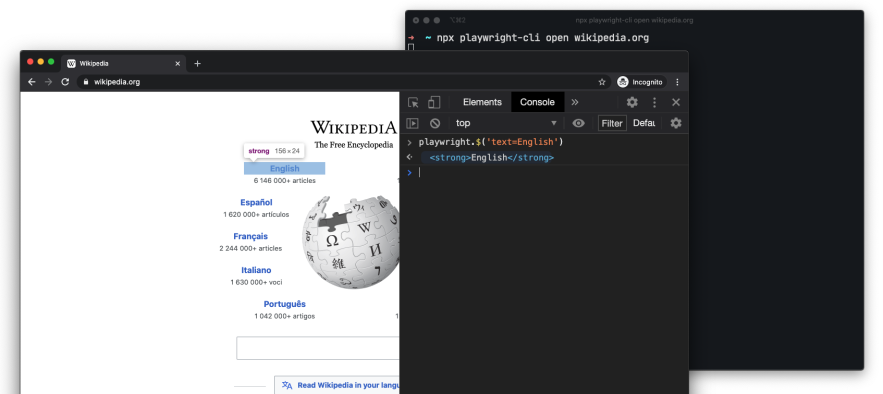
playwright.$(selector)
查询 Playwright 选择器,使用实际的 Playwright 查询引擎,例如:
> playwright.$('.auth-form >> text=Log in');<button>Log in</button>
playwright.$$(selector)
与 相同
playwright.$
,但返回所有匹配的元素。
> playwright.$$('li >> text=John')>[<li>,<li>,<li>,<li>]
playwright.inspect(selector)
在 Elements 面板中显示元素(如果相应浏览器的 DevTools 支持它)。
> playwright.inspect('text=Log in')
playwright.selector(element)
为给定元素生成选择器。
> playwright.selector($0)"div[id="glow-ingress-block"] >> text=/.*Hello.*/"
playwright.locator(selector)
使用实际的 Playwright 查询引擎查询 Playwright 元素,例如:
> playwright.locator('.auth-form',{hasText:'Log in'});>Locator()>- element: button
>- elements:[button]
调试工具(Debugging)
Playwright 脚本与现有的调试工具一起使用,例如 Node.js 调试器和浏览器开发工具。 Playwright 还为浏览器自动化引入了新的调试功能。
- Playwright Inspector
- Playwright Trace Viewer
- Run in headed mode(以GUI模式运行)
- Browser Developer Tools(浏览器开发工具)
- Run in Debug Mode(在调试模式下运行)
- Selectors in Developer Tools Console(开发者工具台中的选择器)
- Visual Studio Code debugger (Node.js)(Visual Studio 代码调试器)
- Verbose API logs(详细的API日志)
Playwright Inspector
Playwright Inspector 是一个 GUI 工具,可帮助创作和调试 Playwright 脚本。这是我们默认推荐的脚本故障排除工具。
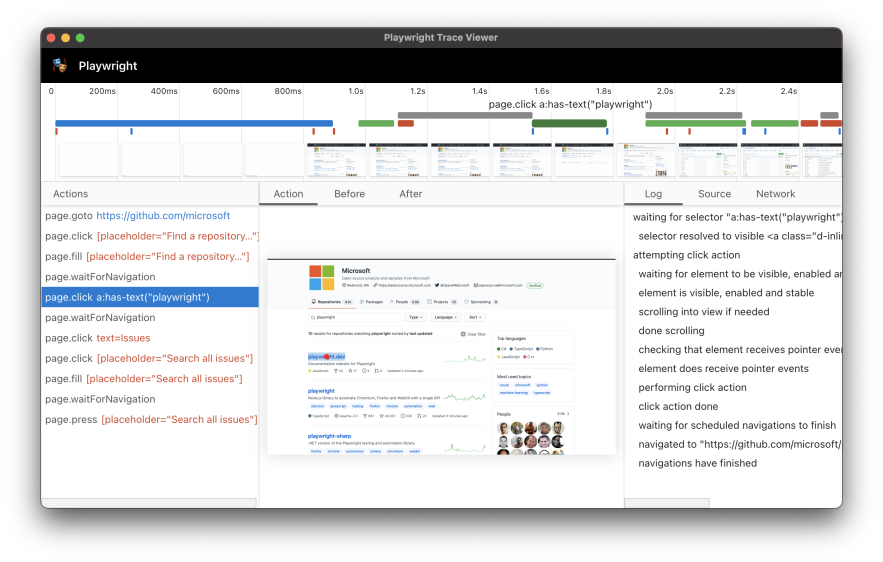
Playwright Trace Viewer
Playwright Trace Viewer 是一个 GUI 工具,可帮助以事后分析的方式对测试运行进行故障排除.
浏览器开发工具(Browser Developer Tools)
您可以在 Chromium、Firefox 和 WebKit 中使用浏览器开发工具,同时以 GUI(Headed)模式运行 Playwright 脚本。开发人员工具有助于:
- 检查 DOM 树并查找元素选择器
- 在执行期间查看控制台日志 (或了解如何 通过 API 读取日志)
- 检查网络活动和其他开发人员工具功能
使用 page.pause() 方法是暂停 Playwright 脚本执行并在开发人员工具中检查页面的简单方法。它还将打开 Playwright Inspector 以帮助调试。
对于 Chromium: 您还可以通过启动选项打开开发人员工具。
await chromium.launch({devtools:true});
⚠ 注意 对于 WebKit:在执行期间启动 WebKit Inspector 将阻止 Playwright 脚本继续执行
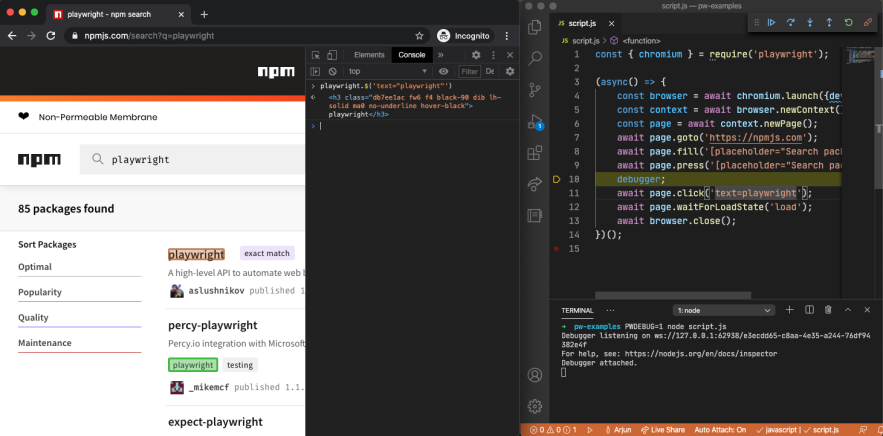
开发者工具控制台中的选择器(Selectors in Developer Tools Console)
开发者工具控制台中的选择器
在调试模式下使用
PWDEBUG=console
运行时,可在开发人员工具控制台中使用
playwright
对象。
- 使用
PWDEBUG=console参数运行 - 设置断点暂停执行
- 在浏览器开发者工具中打开控制台面板
- 使用
playwrightAPI
playwright.$(selector):突出显示第一次出现的选择器内容。这反映了page.$是如何看到页面的。-playwright.$$(selector): 突出显示所有出现的选择器内容。这反映了page.$$是如何看到页面的。-playwright.inspect(selector): 检查“元素”面板中的选择器。-playwright.clear(): 清除现有高亮标记。-playwright.selector(element): 生成一个指向元素的选择器。
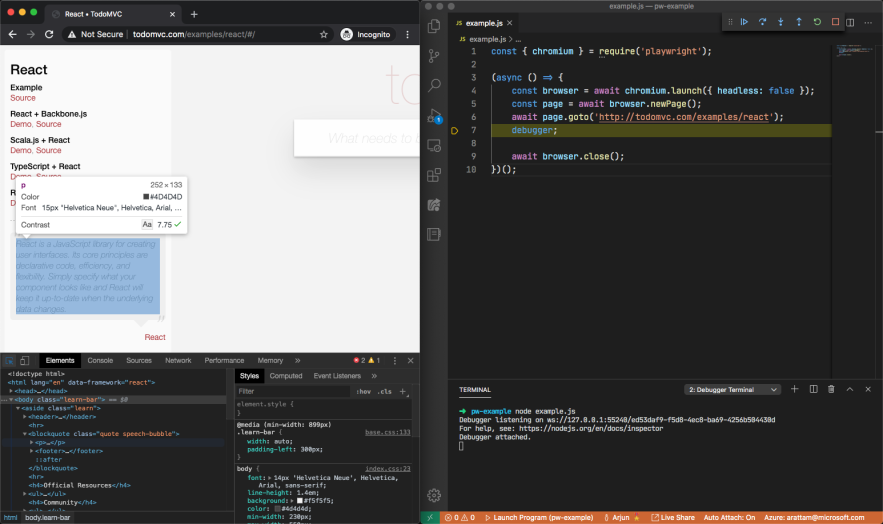
Visual Studio 代码调试器 (Node.js)
Visual Studio 代码调试器
VS Code 调试器可用于通过断点暂停和恢复 Playwright 脚本的执行。调试器可以通过两种方式进行配置。
支持的语言
Playwright API 支持多种语言
- JavaScript and TypeScript
- Python
- Java
- .NET
JavaScript and TypeScript#
支持 Playwright for Node.js .
- NPM
- Documentation
- API
- GitHub repo
Python#
支持 Playwright for Python.
- Documentation
- API
- Playwright on PyPI
- GitHub repo
- Pytest integration
Java#
支持 Playwright for Java.
- Documentation
- API
- GitHub repo
.NET#
支持 Playwright for .NET.
- Documentation
- API
- GitHub repo
- Playwright on NuGet
版权归原作者 wincheshe 所有, 如有侵权,请联系我们删除。