| 标签来实现。通过 CSS 可以增强表格的外观。
示例代码
html
<!DOCTYPE html>

<html lang="en">

<head>

  <meta charset="UTF8">

  <meta name="viewport" content="width=devicewidth, initialscale=1.0">

  <style>

    table {

      width: 100%;

      bordercollapse: collapse;

    }

    th, td {

      border: 1px solid ddd;

      padding: 8px;

      textalign: left;

    }

    th {

      backgroundcolor: f2f2f2;

      fontweight: bold;

    }

    tr:hover {

      backgroundcolor: f1f1f1;

    }

  </style>

  <title>Table Layout</title>

</head>

<body>

  <h2>Product List</h2>

  <table>

    <tr>

      <th>Product Name</th>

      <th>Price</th>

      <th>Quantity</th>

    </tr>

    <tr>

      <td>Product 1</td>

      <td>$10</td>

      <td>5</td>

    </tr>

    <tr>

      <td>Product 2</td>

      <td>$15</td>

      <td>3</td>

    </tr>

    <tr>

      <td>Product 3</td>

      <td>$20</td>

      <td>7</td>

    </tr>

  </table>

</body>

</html>
2. 表单交互
表单通常用于接收用户输入,并与表格交互,例如添加新行或修改表格中的数据。可以通过 JavaScript 实现表单与表格的交互功能。
示例代码
html
<!DOCTYPE html>

<html lang="en">

<head>

  <meta charset="UTF8">

  <meta name="viewport" content="width=devicewidth, initialscale=1.0">

  <style>

    table {

      width: 100%;

      bordercollapse: collapse;

    }

    th, td {

      border: 1px solid ddd;

      padding: 8px;

      textalign: left;

    }

    th {

      backgroundcolor: f2f2f2;

      fontweight: bold;

    }

    tr:hover {

      backgroundcolor: f1f1f1;

    }

    form {

      marginbottom: 20px;

    }

  </style>

  <title>Table with Form Interaction</title>

</head>

<body>

  <h2>Product List</h2>

  <form id="productForm">

    <label for="productName">Product Name:</label>

    <input type="text" id="productName" name="productName" required>

    <label for="price">Price:</label>

    <input type="number" id="price" name="price" required>

    <label for="quantity">Quantity:</label>

    <input type="number" id="quantity" name="quantity" required>

    <button type="submit">Add Product</button>

  </form>

  <table id="productTable">

    <tr>

      <th>Product Name</th>

      <th>Price</th>

      <th>Quantity</th>

    </tr>

  </table>

  <script>

    document.getElementById('productForm').addEventListener('submit', function(e) {

      e.preventDefault();

      const productName = document.getElementById('productName').value;

      const price = document.getElementById('price').value;

      const quantity = document.getElementById('quantity').value;

      const table = document.getElementById('productTable');

      const newRow = table.insertRow();

      const cell1 = newRow.insertCell(0);

      const cell2 = newRow.insertCell(1);

      const cell3 = newRow.insertCell(2);

      cell1.textContent = productName;

      cell2.textContent = $${price};

      cell3.textContent = quantity;

      // Clear the form

      document.getElementById('productForm').reset();

    });

  </script>

</body>
</html>
3. 解释
1. 表格布局:
使用 <table> 创建表格结构。

使用 <tr> 创建表格行,<th> 表示表头,<td> 表示单元格。

通过 CSS 控制表格样式,如边框、内边距和悬停效果。
2. 表单交互:
表单包括用户输入的文本框和数字输入框,用于收集产品名称、价格和数量。

使用 JavaScript 监听表单的 submit 事件,获取表单中的数据,并将其插入到表格中作为新行。

表单提交后,表单数据会被清空以便用户输入新内容。
通过这种方式,可以实现一个简单的表格布局和表单交互的功能。
2.表格属性设置
HTML 表格属性可以通过内联属性(如 border、cellpadding、cellspacing 等)或使用 CSS 进行设置。以下是一些常用的表格属性及其用法。
1. HTML 表格的常用属性
内联属性
border:定义表格的边框宽度。
cellpadding:单元格内容与单元格边缘之间的空白。
cellspacing:单元格之间的空白。
width:定义表格或单元格的宽度。
height:定义表格或单元格的高度。
align:设置表格相对于页面的对齐方式(过时属性)。
bgcolor:定义背景颜色(过时属性)。
示例代码
html
<!DOCTYPE html>

<html lang="en">

<head>

  <meta charset="UTF8">

  <meta name="viewport" content="width=devicewidth, initialscale=1.0">

  <title>HTML Table with Attributes</title>

</head>

<body>

  <h2>Product List</h2>

  <table border="1" cellpadding="10" cellspacing="5" width="80%">

    <tr>

      <th>Product Name</th>

      <th>Price</th>

      <th>Quantity</th>

    </tr>

    <tr>

      <td>Product 1</td>

      <td>$10</td>

      <td>5</td>

    </tr>

    <tr>

      <td>Product 2</td>

      <td>$15</td>

      <td>3</td>

    </tr>

  </table>

</body>

</html>
在这个例子中,border 设置了表格边框,cellpadding 设置了单元格内容与边框的距离,cellspacing 设置了单元格之间的空隙。
2. 使用 CSS 设置表格属性
HTML 的内联属性虽然简单易用,但使用 CSS 可以更灵活地控制表格样式,并且避免使用过时的属性(如 align、bgcolor 等)。
常用 CSS 属性
border:控制表格边框的样式、宽度和颜色。
padding:设置单元格内容与边框之间的距离(替代 cellpadding)。
borderspacing:设置单元格之间的距离(替代 cellspacing)。
textalign:设置文字对齐方式。
backgroundcolor:设置表格或单元格的背景颜色。
width/height:控制表格或单元格的宽度和高度。
示例代码
html
<!DOCTYPE html>

<html lang="en">

<head>

  <meta charset="UTF8">

  <meta name="viewport" content="width=devicewidth, initialscale=1.0">

  <style>

    table {

      width: 80%;

      bordercollapse: separate;

      borderspacing: 5px; / 替代 cellspacing /

    }

    th, td {

      border: 1px solid ddd;

      padding: 10px; / 替代 cellpadding /

      textalign: left;

    }

    th {

      backgroundcolor: f2f2f2;

    }

  </style>

  <title>Table with CSS</title>

</head>

<body>

  <h2>Product List</h2>

  <table>

    <tr>

      <th>Product Name</th>

      <th>Price</th>

      <th>Quantity</th>

    </tr>

    <tr>

      <td>Product 1</td>

      <td>$10</td>

      <td>5</td>

    </tr>

    <tr>

      <td>Product 2</td>

      <td>$15</td>

      <td>3</td>

    </tr>

  </table>

</body>

</html>
3. 表格属性总结
border
定义表格或单元格边框
<table border="1">
或 CSS
border
cellpadding
单元格内容与边框之间的距离
<table cellpadding="10">
cellspacing
单元格之间的距离
<table cellspacing="5">
width
设置表格或单元格宽度
<table width="80%">
height
设置表格或单元格高度
<td height="50">
align
设置表格相对页面的对齐方式(已过时)
<table align="center">
bgcolor
设置表格背景颜色(已过时)
<table bgcolor="#f2f2f2">
border-collapse
控制表格边框的合并行为,常用于 CSS 替代
cellspacing
border-collapse: collapse;
padding
设置单元格内边距,替代
cellpadding
padding: 10px;
border-spacing
设置单元格间距,替代
cellspacing
border-spacing: 5px;
|
通过 CSS 控制表格布局和样式,能够实现更丰富的视觉效果,也便于维护和扩展。
3.表格嵌套
在 HTML 中,表格嵌套指的是在一个表格的单元格内部放置另一个表格。这种布局方式常用于复杂的数据展示,例如嵌套的统计数据、分级信息或不同维度的内容。
1. 表格嵌套的示例
下面是一个简单的表格嵌套示例,展示了如何在一个表格的单元格中放入另一个表格。
示例代码
html
<!DOCTYPE html>

<html lang="en">

<head>

  <meta charset="UTF8">

  <meta name="viewport" content="width=devicewidth, initialscale=1.0">

  <title>Nested Table Example</title>

  <style>

    table {

      width: 100%;

      bordercollapse: collapse;

    }

    th, td {

      border: 1px solid ddd;

      padding: 8px;

      textalign: left;

    }

    th {

      backgroundcolor: f2f2f2;

    }

    / 内部表格的样式 /

    .nestedtable {

      width: 100%;

      border: 1px solid ccc;

    }

    .nestedtable th, .nestedtable td {

      padding: 4px;

      border: 1px solid aaa;

    }

  </style>

</head>

<body>

  <h2>Employee Details</h2>

  <table>

    <tr>

      <th>Name</th>

      <th>Position</th>

      <th>Additional Information</th>

    </tr>

    <tr>

      <td>John Doe</td>

      <td>Manager</td>

      <td>

        <table class="nestedtable">

          <tr>

            <th>Age</th>

            <th>Department</th>

          </tr>

          <tr>

            <td>45</td>

            <td>Marketing</td>

          </tr>

        </table>

      </td>

    </tr>

    <tr>

      <td>Jane Smith</td>

      <td>Developer</td>

      <td>

        <table class="nestedtable">

          <tr>

            <th>Age</th>

            <th>Department</th>

          </tr>

          <tr>

            <td>30</td>

            <td>IT</td>

          </tr>

        </table>

      </td>

    </tr>

  </table>

</body>

</html>
2. 示例解释
1. 主表格:
主表格使用常规的 <table>、<tr>、<th> 和 <td> 标签来定义数据结构。

表格中包含三列:Name、Position 和 Additional Information。
2. 嵌套表格:
在主表格的第三列 Additional Information 中,嵌套了一个子表格。

嵌套表格的样式通过 class="nestedtable" 定义,设置了自己的边框、内边距等样式,使其视觉上独立于主表格。

子表格展示了员工的年龄和部门信息。
3. CSS 样式:
使用了 .nestedtable 类为嵌套表格单独定义样式,例如不同的边框颜色和内边距。

通过 bordercollapse 和 padding 控制表格的视觉布局,使嵌套表格和外部表格之间有明显的区分。
4. 嵌套表格的应用场景
复杂数据展示:嵌套表格适合展示多维度的数据结构,例如每个员工的详细信息。
统计报表:可以在大表格中嵌套子表格来展示分组统计数据。
分类信息:在同一表格中分层展示不同类别的数据,例如产品类别下的具体产品信息。
5. 嵌套表格的注意事项
样式独立性:确保嵌套表格与主表格的样式互不干扰。通过设置不同的类名来应用样式。
响应式布局:嵌套表格可能在小屏幕上变得难以阅读,需要通过 CSS Media Queries 进行调整。
表格嵌套层次不要过深:嵌套层次过多会影响页面的可读性和维护性,同时可能导致表格布局过于复杂。
通过表格嵌套,可以灵活地组织复杂的表格数据,但要注意适度使用并保持表格清晰简洁。
4.表单
HTML 表单(Form)用于在网页中收集用户的输入信息,并通过提交按钮将这些信息发送到服务器进行处理。表单通常用于登录页面、注册页面、搜索框、评论区等。
1. 表单的基本结构
HTML 表单的基本结构包括以下几个部分:
<form>:定义表单区域,所有的输入控件都必须在该标签内。
<input>、<textarea>、<select> 等:用于收集用户输入。
<label>:描述每个输入控件的用途。
<button> 或 <input type="submit">:用于提交表单。
示例代码
html
<!DOCTYPE html>

<html lang="en">

<head>

  <meta charset="UTF8">

  <meta name="viewport" content="width=devicewidth, initialscale=1.0">

  <title>Simple Form</title>

</head>

<body>

  <h2>Registration Form</h2>

  <form action="/submitform" method="post">

    <label for="fname">First Name:</label><br>

    <input type="text" id="fname" name="firstname" placeholder="Enter your first name" required><br><br>

    <label for="lname">Last Name:</label><br>

    <input type="text" id="lname" name="lastname" placeholder="Enter your last name" required><br><br>

    <label for="email">Email:</label><br>

    <input type="email" id="email" name="email" placeholder="Enter your email" required><br><br>

    <label for="password">Password:</label><br>

    <input type="password" id="password" name="password" placeholder="Enter your password" required><br><br>

    <label for="gender">Gender:</label><br>

    <input type="radio" id="male" name="gender" value="male">

    <label for="male">Male</label><br>

    <input type="radio" id="female" name="gender" value="female">

    <label for="female">Female</label><br><br>

    <label for="language">Favorite Language:</label><br>

    <select id="language" name="language">

      <option value="javascript">JavaScript</option>

      <option value="python">Python</option>

      <option value="java">Java</option>

    </select><br><br>

    <input type="submit" value="Submit">

  </form>

</body>

</html>
2. 表单的重要属性
<form> 元素的属性:
action:表单提交到的服务器端处理脚本的 URL。
method:表单提交数据的方式,通常为 GET 或 POST。
GET:将数据附加到 URL,适用于小数据量的查询。
POST:通过 HTTP 请求体发送数据,适用于提交较大数据量或敏感信息。
enctype:定义表单数据的编码类型,通常用于上传文件时设置为 multipart/formdata。
<input> 元素的常用类型:
type="text":单行文本输入框。
type="password":密码输入框,隐藏输入的字符。
type="email":电子邮件输入框,验证电子邮件格式。
type="number":数字输入框。
type="radio":单选按钮,允许用户从一组选项中选择一个。
type="checkbox":复选框,允许用户从一组选项中选择多个。
type="submit":提交按钮。
type="file":文件上传输入框。
其他表单控件:
<textarea>:多行文本输入框。
<select>:下拉选择框,包含多个 <option> 元素供用户选择。
### 3. 表单交互
#### 1. 必填字段:
通过在 <input> 标签中添加 required 属性,可以设置该字段为必填项。
#### 2. 表单验证:
HTML5 提供了一些内置的验证机制,如:
pattern:使用正则表达式验证输入。
min、max:限制数字输入的最小值和最大值。
maxlength:限制文本输入的最大长度。
示例:
html
```
<form>
<label for="phone">Phone Number:</label>
<input type="text" id="phone" name="phone" pattern="\d{10}" title="Enter a 10digit phone number" required>
<input type="submit" value="Submit">
</form>
```
在这个例子中,输入的内容必须是 10 位数字,否则表单提交会被阻止,并提示用户输入正确的格式。
### 4. 提交按钮和重置按钮
<input type="submit">:提交表单数据到服务器。
<input type="reset">:重置表单的所有输入字段。
示例:
html
```
<form>
<input type="text" name="username" placeholder="Username">
<input type="submit" value="Submit">
<input type="reset" value="Reset">
</form>
```
### 5. 表单样式和布局
通过 CSS 可以为表单添加样式,以提升用户体验。常见样式包括设置输入框的宽度、间距、边框颜色等。
示例:
html
```
<style>
input[type="text"], input[type="email"], input[type="password"], select {
width: 100%;
padding: 12px;
margin: 8px 0;
display: inlineblock;
border: 1px solid ccc;
borderradius: 4px;
boxsizing: borderbox;
}
input[type="submit"] {
width: 100%;
backgroundcolor: 4CAF50;
color: white;
padding: 14px 20px;
margin: 8px 0;
border: none;
borderradius: 4px;
cursor: pointer;
}
input[type="submit"]:hover {
backgroundcolor: 45a049;
}
</style>
```
### 6. 表单数据的获取与处理
表单提交后,数据通常会通过 JavaScript 或服务器端脚本(如 PHP、Node.js、Python)进行处理。可以通过以下几种方式获取表单数据:
1. 通过 HTML 提交:数据提交到服务器端 URL(action 属性指定的目标)。
2. 通过 JavaScript:使用 JavaScript 监听表单提交事件,动态处理数据。
JavaScript 示例:
html
```
<form id="myForm">
<input type="text" id="name" name="name" placeholder="Enter your name">
<input type="submit" value="Submit">
</form>
<script>
document.getElementById('myForm').addEventListener('submit', function(event) {
event.preventDefault(); // 阻止默认的提交行为
var name = document.getElementById('name').value;
alert('Submitted name: ' + name);
});
</script>
```
这个 JavaScript 代码会在表单提交时弹出一个包含用户输入内容的提示框,而不是提交表单数据到服务器。
表单是网页中用户与网站交互的核心部分,合理设计和使用表单可以极大提升用户体验。通过结合 HTML 表单控件、内置验证、CSS 样式和 JavaScript 处理逻辑,可以实现功能强大且用户友好的表单。
## 5.综合案例--表格与表单
### 习题1
代码
```
<!DOCTYPE html>
<html lang="en">
<head>
<meta charset="UTF-8">
<meta name="viewport" content="width=device-width, initial-scale=1.0">
<title>达维工作室--联系我们</title>
<style type="text/css">
.chu {
font-weight: bold;
}
.zil {
font-family: "微软雅黑";
font-size: 20px;
font-weight: bold;
color: #ed630a;
}
.zi2 {
font-family: "微软雅黑";
font-weight: bold;
color: #f60;
text-decoration: underline;
}
.zibai {
font-family: "微软雅黑";
color: #fff;
}
body {
background-image: url(4465CAF7A217F1A5103C23623BE7CD18.jpg);
}
</style>
</head>
<body>
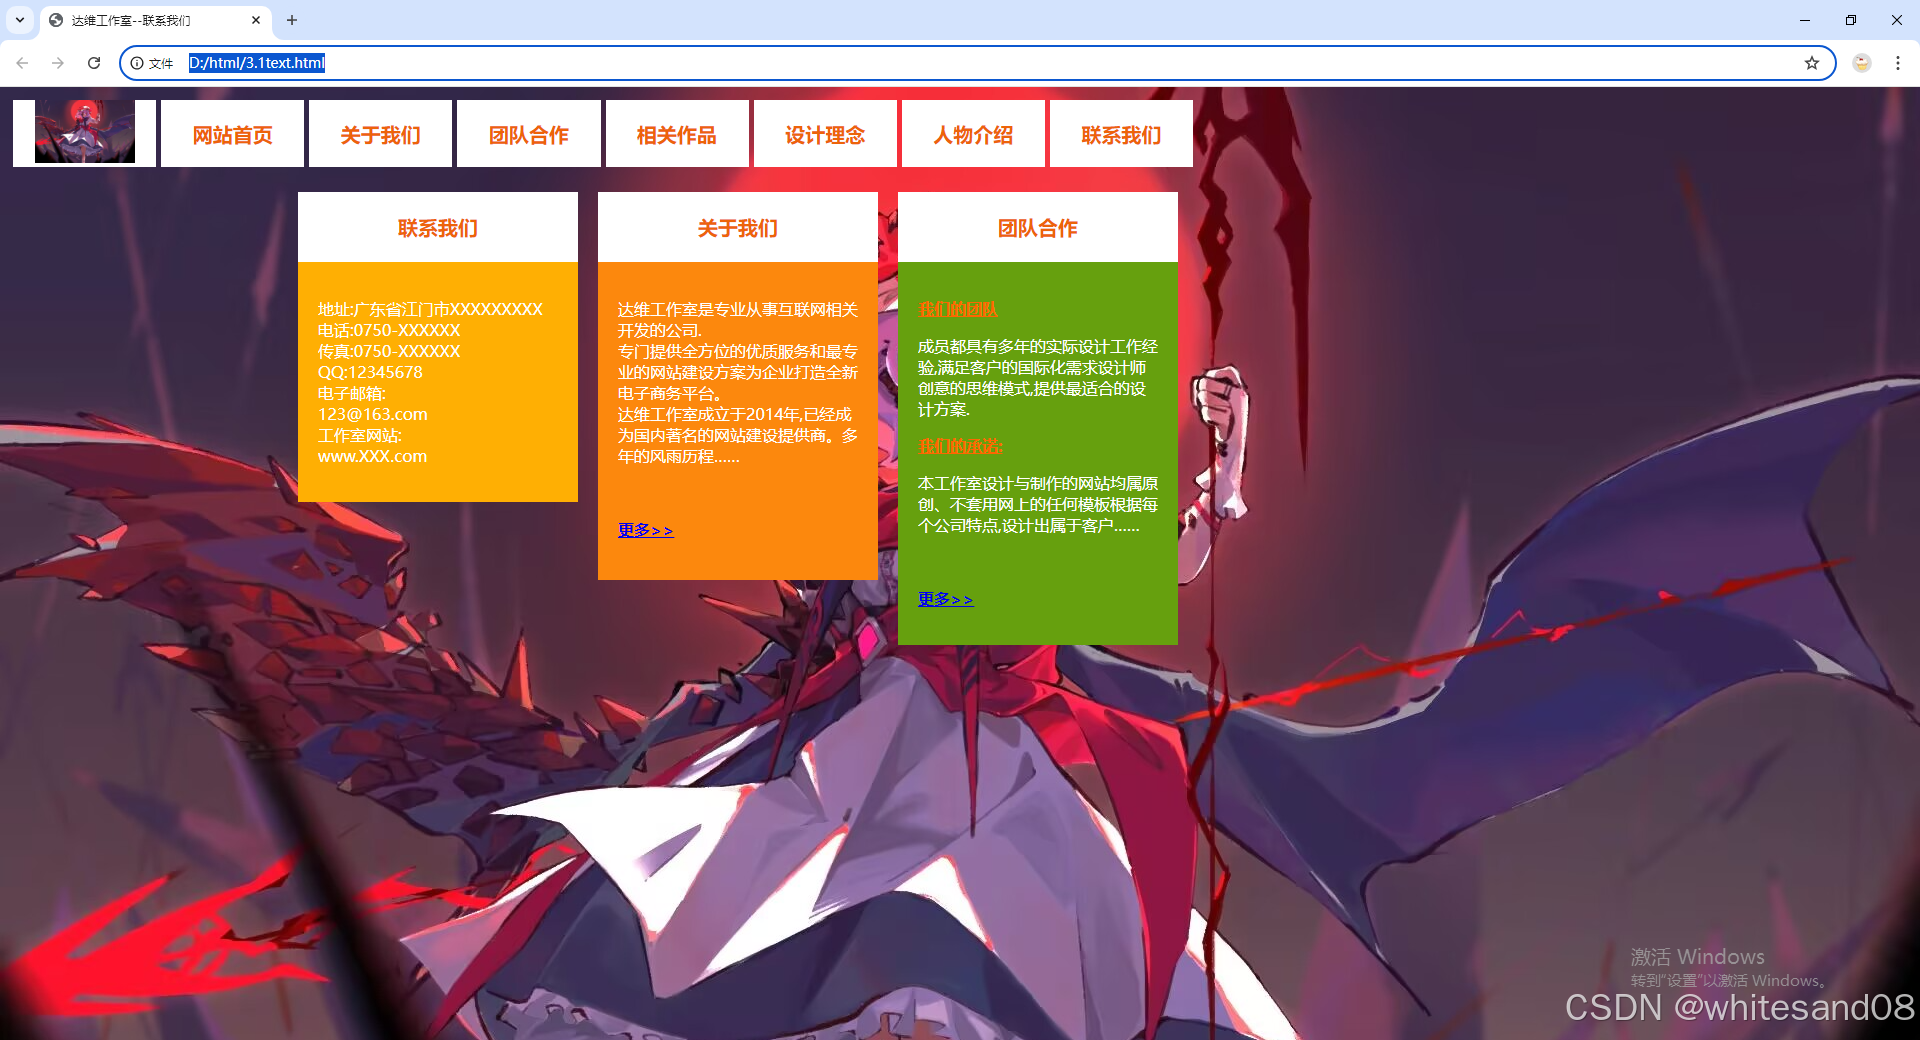
![]()
|
网站首页 |
关于我们 |
团队合作 |
相关作品 |
设计理念 |
人物介绍 |
联系我们 |
|
| |
| 联系我们 |
|
地址:广东省江门市XXXXXXXXX
电话:0750-XXXXXX
传真:0750-XXXXXX
QQ:12345678
电子邮箱:
[email protected]
工作室网站:
www.XXX.com
|
|
| 关于我们 |
|
达维工作室是专业从事互联网相关开发的公司.
专门提供全方位的优质服务和最专业的网站建设方案为企业打造全新电子商务平台。
达维工作室成立于2014年,已经成为国内著名的网站建设提供商。多年的风雨历程……
更多>>
|
|
| 团队合作 |
|
我们的团队
成员都具有多年的实际设计工作经验,满足客户的国际化需求设计师创意的思维模式,提供最适合的设计方案.
我们的承诺:
本工作室设计与制作的网站均属原创、不套用网上的任何模板根据每个公司特点,设计出属于客户……
更多>>
|
|
|
</body>
</html>
```
### 习题2
代码:
```
<!DOCTYPE html>
<html lang="en">
<head>
<meta charset="UTF-8">
<meta name="viewport" content="width=device-width, initial-scale=1.0">
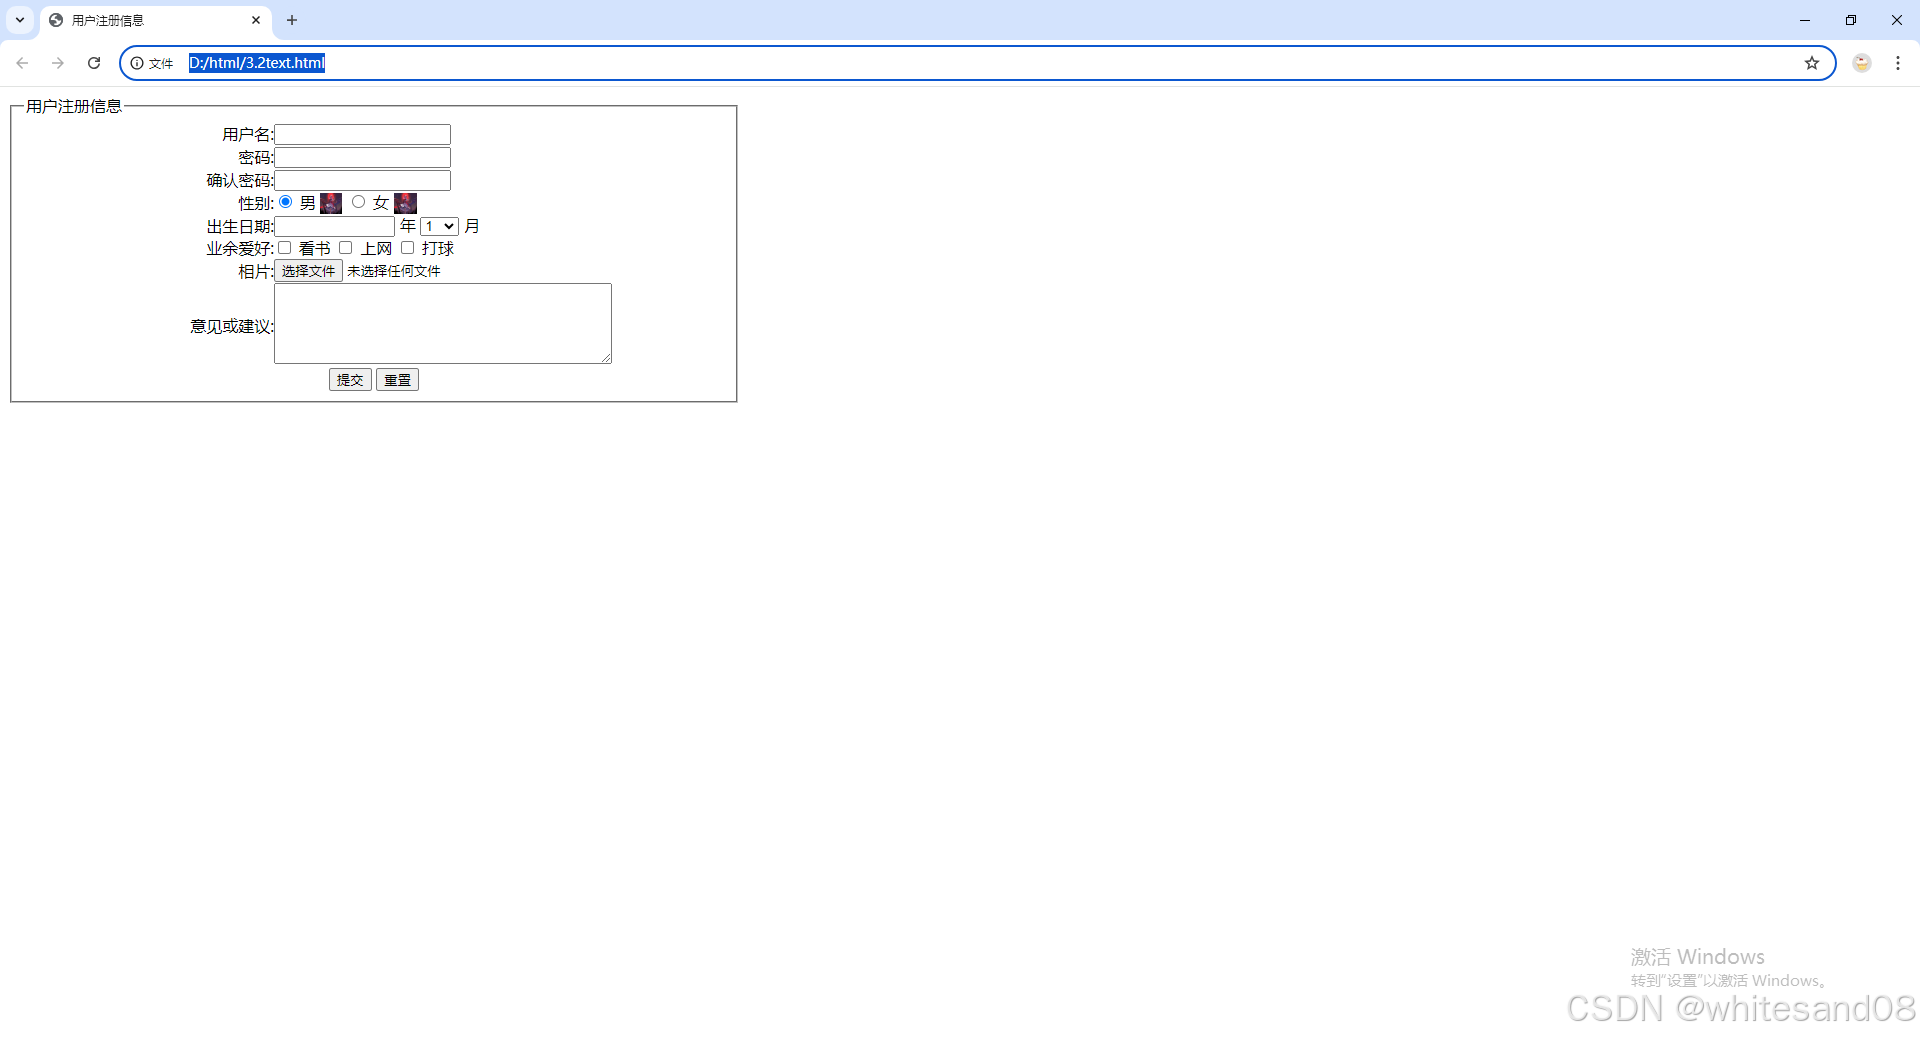
<title>用户注册信息</title>
<style type="text/css">
fieldset {
width: 700px;
}
</style>
</head>
<body>
<form action="" method="post" enctype="multipart/form-data" name="form1" id="form1">
<fieldset>
<legend>用户注册信息</legend>
| 用户名: |
<input type="text" name="textfield" id="textfield"/> |
| 密码: |
<input type="password" name="textfield2" id="textfield2"/> |
| 确认密码: |
<input type="password" name="textfield3" id="textfield3"/> |
| 性别: |
<input type="radio" name="radio" id="radio" value="radio" checked="checked"/> 男
![]() <input type="radio" name="radio" id="radio2" value="radio2"/> 女
<input type="radio" name="radio" id="radio2" value="radio2"/> 女
![]()
|
| 出生日期: |
<input type="text" name="textfield4" id="textfield4" size="12"/> 年
<select name="select" id="select">
<option>1</option>
<option>2</option>
<option>3</option>
<option>4</option>
<option>5</option>
<option>6</option>
<option>7</option>
<option>8</option>
<option>9</option>
<option>10</option>
<option>11</option>
<option>12</option>
</select> 月
|
| 业余爱好: |
<input type="checkbox" name="checkbox" id="checkbox"/> 看书
<input type="checkbox" name="checkbox2" id="checkbox2"/> 上网
<input type="checkbox" name="checkbox3" id="checkbox3"/> 打球
|
| 相片: |
<input type="file" name="fileField" id="fileField"/> |
| 意见或建议: |
<textarea name="textarea" id="textarea" cols="45" rows="5"></textarea>
            </td>
            </tr>
            <tr>
                <td colspan="2" align="center">
                    <input type="submit" name="button" id="button" value="提交"/>
                    <input type="reset" name="button2" id="button2" value="重置"/>
                </td>
            </tr>
        </table>
    </fieldset>
</form>
</body>
</html>
### 习题3
代码:
<!DOCTYPE html>
<html lang="en">
<head>
<meta charset="UTF-8">
<meta name="viewport" content="width=device-width, initial-scale=1.0">
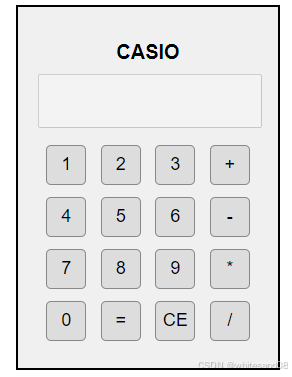
<title>计算机布局</title>
<style>
body {
font-family: Arial, sans-serif;
display: flex;
justify-content: center;
align-items: center;
height: 100vh;
margin: 0;
}
    .calculator {
        border: 2px solid #000;
        padding: 20px;
        background-color: #f0f0f0;
        width: 220px;
        text-align: center;
    }

    .calculator h1 {
        font-size: 20px;
        margin-bottom: 10px;
    }

    .calculator table {
        width: 100%;
    }

    .calculator td {
        padding: 5px;
    }

    .calculator input[type="button"] {
        width: 40px;
        height: 40px;
        font-size: 18px;
        background-color: #ddd;
        border: 1px solid #888;
        border-radius: 5px;
    }

    .calculator input[type="button"]:hover {
        background-color: #ccc;
    }

    .calculator .display {
        width: calc(100% - 10px);
        height: 40px;
        margin-bottom: 10px;
        text-align: right;
        padding: 5px;
        font-size: 18px;
    }
</style>
</head>
<body>
<div class="calculator">
    <h1>CASIO</h1>
    <input type="text" class="display" disabled>
    <table>
        <tr>
            <td><input type="button" value="1"></td>
            <td><input type="button" value="2"></td>
            <td><input type="button" value="3"></td>
            <td><input type="button" value="+"></td>
        </tr>
        <tr>
            <td><input type="button" value="4"></td>
            <td><input type="button" value="5"></td>
            <td><input type="button" value="6"></td>
            <td><input type="button" value="-"></td>
        </tr>
        <tr>
            <td><input type="button" value="7"></td>
            <td><input type="button" value="8"></td>
            <td><input type="button" value="9"></td>
            <td><input type="button" value="*"></td>
        </tr>
        <tr>
            <td><input type="button" value="0"></td>
            <td><input type="button" value="="></td>
            <td><input type="button" value="CE"></td>
            <td><input type="button" value="/"></td>
        </tr>
    </table>
</div>
</body>
</html>
### 习题4
代码:
<!DOCTYPE html>
<html lang="en">
<head>
<meta charset="UTF-8">
<meta name="viewport" content="width=device-width, initial-scale=1.0">
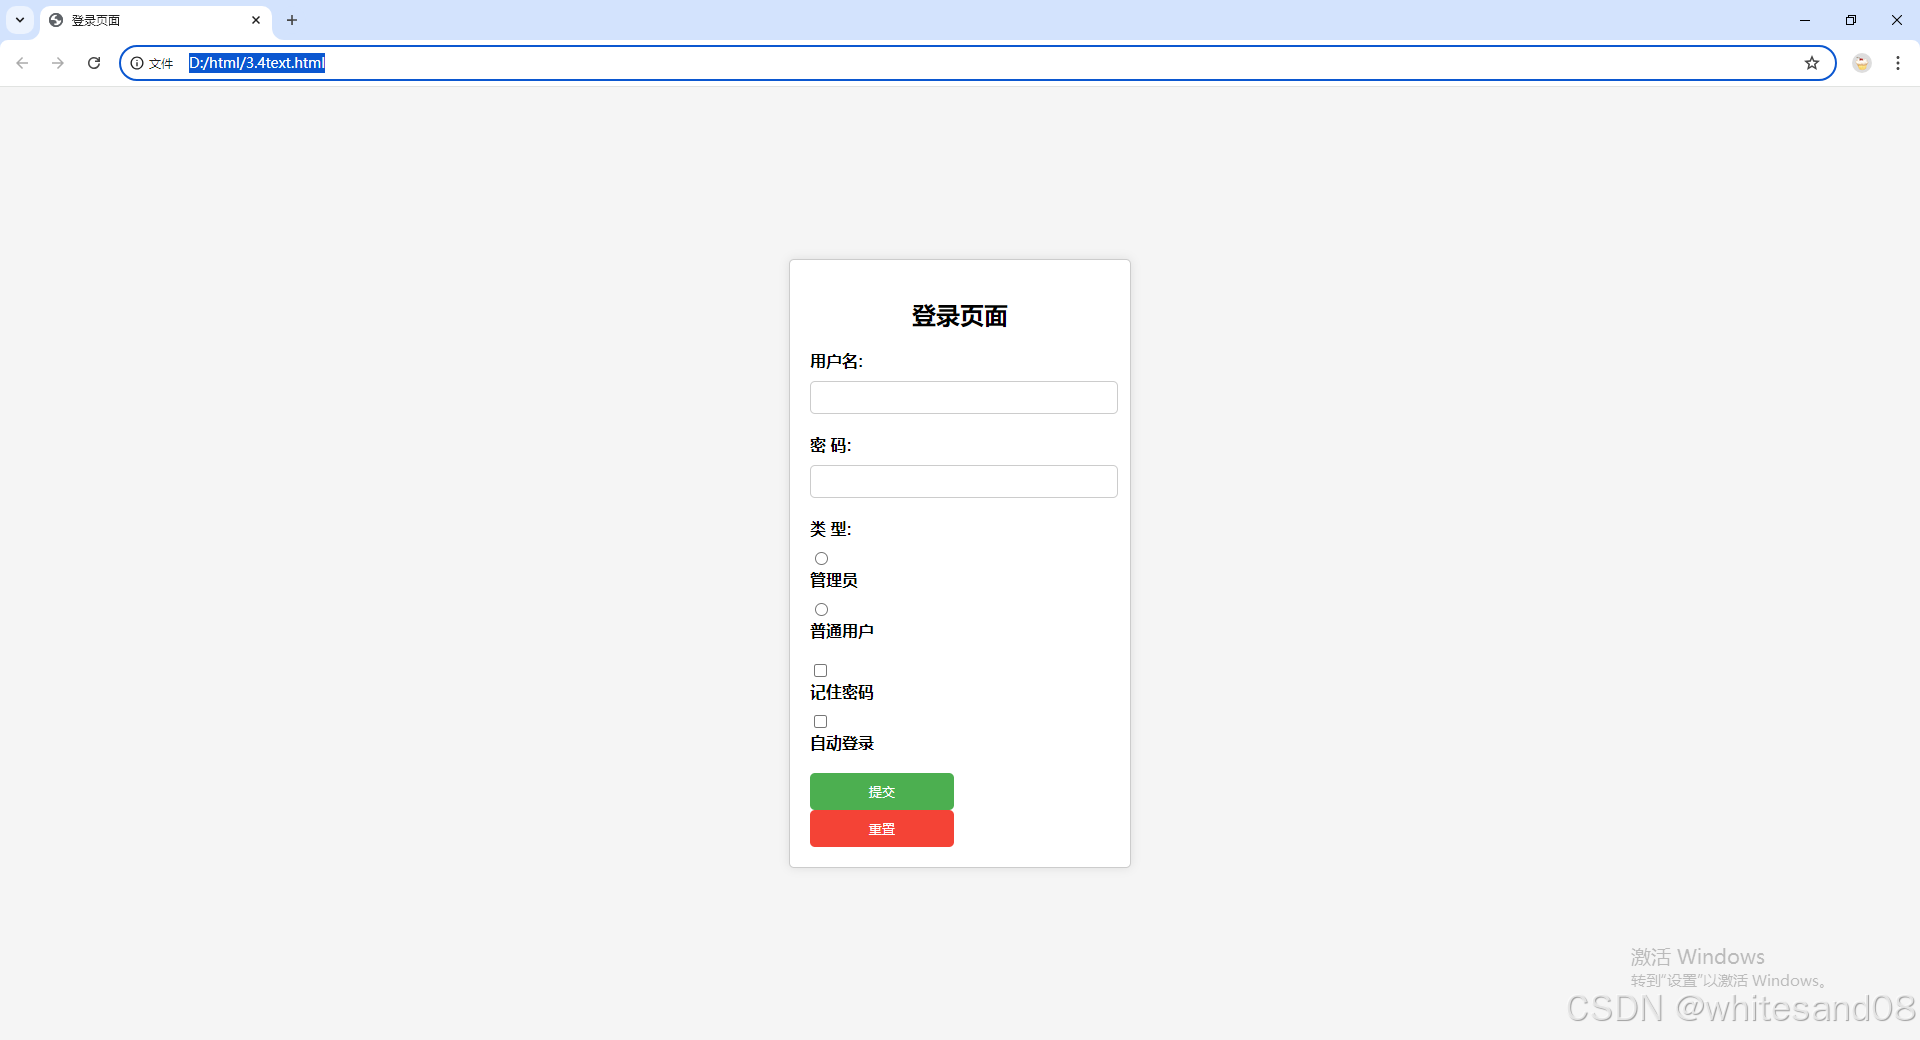
<title>登录页面</title>
<style>
body {
font-family: Arial, sans-serif;
background-color: #f5f5f5;
display: flex;
justify-content: center;
align-items: center;
height: 100vh;
margin: 0;
}
    .login-box {
        background-color: #fff;
        padding: 20px;
        border: 1px solid #ccc;
        border-radius: 5px;
        width: 300px;
        box-shadow: 0 0 10px rgba(0, 0, 0, 0.1);
    }

    .login-box h2 {
        text-align: center;
        margin-bottom: 20px;
    }

    .login-box label {
        display: block;
        margin-bottom: 10px;
        font-weight: bold;
    }

    .login-box input[type="text"],
    .login-box input[type="password"] {
        width: calc(100% - 10px);
        padding: 8px;
        margin-bottom: 20px;
        border: 1px solid #ccc;
        border-radius: 5px;
    }

    .login-box input[type="radio"] {
        margin-right: 5px;
    }

    .login-box .options {
        margin-bottom: 20px;
    }

    .login-box input[type="checkbox"] {
        margin-right: 5px;
    }

    .login-box input[type="submit"],
    .login-box input[type="reset"] {
        width: 48%;
        padding: 10px;
        margin-right: 2%;
        background-color: #4CAF50;
        color: white;
        border: none;
        border-radius: 5px;
        cursor: pointer;
    }

    .login-box input[type="reset"] {
        background-color: #f44336;
    }

    .login-box input[type="submit"]:hover,
    .login-box input[type="reset"]:hover {
        opacity: 0.9;
    }

</style>
</head>
<body>
登录页面
<form>
<label for="username">用户名:</label>
<input type="text" id="username" name="username">
    <label for="password">密 码:</label>
    <input type="password" id="password" name="password">

    <div class="options">
        <label>类 型:</label>
        <input type="radio" id="admin" name="user_type" value="admin">
        <label for="admin">管理员</label>
        <input type="radio" id="normal" name="user_type" value="normal">
        <label for="normal">普通用户</label>
    </div>

    <div class="options">
        <input type="checkbox" id="remember" name="remember">
        <label for="remember">记住密码</label>
        <input type="checkbox" id="auto_login" name="auto_login">
        <label for="auto_login">自动登录</label>
    </div>

    <input type="submit" value="提交">
    <input type="reset" value="重置">
</form>
</body>
</html>
```
“第三章 表格布局与表单交互”的评论:
还没有评论
| | 