
初期对Spring Cloud的学习以应用搭建为主,所以内容不会太枯燥。
一直以来,自以为Spring全家桶的学习中,Spring framework是基础中的基础,部分内容也还是必须要读源码去理解底层原理,SpringMVC、SpringBoot,甚至Mybatis等等,都是如此。但是对于Spring Cloud来说,就从应用入手,以系统搭建为主。以此作为目标的话,Spring Cloud比其他几个部分来讲就会简单很多。
Spring Cloud的几大组件依次学习,先从Eureka入手。Eureka是netflix的服务治理组件,提供服务注册和服务发现、实现注册中心服务。
Eureka包含server端和client端。
Eureka server:服务端,也就是注册中心,每一个Eureka客户端需要向服务端注册,注册成功后服务端持有客户端列表,客户端定时发送心跳至服务端、汇报健康状态,超时未发送心跳服务的客户端将从注册中心的客户端列表中清除。
Eureka client:使用端、客户端,包括服务提供者server provider和服务消费者server consumer,不论服务提供者还是服务消费者,都要向Eureka服务端进行注册并定时发送心跳。服务消费者向服务端获取一份服务提供者的列表、在需要服务提供者服务的之后,向服务提供者发起服务请求并获取服务。
与Spring Boot版本的兼容
Spring Cloud基于SpringBoot搭建,在搭建Spring Cloud项目的时候需要注意Spring Cloud和SpringBoot之间的版本兼容关系,两者之间版本能兼容的情况下,搭建Spring Cloud项目其实并不复杂。否则如果版本不兼容,会出现各种莫名其妙的错误。
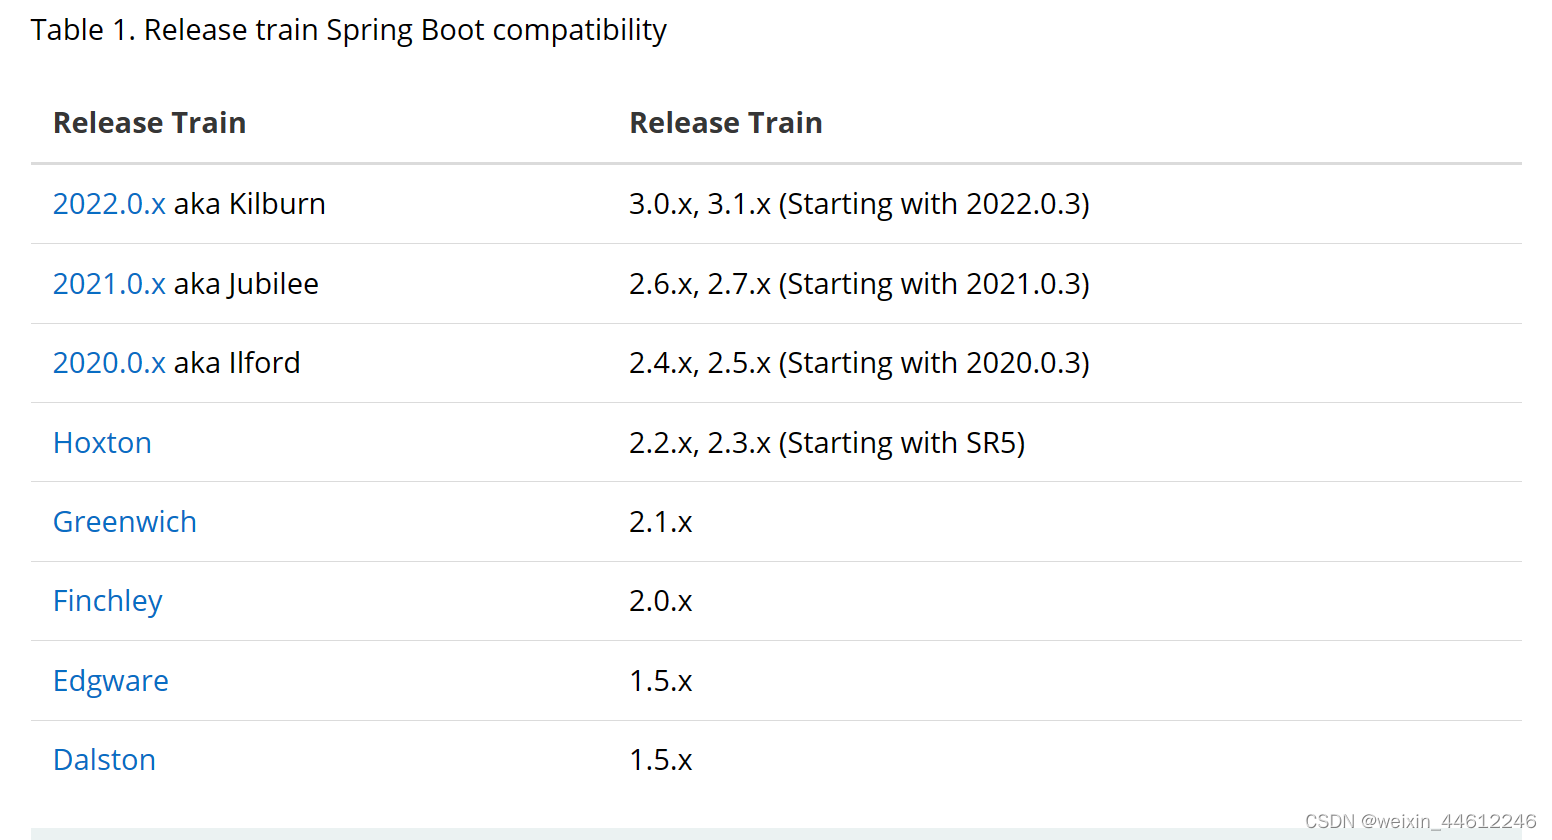
具体的版本对应关系请参考Spring官网:https://spring.io/projects/spring-cloud。
项目结构
我们用一个例子来学习Spring Cloud的Eureka组件,例子项目包含一个父项目、一个Eureka注册中心(Eureka server)Module、一个orderService(Eureka client,service consumer)module、一个userService(Eureka client,service provider)。
其中Eureka注册中心作为Eureka的服务端,所有的Eureka client都要向注册中心进行注册。
orderService模块模拟订单模块,作为微服务,是Eureka的客户端,启动后需要向注册中心进行注册。
userService模拟用户模块,作为微服务,是Eureka的客户端,启动后需要向注册中心进行注册。
orderService需要通过访问userService获取用户信息,这种情况下,orderService就是服务消费者,userSerivce是服务提供者,作为Eureka的客户端,两者都会从注册中心获取到Eureka客户端的信息,因此可以非常方便的访问到彼此:orderService当然能访问到userService提供的服务。
本案例的目的是搭建Spring Cloud的Eureka环境,不做具体的业务实现,也没必要进行数据库的访问、没必要做接口访问的鉴权…等等,所有相关业务细节均忽略。
好的,开始搭建环境。
父项目
创建SpringBoot工程,pom文件如下:
<?xml version="1.0" encoding="UTF-8"?>
<project xmlns="http://maven.apache.org/POM/4.0.0" xmlns:xsi="http://www.w3.org/2001/XMLSchema-instance"
         xsi:schemaLocation="http://maven.apache.org/POM/4.0.0 https://maven.apache.org/xsd/maven-4.0.0.xsd">
    <modelVersion>4.0.0</modelVersion>
    <packaging>pom</packaging>
    <modules>
        <module>eureka-service</module>
        <module>userService</module>
        <module>orderservice</module>
    </modules>
    <parent>
        <groupId>org.springframework.boot</groupId>
        <artifactId>spring-boot-starter-parent</artifactId>
        <version>2.6.5</version>
        <relativePath/> <!-- lookup parent from repository -->
    </parent>
    <groupId>com.example</groupId>
    <artifactId>springCloud</artifactId>
    <version>0.0.1-SNAPSHOT</version>
    <name>springCloud</name>
    <description>springCloud</description>
    <properties>
        <java.version>17</java.version>
        <maven.compiler.source>17</maven.compiler.source>
        <maven.compiler.target>17</maven.compiler.target>
        <project.build.sourceEncoding>UTF-8</project.build.sourceEncoding>
        <!--SpringCloud 版本号2021.0.8-->
        <spring.cloud.version>2021.0.8</spring.cloud.version>
    </properties>

    <dependencyManagement>
        <dependencies>
            <!--spring cloud依赖-->
            <dependency>
                <groupId>org.springframework.cloud</groupId>
                <artifactId>spring-cloud-dependencies</artifactId>
                <version>${spring.cloud.version}</version>
                <type>pom</type>
                <scope>import</scope>
            </dependency>
        </dependencies>
    </dependencyManagement>

    <build>
        <plugins>
            <plugin>
                <groupId>org.springframework.boot</groupId>
                <artifactId>spring-boot-maven-plugin</artifactId>
            </plugin>
        </plugins>
    </build>

</project>
父工程不需要有代码,所以,删除掉src目录。
注意选用的SpringBoot版本号为2.6.5,对应的Spring Cloud的版本号为2021.0.8,需要注意对照官网查询两者的兼容性。
注册中心模块
创建eureka注册中心模块,命名为eureka-service,pom文件中引入spring-web与eureka-service组件:
<?xml version="1.0" encoding="UTF-8"?>
<project xmlns="http://maven.apache.org/POM/4.0.0"
         xmlns:xsi="http://www.w3.org/2001/XMLSchema-instance"
         xsi:schemaLocation="http://maven.apache.org/POM/4.0.0 http://maven.apache.org/xsd/maven-4.0.0.xsd">
    <parent>
        <artifactId>springCloud</artifactId>
        <groupId>com.example</groupId>
        <version>0.0.1-SNAPSHOT</version>
    </parent>
    <modelVersion>4.0.0</modelVersion>

    <artifactId>eureka-service</artifactId>

    <properties>
        <maven.compiler.source>17</maven.compiler.source>
        <maven.compiler.target>17</maven.compiler.target>
    </properties>

    <dependencies>
        <!--spring-cloud-starter-netflix-eureka-server 依赖-->
        <dependency>
            <groupId>org.springframework.cloud</groupId>
            <artifactId>spring-cloud-starter-netflix-eureka-server</artifactId>
        </dependency>

        <!--spring-boot-starter-web 依赖-->
        <dependency>
            <groupId>org.springframework.boot</groupId>
            <artifactId>spring-boot-starter-web</artifactId>
        </dependency>
    </dependencies>

</project>
在resource下创建application.yml配置文件:
# eureka server
server:
  port: 10086

# eureka server
eureka:
  instance:
    hostname: localhost  # eureka服务名
  client:
    registerWithEureka: false #是否向注册中心注册自己
    fetchRegistry: false # 是否向注册中心获取注册信息
    serviceUrl: #
      defaultZone: http://${eureka.instance.hostname}:${server.port}/eureka/
  server:
    enableSelfPreservation: false # 自我保护
设置服务名称为localhost,端口号为10086,设置注册中心的访问地址为http://localhost:10086/eureka/
其实可以发现Eureka注册中心服务其实就是一个web服务,由tomcat提供服务。
创建启动类:
package com;

import org.springframework.boot.SpringApplication;
import org.springframework.boot.autoconfigure.SpringBootApplication;
import org.springframework.cloud.netflix.eureka.server.EnableEurekaServer;

@SpringBootApplication
@EnableEurekaServer
public class EurekaApplication {
    public static void main(String[] args) {
        SpringApplication.run(EurekaApplication.class);
    }
}
启动类增加注解@EnableEurekaServer,表明当前服务是Eureka的注册中心。
运行启动类,服务正常启动后,浏览器输入http://localhost:10086访问Eureka服务: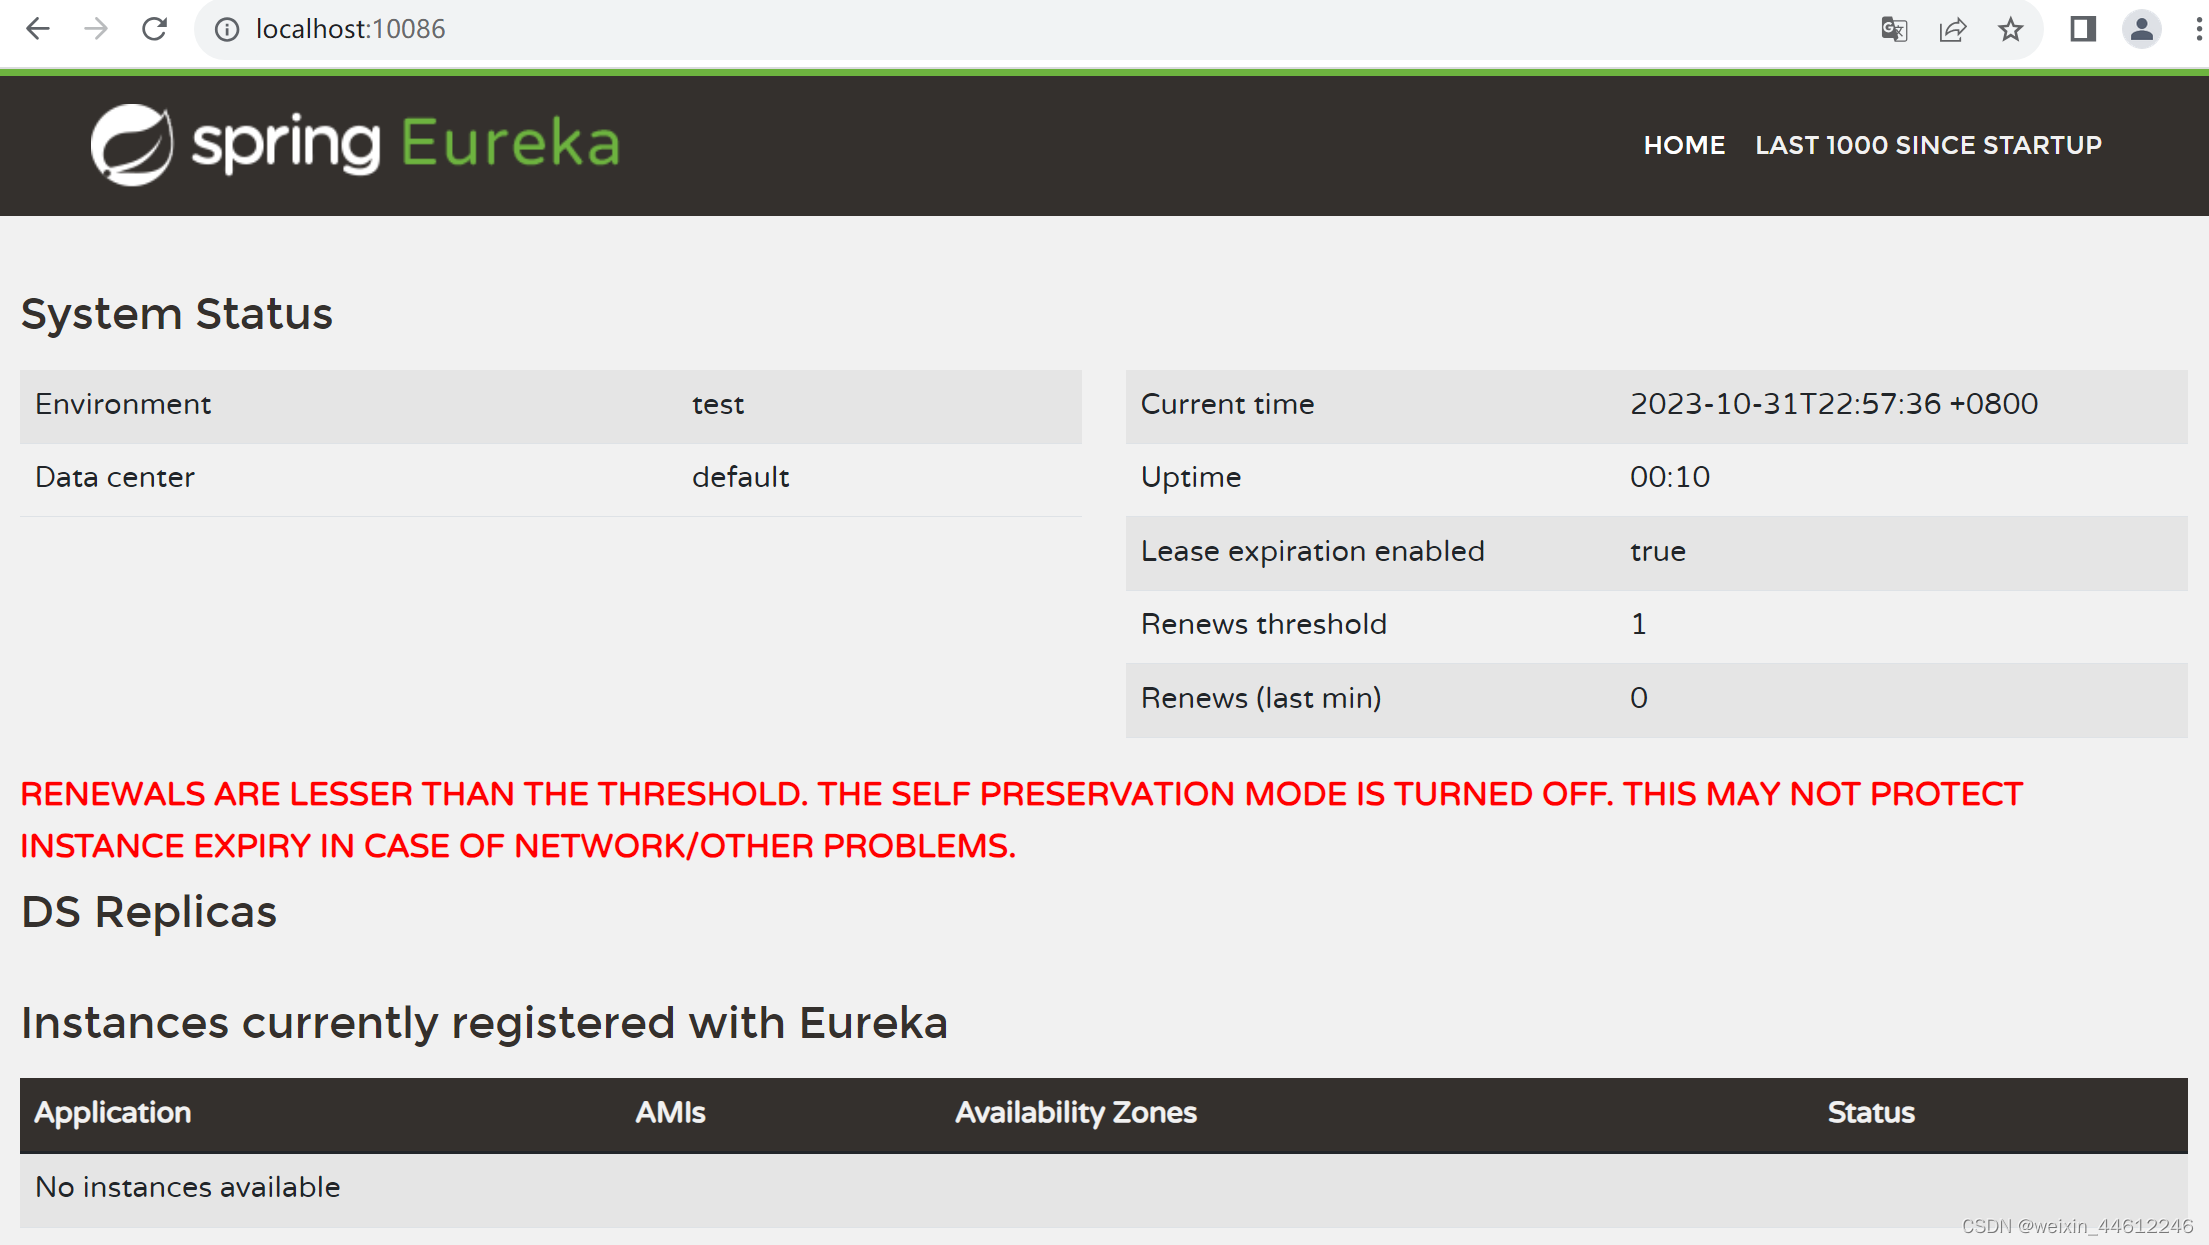
可以看到服务已经正常启动,不过当前尚未有任何客户端注册。
userservice
创建userserice模块,pom文件如下:
<?xml version="1.0" encoding="UTF-8"?>
<project xmlns="http://maven.apache.org/POM/4.0.0"
         xmlns:xsi="http://www.w3.org/2001/XMLSchema-instance"
         xsi:schemaLocation="http://maven.apache.org/POM/4.0.0 http://maven.apache.org/xsd/maven-4.0.0.xsd">
    <parent>
        <artifactId>springCloud</artifactId>
        <groupId>com.example</groupId>
        <version>0.0.1-SNAPSHOT</version>
    </parent>
    <modelVersion>4.0.0</modelVersion>

    <artifactId>userService</artifactId>

    <properties>
        <maven.compiler.source>17</maven.compiler.source>
        <maven.compiler.target>17</maven.compiler.target>
    </properties>
    <dependencies>
        <dependency>
            <groupId>org.springframework.cloud</groupId>
            <artifactId>spring-cloud-starter-netflix-eureka-client</artifactId>
        </dependency>
        <dependency>
            <groupId>org.springframework.boot</groupId>
            <artifactId>spring-boot-starter-web</artifactId>
        </dependency>
         <dependency>
            <groupId>org.projectlombok</groupId>
            <artifactId>lombok</artifactId>
        </dependency>
    </dependencies>

</project>
引入spring-cloud-starter-netflix-eureka-client以及spring-boot-starter-web即可。
在resource下创建application.yml文件:
spring:
  application:
    name: userservice  # eureka服务名称
eureka:
  client:
    service-url: # eureka注册中心路径
      defaultZone: http://127.0.0.1:10086/eureka/
server:
  port: 8080
指定当前应用的name,并配置eureka注册中心路径。并指定当前服务的端口号8080。
启动类加入@EnableEurekaClient注解,表明当前应用是eureka client:
package com;

import org.springframework.boot.SpringApplication;
import org.springframework.boot.autoconfigure.SpringBootApplication;
import org.springframework.cloud.netflix.eureka.EnableEurekaClient;

@SpringBootApplication
@EnableEurekaClient
public class UserServiceApplication {
    public static void main(String[] args) {
        SpringApplication.run(UserServiceApplication.class);
    }
}
然后创建一个User类,简单一点,只包含一个属性name即可:
package com.example.entity;

import com.fasterxml.jackson.annotation.JsonCreator;
import lombok.Data;

@Data

public class User {
    private String name;
}
创建一个UserController,提供一个/user/getUser的访问,为了能够在测试的时候反馈具体是哪一个userservice提供了服务,log打印一句话,创建一个User对象返回即可。
package com.example.controller;

import com.example.entity.User;
import lombok.extern.slf4j.Slf4j;
import org.springframework.web.bind.annotation.GetMapping;
import org.springframework.web.bind.annotation.RequestMapping;
import org.springframework.web.bind.annotation.RestController;

@RestController
@RequestMapping("/user")
@Slf4j
public class UserController {
    @GetMapping("/getUser")
    public User getUser(){
        log.info("userController's getuser comming......");
        User user=new User();
        user.setName("zhangsan");
        return user;
    }
}
orderservice
创建orderservice模块,pom文件与userservice模块大致相同:
<?xml version="1.0" encoding="UTF-8"?>
<project xmlns="http://maven.apache.org/POM/4.0.0"
         xmlns:xsi="http://www.w3.org/2001/XMLSchema-instance"
         xsi:schemaLocation="http://maven.apache.org/POM/4.0.0 http://maven.apache.org/xsd/maven-4.0.0.xsd">
    <parent>
        <artifactId>springCloud</artifactId>
        <groupId>com.example</groupId>
        <version>0.0.1-SNAPSHOT</version>
    </parent>
    <modelVersion>4.0.0</modelVersion>

    <artifactId>orderservice</artifactId>

    <properties>
        <maven.compiler.source>17</maven.compiler.source>
        <maven.compiler.target>17</maven.compiler.target>
    </properties>
    <dependencies>
        <dependency>
            <groupId>org.springframework.cloud</groupId>
            <artifactId>spring-cloud-starter-netflix-eureka-client</artifactId>
        </dependency>
        <dependency>
            <groupId>org.springframework.boot</groupId>
            <artifactId>spring-boot-starter-web</artifactId>
        </dependency>
        <dependency>
            <groupId>com.example</groupId>
            <artifactId>userService</artifactId>
            <version>0.0.1-SNAPSHOT</version>
        </dependency>
    </dependencies>

</project>
application.yml文件,指定端口号9090:
spring:
  application:
    name: orderservice
eureka:
  client:
    service-url: # eureka ?????
      defaultZone: http://127.0.0.1:10086/eureka/
server:
  port: 9090
创建一个OrderController类,提供/order/getOrder接口,该接口调用OrderService的getOrder()方法:
package com.example.controller;

import com.example.service.OrderService;
import org.springframework.beans.factory.annotation.Autowired;
import org.springframework.stereotype.Controller;
import org.springframework.web.bind.annotation.GetMapping;
import org.springframework.web.bind.annotation.RequestMapping;
import org.springframework.web.bind.annotation.RestController;

@RestController
@RequestMapping("/order")
public class OrderController {
    @Autowired
    OrderService orderService;
    @GetMapping("/getOrder")
    public String getOrder(){
        System.out.println("Come here to get Order....===");
        return orderService.getOrder();
    }

}
创建一个OrderService类,增加@Service注解加入Spring容器:
package com.example.service;

import com.example.entity.User;
import org.springframework.beans.factory.annotation.Autowired;
import org.springframework.stereotype.Service;
import org.springframework.web.client.RestTemplate;
@Service
public class OrderService {
    @Autowired
    private RestTemplate restTemplate;
    public String getOrder(){
        //通过userService获取user信息
        String url="http://userservice/user/getUser";
        System.out.println("url"+url);
        User user=restTemplate.getForObject(url,User.class);
        System.out.println(user);
        return user.getName();
    }
}
OrderService类注入RestTemplate 对象,getOrder方法通过RestTemplate 对象调用userservice的/user/getuser接口获取User对象。之后返回获取到的user对象的name。
一切都是为了测试验证Eureka功能,所以不管是userService还是orderService,功能都非常简单。
orderservice还剩最后一步:启动类。
package com;

import org.springframework.boot.SpringApplication;
import org.springframework.boot.autoconfigure.SpringBootApplication;
import org.springframework.cloud.client.loadbalancer.LoadBalanced;
import org.springframework.context.annotation.Bean;
import org.springframework.web.client.RestTemplate;

@SpringBootApplication
@EnableEurekaClient
public class OrderServiceApplication {
    public static void main(String[] args) {
        SpringApplication.run(OrderServiceApplication.class);
    }

    @Bean
    @LoadBalanced
    public RestTemplate restTemplate(){
        return new RestTemplate();
    }

}
增加@EnableEurekaClient注解(不过发现不加这个注解也不影响功能实现,等待后续解析源码学习底层原理的时候再研究这个注解的具体作用)。
启动类中通过@Bean的方式增加RestTemplate 对象的注入(注入到Spring IoC容器中),并且增加@LoadBanance注解,表明通过RestTemplate 对象调用userservice服务的时候需要实现负载均衡功能。
OK,所有的代码准备工作已完成。
测试
第一步,为了测试验证orderservice调用userservice的时候的负载均衡功能,需要启动多个userservice。
idea提供了这个能力,只不过需要在configuration中通过虚拟机参数指定服务端口:
我们一共配置了3个userservice。
orderService无所谓,其实有一个就够了。
我们顺序启动几个服务:
- eureka注册中心服务eureka-service(其实上面我们已经启动过了)。
- userservice服务userservice
- userservice服务userservice1
- userservice服务userservice2
- orderservice服务ordersercice
服务启动之后,在idea的service监控窗口可以看到各服务的启动端口、以及状态: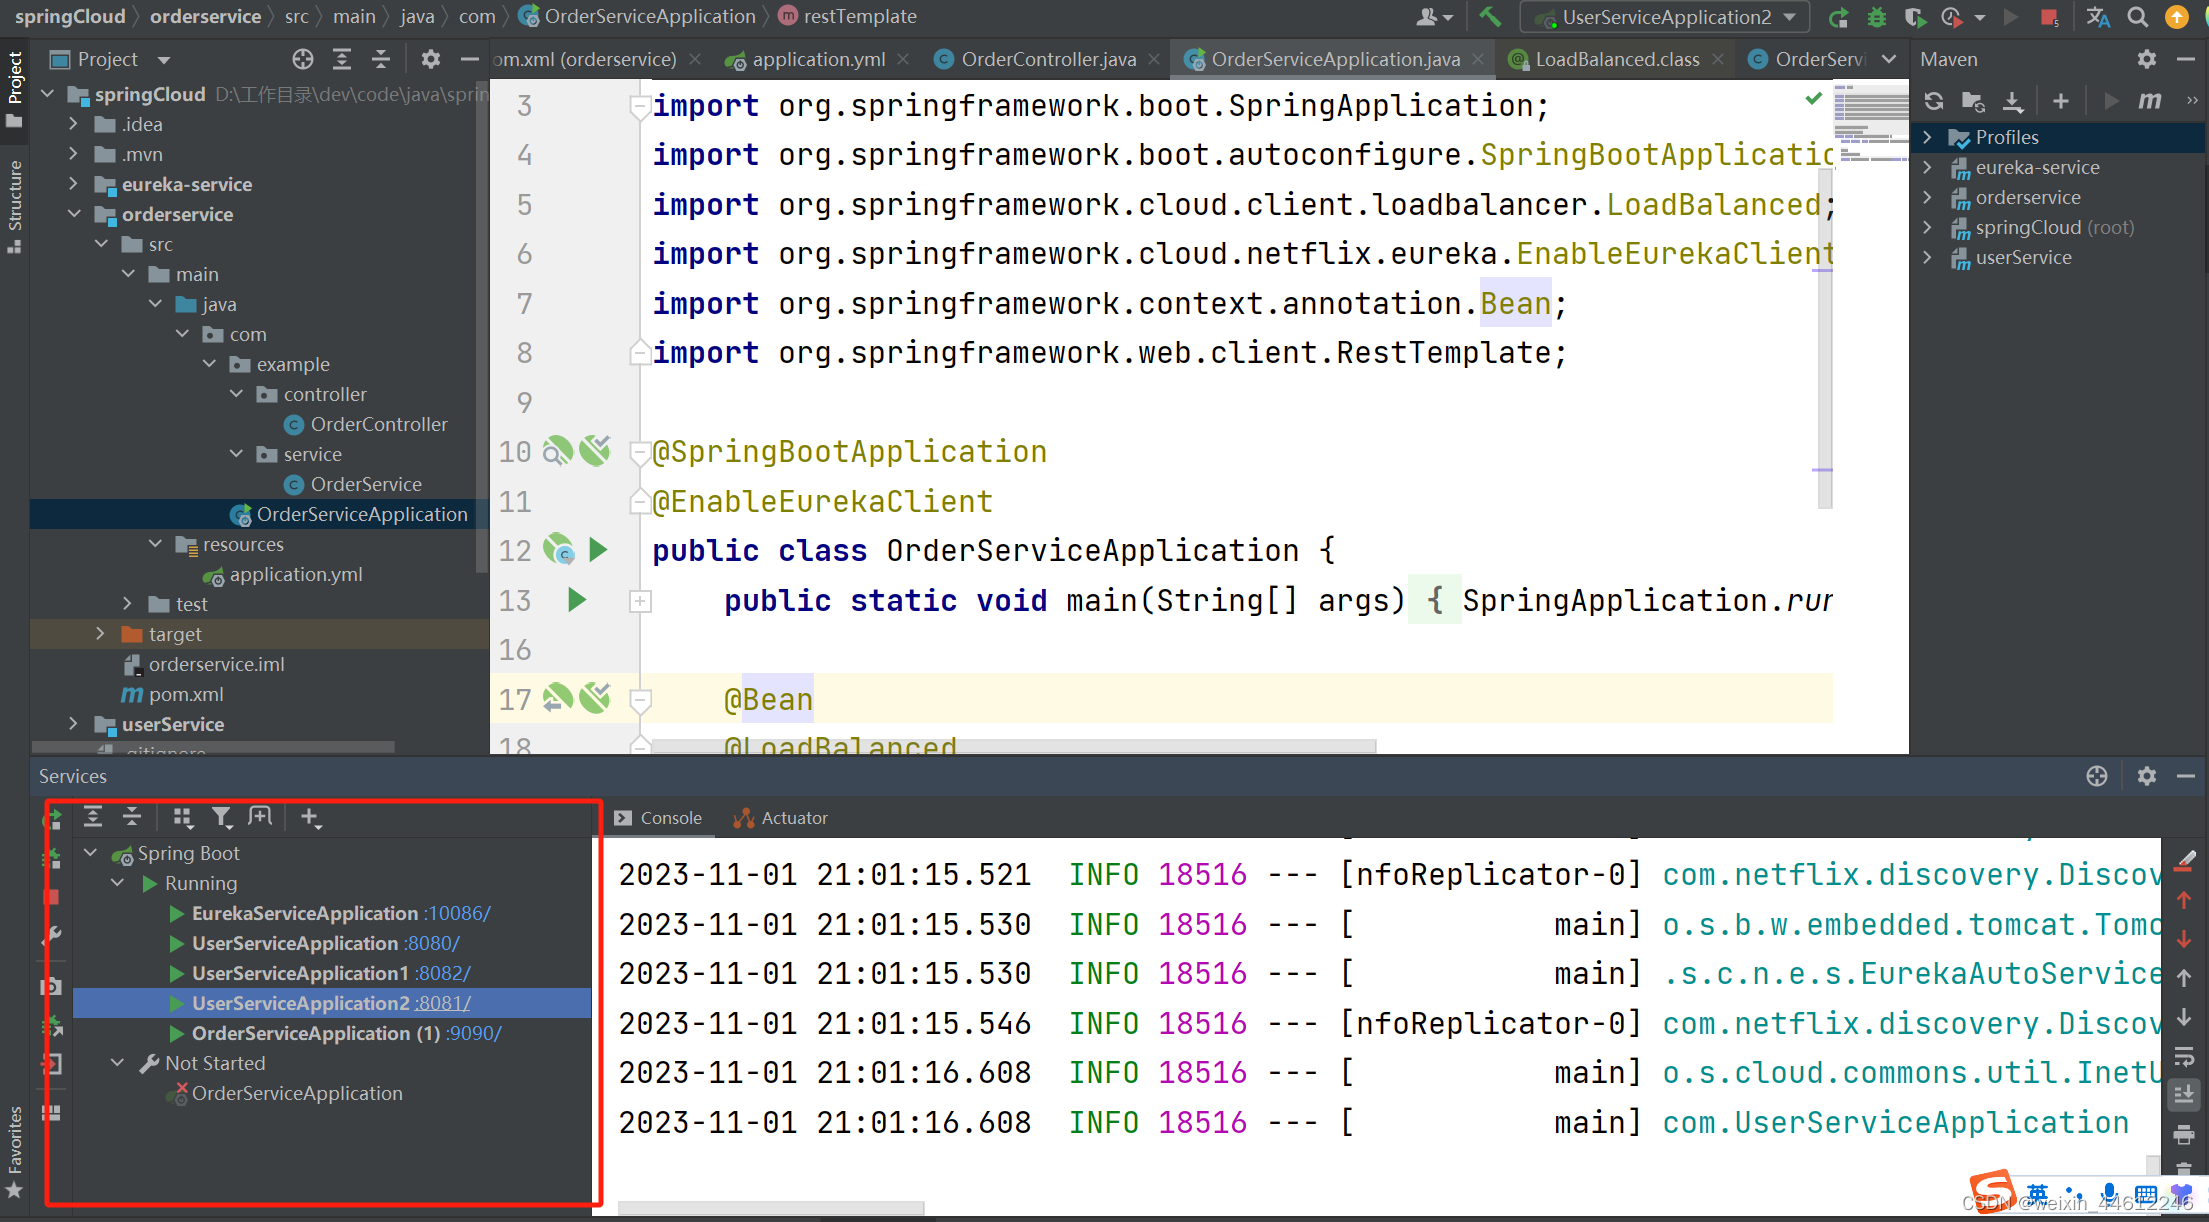
通过浏览器看一下eureka的工作状态: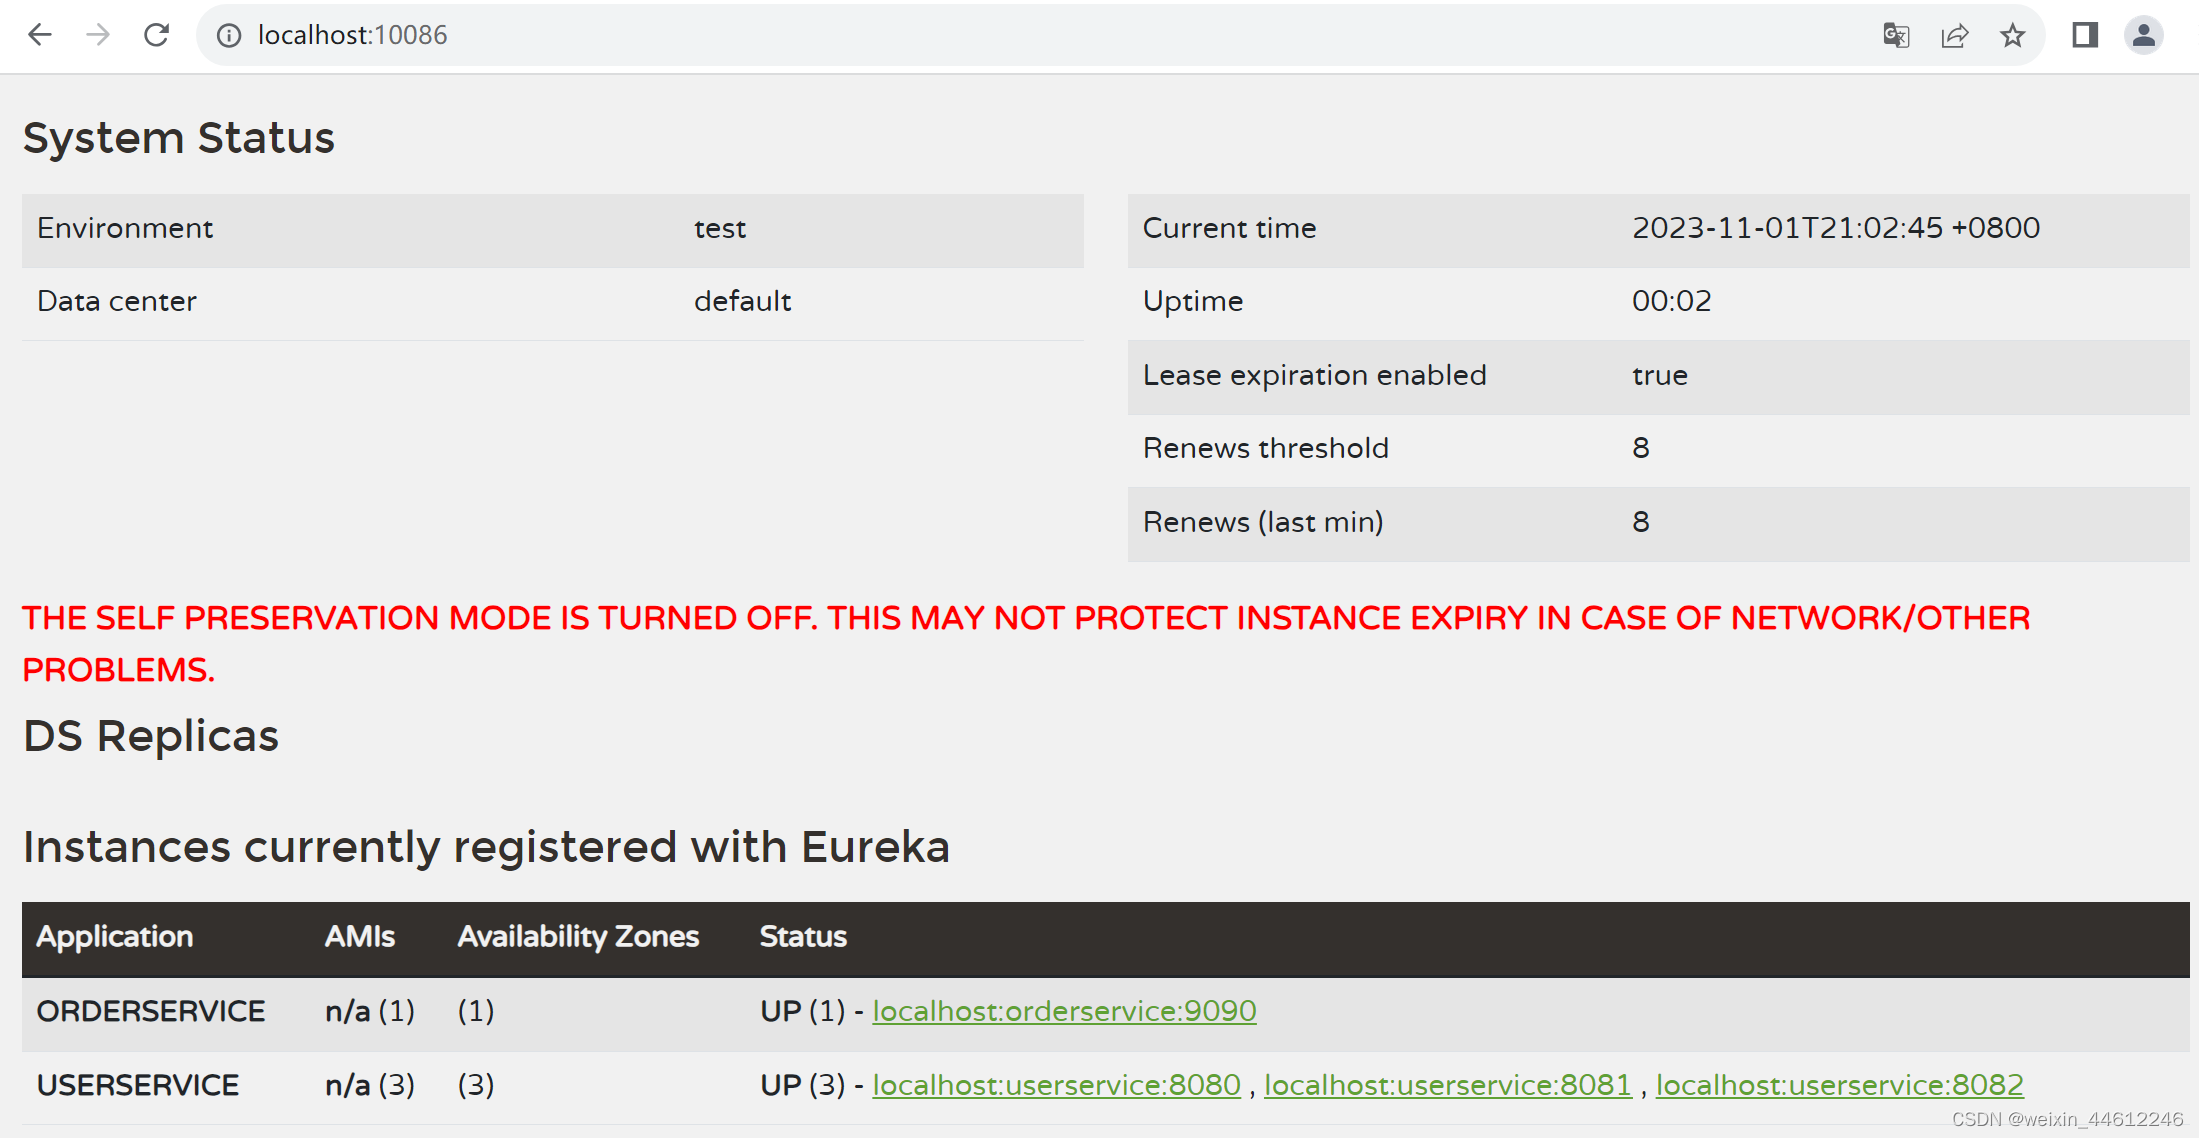
可以看到当前注册到Eureka注册中心的共有4个服务,一个orderservice,3个userservice。
好了,可以开始测试了。
通过浏览器访问orderservice的getorder方法: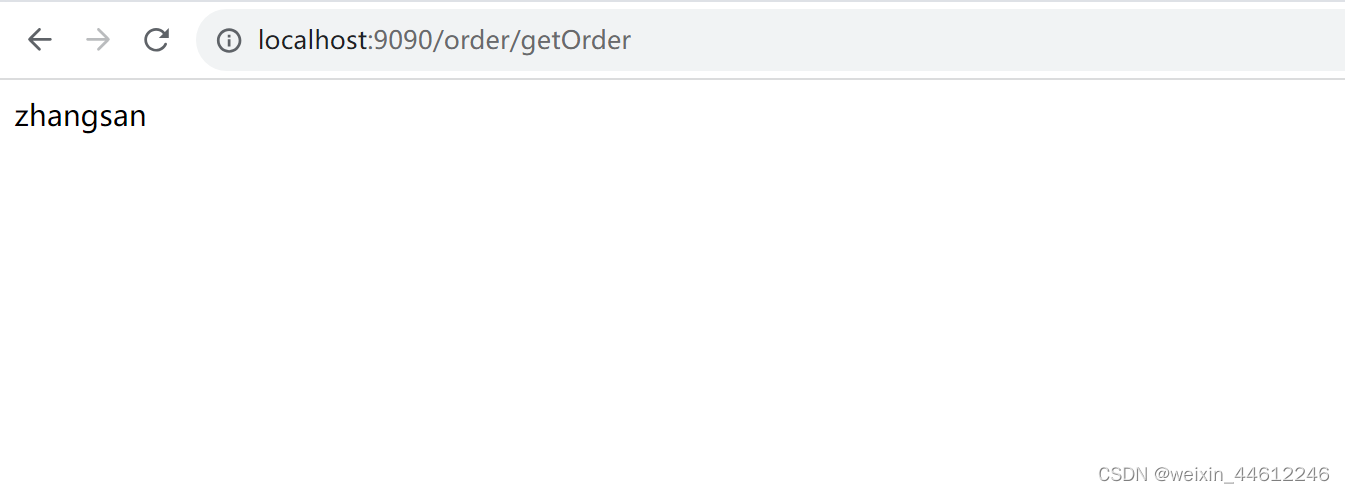
可以正常访问到orderservice服务的接口/order/getorder,并且,orderservice通过restTemplate、以及Eureka客户端可以正常访问到微服务userservice的/user/getuser接口!
说明Eureka注册中心的注册功能、已经Eureka客户端向注册中心拉取服务列表、访问其服务列表中的服务等功能已经可以正常工作了。
通过浏览器反复刷新localhost:9090/order/getOrder接口,多次访问,之后在idea的运行窗口观察userservice的log:
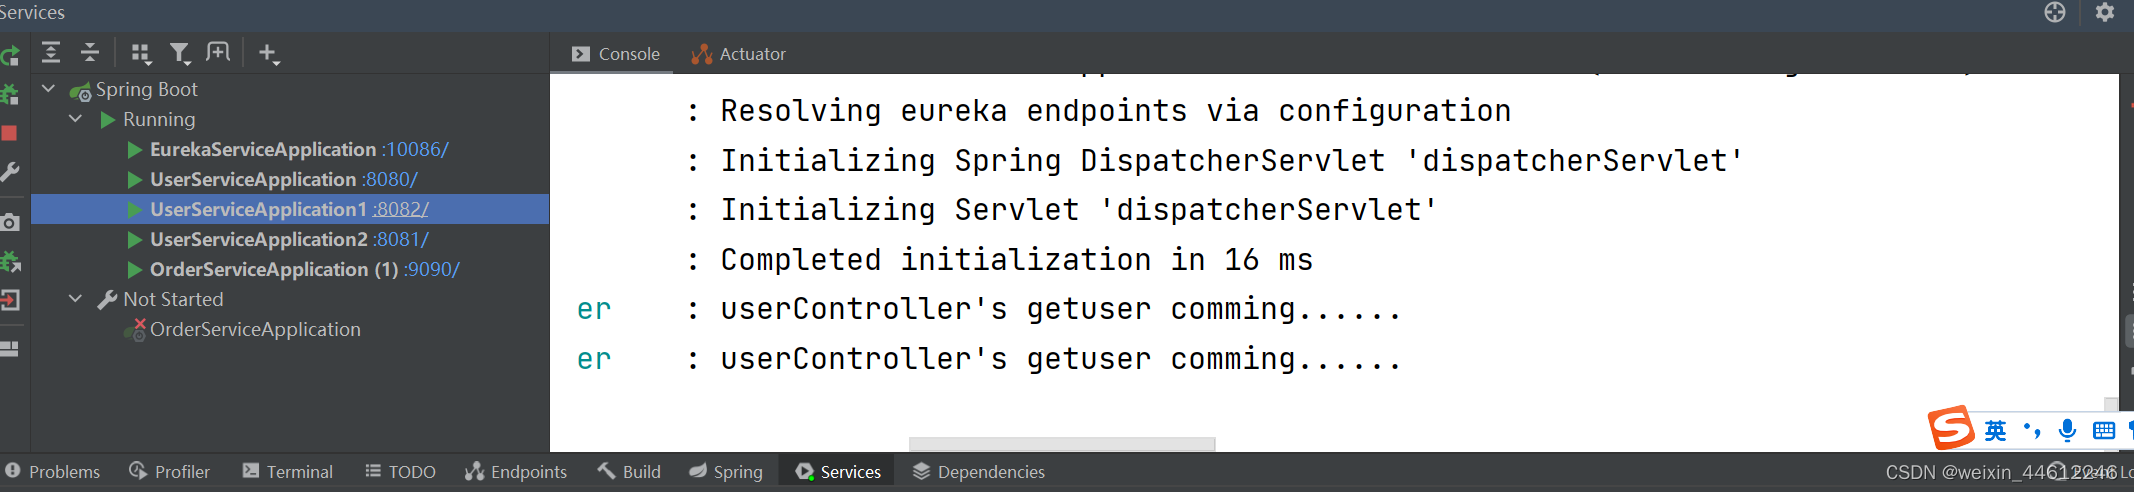
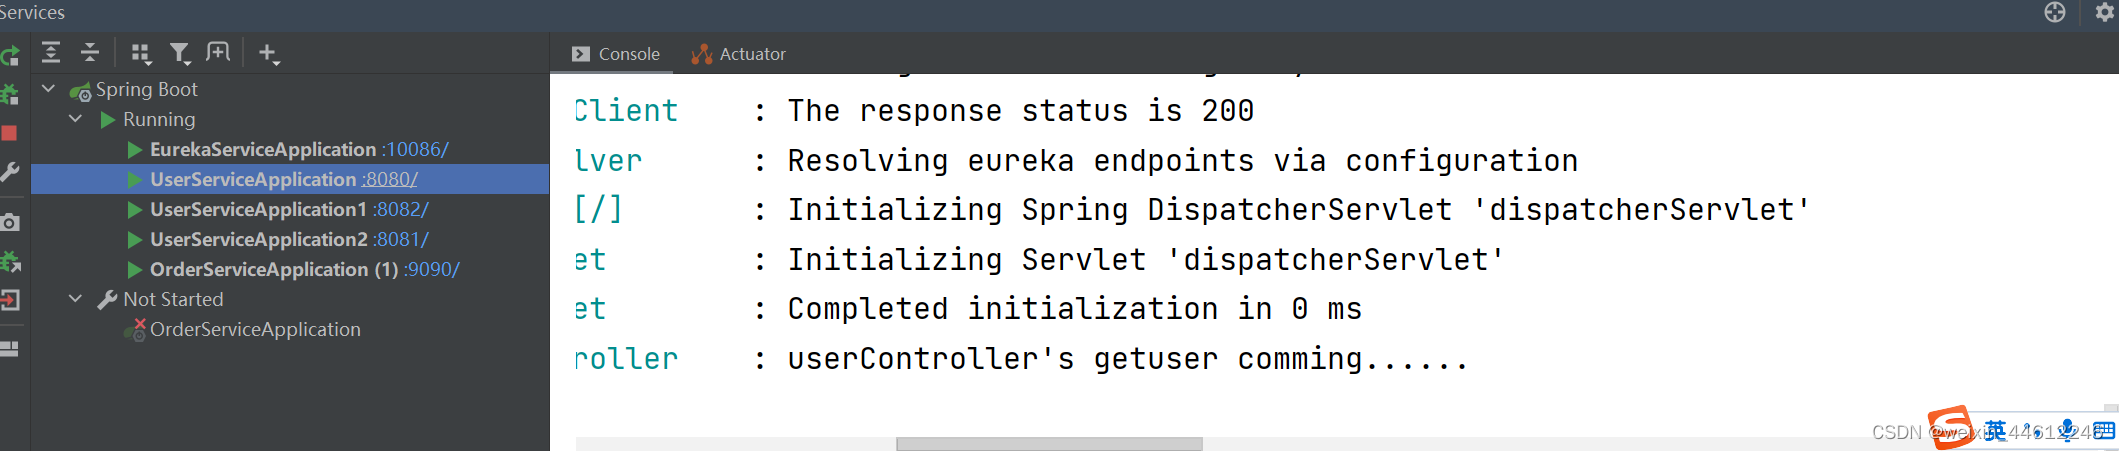
发现8080端口的、8081端口的、以及8082端口的userservice服务会被轮番调用,说明loadbalance功能也已经可以正常工作了。
至于负载均衡策略,留待以后研究吧。
当然我们可以shutdown掉一个userservice,可以发现前端访问/order/getorder接口不受影响,也简单说明了通过Spring Cloud微服务功能可以提高系统服务能力、增强可靠性和可访问能力。
但是,需要补充一下,down掉一个userservice之后,前端访问/order/getorder接口偶然会出现失败的情况,说明一个问题:userservice服务down掉之后,并没有立即反馈给Eureka注册中心(因为有心跳周期的问题),之后,同步给Eureka注册中心之后,orderservice的本地服务列表也应该是需要时间来更新的,所以userservice服务down掉一段时间之后,前端访问才能正常。
let’s say it’s a day!
上一篇 SpringBoot 自动配置@EnableAutoConfiguration
版权归原作者 weixin_44612246 所有, 如有侵权,请联系我们删除。