文章目录
一、pytest是什么?
pytest是python的第三方测试框架,是基于unittest的扩展框架,比unittest更简洁,更高效。能够支持简单的单元测试和复杂的功能测试,还可以用来做selenium/appnium等自动化测试、接口自动化测试(pytest+requests);pytest具有很多第三方插件,并且可以自定义扩展,比较好用的如pytest-selenium(集成selenium)、pytest-html(完美html测试报告生成)、pytest-rerunfailures(失败case重复执行)、pytest-xdist(多CPU分发)等等
二、pytest的特点
- 非常容易上手,入门简单,文档丰富,文档中有很多实例可以参考
- 能够支持简单的单元测试和复杂的功能测试
- 支持参数化
- 执行测试过程中可以将某些测试跳过,或者对某些预期失败的case标记成失败
- 支持重复执行失败的case
- 支持运行由nose, unittest编写的测试case
- 具有很多第三方插件,并且可以自定义扩展
- 方便的和持续集成工具集成
三、pytest下载安装
pytest的官网地址是:https://docs.pytest.org/
需要注意先检查下python的版本,需要python 3.7以上版本
安装完python后,直接使用pip命令安装:
pipinstall-Upytest
安装后进行检查:
pytest--version
常用的插件安装:
pip install pytest-html:生成html格式的自动化测试报告
pip install pytest-xdist:测试用例分布式执行
pip install pytest-ordering:用于改变测试用例的执行顺序
pip install pytest-rerunfailures:用例失败后重跑
pip install pytest-assume:正常情况下一条用例如果有多条断言,一条断言失败了,其他断言就不会执行了,而使用pytest-assume可以继续执行下面的断言
allure-pytest:生成测试报告
四、pytest的配置
pytest框架不是pycharm自带的框架(pycharm默认框架为unittests),还需要配置一下,路径为:
File->Settings->Tools->Python Integrated Tools->Testing中的Default test runner把默认为的unittests改为pytest。
五、pytest约束规则
1、测试文件名要满足test_*.py格式或*_test.py格式
2、测试类名以Test开头,并且不能带有 init 方法(注意:定义class时,需要以T开头,不然pytest是不会去运行该class的)
3、类中,测试方法名以test开头,可以包含一个或多个test_开头的函数。 在执行pytest命令时,会自动从当前目录及子目录中寻找符合上述约束的测试函数来执行
4、批量执行,脚本名以 test 开头。
六、编写脚本
import pytest

# 被测试函数
def add(a, b):return a + b

class TestCase:
    # 测试脚本
    def test_add(self):
        assert 3==add(1,2)if __name__ =='__main__':
    pytest.main()
七、pytest的运行方式
Pytest 运行方式共有三种:
1、主函数模式
- 运行所有 pytest.main()
- 指定模块 pytest.main(‘[-vs],’,‘./testcase/test_day1.py’) 只运行testcase 下的test_day1.py 文件
- 指定目录 pytest.main(‘[-vs]’),‘./testcase’) 只运行testcase 目录下的文件
- 通过nodeid指定用例运行:nodeid由模块名,分隔符,类名,方法名,函数名组成 1.执行某个类:
pytest 文件名.py::类名 例如: #pytest.main(["-vs"],'./interface_testcase/test_day3.py::TestLogin')
2.执行某个方法
pytest 文件名.py::类名::方法名 例如:#pytest.main(["-vs"],'./interface_testcase/test_day3.py::TestLogin::test_01')
3.执行模块中某个方法:
pytest 文件名.py::方法名 例如:#pytest.main(["-vs"],'./interface_testcase/test_day3.py::test_demo11')
2、命令行模式
(1)运行所有:pytest
(2)指定模块 pytest -vs ./testcase/test_day1.py
(3)指定目录 pytest -vs ./testcase
(4)通过nodeid指定用例运行:nodeid由模块名,分隔符,类名,方法名,函数名组成
pytest -vs ./interface_testcase/test_day3.py::test_demo11
pytest -vs ./interface_testcase/test_day3.py::TestLogin::test_01_qianghong1
参数详解:
-s:表示输出调试信息,包括print打印的信息
-v:显示更详细的信息
-vs:一起使用
-n:支持多线程或者分布式运行测试用例
主函数模式运行举例:
pytest.main(['-vs','./testcase/test_day1.py','-n=2'])
命令行模式运行举例:
pytest -vs ./testcase/test_day1.py -n 2
#reruns==number 表示失败用例重跑,举例如下:
pytest -vs ./testcase/test_day2.py --reruns 2
pytest.main(['–vs','./testcase/test_day2.py',‘reruns=2']) #失败得的用例重跑两次
#-x 表示只要一个用例报错,那么测试停止运行
#–maxfail=2 出现两个失败用例停止
#-k 根据测试用例的部分字符串指定测试用例
pytest -vs test_day2 -k “yang”
3、通过读取pytest ini配置文件运行 (最主要运用的方式)
pytest.ini是pytest单元测试框架中的核心配置文件
(1)位置:一般是放在项目的根目录
(2)编码:必须是ANSI,可以使用notepad++来修改编码格式
(3)作用:改变pytest的默认行为
(4)运行的规则:不管是主函数的模式运行该,命令行模式,都会区读取这个配置文件
常用参数
addopts 命令行的参数,用空格分隔
testpaths 测试用例的路径
markers 标记参数,赋值方式为 key:value
python_files 模块的命名规则 xx.py
python_classes 类名的命名规则 Xxx
python_functions 方法的命名规则 **
required_plugins 插件的使用
xfail_strict = true 禁用xpass
addopts: OPTS 命令行参数集
-s:表示输出调试信息,包括 print打印的信息
-v:显示更详细的信息
-vs:这两个参数一起用
-n :支持多线程或者分布式运行测试用例
如:pytest -vs ./testcase/test_login.py -n 2
–html : 测试报告位置
–reruns : 失败重跑
-p no:warnings : 取消警告
–ff : 先执行上次失败的用例
–lf : 只执行上次失败的用例
-x : 遇到测试用例fail,就结束测试
–maxfail=num:遇到num条测试用例fail, 就结束测试
-k :根据测试用例的部分字符串指定测试用例
如:pytest -vs ./testcase -k “ao”
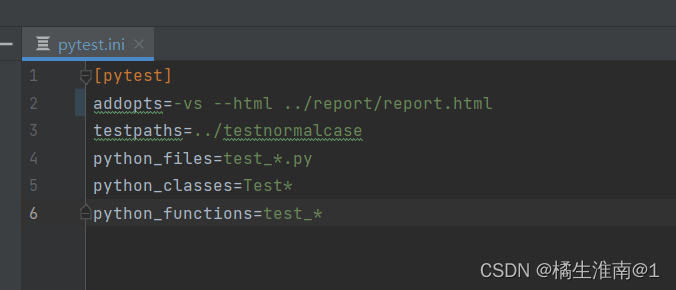
简单的配置如下:
[pytest]addopts=-vs --html../report/report.html
testpaths=../testnormalcase
python_files=test_*.py
python_classes=Test*
python_functions=test_*
版权归原作者 橘生淮南@1 所有, 如有侵权,请联系我们删除。