
前言:在最近的工作当中,客户反应需要实时接收消息提醒,这个功能虽然不大,但不过也用到了一些新的技术,于是我这边写一个关于我如何实现这个功能、编写、测试到部署服务器,归纳到这篇博客中进行总结。
一、什么是WebSocket
WebSocket是一种建立在TCP连接上的全双工通信协议,让客户端和服务端之间可以做到实时通信,允许服务端和客户端互相推送数据,服务端和客户端只要建立一次握手,两者之间便可以创建持久连接实现数据的双向传输。
二、后端实现
2.1、引入pom.xml依赖
        <!-- 集成websocket实现实时通信 -->
        <dependency>
            <groupId>org.springframework.boot</groupId>
            <artifactId>spring-boot-starter-websocket</artifactId>
        </dependency>

        <!-- 常用工具类 -->
        <dependency>
            <groupId>org.apache.commons</groupId>
            <artifactId>commons-lang3</artifactId>
        </dependency>

        <!-- lombok -->
        <dependency>
            <groupId>org.projectlombok</groupId>
            <artifactId>lombok</artifactId>
            <version>1.18.26</version>
        </dependency>
2.2、注册WebSocket核心配置类
package com.example.websocket.config;

import org.springframework.context.annotation.Bean;
import org.springframework.context.annotation.Configuration;
import org.springframework.web.socket.server.standard.ServerEndpointExporter;

@Configuration
public class WebSocketConfig
{
    @Bean
    public ServerEndpointExporter serverEndpointExporter()
    {
        return new ServerEndpointExporter();
    }
}
2.3、编写WebSocket服务器核心代码
这里我提供两种,可以随意进行选择。
第一种:
package com.ithuang.websocket.config;

import lombok.extern.slf4j.Slf4j;
import org.apache.commons.lang3.StringUtils;
import org.springframework.stereotype.Component;

import javax.websocket.*;
import javax.websocket.server.PathParam;
import javax.websocket.server.ServerEndpoint;
import java.io.IOException;
import java.util.concurrent.ConcurrentHashMap;

@ServerEndpoint("/websocket/{userId}")
@Component
@Slf4j
public class WebSocketServer {

    /**静态变量,用来记录当前在线连接数。应该把它设计成线程安全的。*/
    private static int onlineCount = 0;
    /**concurrent包的线程安全Set,用来存放每个客户端对应的MyWebSocket对象。*/
    private static ConcurrentHashMap<String,WebSocketServer> webSocketMap = new ConcurrentHashMap<>();
    /**与某个客户端的连接会话,需要通过它来给客户端发送数据*/
    private Session session;
    /**接收userId*/
    private String userId="";

    /**
     * 连接建立成功调用的方法*/
    @OnOpen
    public void onOpen(Session session, @PathParam("userId") String userId) {
        this.session = session;
        this.userId=userId;
        if(webSocketMap.containsKey(userId)){
            webSocketMap.remove(userId);
            webSocketMap.put(userId,this);
            //加入set中
        }else{
            webSocketMap.put(userId,this);
            //加入set中
            addOnlineCount();
            //在线数加1
        }

        log.info("用户连接:"+userId+",当前在线人数为:" + getOnlineCount());

        try {
            sendMessage("连接成功");
        } catch (IOException e) {
            log.error("用户:"+userId+",网络异常!!!!!!");
        }
    }

    /**
     * 连接关闭调用的方法
     */
    @OnClose
    public void onClose() {

        if(webSocketMap.containsKey(userId)){
            webSocketMap.remove(userId);
            //从set中删除
            subOnlineCount();
        }
        log.info("用户退出:"+userId+",当前在线人数为:" + getOnlineCount());
    }

    /**
     * 收到客户端消息后调用的方法
     *
     * @param message 客户端发送过来的消息*/
    @OnMessage
    public void onMessage(String message, Session session) {
        log.info("用户消息:"+userId+",报文:"+message);
        //可以群发消息
        //消息保存到数据库、redis
//        if(StringUtils.isNotBlank(message)){
//            try {
//                //解析发送的报文
//                JSONObject jsonObject = JSON.parseObject(message);
//
//            }catch (Exception e){
//                e.printStackTrace();
//            }
//        }
    }

    /**
     *
     * @param session
     * @param error
     */
    @OnError
    public void onError(Session session, Throwable error) {
        log.error("用户错误:"+this.userId+",原因:"+error.getMessage());
    }

    /**
     * 实现服务器主动推送
     */
    public void sendMessage(String message) throws IOException {
        this.session.getBasicRemote().sendText(message);
    }

    /**
     * 实现服务器主动推送
     */
    public void sendAllMessage(String message) throws IOException {
        ConcurrentHashMap.KeySetView<String, WebSocketServer> userIds = webSocketMap.keySet();
        for (String userId : userIds) {
            WebSocketServer webSocketServer = webSocketMap.get(userId);
            webSocketServer.session.getBasicRemote().sendText(message);
        }
    }

    /**
     * 发送自定义消息
     * */
    public static void sendInfo(String message,@PathParam("userId") String userId) throws IOException {
        log.info("发送消息到:"+userId+",报文:"+message);
        if(StringUtils.isNotBlank(userId)&&webSocketMap.containsKey(userId)){
            webSocketMap.get(userId).sendMessage(message);
        }else{
            log.error("用户"+userId+",不在线!");
        }
    }

    public static synchronized int getOnlineCount() {
        return onlineCount;
    }

    public static synchronized void addOnlineCount() {
        WebSocketServer.onlineCount++;
    }

    public static synchronized void subOnlineCount() {
        WebSocketServer.onlineCount--;
    }
}
第二种:
package com.ithuang.websocket.config;

import lombok.extern.slf4j.Slf4j;
import org.springframework.stereotype.Component;

import javax.websocket.*;
import javax.websocket.server.PathParam;
import javax.websocket.server.ServerEndpoint;
import java.io.IOException;
import java.util.concurrent.ConcurrentHashMap;
import java.util.concurrent.CopyOnWriteArraySet;

@ServerEndpoint("/websocket/{userId}")
@Component
@Slf4j
public class WebSocketServer {

    // 与某个客户端的连接会话,需要通过它来给客户端发送数据
    private Session session;

    // session集合,存放对应的session
    private static ConcurrentHashMap<Integer, Session> sessionPool = new ConcurrentHashMap<>();

    // concurrent包的线程安全Set,用来存放每个客户端对应的WebSocket对象。
    private static CopyOnWriteArraySet<WebSocketServer> webSocketSet = new CopyOnWriteArraySet<>();

    /**
     * 建立WebSocket连接
     *
     * @param session
     * @param userId 用户ID
     */
    @OnOpen
    public void onOpen(Session session, @PathParam(value = "userId") Integer userId) {
        log.info("WebSocket建立连接中,连接用户ID:{}", userId);
        try {
            Session historySession = sessionPool.get(userId);
            // historySession不为空,说明已经有人登陆账号,应该删除登陆的WebSocket对象
            if (historySession != null) {
                webSocketSet.remove(historySession);
                historySession.close();
            }
        } catch (IOException e) {
            log.error("重复登录异常,错误信息:" + e.getMessage(), e);
        }
        // 建立连接
        this.session = session;
        webSocketSet.add(this);
        sessionPool.put(userId, session);
        log.info("建立连接完成,当前在线人数为:{}", webSocketSet.size());
    }

    /**
     * 发生错误
     *
     * @param throwable e
     */
    @OnError
    public void onError(Throwable throwable) {
        throwable.printStackTrace();
    }

    /**
     * 连接关闭
     */
    @OnClose
    public void onClose() {
        webSocketSet.remove(this);
        log.info("连接断开,当前在线人数为:{}", webSocketSet.size());
    }

    /**
     * 接收客户端消息
     *
     * @param message 接收的消息
     */
    @OnMessage
    public void onMessage(String message) {
        log.info("收到客户端发来的消息:{}", message);
    }

    /**
     * 推送消息到指定用户
     *
     * @param userId  用户ID
     * @param message 发送的消息
     */
    public static void sendMessageByUser(Integer userId, String message) {
        log.info("用户ID:" + userId + ",推送内容:" + message);
        Session session = sessionPool.get(userId);
        try {
            session.getBasicRemote().sendText(message);
        } catch (IOException e) {
            log.error("推送消息到指定用户发生错误:" + e.getMessage(), e);
        }
    }

    /**
     * 群发消息
     *
     * @param message 发送的消息
     */
    public static void sendAllMessage(String message) {
        log.info("发送消息:{}", message);
        for (WebSocketServer webSocket : webSocketSet) {
            try {
                webSocket.session.getBasicRemote().sendText(message);
            } catch (IOException e) {
                log.error("群发消息发生错误:" + e.getMessage(), e);
            }
        }
    }

}
4、撰写定时任务
注:主启动类需要加上@EnableScheduling,否则不生效。
package com.ithuang.websocket.task;

import com.ithuang.websocket.config.WebSocketServer;
import org.springframework.scheduling.annotation.Scheduled;
import org.springframework.stereotype.Component;

import javax.annotation.Resource;
import java.io.IOException;
import java.util.Date;

@Component
public class Send {

    @Resource
    private WebSocketServer webSocketServer;

    @Scheduled(fixedDelay = 2000)
    public void sendMsg() throws IOException {
        webSocketServer.sendAllMessage("hello"+new Date());
    }
}
三、前端实现
需要先自行安装好element-ui组件库,这边不做演示,直接贴出代码
<template>
<div>
<template>
<div>
<el-input v-model="url" type="text" style="width: 20%" />
<el-button @click="initWebsocket" type="primary">连接</el-button>
<el-button @click="exit" type="danger">断开</el-button>
<br />
<el-input type="textarea" v-model="message" :rows="9" />
<el-button type="info" @click="send">发送消息</el-button>
<br />
<br />
<el-input type="textarea" v-model="text_content" :rows="9" /> 返回内容
<br />
<br />
</div>
</template>
</div>
</template>
<script>
// @ is an alias to /src
import HelloWorld from '@/components/HelloWorld.vue'
export default {
name: 'HomeView',
components: {
HelloWorld
},
data() {
return {
url: "ws://127.0.0.1:9090/websocket/1500",
message: "",
text_content: "",
ws: null,
};
},
created() {
},
destroyed() {
this.exit()
},
methods:{
initWebsocket(){
this.ws = new WebSocket(this.url);
const self = this;
this.ws.onopen = function (event) {
// self.text_content = self.text_content + "已经打开连接!" + "\n";
};
this.ws.onmessage = function (event) {
self.text_content = self.text_content + event.data +"\n";
};
this.ws.onclose = function (event) {
// self.text_content = self.text_content + "已经关闭连接!" + "\n";
};
},
exit() {
if (this.ws) {
this.ws.close();
this.ws = null;
}
},
send() {
if (this.ws) {
this.ws.send(this.message);
} else {
alert("未连接到服务器");
}
},
}
}
</script>
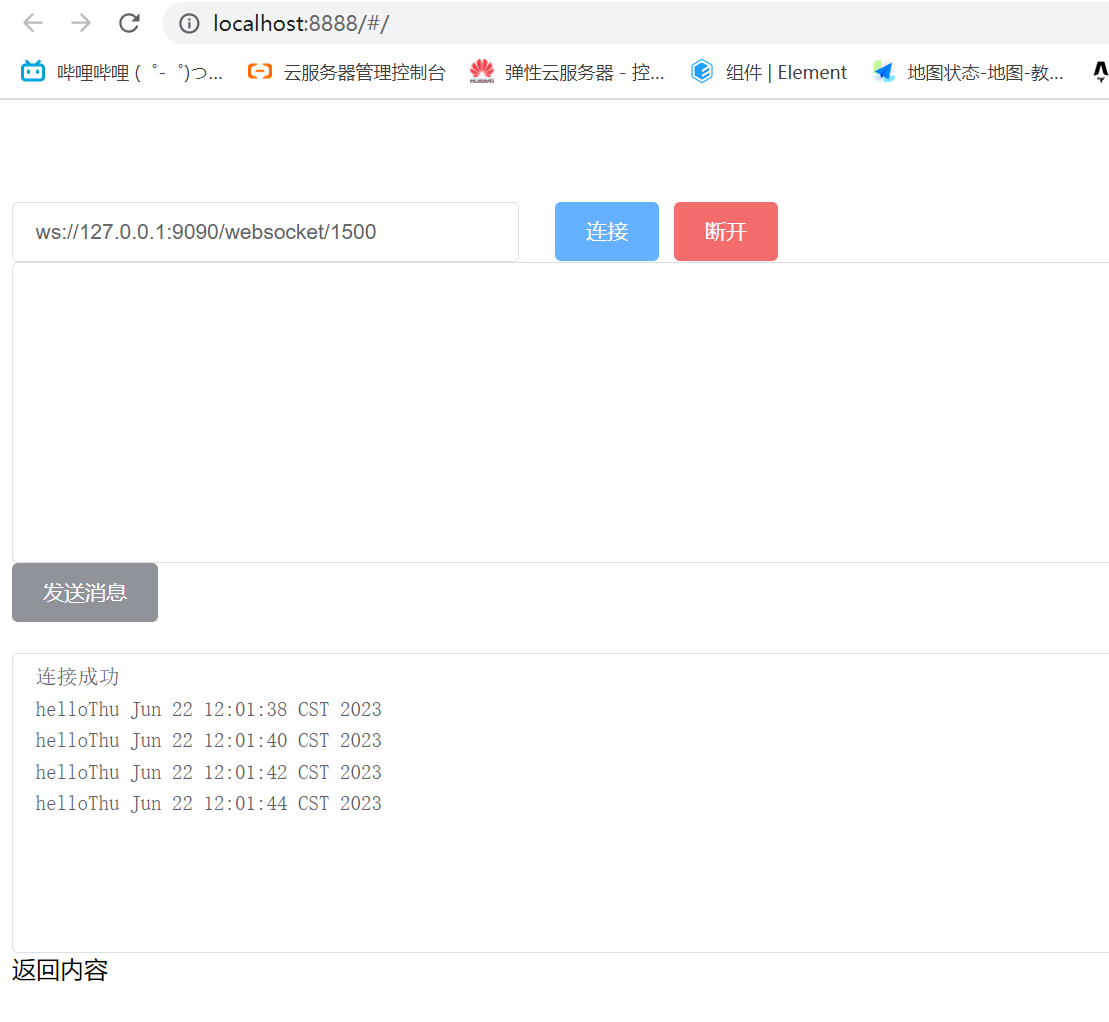
四、本地测试
点击连接
当点击断开或者关闭浏览器,后台输出如下
五、打包前后端
具体的打包方式这边不再做阐述,在后端打包可能会出现如下异常:
解决如下:
在单元测试类上面加上此注解:
@SpringBootTest(webEnvironment = SpringBootTest.WebEnvironment.RANDOM_PORT)
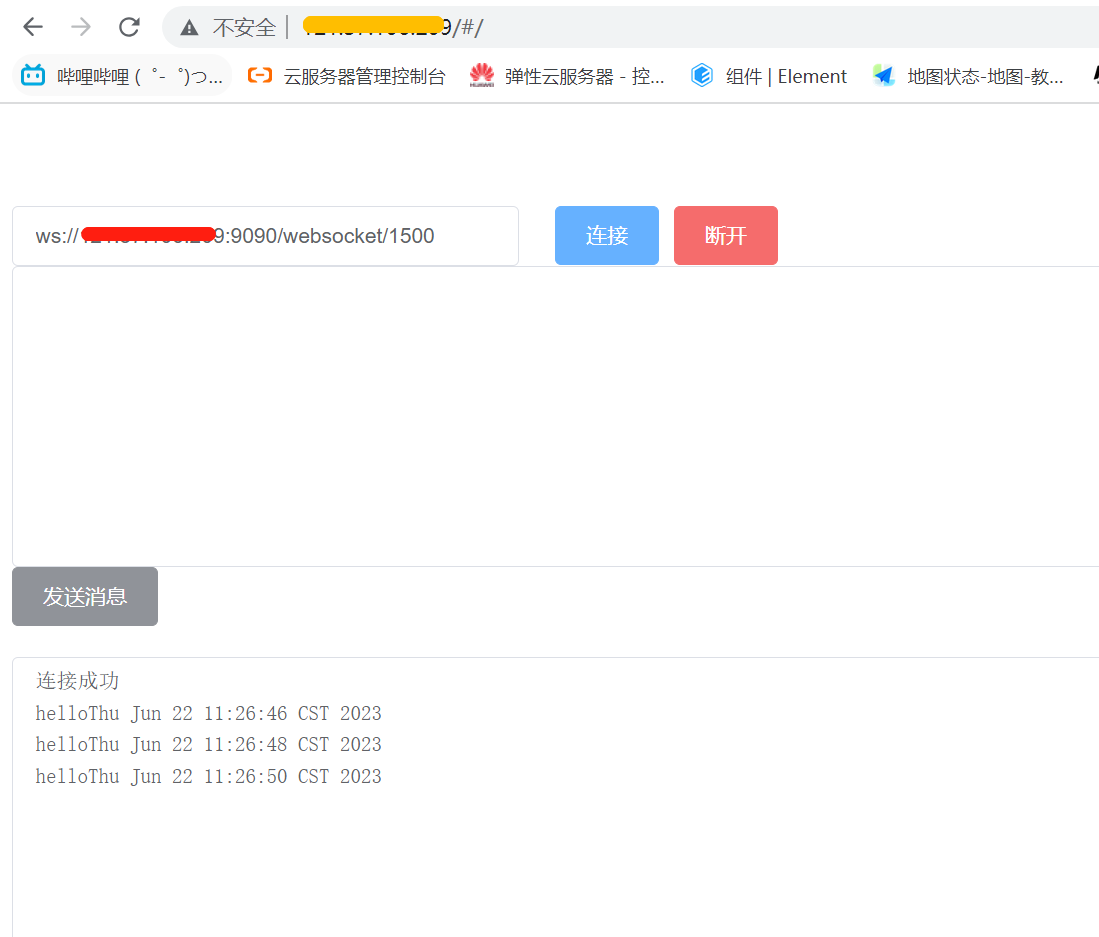
六、部署到服务器测试
具体的部署流程这边不再贴出,把默认的127.0.0.1替换成自己的服务器IP,点击连接即可,后端就会每2秒推送一次消息了,看代码结果。
部署的前端端口默认是80,后端端口是9090,记得放行端口。
后台日志如下: 
七、Gitee源码
前端代码:vue-websocket: vue实现websocket连接的前端代码
后端代码:springboot-websocket: springboot后端实现websocket连接源码
本文转载自: https://blog.csdn.net/HJW_233/article/details/131326572
版权归原作者 黄团团 所有, 如有侵权,请联系我们删除。
版权归原作者 黄团团 所有, 如有侵权,请联系我们删除。