在本文中,我们将为各种图像生成文字描述
图像描述是为图像提供适当文字描述的过程。作为人类,这似乎是一件容易的任务,即使是五岁的孩子也可以轻松完成,但是我们如何编写一个将输入作为图像并生成标题作为输出的计算机程序呢?
在深度神经网络的最新发展之前,业内最聪明的人都无法解决这个问题,但是在深度神经网络问世之后,考虑到我们拥有所需的数据集,这样做是完全有可能的。
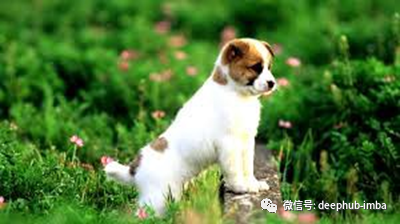
例如,网络模型可以生成与下图相关的以下任何标题,即“A white dog in a grassy area”,“white dog with brown spots”甚至“A dog on grass and some pink flowers ”。
数据集
我们选择的数据集为“ Flickr 8k”。我们之所以选择此数据,是因为它易于访问且具有可以在普通PC上进行训练的完美大小,也足够训练网络生成适当的标题。数据分为三组,主要是包含6k图像的训练集,包含1k图像的开发集和包含1k图像的测试集。每个图像包含5个标题。示例之一如下:

     A child in a pink dress is climbing up a set of stairs in an entryway.
     A girl going into a wooden building.
     A little girl climbing into a wooden playhouse.
     A little girl climbing the stairs to her playhouse.
     A little girl in a pink dress going into a wooden cabin.
数据清理
任何机器学习程序的第一步也是最重要的一步是清理数据并清除所有不需要的数据。在处理标题中的文本数据时,我们将执行基本的清理步骤,例如将计算机中的所有字母都转换为小写字母“ Hey”和“ hey”是两个完全不同的单词,删除特殊标记和标点符号,例如*, (,£,$,%等),并消除所有包含数字的单词。
我们首先为数据集中的所有唯一内容创建词汇表,即8000(图片数量)* 5(每个图像的标题)= 40000标题。我们发现它等于8763。但是这些词中的大多数只出现了1到2次,我们不希望它们出现在我们的模型中,因为这不会使我们的模型对异常值具有鲁棒性。因此,我们将词汇中包含的单词的最少出现次数设置为10个阈值,该阈值等于1652个唯一单词。
我们要做的另一件事是在每个描述中添加两个标记,以指示字幕的开始和结束。这两个标记分别是“ startseq”和“ endseq”,分别表示字幕的开始和结尾。
首先,导入所有必需的库:
 import numpy as np
 from numpy import array
 import pandas as pd
 import matplotlib.pyplot as plt
 import string
 import os
 from PIL import Image
 import glob
 import pickle
 from time import time
 from keras.preprocessing import sequence
 from keras.models import Sequential
 from keras.layers import LSTM, Embedding, Dense, Flatten, Reshape, concatenate, Dropout
 from keras.optimizers import Adam
 from keras.layers.merge import add
 from keras.applications.inception_v3 import InceptionV3
 from keras.preprocessing import image
 from keras.models import Model
 from keras import Input, layers
 from keras.applications.inception_v3 import preprocess_input
 from keras.preprocessing.sequence import pad_sequences
 from keras.utils import to_categorical
让我们定义一些辅助函数:
 # load descriptions
 def load_doc(filename):
     file = open(filename, 'r')
     text = file.read()
     file.close()
     return text


 def load_descriptions(doc):
     mapping = dict()
     for line in doc.split('\n'):
         tokens = line.split()
         if len(line) < 2:
             continue
         image_id, image_desc = tokens[0], tokens[1:]
         image_id = image_id.split('.')[0]
         image_desc = ' '.join(image_desc)
         if image_id not in mapping:
             mapping[image_id] = list()
         mapping[image_id].append(image_desc)
     return mapping

 def clean_descriptions(descriptions):
     table = str.maketrans('', '', string.punctuation)
     for key, desc_list in descriptions.items():
         for i in range(len(desc_list)):
             desc = desc_list[i]
             desc = desc.split()
             desc = [word.lower() for word in desc]
             desc = [w.translate(table) for w in desc]
             desc = [word for word in desc if len(word)>1]
             desc = [word for word in desc if word.isalpha()]
             desc_list[i] =  ' '.join(desc)

      return descriptions

 # save descriptions to file, one per line
 def save_descriptions(descriptions, filename):
     lines = list()
     for key, desc_list in descriptions.items():
         for desc in desc_list:
             lines.append(key + ' ' + desc)
     data = '\n'.join(lines)
     file = open(filename, 'w')
     file.write(data)
     file.close()


 # load clean descriptions into memory
 def load_clean_descriptions(filename, dataset):
     doc = load_doc(filename)
     descriptions = dict()
     for line in doc.split('\n'):
         tokens = line.split()
         image_id, image_desc = tokens[0], tokens[1:]
         if image_id in dataset:
             if image_id not in descriptions:
                 descriptions[image_id] = list()
             desc = 'startseq ' + ' '.join(image_desc) + ' endseq'
             descriptions[image_id].append(desc)
     return descriptions

 def load_set(filename):
     doc = load_doc(filename)
     dataset = list()
     for line in doc.split('\n'):
         if len(line) < 1:
             continue
         identifier = line.split('.')[0]
         dataset.append(identifier)
     return set(dataset)

 # load training dataset


 filename = "dataset/Flickr8k_text/Flickr8k.token.txt"
 doc = load_doc(filename)
 descriptions = load_descriptions(doc)
 descriptions = clean_descriptions(descriptions)
 save_descriptions(descriptions, 'descriptions.txt')
 filename = 'dataset/Flickr8k_text/Flickr_8k.trainImages.txt'
 train = load_set(filename)
 train_descriptions = load_clean_descriptions('descriptions.txt', train)
让我们一一解释:
  load_doc:获取文件的路径并返回该文件内的内容
  load_descriptions:获取包含描述的文件的内容,并生成一个字典,其中以图像id为键,以描述为值列表
  clean_descriptions:通过将所有字母都转换为小写字母,忽略数字和标点符号以及仅包含一个字符的单词来清理描述
  save_descriptions:将描述字典作为文本文件保存到内存中
  load_set:从文本文件加载图像的所有唯一标识符
  load_clean_descriptions:使用上面提取的唯一标识符加载所有已清理的描述
数据预处理
接下来,我们对图像和字幕进行一些数据预处理。图像基本上是我们的特征向量,即我们对网络的输入。因此,我们需要先将它们转换为固定大小的向量,然后再将其传递到神经网络中。为此,我们使用了由Google Research [3]创建的Inception V3模型(卷积神经网络)进行迁移学习。该模型在'ImageNet'数据集[4]上进行了训练,可以对1000张图像进行图像分类,但是我们的目标不是进行分类,因此我们删除了最后一个softmax层,并为每张图像提取了2048个固定矢量,如图所示 以下:

标题文字是我们模型的输出,即我们必须预测的内容。但是预测并不会一次全部发生,而是会逐字预测字幕。为此,我们需要将每个单词编码为固定大小的向量(将在下一部分中完成)。为此,我们首先需要创建两个字典,即“单词到索引”将每个单词映射到一个索引(在我们的情况下为1到1652),以及“索引到单词”将字典将每个索引 映射到其对应的单词字典。我们要做的最后一件事是计算在数据集中具有最大长度的描述的长度,以便我们可以填充所有其他内容以保持固定长度。在我们的情况下,该长度等于34。
字词嵌入
如前所述,我们将每个单词映射到固定大小的向量(即200)中,我们将使用预训练的GLOVE模型。最后,我们为词汇表中的所有1652个单词创建一个嵌入矩阵,其中为词汇表中的每个单词包含一个固定大小的向量。
 # Create a list of all the training captions
 all_train_captions = []
 for key, val in train_descriptions.items():
     for cap in val:
         all_train_captions.append(cap)


 # Consider only words which occur at least 10 times in the corpus
 word_count_threshold = 10
 word_counts = {}
 nsents = 0
 for sent in all_train_captions:
     nsents += 1
     for w in sent.split(' '):
         word_counts[w] = word_counts.get(w, 0) + 1

 vocab = [w for w in word_counts if word_counts[w] >= word_count_threshold]
 print('Preprocessed words {} -> {}'.format(len(word_counts), len(vocab)))


 ixtoword = {}
 wordtoix = {}

 ix = 1
 for w in vocab:
     wordtoix[w] = ix
     ixtoword[ix] = w
     ix += 1

 vocab_size = len(ixtoword) + 1 # one for appended 0's

 # Load Glove vectors
 glove_dir = 'glove.6B'
 embeddings_index = {}
 f = open(os.path.join(glove_dir, 'glove.6B.200d.txt'), encoding="utf-8")

 for line in f:
     values = line.split()
     word = values[0]
     coefs = np.asarray(values[1:], dtype='float32')
     embeddings_index[word] = coefs
 f.close()

 embedding_dim = 200

 # Get 200-dim dense vector for each of the words in out vocabulary
 embedding_matrix = np.zeros((vocab_size, embedding_dim))

 for word, i in wordtoix.items():
     embedding_vector = embeddings_index.get(word)
     if embedding_vector is not None:
         embedding_matrix[i] = embedding_vector
让我们接收下这段代码:
  第1至5行:将所有训练图像的所有描述提取到一个列表中
  第9-18行:仅选择词汇中出现次数超过10次的单词
  第21–30行:创建一个要索引的单词和一个对单词词典的索引。
  第33–42行:将Glove Embeddings加载到字典中,以单词作为键,将vector嵌入为值
  第44–52行:使用上面加载的嵌入为词汇表中的单词创建嵌入矩阵
数据准备
这是该项目最重要的方面之一。对于图像,我们需要使用Inception V3模型将它们转换为固定大小的矢量,如前所述。
 # Below path contains all the images
 all_images_path = 'dataset/Flickr8k_Dataset/Flicker8k_Dataset/'
 # Create a list of all image names in the directory
 all_images = glob.glob(all_images_path + '*.jpg')

 # Create a list of all the training and testing images with their full path names
 def create_list_of_images(file_path):
   images_names = set(open(file_path, 'r').read().strip().split('\n'))
   images = []

   for image in all_images:
       if image[len(all_images_path):] in image_names:
           images.append(image)

   return images


 train_images_path = 'dataset/Flickr8k_text/Flickr_8k.trainImages.txt'
 test_images_path = 'dataset/Flickr8k_text/Flickr_8k.testImages.txt'

 train_images = create_list_of_images(train_images_path)
 test_images = create_list_of_images(test_images_path)

 #preprocessing the images
 def preprocess(image_path):
     img = image.load_img(image_path, target_size=(299, 299))
     x = image.img_to_array(img)
     x = np.expand_dims(x, axis=0)
     x = preprocess_input(x)
     return x

 # Load the inception v3 model
 model = InceptionV3(weights='imagenet')

 # Create a new model, by removing the last layer (output layer) from the inception v3
 model_new = Model(model.input, model.layers[-2].output)

 # Encoding a given image into a vector of size (2048, )
 def encode(image):
     image = preprocess(image)
     fea_vec = model_new.predict(image)
     fea_vec = np.reshape(fea_vec, fea_vec.shape[1])
     return fea_vec


 encoding_train = {}
 for img in train_images:
     encoding_train[img[len(all_images_path):]] = encode(img)


 encoding_test = {}
 for img in test_images:
     encoding_test[img[len(all_images_path):]] = encode(img)

 # Save the bottleneck features to disk
 with open("encoded_files/encoded_train_images.pkl", "wb") as encoded_pickle:
     pickle.dump(encoding_train, encoded_pickle)

 with open("encoded_files/encoded_test_images.pkl", "wb") as encoded_pickle:
     pickle.dump(encoding_test, encoded_pickle)


 train_features = load(open("encoded_files/encoded_train_images.pkl", "rb"))
- 第1-22行:将训练和测试图像的路径加载到单独的列表中
- 第25–53行:循环训练和测试集中的每个图像,将它们加载为固定大小,对其进行预处理,使用InceptionV3模型提取特征,最后对其进行重塑。
- 第56–63行:将提取的特征保存到磁盘
现在,我们不会一次预测所有的标题文字,因为我们不只是将图像提供给计算机,并要求它为其生成文字。我们要做的就是给它图像的特征向量,以及标题的第一个单词,并让它预测第二个单词。然后我们给它给出前两个单词,并让它预测第三个单词。让我们考虑数据集部分中给出的图像和标题“一个女孩正在进入木结构建筑”。在这种情况下,在添加令牌“ startseq”和“ endseq”之后,以下分别是我们的输入(Xi)和输出(Yi)。
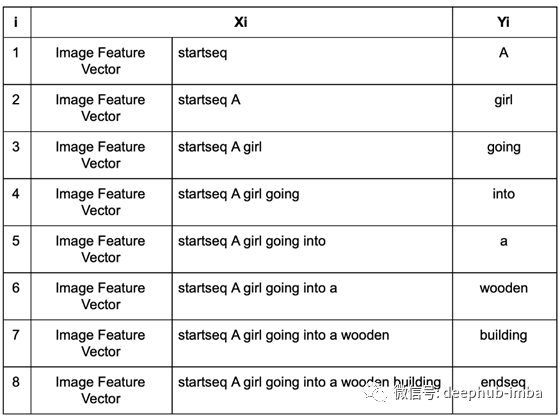
此后,我们将使用我们创建的“索引”字典来更改输入和输出中的每个词以映射索引。在进行批处理时,我们希望所有序列的长度均等,这就是为什么要在每个序列后附加0直到它们成为最大长度(如上所述计算为34)的原因。正如人们所看到的那样,这是大量的数据,将其立即加载到内存中是根本不可行的,为此,我们将使用一个数据生成器将其加载到小块中降低是用的内存。
 # data generator, intended to be used in a call to model.fit_generator()
 def data_generator(descriptions, photos, wordtoix, max_length, num_photos_per_batch):
     X1, X2, y = list(), list(), list()
     n=0
     # loop for ever over images
     while 1:
         for key, desc_list in descriptions.items():
             n+=1
             # retrieve the photo feature
             photo = photos[key+'.jpg']
             for desc in desc_list:
                 # encode the sequence
                 seq = [wordtoix[word] for word in desc.split(' ') if word in wordtoix]
                 # split one sequence into multiple X, y pairs
                 for i in range(1, len(seq)):
                     # split into input and output pair
                     in_seq, out_seq = seq[:i], seq[i]
                     # pad input sequence
                     in_seq = pad_sequences([in_seq], maxlen=max_length)[0]
                     # encode output sequence
                     out_seq = to_categorical([out_seq], num_classes=vocab_size)[0]
                     # store
                     X1.append(photo)
                     X2.append(in_seq)
                     y.append(out_seq)
             # yield the batch data
             if n==num_photos_per_batch:
                 yield [[array(X1), array(X2)], array(y)]
                 X1, X2, y = list(), list(), list()
                 n=0
上面的代码遍历所有图像和描述,并生成表中的数据项。yield将使函数再次从同一行运行,因此,让我们分批加载数据
模型架构和训练
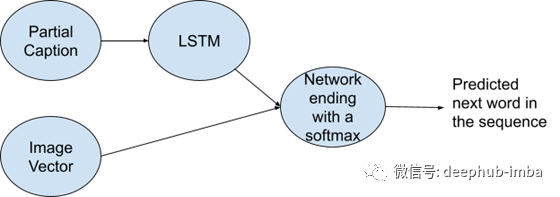
如前所述,我们的模型在每个点都有两个输入,一个输入特征图像矢量,另一个输入部分文字。我们首先将0.5的Dropout应用于图像矢量,然后将其与256个神经元层连接。对于部分文字,我们首先将其连接到嵌入层,并使用如上所述经过GLOVE训练的嵌入矩阵的权重。然后,我们应用Dropout 0.5和LSTM(长期短期记忆)。最后,我们将这两种方法结合在一起,并将它们连接到256个神经元层,最后是一个softmax层,该层预测我们词汇中每个单词的概率。可以使用下图概括高级体系结构:
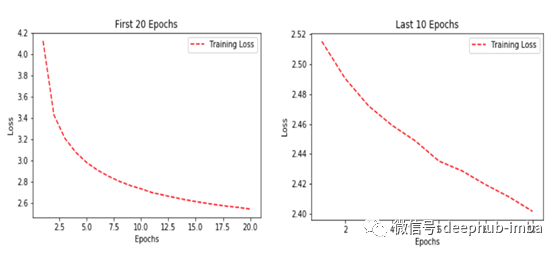
以下是训练期间选择的超参数:损失被选择为“categorical-loss entropy”,优化器为“Adam”。该模型总共训练了30轮,但对于前20轮,批次大小和学习率分别为0.001和3,而接下来的10轮分别为0.0001和6。
 inputs1 = Input(shape=(2048,))
 fe1 = Dropout(0.5)(inputs1)
 fe2 = Dense(256, activation='relu')(fe1)
 inputs2 = Input(shape=(max_length1,))
 se1 = Embedding(vocab_size, embedding_dim, mask_zero=True)(inputs2)
 se2 = Dropout(0.5)(se1)
 se3 = LSTM(256)(se2)
 decoder1 = add([fe2, se3])
 decoder2 = Dense(256, activation='relu')(decoder1)
 outputs = Dense(vocab_size, activation='softmax')(decoder2)
 model = Model(inputs=[inputs1, inputs2], outputs=outputs)

 model.layers[2].set_weights([embedding_matrix])
 model.layers[2].trainable = False

 model.compile(loss='categorical_crossentropy', optimizer='adam')

 epochs = 20
 number_pics_per_batch = 3
 steps = len(train_descriptions)//number_pics_per_batch

 generator = data_generator(train_descriptions, train_features, wordtoix, max_length1, number_pics_per_batch)
 history = model.fit_generator(generator, epochs=20,  steps_per_epoch=steps, verbose=1)


 model.optimizer.lr = 0.0001
 epochs = 10
 number_pics_per_batch = 6
 steps = len(train_descriptions)//number_pics_per_batch

 generator = data_generator(train_descriptions, train_features, wordtoix, max_length1, number_pics_per_batch)
 history1 = model.fit_generator(generator, epochs=10, steps_per_epoch=steps, verbose=1)
 model.save('saved_model/model_' + str(30) + '.h5')
让我们来解释一下代码:
  第1-11行:定义模型架构
  第13–14行:将嵌入层的权重设置为上面创建的嵌入矩阵,并且还设置trainable = False,因此该层将不再受任何训练
  第16–33行:如上所述,使用超参数在两个单独的间隔中训练模型
推理
下面显示了前20轮的训练损失,然后是接下来的10轮的训练损失:
为了进行推断,我们编写了一个函数,该函数根据我们的模型(即贪心)将下一个单词预测为具有最大概率的单词
 def greedySearch(photo):
     in_text = 'startseq'
     for i in range(max_length1):
         sequence = [wordtoix[w] for w in in_text.split() if w in wordtoix]
         sequence = pad_sequences([sequence], maxlen=max_length1)
         yhat = model.predict([photo,sequence], verbose=0)
         yhat = np.argmax(yhat)
         word = ixtoword[yhat]
         in_text += ' ' + word
         if word == 'endseq':
             break
     final = in_text.split()
     final = final[1:-1]
     final = ' '.join(final)
     return final

 z=1
 pic = list(encoding_test.keys())[999]
 image = encoding_test[pic].reshape((1,2048))
 x=plt.imread(images+pic)
 plt.imshow(x)
 plt.show()
 print("Greedy:",greedySearch(image))
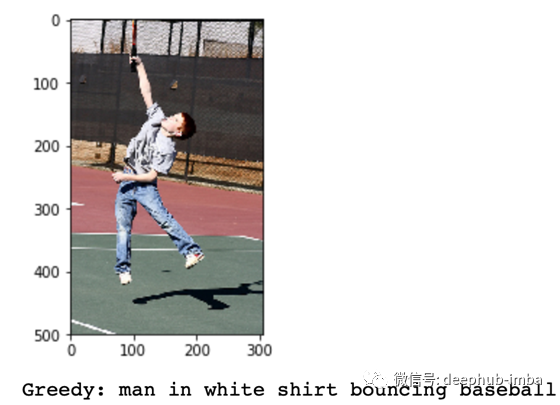
效果还不错
如果你需要完整源代码,看这个连接:https://github.com/Noumanmufc1/Image-Captioning
作者:Nouman
原文地址:https://towardsdatascience.com/using-machine-learning-to-generate-captions-for-images-f9a5797f31d6
deephub翻译组