
文章目录
1、概述
1.1、Spring是什么?
Spring 是一款主流的 Java EE 轻量级开源框架 ,Spring 由“Spring 之父”Rod Johnson 提出并创立,其目的是用于简化 Java 企业级应用的开发难度和开发周期。Spring的用途不仅限于服务器端的开发。从简单性、可测试性和松耦合的角度而言,任何Java应用都可以从Spring中受益。Spring 框架除了自己提供功能外,还提供整合其他技术和框架的能力。
Spring 自诞生以来备受青睐,一直被广大开发人员作为 Java 企业级应用程序开发的首选。时至今日,Spring 俨然成为了 Java EE 代名词,成为了构建 Java EE 应用的事实标准。
自 2004 年 4 月,Spring 1.0 版本正式发布以来,Spring 已经步入到了第 6 个大版本,也就是 Spring 6。本课程采用Spring当前最新发布的正式版本6.0.2。
1.2、Spring 的狭义和广义
在不同的语境中,Spring 所代表的含义是不同的。下面我们就分别从“广义”和“狭义”两个角度,对 Spring 进行介绍。
广义的 Spring:Spring 技术栈
广义上的 Spring 泛指以 Spring Framework 为核心的 Spring 技术栈。
经过十多年的发展,Spring 已经不再是一个单纯的应用框架,而是逐渐发展成为一个由多个不同子项目(模块)组成的成熟技术,例如 Spring Framework、Spring MVC、SpringBoot、Spring Cloud、Spring Data、Spring Security 等,其中 Spring Framework 是其他子项目的基础。
这些子项目涵盖了从企业级应用开发到云计算等各方面的内容,能够帮助开发人员解决软件发展过程中不断产生的各种实际问题,给开发人员带来了更好的开发体验。
狭义的 Spring:Spring Framework
狭义的 Spring 特指 Spring Framework,通常我们将它称为 Spring 框架。
Spring 框架是一个分层的、面向切面的 Java 应用程序的一站式轻量级解决方案,它是 Spring 技术栈的核心和基础,是为了解决企业级应用开发的复杂性而创建的。
Spring 有两个最核心模块: IoC 和 AOP。
IoC:Inverse of Control 的简写,译为“控制反转”,指把创建对象过程交给 Spring 进行管理。
AOP:Aspect Oriented Programming 的简写,译为“面向切面编程”。AOP 用来封装多个类的公共行为,将那些与业务无关,却为业务模块所共同调用的逻辑封装起来,减少系统的重复代码,降低模块间的耦合度。另外,AOP 还解决一些系统层面上的问题,比如日志、事务、权限等。
1.3、Spring Framework特点
- 非侵入式:使用 Spring Framework 开发应用程序时,Spring 对应用程序本身的结构影响非常小。对领域模型可以做到零污染;对功能性组件也只需要使用几个简单的注解进行标记,完全不会破坏原有结构,反而能将组件结构进一步简化。这就使得基于 Spring Framework 开发应用程序时结构清晰、简洁优雅。
- 控制反转:IoC——Inversion of Control,翻转资源获取方向。把自己创建资源、向环境索取资源变成环境将资源准备好,我们享受资源注入。
- 面向切面编程:AOP——Aspect Oriented Programming,在不修改源代码的基础上增强代码功能。
- 容器:Spring IoC 是一个容器,因为它包含并且管理组件对象的生命周期。组件享受到了容器化的管理,替程序员屏蔽了组件创建过程中的大量细节,极大的降低了使用门槛,大幅度提高了开发效率。
- 组件化:Spring 实现了使用简单的组件配置组合成一个复杂的应用。在 Spring 中可以使用 XML 和 Java 注解组合这些对象。这使得我们可以基于一个个功能明确、边界清晰的组件有条不紊的搭建超大型复杂应用系统。
- 一站式:在 IoC 和 AOP 的基础上可以整合各种企业应用的开源框架和优秀的第三方类库。而且 Spring 旗下的项目已经覆盖了广泛领域,很多方面的功能性需求可以在 Spring Framework 的基础上全部使用 Spring 来实现。
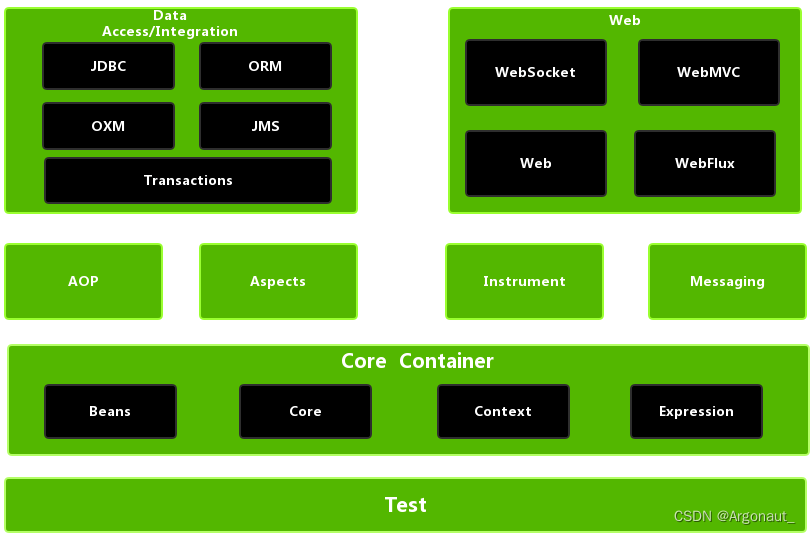
1.4、Spring模块组成
①Spring Core(核心容器)
spring core提供了IOC,DI,Bean配置装载创建的核心实现。核心概念: Beans、BeanFactory、BeanDefinitions、ApplicationContext。
- spring-core :IOC和DI的基本实现
- spring-beans:BeanFactory和Bean的装配管理(BeanFactory)
- spring-context:Spring context上下文,即IOC容器(AppliactionContext)
- spring-expression:spring表达式语言
②Spring AOP
- spring-aop:面向切面编程的应用模块,整合ASM,CGLib,JDK Proxy
- spring-aspects:集成AspectJ,AOP应用框架
- spring-instrument:动态Class Loading模块
③Spring Data Access
- spring-jdbc:spring对JDBC的封装,用于简化jdbc操作
- spring-orm:java对象与数据库数据的映射框架
- spring-oxm:对象与xml文件的映射框架
- spring-jms: Spring对Java Message Service(java消息服务)的封装,用于服务之间相互通信
- spring-tx:spring jdbc事务管理
④Spring Web
- spring-web:最基础的web支持,建立于spring-context之上,通过servlet或listener来初始化IOC容器
- spring-webmvc:实现web mvc
- spring-websocket:与前端的全双工通信协议
- spring-webflux:Spring 5.0提供的,用于取代传统java servlet,非阻塞式Reactive Web框架,异步,非阻塞,事件驱动的服务
⑤Spring Message
- Spring-messaging:spring 4.0提供的,为Spring集成一些基础的报文传送服务
⑥Spring test
- spring-test:集成测试支持,主要是对junit的封装
1.5、Spring6特点
1.5.1、版本要求
(1)Spring6要求JDK最低版本是JDK17
2、入门
2.1、环境要求
- JDK:Java17+(Spring6要求JDK最低版本是Java17)
- Maven:3.6+
- Spring:6.0.2
2.2、构建模块
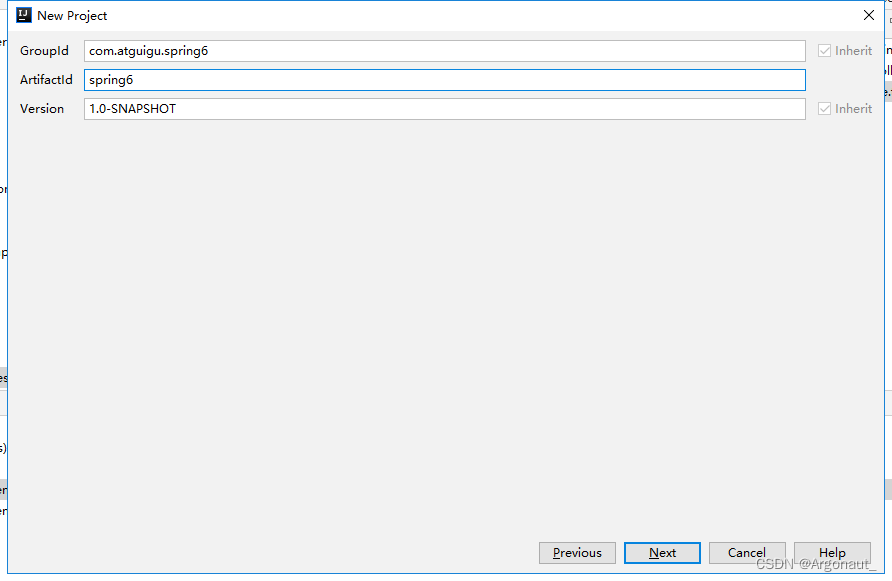
(1)构建父模块spring6
在idea中,依次单击 File -> New -> Project -> New Project
(2)构建子模块spring6-first
2.3、程序开发
2.3.1、引入依赖
添加依赖:
<dependencies><!--spring context依赖--><!--当你引入Spring Context依赖之后,表示将Spring的基础依赖引入了--><dependency><groupId>org.springframework</groupId><artifactId>spring-context</artifactId><version>6.0.2</version></dependency><!--junit5测试--><dependency><groupId>org.junit.jupiter</groupId><artifactId>junit-jupiter-api</artifactId><version>5.3.1</version></dependency></dependencies>
查看依赖: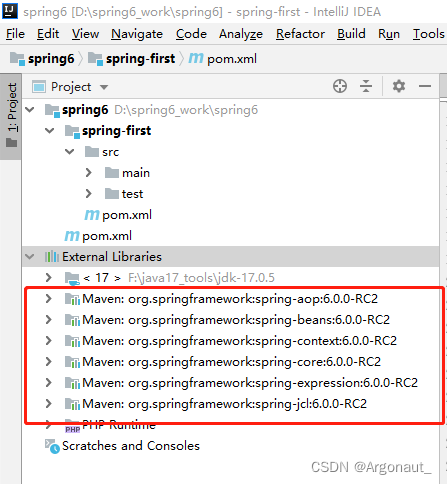
2.3.2、创建java类
packagecom.atguigu.spring6.bean;publicclassHelloWorld{publicvoidsayHello(){System.out.println("helloworld");}}
2.3.3、创建配置文件
在resources目录创建一个 Spring 配置文件 beans.xml(配置文件名称可随意命名,如:springs.xml)
<?xml version="1.0" encoding="UTF-8"?><beansxmlns="http://www.springframework.org/schema/beans"xmlns:xsi="http://www.w3.org/2001/XMLSchema-instance"xsi:schemaLocation="http://www.springframework.org/schema/beans http://www.springframework.org/schema/beans/spring-beans.xsd"><!--
    配置HelloWorld所对应的bean,即将HelloWorld的对象交给Spring的IOC容器管理
    通过bean标签配置IOC容器所管理的bean
    属性:
        id:设置bean的唯一标识
        class:设置bean所对应类型的全类名
    --><beanid="helloWorld"class="com.atguigu.spring6.bean.HelloWorld"></bean></beans>
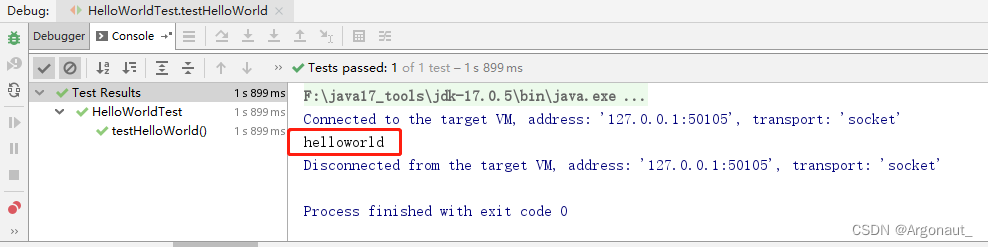
2.3.4、创建测试类测试
packagecom.atguigu.spring6.bean;importorg.junit.jupiter.api.Test;importorg.springframework.context.ApplicationContext;importorg.springframework.context.support.ClassPathXmlApplicationContext;publicclassHelloWorldTest{@TestpublicvoidtestHelloWorld(){ApplicationContext ac =newClassPathXmlApplicationContext("beans.xml");HelloWorld helloworld =(HelloWorld) ac.getBean("helloWorld");
        helloworld.sayHello();}}
2.3.5、运行测试程序
2.4、程序分析
1. 底层是怎么创建对象的,是通过反射机制调用无参数构造方法吗?
修改HelloWorld类:
packagecom.atguigu.spring6.bean;publicclassHelloWorld{publicHelloWorld(){System.out.println("无参数构造方法执行");}publicvoidsayHello(){System.out.println("helloworld");}}
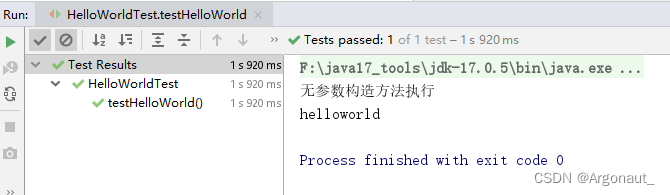
测试得知:创建对象时确实调用了无参数构造方法。
2. Spring是如何创建对象的呢?原理是什么?
// dom4j解析beans.xml文件,从中获取class属性值,类的全类名// 通过反射机制调用无参数构造方法创建对象Class clazz =Class.forName("com.atguigu.spring6.bean.HelloWorld");//Object obj = clazz.newInstance();Object object = clazz.getDeclaredConstructor().newInstance();
3. 把创建好的对象存储到一个什么样的数据结构当中了呢?
bean对象最终存储在spring容器中,在spring源码底层就是一个map集合,存储bean的map在DefaultListableBeanFactory类中:
privatefinalMap<String,BeanDefinition> beanDefinitionMap =newConcurrentHashMap<>(256);
Spring容器加载到Bean类时 , 会把这个类的描述信息, 以包名加类名的方式存到beanDefinitionMap 中,Map<String,BeanDefinition> , 其中 String是Key , 默认是类名首字母小写 , BeanDefinition , 存的是类的定义(描述信息) , 我们通常叫eanDefinition接口为 : bean的定义对象。
2.5、启用Log4j2日志框架
2.5.1、Log4j2日志概述
在项目开发中,日志十分的重要,不管是记录运行情况还是定位线上问题,都离不开对日志的分析。日志记录了系统行为的时间、地点、状态等相关信息,能够帮助我们了解并监控系统状态,在发生错误或者接近某种危险状态时能够及时提醒我们处理,同时在系统产生问题时,能够帮助我们快速的定位、诊断并解决问题。
Apache Log4j2是一个开源的日志记录组件,使用非常的广泛。在工程中以易用方便代替了 System.out 等打印语句,它是JAVA下最流行的日志输入工具。
Log4j2主要由几个重要的组件构成:
(1)日志信息的优先级,日志信息的优先级从高到低有TRACE < DEBUG < INFO < WARN < ERROR < FATAL
- TRACE:追踪,是最低的日志级别,相当于追踪程序的执行
- DEBUG:调试,一般在开发中,都将其设置为最低的日志级别
- INFO:信息,输出重要的信息,使用较多
- WARN:警告,输出警告的信息
- ERROR:错误,输出错误信息
- FATAL:严重错误
这些级别分别用来指定这条日志信息的重要程度;级别高的会自动屏蔽级别低的日志,也就是说,设置了WARN的日志,则INFO、DEBUG的日志级别的日志不会显示.
(2)日志信息的输出目的地,日志信息的输出目的地指定了日志将打印到控制台还是文件中;
(3)日志信息的输出格式,而输出格式则控制了日志信息的显示内容。
2.5.2、引入Log4j2依赖
<!--log4j2的依赖--><dependency><groupId>org.apache.logging.log4j</groupId><artifactId>log4j-core</artifactId><version>2.19.0</version></dependency><dependency><groupId>org.apache.logging.log4j</groupId><artifactId>log4j-slf4j2-impl</artifactId><version>2.19.0</version></dependency>
2.5.3、加入日志配置文件
在类的根路径下提供log4j2.xml配置文件(文件名固定为:log4j2.xml,文件必须放到类根路径下。)
<?xml version="1.0" encoding="UTF-8"?><configuration><loggers><!--
            level指定日志级别,从低到高的优先级:
                TRACE < DEBUG < INFO < WARN < ERROR < FATAL
                trace:追踪,是最低的日志级别,相当于追踪程序的执行
                debug:调试,一般在开发中,都将其设置为最低的日志级别
                info:信息,输出重要的信息,使用较多
                warn:警告,输出警告的信息
                error:错误,输出错误信息
                fatal:严重错误
        --><rootlevel="DEBUG"><appender-refref="spring6log"/><appender-refref="RollingFile"/><appender-refref="log"/></root></loggers><appenders><!--输出日志信息到控制台--><consolename="spring6log"target="SYSTEM_OUT"><!--控制日志输出的格式--><PatternLayoutpattern="%d{yyyy-MM-dd HH:mm:ss SSS} [%t] %-3level %logger{1024} - %msg%n"/></console><!--文件会打印出所有信息,这个log每次运行程序会自动清空,由append属性决定,适合临时测试用--><Filename="log"fileName="d:/spring6_log/test.log"append="false"><PatternLayoutpattern="%d{HH:mm:ss.SSS} %-5level %class{36} %L %M - %msg%xEx%n"/></File><!-- 这个会打印出所有的信息,
            每次大小超过size,
            则这size大小的日志会自动存入按年份-月份建立的文件夹下面并进行压缩,
            作为存档--><RollingFilename="RollingFile"fileName="d:/spring6_log/app.log"filePattern="log/$${date:yyyy-MM}/app-%d{MM-dd-yyyy}-%i.log.gz"><PatternLayoutpattern="%d{yyyy-MM-dd 'at' HH:mm:ss z} %-5level %class{36} %L %M - %msg%xEx%n"/><SizeBasedTriggeringPolicysize="50MB"/><!-- DefaultRolloverStrategy属性如不设置,
            则默认为最多同一文件夹下7个文件,这里设置了20 --><DefaultRolloverStrategymax="20"/></RollingFile></appenders></configuration>
2.5.4、测试
2.5.5、使用日志
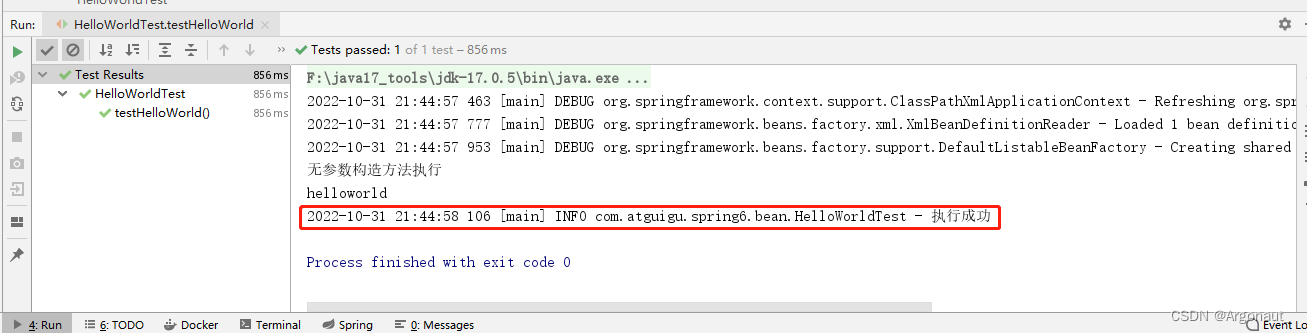
publicclassHelloWorldTest{privateLogger logger =LoggerFactory.getLogger(HelloWorldTest.class);@TestpublicvoidtestHelloWorld(){ApplicationContext ac =newClassPathXmlApplicationContext("beans.xml");HelloWorld helloworld =(HelloWorld) ac.getBean("helloWorld");
        helloworld.sayHello();
        logger.info("执行成功");}}
3、容器:IoC
IoC 是 Inversion of Control 的简写,译为“控制反转”,它不是一门技术,而是一种设计思想,是一个重要的面向对象编程法则,能够指导我们如何设计出松耦合、更优良的程序。
Spring 通过 IoC 容器来管理所有 Java 对象的实例化和初始化,控制对象与对象之间的依赖关系。我们将由 IoC 容器管理的 Java 对象称为 Spring Bean,它与使用关键字 new 创建的 Java 对象没有任何区别。
IoC 容器是 Spring 框架中最重要的核心组件之一,它贯穿了 Spring 从诞生到成长的整个过程。
3.1、IoC容器
3.1.1、控制反转(IoC)
- 控制反转是一种思想。
- 控制反转是为了降低程序耦合度,提高程序扩展力。
- 控制反转,反转的是什么?
- 将对象的创建权利交出去,交给第三方容器负责。- 将对象和对象之间关系的维护权交出去,交给第三方容器负责。
- 控制反转这种思想如何实现呢?
- DI(Dependency Injection):依赖注入
3.1.2、依赖注入
DI(Dependency Injection):依赖注入,依赖注入实现了控制反转的思想。
依赖注入:
- 指Spring创建对象的过程中,将对象依赖属性通过配置进行注入
依赖注入常见的实现方式包括两种:
- 第一种:set注入
- 第二种:构造注入
所以结论是:IOC 就是一种控制反转的思想, 而 DI 是对IoC的一种具体实现。
Bean管理说的是:Bean对象的创建,以及Bean对象中属性的赋值(或者叫做Bean对象之间关系的维护)。
3.1.3、IoC容器在Spring的实现
Spring 的 IoC 容器就是 IoC思想的一个落地的产品实现。IoC容器中管理的组件也叫做 bean。在创建 bean 之前,首先需要创建IoC 容器。Spring 提供了IoC 容器的两种实现方式:
①BeanFactory
这是 IoC 容器的基本实现,是 Spring 内部使用的接口。面向 Spring 本身,不提供给开发人员使用。
②ApplicationContext
BeanFactory 的子接口,提供了更多高级特性。面向 Spring 的使用者,几乎所有场合都使用 ApplicationContext 而不是底层的 BeanFactory。
③ApplicationContext的主要实现类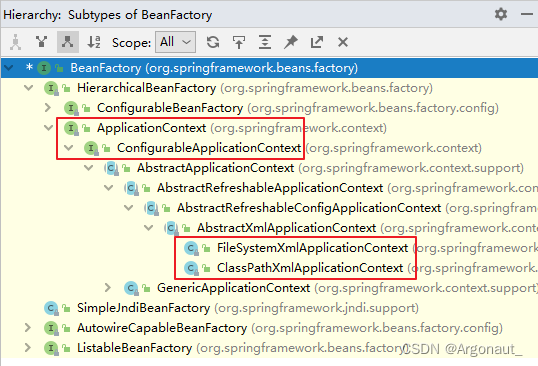
类型名简介ClassPathXmlApplicationContext通过读取类路径下的 XML 格式的配置文件创建 IOC 容器对象FileSystemXmlApplicationContext通过文件系统路径读取 XML 格式的配置文件创建 IOC 容器对象ConfigurableApplicationContextApplicationContext 的子接口,包含一些扩展方法 refresh() 和 close() ,让 ApplicationContext 具有启动、关闭和刷新上下文的能力。WebApplicationContext专门为 Web 应用准备,基于 Web 环境创建 IOC 容器对象,并将对象引入存入 ServletContext 域中。
3.2、基于XML管理Bean
3.2.1、搭建子模块spring6-ioc-xml
①搭建模块
搭建方式如:spring-first
②引入配置文件
引入spring-first模块配置文件:beans.xml、log4j2.xml
③添加依赖
<dependencies><!--spring context依赖--><!--当你引入Spring Context依赖之后,表示将Spring的基础依赖引入了--><dependency><groupId>org.springframework</groupId><artifactId>spring-context</artifactId><version>6.0.3</version></dependency><!--junit5测试--><dependency><groupId>org.junit.jupiter</groupId><artifactId>junit-jupiter-api</artifactId><version>5.3.1</version></dependency><!--log4j2的依赖--><dependency><groupId>org.apache.logging.log4j</groupId><artifactId>log4j-core</artifactId><version>2.19.0</version></dependency><dependency><groupId>org.apache.logging.log4j</groupId><artifactId>log4j-slf4j2-impl</artifactId><version>2.19.0</version></dependency></dependencies>
④引入java类
引入spring-first模块java及test目录下实体类
packagecom.atguigu.spring6.bean;publicclassHelloWorld{publicHelloWorld(){System.out.println("无参数构造方法执行");}publicvoidsayHello(){System.out.println("helloworld");}}
packagecom.atguigu.spring6.bean;importorg.junit.jupiter.api.Test;importorg.slf4j.Logger;importorg.slf4j.LoggerFactory;importorg.springframework.context.ApplicationContext;importorg.springframework.context.support.ClassPathXmlApplicationContext;publicclassHelloWorldTest{privateLogger logger =LoggerFactory.getLogger(HelloWorldTest.class);@TestpublicvoidtestHelloWorld(){}}
3.2.2、实验一:获取bean
①方式一:根据id获取
由于 id 属性指定了 bean 的唯一标识,所以根据 bean 标签的 id 属性可以精确获取到一个组件对象。上个实验中我们使用的就是这种方式。
②方式二:根据类型获取
@TestpublicvoidtestHelloWorld1(){ApplicationContext ac =newClassPathXmlApplicationContext("beans.xml");HelloWorld bean = ac.getBean(HelloWorld.class);
    bean.sayHello();}
③方式三:根据id和类型
@TestpublicvoidtestHelloWorld2(){ApplicationContext ac =newClassPathXmlApplicationContext("beans.xml");HelloWorld bean = ac.getBean("helloworld",HelloWorld.class);
    bean.sayHello();}
④注意的地方
当根据类型获取bean时,要求IOC容器中指定类型的bean有且只能有一个
当IOC容器中一共配置了两个:
<beanid="helloworldOne"class="com.atguigu.spring6.bean.HelloWorld"></bean><beanid="helloworldTwo"class="com.atguigu.spring6.bean.HelloWorld"></bean>
根据类型获取时会抛出异常:
org.springframework.beans.factory.NoUniqueBeanDefinitionException: No qualifying bean of type ‘com.atguigu.spring6.bean.HelloWorld’ available: expected single matching bean but found 2: helloworldOne,helloworldTwo
⑤扩展知识
如果组件类实现了接口,根据接口类型可以获取 bean 吗?
可以,前提是bean唯一
如果一个接口有多个实现类,这些实现类都配置了 bean,根据接口类型可以获取 bean 吗?
不行,因为bean不唯一
结论
根据类型来获取bean时,在满足bean唯一性的前提下,其实只是看:『对象 instanceof 指定的类型』的返回结果,只要返回的是true就可以认定为和类型匹配,能够获取到。
java中,instanceof运算符用于判断前面的对象是否是后面的类,或其子类、实现类的实例。如果是返回true,否则返回false。也就是说:用instanceof关键字做判断时, instanceof 操作符的左右操作必须有继承或实现关系
3.2.3、实验二:依赖注入之setter注入
①创建学生类Student
packagecom.atguigu.spring6.bean;publicclassStudent{privateInteger id;privateString name;privateInteger age;privateString sex;publicStudent(){}publicIntegergetId(){return id;}publicvoidsetId(Integer id){this.id = id;}publicStringgetName(){return name;}publicvoidsetName(String name){this.name = name;}publicIntegergetAge(){return age;}publicvoidsetAge(Integer age){this.age = age;}publicStringgetSex(){return sex;}publicvoidsetSex(String sex){this.sex = sex;}@OverridepublicStringtoString(){return"Student{"+"id="+ id +", name='"+ name +'\''+", age="+ age +", sex='"+ sex +'\''+'}';}}
②配置bean时为属性赋值
spring-di.xml
<beanid="studentOne"class="com.atguigu.spring6.bean.Student"><!-- property标签:通过组件类的setXxx()方法给组件对象设置属性 --><!-- name属性:指定属性名(这个属性名是getXxx()、setXxx()方法定义的,和成员变量无关) --><!-- value属性:指定属性值 --><propertyname="id"value="1001"></property><propertyname="name"value="张三"></property><propertyname="age"value="23"></property><propertyname="sex"value="男"></property></bean>
③测试
@TestpublicvoidtestDIBySet(){ApplicationContext ac =newClassPathXmlApplicationContext("spring-di.xml");Student studentOne = ac.getBean("studentOne",Student.class);System.out.println(studentOne);}
3.2.4、实验三:依赖注入之构造器注入
①在Student类中添加有参构造
publicStudent(Integer id,String name,Integer age,String sex){this.id = id;this.name = name;this.age = age;this.sex = sex;}
②配置bean
spring-di.xml
<beanid="studentTwo"class="com.atguigu.spring6.bean.Student"><constructor-argvalue="1002"></constructor-arg><constructor-argvalue="李四"></constructor-arg><constructor-argvalue="33"></constructor-arg><constructor-argvalue="女"></constructor-arg></bean>
注意:
constructor-arg标签还有两个属性可以进一步描述构造器参数:
- index属性:指定参数所在位置的索引(从0开始)
- name属性:指定参数名
③测试
@TestpublicvoidtestDIByConstructor(){ApplicationContext ac =newClassPathXmlApplicationContext("spring-di.xml");Student studentOne = ac.getBean("studentTwo",Student.class);System.out.println(studentOne);}
3.2.5、实验四:特殊值处理
①字面量赋值
什么是字面量?
int a = 10;
声明一个变量a,初始化为10,此时a就不代表字母a了,而是作为一个变量的名字。当我们引用a的时候,我们实际上拿到的值是10。
而如果a是带引号的:‘a’,那么它现在不是一个变量,它就是代表a这个字母本身,这就是字面量。所以字面量没有引申含义,就是我们看到的这个数据本身。
<!-- 使用value属性给bean的属性赋值时,Spring会把value属性的值看做字面量 --><propertyname="name"value="张三"/>
②null值
<propertyname="name"><null/></property>
注意:
<propertyname="name"value="null"></property>以上写法,为name所赋的值是字符串null
③xml实体
<!-- 小于号在XML文档中用来定义标签的开始,不能随便使用 --><!-- 解决方案一:使用XML实体来代替 --><propertyname="expression"value="a < b"/>
④CDATA节
<propertyname="expression"><!-- 解决方案二:使用CDATA节 --><!-- CDATA中的C代表Character,是文本、字符的含义,CDATA就表示纯文本数据 --><!-- XML解析器看到CDATA节就知道这里是纯文本,就不会当作XML标签或属性来解析 --><!-- 所以CDATA节中写什么符号都随意 --><value><![CDATA[a < b]]></value></property>
3.2.6、实验五:为对象类型属性赋值
①创建班级类Clazz
packagecom.atguigu.spring6.beanpublicclassClazz{privateInteger clazzId;privateString clazzName;publicIntegergetClazzId(){return clazzId;}publicvoidsetClazzId(Integer clazzId){this.clazzId = clazzId;}publicStringgetClazzName(){return clazzName;}publicvoidsetClazzName(String clazzName){this.clazzName = clazzName;}@OverridepublicStringtoString(){return"Clazz{"+"clazzId="+ clazzId +", clazzName='"+ clazzName +'\''+'}';}publicClazz(){}publicClazz(Integer clazzId,String clazzName){this.clazzId = clazzId;this.clazzName = clazzName;}}
②修改Student类
在Student类中添加以下代码:
privateClazz clazz;publicClazzgetClazz(){return clazz;}publicvoidsetClazz(Clazz clazz){this.clazz = clazz;}
方式一:引用外部bean
配置Clazz类型的bean:
<beanid="clazzOne"class="com.atguigu.spring6.bean.Clazz"><propertyname="clazzId"value="1111"></property><propertyname="clazzName"value="财源滚滚班"></property></bean>
为Student中的clazz属性赋值:
<beanid="studentFour"class="com.atguigu.spring6.bean.Student"><propertyname="id"value="1004"></property><propertyname="name"value="赵六"></property><propertyname="age"value="26"></property><propertyname="sex"value="女"></property><!-- ref属性:引用IOC容器中某个bean的id,将所对应的bean为属性赋值 --><propertyname="clazz"ref="clazzOne"></property></bean>
错误演示:
<beanid="studentFour"class="com.atguigu.spring6.bean.Student"><propertyname="id"value="1004"></property><propertyname="name"value="赵六"></property><propertyname="age"value="26"></property><propertyname="sex"value="女"></property><propertyname="clazz"value="clazzOne"></property></bean>
如果错把ref属性写成了value属性,会抛出异常: Caused by: java.lang.IllegalStateException: Cannot convert value of type ‘java.lang.String’ to required type ‘com.atguigu.spring6.bean.Clazz’ for property ‘clazz’: no matching editors or conversion strategy found
意思是不能把String类型转换成我们要的Clazz类型,说明我们使用value属性时,Spring只把这个属性看做一个普通的字符串,不会认为这是一个bean的id,更不会根据它去找到bean来赋值
方式二:内部bean
<beanid="studentFour"class="com.atguigu.spring6.bean.Student"><propertyname="id"value="1004"></property><propertyname="name"value="赵六"></property><propertyname="age"value="26"></property><propertyname="sex"value="女"></property><propertyname="clazz"><!-- 在一个bean中再声明一个bean就是内部bean --><!-- 内部bean只能用于给属性赋值,不能在外部通过IOC容器获取,因此可以省略id属性 --><beanid="clazzInner"class="com.atguigu.spring6.bean.Clazz"><propertyname="clazzId"value="2222"></property><propertyname="clazzName"value="远大前程班"></property></bean></property></bean>
方式三:级联属性赋值
<beanid="studentFour"class="com.atguigu.spring6.bean.Student"><propertyname="id"value="1004"></property><propertyname="name"value="赵六"></property><propertyname="age"value="26"></property><propertyname="sex"value="女"></property><propertyname="clazz"ref="clazzOne"></property><propertyname="clazz.clazzId"value="3333"></property><propertyname="clazz.clazzName"value="最强王者班"></property></bean>
3.2.7、实验六:为数组类型属性赋值
①修改Student类
在Student类中添加以下代码:
privateString[] hobbies;publicString[]getHobbies(){return hobbies;}publicvoidsetHobbies(String[] hobbies){this.hobbies = hobbies;}
②配置bean
<beanid="studentFour"class="com.atguigu.spring.bean6.Student"><propertyname="id"value="1004"></property><propertyname="name"value="赵六"></property><propertyname="age"value="26"></property><propertyname="sex"value="女"></property><!-- ref属性:引用IOC容器中某个bean的id,将所对应的bean为属性赋值 --><propertyname="clazz"ref="clazzOne"></property><propertyname="hobbies"><array><value>抽烟</value><value>喝酒</value><value>烫头</value></array></property></bean>
3.2.8、实验七:为集合类型属性赋值
①为List集合类型属性赋值
在Clazz类中添加以下代码:
privateList<Student> students;publicList<Student>getStudents(){return students;}publicvoidsetStudents(List<Student> students){this.students = students;}
配置bean:
<beanid="clazzTwo"class="com.atguigu.spring6.bean.Clazz"><propertyname="clazzId"value="4444"></property><propertyname="clazzName"value="Javaee0222"></property><propertyname="students"><list><refbean="studentOne"></ref><refbean="studentTwo"></ref><refbean="studentThree"></ref></list></property></bean>
若为Set集合类型属性赋值,只需要将其中的list标签改为set标签即可
②为Map集合类型属性赋值
创建教师类Teacher:
packagecom.atguigu.spring6.bean;publicclassTeacher{privateInteger teacherId;privateString teacherName;publicIntegergetTeacherId(){return teacherId;}publicvoidsetTeacherId(Integer teacherId){this.teacherId = teacherId;}publicStringgetTeacherName(){return teacherName;}publicvoidsetTeacherName(String teacherName){this.teacherName = teacherName;}publicTeacher(Integer teacherId,String teacherName){this.teacherId = teacherId;this.teacherName = teacherName;}publicTeacher(){}@OverridepublicStringtoString(){return"Teacher{"+"teacherId="+ teacherId +", teacherName='"+ teacherName +'\''+'}';}}
在Student类中添加以下代码:
privateMap<String,Teacher> teacherMap;publicMap<String,Teacher>getTeacherMap(){return teacherMap;}publicvoidsetTeacherMap(Map<String,Teacher> teacherMap){this.teacherMap = teacherMap;}
配置bean:
<beanid="teacherOne"class="com.atguigu.spring6.bean.Teacher"><propertyname="teacherId"value="10010"></property><propertyname="teacherName"value="大宝"></property></bean><beanid="teacherTwo"class="com.atguigu.spring6.bean.Teacher"><propertyname="teacherId"value="10086"></property><propertyname="teacherName"value="二宝"></property></bean><beanid="studentFour"class="com.atguigu.spring6.bean.Student"><propertyname="id"value="1004"></property><propertyname="name"value="赵六"></property><propertyname="age"value="26"></property><propertyname="sex"value="女"></property><!-- ref属性:引用IOC容器中某个bean的id,将所对应的bean为属性赋值 --><propertyname="clazz"ref="clazzOne"></property><propertyname="hobbies"><array><value>抽烟</value><value>喝酒</value><value>烫头</value></array></property><propertyname="teacherMap"><map><entry><key><value>10010</value></key><refbean="teacherOne"></ref></entry><entry><key><value>10086</value></key><refbean="teacherTwo"></ref></entry></map></property></bean>
③引用集合类型的bean
<!--list集合类型的bean--><util:listid="students"><refbean="studentOne"></ref><refbean="studentTwo"></ref><refbean="studentThree"></ref></util:list><!--map集合类型的bean--><util:mapid="teacherMap"><entry><key><value>10010</value></key><refbean="teacherOne"></ref></entry><entry><key><value>10086</value></key><refbean="teacherTwo"></ref></entry></util:map><beanid="clazzTwo"class="com.atguigu.spring6.bean.Clazz"><propertyname="clazzId"value="4444"></property><propertyname="clazzName"value="Javaee0222"></property><propertyname="students"ref="students"></property></bean><beanid="studentFour"class="com.atguigu.spring6.bean.Student"><propertyname="id"value="1004"></property><propertyname="name"value="赵六"></property><propertyname="age"value="26"></property><propertyname="sex"value="女"></property><!-- ref属性:引用IOC容器中某个bean的id,将所对应的bean为属性赋值 --><propertyname="clazz"ref="clazzOne"></property><propertyname="hobbies"><array><value>抽烟</value><value>喝酒</value><value>烫头</value></array></property><propertyname="teacherMap"ref="teacherMap"></property></bean>
使用util:list、util:map标签必须引入相应的命名空间
<?xml version="1.0" encoding="UTF-8"?><beansxmlns="http://www.springframework.org/schema/beans"xmlns:xsi="http://www.w3.org/2001/XMLSchema-instance"xmlns:util="http://www.springframework.org/schema/util"xsi:schemaLocation="http://www.springframework.org/schema/util
       http://www.springframework.org/schema/util/spring-util.xsd
       http://www.springframework.org/schema/beans
       http://www.springframework.org/schema/beans/spring-beans.xsd">
3.2.9、实验八:p命名空间
引入p命名空间
<?xml version="1.0" encoding="UTF-8"?><beansxmlns="http://www.springframework.org/schema/beans"xmlns:xsi="http://www.w3.org/2001/XMLSchema-instance"xmlns:util="http://www.springframework.org/schema/util"xmlns:p="http://www.springframework.org/schema/p"xsi:schemaLocation="http://www.springframework.org/schema/util
       http://www.springframework.org/schema/util/spring-util.xsd
       http://www.springframework.org/schema/beans
       http://www.springframework.org/schema/beans/spring-beans.xsd">
引入p命名空间后,可以通过以下方式为bean的各个属性赋值
<beanid="studentSix"class="com.atguigu.spring6.bean.Student"p:id="1006"p:name="小明"p:clazz-ref="clazzOne"p:teacherMap-ref="teacherMap"></bean>
3.2.10、实验九:引入外部属性文件
①加入依赖
<!-- MySQL驱动 --><dependency><groupId>mysql</groupId><artifactId>mysql-connector-java</artifactId><version>8.0.30</version></dependency><!-- 数据源 --><dependency><groupId>com.alibaba</groupId><artifactId>druid</artifactId><version>1.2.15</version></dependency>
②创建外部属性文件
[外链图片转存失败,源站可能有防盗链机制,建议将图片保存下来直接上传(img-V4nKCvyE-1676947504420)(images/spring6/img010.png)]
jdbc.user=root
jdbc.password=atguigu
jdbc.url=jdbc:mysql://localhost:3306/ssm?serverTimezone=UTC
jdbc.driver=com.mysql.cj.jdbc.Driver
③引入属性文件
引入context 名称空间
<?xml version="1.0" encoding="UTF-8"?><beansxmlns="http://www.springframework.org/schema/beans"xmlns:xsi="http://www.w3.org/2001/XMLSchema-instance"xmlns:context="http://www.springframework.org/schema/context"xsi:schemaLocation="http://www.springframework.org/schema/beans
       http://www.springframework.org/schema/beans/spring-beans.xsd
       http://www.springframework.org/schema/context
       http://www.springframework.org/schema/context/spring-context.xsd"></beans>
<!-- 引入外部属性文件 --><context:property-placeholderlocation="classpath:jdbc.properties"/>
注意:在使用 context:property-placeholder 元素加载外包配置文件功能前,首先需要在 XML 配置的一级标签 中添加 context 相关的约束。
④配置bean
<beanid="druidDataSource"class="com.alibaba.druid.pool.DruidDataSource"><propertyname="url"value="${jdbc.url}"/><propertyname="driverClassName"value="${jdbc.driver}"/><propertyname="username"value="${jdbc.user}"/><propertyname="password"value="${jdbc.password}"/></bean>
⑤测试
@TestpublicvoidtestDataSource()throwsSQLException{ApplicationContext ac =newClassPathXmlApplicationContext("spring-datasource.xml");DataSource dataSource = ac.getBean(DataSource.class);Connection connection = dataSource.getConnection();System.out.println(connection);}
3.2.11、实验十:bean的作用域
①概念
在Spring中可以通过配置bean标签的scope属性来指定bean的作用域范围,各取值含义参加下表:
取值含义创建对象的时机singleton(默认)在IOC容器中,这个bean的对象始终为单实例IOC容器初始化时prototype这个bean在IOC容器中有多个实例获取bean时
如果是在WebApplicationContext环境下还会有另外几个作用域(但不常用):
取值含义request在一个请求范围内有效session在一个会话范围内有效
②创建类User
packagecom.atguigu.spring6.bean;publicclassUser{privateInteger id;privateString username;privateString password;privateInteger age;publicUser(){}publicUser(Integer id,String username,String password,Integer age){this.id = id;this.username = username;this.password = password;this.age = age;}publicIntegergetId(){return id;}publicvoidsetId(Integer id){this.id = id;}publicStringgetUsername(){return username;}publicvoidsetUsername(String username){this.username = username;}publicStringgetPassword(){return password;}publicvoidsetPassword(String password){this.password = password;}publicIntegergetAge(){return age;}publicvoidsetAge(Integer age){this.age = age;}@OverridepublicStringtoString(){return"User{"+"id="+ id +", username='"+ username +'\''+", password='"+ password +'\''+", age="+ age +'}';}}
③配置bean
<!-- scope属性:取值singleton(默认值),bean在IOC容器中只有一个实例,IOC容器初始化时创建对象 --><!-- scope属性:取值prototype,bean在IOC容器中可以有多个实例,getBean()时创建对象 --><beanclass="com.atguigu.spring6.bean.User"scope="prototype"></bean>
④测试
@TestpublicvoidtestBeanScope(){ApplicationContext ac =newClassPathXmlApplicationContext("spring-scope.xml");User user1 = ac.getBean(User.class);User user2 = ac.getBean(User.class);System.out.println(user1==user2);}
3.2.12、实验十一:bean生命周期
①具体的生命周期过程
- bean对象创建(调用无参构造器)
- 给bean对象设置属性
- bean的后置处理器(初始化之前)
- bean对象初始化(需在配置bean时指定初始化方法)
- bean的后置处理器(初始化之后)
- bean对象就绪可以使用
- bean对象销毁(需在配置bean时指定销毁方法)
- IOC容器关闭
②修改类User
publicclassUser{privateInteger id;privateString username;privateString password;privateInteger age;publicUser(){System.out.println("生命周期:1、创建对象");}publicUser(Integer id,String username,String password,Integer age){this.id = id;this.username = username;this.password = password;this.age = age;}publicIntegergetId(){return id;}publicvoidsetId(Integer id){System.out.println("生命周期:2、依赖注入");this.id = id;}publicStringgetUsername(){return username;}publicvoidsetUsername(String username){this.username = username;}publicStringgetPassword(){return password;}publicvoidsetPassword(String password){this.password = password;}publicIntegergetAge(){return age;}publicvoidsetAge(Integer age){this.age = age;}publicvoidinitMethod(){System.out.println("生命周期:3、初始化");}publicvoiddestroyMethod(){System.out.println("生命周期:5、销毁");}@OverridepublicStringtoString(){return"User{"+"id="+ id +", username='"+ username +'\''+", password='"+ password +'\''+", age="+ age +'}';}}
注意其中的initMethod()和destroyMethod(),可以通过配置bean指定为初始化和销毁的方法
③配置bean
<!-- 使用init-method属性指定初始化方法 --><!-- 使用destroy-method属性指定销毁方法 --><beanclass="com.atguigu.spring6.bean.User"scope="prototype"init-method="initMethod"destroy-method="destroyMethod"><propertyname="id"value="1001"></property><propertyname="username"value="admin"></property><propertyname="password"value="123456"></property><propertyname="age"value="23"></property></bean>
④测试
@TestpublicvoidtestLife(){ClassPathXmlApplicationContext ac =newClassPathXmlApplicationContext("spring-lifecycle.xml");User bean = ac.getBean(User.class);System.out.println("生命周期:4、通过IOC容器获取bean并使用");
    ac.close();}
⑤bean的后置处理器
bean的后置处理器会在生命周期的初始化前后添加额外的操作,需要实现BeanPostProcessor接口,且配置到IOC容器中,需要注意的是,bean后置处理器不是单独针对某一个bean生效,而是针对IOC容器中所有bean都会执行
创建bean的后置处理器:
packagecom.atguigu.spring6.process;importorg.springframework.beans.BeansException;importorg.springframework.beans.factory.config.BeanPostProcessor;publicclassMyBeanProcessorimplementsBeanPostProcessor{@OverridepublicObjectpostProcessBeforeInitialization(Object bean,String beanName)throwsBeansException{System.out.println("☆☆☆"+ beanName +" = "+ bean);return bean;}@OverridepublicObjectpostProcessAfterInitialization(Object bean,String beanName)throwsBeansException{System.out.println("★★★"+ beanName +" = "+ bean);return bean;}}
在IOC容器中配置后置处理器:
<!-- bean的后置处理器要放入IOC容器才能生效 --><beanid="myBeanProcessor"class="com.atguigu.spring6.process.MyBeanProcessor"/>
3.2.13、实验十二:FactoryBean
①简介
FactoryBean是Spring提供的一种整合第三方框架的常用机制。和普通的bean不同,配置一个FactoryBean类型的bean,在获取bean的时候得到的并不是class属性中配置的这个类的对象,而是getObject()方法的返回值。通过这种机制,Spring可以帮我们把复杂组件创建的详细过程和繁琐细节都屏蔽起来,只把最简洁的使用界面展示给我们。
将来我们整合Mybatis时,Spring就是通过FactoryBean机制来帮我们创建SqlSessionFactory对象的。
/*
 * Copyright 2002-2020 the original author or authors.
 *
 * Licensed under the Apache License, Version 2.0 (the "License");
 * you may not use this file except in compliance with the License.
 * You may obtain a copy of the License at
 *
 *      https://www.apache.org/licenses/LICENSE-2.0
 *
 * Unless required by applicable law or agreed to in writing, software
 * distributed under the License is distributed on an "AS IS" BASIS,
 * WITHOUT WARRANTIES OR CONDITIONS OF ANY KIND, either express or implied.
 * See the License for the specific language governing permissions and
 * limitations under the License.
 */packageorg.springframework.beans.factory;importorg.springframework.lang.Nullable;/**
 * Interface to be implemented by objects used within a {@link BeanFactory} which
 * are themselves factories for individual objects. If a bean implements this
 * interface, it is used as a factory for an object to expose, not directly as a
 * bean instance that will be exposed itself.
 *
 * <p><b>NB: A bean that implements this interface cannot be used as a normal bean.</b>
 * A FactoryBean is defined in a bean style, but the object exposed for bean
 * references ({@link #getObject()}) is always the object that it creates.
 *
 * <p>FactoryBeans can support singletons and prototypes, and can either create
 * objects lazily on demand or eagerly on startup. The {@link SmartFactoryBean}
 * interface allows for exposing more fine-grained behavioral metadata.
 *
 * <p>This interface is heavily used within the framework itself, for example for
 * the AOP {@link org.springframework.aop.framework.ProxyFactoryBean} or the
 * {@link org.springframework.jndi.JndiObjectFactoryBean}. It can be used for
 * custom components as well; however, this is only common for infrastructure code.
 *
 * <p><b>{@code FactoryBean} is a programmatic contract. Implementations are not
 * supposed to rely on annotation-driven injection or other reflective facilities.</b>
 * {@link #getObjectType()} {@link #getObject()} invocations may arrive early in the
 * bootstrap process, even ahead of any post-processor setup. If you need access to
 * other beans, implement {@link BeanFactoryAware} and obtain them programmatically.
 *
 * <p><b>The container is only responsible for managing the lifecycle of the FactoryBean
 * instance, not the lifecycle of the objects created by the FactoryBean.</b> Therefore,
 * a destroy method on an exposed bean object (such as {@link java.io.Closeable#close()}
 * will <i>not</i> be called automatically. Instead, a FactoryBean should implement
 * {@link DisposableBean} and delegate any such close call to the underlying object.
 *
 * <p>Finally, FactoryBean objects participate in the containing BeanFactory's
 * synchronization of bean creation. There is usually no need for internal
 * synchronization other than for purposes of lazy initialization within the
 * FactoryBean itself (or the like).
 *
 * @author Rod Johnson
 * @author Juergen Hoeller
 * @since 08.03.2003
 * @param <T> the bean type
 * @see org.springframework.beans.factory.BeanFactory
 * @see org.springframework.aop.framework.ProxyFactoryBean
 * @see org.springframework.jndi.JndiObjectFactoryBean
 */publicinterfaceFactoryBean<T>{/**
     * The name of an attribute that can be
     * {@link org.springframework.core.AttributeAccessor#setAttribute set} on a
     * {@link org.springframework.beans.factory.config.BeanDefinition} so that
     * factory beans can signal their object type when it can't be deduced from
     * the factory bean class.
     * @since 5.2
     */StringOBJECT_TYPE_ATTRIBUTE="factoryBeanObjectType";/**
     * Return an instance (possibly shared or independent) of the object
     * managed by this factory.
     * <p>As with a {@link BeanFactory}, this allows support for both the
     * Singleton and Prototype design pattern.
     * <p>If this FactoryBean is not fully initialized yet at the time of
     * the call (for example because it is involved in a circular reference),
     * throw a corresponding {@link FactoryBeanNotInitializedException}.
     * <p>As of Spring 2.0, FactoryBeans are allowed to return {@code null}
     * objects. The factory will consider this as normal value to be used; it
     * will not throw a FactoryBeanNotInitializedException in this case anymore.
     * FactoryBean implementations are encouraged to throw
     * FactoryBeanNotInitializedException themselves now, as appropriate.
     * @return an instance of the bean (can be {@code null})
     * @throws Exception in case of creation errors
     * @see FactoryBeanNotInitializedException
     */@NullableTgetObject()throwsException;/**
     * Return the type of object that this FactoryBean creates,
     * or {@code null} if not known in advance.
     * <p>This allows one to check for specific types of beans without
     * instantiating objects, for example on autowiring.
     * <p>In the case of implementations that are creating a singleton object,
     * this method should try to avoid singleton creation as far as possible;
     * it should rather estimate the type in advance.
     * For prototypes, returning a meaningful type here is advisable too.
     * <p>This method can be called <i>before</i> this FactoryBean has
     * been fully initialized. It must not rely on state created during
     * initialization; of course, it can still use such state if available.
     * <p><b>NOTE:</b> Autowiring will simply ignore FactoryBeans that return
     * {@code null} here. Therefore it is highly recommended to implement
     * this method properly, using the current state of the FactoryBean.
     * @return the type of object that this FactoryBean creates,
     * or {@code null} if not known at the time of the call
     * @see ListableBeanFactory#getBeansOfType
     */@NullableClass<?>getObjectType();/**
     * Is the object managed by this factory a singleton? That is,
     * will {@link #getObject()} always return the same object
     * (a reference that can be cached)?
     * <p><b>NOTE:</b> If a FactoryBean indicates to hold a singleton object,
     * the object returned from {@code getObject()} might get cached
     * by the owning BeanFactory. Hence, do not return {@code true}
     * unless the FactoryBean always exposes the same reference.
     * <p>The singleton status of the FactoryBean itself will generally
     * be provided by the owning BeanFactory; usually, it has to be
     * defined as singleton there.
     * <p><b>NOTE:</b> This method returning {@code false} does not
     * necessarily indicate that returned objects are independent instances.
     * An implementation of the extended {@link SmartFactoryBean} interface
     * may explicitly indicate independent instances through its
     * {@link SmartFactoryBean#isPrototype()} method. Plain {@link FactoryBean}
     * implementations which do not implement this extended interface are
     * simply assumed to always return independent instances if the
     * {@code isSingleton()} implementation returns {@code false}.
     * <p>The default implementation returns {@code true}, since a
     * {@code FactoryBean} typically manages a singleton instance.
     * @return whether the exposed object is a singleton
     * @see #getObject()
     * @see SmartFactoryBean#isPrototype()
     */defaultbooleanisSingleton(){returntrue;}}
②创建类UserFactoryBean
packagecom.atguigu.spring6.bean;publicclassUserFactoryBeanimplementsFactoryBean<User>{@OverridepublicUsergetObject()throwsException{returnnewUser();}@OverridepublicClass<?>getObjectType(){returnUser.class;}}
③配置bean
<beanid="user"class="com.atguigu.spring6.bean.UserFactoryBean"></bean>
④测试
@TestpublicvoidtestUserFactoryBean(){//获取IOC容器ApplicationContext ac =newClassPathXmlApplicationContext("spring-factorybean.xml");User user =(User) ac.getBean("user");System.out.println(user);}
3.2.14、实验十三:基于xml自动装配
自动装配:
根据指定的策略,在IOC容器中匹配某一个bean,自动为指定的bean中所依赖的类类型或接口类型属性赋值
①场景模拟
创建类UserController
packagecom.atguigu.spring6.autowire.controllerpublicclassUserController{privateUserService userService;publicvoidsetUserService(UserService userService){this.userService = userService;}publicvoidsaveUser(){
        userService.saveUser();}}
创建接口UserService
packagecom.atguigu.spring6.autowire.servicepublicinterfaceUserService{voidsaveUser();}
创建类UserServiceImpl实现接口UserService
packagecom.atguigu.spring6.autowire.service.implpublicclassUserServiceImplimplementsUserService{privateUserDao userDao;publicvoidsetUserDao(UserDao userDao){this.userDao = userDao;}@OverridepublicvoidsaveUser(){
        userDao.saveUser();}}
创建接口UserDao
packagecom.atguigu.spring6.autowire.daopublicinterfaceUserDao{voidsaveUser();}
创建类UserDaoImpl实现接口UserDao
packagecom.atguigu.spring6.autowire.dao.implpublicclassUserDaoImplimplementsUserDao{@OverridepublicvoidsaveUser(){System.out.println("保存成功");}}
②配置bean
使用bean标签的autowire属性设置自动装配效果
自动装配方式:byType
byType:根据类型匹配IOC容器中的某个兼容类型的bean,为属性自动赋值
若在IOC中,没有任何一个兼容类型的bean能够为属性赋值,则该属性不装配,即值为默认值null
若在IOC中,有多个兼容类型的bean能够为属性赋值,则抛出异常NoUniqueBeanDefinitionException
<beanid="userController"class="com.atguigu.spring6.autowire.controller.UserController"autowire="byType"></bean><beanid="userService"class="com.atguigu.spring6.autowire.service.impl.UserServiceImpl"autowire="byType"></bean><beanid="userDao"class="com.atguigu.spring6.autowire.dao.impl.UserDaoImpl"></bean>
自动装配方式:byName
byName:将自动装配的属性的属性名,作为bean的id在IOC容器中匹配相对应的bean进行赋值
<beanid="userController"class="com.atguigu.spring6.autowire.controller.UserController"autowire="byName"></bean><beanid="userService"class="com.atguigu.spring6.autowire.service.impl.UserServiceImpl"autowire="byName"></bean><beanid="userServiceImpl"class="com.atguigu.spring6.autowire.service.impl.UserServiceImpl"autowire="byName"></bean><beanid="userDao"class="com.atguigu.spring6.autowire.dao.impl.UserDaoImpl"></bean><beanid="userDaoImpl"class="com.atguigu.spring6.autowire.dao.impl.UserDaoImpl"></bean>
③测试
@TestpublicvoidtestAutoWireByXML(){ApplicationContext ac =newClassPathXmlApplicationContext("autowire-xml.xml");UserController userController = ac.getBean(UserController.class);
    userController.saveUser();}
3.3、基于注解管理Bean(☆)
从 Java 5 开始,Java 增加了对注解(Annotation)的支持,它是代码中的一种特殊标记,可以在编译、类加载和运行时被读取,执行相应的处理。开发人员可以通过注解在不改变原有代码和逻辑的情况下,在源代码中嵌入补充信息。
Spring 从 2.5 版本开始提供了对注解技术的全面支持,我们可以使用注解来实现自动装配,简化 Spring 的 XML 配置。
Spring 通过注解实现自动装配的步骤如下:
- 引入依赖
- 开启组件扫描
- 使用注解定义 Bean
- 依赖注入
3.3.1、搭建子模块spring6-ioc-annotation
①搭建模块
搭建方式如:spring6-ioc-xml
②引入配置文件
引入spring-ioc-xml模块日志log4j2.xml
③添加依赖
<dependencies><!--spring context依赖--><!--当你引入Spring Context依赖之后,表示将Spring的基础依赖引入了--><dependency><groupId>org.springframework</groupId><artifactId>spring-context</artifactId><version>6.0.3</version></dependency><!--junit5测试--><dependency><groupId>org.junit.jupiter</groupId><artifactId>junit-jupiter-api</artifactId></dependency><!--log4j2的依赖--><dependency><groupId>org.apache.logging.log4j</groupId><artifactId>log4j-core</artifactId><version>2.19.0</version></dependency><dependency><groupId>org.apache.logging.log4j</groupId><artifactId>log4j-slf4j2-impl</artifactId><version>2.19.0</version></dependency></dependencies>
3.3.2、开启组件扫描
Spring 默认不使用注解装配 Bean,因此我们需要在 Spring 的 XML 配置中,通过 context:component-scan 元素开启 Spring Beans的自动扫描功能。开启此功能后,Spring 会自动从扫描指定的包(base-package 属性设置)及其子包下的所有类,如果类上使用了 @Component 注解,就将该类装配到容器中。
<?xml version="1.0" encoding="UTF-8"?><beansxmlns="http://www.springframework.org/schema/beans"xmlns:xsi="http://www.w3.org/2001/XMLSchema-instance"xmlns:context="http://www.springframework.org/schema/context"xsi:schemaLocation="http://www.springframework.org/schema/beans
    http://www.springframework.org/schema/beans/spring-beans-3.0.xsd
    http://www.springframework.org/schema/context
            http://www.springframework.org/schema/context/spring-context.xsd"><!--开启组件扫描功能--><context:component-scanbase-package="com.atguigu.spring6"></context:component-scan></beans>
注意:在使用 context:component-scan 元素开启自动扫描功能前,首先需要在 XML 配置的一级标签 中添加 context 相关的约束。
情况一:最基本的扫描方式
<context:component-scanbase-package="com.atguigu.spring6"></context:component-scan>
情况二:指定要排除的组件
<context:component-scanbase-package="com.atguigu.spring6"><!-- context:exclude-filter标签:指定排除规则 --><!--
         type:设置排除或包含的依据
        type="annotation",根据注解排除,expression中设置要排除的注解的全类名
        type="assignable",根据类型排除,expression中设置要排除的类型的全类名
    --><context:exclude-filtertype="annotation"expression="org.springframework.stereotype.Controller"/><!--<context:exclude-filter type="assignable" expression="com.atguigu.spring6.controller.UserController"/>--></context:component-scan>
情况三:仅扫描指定组件
<context:component-scanbase-package="com.atguigu"use-default-filters="false"><!-- context:include-filter标签:指定在原有扫描规则的基础上追加的规则 --><!-- use-default-filters属性:取值false表示关闭默认扫描规则 --><!-- 此时必须设置use-default-filters="false",因为默认规则即扫描指定包下所有类 --><!--
         type:设置排除或包含的依据
        type="annotation",根据注解排除,expression中设置要排除的注解的全类名
        type="assignable",根据类型排除,expression中设置要排除的类型的全类名
    --><context:include-filtertype="annotation"expression="org.springframework.stereotype.Controller"/><!--<context:include-filter type="assignable" expression="com.atguigu.spring6.controller.UserController"/>--></context:component-scan>
3.3.3、使用注解定义 Bean
Spring 提供了以下多个注解,这些注解可以直接标注在 Java 类上,将它们定义成 Spring Bean。
注解说明@Component该注解用于描述 Spring 中的 Bean,它是一个泛化的概念,仅仅表示容器中的一个组件(Bean),并且可以作用在应用的任何层次,例如 Service 层、Dao 层等。 使用时只需将该注解标注在相应类上即可。@Repository该注解用于将数据访问层(Dao 层)的类标识为 Spring 中的 Bean,其功能与 @Component 相同。@Service该注解通常作用在业务层(Service 层),用于将业务层的类标识为 Spring 中的 Bean,其功能与 @Component 相同。@Controller该注解通常作用在控制层(如SpringMVC 的 Controller),用于将控制层的类标识为 Spring 中的 Bean,其功能与 @Component 相同。
3.3.4、实验一:@Autowired注入
单独使用@Autowired注解,默认根据类型装配。【默认是byType】
查看源码:
packageorg.springframework.beans.factory.annotation;importjava.lang.annotation.Documented;importjava.lang.annotation.ElementType;importjava.lang.annotation.Retention;importjava.lang.annotation.RetentionPolicy;importjava.lang.annotation.Target;@Target({ElementType.CONSTRUCTOR,ElementType.METHOD,ElementType.PARAMETER,ElementType.FIELD,ElementType.ANNOTATION_TYPE})@Retention(RetentionPolicy.RUNTIME)@Documentedpublic@interfaceAutowired{booleanrequired()defaulttrue;}
源码中有两处需要注意:
- 第一处:该注解可以标注在哪里?
- 构造方法上- 方法上- 形参上- 属性上- 注解上
- 第二处:该注解有一个required属性,默认值是true,表示在注入的时候要求被注入的Bean必须是存在的,如果不存在则报错。如果required属性设置为false,表示注入的Bean存在或者不存在都没关系,存在的话就注入,不存在的话,也不报错。
①场景一:属性注入
创建UserDao接口
packagecom.atguigu.spring6.dao;publicinterfaceUserDao{publicvoidprint();}
创建UserDaoImpl实现
packagecom.atguigu.spring6.dao.impl;importcom.atguigu.spring6.dao.UserDao;importorg.springframework.stereotype.Repository;@RepositorypublicclassUserDaoImplimplementsUserDao{@Overridepublicvoidprint(){System.out.println("Dao层执行结束");}}
创建UserService接口
packagecom.atguigu.spring6.service;publicinterfaceUserService{publicvoidout();}
创建UserServiceImpl实现类
packagecom.atguigu.spring6.service.impl;importcom.atguigu.spring6.dao.UserDao;importcom.atguigu.spring6.service.UserService;importorg.springframework.beans.factory.annotation.Autowired;importorg.springframework.stereotype.Service;@ServicepublicclassUserServiceImplimplementsUserService{@AutowiredprivateUserDao userDao;@Overridepublicvoidout(){
        userDao.print();System.out.println("Service层执行结束");}}
创建UserController类
packagecom.atguigu.spring6.controller;importcom.atguigu.spring6.service.UserService;importorg.springframework.beans.factory.annotation.Autowired;importorg.springframework.stereotype.Controller;@ControllerpublicclassUserController{@AutowiredprivateUserService userService;publicvoidout(){
        userService.out();System.out.println("Controller层执行结束。");}}
测试一
packagecom.atguigu.spring6.bean;importcom.atguigu.spring6.controller.UserController;importorg.junit.jupiter.api.Test;importorg.slf4j.Logger;importorg.slf4j.LoggerFactory;importorg.springframework.context.ApplicationContext;importorg.springframework.context.support.ClassPathXmlApplicationContext;publicclassUserTest{privateLogger logger =LoggerFactory.getLogger(UserTest.class);@TestpublicvoidtestAnnotation(){ApplicationContext context =newClassPathXmlApplicationContext("Beans.xml");UserController userController = context.getBean("userController",UserController.class);
        userController.out();
        logger.info("执行成功");}}
测试结果: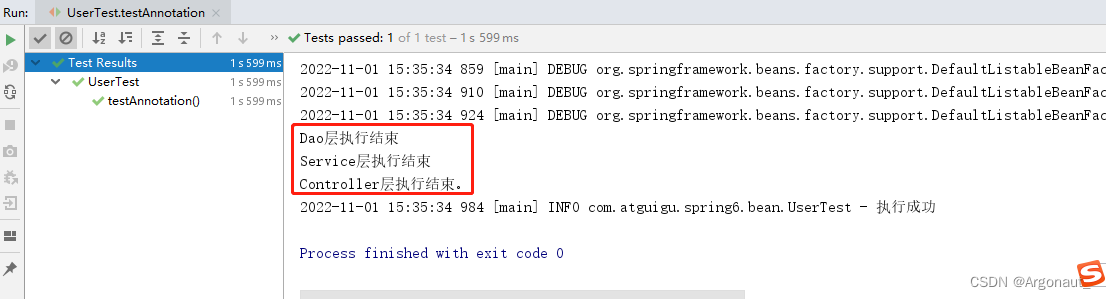
②场景二:set注入
修改UserServiceImpl类
packagecom.atguigu.spring6.service.impl;importcom.atguigu.spring6.dao.UserDao;importcom.atguigu.spring6.service.UserService;importorg.springframework.beans.factory.annotation.Autowired;importorg.springframework.stereotype.Service;@ServicepublicclassUserServiceImplimplementsUserService{privateUserDao userDao;@AutowiredpublicvoidsetUserDao(UserDao userDao){this.userDao = userDao;}@Overridepublicvoidout(){
        userDao.print();System.out.println("Service层执行结束");}}
修改UserController类
packagecom.atguigu.spring6.controller;importcom.atguigu.spring6.service.UserService;importorg.springframework.beans.factory.annotation.Autowired;importorg.springframework.stereotype.Controller;@ControllerpublicclassUserController{privateUserService userService;@AutowiredpublicvoidsetUserService(UserService userService){this.userService = userService;}publicvoidout(){
        userService.out();System.out.println("Controller层执行结束。");}}
测试:成功调用
③场景三:构造方法注入
修改UserServiceImpl类
packagecom.atguigu.spring6.service.impl;importcom.atguigu.spring6.dao.UserDao;importcom.atguigu.spring6.service.UserService;importorg.springframework.beans.factory.annotation.Autowired;importorg.springframework.stereotype.Service;@ServicepublicclassUserServiceImplimplementsUserService{privateUserDao userDao;@AutowiredpublicUserServiceImpl(UserDao userDao){this.userDao = userDao;}@Overridepublicvoidout(){
        userDao.print();System.out.println("Service层执行结束");}}
修改UserController类
packagecom.atguigu.spring6.controller;importcom.atguigu.spring6.service.UserService;importorg.springframework.beans.factory.annotation.Autowired;importorg.springframework.stereotype.Controller;@ControllerpublicclassUserController{privateUserService userService;@AutowiredpublicUserController(UserService userService){this.userService = userService;}publicvoidout(){
        userService.out();System.out.println("Controller层执行结束。");}}
测试:成功调用
④场景四:形参上注入
修改UserServiceImpl类
packagecom.atguigu.spring6.service.impl;importcom.atguigu.spring6.dao.UserDao;importcom.atguigu.spring6.service.UserService;importorg.springframework.beans.factory.annotation.Autowired;importorg.springframework.stereotype.Service;@ServicepublicclassUserServiceImplimplementsUserService{privateUserDao userDao;publicUserServiceImpl(@AutowiredUserDao userDao){this.userDao = userDao;}@Overridepublicvoidout(){
        userDao.print();System.out.println("Service层执行结束");}}
修改UserController类
packagecom.atguigu.spring6.controller;importcom.atguigu.spring6.service.UserService;importorg.springframework.beans.factory.annotation.Autowired;importorg.springframework.stereotype.Controller;@ControllerpublicclassUserController{privateUserService userService;publicUserController(@AutowiredUserService userService){this.userService = userService;}publicvoidout(){
        userService.out();System.out.println("Controller层执行结束。");}}
测试:成功调用
⑤场景五:只有一个构造函数,无注解
修改UserServiceImpl类
packagecom.atguigu.spring6.service.impl;importcom.atguigu.spring6.dao.UserDao;importcom.atguigu.spring6.service.UserService;importorg.springframework.beans.factory.annotation.Autowired;importorg.springframework.beans.factory.annotation.Qualifier;importorg.springframework.stereotype.Service;@ServicepublicclassUserServiceImplimplementsUserService{@AutowiredprivateUserDao userDao;publicUserServiceImpl(UserDao userDao){this.userDao = userDao;}@Overridepublicvoidout(){
        userDao.print();System.out.println("Service层执行结束");}}
测试通过
当有参数的构造方法只有一个时,@Autowired注解可以省略。
说明:有多个构造方法时呢?大家可以测试(再添加一个无参构造函数),测试报错
⑥场景六:@Autowired注解和@Qualifier注解联合
添加dao层实现
packagecom.atguigu.spring6.dao.impl;importcom.atguigu.spring6.dao.UserDao;importorg.springframework.stereotype.Repository;@RepositorypublicclassUserDaoRedisImplimplementsUserDao{@Overridepublicvoidprint(){System.out.println("Redis Dao层执行结束");}}
测试:测试异常
错误信息中说:不能装配,UserDao这个Bean的数量等于2
怎么解决这个问题呢?当然要byName,根据名称进行装配了。
修改UserServiceImpl类
packagecom.atguigu.spring6.service.impl;importcom.atguigu.spring6.dao.UserDao;importcom.atguigu.spring6.service.UserService;importorg.springframework.beans.factory.annotation.Autowired;importorg.springframework.stereotype.Service;@ServicepublicclassUserServiceImplimplementsUserService{@Autowired@Qualifier("userDaoImpl")// 指定bean的名字privateUserDao userDao;@Overridepublicvoidout(){
        userDao.print();System.out.println("Service层执行结束");}}
总结
- @Autowired注解可以出现在:属性上、构造方法上、构造方法的参数上、setter方法上。
- 当带参数的构造方法只有一个,@Autowired注解可以省略。()
- @Autowired注解默认根据类型注入。如果要根据名称注入的话,需要配合@Qualifier注解一起使用。
3.3.5、实验二:@Resource注入
@Resource注解也可以完成属性注入。那它和@Autowired注解有什么区别?
- @Resource注解是JDK扩展包中的,也就是说属于JDK的一部分。所以该注解是标准注解,更加具有通用性。(JSR-250标准中制定的注解类型。JSR是Java规范提案。)
- @Autowired注解是Spring框架自己的。
- @Resource注解默认根据名称装配byName,未指定name时,使用属性名作为name。通过name找不到的话会自动启动通过类型byType装配。
- @Autowired注解默认根据类型装配byType,如果想根据名称装配,需要配合@Qualifier注解一起用。
- @Resource注解用在属性上、setter方法上。
- @Autowired注解用在属性上、setter方法上、构造方法上、构造方法参数上。
@Resource注解属于JDK扩展包,所以不在JDK当中,需要额外引入以下依赖:【如果是JDK8的话不需要额外引入依赖。高于JDK11或低于JDK8需要引入以下依赖。】
<dependency><groupId>jakarta.annotation</groupId><artifactId>jakarta.annotation-api</artifactId><version>2.1.1</version></dependency>
源码:
packagejakarta.annotation;importjava.lang.annotation.ElementType;importjava.lang.annotation.Repeatable;importjava.lang.annotation.Retention;importjava.lang.annotation.RetentionPolicy;importjava.lang.annotation.Target;@Target({ElementType.TYPE,ElementType.FIELD,ElementType.METHOD})@Retention(RetentionPolicy.RUNTIME)@Repeatable(Resources.class)public@interfaceResource{Stringname()default"";Stringlookup()default"";Class<?>type()defaultObject.class;Resource.AuthenticationTypeauthenticationType()defaultResource.AuthenticationType.CONTAINER;booleanshareable()defaulttrue;StringmappedName()default"";Stringdescription()default"";publicstaticenumAuthenticationType{CONTAINER,APPLICATION;privateAuthenticationType(){}}}
①场景一:根据name注入
修改UserDaoImpl类
packagecom.atguigu.spring6.dao.impl;importcom.atguigu.spring6.dao.UserDao;importorg.springframework.stereotype.Repository;@Repository("myUserDao")publicclassUserDaoImplimplementsUserDao{@Overridepublicvoidprint(){System.out.println("Dao层执行结束");}}
修改UserServiceImpl类
packagecom.atguigu.spring6.service.impl;importcom.atguigu.spring6.dao.UserDao;importcom.atguigu.spring6.service.UserService;importjakarta.annotation.Resource;importorg.springframework.beans.factory.annotation.Autowired;importorg.springframework.beans.factory.annotation.Qualifier;importorg.springframework.stereotype.Service;@ServicepublicclassUserServiceImplimplementsUserService{@Resource(name ="myUserDao")privateUserDao myUserDao;@Overridepublicvoidout(){
        myUserDao.print();System.out.println("Service层执行结束");}}
测试通过
②场景二:name未知注入
修改UserDaoImpl类
packagecom.atguigu.spring6.dao.impl;importcom.atguigu.spring6.dao.UserDao;importorg.springframework.stereotype.Repository;@Repository("myUserDao")publicclassUserDaoImplimplementsUserDao{@Overridepublicvoidprint(){System.out.println("Dao层执行结束");}}
修改UserServiceImpl类
packagecom.atguigu.spring6.service.impl;importcom.atguigu.spring6.dao.UserDao;importcom.atguigu.spring6.service.UserService;importjakarta.annotation.Resource;importorg.springframework.beans.factory.annotation.Autowired;importorg.springframework.beans.factory.annotation.Qualifier;importorg.springframework.stereotype.Service;@ServicepublicclassUserServiceImplimplementsUserService{@ResourceprivateUserDao myUserDao;@Overridepublicvoidout(){
        myUserDao.print();System.out.println("Service层执行结束");}}
测试通过
当@Resource注解使用时没有指定name的时候,还是根据name进行查找,这个name是属性名。
③场景三 其他情况
修改UserServiceImpl类,userDao1属性名不存在
packagecom.atguigu.spring6.service.impl;importcom.atguigu.spring6.dao.UserDao;importcom.atguigu.spring6.service.UserService;importjakarta.annotation.Resource;importorg.springframework.beans.factory.annotation.Autowired;importorg.springframework.beans.factory.annotation.Qualifier;importorg.springframework.stereotype.Service;@ServicepublicclassUserServiceImplimplementsUserService{@ResourceprivateUserDao userDao1;@Overridepublicvoidout(){
        userDao1.print();System.out.println("Service层执行结束");}}
测试异常
根据异常信息得知:显然当通过name找不到的时候,自然会启动byType进行注入,以上的错误是因为UserDao接口下有两个实现类导致的。所以根据类型注入就会报错。
@Resource的set注入可以自行测试
总结:
@Resource注解:默认byName注入,没有指定name时把属性名当做name,根据name找不到时,才会byType注入。byType注入时,某种类型的Bean只能有一个
3.3.6、Spring全注解开发
全注解开发就是不再使用spring配置文件了,写一个配置类来代替配置文件。
packagecom.atguigu.spring6.config;importorg.springframework.context.annotation.ComponentScan;importorg.springframework.context.annotation.Configuration;@Configuration//@ComponentScan({"com.atguigu.spring6.controller", "com.atguigu.spring6.service","com.atguigu.spring6.dao"})@ComponentScan("com.atguigu.spring6")publicclassSpring6Config{}
测试类
@TestpublicvoidtestAllAnnotation(){ApplicationContext context =newAnnotationConfigApplicationContext(Spring6Config.class);UserController userController = context.getBean("userController",UserController.class);
    userController.out();
    logger.info("执行成功");}
版权归原作者 Argonaut_ 所有, 如有侵权,请联系我们删除。