
前言
在上篇文章tcp编程中,我们实现了C++客户端与java服务器之间的通信,客户端发送了一个消息给服务器,今天我们要实现基于WebSocket实现服务器主动向前端推送消息,并且以服务器接收到C++客户端的消息主动向前端推送消息的触发条件。
了解Websocket
WebSocket 的诞生背景
    在早期,网站为了实现推送技术,通常使用**轮询**(或称为**短轮询**)。轮询是指浏览器每隔一段时间向服务器发出 HTTP 请求,然后服务器返回最新的数据给客户端。这种方式存在明显的缺点:浏览器需要不断地向服务器发出请求,而每次请求都包含较长的头部信息,导致带宽资源浪费。

    为了解决这个问题,**HTML5** 定义了 **WebSocket 协议**,它能更好地节省服务器资源和带宽,并且能够更实时地进行通讯。
WebSocket 的基本原理
- WebSocket 是什么?
- WebSocket 是一种网络传输协议,基于 TCP 实现。
- 它在单个 TCP 连接上进行全双工通信,位于 OSI 模型的应用层。
- 与 HTTP 不同,WebSocket 需要先创建连接,然后可以进行双向数据传输。
- WebSocket 握手过程
- 客户端通过 WebSocket 构造函数创建 WebSocket 对象,连接到服务器的 WebSocket URL。
- 客户端发送类似于 HTTP 请求的报文,服务器返回接受 WebSocket 协议的响应。
- 握手成功后,客户端和服务器之间的 WebSocket 连接建立,后续数据以帧序列的形式传输。
WebSocket 与 HTTP 的区别
- WebSocket 使用类似于 HTTP 的握手连接,但数据传输更高效。
- 较少的控制开销:头部信息较小。
- 更强的实时性:实时通信,避免等待请求响应。
- 保持连接状态:WebSocket 是全双工通信,不需要反复发出请求。无需重新发起连接。
- 更好的二进制支持:处理二进制内容。
- 可以支持扩展:自定义子协议。
WebSocket可以做什么
推文
广告
聊天室
公告消息
...................
服务器端
打开idea,创建一个Springboot项目,添加WebSocket依赖
        <dependency>
            <groupId>org.springframework.boot</groupId>
            <artifactId>spring-boot-starter-websocket</artifactId>
        </dependency>
创建一个WebSocket控制类,代码如下
/**
 * WebSocket操作类
 */
@Component
@Slf4j
@ServerEndpoint("/websocket/{userId}")  // 接口路径 ws://localhost:8081/webSocket/userId;
public class WebSocket {

    /**
     * 与某个客户端的连接会话,需要通过它来给客户端发送数据
     */
    private Session session;
    /**
     * 用户ID
     */
    private String userId;

    /**
     * concurrent包的线程安全Set,用来存放每个客户端对应的MyWebSocket对象。
     * 虽然@Component默认是单例模式的,但springboot还是会为每个websocket连接初始化一个bean,
     * 所以可以用一个静态set保存起来。
     * 注:底下WebSocket是当前类名
     */
    private static CopyOnWriteArraySet<WebSocket> webSockets =new CopyOnWriteArraySet<>();
    /**
     * 用来存所有在线连接用户信息,用来存每个session
      */
    private static ConcurrentHashMap<String,Session> sessionPool = new ConcurrentHashMap<String,Session>();
    /**
     * 链接成功调用的方法
     */
    @OnOpen
    public void onOpen(Session session, @PathParam(value="userId")String userId) {
        try {
            this.session = session;
            this.userId = userId;
            webSockets.add(this);
            sessionPool.put(userId, session);
            log.info("【websocket消息】有新的连接,总数为:"+webSockets.size());
        } catch (Exception e) {
        }
    }
    /**
     * 链接关闭调用的方法
     */
    @OnClose
    public void onClose() {
        try {
            webSockets.remove(this);
            sessionPool.remove(this.userId);
            log.info("【websocket消息】连接断开,总数为:"+webSockets.size());
        } catch (Exception e) {
        }
    }
    /**
     * 收到客户端消息后调用的方法
     *
     * @param message
     */
    @OnMessage
    public void onMessage(String message) {
        log.info("【websocket消息】收到客户端消息:"+message);
    }

    /** 发送错误时的处理
     * @param session
     * @param error
     */
    @OnError
    public void onError(Session session, Throwable error) {
        log.error("用户错误,原因:"+error.getMessage());
        error.printStackTrace();
    }

    /**
     * 广播消息
      */
    public void sendAllMessage(String message) {
        log.info("【websocket消息】广播消息:"+message);
        for(WebSocket webSocket : webSockets) {
            try {
                if(webSocket.session.isOpen()) {
                    webSocket.session.getAsyncRemote().sendText(message);
                }
            } catch (Exception e) {
                e.printStackTrace();
            }
        }
    }

    /**
     * 单点消息
      */
    public void sendOneMessage(String userId, String message) {
        Session session = sessionPool.get(userId);
        if (session != null&&session.isOpen()) {
            try {
                log.info("【websocket消息】 单点消息:"+message);
                session.getAsyncRemote().sendText(message);
            } catch (Exception e) {
                e.printStackTrace();
            }
        }
    }

    /**
     * 向多人发消息
     */
    public void sendMoreMessage(String[] userIds, String message) {
        for(String userId:userIds) {
            Session session = sessionPool.get(userId);
            if (session != null&&session.isOpen()) {
                try {
                    log.info("【websocket消息】 单点消息:"+message);
                    session.getAsyncRemote().sendText(message);
                } catch (Exception e) {
                    e.printStackTrace();
                }
            }
        }
    }
}
添加一个和上篇文章一样的ServerThread类,添加@Component注解并添加WebSocket的调用代码
@Component//注册为Springboot管理的bean,否则不能使用Springboot的其它bean
public class faceServerThread implements Runnable{
    @Autowired
    private studentDao dao;//用于访问数据库
    WebSocket webSocket=new WebSocket();//用于使用WebSocket中的方法
    @Override
    public void run() {
        try {
            ServerSocket server=new ServerSocket(8888);
            Socket socket;
            byte[] buffer = new byte[1024];
            int len;
            student stu;
            while(true)
            {
                socket=server.accept();//处于阻塞状态,直到客户端连接
                System.out.println("客户端连接成功");
                InputStream input=socket.getInputStream();//用于读取客户端发来的字节流
                while ((len=input.read(buffer))!=-1){
                    String str = new String(buffer, 0, len);
                    //此处为代码修改部分
                    stu=dao.selectById(str);
                    if(stu!=null){
                        System.out.println(str);
                        webSocket.sendOneMessage("0",str);
                    }
                    ///
                }
                System.out.println("接收消息完毕");
                //System.out.println("收到消息:"+id);
            }
        } catch (IOException e) {
            System.out.println("客户端连接失败:");
            e.printStackTrace();
        }
    }
}
此处实现了runnable接口,是为了另外开一条线程,不与Springboot冲突。
在启动类中添加启动线程
@SpringBootApplication
public class FreshmandemoApplication {
    public static void main(String[] args){
        ConfigurableApplicationContext context=SpringApplication.run(FreshmandemoApplication.class, args);
        faceServerThread faceThread=context.getBean(faceServerThread.class);
        new Thread(faceThread).start();
    }
}
前端客户端
添加一个HTML文件,实现WebSocket
<!DOCTYPE html>
<html lang="en">
<head>
    <meta charset="UTF-8">
    <title>Title</title>
</head>
<body>
</body>
<script type="text/javascript">
    var socket;
    if (typeof (WebSocket) == "undefined") {
        console.log("您的浏览器不支持WebSocket");
    } else {
        console.log("您的浏览器支持WebSocket");
        //实现化WebSocket对象,指定要连接的服务器地址与端口  建立连接
        var reqUrl = "http://localhost:8081/websocket/0" ;
        socket = new WebSocket(reqUrl.replace("http", "ws"));
        //打开事件
        socket.onopen = function () {
            console.log("Socket 已打开");
            //socket.send("这是来自客户端的消息" + location.href + new Date());
        };
        //获得消息事件
        socket.onmessage = function (msg) {
            console.log("onmessage--" + msg.data);
            //发现消息进入    开始处理前端触发逻辑
        };
        //关闭事件
        socket.onclose = function () {
            console.log("Socket已关闭");
        };
        //发生了错误事件
        socket.onerror = function () {
            alert("Socket发生了错误");
            //此时可以尝试刷新页面
        }
        //离开页面时,关闭socket
        //jquery1.8中已经被废弃,3.0中已经移除
        // $(window).unload(function(){
        //     socket.close();
        //});
    }

  /*  function sendMessage() {
        if (typeof (WebSocket) == "undefined") {
            console.log("您的浏览器不支持WebSocket");
        } else {
            // console.log("您的浏览器支持WebSocket");
            var toUserId = document.getElementById('toUserId').value;
            var contentText = document.getElementById('contentText').value;
            var msg = '{"sid":"' + toUserId + '","message":"' + contentText + '"}';
            console.log(msg);
            socket.send(msg);
        }
    }*/

</script>
</html>
测试
运行服务器,打开HTML文件,并开启浏览器控制台,打开上篇文章中的Qt客户端项目向后端服务器发送一个消息,
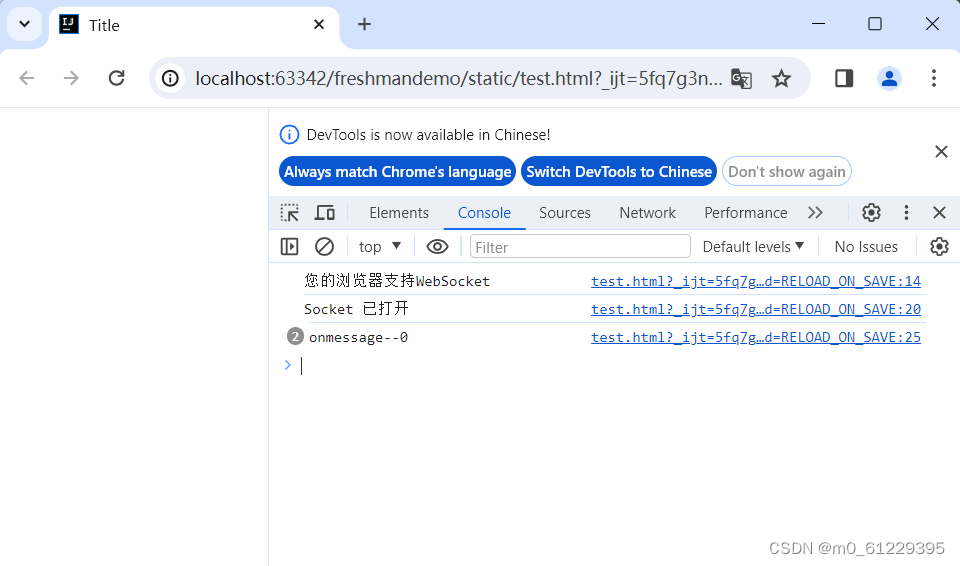
可以看到Qt客户端向后端服务器发送一个消息的同时,浏览器控制台也接收到一个消息。
本文转载自: https://blog.csdn.net/m0_61229395/article/details/136235129
版权归原作者 阿覠 所有, 如有侵权,请联系我们删除。
版权归原作者 阿覠 所有, 如有侵权,请联系我们删除。