文章目录
一、前提准备及规划
1、服务端口规划:
服务端口Prometheus59090Node_exporter59100Alertanager9093Webhook-dingtalk8060
2、本次实验架构调用图如下:
3、钉钉创建机器人保存Webhook地址:

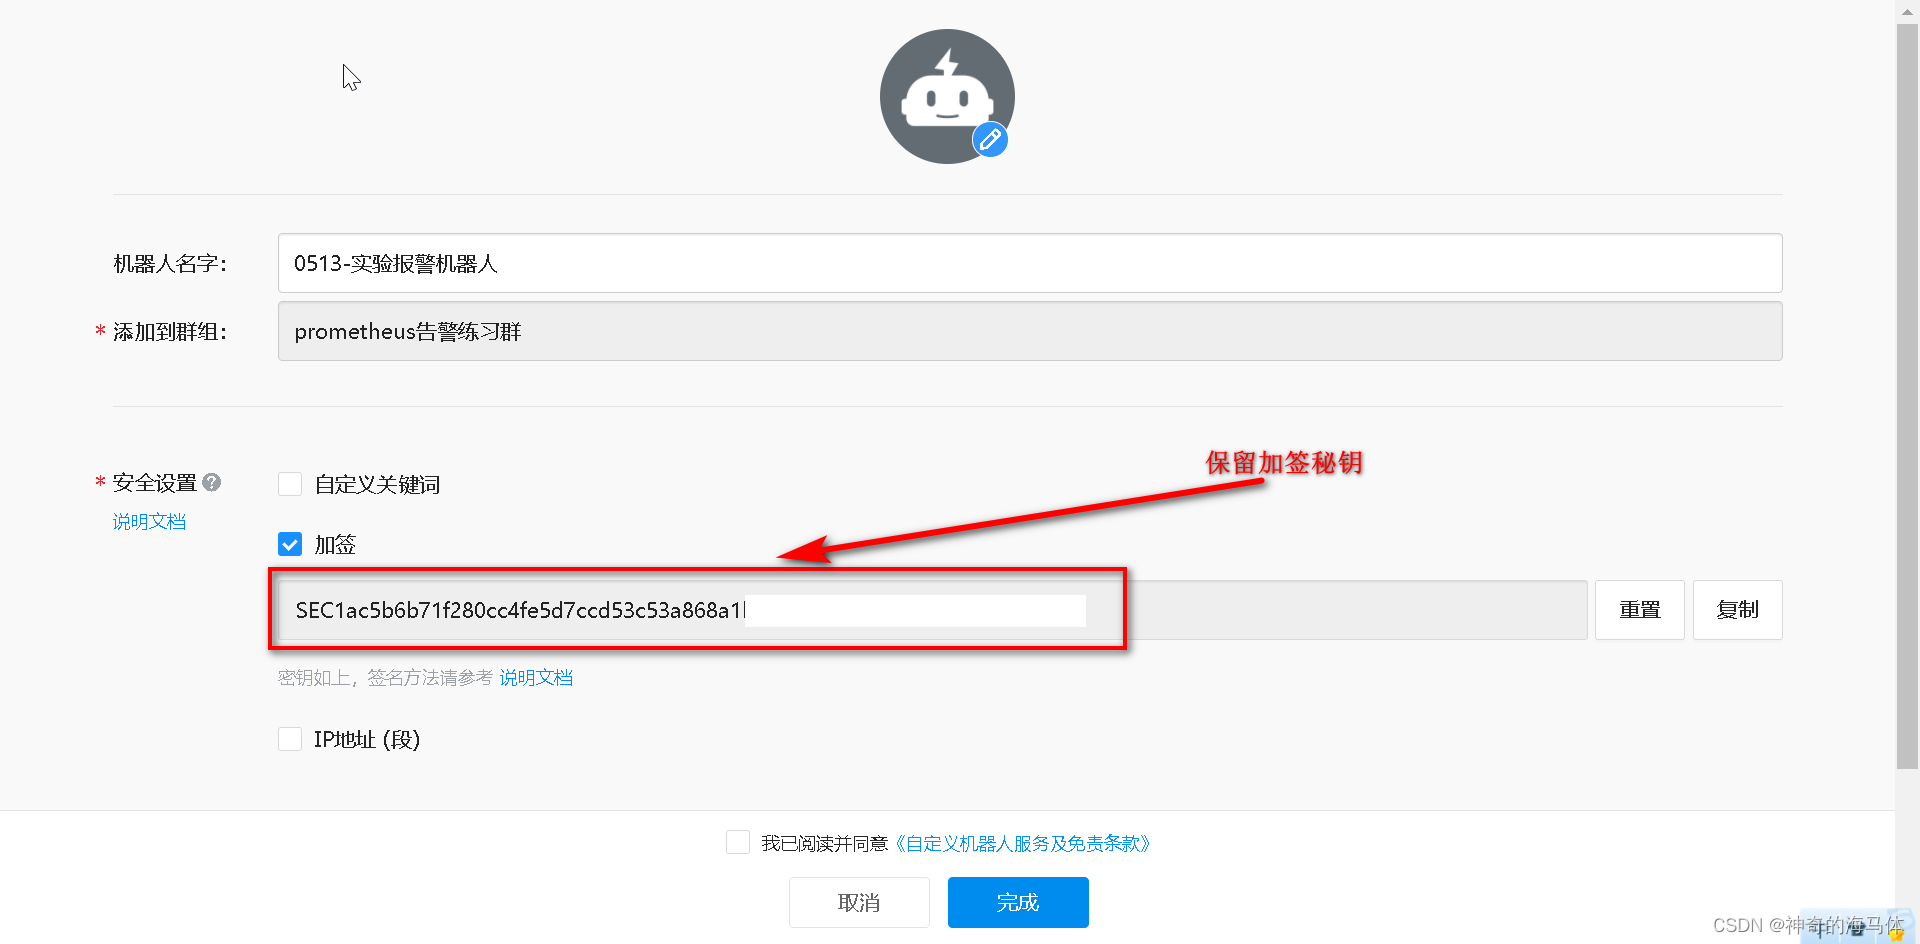
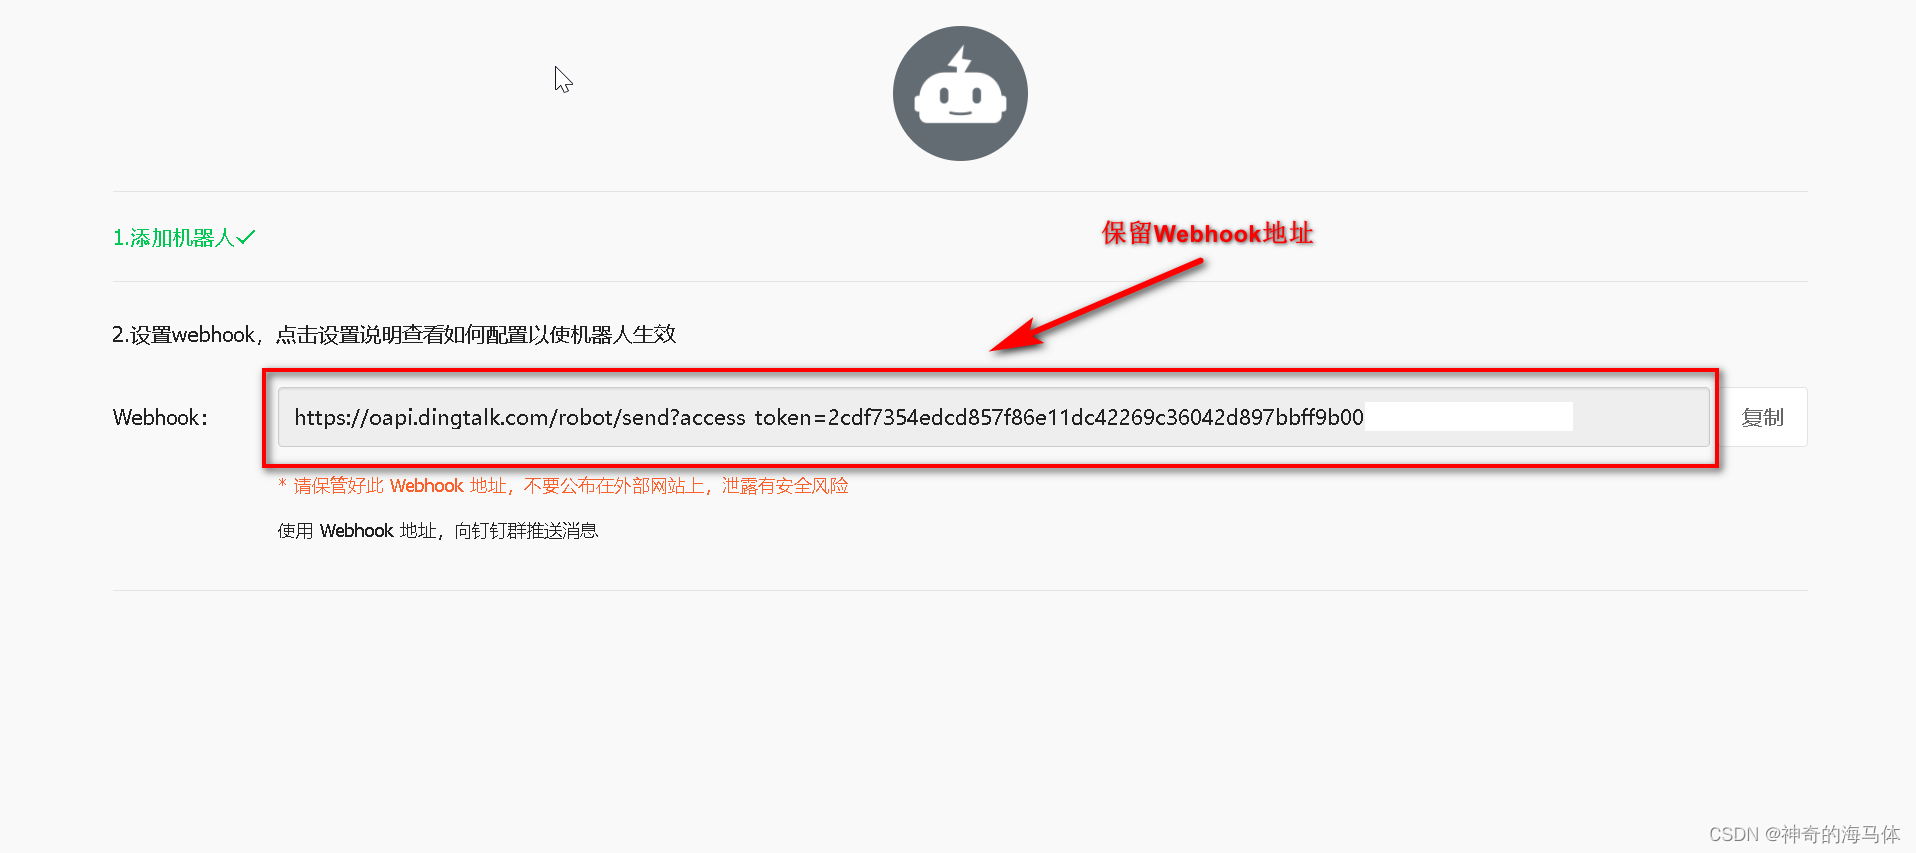
总共需要保存两项,我们后续会用到:
1、加签后的秘钥
2、webhook地址
二、安装及启动
安装配置只涉及到安装及正常启动无误,并不涉及配置内容!
创建
/usr/local/prometheus
目录,设计到所有安装的服务,咱们都放到此目录中。
mkdir /usr/local/prometheus
配置时间同步 && 定时同步
yum -yinstall ntpdate
ntpdate ntp1.aliyun.com

echo"0 1 * * * ntpdate ntp1.aliyun.com">> /var/spool/cron/root
crontab-l
2.1 Prometheus安装启动
1、安装Prometheus
官方下载地址:
wget https://github.com/prometheus/prometheus/releases/download/v2.42.0/prometheus-2.42.0.linux-amd64.tar.gz

tar zxf prometheus-2.42.0.linux-amd64.tar.gz
mv prometheus-2.42.0.linux-amd64 /usr/local/prometheus/prometheus
2、配置Prometheus使用systemd管理
vim /usr/lib/systemd/system/prometheus.service

[Unit]Description=Prometheus-Server
Documentation=https://prometheus.io/
After=network.target

[Service]ExecStart=/usr/local/prometheus/prometheus/prometheus --web.listen-address=0.0.0.0:59090  --config.file=/usr/local/prometheus/prometheus/prometheus.yml
User=root

[Install]WantedBy=multi-user.target
3、启动 && 开机自启
systemctl enable prometheus --now
systemctl status prometheus
4、验证
浏览器访问
http://IP:59090
,显示下图表示无误~
2.2 Node_export安装启动
1、安装node_export
官方下载地址:
wget https://github.com/prometheus/node_exporter/releases/download/v1.5.0/node_exporter-1.5.0.linux-amd64.tar.gz

tar zxf node_exporter-1.5.0.linux-amd64.tar.gz
mv node_exporter-1.5.0.linux-amd64 /usr/local/prometheus/node_exporter
2、配置node_exporter使用systemd管理
vim /usr/lib/systemd/system/node_exporter.service

[Unit]Description=Prometheus-Server
After=network.target

[Service]ExecStart=/usr/local/prometheus/node_exporter/node_exporter --web.listen-address=0.0.0.0:59100
User=root

[Install]WantedBy=multi-user.target
3、启动 && 开机自启
systemctl enable node_exporter --now
systemctl status node_exporter
4、验证 浏览器查看 收集数据信息
浏览器访问
http://IP:59100/metrics
,显示下图表示无误~
2.3 Alertmanager安装启动
1、安装Altermanager
官方下载地址:
wget https://github.com/prometheus/alertmanager/releases/download/v0.25.0-rc.2/alertmanager-0.25.0-rc.2.linux-amd64.tar.gz

tar zxf alertmanager-0.25.0-rc.2.linux-amd64.tar.gz
mv alertmanager-0.25.0-rc.2.linux-amd64 /usr/local/prometheus/alertmanager
2、配置Alertmanager使用systemd管理
vim /usr/lib/systemd/system/alertmanager.service

[Unit]Description=Prometheus-Server
After=network.target

[Service]ExecStart=/usr/local/prometheus/alertmanager/alertmanager --cluster.advertise-address=0.0.0.0:59093 --config.file=/usr/local/prometheus/alertmanager/alertmanager.yml
User=root

[Install]WantedBy=multi-user.target
3、启动 && 开机自启
systemctl enable alertmanager --now
systemctl status alertmanager
4、验证 浏览器访问alertmanager管理页面
浏览器访问
http://IP:9093
,显示下图表示无误~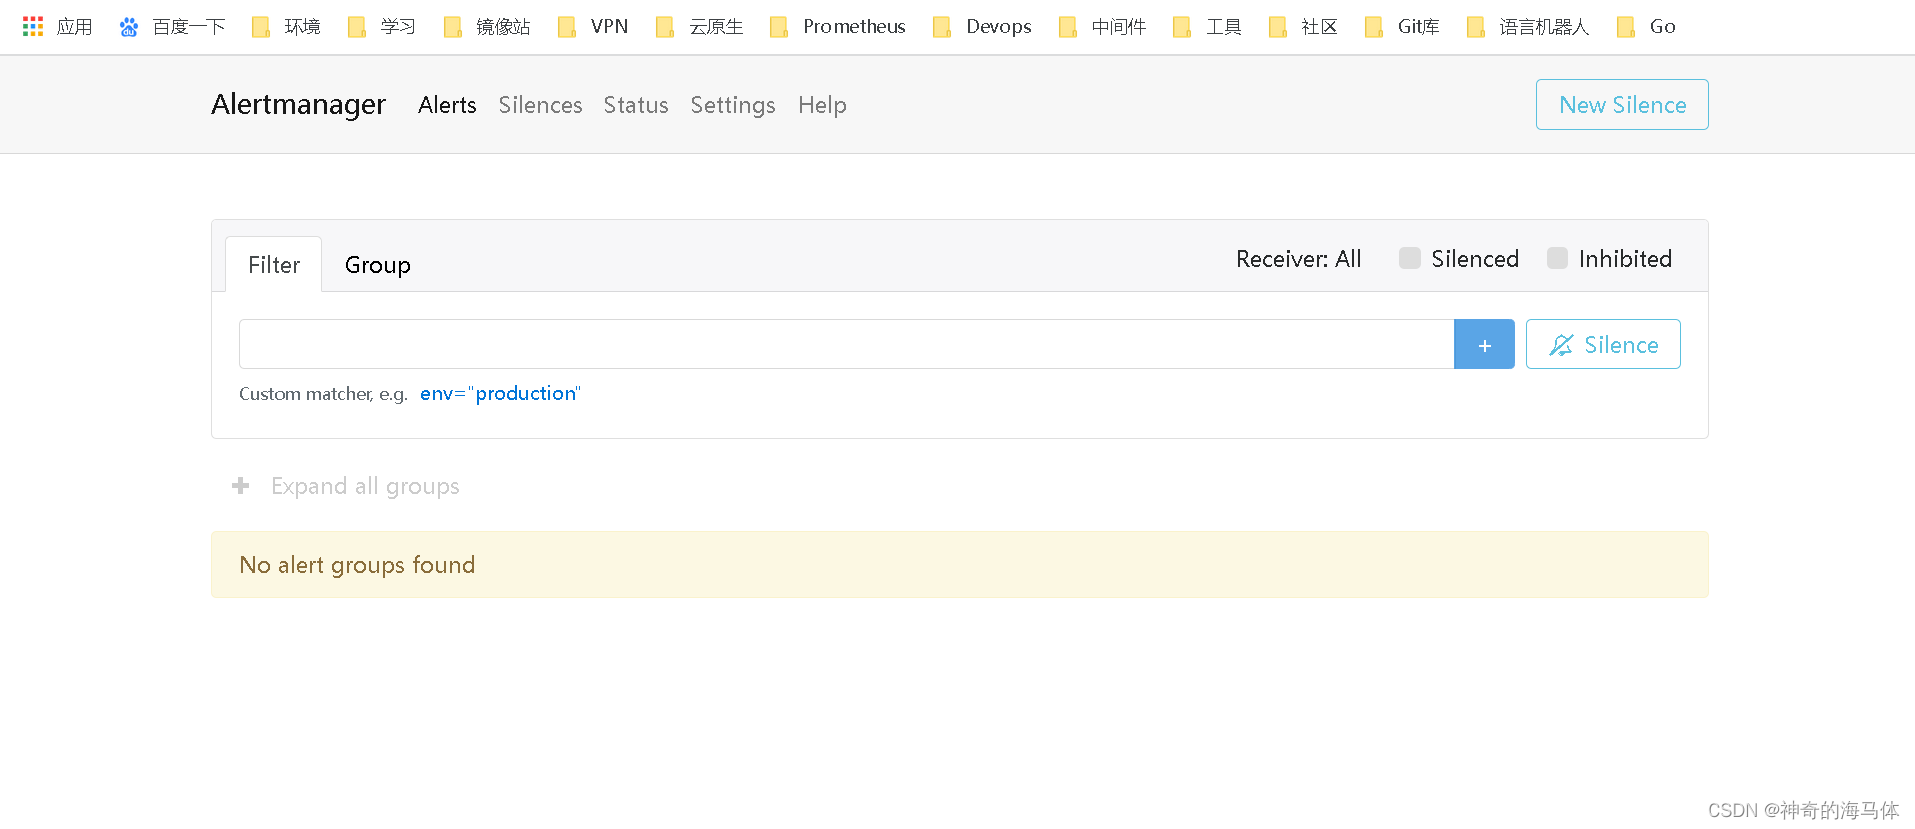
2.4 Webhook-dingtalk安装启动
1、安装webhook-dingtalk插件
下载地址:
wget https://github.com/timonwong/prometheus-webhook-dingtalk/releases/download/v2.1.0/prometheus-webhook-dingtalk-2.1.0.linux-amd64.tar.gz

tar zxf prometheus-webhook-dingtalk-2.1.0.linux-amd64.tar.gz
mv prometheus-webhook-dingtalk-2.1.0.linux-amd64 /usr/local/prometheus/webhook-dingtalk
2、配置webhook-dingtalk使用systemd管理
cp /usr/local/prometheus/webhook-dingtalk/config.example.yml /usr/local/prometheus/webhook-dingtalk/config.yml
vim /usr/lib/systemd/system/webhook.service

[Unit]Description=Prometheus-Server
After=network.target

[Service]ExecStart=/usr/local/prometheus/webhook-dingtalk/prometheus-webhook-dingtalk --config.file=/usr/local/prometheus/webhook-dingtalk/config.yml
User=root

[Install]WantedBy=multi-user.target
3、启动 && 开机自启
systemctl enable webhook.service --now
systemctl status webhook.service
4、验证,查看端口是否启动
netstat-anput|grep8060
三、配置及测试
3.1 Webhook-dingtalk配置钉钉webhook地址
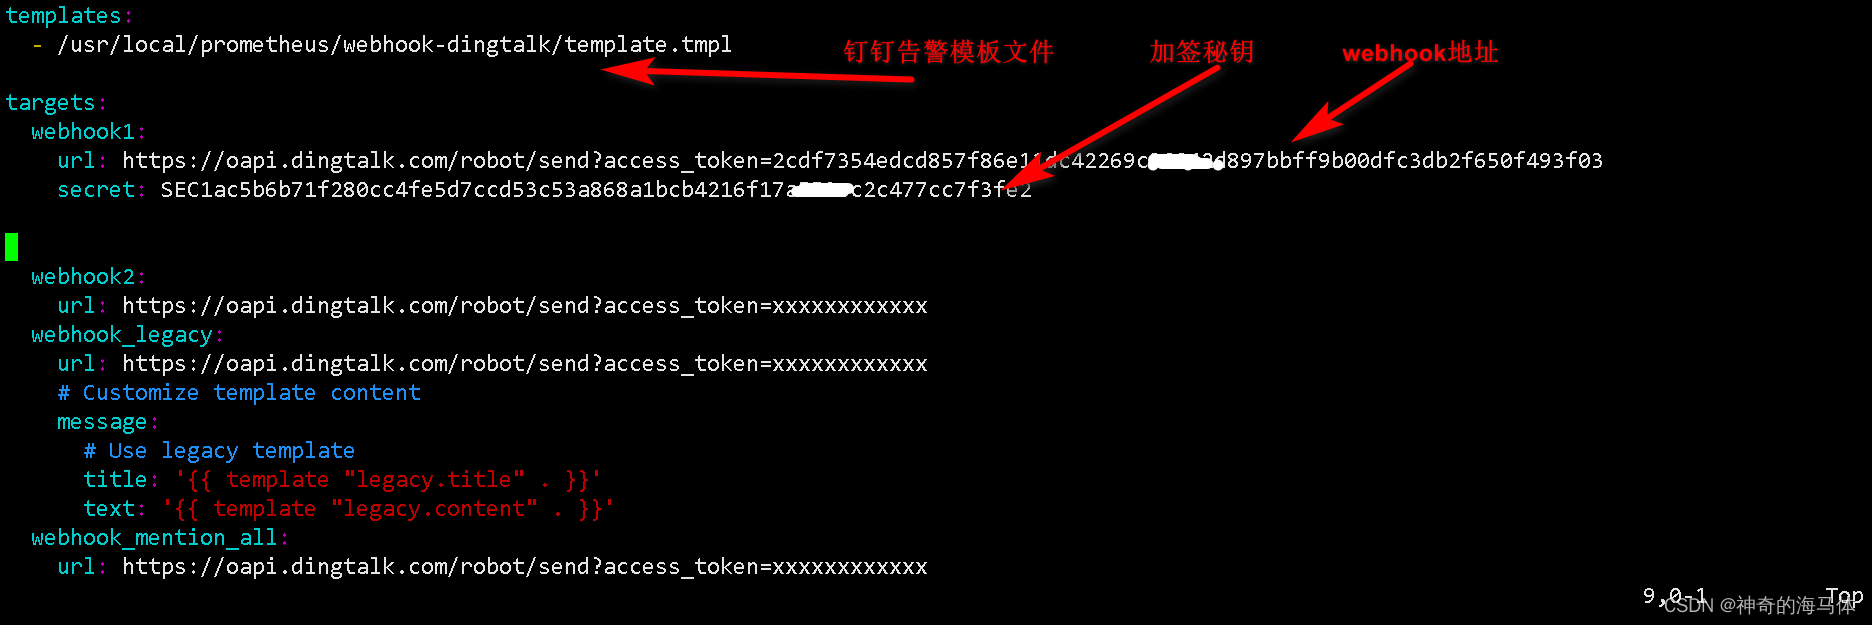
1、 Webhook-dingtalk配置相对比较简单,只改以下三处即可,如下图:
加签秘钥、webhook地址是咱们在钉钉创建机器人时获取的!
vim /usr/local/prometheus/webhook-dingtalk/config.yml
2、添加钉钉报警模板
vim /usr/local/prometheus/webhook-dingtalk/template.tmpl

{{ define "__subject"}}[{{ .Status | toUpper }}{{if eq .Status "firing"}}:{{ .Alerts.Firing | len }}{{ end }}]{{ end }}{{ define "__alert_list"}}{{ range .}}
---
{{if .Labels.owner }}@{{ .Labels.owner }}{{ end }}

**告警主题**: {{ .Annotations.summary }}

**告警类型**: {{ .Labels.alertname }}

**告警级别**: {{ .Labels.severity }}

**告警主机**: {{ .Labels.instance }}

**告警信息**: {{ index .Annotations "description"}}

**告警时间**: {{ dateInZone "2006.01.02 15:04:05"(.StartsAt)"Asia/Shanghai"}}{{ end }}{{ end }}{{ define "__resolved_list"}}{{ range .}}
---
{{if .Labels.owner }}@{{ .Labels.owner }}{{ end }}

**告警主题**: {{ .Annotations.summary }}

**告警类型**: {{ .Labels.alertname }}

**告警级别**: {{ .Labels.severity }}

**告警主机**: {{ .Labels.instance }}

**告警信息**: {{ index .Annotations "description"}}

**告警时间**: {{ dateInZone "2006.01.02 15:04:05"(.StartsAt)"Asia/Shanghai"}}

**恢复时间**: {{ dateInZone "2006.01.02 15:04:05"(.EndsAt)"Asia/Shanghai"}}{{ end }}{{ end }}{{ define "default.title"}}{{ template "__subject".}}{{ end }}{{ define "default.content"}}{{if gt (len .Alerts.Firing)0}}
**====侦测到{{ .Alerts.Firing | len  }}个故障====**
{{ template "__alert_list" .Alerts.Firing }}
---
{{ end }}{{if gt (len .Alerts.Resolved)0}}
**====恢复{{ .Alerts.Resolved | len  }}个故障====**
{{ template "__resolved_list" .Alerts.Resolved }}{{ end }}{{ end }}{{ define "ding.link.title"}}{{ template "default.title".}}{{ end }}{{ define "ding.link.content"}}{{ template "default.content".}}{{ end }}{{ template "default.title".}}{{ template "default.content".}}
3、重启
systemctl restart webhook
systemctl status webhook
3.2 Alertmanager配置钉钉告警
1、修改配置
vim /usr/local/prometheus/alertmanager/alertmanager.yml

route:
  group_by: ['dingding']
  group_wait: 30s
  group_interval: 1h
  repeat_interval: 1h
  receiver: 'dingding.webhook1'
  routes:
  - receiver: 'dingding.webhook1'
    match_re:
      alertname: ".*"
receivers:
  - name: 'dingding.webhook1'
    webhook_configs:
    - url: 'http://16.32.15.200:8060/dingtalk/webhook1/send'
      send_resolved: true
inhibit_rules:
  - source_match:
      severity: 'critical'
    target_match:
      severity: 'warning'
    equal: ['alertname', 'dev', 'instance']
重点修改地方我已图片圈出,如下图: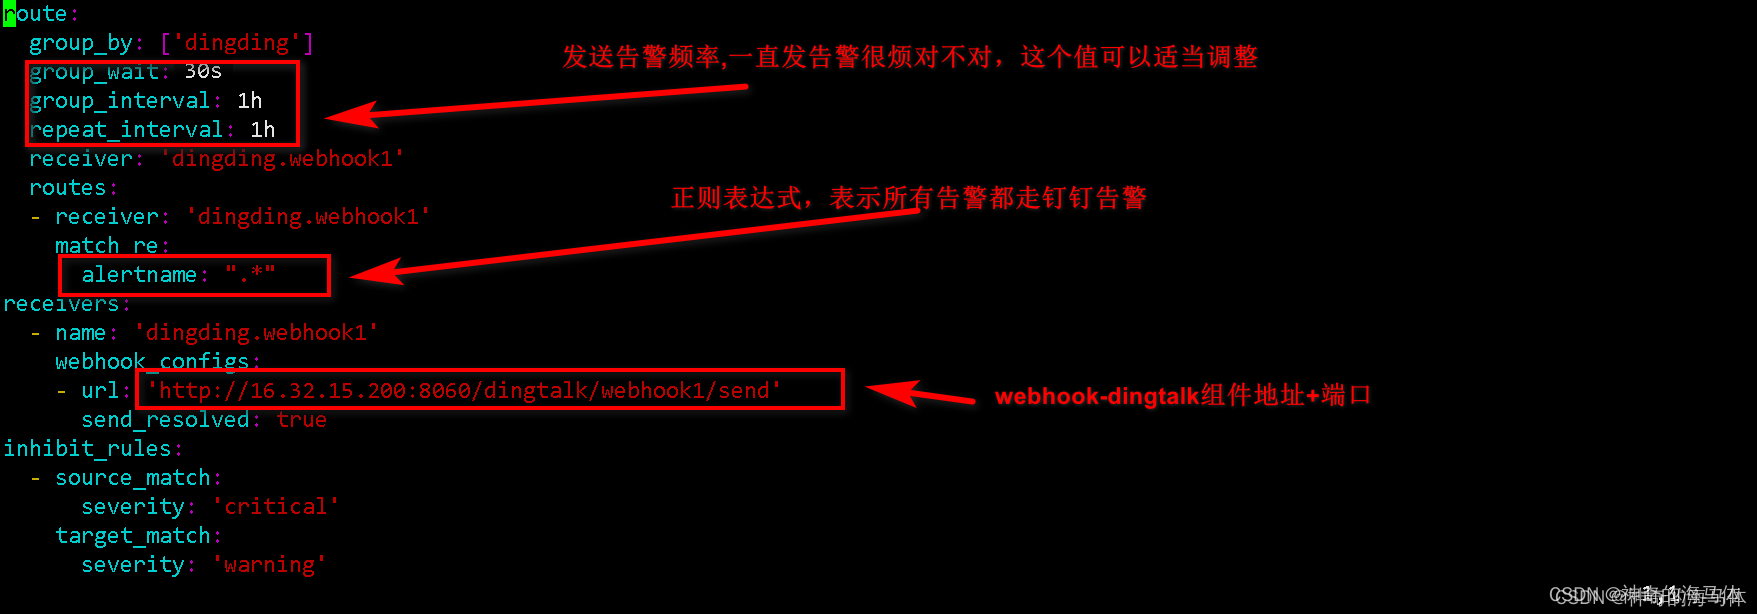
2、重启
systemctl restart alertmanager
systemctl status alertmanager
3.3 Prometheus集成Alertmanager及告警规则配置
1、修改prometheus配置
vim /usr/local/prometheus/prometheus/prometheus.yml

global:
  scrape_interval: 15s
  evaluation_interval: 15s

alerting:
  alertmanagers:
    - static_configs:
        - targets:
           - 16.32.15.200:9093

rule_files:
   - "/usr/local/prometheus/prometheus/rule/node_exporter.yml"

scrape_configs:
  - job_name: "VMware-16.32.15.200"
    static_configs:
      - targets: ["16.32.15.200:59100"]
重点修改地方,我已图片形式标注,如下图: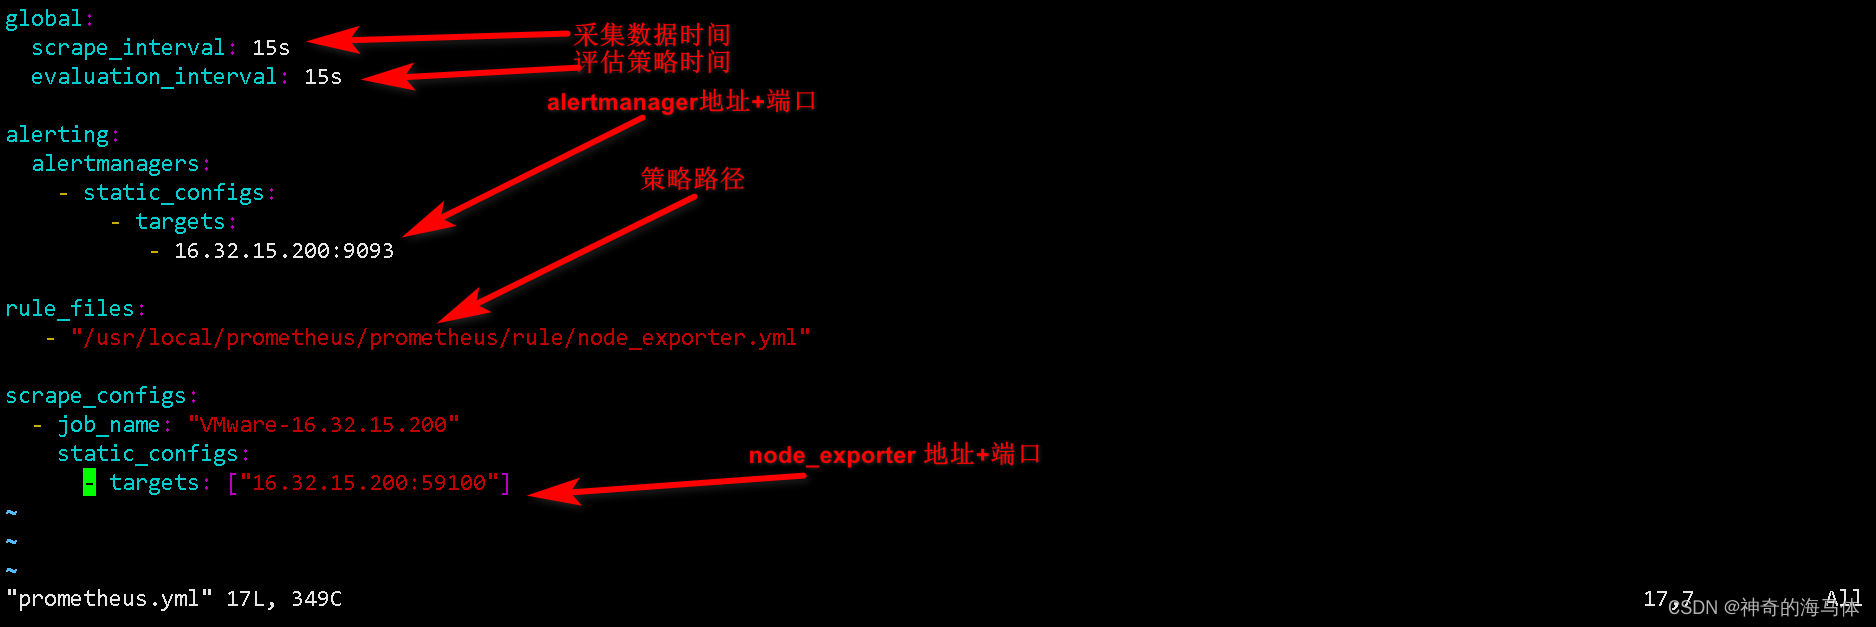
2、添加node_exporter告警规则
mkdir /usr/local/prometheus/prometheus/rule
vim /usr/local/prometheus/prometheus/rule/node_exporter.yml

groups:
- name: 服务器资源监控
  rules:
  - alert: 内存使用率过高
    expr: 100 - (node_memory_MemAvailable_bytes / node_memory_MemTotal_bytes) * 100>80
    for: 3m
    labels:
      severity: 严重告警
    annotations:
      summary: "{{ $labels.instance }} 内存使用率过高, 请尽快处理!"
      description: "{{ $labels.instance }}内存使用率超过80%,当前使用率{{ $value }}%."

  - alert: 服务器宕机
    expr: up ==0
    for: 1s
    labels:
      severity: 严重告警
    annotations:
      summary: "{{$labels.instance}} 服务器宕机, 请尽快处理!"
      description: "{{$labels.instance}} 服务器延时超过3分钟,当前状态{{ $value }}. "

  - alert: CPU高负荷
    expr: 100 - (avg by (instance,job)(irate(node_cpu_seconds_total{mode="idle"}[5m])) * 100)>90
    for: 5m
    labels:
      severity: 严重告警
    annotations:
      summary: "{{$labels.instance}} CPU使用率过高,请尽快处理!"
      description: "{{$labels.instance}} CPU使用大于90%,当前使用率{{ $value }}%. "

  - alert: 磁盘IO性能
    expr: avg(irate(node_disk_io_time_seconds_total[1m])) by(instance,job)* 100>90
    for: 5m
    labels:
      severity: 严重告警
    annotations:
      summary: "{{$labels.instance}} 流入磁盘IO使用率过高,请尽快处理!"
      description: "{{$labels.instance}} 流入磁盘IO大于90%,当前使用率{{ $value }}%."


  - alert: 网络流入
    expr: ((sum(rate (node_network_receive_bytes_total{device!~'tap.*|veth.*|br.*|docker.*|virbr*|lo*'}[5m])) by (instance,job)) / 100)>102400
    for: 5m
    labels:
      severity: 严重告警
    annotations:
      summary: "{{$labels.instance}} 流入网络带宽过高,请尽快处理!"
      description: "{{$labels.instance}} 流入网络带宽持续5分钟高于100M. RX带宽使用量{{$value}}."

  - alert: 网络流出
    expr: ((sum(rate (node_network_transmit_bytes_total{device!~'tap.*|veth.*|br.*|docker.*|virbr*|lo*'}[5m])) by (instance,job)) / 100)>102400
    for: 5m
    labels:
      severity: 严重告警
    annotations:
      summary: "{{$labels.instance}} 流出网络带宽过高,请尽快处理!"
      description: "{{$labels.instance}} 流出网络带宽持续5分钟高于100M. RX带宽使用量{$value}}."

  - alert: TCP连接数
    expr: node_netstat_Tcp_CurrEstab >10000
    for: 2m
    labels:
      severity: 严重告警
    annotations:
      summary: " TCP_ESTABLISHED过高!"
      description: "{{$labels.instance}} TCP_ESTABLISHED大于100%,当前使用率{{ $value }}%."

  - alert: 磁盘容量
    expr: 100-(node_filesystem_free_bytes{fstype=~"ext4|xfs"}/node_filesystem_size_bytes {fstype=~"ext4|xfs"}*100)>90
    for: 1m
    labels:
      severity: 严重告警
    annotations:
      summary: "{{$labels.mountpoint}} 磁盘分区使用率过高,请尽快处理!"
      description: "{{$labels.instance}} 磁盘分区使用大于90%,当前使用率{{ $value }}%."
3、重启
systemctl restart prometheus
systemctl status prometheus
4、访问Prometheus Web页面可以查看到添加的规则,如下图: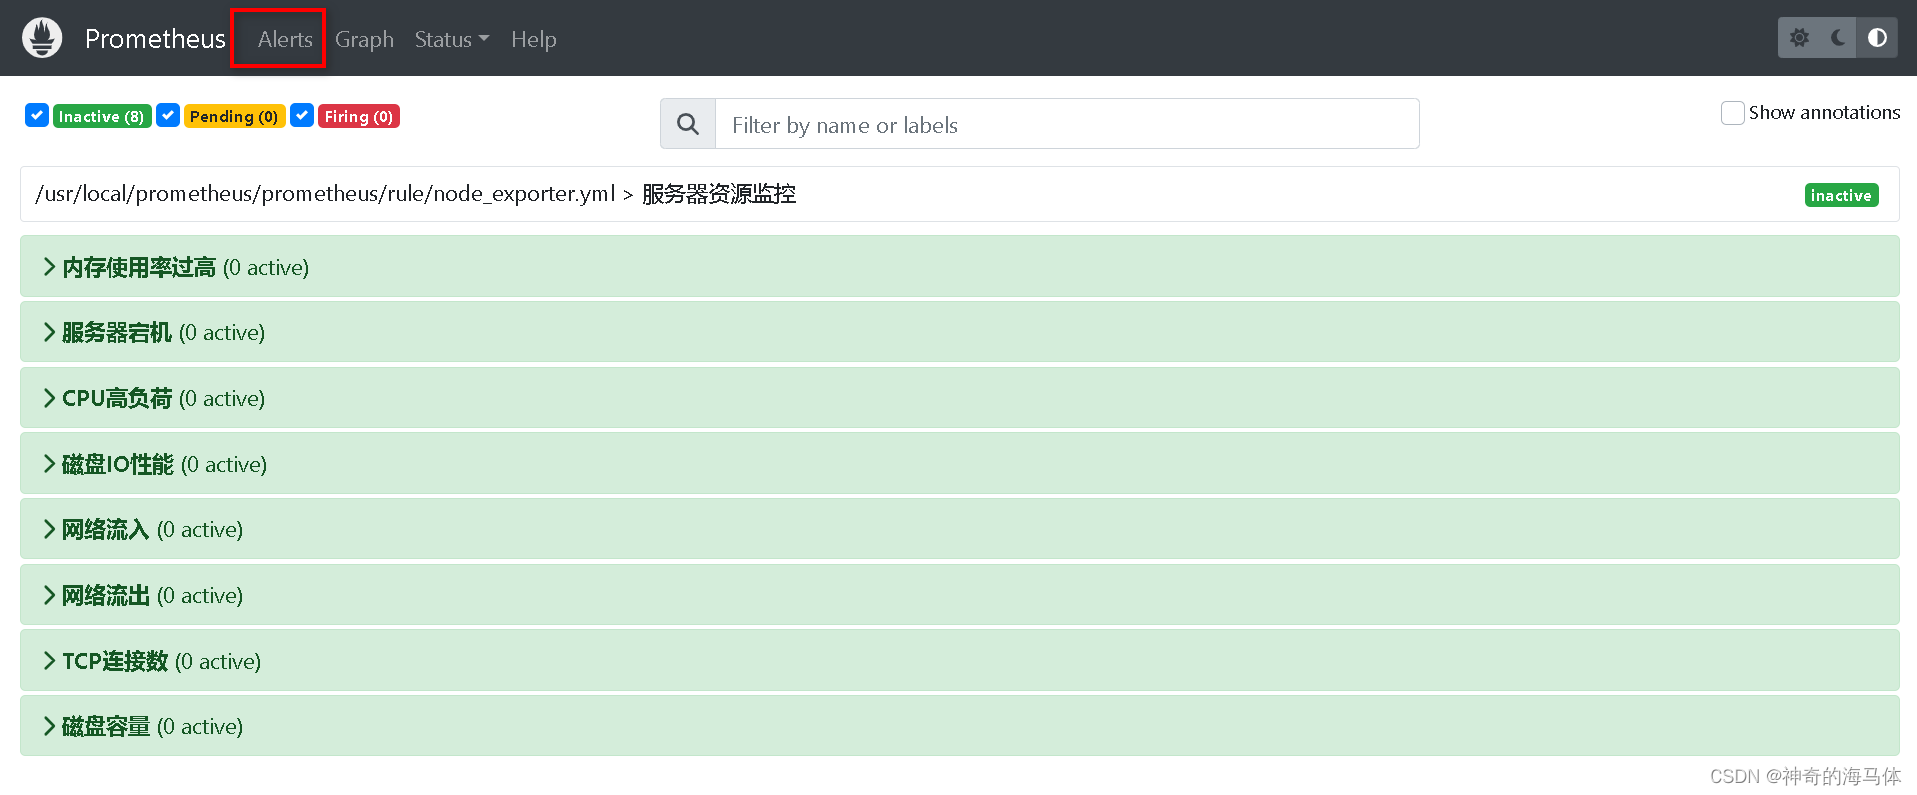
四、测试告警
1、故意将node_exporter停止掉,模拟服务器宕机
systemctl stop node_exporter
2、Prometheus 管理页面可以看到告警信息如下图: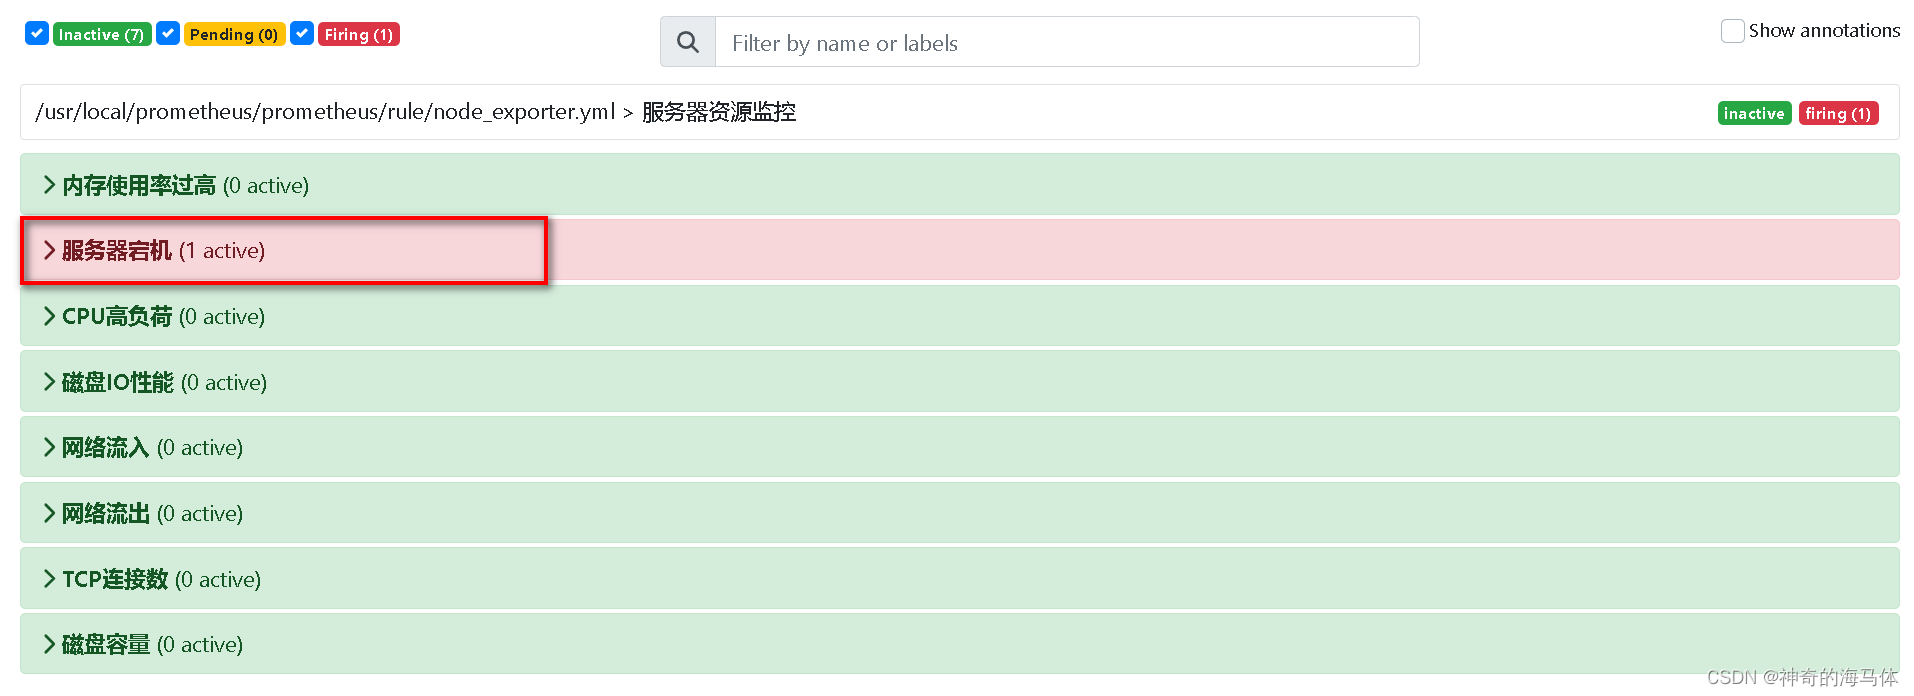
3、Prometheus会将告警信息发送给Alertmanager,所以说Alertmanager页面可以看到告警信息如下图: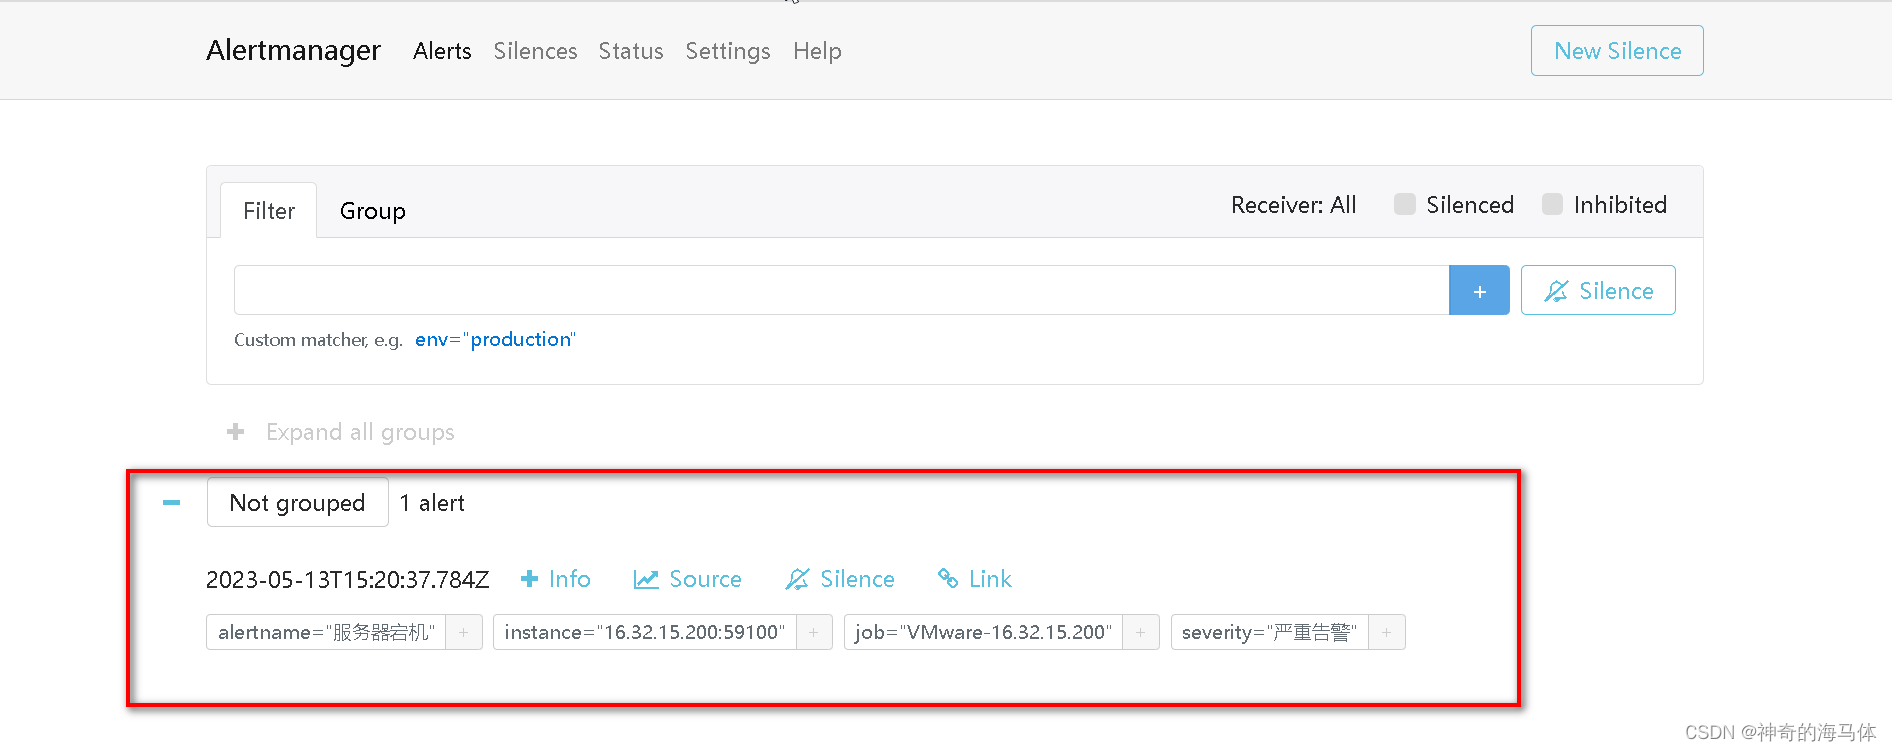
4、此时会发送到钉钉机器人告警,如下图所示:
版权归原作者 神奇的海马体 所有, 如有侵权,请联系我们删除。