
一:环境使用
- Nodemcu-esp32s开发板
- 128*160 tft 显示屏幕
- GUI gui 开发软件
- platformio + arduino框架开发环境
此移植需要提前配置好 LVGL 的环境,如果不会配置可以看我之前的文章LVGL配置
GUI gui 生成移植代码
- 我简单的生成了一个GUI gui 项目文件

- 生成的代码文件夹 中custom 和 generated 是我们所需要的。

将这两个文件夹放到我们的platformio的工程文件夹下面,这一步的操作就完成了。
相关文件修改
- 将这两个文件夹中的所有
#include "lvgl/lvgl.h"改为#include "lvgl.h"
将这两个文件夹中的.c文件中的
#include"lv_font.h" 改为”lvgl.h“
3. 这时候编译运行一下,可能会报错,无法找到头文件,这时候需要我们在C++环境配置的json文件中添加相关路径。
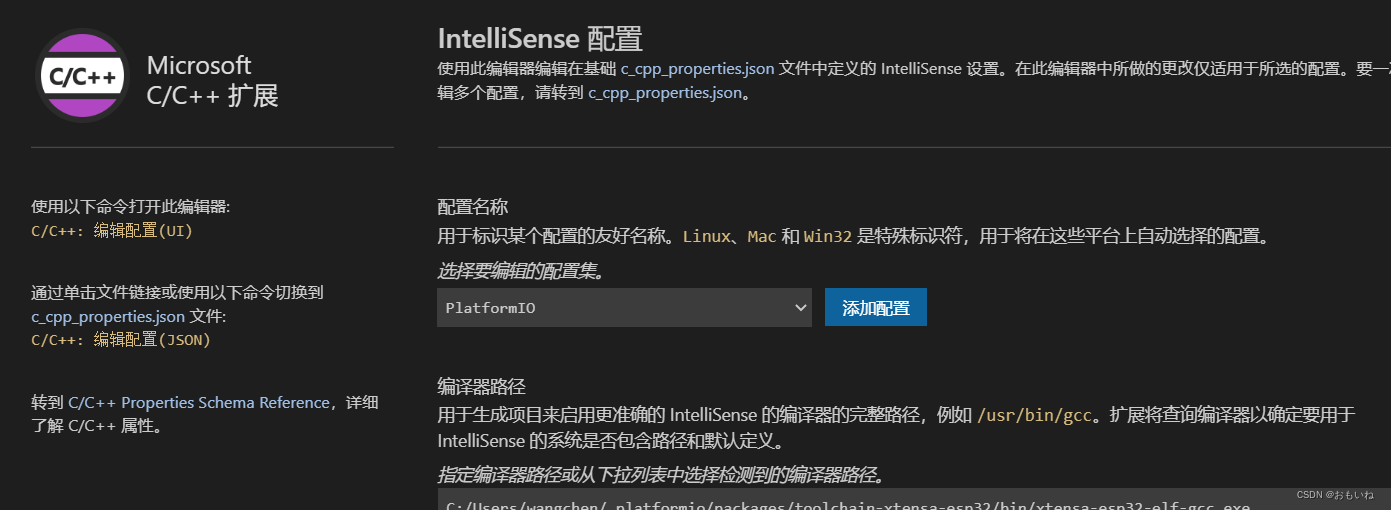
点击C/C++编译配置设置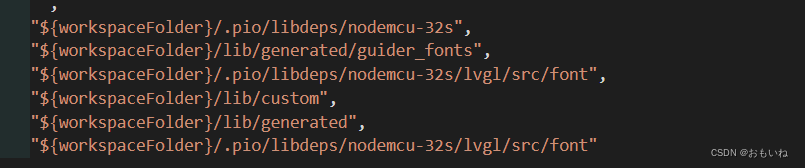
进行类似操作,将无法找到的头文件文件夹添加到里面
main文件修改
好了经过以上配置,我们以及将所需要的内容添加到里面了,但是如何调用呢,我们在一个已经配置好的lvgl 的main文件中修改。
- 添加头文件
#include<gui_guider.h>#include<custom.h>#include<events_init.h>
- 添加页面初始化配置 ps: 一定要在lvgl和tft屏幕初始化之后
setup_ui(&guider_ui);events_init(&guider_ui);custom_init(&guider_ui);
注意在前面我们需要声明 guider_ui 这个东东,否则会报错。
然后就大功告成了,看看成果。
全部代码如下
#include<Arduino.h>#include<lvgl.h>#include<TFT_eSPI.h>#include<gui_guider.h>#include<custom.h>#include<events_init.h>/*If you want to use the LVGL examples,
  make sure to install the lv_examples Arduino library
  and uncomment the following line.
#include <lv_examples.h>
*/

lv_ui guider_ui;/*Change to your screen resolution*/staticconstuint16_t screenWidth  =128;staticconstuint16_t screenHeight =160;staticlv_disp_draw_buf_t draw_buf;staticlv_color_t buf[ screenWidth *10];

TFT_eSPI tft =TFT_eSPI(screenWidth, screenHeight);/* TFT instance */#ifLV_USE_LOG !=0/* Serial debugging */voidmy_print(constchar* buf){
    Serial.printf(buf);
    Serial.flush();}#endif/* Display flushing */voidmy_disp_flush(lv_disp_drv_t*disp,constlv_area_t*area,lv_color_t*color_p ){uint32_t w =( area->x2 - area->x1 +1);uint32_t h =( area->y2 - area->y1 +1);

    tft.startWrite();
    tft.setAddrWindow( area->x1, area->y1, w, h );
    tft.pushColors((uint16_t*)&color_p->full, w * h, true );
    tft.endWrite();lv_disp_flush_ready( disp );}/*
void my_touchpad_read( lv_indev_drv_t * indev_driver, lv_indev_data_t * data )
{
    uint16_t touchX, touchY;

    bool touched = tft.getTouch( &touchX, &touchY, 600 );

    if( !touched )
    {
        data->state = LV_INDEV_STATE_REL;
    }
    else
    {
        data->state = LV_INDEV_STATE_PR;

        data->point.x = touchX;
        data->point.y = touchY;

        Serial.print( "Data x " );
        Serial.println( touchX );

        Serial.print( "Data y " );
        Serial.println( touchY );
    }
}
*/voidsetup(){
    Serial.begin(115200);/* prepare for possible serial debug */

    String LVGL_Arduino ="Hello LVGL! ";//LVGL_Arduino += String('V') + lv_version_major() + "." + lv_version_minor() + "." + lv_version_patch();
    Serial.println( LVGL_Arduino );
    Serial.println("I am LVGL_Arduino");lv_init();#ifLV_USE_LOG !=0lv_log_register_print_cb( my_print );/* register print function for debugging */#endif

    tft.begin();/* TFT init */
    tft.setRotation(0);/* Landscape orientation, flipped *//*Set the touchscreen calibration data,
     the actual data for your display can be acquired using
     the Generic -> Touch_calibrate example from the TFT_eSPI library*/// uint16_t calData[5] = { 275, 3620, 264, 3532, 1 };// tft.setTouch( calData );lv_disp_draw_buf_init(&draw_buf, buf,NULL, screenWidth *10);/*Initialize the display*/staticlv_disp_drv_t disp_drv;lv_disp_drv_init(&disp_drv );/*Change the following line to your display resolution*/
    disp_drv.hor_res = screenWidth;
    disp_drv.ver_res = screenHeight;
    disp_drv.flush_cb = my_disp_flush;
    disp_drv.draw_buf =&draw_buf;lv_disp_drv_register(&disp_drv );/*Initialize the (dummy) input device driver*///static lv_indev_drv_t indev_drv;//lv_indev_drv_init( &indev_drv );//indev_drv.type = LV_INDEV_TYPE_POINTER;//indev_drv.read_cb = my_touchpad_read;//lv_indev_drv_register( &indev_drv );#if1setup_ui(&guider_ui);events_init(&guider_ui);custom_init(&guider_ui);/* Create simple label *//* lv_obj_t *label = lv_label_create( lv_scr_act() );
    lv_label_set_text( label, LVGL_Arduino.c_str() );
    lv_obj_align( label, LV_ALIGN_CENTER, 0, 0 );*/#else/* Try an example from the lv_examples Arduino library
       make sure to include it as written above.
    lv_example_btn_1();
   */// uncomment one of these demoslv_demo_widgets();// OK// lv_demo_benchmark();          // OK// lv_demo_keypad_encoder();     // works, but I haven't an encoder// lv_demo_music();              // NOK// lv_demo_printer();// lv_demo_stress();             // seems to be OK#endif
    Serial.println("Setup done");}voidloop(){lv_timer_handler();/* let the GUI do its work */delay(5);}
本文转载自: https://blog.csdn.net/amimax/article/details/127332381
版权归原作者 おもいね 所有, 如有侵权,请联系我们删除。
版权归原作者 おもいね 所有, 如有侵权,请联系我们删除。