

python代码可以自己扩充图像数据集。
无论我们喜欢Keras还是Pytorch,我们都可以使用丰富的资料库来有效地增广我们的图像。但是如果遇到特殊情况:
- 我们的数据集结构复杂(例如3个输入图像和1-2个分段输出)。
- 我们需要完全的自由和透明度。
- 我们希望进行这些库未提供的扩充方法。
对于这些情况以及其他特殊情况,我们必须能够掌握我们自己的图像增广函数。而且,我每次都使用自己的函数。因此,在本文中,我将介绍并提供执行图像增广的功能。
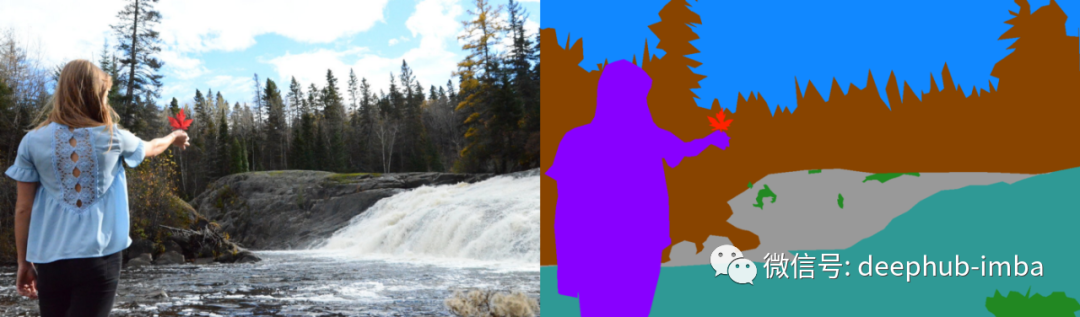
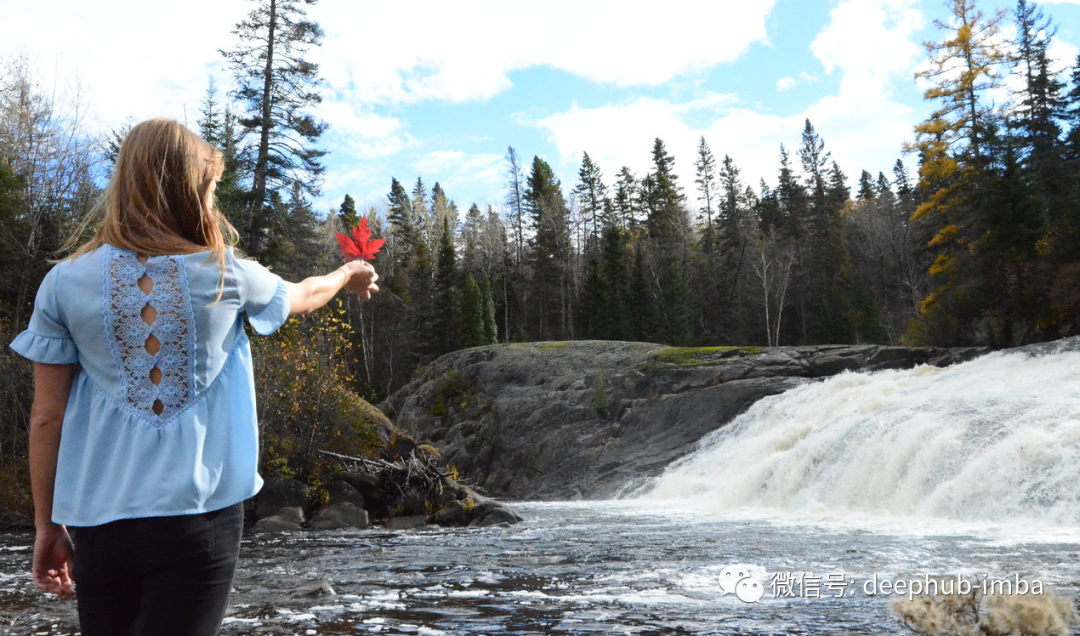
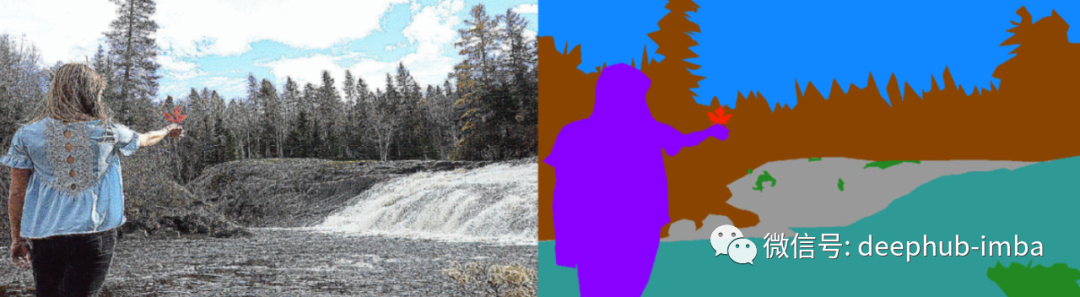
我将使用朋友的照片来提醒我在加拿大度过的美好时光作为示例。希望您喜欢这张照片,因为这是您在本文中看到的唯一一张照片。
我将增广过程细分为一个实际的案例,将我们的函数与图像和目标图像一起使用。这将使您对将要描述的方法的灵活性有所了解:
- 翻转
- 裁剪
- 过滤和锐化
- 模糊
- 旋转,平移,剪切,缩放
- 剪下
- 色彩
- 亮度
- 对比
- 均匀和高斯噪声
- 渐变
- 镜头变形
本文的目的不是为了证明增广技术是如何设计的,而是理解它们的用法。
一些有用的函数
在开始之前,我想解释每种方法具有的通用结构。它实际上是一个要初始化的对象。该对象将以我们的样本作为参数调用,并将返回我们的扩充样本。这就是全部?是的,仅此而已!然后,让我们从增广功能之前的一些有用函数开始。
Resize
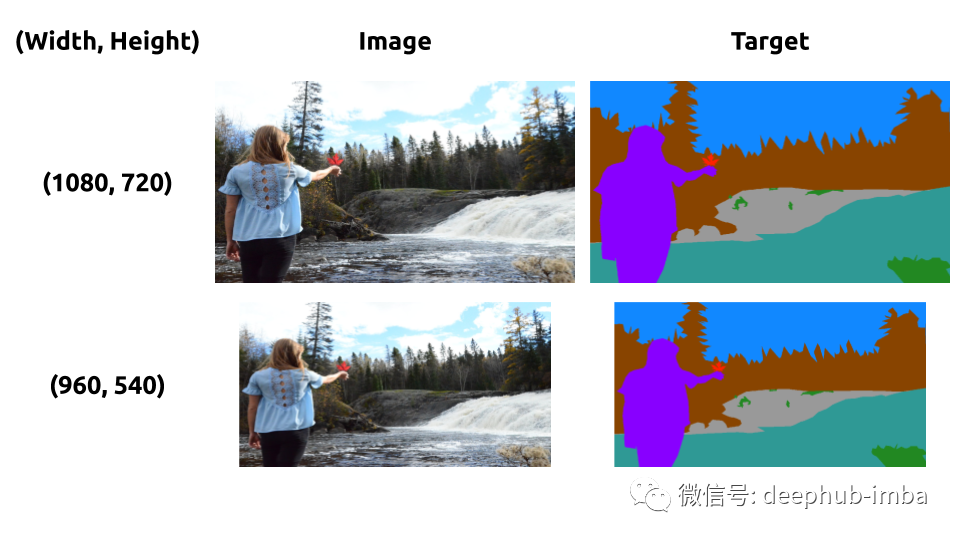
第一个有用的函数允许我们使用(宽度,高度)形状调整图像大小。这个类使我们看到了所有其他的初始化方式。我们实例化一个对象,该对象的大小被参数化。在我们的例子中,所有样本(图像和目标)将以相同的尺寸返回。使用此类型的功能,我们可以轻松地以所需方式处理图像和目标。
classResize(object):
    def__init__(self, output_size):
        self.output_size = output_size

    def__call__(self, X, Y):
        _X = cv2.resize(X, self.output_size)
        w, h = self.output_size
        c = Y.shape[-1]
        _Y = np.zeros((h, w, c))
        foriinrange(Y.shape[-1]):
            _Y[..., i] = cv2.resize(Y[..., i], self.output_size)
        return_X, _Y
Clip
剪辑函数是一项非常有用的函数,尤其是当您需要从一种颜色空间切换到另一种颜色空间或在0和1或0和255之间重置图像时。

默认情况下,如果仅指定一个阈值,则最小阈值为0。
classClip(object):
    def__init__(self, mini, maxi=None):
        ifmaxiisNone:
            self.mini, self.maxi = 0, mini
        else:
            self.mini, self.maxi = mini, maxi

    def__call__(self, X, Y):
        mini_mask = np.where(X<self.mini)
        maxi_mask = np.where(X>self.maxi)
        X[mini_mask] = self.mini
        X[maxi_mask] = self.maxi
        returnX, Y
Normalize or Standardize
在传递模型中的输入之前,我们通常希望对数据进行标准化或规范化。当然,这些操作可以在特定的轴上完成。

默认情况下,对整个图像执行标准化和规范化。
classNormalize(object):
    def__init__(self, axis=None):
        self.axis = axis

    def__call__(self, X, Y):
        mini = np.min(X, self.axis)
        maxi = np.max(X, self.axis)
        X = (X-mini) / (maxi-mini)
        returnX, Y

classStandardize(object):
    def__init__(self, axis=None):
        self.axis = axis

    def__call__(self, X, Y):
        mean =  np.mean(X, self.axis)
        std = np.std(X, self.axis)
        X = (X-mean) /std
        returnX, Y
ToTensor
最后,如果您使用的是
Pytorch
,则需要将图像转换为
Torch.Tensor
。唯一需要注意的是,使用
Pytorch
,我们的图像维度中首先是通道,而不是最后是通道。最后,我们还可以选择张量的输出类型。
classToTensor(object):
    def__init__(self, X_type=None, Y_type=None):
        # must bu torch types
        self.X_type = X_type
        self.Y_type = Y_type

    def__call__(self, X, Y):

        # swap color axis because
        # numpy img_shape: H x W x C
        # torch img_shape: C X H X W
        X = X.transpose((2, 0, 1))
        Y = Y.transpose((2, 0, 1))

        # convert to tensor
        X = torch.from_numpy(X)
        Y = torch.from_numpy(Y)

        ifself.X_typeisnotNone:
            X = X.type(self.X_type)
        ifself.Y_typeisnotNone:
            Y = Y.type(self.Y_type)
        returnX, Y
怎么使用?
我们要做的就是定义我们要在样本中进行的转换的列表,仅此而已。之后我们什么也别碰。请注意,转换顺序很重要。而且由你决定。
X, Y = get_next_sample()

    fortintransform: # data augmentation
        X, Y = t(X, Y)

    pred = model.predict(X, Y)
现在,我们可以深入研究本文的目的,并查看图像增广技术。
旋转

第一个,也是最简单的一个,包括在图像的水平和垂直轴上随机执行翻转。换句话说,执行垂直翻转的机会为50/100,执行水平翻转的机会为50/100。
classFlip(object):
    def__call__(self, X, Y):
        foraxisin [0, 1]:
            ifnp.random.rand(1) <0.5:
                X = np.flip(X, axis)
                Y = np.flip(Y, axis)
        returnX, Y
裁剪
要进行图像增广,通常会随机裁剪图像。换句话说,我们在随机区域上裁剪了一部分随机大小的图像。
可以从尺寸的比例(高度,宽度)中选择裁剪图像的尺寸。如果未指定裁剪的比例最大大小,则默认情况下,我们将认为它是图像的大小。
classCrop(object):
    def__init__(self, min_size_ratio, max_size_ratio=(1, 1)):
        self.min_size_ratio = np.array(list(min_size_ratio))
        self.max_size_ratio = np.array(list(max_size_ratio))

    def__call__(self, X, Y):
        size = np.array(X.shape[:2])
        mini = self.min_size_ratio*size
        maxi = self.max_size_ratio*size
        # random size
        h = np.random.randint(mini[0], maxi[0])
        w = np.random.randint(mini[1], maxi[1])
        # random place
        shift_h = np.random.randint(0, size[0] -h)
        shift_w = np.random.randint(0, size[1] -w)
        X = X[shift_h:shift_h+h, shift_w:shift_w+w]
        Y = Y[shift_h:shift_h+h, shift_w:shift_w+w]

        returnX, Y
过滤器
一般情况
我们将开始一些有趣的事情。过滤器是很棒的方法,但我认为能够轻松创建我们自己的卷积过滤器非常重要。
所以我想做一个通用的函数,以便能够使用我们自己的过滤器。
classCustomFilter(object):
    def__init__(self, kernel):
        self.kernel = kernel

    def__call__(self, X, Y):
        X = cv2.filter2D(X, -1, self.kernel)
        returnX, Y
锐化
就过滤器而言,可以通过选择上游过滤器并以随机权重应用过滤器来进行进一步处理。例如,我向您介绍用于锐化图像的过滤器。
中心值从0到65。
classSharpen(object):
    def__init__(self, max_center=4):
        self.identity = np.array([[0, 0, 0],
                                  [0, 1, 0],
                                  [0, 0, 0]])
        self.sharpen = np.array([[ 0, -1,  0],
                                [-1,  4, -1],
                                [ 0, -1,  0]]) /4

    def__call__(self, X, Y):

        sharp = self.sharpen*np.random.random() *self.max_center
        kernel = self.identity+sharp

        X = cv2.filter2D(X, -1, kernel)
        returnX, Y
模糊
可以用最流行的滤镜来随机模糊我们的图像。有很多方法可以模糊我们的图像。最著名的是平均值,中值,高斯或双边滤波器。
平均模糊

内核大小从1到35
关于平均滤波器。顾名思义,它使我们可以对给定中心的值取平均值。这是由内核完成的。可以指定其大小以增加或减少模糊。要使用平均滤波器增广图像,我们只需要使用随机大小的内核对输入图像进行滤波。
classGaussianBlur(object):
    def__init__(self, max_kernel=(7, 7)):
        self.max_kernel = ((max_kernel+1) //2)

    def__call__(self, X, Y):
        kernel_size = (
            np.random.randint(1, self.max_kernel[0]) *2+1,
            np.random.randint(1, self.max_kernel[1]) *2+1,
        )
        X = cv2.GaussianBlur(X, kernel_size, 0)
        returnX, Y
高斯模糊
内核大小从1到35
高斯模糊不使用平均滤波器,而是使用高斯滤波器,因此这些值对应于从中心开始的高斯曲线。请注意,内核维数只能包含奇数。
classGaussianBlur(object):
    def__init__(self, max_kernel=(7, 7)):
        self.max_kernel = max_kernel

    def__call__(self, X, Y):
        kernel_size = (
            np.random.randint(1, self.max_kernel[0] +1),
            np.random.randint(1, self.max_kernel[1] +1),
        )
        X = cv2.GaussianBlur(X, kernel_size, 0)
        returnX, Y
透视变换
迄今为止,最广泛使用的图像增广技术是透视变换。有旋转,平移,剪切和缩放。这些转换可以在3D维度中执行。通常,它们仅在2D中使用。让我们利用我们拥有的一切。
翻转
平移

剪切
缩放
结合
我不会在2D图像的3D转换上花费更多的时间,因为我写了有关这方面的整篇文章。因此,我选择了本文结尾处提供的函数。
应该注意的是,该函数允许我们根据所提出的4个矩阵随机执行变换。顺序很重要。这里我们有剪切,然后是旋转,然后是比例缩放,最后是平移。注意,平移是通过图像尺寸的比例完成的。
结合随机旋转平移剪切和比例缩放
classPerspective(object):
    def__init__(self,
                 max_ratio_translation=(0.2, 0.2, 0),
                 max_rotation=(10, 10, 360),
                 max_scale=(0.1, 0.1, 0.2),
                 max_shearing=(15, 15, 5)):

        self.max_ratio_translation = np.array(max_ratio_translation)
        self.max_rotation = np.array(max_rotation)
        self.max_scale = np.array(max_scale)
        self.max_shearing = np.array(max_shearing)

    def__call__(self, X, Y):

        # get the height and the width of the image
        h, w = X.shape[:2]
        max_translation = self.max_ratio_translation*np.array([w, h, 1])
        # get the values on each axis
        t_x, t_y, t_z = np.random.uniform(-1, 1, 3) *max_translation
        r_x, r_y, r_z = np.random.uniform(-1, 1, 3) *self.max_rotation
        sc_x, sc_y, sc_z = np.random.uniform(-1, 1, 3) *self.max_scale+1
        sh_x, sh_y, sh_z = np.random.uniform(-1, 1, 3) *self.max_shearing

        # convert degree angles to rad
        theta_rx = np.deg2rad(r_x)
        theta_ry = np.deg2rad(r_y)
        theta_rz = np.deg2rad(r_z)
        theta_shx = np.deg2rad(sh_x)
        theta_shy = np.deg2rad(sh_y)
        theta_shz = np.deg2rad(sh_z)

        # compute its diagonal
        diag = (h**2+w**2) **0.5
        # compute the focal length
        f = diag
        ifnp.sin(theta_rz) != 0:
            f /= 2*np.sin(theta_rz)

        # set the image from cartesian to projective dimension
        H_M = np.array([[1, 0, -w/2],
                        [0, 1, -h/2],
                        [0, 0,      1],
                        [0, 0,      1]])
        # set the image projective to carrtesian dimension
        Hp_M = np.array([[f, 0, w/2, 0],
                         [0, f, h/2, 0],
                         [0, 0,     1, 0]])

        # adjust the translation on z
        t_z = (f-t_z) /sc_z**2
        # translation matrix to translate the image
        T_M = np.array([[1, 0, 0, t_x],
                        [0, 1, 0, t_y],
                        [0, 0, 1, t_z],
                        [0, 0, 0,  1]])

        # calculate cos and sin of angles
        sin_rx, cos_rx = np.sin(theta_rx), np.cos(theta_rx)
        sin_ry, cos_ry = np.sin(theta_ry), np.cos(theta_ry)
        sin_rz, cos_rz = np.sin(theta_rz), np.cos(theta_rz)
        # get the rotation matrix on x axis
        R_Mx = np.array([[1,      0,       0, 0],
                         [0, cos_rx, -sin_rx, 0],
                         [0, sin_rx,  cos_rx, 0],
                         [0,      0,       0, 1]])
        # get the rotation matrix on y axis
        R_My = np.array([[cos_ry, 0, -sin_ry, 0],
                         [     0, 1,       0, 0],
                         [sin_ry, 0,  cos_ry, 0],
                         [     0, 0,       0, 1]])
        # get the rotation matrix on z axis
        R_Mz = np.array([[cos_rz, -sin_rz, 0, 0],
                         [sin_rz,  cos_rz, 0, 0],
                         [     0,       0, 1, 0],
                         [     0,       0, 0, 1]])
        # compute the full rotation matrix
        R_M = np.dot(np.dot(R_Mx, R_My), R_Mz)

        # get the scaling matrix
        Sc_M = np.array([[sc_x,     0,    0, 0],
                         [   0,  sc_y,    0, 0],
                         [   0,     0, sc_z, 0],
                         [   0,     0,    0, 1]])

        # get the tan of angles
        tan_shx = np.tan(theta_shx)
        tan_shy = np.tan(theta_shy)
        tan_shz = np.tan(theta_shz)
        # get the shearing matrix on x axis
        Sh_Mx = np.array([[      1, 0, 0, 0],
                          [tan_shy, 1, 0, 0],
                          [tan_shz, 0, 1, 0],
                          [      0, 0, 0, 1]])
        # get the shearing matrix on y axis
        Sh_My = np.array([[1, tan_shx, 0, 0],
                          [0,       1, 0, 0],
                          [0, tan_shz, 1, 0],
                          [0,       0, 0, 1]])
        # get the shearing matrix on z axis
        Sh_Mz = np.array([[1, 0, tan_shx, 0],
                          [0, 1, tan_shy, 0],
                          [0, 0,       1, 0],
                          [0, 0,       0, 1]])
        # compute the full shearing matrix
        Sh_M = np.dot(np.dot(Sh_Mx, Sh_My), Sh_Mz)

        Identity = np.array([[1, 0, 0, 0],
                             [0, 1, 0, 0],
                             [0, 0, 1, 0],
                             [0, 0, 0, 1]])

        # compute the full transform matrix
        M = Identity
        M = np.dot(Sh_M, M)
        M = np.dot(R_M,  M)
        M = np.dot(Sc_M, M)
        M = np.dot(T_M,  M)
        M = np.dot(Hp_M, np.dot(M, H_M))
        # apply the transformation
        X = cv2.warpPerspective(X, M, (w, h))
        Y = cv2.warpPerspective(Y, M, (w, h))
        returnX, Y
剪下
在整个输入上用0替换进行抠图并同时裁剪目标
抠图非常直观。它涉及随机删除输入图像的区域。它的工作方式与我们之前提到的裁剪相同。但是,我们不删除相关区域。因此,我们可以再次允许用户提供每个比例的要删除区域的最小和最大大小,最大区域数,以同时或不同时从目标剪切区域,我们可以剪切每个通道,还选择已删除区域的默认替换值。
输入剪切通道替换为1,不裁剪目标
classCutout(object):
    def__init__(self,
                 min_size_ratio,
                 max_size_ratio,
                 channel_wise=False,
                 crop_target=True,
                 max_crop=10,
                 replacement=0):
        self.min_size_ratio = np.array(list(min_size_ratio))
        self.max_size_ratio = np.array(list(max_size_ratio))
        self.channel_wise = channel_wise
        self.crop_target = crop_target
        self.max_crop = max_crop
        self.replacement = replacement

    def__call__(self, X, Y):
        size = np.array(X.shape[:2])
        mini = self.min_size_ratio*size
        maxi = self.max_size_ratio*size
        for_inrange(self.max_crop):
            # random size
            h = np.random.randint(mini[0], maxi[0])
            w = np.random.randint(mini[1], maxi[1])
            # random place
            shift_h = np.random.randint(0, size[0] -h)
            shift_w = np.random.randint(0, size[1] -w)
            ifself.channel_wise:
                c = np.random.randint(0, X.shape[-1])
                X[shift_h:shift_h+h, shift_w:shift_w+w, c] = self.replacement
                ifself.crop_target:
                    Y[shift_h:shift_h+h, shift_w:shift_w+w] = self.replacement
            else:
                X[shift_h:shift_h+h, shift_w:shift_w+w] = self.replacement
                ifself.crop_target:
                    Y[shift_h:shift_h+h, shift_w:shift_w+w] = self.replacement
        returnX, Y
色彩空间

现在,我们进入最有趣的部分。也是很少考虑的部分。如果我们知道色彩空间,则可以利用它们的属性来增广图像。举一个简单的例子,借助HSV颜色空间,我们可以很容易地提取树叶的颜色,并根据我们的意愿随机更改其颜色。那是一件很酷的事情!并且我们可以了解自己的图像增广功能的原理。当然,这需要更多的创造力。因此,重要的是要了解我们的色彩空间,以充分利用它们。特别是因为它们对于我们(深度)机器学习模型的预处理至关重要。
classLeaf(object):
    def__init__(self):
        pass
    def__call__(self, X, Y):
        blur = cv2.GaussianBlur(X, (7, 7), 0)
        hsv_blur = cv2.cvtColor(blur, cv2.COLOR_BGR2HSV)
        # lower mask (0-10)
        lower_red = np.array([0,130,130])
        upper_red = np.array([20,255,255])
        mask_0 = cv2.inRange(hsv_blur, lower_red, upper_red)

        # upper mask (170-180)
        lower_red = np.array([165,130,130])
        upper_red = np.array([185,255,255])
        mask_1 = cv2.inRange(hsv_blur, lower_red, upper_red)
        hsv_blur[np.where(mask_1)] = hsv_blur[np.where(mask_1)] -np.array([165, 0, 0])

        mask = mask_0+mask_1
        # change color
        turn_color = np.random.randint(0, 255)
        hsv_blur[np.where(mask)] = hsv_blur[np.where(mask)] +np.array([turn_color, 0, 0])
        X_blur = cv2.cvtColor(hsv_blur, cv2.COLOR_HSV2BGR)
        X[np.where(mask)] = X_blur[np.where(mask)]
        returnX, Y
亮度
亮度从-100到100
图像增广的一个伟大经典就是能够改变亮度。有几种方法可以做到这一点,最简单的就是简单地添加一个随机偏差。
classBrightness(object):
    def__init__(self, range_brightness=(-50, 50)):
        self.range_brightness = range_brightness

    def__call__(self, X, Y):
        brightness = np.random.randint(*self.range_brightness)
        X = X+brightness
        returnX, Y
对比度

对比度从-100到100
同样,使用对比非常简单。这也可以通过随机数完成。
classContrast(object):
    def__init__(self, range_contrast=(-50, 50)):
        self.range_contrast = range_contrast

    def__call__(self, X, Y):
        contrast = np.random.randint(*self.range_contrast)
        X = X* (contrast/127+1) -contrast
        returnX, Y
噪声注入
最后一种相当常见的图像增广技术是噪声注入。实际上,我们只添加与输入大小相同的矩阵。该矩阵由遵循随机分布的元素组成。可以从任何随机分布中进行噪声注入。实际上,我们只看到其中两个。但是随时可以进一步😃
一般方法

classUniformNoise(object):
    def__init__(self, low=-50, high=50):
        self.low = low
        self.high = high

    def__call__(self, X, Y):
        noise = np.random.uniform(self.low, self.high, X.shape)
        X = X+noise
        returnX, Y
高斯方法
classGaussianNoise(object):
    def__init__(self, center=0, std=50):
        self.center = center
        self.std = std

    def__call__(self, X, Y):
        noise = np.random.normal(self.center, self.std, X.shape)
        X = X+noise
        returnX, Y
渐晕
最后,更少使用但并非没有用的一种方法。有些相机会产生渐晕效果。考虑如何通过随机模仿这种现象来增广图像也很有趣。我们还将尝试为用户提供灵活性。我们将能够确定距离效果和可以随机开始的最小距离,确定其强度,甚至可以确定效果是朝着黑色还是向白色方向发展。
classVignetting(object):
    def__init__(self,
                 ratio_min_dist=0.2,
                 range_vignette=(0.2, 0.8),
                 random_sign=False):
        self.ratio_min_dist = ratio_min_dist
        self.range_vignette = np.array(range_vignette)
        self.random_sign = random_sign

    def__call__(self, X, Y):
        h, w = X.shape[:2]
        min_dist = np.array([h, w]) /2*np.random.random() *self.ratio_min_dist

        # create matrix of distance from the center on the two axis
        x, y = np.meshgrid(np.linspace(-w/2, w/2, w), np.linspace(-h/2, h/2, h))
        x, y = np.abs(x), np.abs(y)

        # create the vignette mask on the two axis
        x = (x-min_dist[0]) / (np.max(x) -min_dist[0])
        x = np.clip(x, 0, 1)
        y = (y-min_dist[1]) / (np.max(y) -min_dist[1])
        y = np.clip(y, 0, 1)

        # then get a random intensity of the vignette
        vignette = (x+y) /2*np.random.uniform(*self.range_vignette)
        vignette = np.tile(vignette[..., None], [1, 1, 3])

        sign = 2* (np.random.random() <0.5) * (self.random_sign) -1
        X = X* (1+sign*vignette)

        returnX, Y
镜头变形
最后,这是一种非常好的方法。我很惊讶它不经常被使用。但是它可以模仿相机镜头的失真。就像透过圆形玻璃看。在我们看来,由于透镜(玻璃)是圆形的,因此失真了。因此,如果我们的图像是从带镜头的相机拍摄的,为什么不模拟它们。默认情况下,应将其用于图像。至少我是这样认为的。
因此,我建议在最后一个函数中,通过播放径向系数k1,k2,k3和切向系数p1,p2,可以随机模拟我们的镜头失真。在该方法中,系数的顺序如下:k1,k2,p1,p2,k3。
classLensDistortion(object):
    def__init__(self, d_coef=(0.15, 0.15, 0.1, 0.1, 0.05)):
        self.d_coef = np.array(d_coef)

    def__call__(self, X, Y):

        # get the height and the width of the image
        h, w = X.shape[:2]

        # compute its diagonal
        f = (h**2+w**2) **0.5

        # set the image projective to carrtesian dimension
        K = np.array([[f, 0, w/2],
                      [0, f, h/2],
                      [0, 0,     1]])

        d_coef = self.d_coef*np.random.random(5) # value
        d_coef = d_coef* (2* (np.random.random(5) <0.5) -1) # sign
        # Generate new camera matrix from parameters
        M, _ = cv2.getOptimalNewCameraMatrix(K, d_coef, (w, h), 0)

        # Generate look-up tables for remapping the camera image
        remap = cv2.initUndistortRectifyMap(K, d_coef, None, M, (w, h), 5)

        # Remap the original image to a new image
        X = cv2.remap(X, *remap, cv2.INTER_LINEAR)
        Y = cv2.remap(Y, *remap, cv2.INTER_LINEAR)
        returnX, Y
希望对您有用!请随时关注我或就您喜欢或不喜欢的内容给我反馈。✏️待会儿见!😘
资料来源
特别感谢Elise授权使用此图片👋
作者:Axel Thevenot
deephub翻译组:孟翔杰
DeepHub
微信号 : deephub-imba
每日大数据和人工智能的重磅干货
大厂职位内推信息
长按识别二维码关注 ->
喜欢就请三连暴击!********** **********