选择适合电脑系统的 Postman 软件版本,因为我是 Windows 64位 系统,所以我选择 Windows 64位 版本的 Postman 。选择完版本后,点击下载。

二、安装Postman
下载完成后,双击exe程序,Postman 会自动安装,安装完注册登录。

三、创建新的Request
进入 Postman 主界面,点击 Start something new 里的 Create a request,创建一个 request 类型的接口测试项目。

四、填写参数测试
以模拟 GET请求 为例,选择请求方式为 GET ,然后输入接口的访问地址(接口访问需保证调试的接口项目正在本地运行),Params里写入要传递的参数,点击 Send 按钮发送。

Postman 提供两种参数的写入方式,一种是 <Key,Value>键值对 ,另一种是 Bulk包体传输,我们可以点击界面右方的 Bulk Edit 切换这两种写入方式。

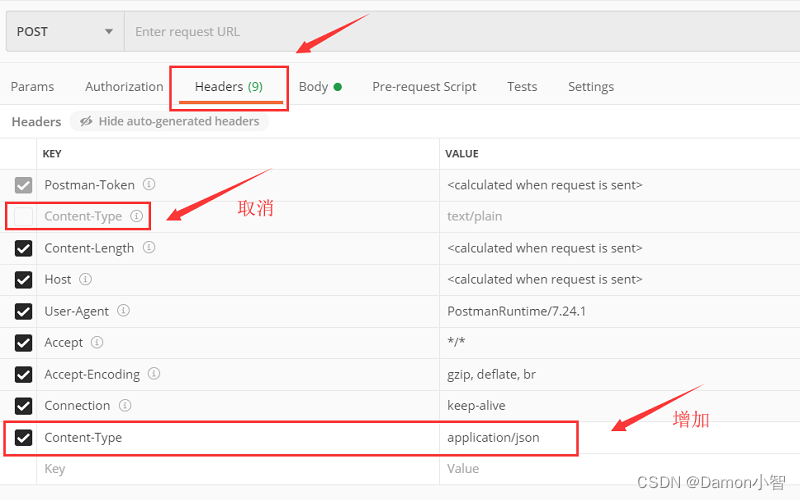
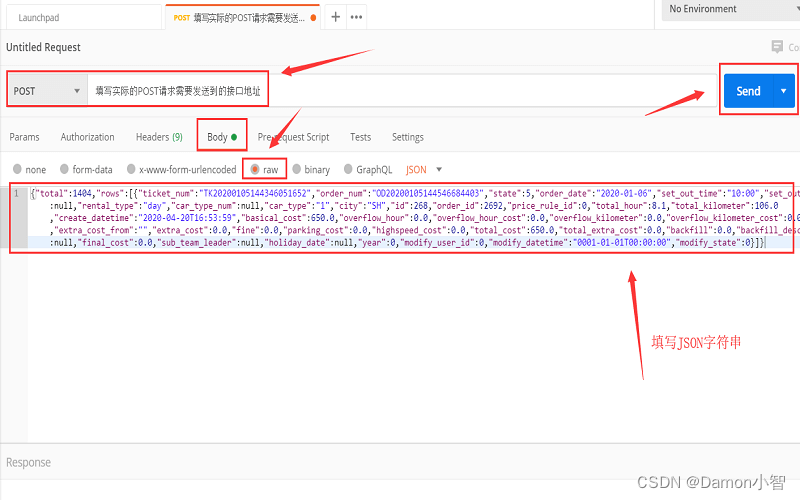
再以 POST请求 为例,我们传递一段 JSON 字符串,选择 POST 为请求方式,编辑 Header(请求头)中的 Content-Type 为 application/json,在 Body里填入Json字符串,选择 raw(纯文本)格式发送,点击Send。

五、查看返回结果

若接口正常则会返回相应的值,我的返回值是:
{"status":1,"msg":"update_success"}
这个返回值表示我的接口运行正常。
六、实例演示
下面用Java实现了一个简单的接口,通过post请求可以向接口发送一个字符串,接口返回Hello+字符串的组合。
1、创建接口
ExampleController.java
import org.springframework.web.bind.annotation.PostMapping;
import org.springframework.web.bind.annotation.RequestBody;
import org.springframework.web.bind.annotation.RestController;

@RestController
public class ExampleController {

    @PostMapping("/example")
    public ExampleResponse example(@RequestBody ExampleRequest request) {
        // 在这里处理请求,并返回相应的响应对象
        ExampleResponse response = new ExampleResponse();
        response.setMessage("Hello, " + request.getName() + "!");
        return response;
    }
}
ExampleRequest.java
public class ExampleRequest {
    private String name;

    // 省略构造函数和getter/setter方法

    public String getName() {
        return name;
    }

    public void setName(String name) {
        this.name = name;
    }
}
ExampleResponse.java
public class ExampleResponse {
    private String message;

    // 省略构造函数和getter/setter方法

    public String getMessage() {
        return message;
    }

    public void setMessage(String message) {
        this.message = message;
    }
}
2、postman创建请求
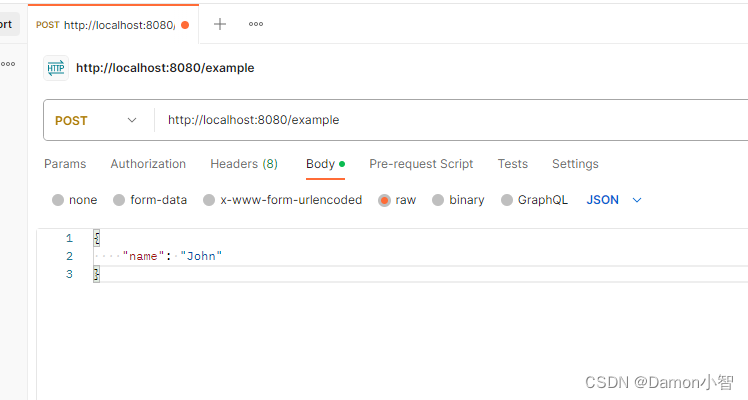
我们勾选啊Post请求,输入请求url:http://localhost:8080/example;
参数在Body里输入,选择raw格式的json:
{
    "name": "John"
}

3、发送请求查看结果
版权归原作者 2401_87378238 所有, 如有侵权,请联系我们删除。