
上篇文章我们已经介绍了Hugging Face的主要类,在本文中将介绍如何使用Hugging Face进行BERT的微调进行评论的分类。其中包含:AutoTokenizer、AutoModel、Trainer、TensorBoard、数据集和指标的使用方法。
在本文中,我们将只关注训练和测试拆分。每个数据集都由一个文本特征(评论的文本)和一个标签特征(表示评论的好坏)组成。
from datasets import load_dataset, load_metric

task = "imdb"

dataset = load_dataset(task)

print(dataset)
"""
DatasetDict({
    train: Dataset({
        features: ['text', 'label'],
        num_rows: 25000
    })
    test: Dataset({
        features: ['text', 'label'],
        num_rows: 25000
    })
    unsupervised: Dataset({
        features: ['text', 'label'],
        num_rows: 50000
    })
})
"""
IMDb数据集的通用基准指标是准确率,所以这里使用 datasets 库的 load_metric 函数来加载 metric 脚本,稍后可以与 compute 方法一起使用。
metric = load_metric("accuracy")

metric.compute(predictions=[0,0,1,1], references=[0,1,1,1])
# {'accuracy': 0.75}
下载的数据集有训练和测试拆分,但我们还需要拆分出验证集来判断模型在训练期间表现以避免过拟合。
使用train_test_split 应用于 test_size = 0.3 进行拆分:这会产生一个包含 70% 原始样本的新训练集和一个包含 30% 原始样本的验证集。
splitted_datasets = dataset["train"].train_test_split(test_size=0.3)
print(splitted_datasets)
"""
DatasetDict({
    train: Dataset({
        features: ['text', 'label'],
        num_rows: 17500
    })
    test: Dataset({
        features: ['text', 'label'],
        num_rows: 7500
    })
})
"""
接下来使用 Hugging Face的AutoTokenizer 类加载 BERT Tokenizer。
本文实际上加载 DistilBERT 作为 快速替代方案,如果需要加载 BERT,代码基本是相同的(即将 distilbert-base-uncased 替换为 Bert-base-uncased)。DistilBERT 是一种小型、快速、廉价和轻量级的 Transformer 模型,通过蒸馏 BERT 基础进行训练。根据 GLUE 语言理解基准测试,它的参数比 Bert-base-uncased 少 40%,运行速度提高 60%,同时保持 BERT 95% 以上的性能。
from transformers import AutoTokenizer

model_checkpoint = "distilbert-base-uncased"

# use_fast: Whether or not to try to load the fast version of the tokenizer.
# Most of the tokenizers are available in two flavors: a full python
# implementation and a “Fast” implementation based on the Rust library 🤗 Tokenizers.
# The “Fast” implementations allows a significant speed-up in particular
# when doing batched tokenization, and additional methods to map between the
# original string (character and words) and the token space.
tokenizer = AutoTokenizer.from_pretrained(model_checkpoint, use_fast=True)

tokenizer(["Hello, this one sentence!"])
# {'input_ids': [[101, 7592, 1010, 2023, 2028, 6251, 999, 102]], 'attention_mask':
# [[1, 1, 1, 1, 1, 1, 1, 1]]}
# input_ids: the tokenizer vocabulary indexes of the tokenized input sentence
# attention_mask: 0 if the corresponding input_id is padding, 1 otherwise
tokenizer输出为:
 input_ids:分词输入句子的分词器词汇索引。
 attention_mask:一个由 1 和 0 组成的数组,其中 0 表示发生填充的位置。
input_ids 和 attention_mask 都将被输入 DistilBERT 模型中。
def preprocess_function_batch(examples):
    # truncation=True: truncate to the maximum acceptable input length for
    # the model.
    return tokenizer(examples["text"], truncation=True)

# batched=True: use this if you have a mapped function which can efficiently
# handle batches of inputs like the tokenizer
splitted_datasets_encoded = splitted_datasets.map(preprocess_function_batch, batched=True)
"""
DatasetDict({
    train: Dataset({
        features: ['text', 'label', 'input_ids', 'attention_mask'],
        num_rows: 17500
    })
    test: Dataset({
        features: ['text', 'label', 'input_ids', 'attention_mask'],
        num_rows: 7500
    })
})
"""
现在可以使用 AutoModelForSequenceClassification 类及其 from_pretrained 方法加载预训练的 BERT。这里要使用num_label = 2 参数,因为现在需要在是二进制分类任务上微调 BERT,我们将重新生成的head部分,用一个随机初始化的带有两个标签的分类头替换原始层(其权重将在训练期间学习) .
from transformers import TrainingArguments, Trainer
from transformers import AutoModelForSequenceClassification

# num_labels: number of labels to use in the last layer added to the model,
# typically for a classification task.

# The AutoModelForSequenceClassification class loads the
# DistilBertForSequenceClassification class as underlying model. Since
# AutoModelForSequenceClassification doesn't accept the parameter 'num_labels',
# it is passed to the underlying class DistilBertForSequenceClassification, which
# accepts it.

model = AutoModelForSequenceClassification.from_pretrained(model_checkpoint, num_labels=2)

# This will issue a warning about some of the pretrained weights not being used
# and some weights being randomly initialized. That’s because we are throwing
# away the pretraining head of the BERT model to replace it with a classification
# head which is randomly initialized. We will fine-tune this model on our task,
# transferring the knowledge of the pretrained model to it (which is why doing
# this is called transfer learning).
在编写训练代码之前,需要启动 TensorBoard,这样可以获得模型的实时训练信息。这里显示的代码适用于 Google Colab,其中已经安装了 TensorBoard,并且 Jupyter 魔术命令允许直接从 Notebook 单元显示 TensorBoard 前端。
启动 TensorBoard 时,logdir 参数应该代表 Hugging Face 写入模型训练日志的目录。
model_output_dir = f"{model_checkpoint}-finetuned-{task}"
print(model_output_dir) # distilbert-base-uncased-finetuned-imdb

# Start TensorBoard before training to monitor it in progress
%load_ext tensorboard
%tensorboard --logdir '{model_output_dir}'/runs
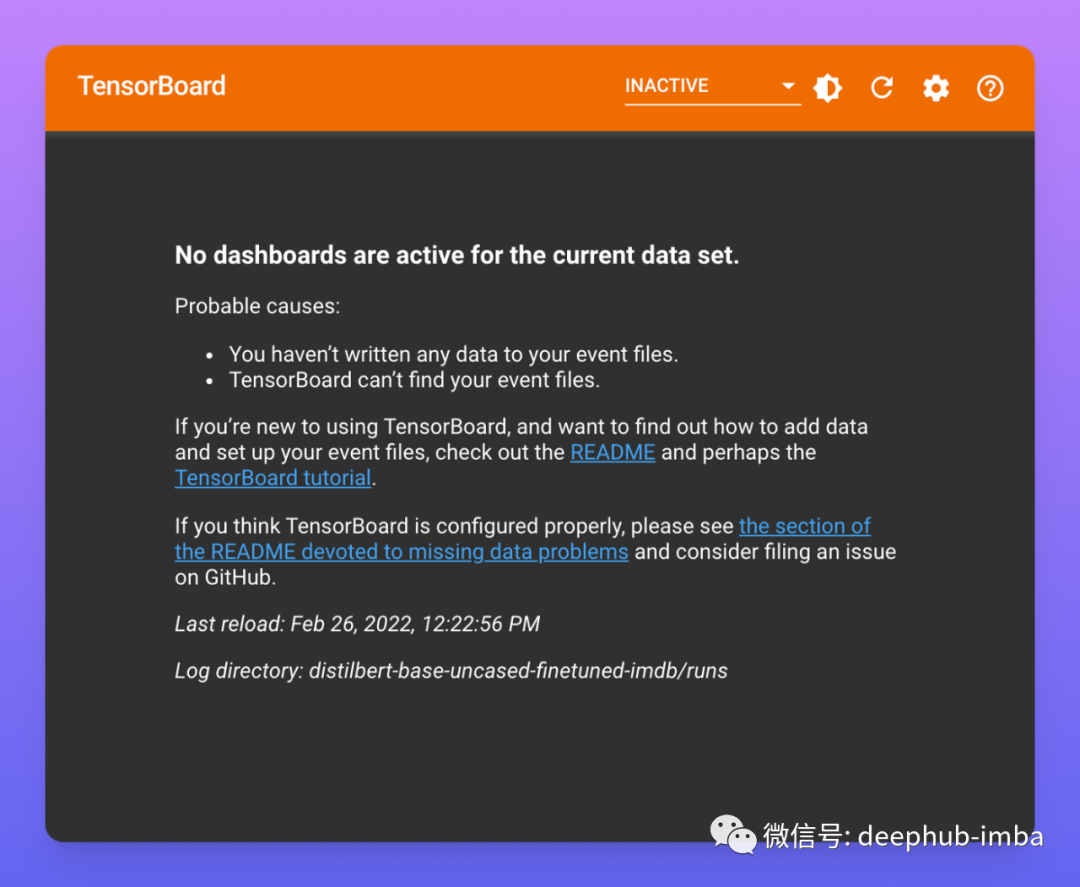
启动时,TensorBoard 面板将显示当前没有可用的仪表板。如果在模型训练期间刷新此页面则会查看到一些实时的数据。
接下来是配置一些训练参数。代码片段中已经为每个参数添加说明。
- output_dir 存储最终模型的位置。
- evaluation_strategy和eval_steps每50个训练step在验证集上验证训练模型。
- logging_strategy 和 logging_steps 每 50 个训练step保存日志(将由 TensorBoard 可视化)。
- save_strategy 和 save_steps 表示每 200 个训练step保存训练模型。
- learning_rate 学习率。per_device_train_batch_size 和 per_device_eval_batch_size 分别表示在训练和验证期间使用的批大小。
- num_train_epochs表示训练的轮次数。
- load_best_model_at_end 表示在测试集上计算使用性能最好的模型(用 metric_for_best_model 指定)的模型。
- report_to 将所有训练和验证的数据报告给 TensorBoard。
args = TrainingArguments(
    # output_dir: directory where the model checkpoints will be saved.
    output_dir=model_output_dir,
    # evaluation_strategy (default "no"):
    # Possible values are:
    # "no": No evaluation is done during training.
    # "steps": Evaluation is done (and logged) every eval_steps.
    # "epoch": Evaluation is done at the end of each epoch.
    evaluation_strategy="steps",
    # eval_steps: Number of update steps between two evaluations if
    # evaluation_strategy="steps". Will default to the same value as
    # logging_steps if not set.
    eval_steps=50,
    # logging_strategy (default: "steps"): The logging strategy to adopt during
    # training (used to log training loss for example). Possible values are:
    # "no": No logging is done during training.
    # "epoch": Logging is done at the end of each epoch.
    # "steps": Logging is done every logging_steps.
    logging_strategy="steps",
    # logging_steps (default 500): Number of update steps between two logs if
    # logging_strategy="steps".
    logging_steps=50,
    # save_strategy (default "steps"):
    # The checkpoint save strategy to adopt during training. Possible values are:
    # "no": No save is done during training.
    # "epoch": Save is done at the end of each epoch.
    # "steps": Save is done every save_steps (default 500).
    save_strategy="steps",
    # save_steps (default: 500): Number of updates steps before two checkpoint
    # saves if save_strategy="steps".
    save_steps=200,
    # learning_rate (default 5e-5): The initial learning rate for AdamW optimizer.
    # Adam algorithm with weight decay fix as introduced in the paper
    # Decoupled Weight Decay Regularization.
    learning_rate=2e-5,
    # per_device_train_batch_size: The batch size per GPU/TPU core/CPU for training.
    per_device_train_batch_size=16,
    # per_device_eval_batch_size: The batch size per GPU/TPU core/CPU for evaluation.
    per_device_eval_batch_size=16,
    # num_train_epochs (default 3.0): Total number of training epochs to perform
    # (if not an integer, will perform the decimal part percents of the last epoch
    # before stopping training).
    num_train_epochs=1,
    # load_best_model_at_end (default False): Whether or not to load the best model
    # found during training at the end of training.
    load_best_model_at_end=True,
    # metric_for_best_model:
    # Use in conjunction with load_best_model_at_end to specify the metric to use
    # to compare two different models. Must be the name of a metric returned by
    # the evaluation with or without the prefix "eval_".
    metric_for_best_model="accuracy",
    # report_to:
    # The list of integrations to report the results and logs to. Supported
    # platforms are "azure_ml", "comet_ml", "mlflow", "tensorboard" and "wandb".
    # Use "all" to report to all integrations installed, "none" for no integrations.
    report_to="tensorboard"
)
然后需要将这些训练参数传递给 Trainer 对象, Trainer 对象被实例化就可以使用 train 方法开始训练。
# Function that returns an untrained model to be trained
def model_init():
    return AutoModelForSequenceClassification.from_pretrained(model_checkpoint,
                                                              num_labels=2)

# Function that will be called at the end of each evaluation phase on the whole
# arrays of predictions/labels to produce metrics.
def compute_metrics(eval_pred):
    # Predictions and labels are grouped in a namedtuple called EvalPrediction
    predictions, labels = eval_pred
    # Get the index with the highest prediction score (i.e. the predicted labels)
    predictions = np.argmax(predictions, axis=1)
    # Compare the predicted labels with the reference labels
    results =  metric.compute(predictions=predictions, references=labels)
    # results: a dictionary with string keys (the name of the metric) and float
    # values (i.e. the metric values)
    return results

# Since PyTorch does not provide a training loop, the 🤗 Transformers library
# provides a Trainer API that is optimized for 🤗 Transformers models, with a
# wide range of training options and with built-in features like logging,
# gradient accumulation, and mixed precision.
trainer = Trainer(
    # Function that returns the model to train. It's useful to use a function
    # instead of directly the model to make sure that we are always training
    # an untrained model from scratch.
    model_init=model_init,
    # The training arguments.
    args=args,
    # The training dataset.
    train_dataset=splitted_datasets_encoded["train"],
    # The evaluation dataset. We use a small subset of the validation set
    # composed of 150 samples to speed up computations...
    eval_dataset=splitted_datasets_encoded["test"].shuffle(42).select(range(150)),
    # Even though the training set and evaluation set are already tokenized, the
    # tokenizer is needed to pad the "input_ids" and "attention_mask" tensors
    # to the length managed by the model. It does so one batch at a time, to
    # use less memory as possible.
    tokenizer=tokenizer,
    # Function that will be called at the end of each evaluation phase on the whole
    # arrays of predictions/labels to produce metrics.
    compute_metrics=compute_metrics
)

# ... train the model!
trainer.train()
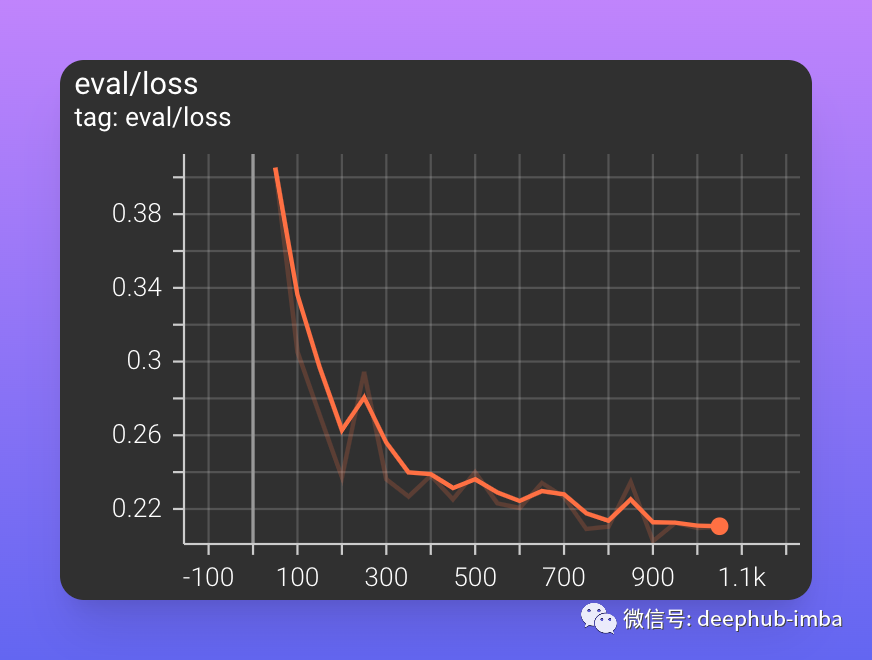
在训练过程中,可以刷新 TensorBoard 来查看训练指标的更新。在本文中,只看到训练集上的损失、验证集上的损失和验证集上的准确率。
训练集上的损失在第一个训练步骤期间迅速减少。训练结束时损失约为 0.23。

验证集上的损失几乎相同。在训练结束时损失在 0.21 左右,低于训练集上的损失,表明可以在不过度拟合的情况下进行进一步的训练。
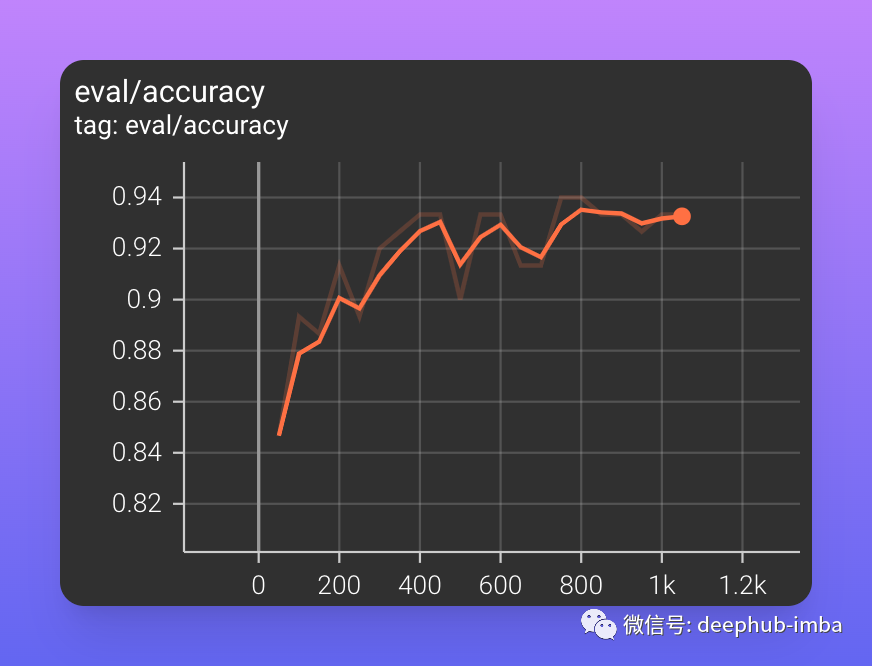
验证集的准确率迅速接近 90%,并且在训练结束时仍在增加,达到约 93% 的值。
最后使用经过最佳训练的模型对测试集进行预测并计算其准确性。可以使用 Trainer 对象的 predict 方法生成预测。
 Tokenize test set
dataset_test_encoded = dataset["test"].map(preprocess_function_batch, batched=True)
# Use the model to get predictions
test_predictions = trainer.predict(dataset_test_encoded)
# For each prediction, create the label with argmax
test_predictions_argmax = np.argmax(test_predictions[0], axis=1)
# Retrieve reference labels from test set
test_references = np.array(dataset["test"]["label"])
# Compute accuracy
metric.compute(predictions=test_predictions_argmax, references=test_references)
# {'accuracy': 0.91888}
获得了大约 91.9% 的准确率。它与其他模型相比如何?
看看检查一下 IMDb 数据集上的PaperWithCode排行榜的论文。可以看到最佳准确率从 2015 年的 92.3% 到 2019 年的 97.4% 不等。看起来 IMDb 数据集上的表现已经基本上不会再有什么提高了,因为进一步的改进不会那么重要,而类似 BERT 的模型已经能够达到95%以上的准确率。
那么下一步要干什么?
- 使用 Trainer 对象调整超参数。
- 微调 更好的模型例如RoBERTa,Bigbird等。
- 使用其他的方式进行训练,例如半监督等。
最后总结,在本文中我们拆分训练数据以创建验证集加载并测试 BERT Tokenizer和 BERT 预训练模型。准备好训练数据和参数后使用 Trainer 类对 BERT 进行微调训练。然后再 TensorBoard 上的记录了训练日志,计算了测试集的最终准确度,并将其与最先进的结果进行了比较。这就是使用Hugging Face库进行NLP的一般性的步骤。
作者:Fabio Chiusano