系列文章目录
文章目录
一、虚拟 DOM - diff 算法概述
diff 算法参考链接
- diff 算法是 vdom 中最核心、最关键的部分
- diff 算法能在日常使用 vue react 中体现出来(如 key)
diff 算法概述:
- diff 即对比,是一个广泛的概念,如 linux diff 命令,git diff 命令
- 两个 js 对象也可以做 diff
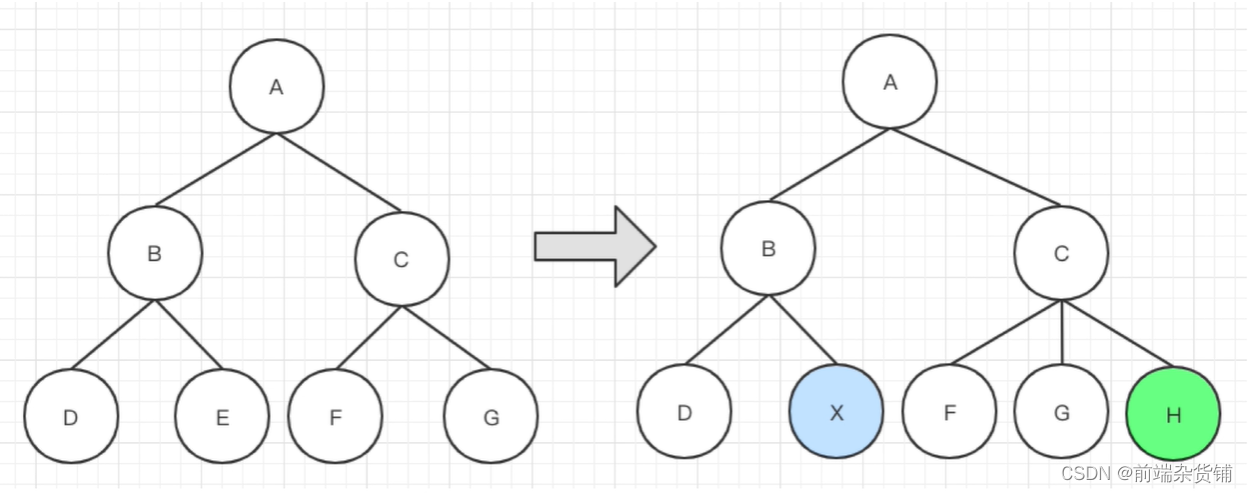
- 两棵树做 diff,如这里的 vdom diff
出处:https://coding.imooc.com/lesson/419.html#mid=33875

树 diff 的时间复杂度 O(n^3)
- 第一,遍历 tree1
- 第二,遍历 tree2
- 第三,排序
- 100个节点,要计算100万次,算法不可用
优化时间复杂度到O(n)
- 只比较同一层级,不跨级比较
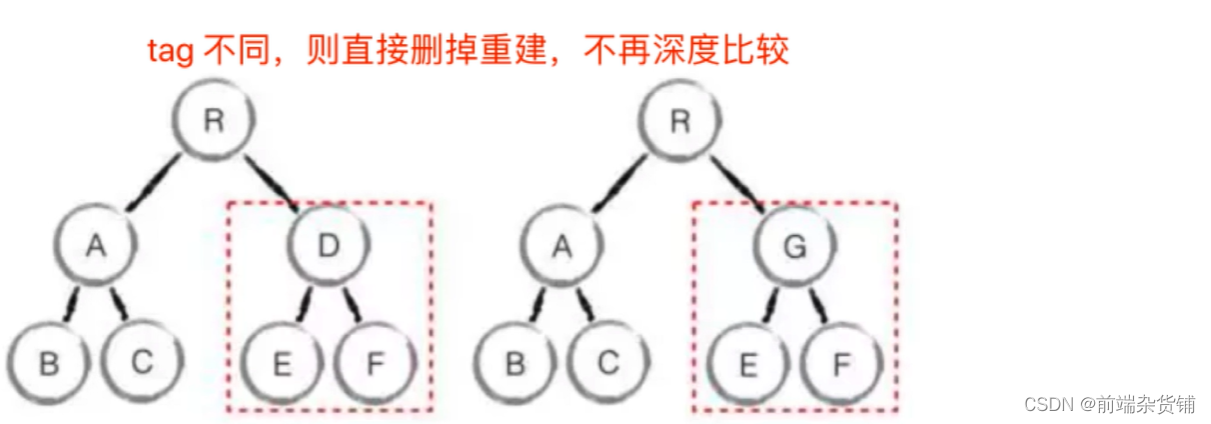
- tag 不相同,则直接删掉重建,不再深度比较
- tag 和 key,两者都相同,则认为是相同节点,不再深度比较
出处:https://coding.imooc.com/lesson/419.html#mid=33875
二、模板编译
1、模板编译 - with 语法
- 模板是 vue 开发中最常用的部分,即与使用相关联的原理
- 它不是 html,有指令、插值、JS表达式,到底是什么?
模板编译:
- 前置知识:JS 的 with 语法
- vue template complier 将模板编译为 render 函数
- 执行 render 函数生成 vnode
with 语法:
- 改变 {} 内自由变量的查找规则,当作 obj 属性来查找
- 如果找不到匹配的 obj 属性,就会报错
- with 要慎用,它打破了作用域规则,易读性差
示例:不使用 with,对象里没有定义的属性为 undefined
const obj ={a:100,b:200}

console.log(obj.a)// 100
console.log(obj.b)// 200
console.log(obj.c)// undefined
使用 with,对象里没有定义的属性会报错
const obj ={a:100,b:200}// 使用 with,能改变 {} 内自由变量的查找方式// 将 {} 内自由变量,当作 obj 的属性来查找with(obj){
    console.log(a)// 100
    console.log(b)// 200
    console.log(c)// Uncaught ReferenceError: c is not defined}
2、vue模板被编译成什么
模板编译:
- 模板不是 html,有指令、插值、JS 表达式,能实现判断、循环
- html 是标签语言,只有 JS 才能实现判断、循环
- 因此,模板一定是转换为某种 JS 代码,即模板编译
示例:
(1)安装 vue-template-compiler
npm i vue-template-compiler --save
(2)创建 index.js 文件
const compiler =require('vue-template-compiler')......// 编译const res = compiler.compile(template)
console.log(res.render)
(3)演示(以下演示均在 index.js 文件的 … 中)
插值:
- 打印结果即:创建一个 p 标签,子元素是 TextVNode,为一个字符串
- _c:createElement,创建元素
- _v:createTextVNode,创建文本节点
- _s:toString,转为字符串类型
- this:const vm = new Vue({…}),即 vm 实例
// 插值const template =`<p>{{message}}</p>`// with(this){return _c('p',['p',[_v(_s(message))]])}// h -> vnode// createElement -> vnode
表达式:
- template 里面的表达式就是被当成 JS 代码执行
// 表达式const template =`<p>{{flag ? message : 'no message found'}}</p>`//with(this){return _c('p',[_v(_s(flag ? message : 'no message found'))])}
属性和动态属性:
- container,div1 是静态字符串,所以编译后需要用引号包裹
- imgUrl 是动态属性,是个变量,所以编译后不用引号包裹
// 属性和动态属性const template =`
     <div id="div1" class="container">
         <img :src="imgUrl"/>
     </div>
 `// with(this){return _c('div',//      {staticClass:"container",attrs:{"id":"div1"}},//      [_c('img',{attrs:{"src":imgUrl}})]// )}
条件:
- 转换成一个三元表达式
// 条件const template =`
    <div>
        <p v-if="flag === 'a'">A</p>
        <p v-else>B</p>
    </div>
`// with(this){return _c('div',[(flag === 'a')?_c('p',[_v("A")]):_c('p',[_v("B")])])}
循环:
- _l:renderList,渲染列表
- 第二个 return,返回的第一个参数是 tag,第二个参数是属性,第三个参数是子元素
// 循环const template =`
    <ul>
        <li v-for="item in list" :key="item.id">{{item.title}}</li>
    </ul>
`// with(this){return _c('ul',_l((list),function(item){return _c('li',{key:item.id},[_v(_s(item.title))])}),0)}
事件:
- on 里面是事件,函数的名字是变量,没有引号包裹
// 事件const template =`
    <button @click="clickHandler">submit</button>
`// with(this){return _c('button',{on:{"click":clickHandler}},[_v("submit")])}
v-model:
// v-modelconst template =`<input type="text" v-model="name">`// 主要看 input 事件// with(this){return _c('input',{directives:[{name:"model",rawName:"v-model",value:(name),expression:"name"}],attrs:{"type":"text"},domProps:{"value":(name)},on:{"input":function($event){if($event.target.composing)return;name=$event.target.value}}})}
编译模板:
- 模板编译为 render 函数,执行 render 函数返回 vnode
- 基于 vnode 再执行 patch 和 diff
- 使用 webpack vue-loader,会在开发环境下编译模板
3、vue 组件中使用 render 代替 template
- 有些复杂情况中,不能用 template,可以考虑用 render
- react 一直都用 render(没有模板)
Vue.component('heading',{// template: `xxx`,render:function(createElement){returncreateElement('h'+this.level,[createElement('a',{attrs:{name:'headerId',href:'#'+'headerId'}},'this is a tag')])}})
总结:
- with 语法
- 模板到 render 函数,再到 vnode,再到渲染和更新
- vue 组件可以用 render 代替 template
4、总结组件 渲染/更新 过程
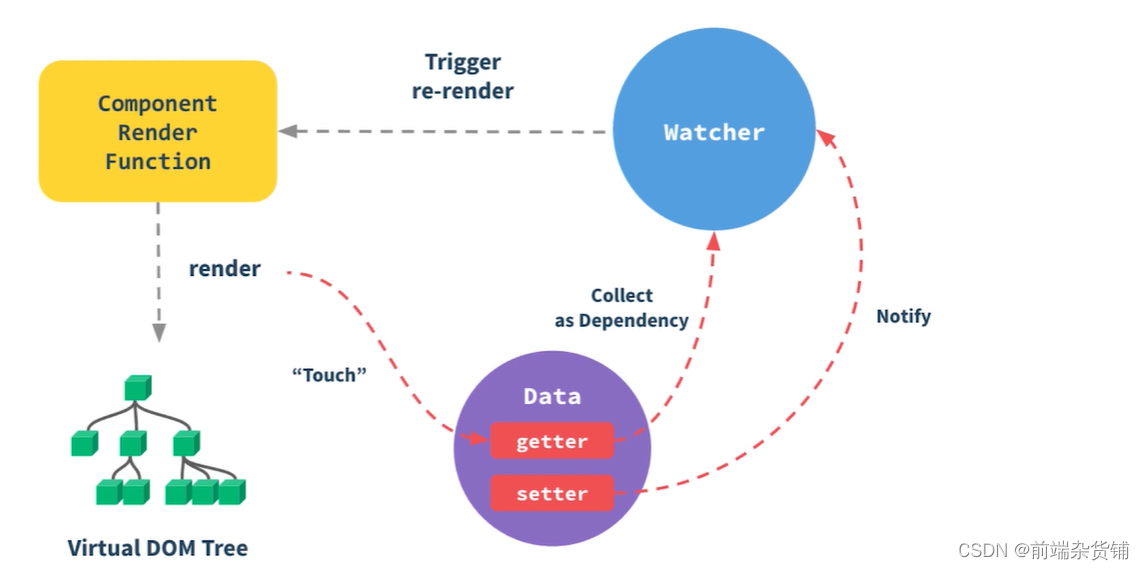
- 一个组件渲染到页面,修改 data 触发更新(数据驱动视图)
- 其背后原理是什么,需要掌握哪些要点?
- 考察对流程了解的全面程度
三大知识点:
- 响应式:监听 data 属性 getter setter
- 模板编译:模板到 render 函数,再到 vnode
- vdom:patch(elem,vnode) 和 patch(vnode, newVnode)
三个过程:
- 初次渲染过程
- 更新过程
- 异步渲染
三、vue组件是如何渲染和更新的
1、初次渲染过程
- 解析模板为 render 函数(或在开发环境已完成,vue-loader)
- 触发响应式,监听 data 属性 getter setter
- 执行 render 函数,生成 vnode,patch(elem, vnode)
2、执行 render 函数会触发 getter
- 模板中使用到的会触发 get
- 模板中没有使用到的不会触发 get,因为和视图没有关系
<p>{{message}}</p>exportdefault{data(){return{message:'杂货铺',// 会触发 getcity:'北京'// 不会触发 get,因为模板没用到,即和视图没关系}}}
3、更新过程
- 修改 data,触发 setter(此前在 getter 中已被监听)
- 重新执行 render 函数,生成 newVnode
- patch(vnode, newVnode)

4、vue组件如何进行异步渲染
- $nextTick 是异步的
- 汇总 data 的修改,一次性更新视图
- 减少 DOM 操作次数,提高性能
四、如何用 JS 实现 hash 路由
- vue-router 的路由模式:hash模式,H5 history
1、网页 url 组成部分
http://127.0.0.1:8881/01-hash.html?a=100&b=20#/aaa/bbb

location.protocol // 'http:' 【协议】
location.hostname // '127.0.0.1' 【IP地址/域名】
location.host // '127.0.0.1:8881' 【IP地址带端口】
location.port // '8881' 【端口】
location.pathname // '/01-hash.html' 【文件路径名】
location.search // '?a=100&b=20' 【参数】
location.hash // '#/aaa/bbb' 【#及后面的部分】
2、hash 的特点
- hash 变化会触发网页跳转,即浏览器的前进、后退
- hash 变化不会刷新页面,SPA 必需的特点
- hash 永远不会提交到 server 端(前端自生自灭)
3、hash 变化示例
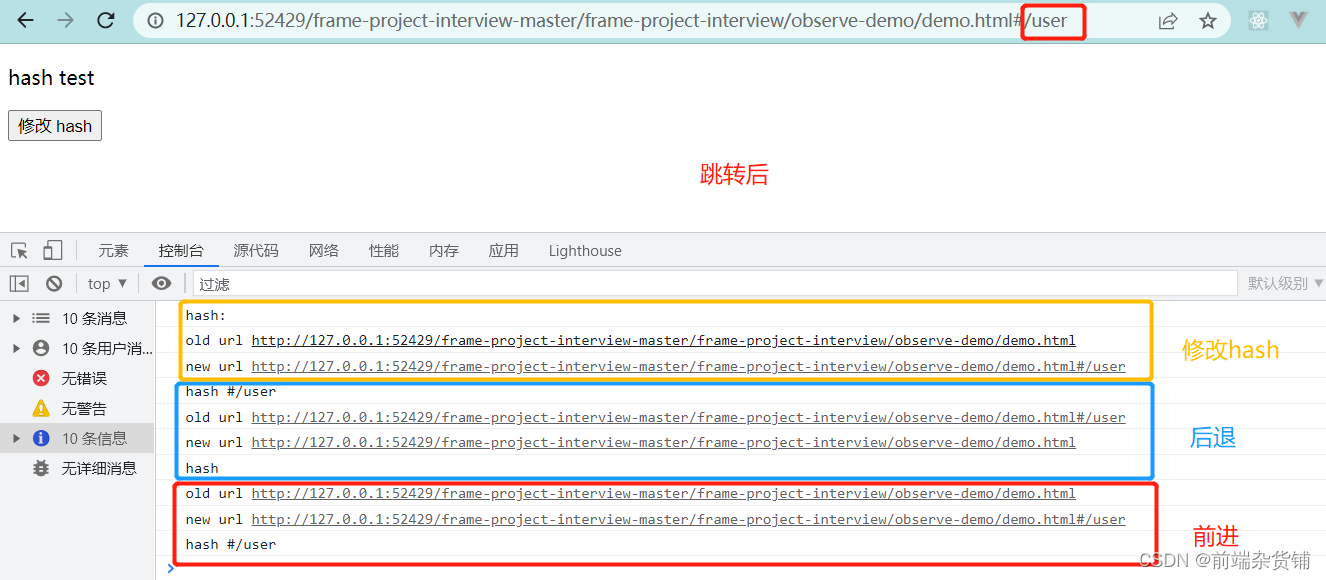
- onhashchange:用来监听 hash 值的变化
- href 属性是一个可读可写的字符串,可设置或返回当前显示的文档的完整 URL
<p>hash test</p><button id="btn1">修改 hash</button>// hash 变化,包括// a. JS 修改 url// b. 手动修改 url 的 hash// c. 浏览器前进、后退
window.onhashchange=(event)=>{
    console.log('old url', event.oldURL)
    console.log('new url', event.newURL)

    console.log('hash', location.hash)}// 页面初次加载,获取 hash
document.addEventListener('DOMContentLoaded',()=>{
    console.log('hash:', location.hash)})// JS 修改 url
document.getElementById('btn1').addEventListener('click',()=>{
    location.href ='#/user'})


五、如何用 JS 实现 H5 history 路由
- 用 url 规范的路由,但跳转时不刷新页面
- history.pushState
- window.onpopstate
1、示例
- history.pushState(state,title,url)
- state:一个与指定网址相关的状态对象,popstate 事件触发时,该对象会传入回调函数。如果不需要这个对象,此处可以填null
- title:新页面的标题,但是所有浏览器目前都忽略这个值,因此这里可以填null
- url:新的网址,必须与当前页面处在同一个域。浏览器的地址栏将显示这个网址
<p>history API test</p><button id="btn1">修改 url</button>// 页面初次加载,获取 path
document.addEventListener('DOMContentLoaded',()=>{
    console.log('load', location.pathname)})// 打开一个新的路由// 【注意】用 pushState 方式,浏览器不会刷新页面
document.getElementById('btn1').addEventListener('click',()=>{const state ={name:'page1'}
    console.log('切换路由到','page1')
    history.pushState(state,'','page1')})// 监听浏览器前进、后退‘
window.onpopstate=(event)=>{
    console.log('onpopstate', event.state, location.pathname)}


2、如何选择
- to B(面向企业或特定用户群体) 的系统推荐用 hash,简单易用,对 url 规范不敏感
- to C(面向个体消费者)的系统,可以考虑选择 H5 history,但需要服务端支持
- 能选择简单的,就不要用复杂的,要考虑成本和利益
不积跬步无以至千里,不积小流无以成江海
点个关注不迷路,持续更新中…
版权归原作者 前端杂货铺 所有, 如有侵权,请联系我们删除。