一、介绍
之前也做了一个selenium搜狗微信爬虫,但是觉得还有很多不足,比如每次搜索都会开关chromedriver,影响效率;没有对验证码进行处理;代码结构存在缺陷。
这次准备对以上的情况进行完善,代码的介绍在这里(AI写的,觉得比我自己写的好)
代码是一个基于 Selenium 的 Python 爬虫程序,用于从搜狗微信中抓取指定关键词的相关文章信息。具体来说,代码主要包含以下部分:
Content类:这个类包含了爬虫的主要逻辑和功能。它的实例包含如下方法:-page_num():获取搜索结果的总页数。-article_num():获取当前页面上的文章数量。-open_and_close():关闭当前的 WebDriver 实例并打开一个新的页面。-error():处理错误,例如需要输入验证码的情况。-manaual_code():手动输入验证码。-cycle_function():爬虫的主循环功能,用于抓取文章信息。-switch_window():在新标签页中打开新页面并关闭旧页面。-code_process():处理验证码图片。-web_spyder():运行爬虫并返回文章信息。create_driver()函数:创建并配置一个 Selenium WebDriver 实例。spyder_result()函数:用于运行爬虫并返回所有关键词的搜索结果。程序首先从 Excel 文件中读取关键词列表,然后对每个关键词进行搜索,抓取相关文章信息,并将结果存储在一个列表中,最后将爬取的结果再写入excel文件。
这段代码的主要目的是从搜索引擎中抓取与指定关键词相关的文章信息,并处理可能出现的验证码。通过使用 Selenium WebDriver,程序可以模拟用户在浏览器中的操作,从而实现对动态网页的抓取。
二、代码
代码由5个文件组成,分别为:
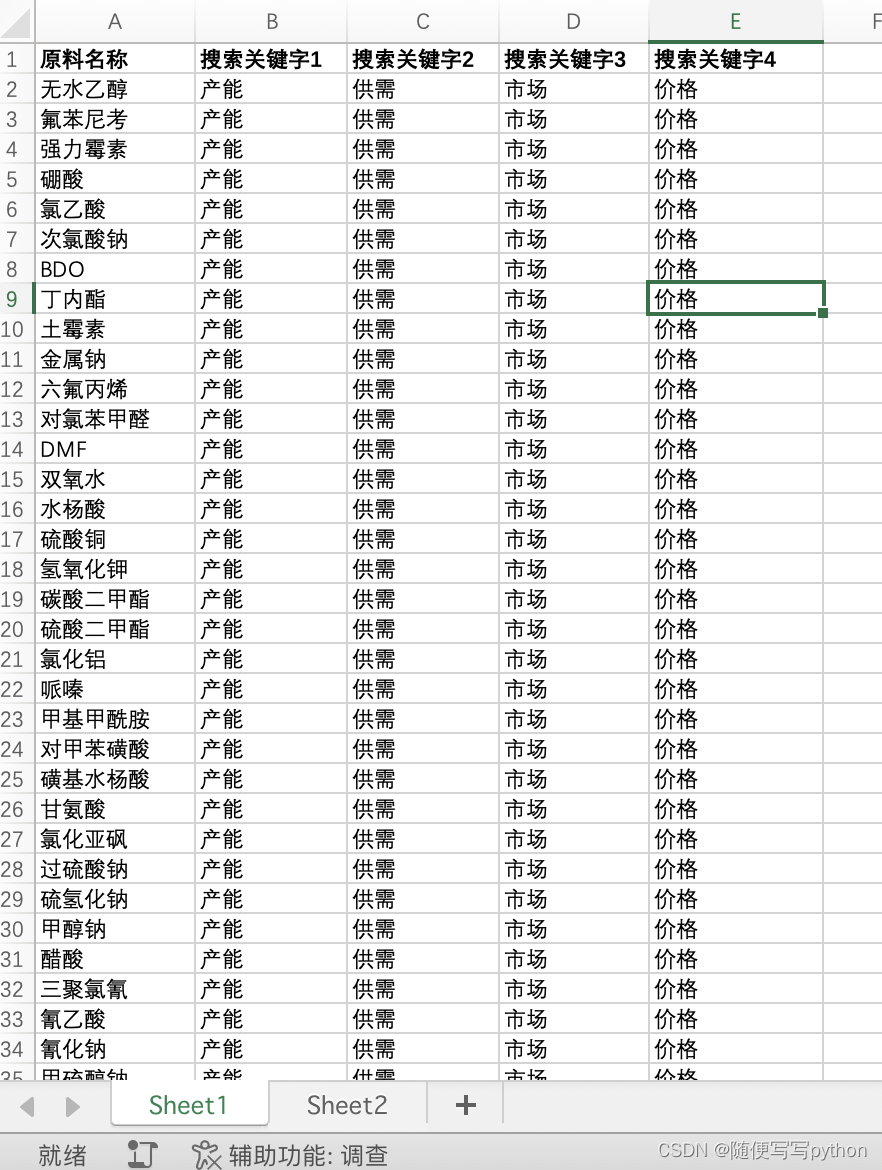
文件名称作用function.py存储爬虫代码运行的主要函数excel_read.py从excel中读取需要爬取的关键词settings.py存储代码中的设置excel_write.py将爬取结果写入excelmain_process.py程序入口
1、function.py
from selenium import webdriver
from selenium.webdriver.chrome.service import Service
from selenium.webdriver.common.by import By
from selenium.webdriver.support.ui import WebDriverWait
from selenium.webdriver.support import expected_conditions as EC
from selenium.common.exceptions import TimeoutException, NoSuchElementException
from twocaptcha import TwoCaptcha
import time
import re
import numpy as np
from PIL import Image
import sys
import os
# ===================================================================
from settings import website_dress, aim_date, driver_path, keyword_row_num, code_picture_path, twocaptcha_key
from excel_read import excel_read

class Content():

    def __init__(self, input_keyword, driver):
        self.input_keyword = input_keyword
        self.article_cycle_time = 0
        self.current_page_num = 1
        self.open_website_time = 1
        self.article_content = []
        self.driver = driver

    def page_num(self):  # 判断搜索结果一共多少页
        try:
            page = len(self.driver.find_element(By.CLASS_NAME, 'p-fy').find_elements(By.XPATH, 'a'))
        except Exception:
            page = 1
        return page

    def article_num(self):  # 判断每一页有多少个搜索结果
        try:
            each_page_article_num = len(self.driver.find_element(By.CLASS_NAME, 'news-list').find_elements(By.XPATH, 'li'))
        except:
            each_page_article_num = 0
        return each_page_article_num

    def open_and_close(self):
        self.driver.close()
        self.driver.get(website_dress)

    def error(self):  # 报错处理
        try:
            if self.driver.find_elements(By.CLASS_NAME, 'p4'):  # 需要输入验证码
                print('需要输入验证码')
                self.code_process()
            else:
                #print('新的页面')
                self.switch_window()
        except:
            print('直接跳过')
            pass

    def manaual_code(self):  # 手动输入验证码
        while True:
            if input('请手动输入验证码') != 'y' or 'Y':
                manaual_input_code = input('请手动输入验证码')
                input_code_box = self.driver.find_element(By.ID, 'seccodeInput: ')  # 找到验证码输入框
                input_code_box.send_keys(manaual_input_code)  # 输入验证码
                self.driver.find_element(By.ID, 'submit').click()  # 点击【提交】按钮
                time.sleep(0.5)
                if self.driver.find_elements(By.CLASS_NAME, 'p4'):  # 需要手动输入验证码
                    continue
                else:
                    break
            else:
                break

    def cycle_function(self):  # 主循环function
        create_driver()  # 不显示图片
        # 搜索框输入信息,等待搜索框在5秒内出现from PIL import Image
        try:
            element = WebDriverWait(self.driver, 5, 0.5).until(EC.presence_of_element_located((By.CLASS_NAME, "sec-input")))
            element.clear()
            element.send_keys(self.input_keyword)
            print('|||||||||' + str(self.input_keyword) + '|||||||||')
            # 模拟输入回车按键
            self.driver.find_element(By.CLASS_NAME, "enter-input.article").click()
        except:
            pass

        while True:
            try:
                ntb = self.driver.find_element(By.CLASS_NAME, 'np')
            except NoSuchElementException:
                ntb = None
                self.error()
            #print(self.current_page_num)
            article_num = self.article_num()  # 判断每一页有多少篇文章
            #print('本页含有' + str(article_num) + '篇文章')
            for j in range(article_num):
                # 找到每一篇文章
                txt_box = self.driver.find_elements(By.CLASS_NAME, 'txt-box')[j]
                self.article_cycle_time += 1
                #print('第' + str(self.article_cycle_time) + '篇文章检查完毕')
                # 找到文章的日期
                article_publish = txt_box.find_element(By.CLASS_NAME, "s2").get_attribute('textContent')
                article_publish_text = re.search(r'\d{4}-\d{1,2}-\d{1,2}', article_publish)  # 正则表达式
                if article_publish_text:
                    article_publish_date = article_publish_text.group()
                else:
                    article_publish_date = '发布日期未知'
                #print(article_publish_date)
                if article_publish_date in aim_date:
                    each_article_content = []  # 每一个符合条件文章的标题、关键词简述和网址链接都会被存储在一个单独的list中
                    '''输出符合条件文章的标题、关键词简述、网址链接'''
                    article_title = txt_box.find_element(By.XPATH, 'h3').get_attribute('textContent')
                    #print(article_title)
                    article_text = txt_box.find_element(By.CLASS_NAME, 'txt-info').get_attribute('textContent')
                    #print(article_text)
                    article_url = txt_box.find_element(By.TAG_NAME, 'a').get_attribute('href')
                    print(article_url)
                    each_article_content.append(article_title)
                    each_article_content.append(article_text)
                    each_article_content.append(article_url)
                    self.article_content.append(each_article_content)
            print('共搜索' + str(self.article_cycle_time) + '篇文章')
            if not ntb:
                break
            try:
                self.driver.find_element(By.CLASS_NAME, 'np').click()  # 点击【下一页】
                time.sleep(np.random.uniform())  # 随机暂停0-1秒

            except:
                self.error()

    def switch_window(self):  # 打开新页面
        self.driver.execute_script("window.open('https://weixin.sogou.com');")  # 打开新的标签页
        self.driver.switch_to.window(self.driver.window_handles[1])  # 切换到新的标签页
        self.driver.switch_to.window(self.driver.window_handles[0])  # 关闭旧的标签页
        self.driver.close()
        self.driver.switch_to.window(self.driver.window_handles[0])  # 确保当前的焦点在新的标签页

    def code_process(self):  # 获取验证码图片
        a = 0
        while True:
            try:
                code = self.driver.find_element(By.CLASS_NAME, 'other')  # 判断页面是否出现验证码
            except NoSuchElementException:
                code = None
            if code == None:
                break
            try:
                self.driver.get_screenshot_as_file('code_picture_file.png')  # 获取截图
                # 获取验证码的图像位置参数
                element = self.driver.find_element(By.ID, 'seccodeImage')
                left = int(element.location['x'])
                top = int(element.location['y'])
                right = int(element.location['x'] + element.size['width'])
                bottom = int(element.location['y'] + element.size['height'])

                image = Image.open('code_picture_file.png')
                image = image.crop((left, top, right, bottom))
                image.save('code_picture.png')
                print('===***需要输入验证码,正在处理验证码***===')
                '''验证码网站处理图片'''
                sys.path.append(os.path.dirname(os.path.dirname(os.path.realpath(__file__))))
                api_key = os.getenv('APIKEY_2CAPTCHA', twocaptcha_key)
                solver = TwoCaptcha(api_key)
                code_result = solver.normal(code_picture_path)['code']  # 通过验证码网站获得识别后的验证码文字
                #print('通过验证码网站获得了识别后的验证码文字')
                print(code_result)

                input_code_box = self.driver.find_element(By.ID, 'seccodeInput')  # 找到验证码输入框
                #print('找到验证码输入框')
                input_code_box.send_keys(code_result)  # 输入验证码
                self.driver.find_element(By.ID, 'submit').click()  # 点击【提交】按钮
                #print('提交验证码')
                time.sleep(0.5)
                a += 1
                if a == 3:  # 三次输入不正确则跳过
                    break

            except:
                self.manaual_code()  # 手动输入验证码

    def web_spyder(self):  # 以list的形式输出每一个关键词的爬取结果
        article_content = self.article_content  # 存储一个关键词爬取的所有的符合条件的搜索结果
        self.driver.set_page_load_timeout(10)
        try:
            self.cycle_function()
            #self.open_and_close()
            self.switch_window()  # 打开新页面,关闭旧页面
        except:
            print('错误')
            pass

        return article_content

def create_driver():  # selenium浏览器的主要设置
    chrome_options = webdriver.ChromeOptions()
    '''加载图片'''
    chrome_prefs = {"profile.managed_default_content_settings.images": 1}
    chrome_options.add_experimental_option("prefs", chrome_prefs)
    '''删除【自动化工具控制】标志'''
    chrome_options.add_experimental_option("excludeSwitches", ["enable-automation"])
    chrome_options.add_experimental_option('useAutomationExtension', False)
    chrome_options.add_argument('--disable-blink-features=AutomationControlled')
    '''创建浏览器指纹'''
    #chrome_options.add_argument('user-agent=Mozilla/5.0 (Windows NT 10.0; Win64; x64) AppleWebKit/537.36 (KHTML, like Gecko) Chrome/119.0.0.0 Safari/537.36')

    service = Service(executable_path=driver_path)
    driver = webdriver.Chrome(service=service, options=chrome_options)
    #driver.set_window_size(100,60)  # 设置运行窗口尺寸大小
    return driver

def spyder_result():
    print('程序开始运行')
    time_start_1 = time.time()
    all_keyword_list = excel_read()
    all_article_list = []  # 创建空列表存储所有的爬取结果
    search_cycle_time = 0
    product_count = 0
    driver = create_driver()
    driver.get(website_dress)  # 打开浏览器

    time.sleep(3)  # 等待网站初次加载

    for keyword_list in all_keyword_list:
        time_start_2 = time.time()
        for keyword in keyword_list:

            input_keyword = keyword
            content = Content(input_keyword, driver)
            each_keyword_article_content = content.web_spyder()
            all_article_list.append(each_keyword_article_content)
            search_cycle_time += 1
            if search_cycle_time == keyword_row_num + 1:
                product_count += 1
                print('================第'+str(product_count)+'个原料已经搜索完毕,还剩下'
                      +str(len(all_keyword_list) - product_count)+'个=================')
                search_cycle_time = 0

            time_end_2 = time.time()
            print('用时:'+str('%.2f' % (time_end_2 - time_start_2))+'秒')

    print(all_article_list)
    driver.quit()
    time_end_1 = time.time()
    time_consume = time_end_1 - time_start_1
    minutes, seconds = divmod(time_consume, 60)
    print('程序执行完毕。总用时:'+str(minutes)+'min,'+str('%.2f' % (seconds))+'s')

    return all_article_list
2、excel_read.py
from openpyxl import load_workbook
'''==========读取Sheet1中的信息,组成将要进行搜索的关键词,最终返回的列表格式为:
[[1,2,3,4,5][][][][]]
1个大列表里面嵌套多个小列表,每个列表里面包含5个元素'''
from settings import excel_path, keyword_row_num

def excel_read():
    wb = load_workbook(excel_path)
    ws = wb['Sheet1']
    product_num = ws.max_row-1
    print('一共有'+str(product_num)+'种原料待搜索')
    all_keyword_list = []
    for i in range(product_num):
        keyword_list = []
        for j in range(keyword_row_num):
            keyword_list.append(ws.cell(i+2, 1).value + ws.cell(i+2, j+2).value)
        keyword_list.append(ws.cell(i+2, 1).value)
        all_keyword_list.append(keyword_list)

    return all_keyword_list
excel文件是这样的结构

3、settings.py
需要更改的设置都在这里
# 爬取的网址
website_dress = 'https://weixin.sogou.com/'
# excel文件的存储地址
excel_path = r'C:\Users\Administrator\Desktop\selenium爬虫程序\原材料新闻微信搜索.xlsx'
excel_write_path = r'C:\Users\Administrator\Desktop\selenium爬虫程序\原材料新闻微信搜索2.xlsx'
# 搜索关键词的个数
keyword_row_num = 4
# 要爬取的日期列表
aim_date = ['2023-11-6', '2023-11-7', '2023-11-8', '2023-11-9', '2023-11-10', '2023-11-11', '2023-11-12']
# driver的存放地址
driver_path = r'C:\Users\Administrator\Desktop\chromedriver.exe'
# 验证码图片存放地址
code_picture_path = r'C:\Users\Administrator\Desktop\selenium爬虫程序\code_picture.png'
# twocaptcha_key  代码处理网站:https://2captcha.com/enterpage
twocaptcha_key = 'your_key'
4、excel_write.py
from openpyxl import load_workbook
import pandas as pd
from function import spyder_result
from settings import excel_path, excel_write_path
'''将爬取结果写入excel'''

def excel_write():
    wb = load_workbook(excel_path)
    ws = wb['Sheet2']

    all_list = []
    all_article_list = spyder_result()
    for each_list in all_article_list:
        if each_list != []:
            all_list.append(each_list)

    #ws.cell(1, 1).value = '标题'
    cell_row = 1
    cell_col = 1
    for each_list in all_list:
        for lis in each_list:
            cell_row += 1
            for i in range(3):
                ws.cell(cell_row, cell_col+i).value = lis[i]
    wb.save(excel_path)
    #  去重
    data = pd.DataFrame(pd.read_excel(excel_path, 'Sheet2'))
    no_re_row = data.drop_duplicates(['Unnamed: 0'])
    no_re_row.to_excel(excel_write_path)
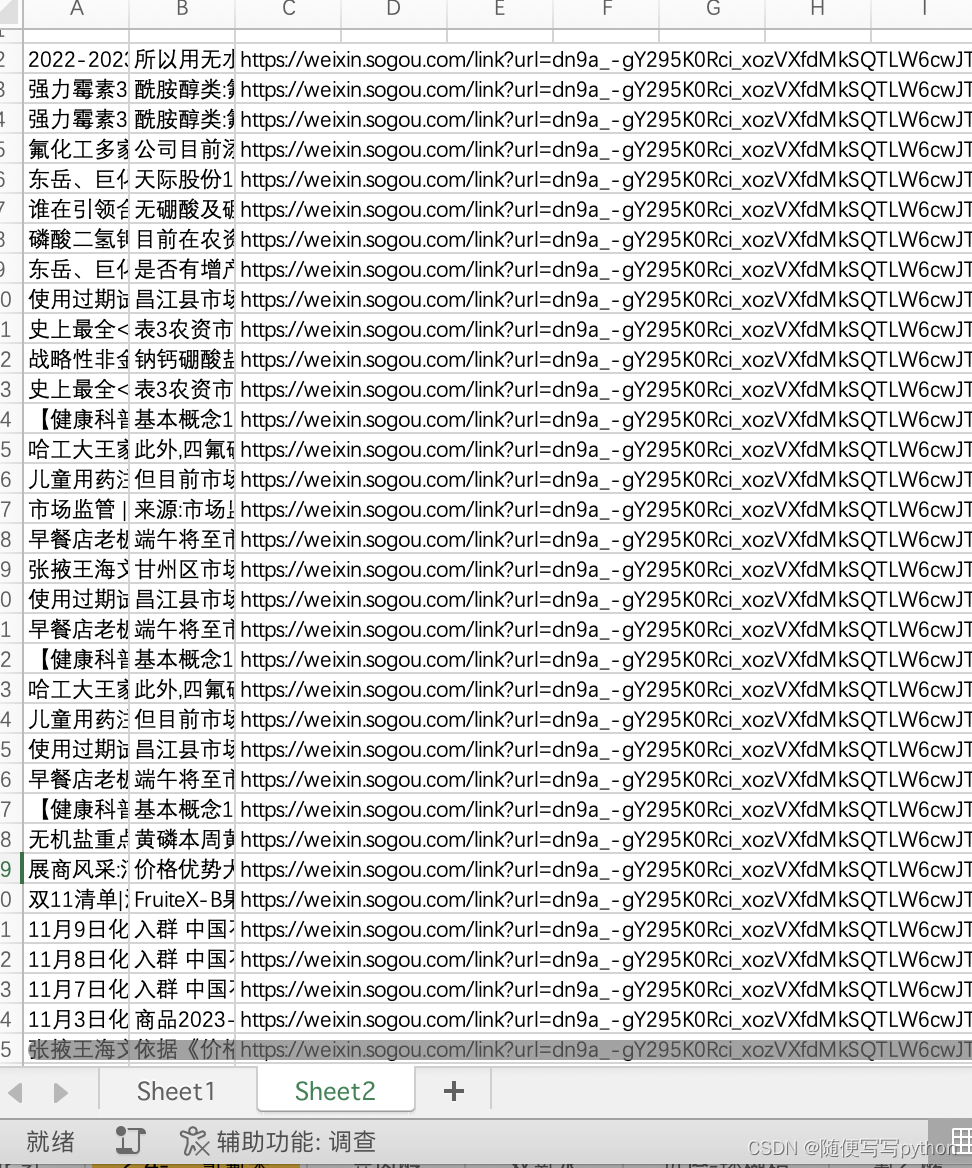
最终的写入结果

5、main_process.py
主程序入口
from excel_write import excel_write

if __name__ == '__main__':
    excel_write()
版权归原作者 随便写写python 所有, 如有侵权,请联系我们删除。