
RabbitMQ
1.初识MQ
1.同步通讯和异步通讯
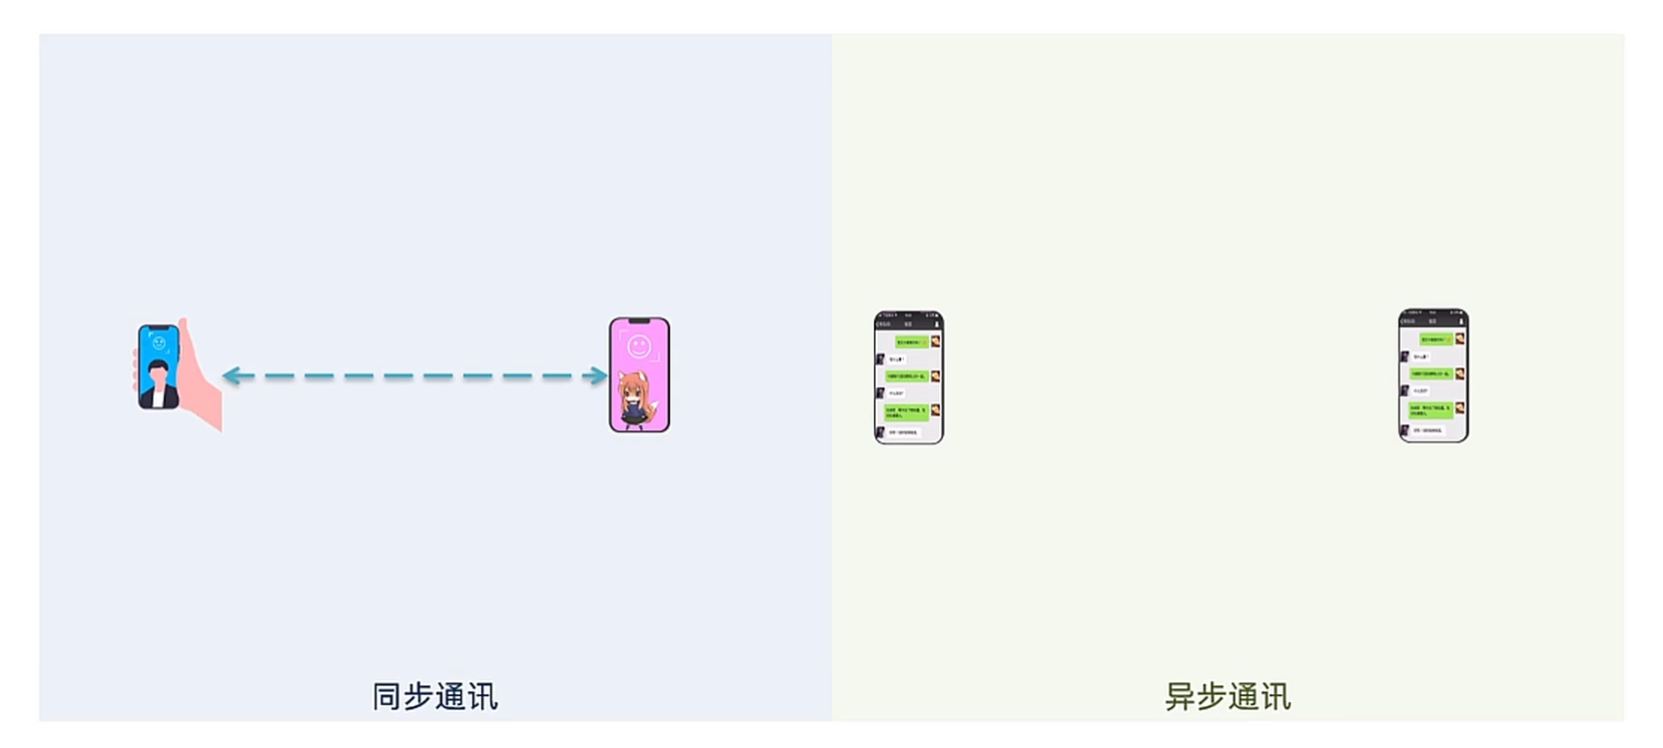
2.同步调用的问题
- 微服务基于Feign的调用就属于同步方式
- 优点: - 时效性高,可以立即得到结果
- 失败: 1. 耦合度高:每次有新需求,代码就得改2. 性能下降:调用者得等待提供者响应,如果调用链过长则响应时间等于每次调用时间之和3. 资源浪费:调用链的每个服务在等待响应的过程中,不能释放请求占用的资源,高并发场景下会极度浪费资源4. 级联失败:如果服务提供者出现问题,所有调用方法都会出现问题
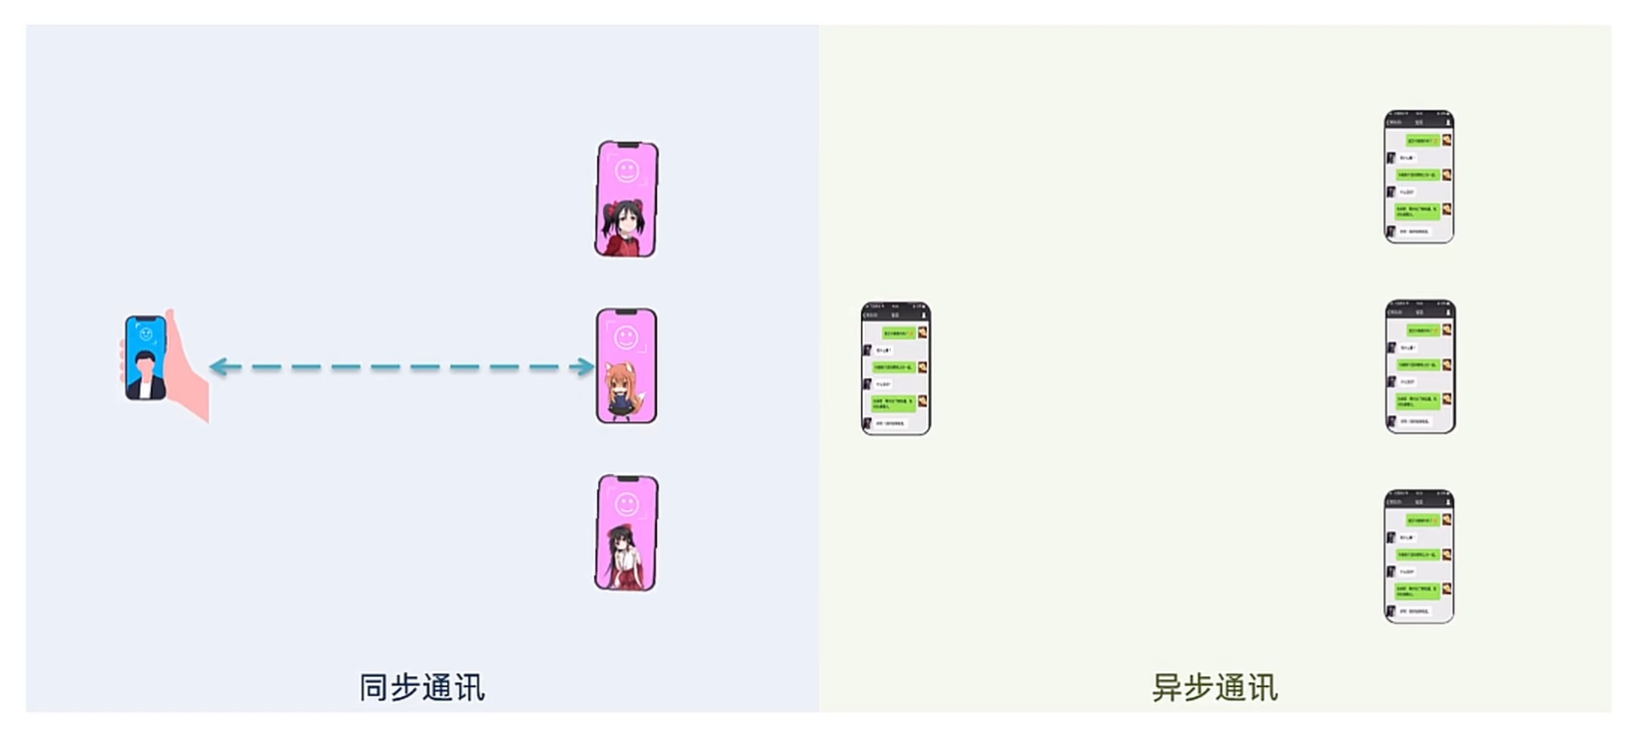
3.异步调用方案
- 常见的实现是事件驱动
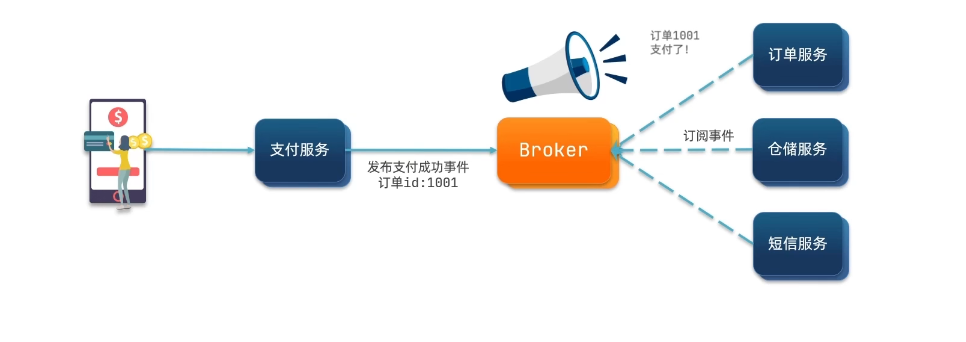
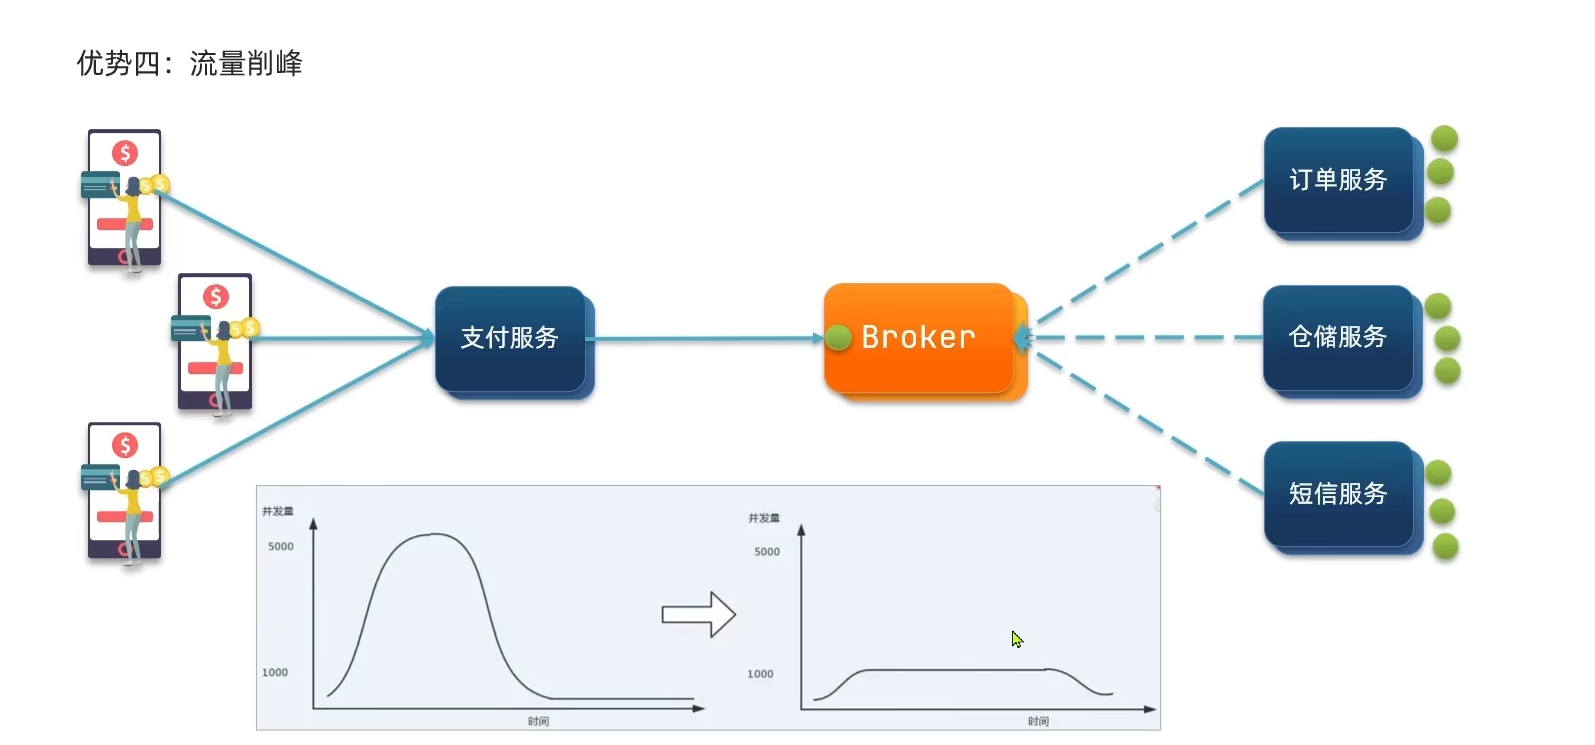
- 优势:1. 服务解耦2. 性能提升,吞吐量高3. 没有强依赖关系,不用担心级联失败4. 流量削峰
- 缺点:1. 依赖于Broker的可靠性,安全性,吞吐能力2. 架构复杂了,业务没有明显的流程线,不要追踪管理
4.什么是MQ
- MQ(MessageQueue),中文是消息队列,字面看就是存放消息的队列。也就是事件驱动的Broker。
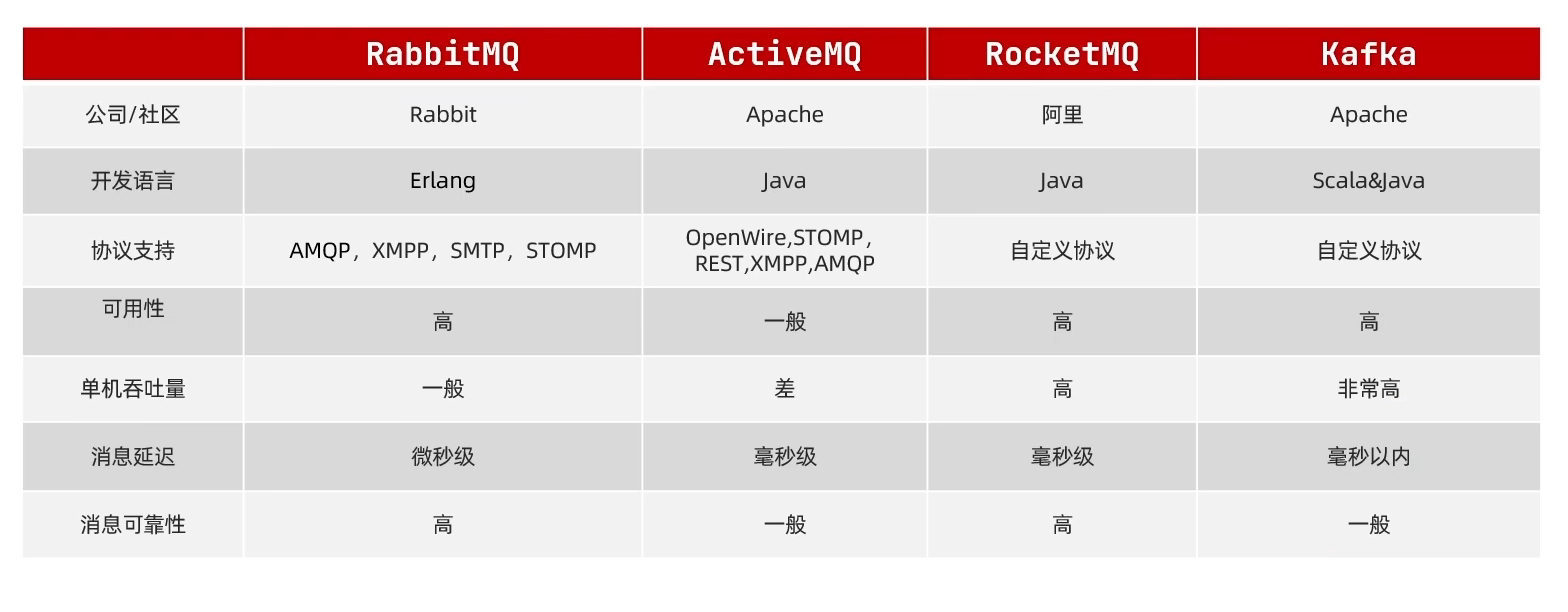
2.RabbitMQ
1.安装
- 拉取docker镜像
docker pull rabbitmq:3-management - 安装mq
docker run \ -e RABBITMQ_DEFAULT_USER=admin \ -e RABBITMQ_DEFAULT_PASS=admin \ --name mq \ --hostname mq1 \ -p 15672:15672 \ -p 5672:5672 \ -d \ rabbitmq:3-management - 访问
ip:16672例如:http://81.69.33.81:15672/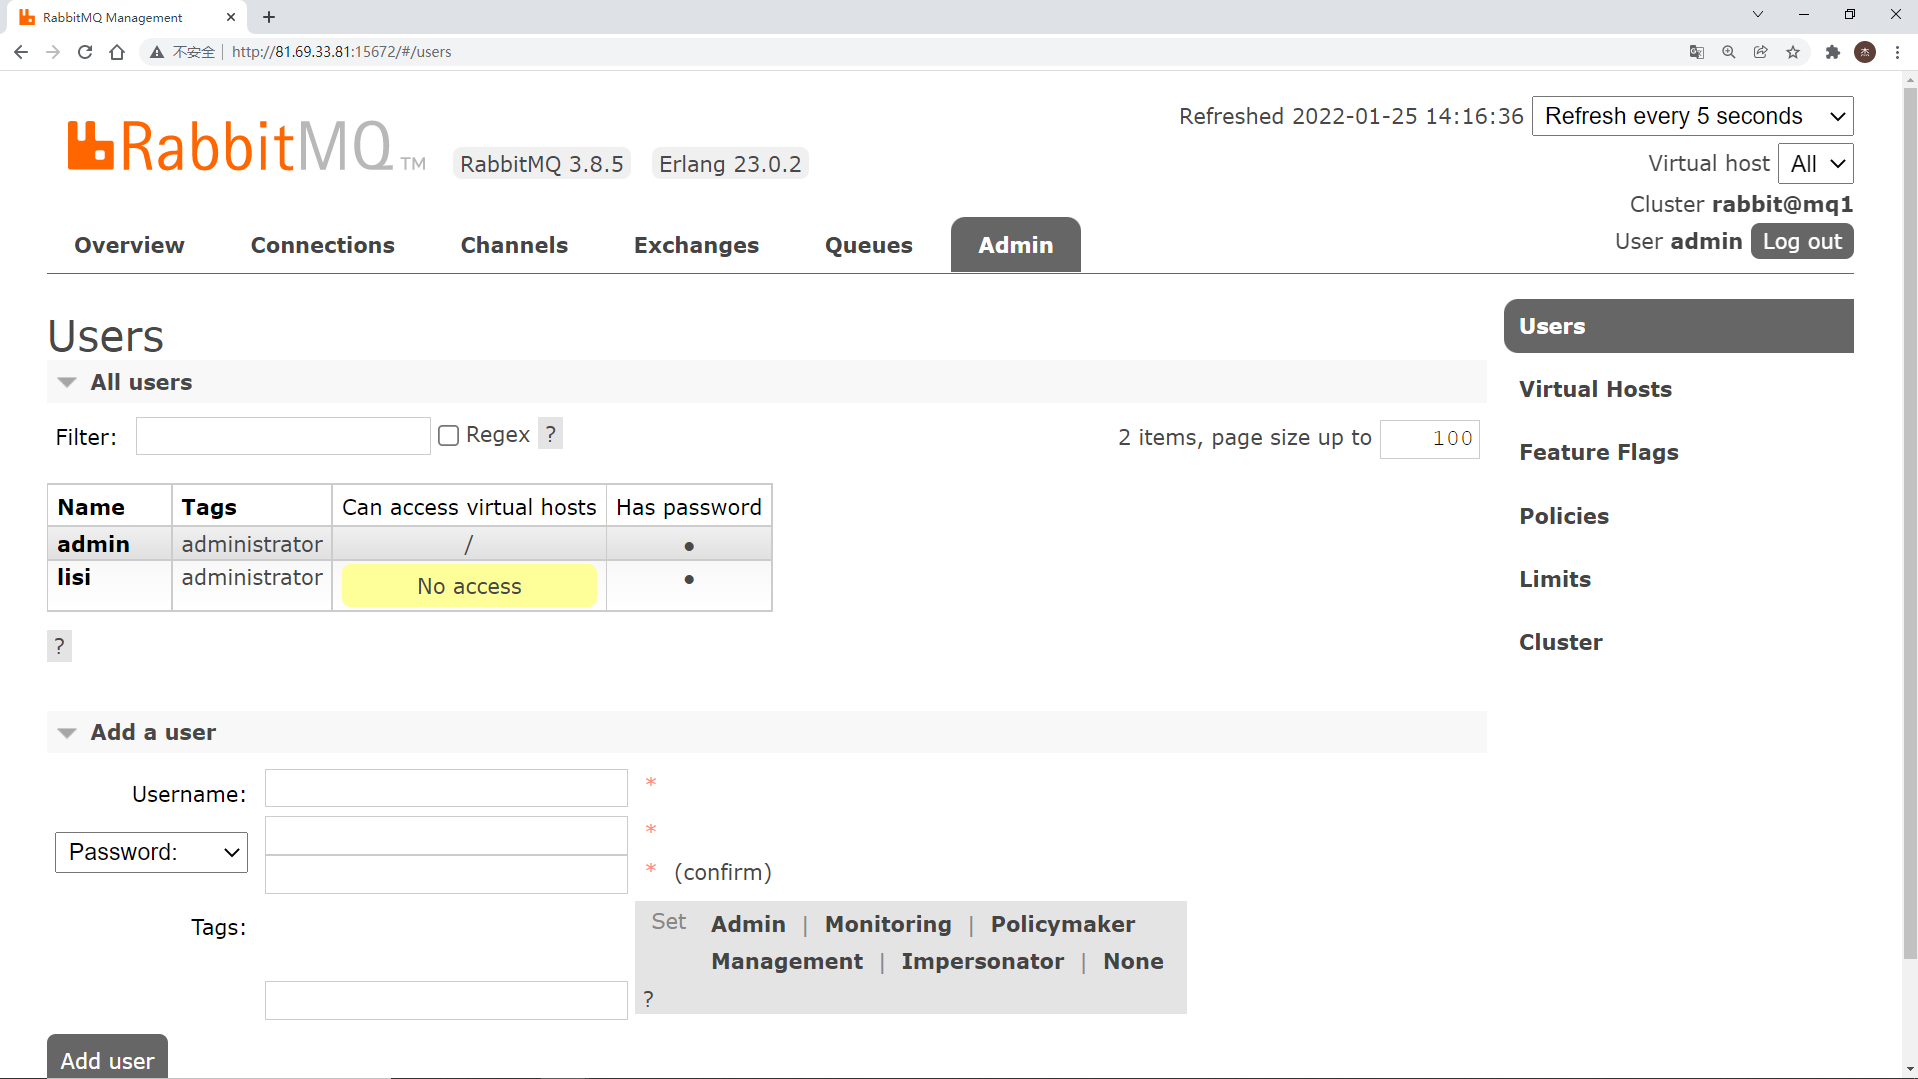
2.各个页面简介
- Overview:总览,里面是mq节点的一些信息
- Connections:连接,将来不论是消息的发布者还是消费者,都应该和mq进行连接
- Channels:是通道,建立连接后,一定要创建一个通道,生产者或消费者基于Channels完成消息的发送或者接受
- Exchanges:交换机,是消息的路由器
- Queues:消息的存储
- Admin:管理,对用户进行管理,创建虚拟主机
3.mq结构
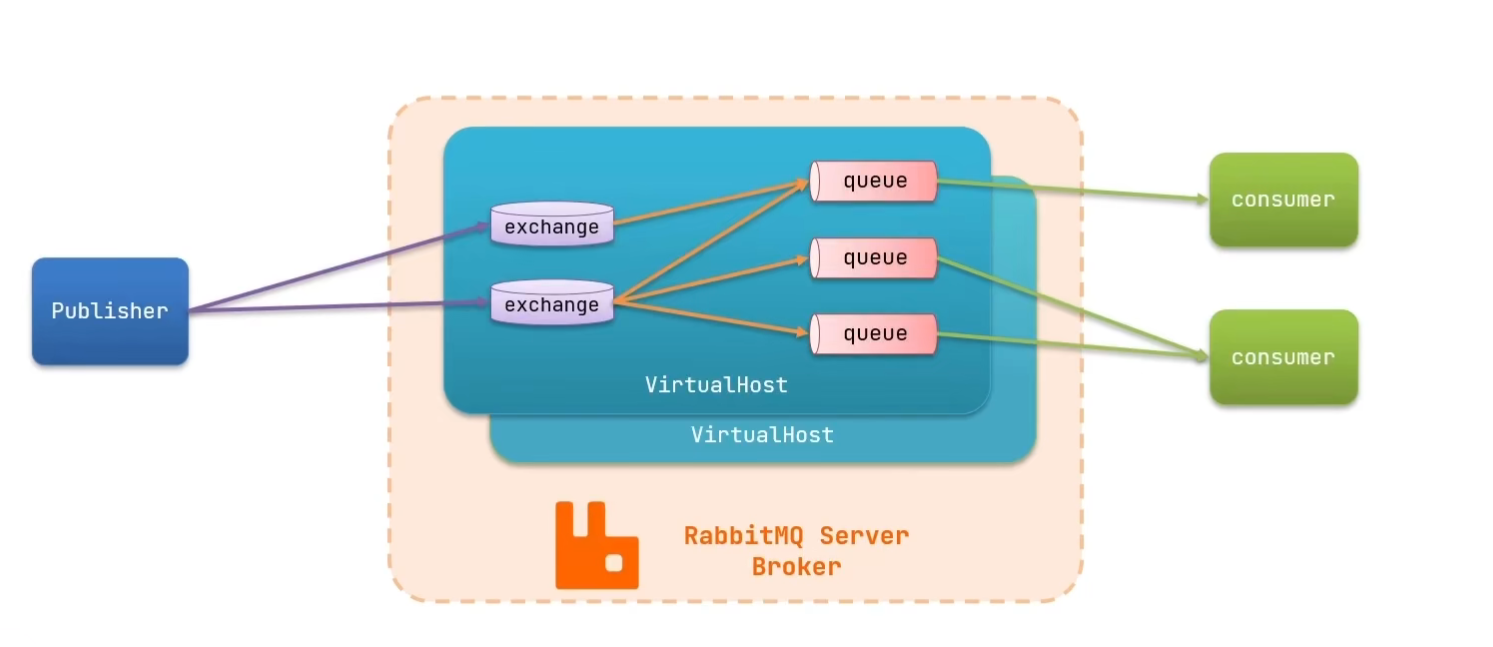
4.mq的几个概念:
- channel:操作mq的工具
- exchange:路由消息到队列中
- queue:缓存消息
- virtual host:虚拟主机,是对queue,exchange等资源的逻辑分组
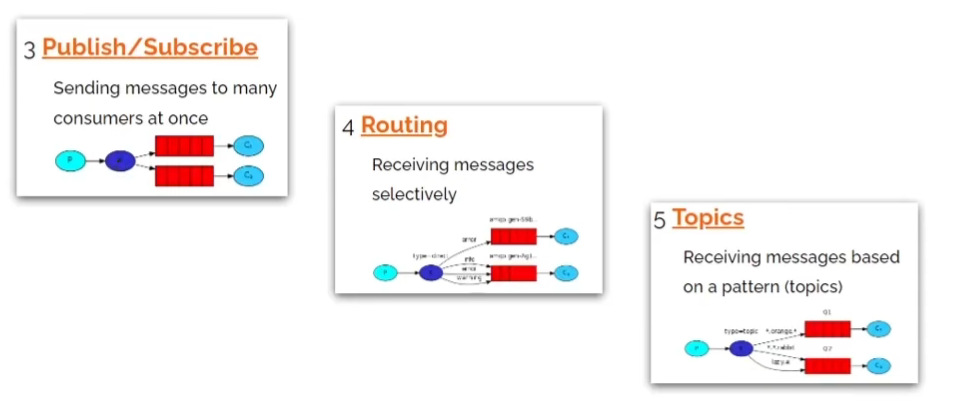
3.常见消息模型
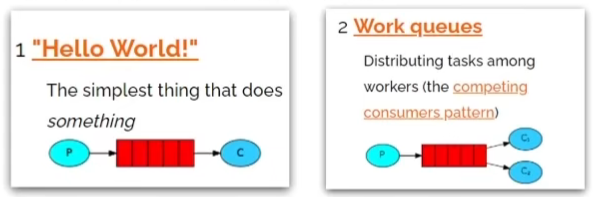
MQ官方文档给了五个MQ的Demo示例,对应了几种不同的用法:
- 基本消息队列(BasicQueue)
- 工作消息队列(WorkQueue)
- 发布订阅,又根据交换机类型分为三种:- Fanout Exchange:广播- Direct Exchange:路由- Topic Exchange:主题
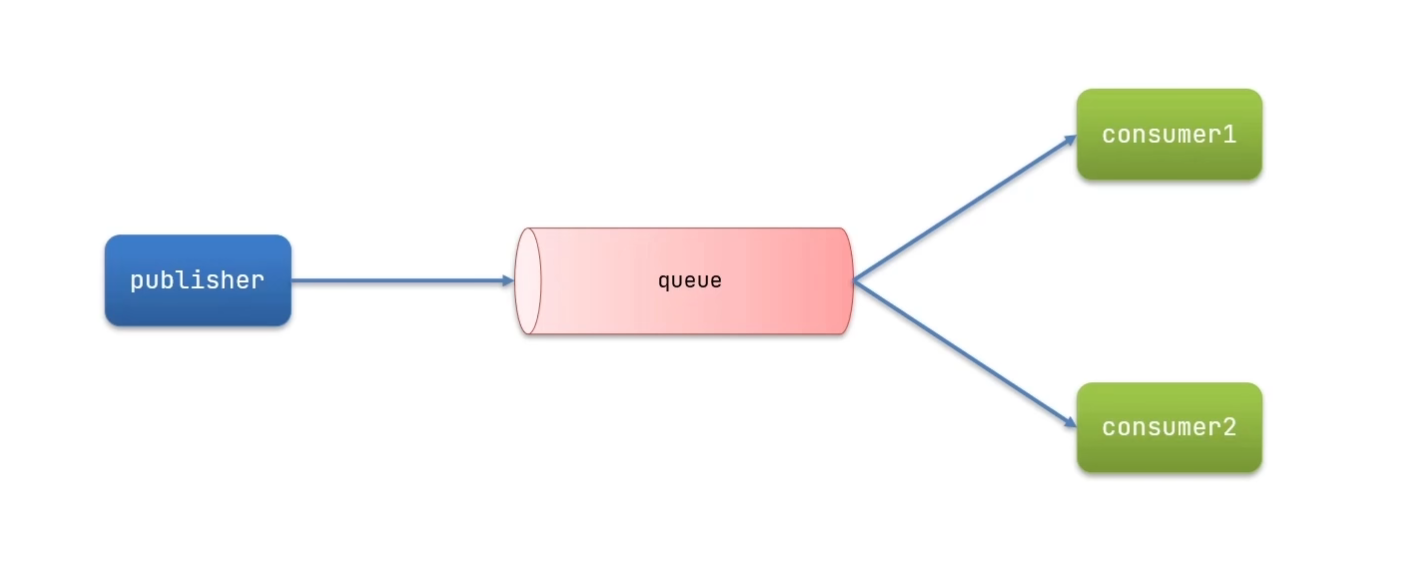
HelloWorld案例
- publisher:消息发布者,将消息发布到对列queue
- queue:消息队列,负责接收并缓存消息
- consumer:订阅队列,处理队列中的消息

- 基本消息队列的发送消息流程:1. 建立connection2. 创建channel3. 利用channel声明队列4. 利用channel向队列发送消息
packagecn.itcast.mq.helloworld;importcom.rabbitmq.client.Channel;importcom.rabbitmq.client.Connection;importcom.rabbitmq.client.ConnectionFactory;importorg.junit.Test;importjava.io.IOException;importjava.util.concurrent.TimeoutException;publicclassPublisherTest{@TestpublicvoidtestSendMessage()throwsIOException,TimeoutException{// 1.建立连接ConnectionFactory factory =newConnectionFactory();// 1.1.设置连接参数,分别是:主机名、端口号、vhost、用户名、密码 factory.setHost("124.221.92.145"); factory.setPort(5672); factory.setVirtualHost("/"); factory.setUsername("admin"); factory.setPassword("admin");// 1.2.建立连接Connection connection = factory.newConnection();// 2.创建通道ChannelChannel channel = connection.createChannel();// 3.创建队列String queueName ="simple.queue"; channel.queueDeclare(queueName,false,false,false,null);// 4.发送消息String message ="hello, rabbitmq!"; channel.basicPublish("", queueName,null, message.getBytes());System.out.println("发送消息成功:【"+ message +"】");// 5.关闭通道和连接 channel.close(); connection.close();}} - 基本消息队列的消息接收流程:1. 建立connection2. 创建channel3. 利用channel声明队列4. 定义consumer的消息行为handleDelivery()5. 利用channel将消费者与队列绑定
packagecn.itcast.mq.helloworld;importcom.rabbitmq.client.*;importjava.io.IOException;importjava.util.concurrent.TimeoutException;publicclassConsumerTest{publicstaticvoidmain(String[] args)throwsIOException,TimeoutException{// 1.建立连接ConnectionFactory factory =newConnectionFactory();// 1.1.设置连接参数,分别是:主机名、端口号、vhost、用户名、密码 factory.setHost("124.221.92.145"); factory.setPort(5672); factory.setVirtualHost("/"); factory.setUsername("admin"); factory.setPassword("admin");// 1.2.建立连接Connection connection = factory.newConnection();// 2.创建通道ChannelChannel channel = connection.createChannel();// 3.创建队列String queueName ="simple.queue"; channel.queueDeclare(queueName,false,false,false,null);// 4.订阅消息 channel.basicConsume(queueName,true,newDefaultConsumer(channel){@OverridepublicvoidhandleDelivery(String consumerTag,Envelope envelope,AMQP.BasicProperties properties,byte[] body)throwsIOException{// 5.处理消息String message =newString(body);System.out.println("接收到消息:【"+ message +"】");}});System.out.println("等待接收消息。。。。");}}
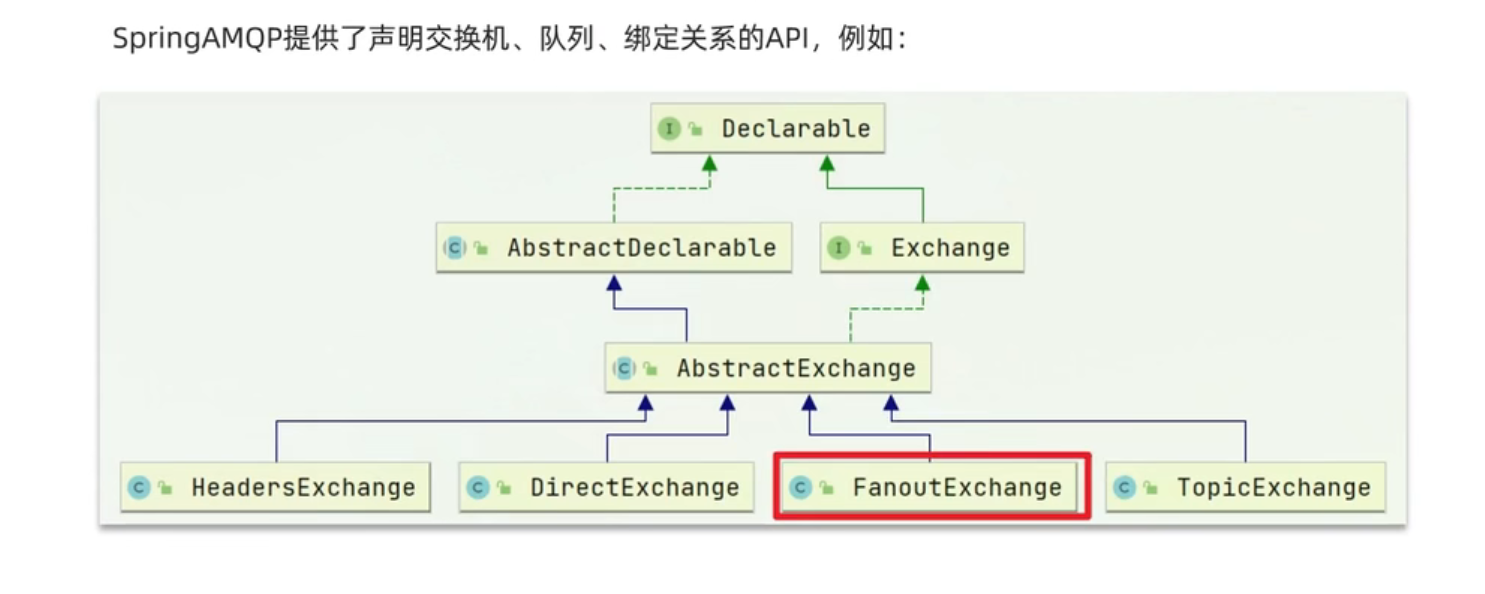
4.SpringAMQP
- AMQP:Advance Message Queuing Protocal,是用于在应用程序或之间传递业务消息的开放标准。该协议与语言和平台无关,更符合微服务中独立性的要求。
- Spring AMQP是基于AMQP协议定义的一套API规范,提供模板来发送接收消息。包含两部分,其中spring-amqp是基础抽象,spring-rabbit是底层的默认实现。
1.利用SpringAMQP实现HelloWorld中基础消息队列功能
- 在父工程中引入spring-amqp的依赖
<!--AMQP依赖,包含RabbitMQ--><dependency><groupId>org.springframework.boot</groupId><artifactId>spring-boot-starter-amqp</artifactId></dependency> - 在publisher服务中利用RabbitTemplate发送消息到simple.queue这个队列1. 在publisher服务编写application.yml,添加mq连接消息
spring:rabbitmq:host: 124.221.92.145 #主机名port:5672#端口virtual-host: / #虚拟主机username: admin password: admin2. 编写一个测试类,利用RabbitTemplate发送消息packagecn.itcast.mq.helloworld.cn.itcast.mq.spring;importorg.junit.Test;importorg.junit.runner.RunWith;importorg.springframework.amqp.rabbit.core.RabbitTemplate;importorg.springframework.beans.factory.annotation.Autowired;importorg.springframework.boot.test.context.SpringBootTest;importorg.springframework.test.context.junit4.SpringRunner;/** * @program: mq-demo * @description: * @packagename: cn.itcast.mq.helloworld.cn.itcast.mq.spring * @author: Jay * @date: 2022/03/15 10:16:03 **/@RunWith(SpringRunner.class)@SpringBootTestpublicclassSpringAmqpTest{@AutowiredprivateRabbitTemplate rabbitTemplate;@Testpublicvoidtest(){String queueName ="simple.queue";String message ="HelloWorld"; rabbitTemplate.convertAndSend(queueName,message);}} - 在consumer服务中编写消费逻辑,绑定simple.queue这个队列1. 在consumer服务编写application.yml,添加mq连接消息
spring:rabbitmq:host: 124.221.92.145 #主机名port:5672#端口virtual-host: / #虚拟主机username: admin password: admin2. 创建监听的类,添加Component注解,声明方法添加RabbitListener注解packagecn.itcast.mq.spring;importorg.springframework.amqp.rabbit.annotation.RabbitListener;importorg.springframework.stereotype.Component;/** * @program: mq-demo * @description: * @packagename: cn.itcast.mq.spring * @author: Jay * @date: 2022/03/20 20:32:03 **/@ComponentpublicclassSpringRabbitListener{@RabbitListener(queues ="simple.queue")publicvoidlistenSimpleQueueMessage(String msg)throwsException{System.out.println(msg);}}- 注意:RabbitMQ没有消息回溯功能
2.Work Queue工作队列
- work queue 工作队列,可以提高消息处理速度,避免消息堆积
- 实现一个队列绑定多个消费者 - 基本思路: 1. 在publisher服务中定义测试方法,每秒产生50条消息,发送到simple.queue2. 在consumer服务中定义两个监听者,都监听simple.queue队列3. 消费者1每秒处理50条消息,消费者2每秒处理10条消息
案例:WorkQueue
- 消息推送
@TestpublicvoidtestSendMessage2WorkQueue()throwsInterruptedException{String queueName ="simple.queue";String message ="hello message__";for(int i =0; i <50; i++){ rabbitTemplate.convertAndSend(queueName,message + i);Thread.sleep(20);}} - 消息接收
@RabbitListener(queues ="simple.queue")publicvoidlistenWorkQueue1(String message)throwsInterruptedException{System.out.println("1.........接受的消息"+ message +"::::"+LocalTime.now());Thread.sleep(20);}@RabbitListener(queues ="simple.queue")publicvoidlistenWorkQueue2(String message)throwsInterruptedException{System.err.println("2+++++++++++接受的消息"+ message +"::::"+LocalTime.now());Thread.sleep(200);} - 结果发现
2+++++++++++接受的消息hello message__0::::09:46:55.5471.........接受的消息hello message__1::::09:46:55.5621.........接受的消息hello message__3::::09:46:55.6031.........接受的消息hello message__5::::09:46:55.6531.........接受的消息hello message__7::::09:46:55.6951.........接受的消息hello message__9::::09:46:55.7302+++++++++++接受的消息hello message__2::::09:46:55.7481.........接受的消息hello message__11::::09:46:55.7711.........接受的消息hello message__13::::09:46:55.8121.........接受的消息hello message__15::::09:46:55.8541.........接受的消息hello message__17::::09:46:55.8941.........接受的消息hello message__19::::09:46:55.9462+++++++++++接受的消息hello message__4::::09:46:55.9491.........接受的消息hello message__21::::09:46:55.9781.........接受的消息hello message__23::::09:46:56.0191.........接受的消息hello message__25::::09:46:56.0591.........接受的消息hello message__27::::09:46:56.1021.........接受的消息hello message__29::::09:46:56.1422+++++++++++接受的消息hello message__6::::09:46:56.1511.........接受的消息hello message__31::::09:46:56.1831.........接受的消息hello message__33::::09:46:56.2241.........接受的消息hello message__35::::09:46:56.2661.........接受的消息hello message__37::::09:46:56.3071.........接受的消息hello message__39::::09:46:56.3492+++++++++++接受的消息hello message__8::::09:46:56.3511.........接受的消息hello message__41::::09:46:56.3911.........接受的消息hello message__43::::09:46:56.4321.........接受的消息hello message__45::::09:46:56.4731.........接受的消息hello message__47::::09:46:56.5152+++++++++++接受的消息hello message__10::::09:46:56.5511.........接受的消息hello message__49::::09:46:56.5562+++++++++++接受的消息hello message__12::::09:46:56.7532+++++++++++接受的消息hello message__14::::09:46:56.9532+++++++++++接受的消息hello message__16::::09:46:57.1552+++++++++++接受的消息hello message__18::::09:46:57.3572+++++++++++接受的消息hello message__20::::09:46:57.5592+++++++++++接受的消息hello message__22::::09:46:57.7592+++++++++++接受的消息hello message__24::::09:46:57.9602+++++++++++接受的消息hello message__26::::09:46:58.1602+++++++++++接受的消息hello message__28::::09:46:58.3612+++++++++++接受的消息hello message__30::::09:46:58.5612+++++++++++接受的消息hello message__32::::09:46:58.7622+++++++++++接受的消息hello message__34::::09:46:58.9622+++++++++++接受的消息hello message__36::::09:46:59.1622+++++++++++接受的消息hello message__38::::09:46:59.3632+++++++++++接受的消息hello message__40::::09:46:59.5632+++++++++++接受的消息hello message__42::::09:46:59.7642+++++++++++接受的消息hello message__44::::09:46:59.9642+++++++++++接受的消息hello message__46::::09:47:00.1662+++++++++++接受的消息hello message__48::::09:47:00.367- 消费者1拿了所有奇数- 消费者2拿了所有偶数- 原因:消费预取限制,在处理之前先将消息发送给消费者,修改application.yml文件,设置proFetch这个值,可以控制预取消息的上限:spring:rabbitmq:host: 124.221.92.145 #主机名port:5672#端口virtual-host: / #虚拟主机username: admin password: admin listener:simple:prefetch:1#一次只能取一条数据,处理完才能取下一个消息
总结
- 多个消息绑定到一个队列,同一个消息只能被一个消费者处理
- 通过设置prefetch来控制消费者预取的消息数量
5.发布订阅模型介绍
- 发布订阅模式与之前案例区别就允许将同一消息发送给多个消费者。实现的方式是加入了exchange(交换机)。
- 交换机常见的类型: 1. Fanout:广播2. Direct:路由3. Topic:话题
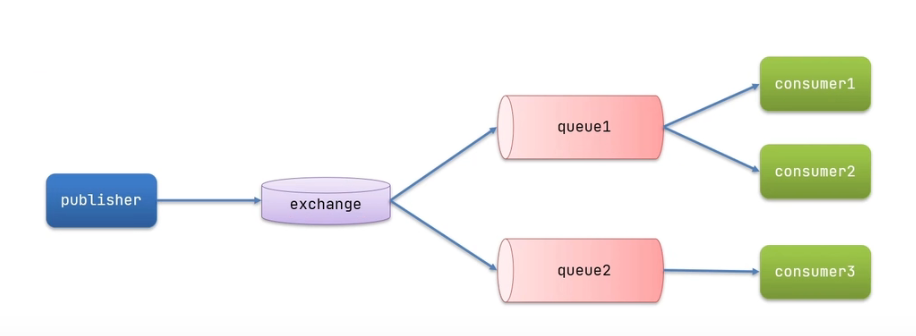
- 注意:exchange负责消息路由,而不是存储,路由失败则消息丢失
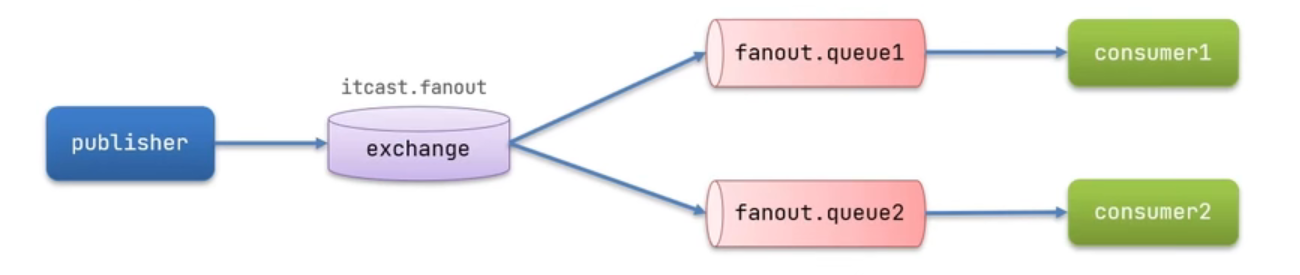
1.发布订阅——Fanout Exchange
- Fanout Exchange会将接受到的消息路由到每一个跟其绑定的queue
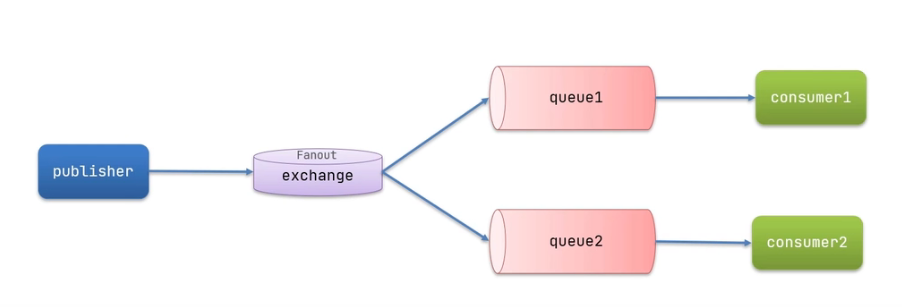
- 利用SpringAMQP演示FanoutExchange的使用1. 在consumer服务中,利用代码声明队列,交换机,并将两者绑定2. 在consumer服务中,编写两个消费方法,分别监听fanout.queue和fanout.queue23. 在publisher中编写方法,向itcast.fanout中发送消息
1.在consumer服务声明Exchange,Queue,Binding
- 在consumer服务常见一个类,添加@Configuration,声明FanoutExchange,Queue和绑定对象Binding,代码如下:
packagecn.itcast.mq.config;importorg.springframework.amqp.core.Binding;importorg.springframework.amqp.core.BindingBuilder;importorg.springframework.amqp.core.FanoutExchange;importorg.springframework.amqp.core.Queue;importorg.springframework.context.annotation.Bean;importorg.springframework.context.annotation.Configuration;/** * @program: mq-demo * @description: * @packagename: cn.itcast.mq.config * @author: Jay * @date: 2022/03/22 11:10:03 **/@ConfigurationpublicclassFanoutConfig{//itcast.fanout@BeanpublicFanoutExchangefanoutExchange(){returnnewFanoutExchange("itcast.fanout");}//fanout.queue1@BeanpublicQueuefanoutQueue1(){returnnewQueue("fanout.queue1");}//绑定队列1到交换机@BeanpublicBindingfanoutBinding1(Queue fanoutQueue1,FanoutExchange fanoutExchange){returnBindingBuilder.bind(fanoutQueue1).to(fanoutExchange);}//fanout.queue2@BeanpublicQueuefanoutQueue2(){returnnewQueue("fanout.queue2");}//绑定队列2到交换机@BeanpublicBindingfanoutBinding2(Queue fanoutQueue2,FanoutExchange fanoutExchange){returnBindingBuilder.bind(fanoutQueue2).to(fanoutExchange);}}
2.consumer接受消息
@RabbitListener(queues ="fanout.queue1")publicvoidlistenFanQueue(String message){System.out.println("消费者接1受的FanoutQueue1的消息"+message);}@RabbitListener(queues ="fanout.queue2")publicvoidlistenFanQueue2(String message){System.out.println("消费者2接受的FanoutQueue2的消息"+message);}
3.publisher发送消息
@TestpublicvoidtestSendFanoutExchange(){//交换机名称String exchangeName ="itcast.fanout";//消息String message ="hello every one!";
    rabbitTemplate.convertAndSend(exchangeName,"", message);}
总结:
- 交换机的作用是什么? - 接收publisher发送的消息- 将消息按照规则路由给与之绑定的队列- 不能缓存消息,路由失败,消息丢失- FanoutExchange会将消息路由到每一个与之绑定的队列
- 声明队列,交换机,绑定关系的Bean是什么? - Queue- FanoutExchange- Binding
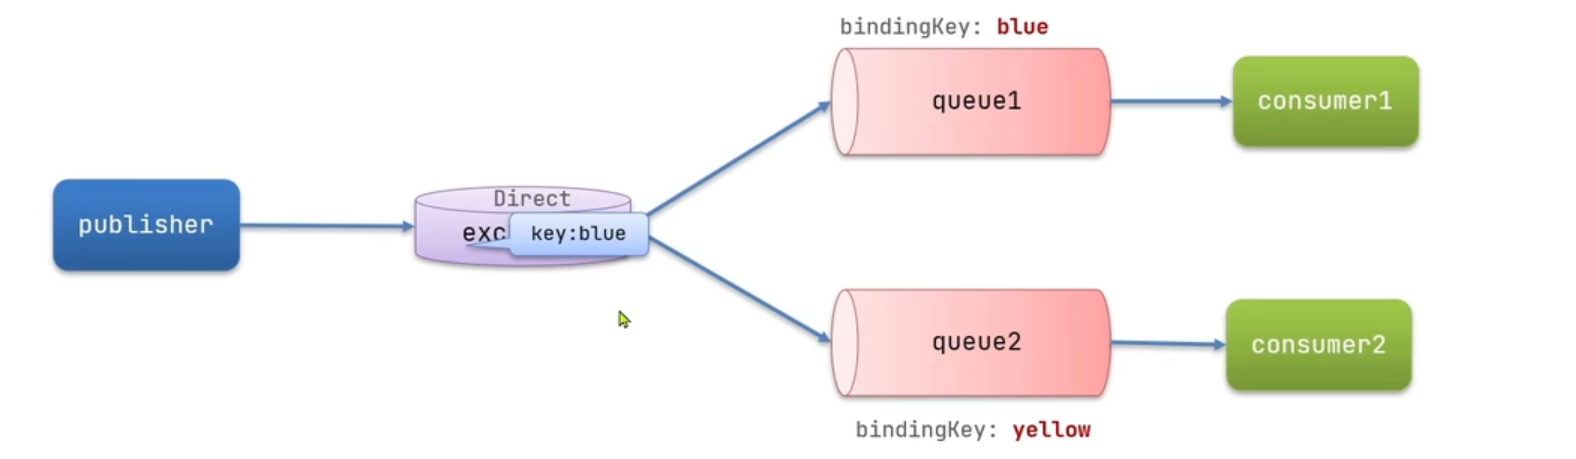
2.发布订阅——DirectExchange
- DirectExchange会将接受的消息根据规则路由到指定的Queue,因此称之为路由模式(routes)
- 每一个Queue都与Exchange设置一个BingdingKey,可以指定多个
- 发布者发布消息时,指定消息的RoutingKey
- Exchange将消息路由到BindingKey与消息RoutingKey一致的对列
- 案例:
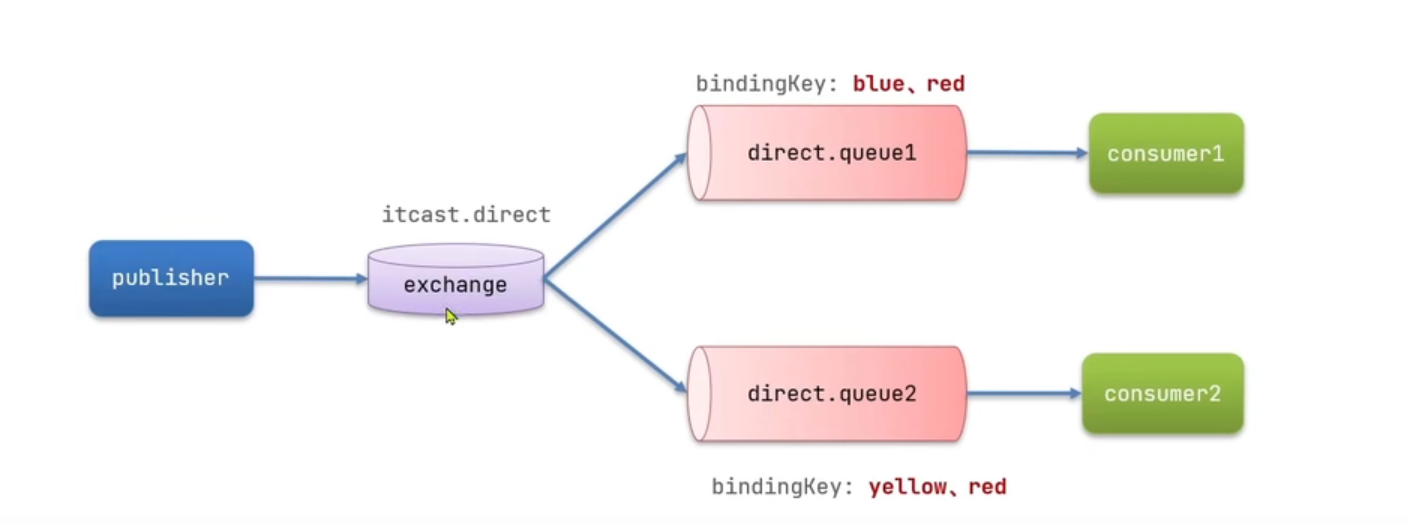
思路如下:
- 利用@RabbitListener声明Exchange,Queue,RoutingKey
- 在consumer服务中,编写两个消费者方法,分别监听direct.queue2和direct.queue2
- 在publisher中编写的方法,向itcast.direct发送消息
1.利用@RabbitListener声明Exchange,Queue,RoutingKey
2.在consumer服务中,编写两个消费者方法,分别监听direct.queue2和direct.queue2
@RabbitListener(bindings =@QueueBinding(
        value =@Queue(name ="direct.queue1"),
        exchange =@Exchange(name ="itcast.direct", type =ExchangeTypes.DIRECT),
        key ={"red","blue"}))publicvoidlistenDirectQueue1(String msg){System.out.println("消费者1接受的DirectQueue1的消息"+msg);}@RabbitListener(bindings =@QueueBinding(
        value =@Queue(name ="direct.queue2"),
        exchange =@Exchange(name ="itcast.direct", type =ExchangeTypes.DIRECT),
        key ={"red","yellow"}))publicvoidlistenDirectQueue2(String msg){System.out.println("消费者2接受的DirectQueue2的消息"+msg);}
3.在publisher中编写的方法,向itcast.direct发送消息
@TestpublicvoidtestSendDirectExchange(){//交换机名称String exchangeName ="itcast.direct";//消息String message ="hello blue";
    rabbitTemplate.convertAndSend(exchangeName,"blue", message);//消息String message1 ="hello yellow";
    rabbitTemplate.convertAndSend(exchangeName,"yellow", message1);//消息String message2 ="hello red";
    rabbitTemplate.convertAndSend(exchangeName,"red", message2);}
总结:
- 描述Direct交换机与Fanout交换机的差异?- Fanout交换机将消息路由到每一个与之绑定的对列- Direct交换机根据RoutingKey判断路由给哪个对列- 如果多个对列具有相同的RoutingKey,则与Fanout功能类似
- 基于@RabbitListener注解声明对列和交换机有哪些常用的注解?- @Queue- @Exchange
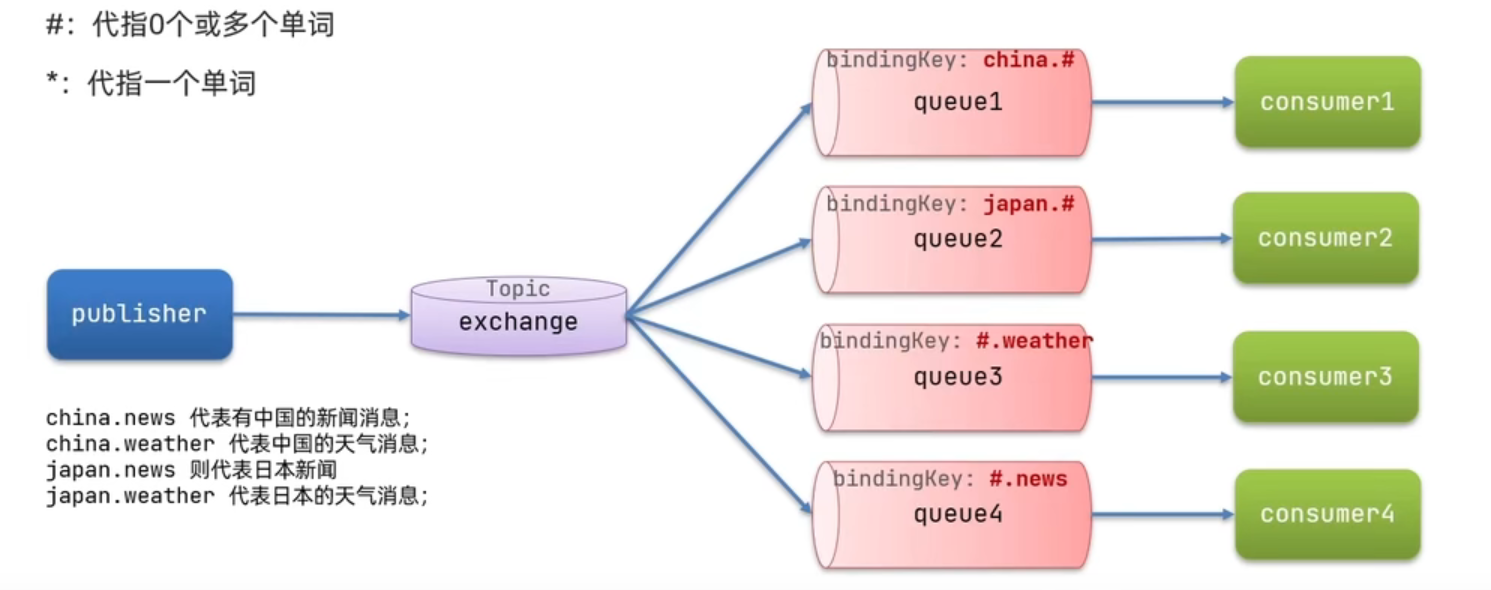
3.发布订阅——TopicExchange
- TopicExchange与DirectExchange类似,区别在于routingKey必须是多个单词的列表,并且以.分割
- Queue与Exchange指定BindingKey时可以使用通配符: - #代指0个或多个单词- *:代指一个单词
案例
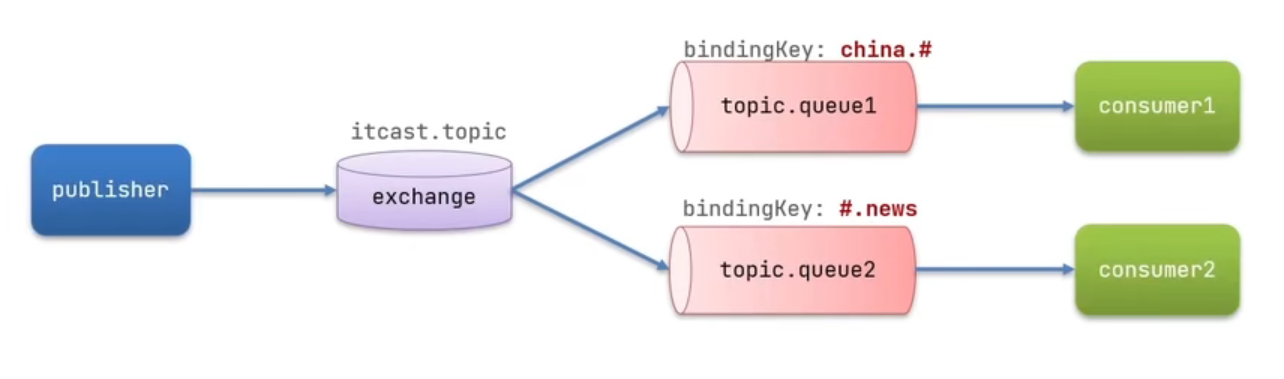
1.利用@RabbitListener声明Exchange,Queue,RoutingKey
2.在Consumer服务中,编写两个消费者方法,分别监听topic.queue1和topic.queue2
@RabbitListener(bindings =@QueueBinding(
        value =@Queue(name ="topic.queue1"),
        exchange =@Exchange(name ="itcast.topic", type =ExchangeTypes.TOPIC),
        key ="china.#"))publicvoidlistenTopicQueue1(String msg){System.out.println("消费者1接受的listenTopicQueue1的消息"+msg);}@RabbitListener(bindings =@QueueBinding(
        value =@Queue(name ="topic.queue1"),
        exchange =@Exchange(name ="itcast.topic", type =ExchangeTypes.TOPIC),
        key ="#.news"))publicvoidlistenTopicQueue2(String msg){System.out.println("消费者2接受的listenTopicQueue2的消息"+msg);}
3.在publisher中编写测试方法,向itcast.topic发送消息
@TestpublicvoidtestSendTopicExchange(){//交换机名称String exchangeName ="itcast.topic";//消息String message ="桀桀桀";
    rabbitTemplate.convertAndSend(exchangeName,"china.news", message);}
6.消息转换器
案例:测试发送Object类型消息
- 在SpringAMQP发送方法时,会默认将对象序列化为字节发送。
- spring对消息对象处理是由org.springframework.amqp.support.converter.MessageConverter来处理的。而默认实现是SimpleMessageConverter,基于ObjectOutputStream完成序列化。
- 如果要修改需要定义一个MessageConverter类型的Bean即可。推荐使用JSON方式序列化:
- 在publisher引入依赖
<dependency><groupId>com.fasterxml.jackson.dataformat</groupId><artifactId>jackson-dataformat-xml</artifactId><version>2.9.10</version></dependency> - 在publisher 服务声明 MessageConverter:
@SpringBootApplicationpublicclassPublisherApplication{publicstaticvoidmain(String[] args){SpringApplication.run(PublisherApplication.class);}@BeanpublicMessageConvertermessageConverter(){returnnewJackson2JsonMessageConverter();}} - 接收消息
@SpringBootApplicationpublicclassConsumerApplication{publicstaticvoidmain(String[] args){SpringApplication.run(ConsumerApplication.class, args);}@BeanpublicMessageConvertermessageConverter(){returnnewJackson2JsonMessageConverter();}}``````@RabbitListener(queues ="object.queue")publicvoidlistenObjectQueue(Map<String,Object> map){System.out.println("接收到object的消息为"+map);}
tatic void main(String[] args) {
SpringApplication.run(PublisherApplication.class);
}
   @Bean
   public MessageConverter messageConverter(){
       return new Jackson2JsonMessageConverter();
   }
}
3. 接收消息

```java
@SpringBootApplication
public class ConsumerApplication {
    public static void main(String[] args) {
        SpringApplication.run(ConsumerApplication.class, args);
    }

    @Bean
    public MessageConverter messageConverter(){
        return new Jackson2JsonMessageConverter();
    }
}
@RabbitListener(queues ="object.queue")publicvoidlistenObjectQueue(Map<String,Object> map){System.out.println("接收到object的消息为"+map);}
本文转载自: https://blog.csdn.net/m0_60181979/article/details/126338474
版权归原作者 _衍 所有, 如有侵权,请联系我们删除。
版权归原作者 _衍 所有, 如有侵权,请联系我们删除。