1. 前置作业
刷机获取root是必须的,而且必需要有一个支持docker的内核。
检测当前设备支持docker的方法:
安装Termux并初始化。 这里给个安装包下载链接:[termux app链接]。
下载Moby的脚本用于检查缺少的内核功能
pkg install wget tsu
wget https://raw.githubusercontent.com/moby/moby/master/contrib/check-config.sh
chmod +x check-config.sh
sed -i '1s_.*_#!/data/data/com.termux/files/usr/bin/bash_' check-config.sh
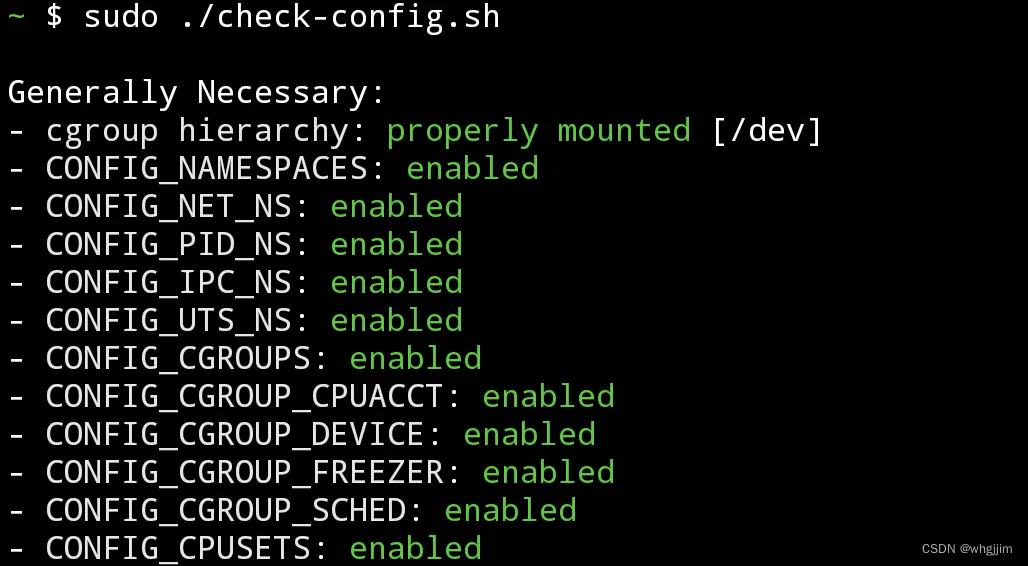
sudo ./check-config.sh
查看CONFIG都是绿字就行。

编译支持docker的安卓内核的方法,就不在此写了,有很多链接可以参考。
比如:自定义小米10pro(代号cmi)的kernel内核,并开启安卓支持docker
2. 开始安装ubuntu的lxc容器,以及安装dockerd
0. 安装termux
这一步就不用说了,因为下面都是在termux里执行的。本身验证内核是否符合要求,就已经要求安装好termux了。这里再发一下安装包下载链接(赚赚积分):[termux app链接]。
1. 安装lxc(仅第一次要执行)
pkg  install  root-repo   #它会添加新源
termux-change-repo    # 选择Mirror group -> 选择Mirrors in China
pkg  install  tsu  lxc  which
2. 配置cgroup和网络(仅第一次要执行)
执行如下命令检查cgroup版本:
tsu
mount | grep cgroup
注意看 /sys/fs/cgroup type cgroup2 这行,根据显示的信息,我的是 cgroup2
如果你是 cgroup1 版本,则执行
echo "lxc.init.cmd = /sbin/init systemd.unified_cgroup_hierarchy" >> $PREFIX/share/lxc/config/common.conf.d/ubuntu.conf
如果你是 cgroup2 版本 执行
echo "lxc.init.cmd = /sbin/init systemd.unified_cgroup_hierarchy=0" >> $PREFIX/share/lxc/config/common.conf.d/ubuntu.conf
修改cgroup自动挂载脚本,cgroup1 和 cgroup2 都要执行
# 修改/data/data/com.termux/files/usr/bin/lxc-setup-cgroups文件:
vi /data/data/com.termux/files/usr/bin/lxc-setup-cgroups
--- a/lxc-setup-cgroups   2020-07-24 05:01:51.000000000 +0800
+++ b/lxc-setup-cgroups   2023-10-30 12:28:23.758527725 +0800
@@ -3,9 +3,7 @@ set -e
 export PATH=$PATH:/system/xbin:/system/bin
-if ! mountpoint -q /sys/fs/cgroup; then
-       mount -t tmpfs -o mode=755,nodev,noexec,nosuid tmpfs /sys/fs/cgroup
-fi
+mount -t tmpfs -o mode=755,nodev,noexec,nosuid tmpfs /sys/fs/cgroup
 for cg in blkio cpu cpuacct cpuset devices freezer memory; do
        if [ ! -d "/sys/fs/cgroup/${cg}" ]; then
@@ -16,3 +14,7 @@ for cg in blkio cpu cpuacct cpuset devic
                mount -t cgroup -o "${cg}" cgroup "/sys/fs/cgroup/${cg}" || true
        fi
 done
+
+mkdir -p /sys/fs/cgroup/systemd;
+mount -t cgroup cgroup -o none,name=systemd /sys/fs/cgroup/systemd;
+
配置网络,cgroup1 和 cgroup2 都要执行
sed -i 's/lxc\.net\.0\.type = empty/lxc.net.0.type = none/g' /data/data/com.termux/files/usr/etc/lxc/default.conf
3. 挂载cgroup(以后每次重启设备后,都要执行)
sudo umount /sys/fs/cgroup
sudo umount /debug_ramdisk/.magisk/mirror/sys/fs/cgroup
# 上面两个umount只需安装新lxc容器,需要执行。主要用于排除对lxc的干扰。
tsu -s "lxc-setup-cgroups"
4. 安装ubuntu的 lxc 容器(仅第一次要执行)
tsu
lxc-create -t download -n ubuntu -- --server mirrors.tuna.tsinghua.edu.cn/lxc-images --no-validate
# 然后选择“ubuntu”, “bionic”,“arm64” ## !!注意不要选成amd64了
# 等待系统下载完成
到这里,先别急着启动系统,因为如果启动了 你会发现不知道登录用户名和密码
# vim开启鼠标的话,可输入“:set mouse=n”关闭
# 使用vi设置root密码:
vi  /data/data/com.termux/files/usr/var/lib/lxc/ubuntu/rootfs/etc/shadow
--- a/shadow    2023-10-31 08:57:36.605348208 +0800
+++ b/shadow    2023-10-31 08:58:10.808684949 +0800
@@ -1,4 +1,4 @@
-root:*:19598:0:99999:7:::
+root:paa5KD6arxLr2:19598:0:99999:7:::
 daemon:*:19598:0:99999:7:::
 bin:*:19598:0:99999:7:::
# 修改密码,就是修改用户名后 2 个:之间的内容,星号改为:paa5KD6arxLr2,这个密码的明文是123456
5. 启动lxc容器
第一次启动,使用如下命令启动,并立即做一些配置:(仅第一次要执行)
lxc-start -n ubuntu -d -F    # 启动 ubuntu 系统
#登录用户名为root,密码为123456

#登录lxc容器后,再在lxc容器里,执行如下配置命令:
passwd root #启动后,立即使用passwd修改root密码
#修改源
echo "deb https://mirrors.tuna.tsinghua.edu.cn/ubuntu-ports/ bionic main restricted universe multiverse" > /etc/apt/sources.list
echo "deb https://mirrors.tuna.tsinghua.edu.cn/ubuntu-ports/ bionic-updates main restricted universe multiverse" >> /etc/apt/sources.list
echo "deb https://mirrors.tuna.tsinghua.edu.cn/ubuntu-ports/ bionic-backports main restricted universe multiverse" >> /etc/apt/sources.list
echo "deb https://mirrors.tuna.tsinghua.edu.cn/ubuntu-ports/ bionic-security main restricted universe multiverse" >> /etc/apt/sources.list
apt update
# 没有网络的话,需要修复一下
### vi /etc/resolv.conf  #修改dns(apt更新不了,就修改dns,然后ping一下www.baidu.com)
# 测试一下 apt update, 还是没有网络的话,执行以下 2 条命令:
### groupadd -g 3003 aid_inet  执行这命令可能提示 aid_inet 已经存在,那就执行第 2 条命令即可
### usermod -G nogroup -g aid_inet _apt

#安装sshd,并配置root登录允许,开机自启动
apt install openssh-server
vi /etc/ssh/sshd_config  #修改为:PermitRootLogin yes
systemctl restart sshd
#改时区
date
ln -sf /usr/share/zoneinfo/Asia/Shanghai /etc/localtime
date
以后每次重启设备,使用如下命令启动:(以后每次重启设备后,都要执行)
tsu -s "lxc-start -n 容器名"
6. 配置路由和网络(以后每次重启设备后,都要执行)(这部分可以先执行,然后再启动lxc容器)
# 以下命令需要在lxc容器外面执行

# 开启网络转发
tsu -s "sysctl -w net.ipv4.ip_forward=1"
# 清理安卓防火墙
tsu -s "iptables -t filter -F"
tsu -s "iptables -t filter -X"
tsu -s "iptables -t nat -F"
tsu -s "iptables -t nat -X"
tsu -s "iptables -t raw -F"
tsu -s "iptables -t raw -X"
tsu -s "iptables -t mangle -F"
tsu -s "iptables -t mangle -X"
# 添加路由
tsu -s "ip rule add pref 1 from all lookup main"
tsu -s "ip rule add pref 2 from all lookup default"
# 这里的192.168.1.1需要换成自己当前网络的网关ip或路由器的ip
tsu -s "ip route add default via 192.168.1.1 dev wlan0"
tsu -s "ip rule add from all lookup main pref 30000"
7. lxc里安装dockerd(仅第一次要执行)
在lxc容器里执行这些命令,安装 dockerd:
curl -fsSL https://get.docker.com -o get-docker.sh
sh get-docker.sh
update-alternatives --set iptables /usr/sbin/iptables-legacy  # 切换到传统iptables模式
# 启用 docker
service docker start
service docker restart
systemctl enable docker
# 测试docker是否正常工作
docker run hello-world
[重点] docker 镜像运行失败修复:
如果hello-world运行失败,则需要下载runc文件:[runc链接]。替换/usr/bin/runc文件,并添加可执行权限。
同时需要在lxc容器外部,再执行:
tsu
echo "lxc.cgroup.devices.allow = c 10:200 rwm" >> /data/data/com.termux/files/usr/share/lxc/config/common.conf.d/ubuntu.conf
3. 其他补充
1. 目录挂载(仅第一次要执行)
在/data/data/com.termux/files/usr/share/lxc/config/common.conf.d/ubuntu.conf配置文件里,添加目录挂载,将安卓系统的system、data、sdcard目录挂载进去,方便使用。最终该配置文件里的内容如下:
lxc.init.cmd = /sbin/init systemd.unified_cgroup_hierarchy=0
lxc.cgroup.devices.allow = c 10:200 rwm
lxc.mount.entry = /storage/self/primary mnt/ none bind 0 0
lxc.mount.entry = /data data/ none bind 0 0
lxc.mount.entry = /system system/ none bind 0 0
2. dns自动重置文件修复(仅第一次要执行)
lxc的dns配置文件/etc/resolv.conf会自动重置,需要这样配置:
# 在lxc容器内部,执行如下配置:
rm -f /etc/resolv.conf #删除旧文件(旧文件是一个软链接)
echo "nameserver 8.8.8.8" > /etc/resolv.conf
systemctl stop systemd-resolved
systemctl disable systemd-resolved
systemctl mask systemd-resolved
3. 停止容器的方法
# 方法一:
sudo lxc-stop -n 容器名  -k   # 强行停止 termux,lxc 容器并不会停止,所以还是需要用命令
# 方法二:
# 进入容器,执行 `poweroff` 命令
4. 这里把我用的termux启动lxc容器的脚本,提供给大家参考:
# cat start_ubuntu.sh

#!/data/data/com.termux/files/usr/bin/bash

BootLog() {
        echo `date` >> myboot.log
        echo `id` >> myboot.log
        echo `pwd` >> myboot.log
        env >> myboot.log
        echo "============================================" >> myboot.log
}

BootLog
termux-wake-lock

tsu -s "sysctl -w net.ipv4.ip_forward=1"
tsu -s "iptables -t filter -F"
tsu -s "iptables -t filter -X"
tsu -s "iptables -t nat -F"
tsu -s "iptables -t nat -X"
tsu -s "iptables -t raw -F"
tsu -s "iptables -t raw -X"
tsu -s "iptables -t mangle -F"
tsu -s "iptables -t mangle -X"
tsu -s "ip rule add pref 1 from all lookup main"
tsu -s "ip rule add pref 2 from all lookup default"
tsu -s "ip route add default via 192.168.1.1 dev wlan0"
tsu -s "ip rule add from all lookup main pref 30000"

tsu -s "lxc-setup-cgroups"
tsu -s "lxc-start -n ubuntu"
5. 补充其他问题解决
解决普通用户不能用sudo的方法
mount -n -o remount,suid /
解决普通用户不能联网的方法
usermod -g aid_inet 用户名
初始密码修改为其他自定义值的方法
sudo chroot $PREFIX/var/lib/lxc/容器名/rootfs bin/passwd
按提示
输入密码 回车
再次输入密码 回车
其他参考链接:
4. 遗留问题
如果要拿手机当服务器来跑docker,还需要解决电池的问题。因为既然是跑服务,肯定是24小时接电源适配器的,这样时间长了,手机电池绝对遭不住。轻则鼓包漏气、后盖起翘,重则起火就得不偿失了。本人可不承担,请自行承担后果哦。
但古人有言,祸福相依,手机的电池,并非只会带来坏处。如果我们处理得当,相当于给我们的服务器自带了一个UPS,岂不美哉。
方法暂不公开了,如需技术协助,可以邮件我:w._heng@163.com,¥50 for 啤酒。
版权归原作者 whgjjim 所有, 如有侵权,请联系我们删除。