
文章目录
0 问题的提出
0.1 关于115网盘
本文无意探究115网盘的好坏,也并非是要推崇特定产品,只是提供一套解决方案,其他网盘也可以使用。经历多轮环境的风云变换,115还是活了下来,说明115还是经受住了市场的考验。问题的关键在于115网盘的门槛另很多人望而却步,小众带来的问题便是相关的配套的生态不够完善,很多不错的插件也已不再更新,相关的教程少的可怜。
0.2本文的内容安排
监于网络中的各种文章的质量良莠不齐,本文将网络中的内容进行了整合,主要内容主要包以下几个方面:
- AList 的安装与115网盘的挂载
- Aria2 与 AList 的整合
- Rclone的安装与 AList 挂载
1 安装AList 的并挂载115网盘
1.1 安装AList
本文建议手动安装所有的软件,原因主要有两点:一是不同软件间的相互协作需要在相同的环境下,如
alist
和
aria2
,使用
docker
会增加配置的难度;二是就个人经验而言
docker
十分占用系统资源,增加电脑负担。
安装
alist
参考官网的安装教程:
- 打开
AList的发布页面AList Release,选择自己喜欢的AList版本并复制下载链接
- 下载并安装
AList
# 进入你喜欢的目录并下载:
cd /your/path/
wget https://github.com/alist-org/alist/releases/download/v3.28.0/alist-darwin-arm64.tar.gz

# 解压缩:
tar -zxvf alist-xxxx.tar.gz
# 赋其可执行权限:
chmod +x alist
# 启动服务
./alist server

# 不同版本设定管理员随机密码:
# 小于 v3.25.0 版
./alist admin

# 高于 v3.25.0 版
# 设定随机密码
./alist admin random
# 手动设定密码 `NEW_PASSWORD` 改成自己欢的密码
./alist admin set NEW_PASSWORD
- 配置开机启动项
# 编辑配置文件
vi ~/Library/LaunchAgents/ci.nn.alist.plist
- 文件内容
- 将
path_alist改成自己所在的路径- 将
path/to/working/dir改为AList的工作目录,这两个内容可以相同
<?xml version="1.0" encoding="UTF-8"?>
<!DOCTYPE plist PUBLIC "-//Apple//DTD PLIST 1.0//EN" "http://www.apple.com/DTDs/PropertyList-1.0.dtd">
<plist version="1.0">
     <dict>
         <key>Label</key>
         <string>ci.nn.alist</string>
         <key>KeepAlive</key>
         <true/>
         <key>ProcessType</key>
         <string>Background</string>
         <key>RunAtLoad</key>
         <true/>
         <key>WorkingDirectory</key>
         <string>path/to/working/dir</string>
         <key>ProgramArguments</key>
         <array>
             <string>path_alist/alist</string>
             <string>server</string>
         </array>
     </dict>
</plist>
- 加载配置项:
launchctl load ~/Library/LaunchAgents/ci.nn.alist.plist - 启动
AList:launchctl start ~/Library/LaunchAgents/ci.nn.alist.plist - 停止
AList:launchctl stop ~/Library/LaunchAgents/ci.nn.alist.plist - 卸载配置项:
launchctl unload ~/Library/LaunchAgents/ci.nn.alist.plist
1.2 挂载115网盘
- 在流浏器地址栏输入
http://ip:5244进入AList首页,本机可以直接输入127.0.0.1:5244
- 进入管理界面
- 添加网盘
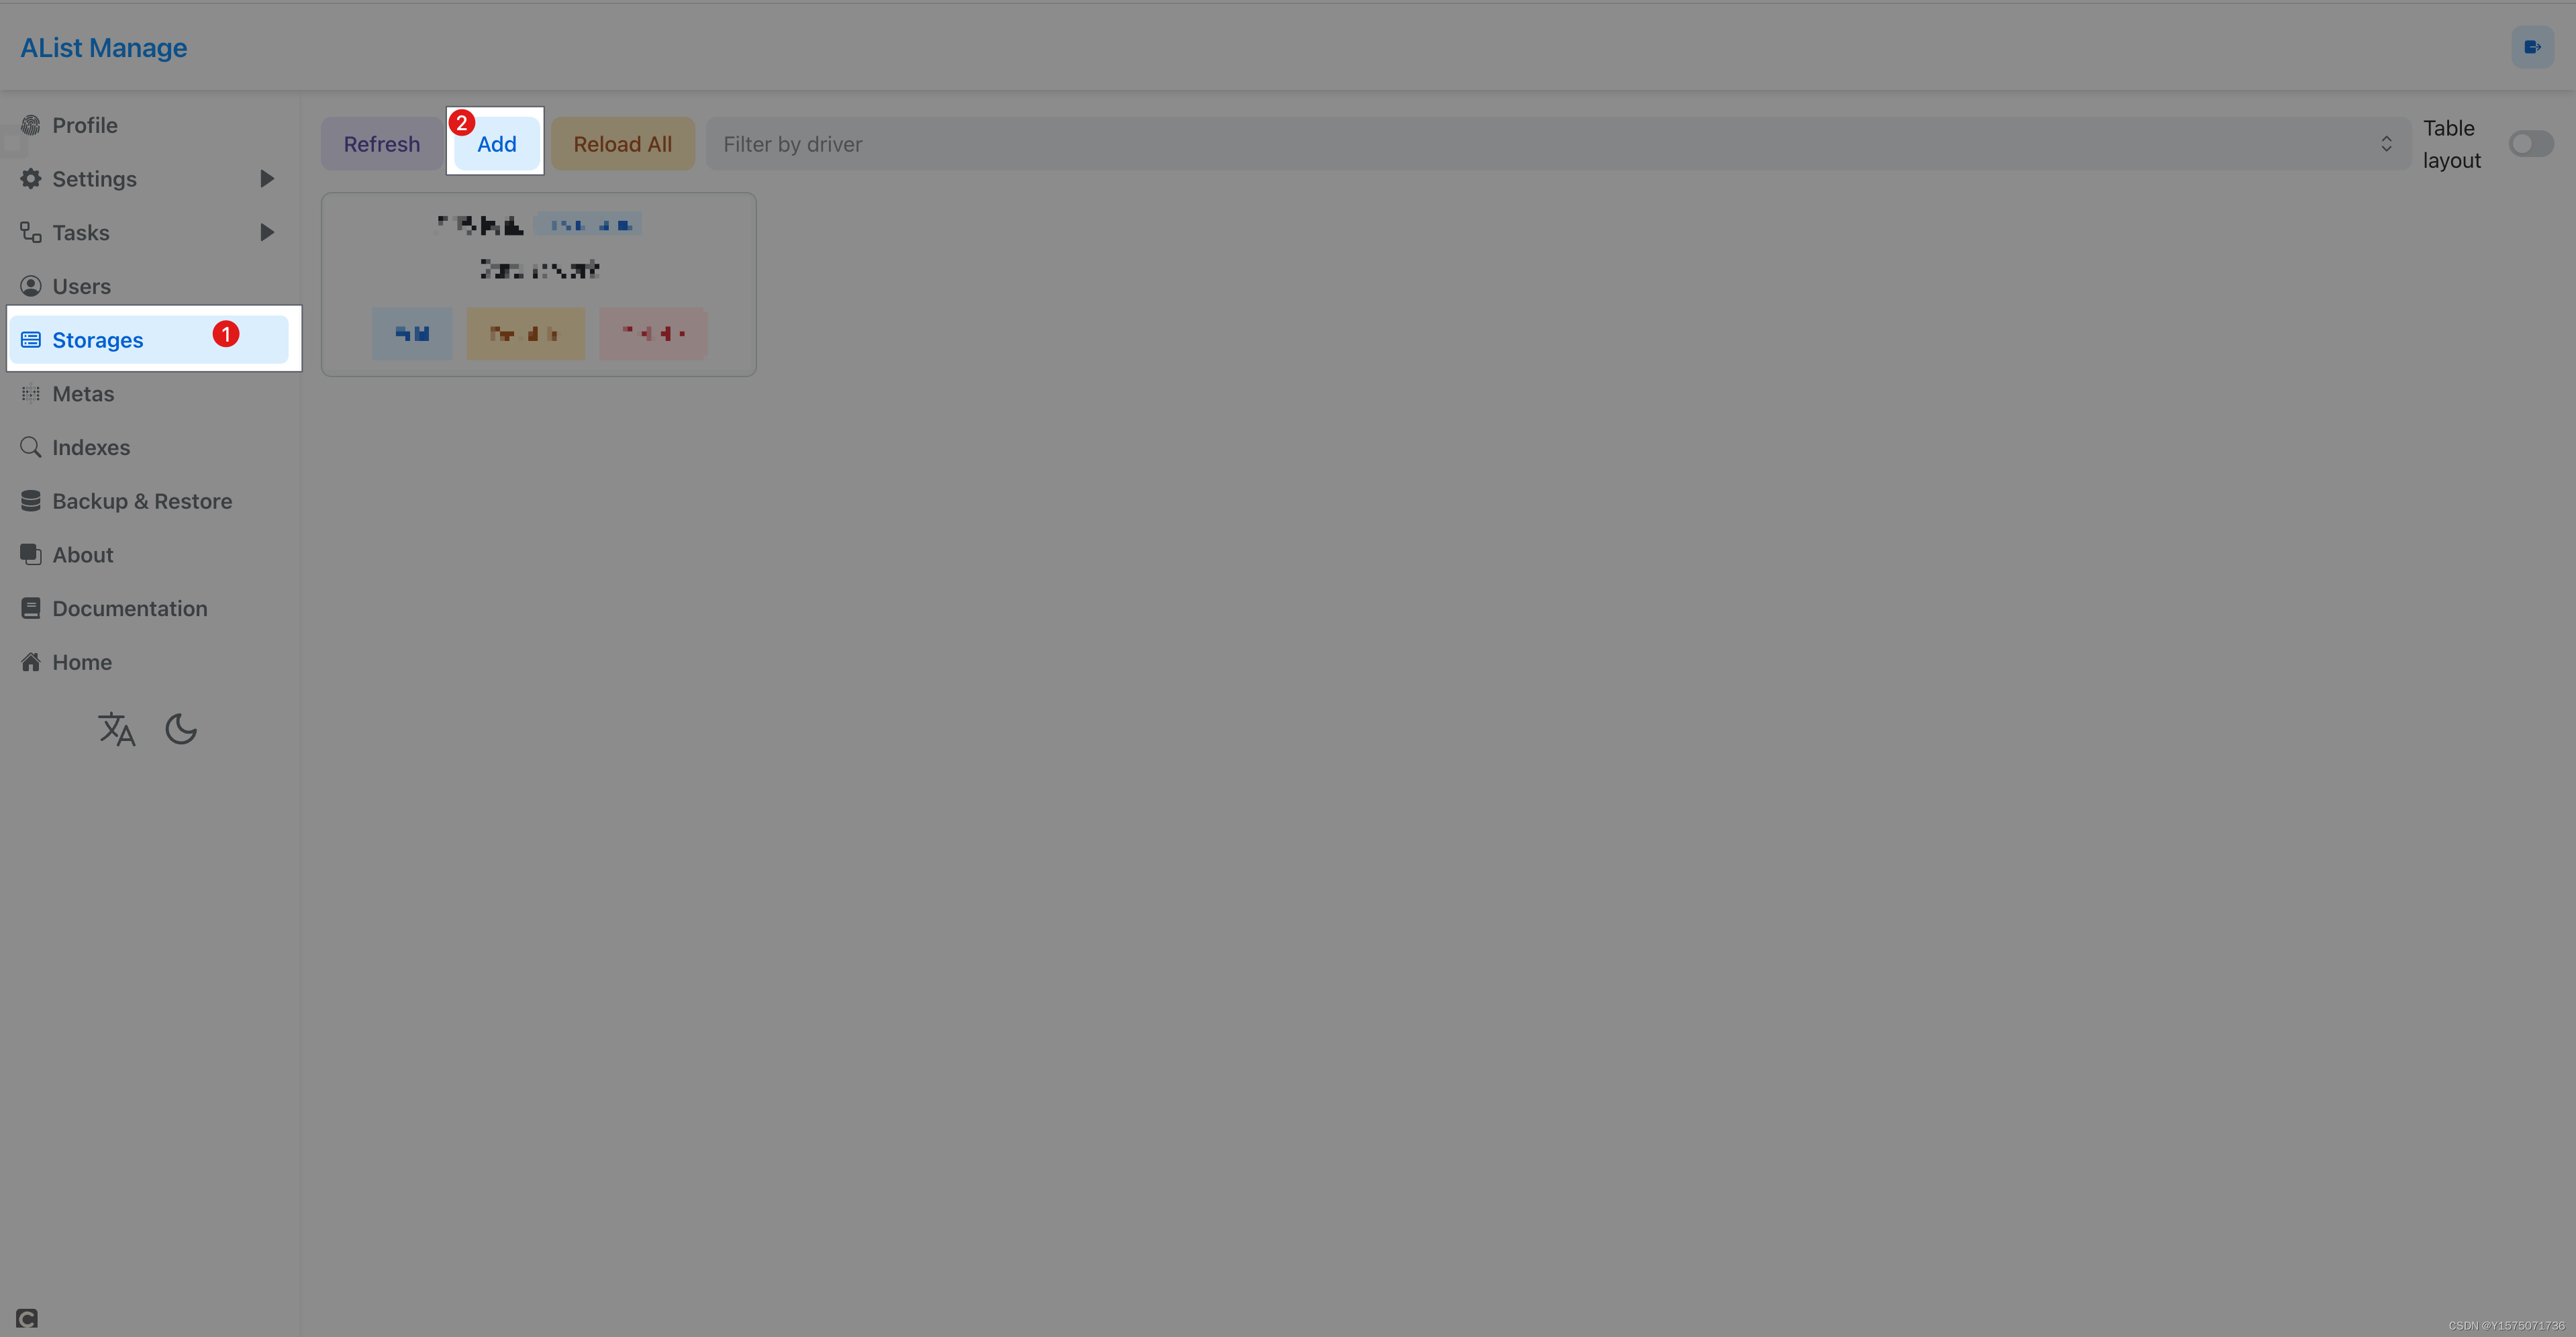
- 115网盘挂载需要填写的相关信息
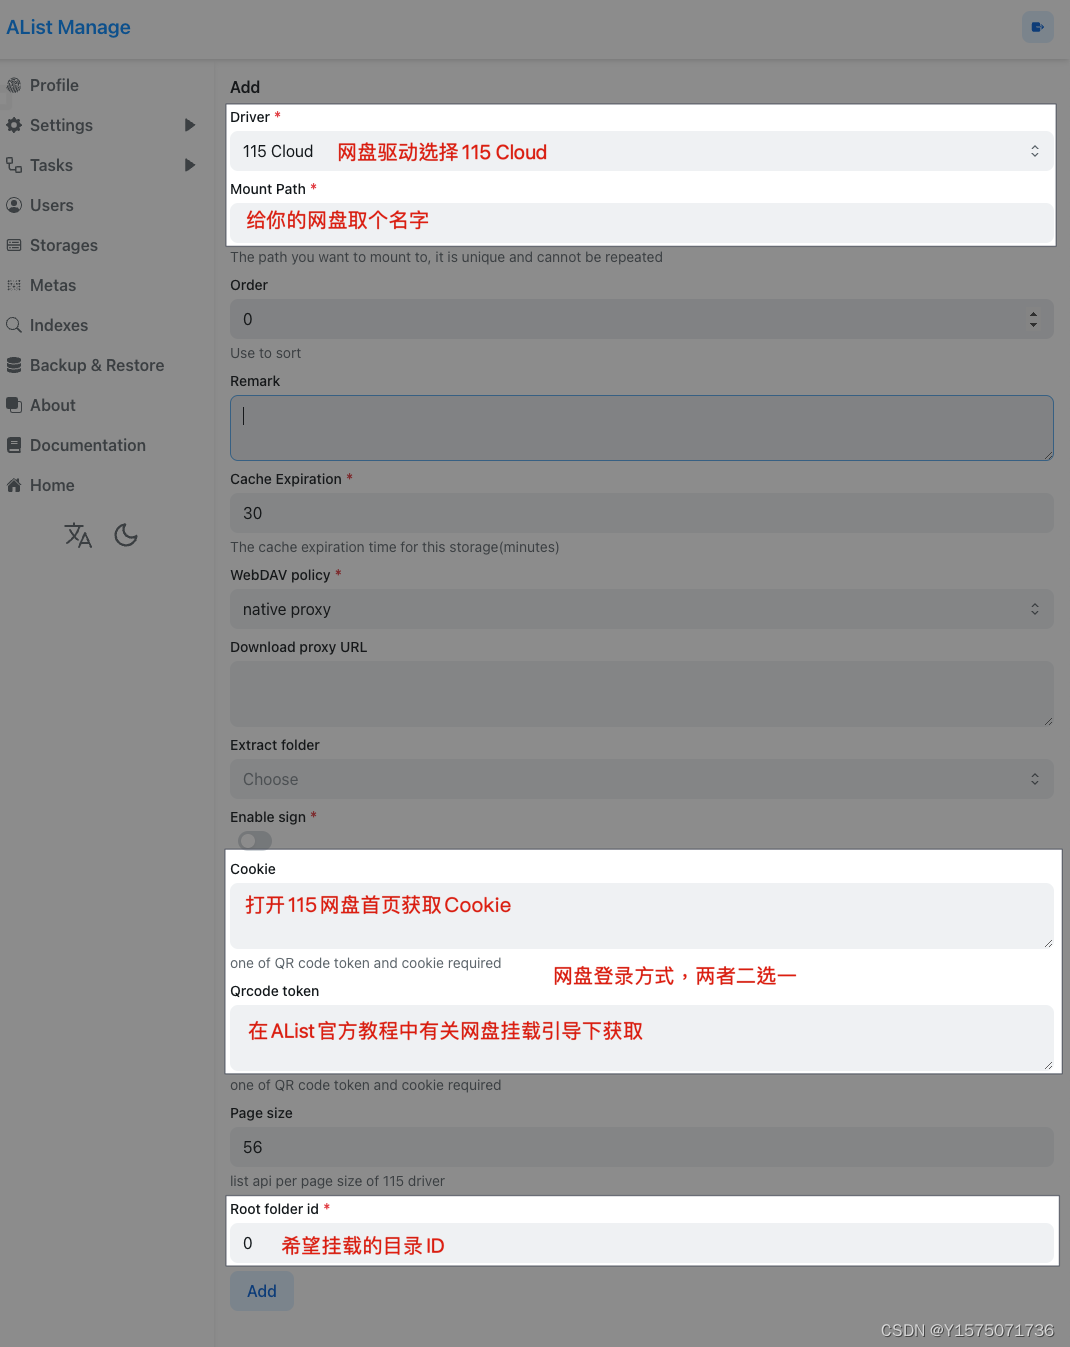
- 115网盘
Cookie获取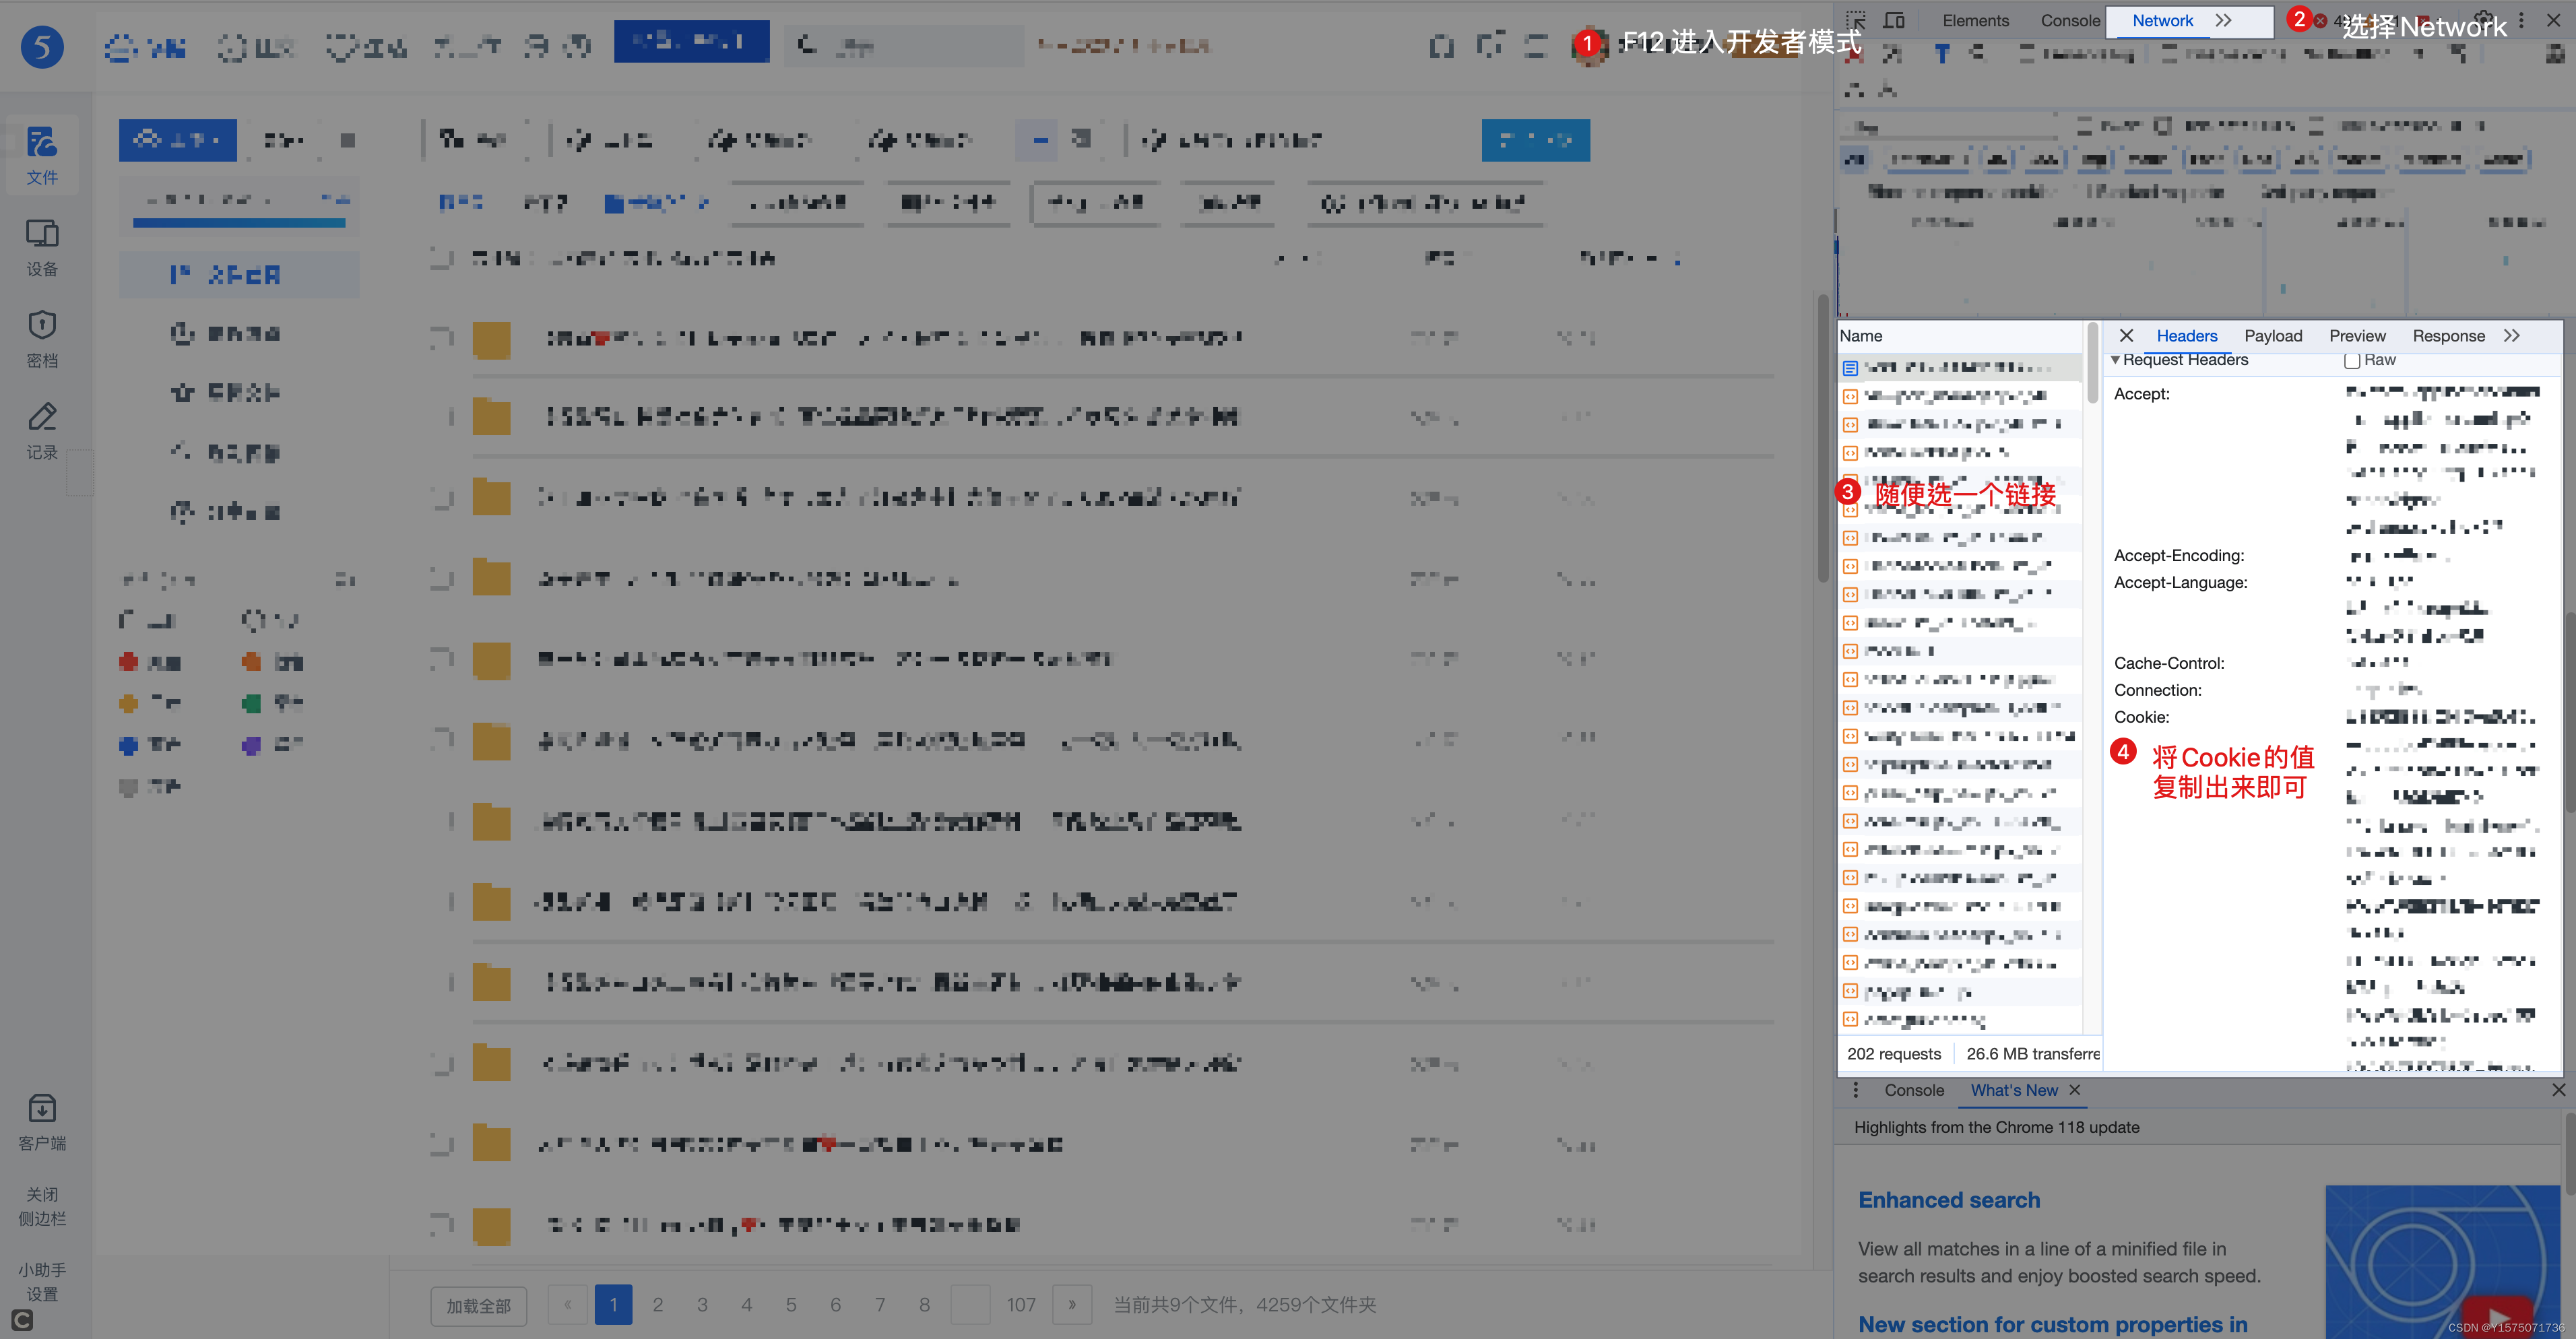
- 115网盘
Qrcode token在此获取QRCode 扫码方式登录
- 115网盘
Root folder id获取
2 Aria2 与 AList 的整合
2.1 Aria2 安装与 RPC 设置
aria2本文建议直接使用Motix
- 获取
rpc设置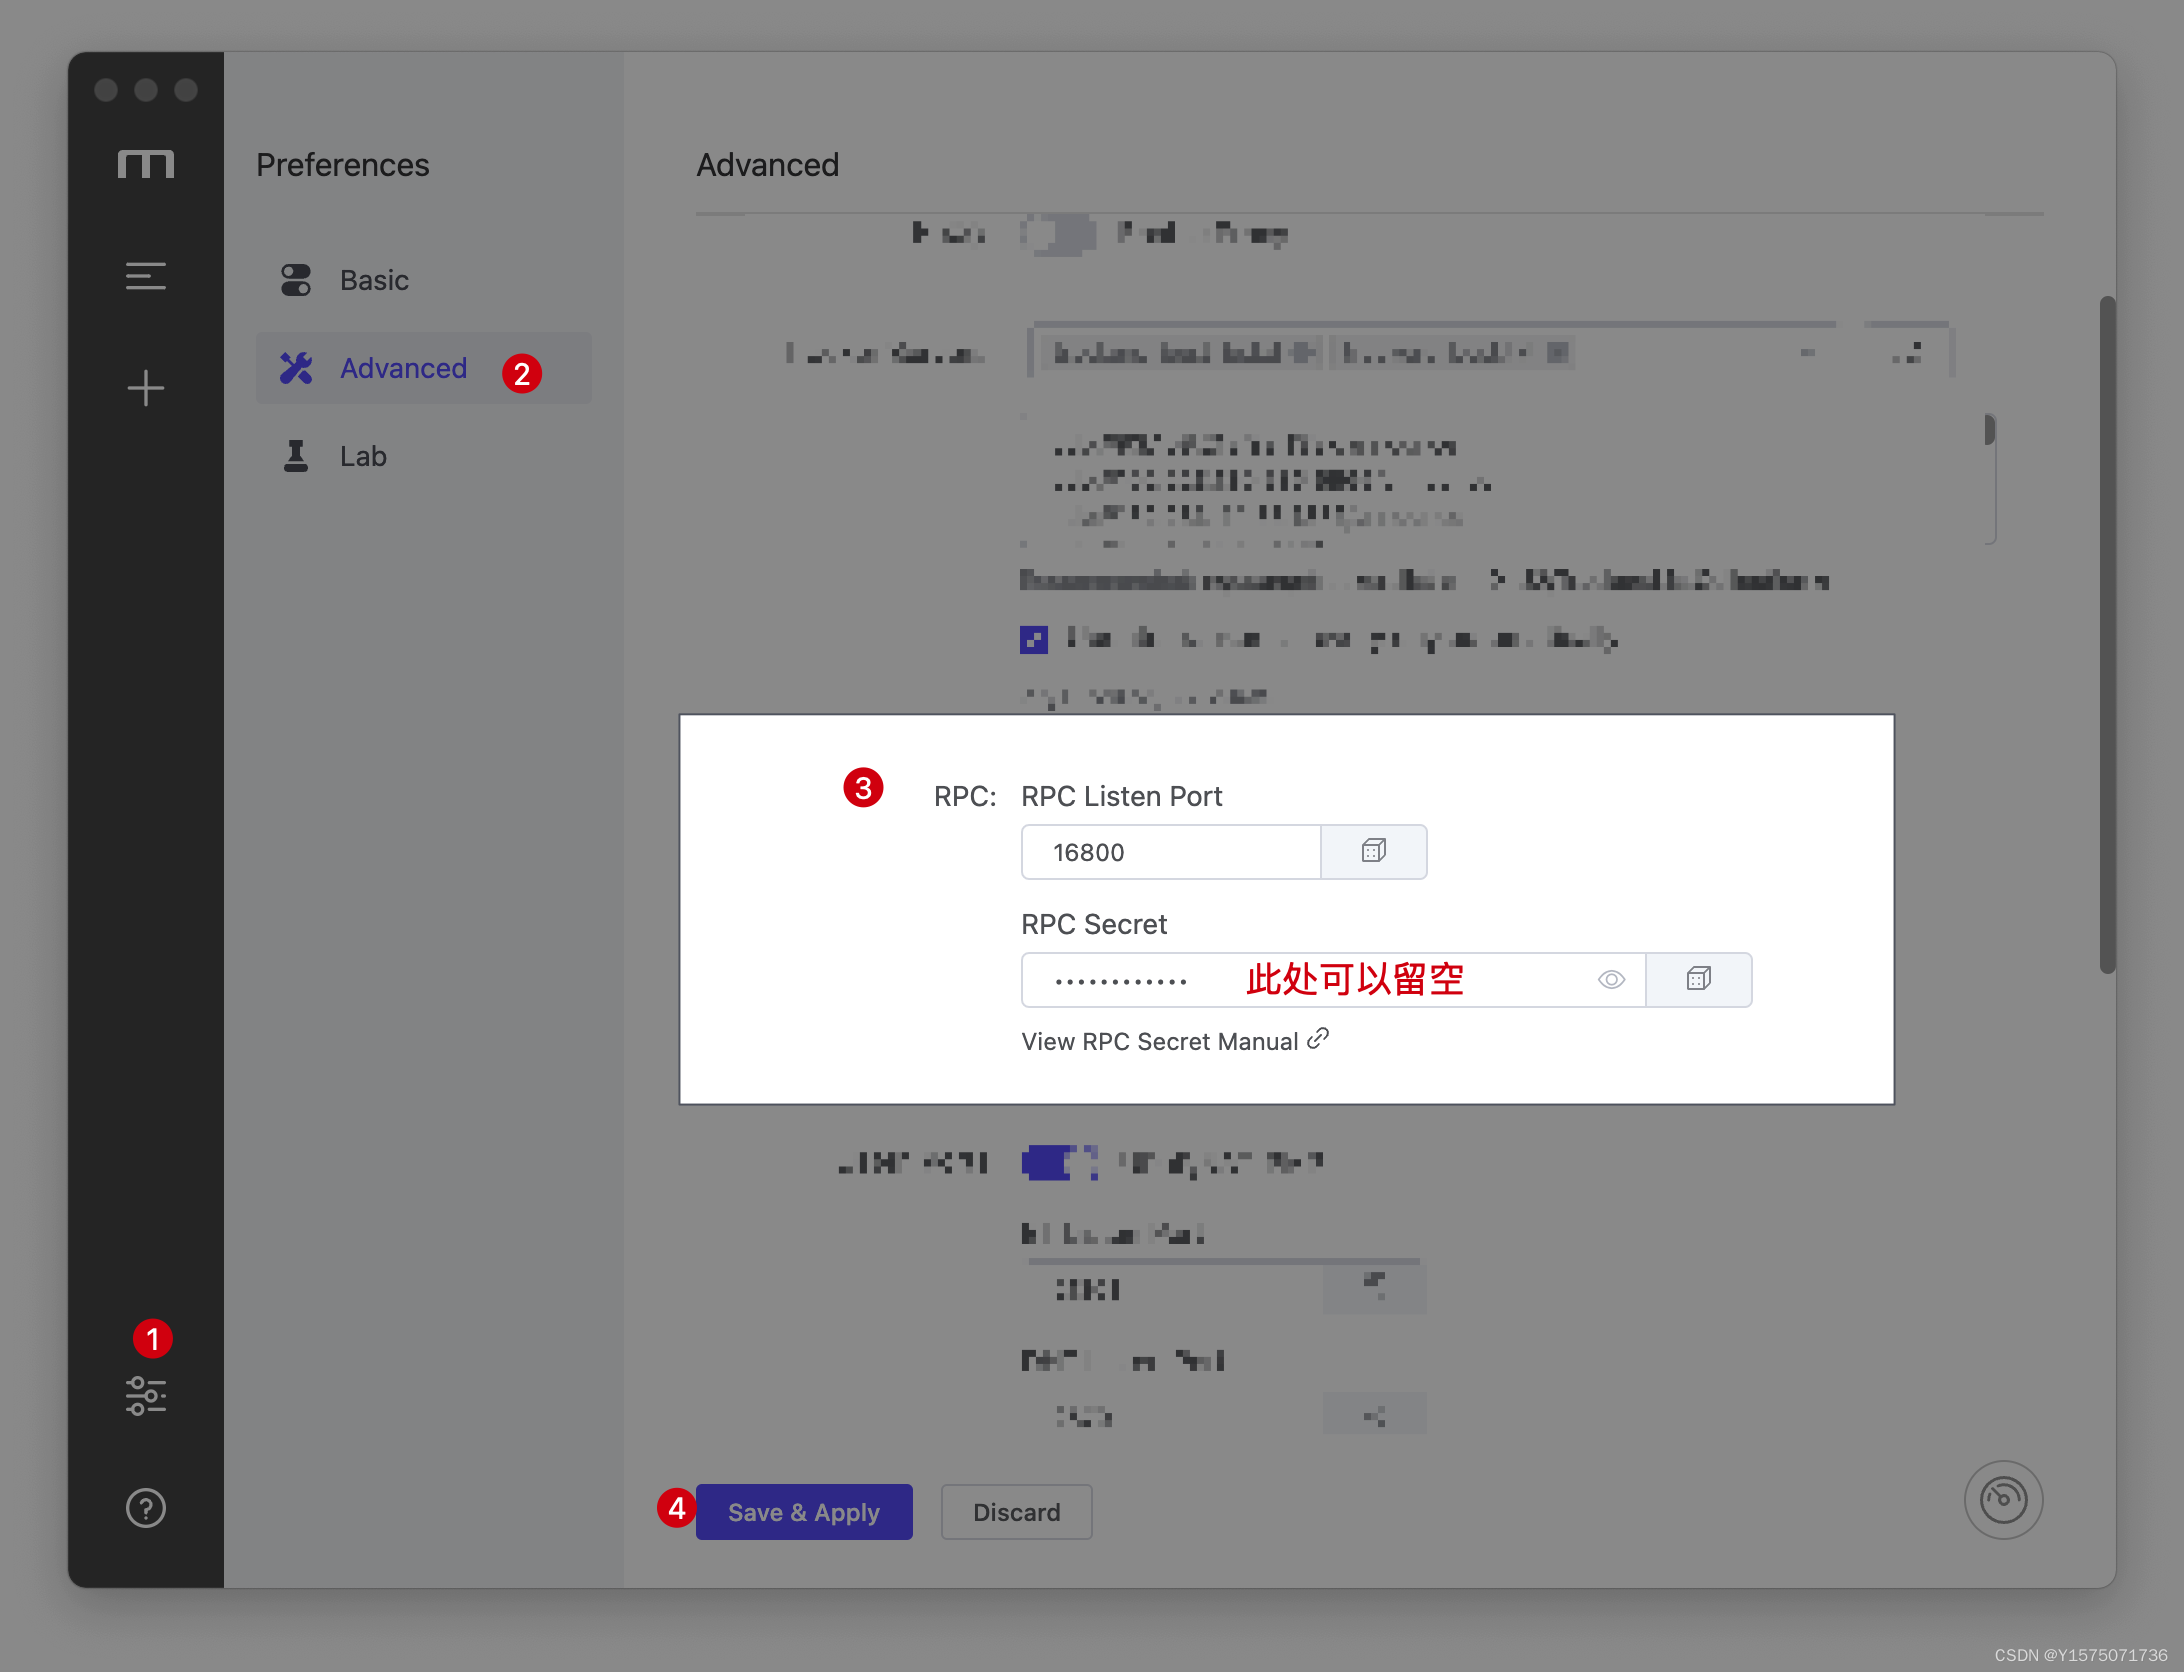
2.2 配置 Aria2
- 将
Motrix中关于rpc的信息填入AList后端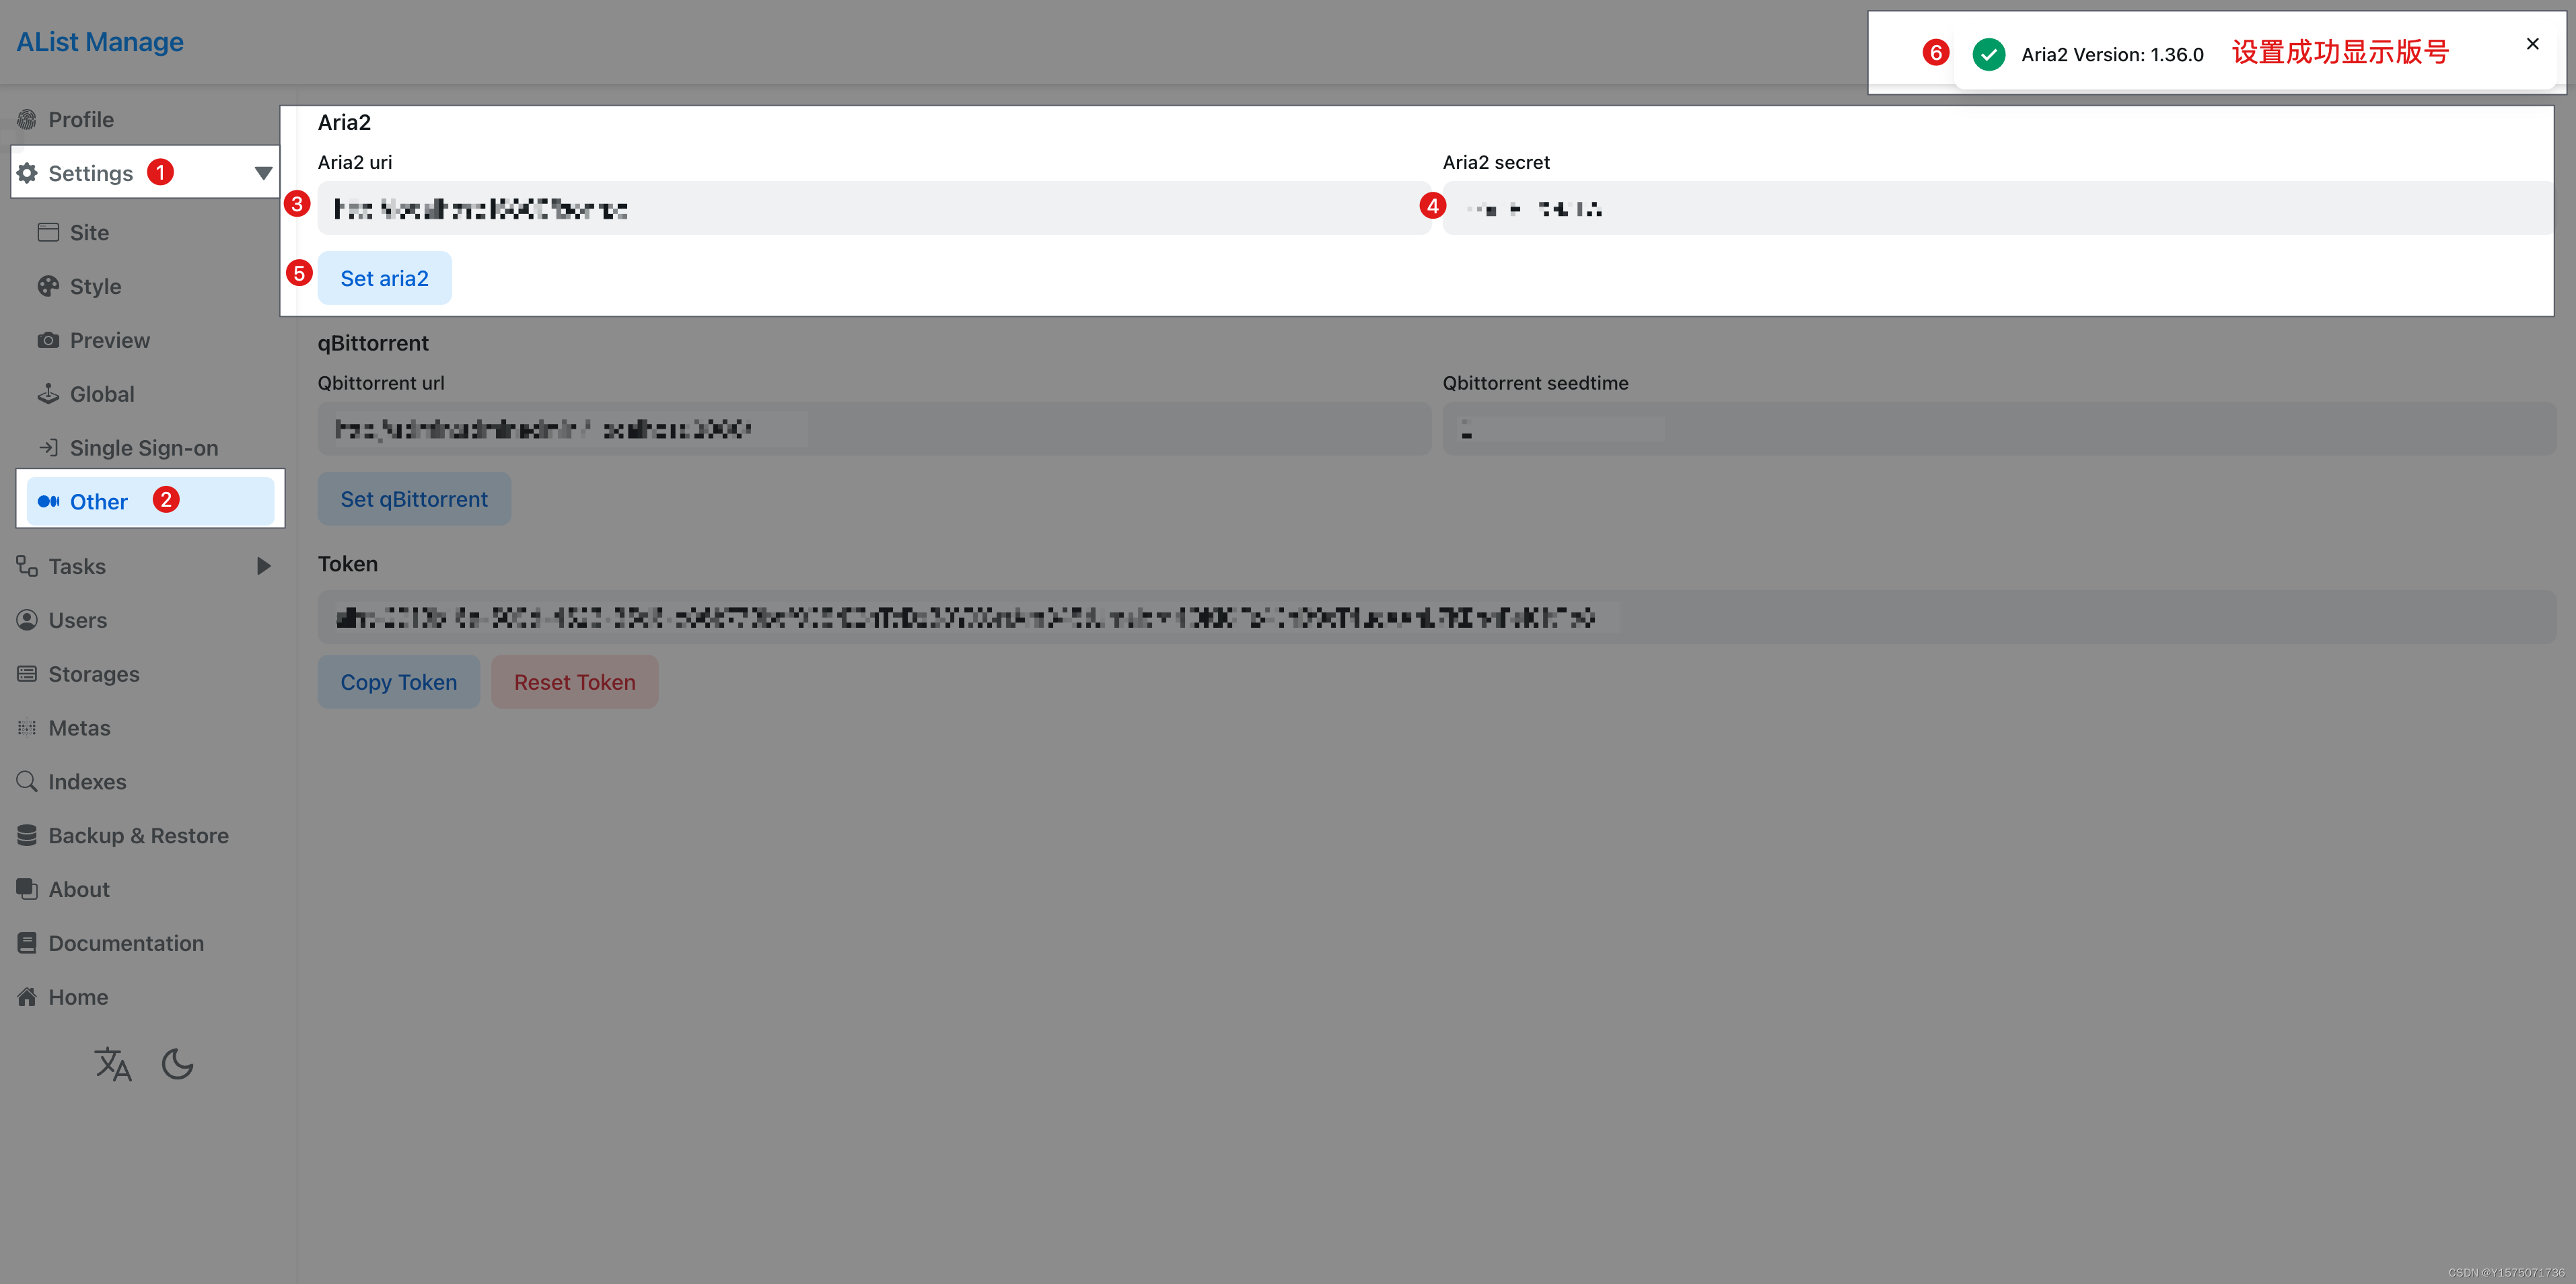
AList前端配置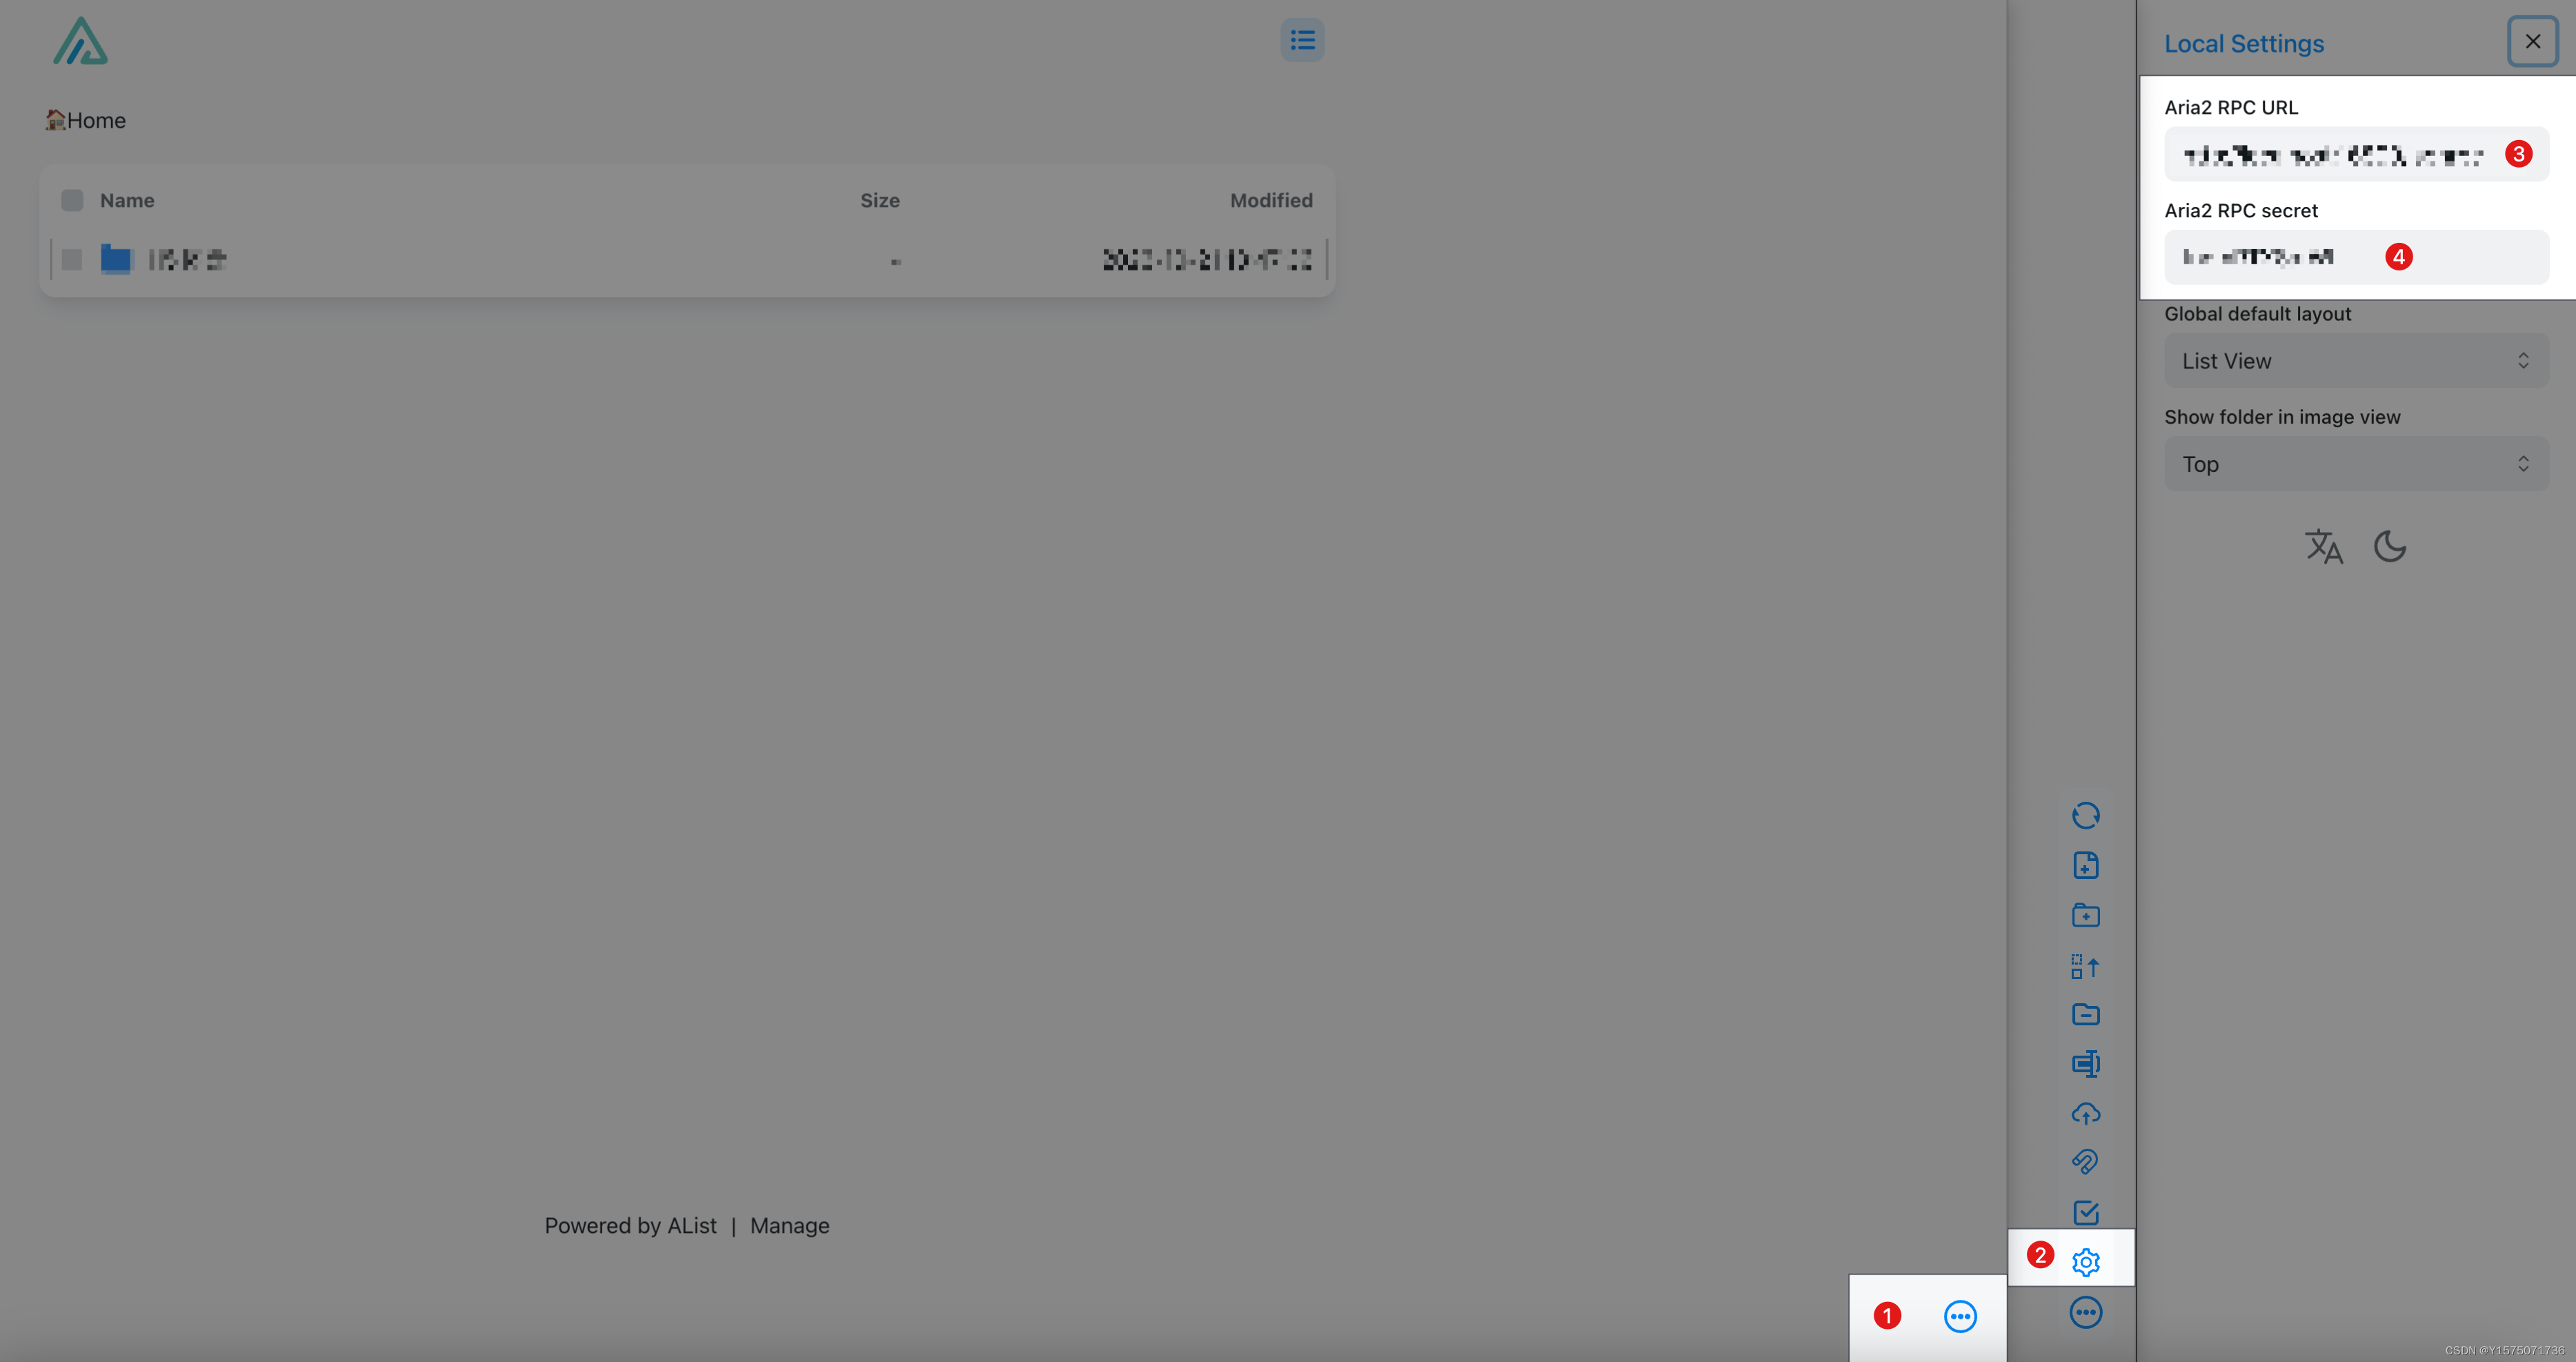
3 Rclone 与 AList 整合
3.1 Rclone 安装
- 环境依赖
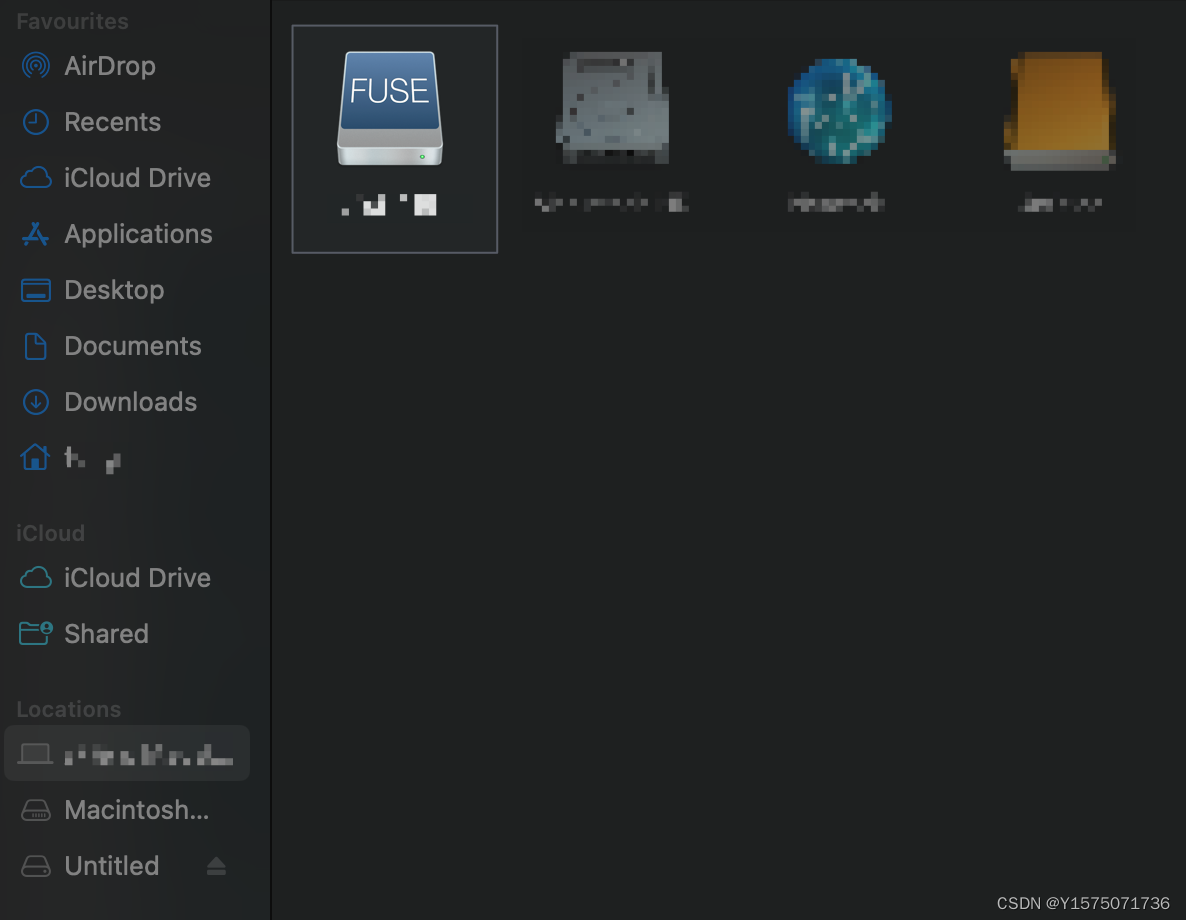
Mac下文件系统支持不全,需要
Macfuse提供第三方文件系的支持
brew install --cask macfuse
- 安装
rclone,参考官方教程
sudo -v ; curl https://rclone.org/install.sh | sudo bash
brew安装的rclone不具备挂载功能
3.2 挂载 AList
- 在终端中输入
rclone config生成`rclone配置文件 n新建一个远程链接
Current remotes:

e) Edit existing remote
n) New remote
d) Delete remote
r) Rename remote
c) Copy remote
s) Set configuration password
q) Quit config
e/n/d/r/c/s/q> n
- 取一个自己喜欢的名字
Enter name for new remote.
name> alist
- 视情况而定选择
Web Dav
Option Storage.
Type of storage to configure.
Choose a number from below, or type in your own value.
 1 / 1Fichier
   \ (fichier)
 2 / Akamai NetStorage
   \ (netstorage)
 3 / Alias for an existing remote
   \ (alias)
 4 / Amazon Drive
   \ (amazon cloud drive)
 5 / Amazon S3 Compliant Storage Providers including AWS, Alibaba, ArvanCloud, Ceph, China Mobile, Cloudflare, GCS, DigitalOcean, Dreamhost, Huawei OBS, IBM COS, IDrive e2, IONOS Cloud, Leviia, Liara, Lyve Cloud, Minio, Netease, Petabox, RackCorp, Scaleway, SeaweedFS, StackPath, Storj, Synology, Tencent COS, Qiniu and Wasabi
   \ (s3)
 6 / Backblaze B2
   \ (b2)
 7 / Better checksums for other remotes
   \ (hasher)
 8 / Box
   \ (box)
 9 / Cache a remote
   \ (cache)
10 / Citrix Sharefile
   \ (sharefile)
11 / Combine several remotes into one
   \ (combine)
12 / Compress a remote
   \ (compress)
13 / Dropbox
   \ (dropbox)
14 / Encrypt/Decrypt a remote
   \ (crypt)
15 / Enterprise File Fabric
   \ (filefabric)
16 / FTP
   \ (ftp)
17 / Google Cloud Storage (this is not Google Drive)
   \ (google cloud storage)
18 / Google Drive
   \ (drive)
19 / Google Photos
   \ (google photos)
20 / HTTP
   \ (http)
21 / Hadoop distributed file system
   \ (hdfs)
22 / HiDrive
   \ (hidrive)
23 / In memory object storage system.
   \ (memory)
24 / Internet Archive
   \ (internetarchive)
25 / Jottacloud
   \ (jottacloud)
26 / Koofr, Digi Storage and other Koofr-compatible storage providers
   \ (koofr)
27 / Local Disk
   \ (local)
28 / Mail.ru Cloud
   \ (mailru)
29 / Mega
   \ (mega)
30 / Microsoft Azure Blob Storage
   \ (azureblob)
31 / Microsoft OneDrive
   \ (onedrive)
32 / OpenDrive
   \ (opendrive)
33 / OpenStack Swift (Rackspace Cloud Files, Blomp Cloud Storage, Memset Memstore, OVH)
   \ (swift)
34 / Oracle Cloud Infrastructure Object Storage
   \ (oracleobjectstorage)
35 / Pcloud
   \ (pcloud)
36 / PikPak
   \ (pikpak)
37 / Proton Drive
   \ (protondrive)
38 / Put.io
   \ (putio)
39 / QingCloud Object Storage
   \ (qingstor)
40 / Quatrix by Maytech
   \ (quatrix)
41 / SMB / CIFS
   \ (smb)
42 / SSH/SFTP
   \ (sftp)
43 / Sia Decentralized Cloud
   \ (sia)
44 / Storj Decentralized Cloud Storage
   \ (storj)
45 / Sugarsync
   \ (sugarsync)
46 / Transparently chunk/split large files
   \ (chunker)
47 / Union merges the contents of several upstream fs
   \ (union)
48 / Uptobox
   \ (uptobox)
49 / WebDAV
   \ (webdav)
50 / Yandex Disk
   \ (yandex)
51 / Zoho
   \ (zoho)
52 / premiumize.me
   \ (premiumizeme)
53 / seafile
   \ (seafile)
Storage> 49
- 输入
http://ip:5244/dav,本机可输入http://127.0.0.1:5244/dav
Option url.
URL of http host to connect to.
E.g. https://example.com.
Enter a value.
url> http://127.0.0.1:5244/dav
- 视情况而定选择
Other site/service or software
Option vendor.
Name of the WebDAV site/service/software you are using.
Choose a number from below, or type in your own value.
Press Enter to leave empty.
 1 / Fastmail Files
   \ (fastmail)
 2 / Nextcloud
   \ (nextcloud)
 3 / Owncloud
   \ (owncloud)
 4 / Sharepoint Online, authenticated by Microsoft account
   \ (sharepoint)
 5 / Sharepoint with NTLM authentication, usually self-hosted or on-premises
   \ (sharepoint-ntlm)
 6 / Other site/service or software
   \ (other)
vendor> 6
- 输入
AList帐户名
Option user.
User name.
In case NTLM authentication is used, the username should be in the format 'Domain\User'.
Enter a value. Press Enter to leave empty.
user> admin
- 选择
y,输入两次密码
Option pass.
Password.
Choose an alternative below. Press Enter for the default (n).
y) Yes, type in my own password
g) Generate random password
n) No, leave this optional password blank (default)
y/g/n> y
Enter the password:
password:
Confirm the password:
password:
- 回车
Option bearer_token.
Bearer token instead of user/pass (e.g. a Macaroon).
Enter a value. Press Enter to leave empty.
bearer_token>
- 回车
Edit advanced config?
y) Yes
n) No (default)
y/n>
- 回车
Configuration complete.
Options:
- type: webdav
- url: http://127.0.0.1:5244/dav
- vendor: other
- user: admin
- pass: *** ENCRYPTED ***
Keep this "alist" remote?
y) Yes this is OK (default)
e) Edit this remote
d) Delete this remote
y/e/d>
- 选
q退出
Current remotes:

Name                 Type
====                 ====
alist                webdav
e) Edit existing remote
n) New remote
d) Delete remote
r) Rename remote
c) Copy remote
s) Set configuration password
q) Quit config
e/n/d/r/c/s/q> q
- 查看连接是否成功
# 查看 alist 挂载的硬盘 <name> 前面设定的名字
rclone lsd <name>:

# 查看 alist 中的文件
rclone ls <name>:
- 挂载到本地
# 建一个挂载点
mkdir /your/path
# 挂载
rclone mount <DriveName>:<Folder>  <LocalFolder> --copy-links --no-gzip-encoding --no-check-certificate --allow-other --allow-non-empty --umask 000 --use-mmap
DriverName是你在配置rclone的时候设置的名字,Folder没有需要求的话填/即可,LocalFolder是你本地挂载的地址,/tmp比较特殊,上传时缓存目录,其他类型挂载一般时不需要这个参数的,默认/tmp地址即可,除非你的系统特殊。
例如:
rclone mount alist:/ /webdav --copy-links --no-gzip-encoding --no-check-certificate --allow-other --allow-non-empty --umask 000 --use-mmap --daemon
- 解除本地挂载
# 解除本地挂载,后面跟的是挂载的本地目录
# 当自动取消挂载失败时,也可以这样手动取消挂载
fusermount -qzu /webdav
3.3 设置开机启动
- 创建
plist文件
vi ~/Library/LaunchAgents/com.example.mount_rclone.plist
- 填写以下内容
rclone配置文件的位置为
~/.config/rclone/rclone.conf<USER>为
Mac本机用户
<?xml version="1.0" encoding="UTF-8"?>
<!DOCTYPE plist PUBLIC "-//Apple//DTD PLIST 1.0//EN" "http://www.apple.com/DTDs/PropertyList-1.0.dtd">
<plist version="1.0">
    <dict>
        <key>KeepAlive</key>
            <true/>
        <key>Label</key>
            <string>com.example.mount_rclone</string>
        <key>ProgramArguments</key>
            <array>
                <string>/usr/local/bin/rclone</string>
                <string>mount</string>
                <string>--allow-other</string>
                <string>--allow-non-empty</string>
                <string>--config=/Users/<USER>/.config/rclone/rclone.conf</string>
                <string>--copy-links</string>
                <string>--no-gzip-encoding</string>
                <string>--no-check-certificate</string>
                <string>--umask=000</string>
                <string>--use-mmap</string>
                <string><DriveName>:<Folder></string>
                <string><LocalFolder></string>
            </array>
        <key>RunAtLoad</key>
            <true/>
        <key>StandardErrorPath</key>
            <string>/Users/<USER>/Documents/logs/rclone-mount.log</string>
        <key>StandardOutPath</key>
            <string>/Users/<USER>/Documents/logs/stdout</string>
    </dict>
</plist>
- 加载配置项:
launchctl load ~/Library/LaunchAgents/com.example.mount_rclone.plist- 启动
Rclone:launchctl start ~/Library/LaunchAgents/com.example.mount_rclone.plist- 停止
Rclone:launchctl stop ~/Library/LaunchAgents/com.example.mount_rclone.plist- 卸载配置项:
launchctl unload ~/Library/LaunchAgents/com.example.mount_rclone.plist
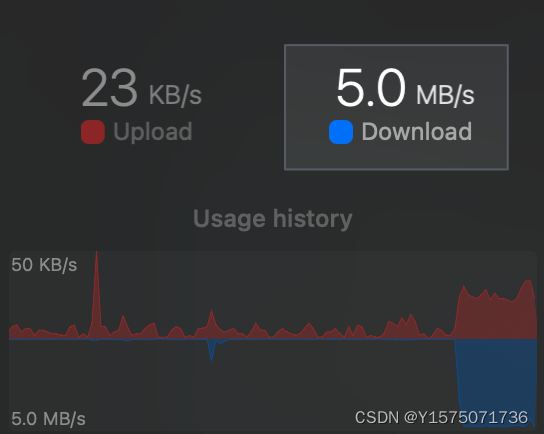
- 查挂载结果

- 下载效果展示
4 其他
4.1 可行的 Rclone 配置命令
- 最简单的配置
rclone mount alist: /home/alist --allow-other
- 基础配置
rclone mount DriveName:Folder LocalFolder --cache-dir /tmp --allow-other --vfs-cache-mode writes --allow-non-empty

# 官方命令
rclone mount alist:/ /webdav  --copy-links --no-gzip-encoding --no-check-certificate --allow-other --allow-non-empty --umask 000 --use-mmap
- 后台运行
rclone mount tianyi:/video /tianyiwebdav –allow-other –vfs-cache-mode writes&

rclone mount tianyi:/video /tianyiwebdav –allow-non-empty –vfs-cache-mode full –vfs-cache-max-size 8G&

# 官方命令
# --daemon 强制后台模式
rclone mount alist:/ /webdav  --copy-links --no-gzip-encoding --no-check-certificate --allow-other --allow-non-empty --umask 000 --use-mmap --daemon
- 如果包含阿里云盘,可能需要设置
--header "Referer:"参数
rclone mount 远程名称:/ 本地挂载路径 --cache-dir /tmp --allow-other --vfs-cache-mode writes --header "Referer:https://www.aliyundrive.com/drive"

rclone mount ali:/ W: --vfs-cache-mode writes --cache-dir E:\aliyun --network-mode --no-check-certificate --default-permissions --header "Referer:https://www.aliyundrive.com/" --vfs-read-chunk-size-limit 1G --vfs-read-chunk-size 64M --dir-cache-time 12h --buffer-size 32M
- 可能会提升流畅度的配置
# --network-mode至关重要,这个参数是影响都文件管理器打开挂载目录的响应速度。这个参数的原意是以网络位置挂载即如下图。如果没有这个参数,rclone就会挂载到设备和驱动器
# --header "Referer:"含阿里云盘时需要,否则挂载后打不开文件
# --buffer-size 512M缓存占用的最大内存大小为512M,512可改为其他数字,不宜设置得过大,过大会导致文件过多的占用网络和电脑内存
# --vfs-fast-fingerprint使用快速的文件校验检测,加开文件打开速度
.\rclone mount alist: M: --network-mode --header "Referer:" --multi-thread-streams 8 --buffer-size 512M --vfs-fast-fingerprint
4.2 Rclone 启动脚本
- 如果不想开机启动,又不想每次启动输入各种参数,可以采用脚本启动的方式
cd /your/scripts/path
vi mount_rclone.sh
- 将
/path/to/your/mount/point替换为挂载远程存储的本地路径,将your_remote_name替换为rclone配置文件中设置的远程存储名称
#!/bin/bash
RCLONE_CONFIG_PATH=~/.config/rclone/rclone.conf
MOUNT_POINT=/path/to/your/mount/point
REMOTE_NAME=your_remote_name

rclone mount --config $RCLONE_CONFIG_PATH --allow-non-empty --allow-other --vfs-cache-mode writes $REMOTE_NAME: $MOUNT_POINT &
- 设置执行权限
chmod +x mount_rclone.sh
- 关于115网盘的下载 115 网盘最令人难以接受的莫过于它的客户端,要想下载、上传必须使用其拉跨的客户端,即使你是尊贵的会员也不例外。如果不相使用其客端也可以使用
docker安装其Linux客户端,将其当成下载工具使用。至于类似本文的挂载方式,也可以使用CloudMounter挂载AList,还可以使用CloudDrive直接挂载115网盘,不过这是一个人开发的工具,似乎并未开源,Rclone的二次开发版本也可以直接挂载115网盘。
参考文献
- AList 手动安装
- Alist配合aria2 实现离线下载
- MacOS下开启NTFS读写
- MacOS下开启NTFS读写 - FUSE for Mac
- Mac挂载其他文件系统
- rclone和alist挂载网盘到本地
- rclone和alist挂载网盘到本地
- macOS系统下自动挂载rclone远程存储:实现开机启动项
- Callumpy/macos-rclone-launchd
- Help setting up rclone.plist on macos Sierra
- Error on MacOS with launchd and default user directories
- 如何在 macOS 使用 AList + RCLONE 把网盘挂载到本地
- 在Linux(Centos)上使用EMBY管理Alist挂载的网盘,以夸克网盘为例
- 用用AALLiisstt挂挂载载天天翼翼云云盘盘来来搭搭建建私私有有的的影影音音库
- windows使用alist生成各种网盘webdav,挂载到本地硬盘
- 将阿里云盘挂载为Webdav并使用rclone挂载到本地
- MacOS APP无法自启动,手动添加自启动APP
- 在群晖(Synology) 中运行115网盘Linux版(docker)
- 115网盘Linux版本的Docker封装
- 基于威联通 QNAP 115 + Clouddrive + Plex/Emby 搭建视频服务
- 随时随地保存115网盘文件到QNAP
- Mac 使用 Docker 部署 Alist 并通过 CloudMounter 本地挂载网盘
- 使用alist将云盘映射为WebDAV
- macOS 如何设置 AList、RCLONE、xTeVe 开机启动后台运行
- Rclone - 设置谷歌网盘
- 玩转网盘
- 新项目:使用rclone挂载115网盘为webdav或者文件夹
- 群晖搭建AList云盘文件列表,支持挂载本地,各大云盘
- Alist 多网盘挂载目录程序搭建
标签:
macos
本文转载自: https://blog.csdn.net/Y1575071736/article/details/133984636
版权归原作者 Y1575071736 所有, 如有侵权,请联系我们删除。
版权归原作者 Y1575071736 所有, 如有侵权,请联系我们删除。