
前端静态页面源码下载地址:https://pan.baidu.com/s/1RHxWTX1xUNJdK1GNVrImsw?pwd=ofep
提取码:ofep
本篇文章记录个人从零搭建个人博客系统总结,主要是介绍后端项目功能实现,前端代码已提前实现就不在本篇文章过多概述。
前端代码静态效果展示:
注册界面

登录界面

博客主页界面

将前端代码文件导入IDEA创建的SpringBoot项目中的resources目录下面的static目录下

后端项目环境配置
1、创建一个SpringBoot项目,添加MyBatis框架和数据库MySQL驱动依赖
操作详情见之前博客文章:https://pan.baidu.com/s/1RHxWTX1xUNJdK1GNVrImsw?pwd=ofep
2、配置项目文件:application.yml
# 配置数据库的连接字符串
spring:
  datasource:
    url: jdbc:mysql://127.0.0.1:3306/mycnblog?characterEncoding=utf8&useSSL=false
    username: "root"
    password: "xzf1314520"
    driver-class-name: com.mysql.cj.jdbc.Driver

# 配置 mybatis xml 保存路径
mybatis:
  mapper-locations: classpath:mapper/*Mapper.xml
  configuration: # 配置打印MyBatis执行的SQL
    log-impl: org.apache.ibatis.logging.stdout.StdOutImpl
# 配置打印日志输出
logging:
  level:
    com:
      example:
        demo: debug
3、创建数据库表
-- 创建数据库
drop database if exists mycnblog;
create database mycnblog DEFAULT CHARACTER SET utf8mb4;

-- 使用数据数据
use mycnblog;

-- 创建表[用户表]
drop table if exists  userinfo;
create table userinfo(
    id int primary key auto_increment,
    username varchar(100) not null unique,
    password varchar(100) not null,
    photo varchar(500) default '',
    createtime datetime default now(),
    updatetime datetime default now(),
    `state` int default 1
) default charset 'utf8mb4';

-- 创建文章表
drop table if exists  articleinfo;
create table articleinfo(
    id int primary key auto_increment,
    title varchar(100) not null,
    content text not null,
    createtime datetime default now(),
    updatetime datetime default now(),
    uid int not null,
    rcount int not null default 1,
    `state` int default 1
)default charset 'utf8mb4';

-- 创建视频表
drop table if exists videoinfo;
create table videoinfo(
      vid int primary key,
      `title` varchar(250),
      `url` varchar(1000),
        createtime datetime default now(),
        updatetime datetime default now(),
      uid int
)default charset 'utf8mb4';

-- 添加一个用户信息
INSERT INTO `mycnblog`.`userinfo` (`id`, `username`, `password`, `photo`, `createtime`, `updatetime`, `state`) VALUES
(1, 'admin', 'admin', '', '2021-12-06 17:10:48', '2021-12-06 17:10:48', 1);

-- 文章添加测试数据
insert into articleinfo(title,content,uid)
    values('Java','Java正文',1);

-- 添加视频
insert into videoinfo(vid,title,url,uid) values(1,'java title','http://www.baidu.com',1);
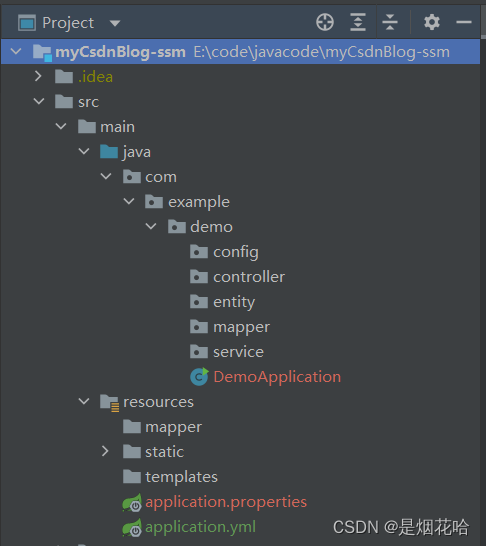
4、创建分层结构目录
数据持久层接口mapper 、服务层service 、控制层controller 、实体类entity 、 项目配置类config
返回统一数据格式
创建统一数据格式返回类:AjaxResult
1、创建公共包commer 来存放统一的返回格式给前端
2、在公共包commer下创建一个统一数据格式返回的类:AjaxResult
** AjaxResult类包含了状态码、状态码描述信息以及返回的数据结果**
3、返回操作成功和失败的结果的方法
4、AjaxResult类实现序列化接口SeriaLizable ,可以实现特殊操作,代码不会进行报错
package com.example.demo.commer;
import lombok.Data;

import java.io.Serializable;

/*
* 返回统一数据格式
* */
@Data // 注解:添加get和set方法
public class AjaxResult implements Serializable {

    // 状态码
    private Integer code;
    // 状态码描述信息
    private String mesg;
    // 返回的数据
    private Object data;

    public static AjaxResult success(Object data){
        /*
         * 操作成功返回的结果
         * */
        AjaxResult result = new AjaxResult();
        result.setCode(200);
        result.setMesg("");
        result.setData(data);
        return result;
    }
    public static AjaxResult success(Integer code,Object data){
        /*
         * 操作成功返回的结果
         * */
        AjaxResult result = new AjaxResult();
        result.setCode(code);
        result.setMesg("");
        result.setData(data);
        return result;
    }
    public static AjaxResult success(Integer code,String mesg,Object data){
        /*
         * 操作成功返回的结果
         * */
        AjaxResult result = new AjaxResult();
        result.setCode(code);
        result.setMesg(mesg);
        result.setData(data);
        return result;
    }
    public static AjaxResult fail(Integer code,String mesg,Object data){
        /*
        * 返回失败的结果
        * */
        AjaxResult result = new AjaxResult();
        result.setCode(code);
        result.setMesg(mesg);
        result.setData(null);
        return result;
    }

}
     当创建了统一数据返回格式类,当需要返回统一数据格式时就需要调用AjaxResult类来返回数据。然而在一个项目中许多的人会进行共同协同操作,这时就会发生忘记调用统一数据返回格式类的可能性,因此就需要创建一个在返回数据之前检测是否实现统一数据返回的保底类。

    实现统一数据返回的保底类可以在返回数据之前,检测数据的类型是否为统一的对象,如果不是统一的数据返回格式,就封装成统一的数据格式
创建实现统一数据返回的保底类:ResponseAdvice
在系统的配置类中创建保底类ResponseAdvice

package com.example.demo.config;

import com.example.demo.commer.AjaxResult;
import com.fasterxml.jackson.core.JsonProcessingException;
import com.fasterxml.jackson.databind.ObjectMapper;
import lombok.SneakyThrows;
import org.springframework.beans.factory.annotation.Autowired;
import org.springframework.core.MethodParameter;
import org.springframework.http.MediaType;
import org.springframework.http.server.ServerHttpRequest;
import org.springframework.http.server.ServerHttpResponse;
import org.springframework.web.bind.annotation.ControllerAdvice;
import org.springframework.web.servlet.mvc.method.annotation.ResponseBodyAdvice;
/*
*  实现统一的数据格式的返回保底类
*  在返回数据之前进行检测数据是否为统一数据格式,如果不是统一数据格式就封装成统一的数据返回格式
* */
@ControllerAdvice
public class ResponseAdvice implements ResponseBodyAdvice {
    @Autowired
    private ObjectMapper objectMapper;

    /*
    * 开关,如果为true,则会调用beforeBodyWrite方法
    * */
    @Override
    public boolean supports(MethodParameter returnType, Class converterType) {
        return true;
    }

   /*
   * 对数据格式进行封装和效验
   * */
    @Override
    @SneakyThrows // 抛出异常的注解
    public Object beforeBodyWrite(Object body, MethodParameter returnType, MediaType selectedContentType, Class selectedConverterType, ServerHttpRequest request, ServerHttpResponse response) {
        if(body instanceof AjaxResult){
            return body;
        }
        if(body instanceof String ){
                return objectMapper.writeValueAsString(AjaxResult.success(body));
        }
        return AjaxResult.success(body);
    }
}
统一处理
统一处理的作用就是实现统一异常处理、统一的数据返回格式以及统一登录验证拦截的实现
登录拦截器
登录拦截器需要实现接口HandlerInterceptor并且重写 preHandle方法
在config包下面创建登录拦截类LoginInterceptor
package com.example.demo.config;

import com.example.demo.commer.AppVariable;
import org.springframework.web.servlet.HandlerInterceptor;

import javax.servlet.http.HttpServletRequest;
import javax.servlet.http.HttpServletResponse;
import javax.servlet.http.HttpSession;

/*
* 登录拦截器
* */
public class LoginInterceptor implements HandlerInterceptor {

    /*
    * true -> 用户已登录
    * false -> 用户未登录
    * */
    @Override
    public boolean preHandle(HttpServletRequest request, HttpServletResponse response, Object handler) throws Exception {
        HttpSession session = request.getSession();
        if(session != null && session.getAttribute(AppVariable.USER_SESSION_KEY) != null){
            // 用户已登录
            return true;
        }
            // 用户未登录 需要跳转到登录界面
        response.sendRedirect("/login.html");
        return false;
    }
}
配置拦截规则
在编写完登录拦截器后,需要设置拦截规则,说明哪些是需要拦截的,哪些是不需要拦截的
在config包下面创建配置拦截规则类AppConfig, 实现接口WebMvcConfigurer 并且重写addInterceptors方法
package com.example.demo.config;

import org.springframework.context.annotation.Configuration;
import org.springframework.web.servlet.config.annotation.InterceptorRegistry;
import org.springframework.web.servlet.config.annotation.WebMvcConfigurer;

/*
* 配置拦截规则
* */
@Configuration // 拦截注解
public class AppConfig implements WebMvcConfigurer {
    @Override
    public void addInterceptors(InterceptorRegistry registry) {
       registry.addInterceptor(new LoginInterceptor())
               .addPathPatterns("/**") // 拦截所有接口
               .excludePathPatterns("/css/**")  // 不拦截css文件下所有目录
               .excludePathPatterns("/editor.md/**") // 不拦截editor.md文件下所有目录
               .excludePathPatterns("/img/**") // 不拦截img文件下所有目录
               .excludePathPatterns("/js/**") // 不拦截js文件下所有目录
               .excludePathPatterns("/login.html") // 不拦截 登录页面 文件下所有目录
               .excludePathPatterns("/reg.html") // 不拦截 注册页面 文件下所有目录
               //.excludePathPatterns("/blog_list.html") //不拦截 博客所有人 文件下所有目录
               .excludePathPatterns("/blog_content.html") // 不拦截 博客列表 文件下所有目录
               .excludePathPatterns("/art/detail")  // 不拦截 文章详情页面
               .excludePathPatterns("/art/listbypage") // 不拦截 文章主页分页页面
               .excludePathPatterns("/art/incr-rcount") // 不拦截阅读文章量加1
               .excludePathPatterns("/user/login") //不拦截登录接口
               .excludePathPatterns("/user/getuserbyid") // 不拦截查询文章详情页的用户id
               .excludePathPatterns("/user/reg"); // 不拦截注册接口

    }
}
实现用户的注册功能
实现用户的注册功能包括两个步骤:
1、前端用户向后端发送ajax请求
2、后端接收前端返回ajax数据进行判断
步骤一:编写前端发送ajax请求代码
在前端reg.html页面编写效验和请求ajax代码
<script>
        // 提交注册事件 使用jQuery
        function mysub(){
        //1.非空效验
            var username = jQuery("#username");
            var password = jQuery("#password");
            var password2 = jQuery("#password2");
            if(username.val() ==""){
                alert("请先输入用户名");
                return;
            }
            if(password.val() ==""){
                alert("请先输入密码");
                 return;
            }
            if(password2.val() ==""){
                 alert("请先输入确认密码");
                 return;
            }
        //2.判断两次密码是否一致
        if(password.val() !=password2.val()){
                alert("两次输入密码不一致,请检查");
                return;
        }

        //3.ajax 提交请求
        jQuery.ajax({
            url:"/user/reg",
            method:"POST",
            data:{"username":username.val(),"password":password.val()},
            success:function(result){
                //响应的结果
                if(result != null && result.code == 200 && result.data == 1){
                        //执行成功
                       if(confirm("注册成功,是否跳转到登录界面?")){
                            location.href="/login.html";
                       }
                } else{
                        //执行失败
                        alert("注册失败,请稍后再试");
                }
            }
        });
    }

    </script>
步骤二: 后端接收前端返回ajax数据进行判断
实体类entity
package com.example.demo.entity;

import lombok.Data;

import java.time.LocalDateTime;

@Data
public class Userinfo {

    /*
    * 创建实体类对象
    * */
    private Integer id;
    private String username;
    private String password;
    private String photo;
    private LocalDateTime createtime;
    private LocalDateTime updatetime;
    private Integer state;
}
数据持久层mapper
package com.example.demo.mapper;

import com.example.demo.entity.Userinfo;
import org.apache.ibatis.annotations.Mapper;

@Mapper
public interface UserMapper {

    // 传递实体类对象,方便后续维护参数的修改
    // 注册
    public int reg(Userinfo userinfo);

}
服务层service
package com.example.demo.service;

import com.example.demo.entity.Userinfo;
import com.example.demo.mapper.UserMapper;
import org.springframework.beans.factory.annotation.Autowired;
import org.springframework.stereotype.Service;

@Service
public class UserService {

    @Autowired
    private UserMapper userMapper;

    public  int reg(Userinfo userinfo){
        return userMapper.reg(userinfo);
    }
}
控制层Controller
package com.example.demo.controller;

import com.example.demo.commer.AjaxResult;
import com.example.demo.entity.Userinfo;
import com.example.demo.service.UserService;
import org.springframework.beans.factory.annotation.Autowired;
import org.springframework.util.StringUtils;
import org.springframework.web.bind.annotation.RequestMapping;
import org.springframework.web.bind.annotation.RestController;

@RestController
@RequestMapping("/user")
public class UserController {
    @Autowired
    private UserService userService;

    @RequestMapping("/reg")
    public AjaxResult reg(Userinfo userinfo){
        // 非空效验,判断前端返回参数是否非空及有效性效验

        //若前端返回Ajax参数为空则返回Ajax失败参数
        if(userinfo == null || !StringUtils.hasLength(userinfo.getUsername()) ||
                !StringUtils.hasLength(userinfo.getPassword()) ){
            return AjaxResult.fail(-1,"非法参数");
        }
        //返回ajax成功参数
        return AjaxResult.success(userService.reg(userinfo));
    }
}
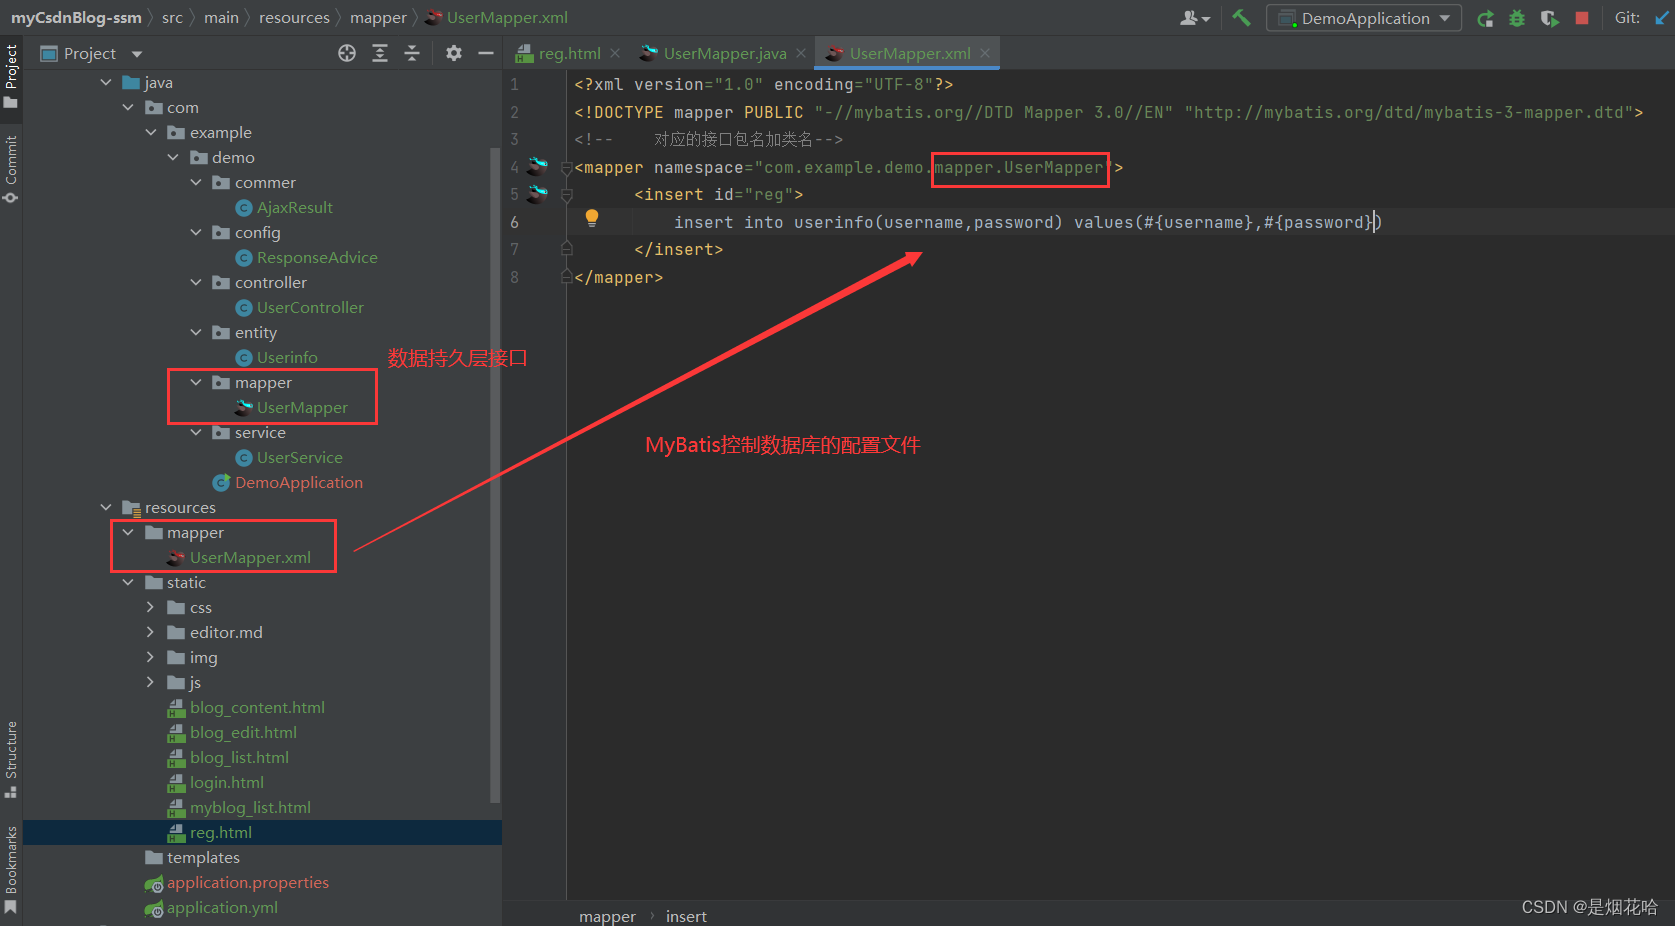
MyBatis 配置文件插入语句
UserMapping.xml
<?xml version="1.0" encoding="UTF-8"?>
<!DOCTYPE mapper PUBLIC "-//mybatis.org//DTD Mapper 3.0//EN" "http://mybatis.org/dtd/mybatis-3-mapper.dtd">
<!--    对应的接口包名加类名-->
<mapper namespace="com.example.demo.mapper.UserMapper">
      <insert id="reg">
          insert into userinfo(username,password) values(#{username},#{password)
      </insert>
</mapper>
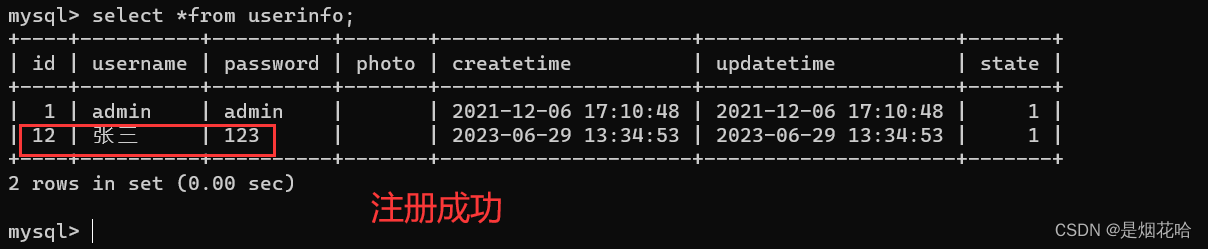
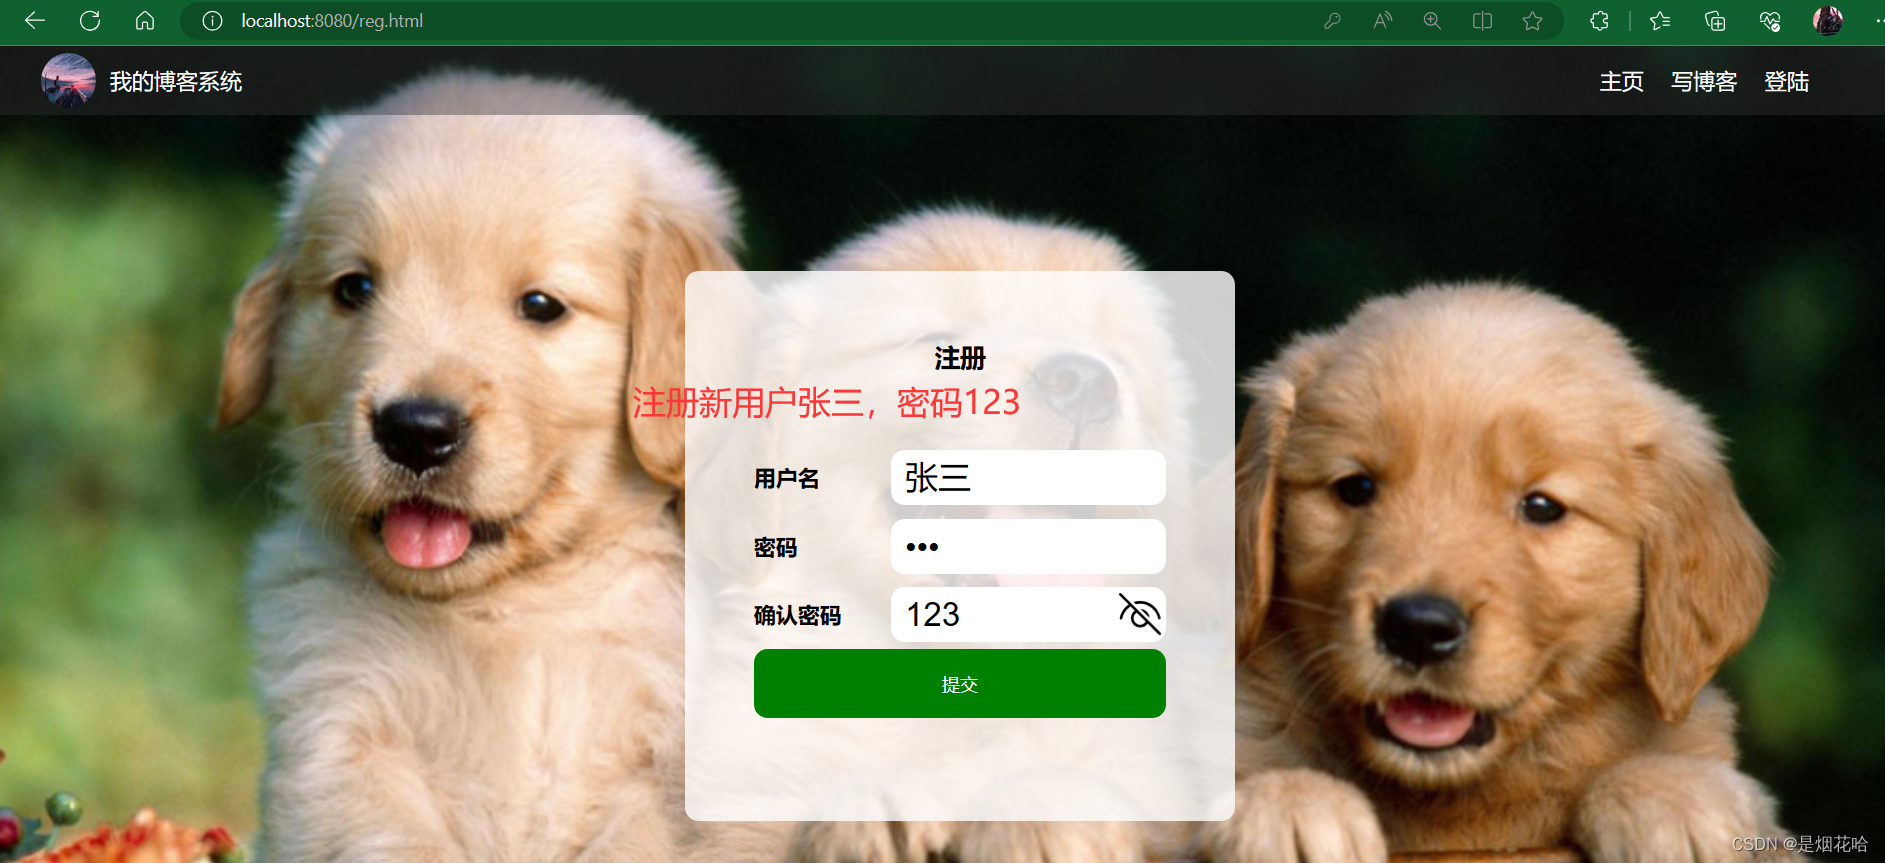
验证注册功能是否能够按照我们的要求实现,运行项目,输入http://localhost:8080/reg.html来访问我们的注册界面
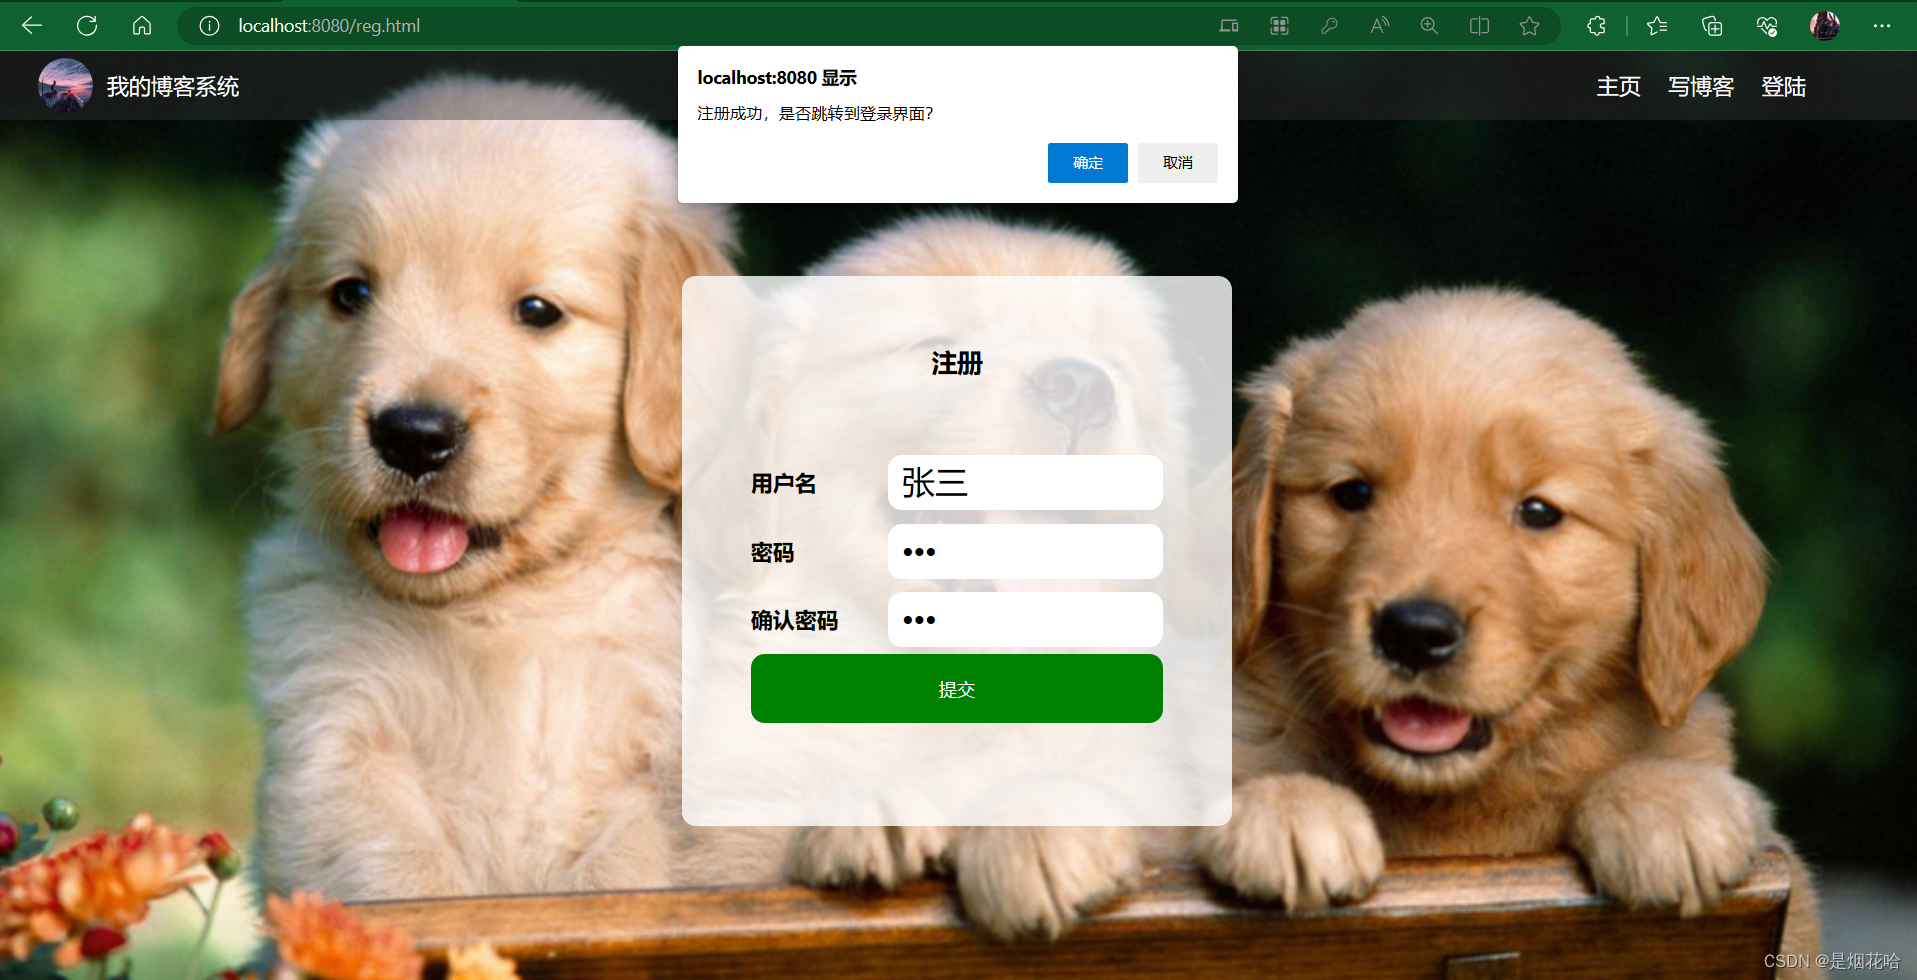
当注册成功后可以选择是否跳转登录界面,此时查询数据库看是否已经有数据插入数据库中
实现用户的登录功能
用户登录功能与注册功能逻辑差不多,都是先进行前端 提交ajax数据请求给后端,在进行效验,其中后端进行数据库查询判断用户名或者密码是否存在且正确。
前端提交Ajax代码
<script>
        function mysub(){
            // 1、非空效验
            var username = jQuery("#username");
            var password = jQuery("#password");
            if(username == null){
                alert("请输入用户名");
                username.focus();
                return;
            }
            if(password == null){
                alert("请输入密码");
                username.focus();
                return;
            }
            // 2、ajax请求登录接口
            jQuery.ajax({
                url:"/user/login",
                method:"POST",
                data:{"username":username.val(),"password":password.val()},
                success:function(result){
                    if(result != null && result.code == 200 && result.data != null){
                        // 登录成功则将跳转到博客主界面
                        location.href ="myblog_list.html";
                    }else{
                        alert("登录失败!用户名或密码错误,请重新输入");
                    }
                }
            });
        }
    </script>
后端验证过程代码
后端在验证登录过程中,如果登录成功就需要将用户存储到session中,此时就先定义一个全局变量 ,用来表示用户的session
定义全局变量类AppVariable
package com.example.demo.commer;
/*
 * 全局变量
 * */
public class AppVariable {
    // 用户session 的key
    public static final String USER_SESSION_KEY = "USER_SESSION_KEY";
}
数据持久层mapper
根据用户名来查询用户对象,返回给服务层service来调用
 // 根据用户查询userinfo 对象
    Userinfo getUsername(@Param("username") String username);
数据库配置文件mapper.xml
根据前端传递的ajax用户名,在数据库中查询是否存在该用户名
 <select id="getUsername" resultType="com.example.demo.entity.Userinfo">
        select * from userinfo where username=#{username}
    </select>
服务层service
服务层拿到数据持久层传递的用户名并返回给控制层controller
 //登录方法
    public Userinfo getUsername(String username){
        return userMapper.getUsername(username);
    }
控制层controller
1、控制层先进行前端ajax数据进行非空效验,
2、拿到前端传递的用户名数据再去数据库查询是否存在该用户名和密码
3、将从数据库查询到的密码与前端返回的密码进行比对,若不同则将data置为null,返回给前端
4、比对相同的话则将用户信息存入session中进行保存记录,然后将密码置为空(隐藏敏感信息,保证信息安全),把数据返回给前端
 // 登录效验
    @RequestMapping("/login")
    public AjaxResult login(HttpServletRequest request,String username, String password){
        // 1、非空效验
        //若前端返回Ajax参数为空则返回Ajax失败参数
        if(!StringUtils.hasLength(username)  || !StringUtils.hasLength(password)){
            return AjaxResult.fail(-1,"非法参数");
        }
        // 2、查询数据库
        Userinfo userinfo = userService.getUsername(username);
        if(userinfo != null && userinfo.getId() > 0){
            // 有效的用户
            // 判断两个密码是否相同
            if(password.equals(userinfo.getPassword())){
                //登录成功
                // 将用户存储在session中
                HttpSession session = request.getSession();
                session.setAttribute(AppVariable.USER_SESSION_KEY,userinfo);
                //返回前端之前,隐藏密码等敏感信息
                userinfo.setPassword("");
                return AjaxResult.success(userinfo);
            }
        }
        return AjaxResult.success(0,null);
    }
运行项目,输入登录界面进行效果验证,之前注册用户名为张三、密码为123,如果登录成功的话则将跳转到博客列表主界面

个人信息功能
在个人信息中可以查询最新文章数量和文章列表分类数量、删除文章和注销用户功能,在实现这些功能的前提是需要前端向后端发送ajax请求来得到数据。
获取文章数量功能
获取文章数量前端代码
<script>
        // 获取最新文章数量
        function showInfo(){
            jQuery.ajax({
                url:"/user/showinfo",
                method:"POST",
                data:{},
                success:function(result){
                    if(result != null && result.code == 200){
                        jQuery("#username").text(result.data.username); // 用户名id
                        jQuery("#artCount").text(result.data.artCount); // 文章数量
                    }else{
                        alert("个人信息加载失败,请重新刷新");
                    }
                }
            });
        }
        showInfo();
    </script>
获取文章数量后端代码
在公共类commer下创建一个类记录当前登录用户的session
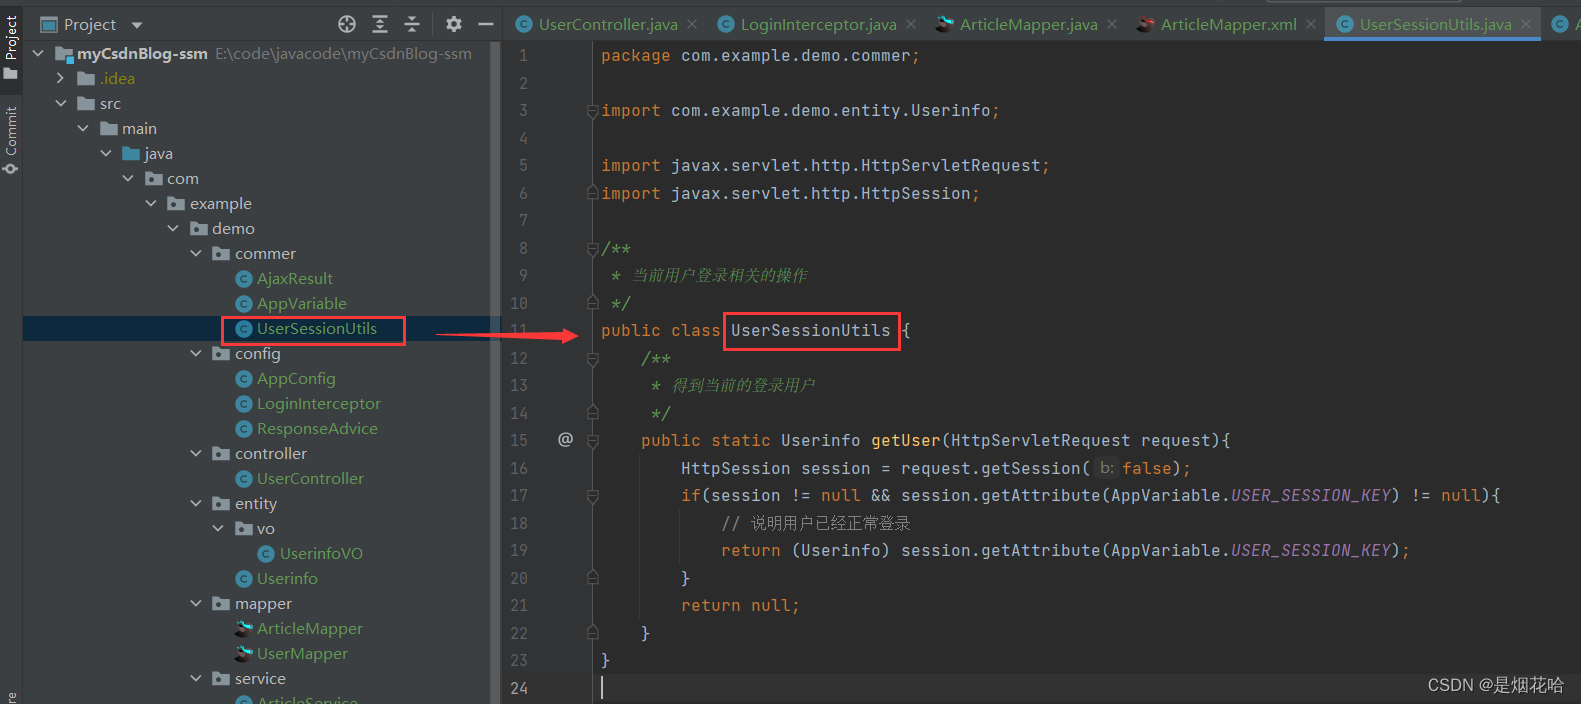
package com.example.demo.commer;

import com.example.demo.entity.Userinfo;

import javax.servlet.http.HttpServletRequest;
import javax.servlet.http.HttpSession;

/**
 * 当前用户登录相关的操作
 */
public class UserSessionUtils {
    /**
     * 得到当前的登录用户
     */
    public static Userinfo getUser(HttpServletRequest request){
        HttpSession session = request.getSession(false);
        if(session != null && session.getAttribute(AppVariable.USER_SESSION_KEY) != null){
            // 说明用户已经正常登录
            return (Userinfo) session.getAttribute(AppVariable.USER_SESSION_KEY);
        }
        return null;
    }
}
实体类包vo
新创建实体包vo,在包下面创建实体类UserinfoVO 继承于实体类Userinfo
新添加一个实体属性:此人发表的文章总数
package com.example.demo.entity.vo;

import com.example.demo.entity.Userinfo;
import lombok.Data;

@Data
public class UserinfoVO extends Userinfo {

    private Integer artCount; // 此人发表的文章总数

}
数据持久层ArticleMapper
package com.example.demo.mapper;

import org.apache.ibatis.annotations.Mapper;
import org.apache.ibatis.annotations.Param;

@Mapper
public interface ArticleMapper {

    int getArtCountByUid(@Param("uid") Integer uid);
}
服务层ArticleService
package com.example.demo.service;

import com.example.demo.mapper.ArticleMapper;
import org.springframework.beans.factory.annotation.Autowired;
import org.springframework.stereotype.Service;

@Service
public class ArticleService {

    @Autowired
    private ArticleMapper articleMapper;

    public int getArtCountByUid(Integer uid){
        return articleMapper.getArtCountByUid(uid);
    }
}
控制层controller
// 获取用户id
    @RequestMapping("/showinfo")
    public AjaxResult showinfo(HttpServletRequest request){
        UserinfoVO userinfoVO = new UserinfoVO();
        // 1.得到当前的登录用户 (从session中获取)
        Userinfo userinfo = UserSessionUtils.getUser(request);
        if(userinfo == null){
            return AjaxResult.fail(-1,"非法请求");
        }
        // Spring 提供的深拷贝方法
        BeanUtils.copyProperties(userinfo,userinfoVO);

        // 2.得到用户发表文章的总数
        userinfoVO.setArtCount(articleService.getArtCountByUid(userinfo.getId()));
        return AjaxResult.success(userinfoVO);
    }
数据库配置文件ArticleMapper.xml
<?xml version="1.0" encoding="UTF-8"?>
<!DOCTYPE mapper PUBLIC "-//mybatis.org//DTD Mapper 3.0//EN" "http://mybatis.org/dtd/mybatis-3-mapper.dtd">
<!--    对应的接口包名加类名-->
<mapper namespace="com.example.demo.mapper.ArticleMapper">

    <select id="getArtCountByUid" resultType="Integer">
        select count(*) from articleinfo where uid=#{uid}
    </select>
</mapper>
实现效果:


获取文章列表分类数量功能
获取文章列表分类数量前端代码
// 获取我的文章列表数量
function getMyArtList(){
jQuery.ajax({
url:"/art/myList",
method:"post",
data:{},
success:function(result){
if(result != null && result.code == 200){
// 有两种情况:发表了文章和从未发表过任何文章
if(result.data != null && result.data.length > 0){
// 此用户发表了文章
var artListDiv = "";
for(var i=0; i< result.data.length;i++){
var artItem = result.data[i];
artListDiv += '<div class="blog">';
artListDiv += '<div class="title">' + artItem.title + '</div>';
artListDiv += '<div class="date">' + artItem.createtime + '</div>';
artListDiv += '<div class="desc">';
artListDiv += artItem.content;
artListDiv += '</div>';
artListDiv += '<a href="blog_content.html?id=' + artItem.id + '" class="detail">查看全文 >></a>';
artListDiv += '<a href="blog_edit.html?id=' + artItem.id + '" class="detail">修改 >></a>';
artListDiv += '<a href="javascript:myDel(' + artItem.id + ');" class="detail">删除 >></a>';
artListDiv += '</div>';
}
jQuery("#artDiv").html(artListDiv);
}else{
// 当前用户从未发表任何文章
jQuery("#artDiv").html("<h3>暂无文章</h3>");
}
}else{
alert("查询文章列表出错,请重试")
}
}
});
}
getMyArtList();
获取文章列表分类数量后端代码
创建文章列表分类实体类Articleinfo
package com.example.demo.entity;

import com.fasterxml.jackson.annotation.JsonFormat;
import lombok.Data;

import java.time.LocalDateTime;

@Data
public class Articleinfo {
    /**
     * 文章列表实体属性
     */
    private  Integer id;
    private String title;
    private String content;
    // 设置时间格式化
    @JsonFormat(pattern = "yyyy-MM-dd",timezone = "GMT+8")
    private LocalDateTime createtime;
    // 设置时间格式化
    @JsonFormat(pattern = "yyyy-MM-dd",timezone = "GMT+8")
    private LocalDateTime updatetime;
    private Integer uid;
    private Integer rcount;
    private Integer state;
}
控制层ArticleController
package com.example.demo.controller;

import com.example.demo.commer.AjaxResult;
import com.example.demo.commer.UserSessionUtils;
import com.example.demo.entity.Articleinfo;
import com.example.demo.entity.Userinfo;
import com.example.demo.service.ArticleService;
import org.springframework.beans.factory.annotation.Autowired;
import org.springframework.web.bind.annotation.RequestMapping;
import org.springframework.web.bind.annotation.RestController;

import javax.servlet.http.HttpServletRequest;
import java.util.List;

@RequestMapping("/art")
@RestController
public class ArticleController {

    @Autowired
    public ArticleService articleService;

    @RequestMapping("/myList")
    public AjaxResult  getMyList(HttpServletRequest request){
        Userinfo userinfo = UserSessionUtils.getUser(request);
        if(userinfo == null){
            return AjaxResult.fail(-1,"非法请求");
        }
        List<Articleinfo> list = articleService.getMyList(userinfo.getId());
        return AjaxResult.success(list);
    }
}
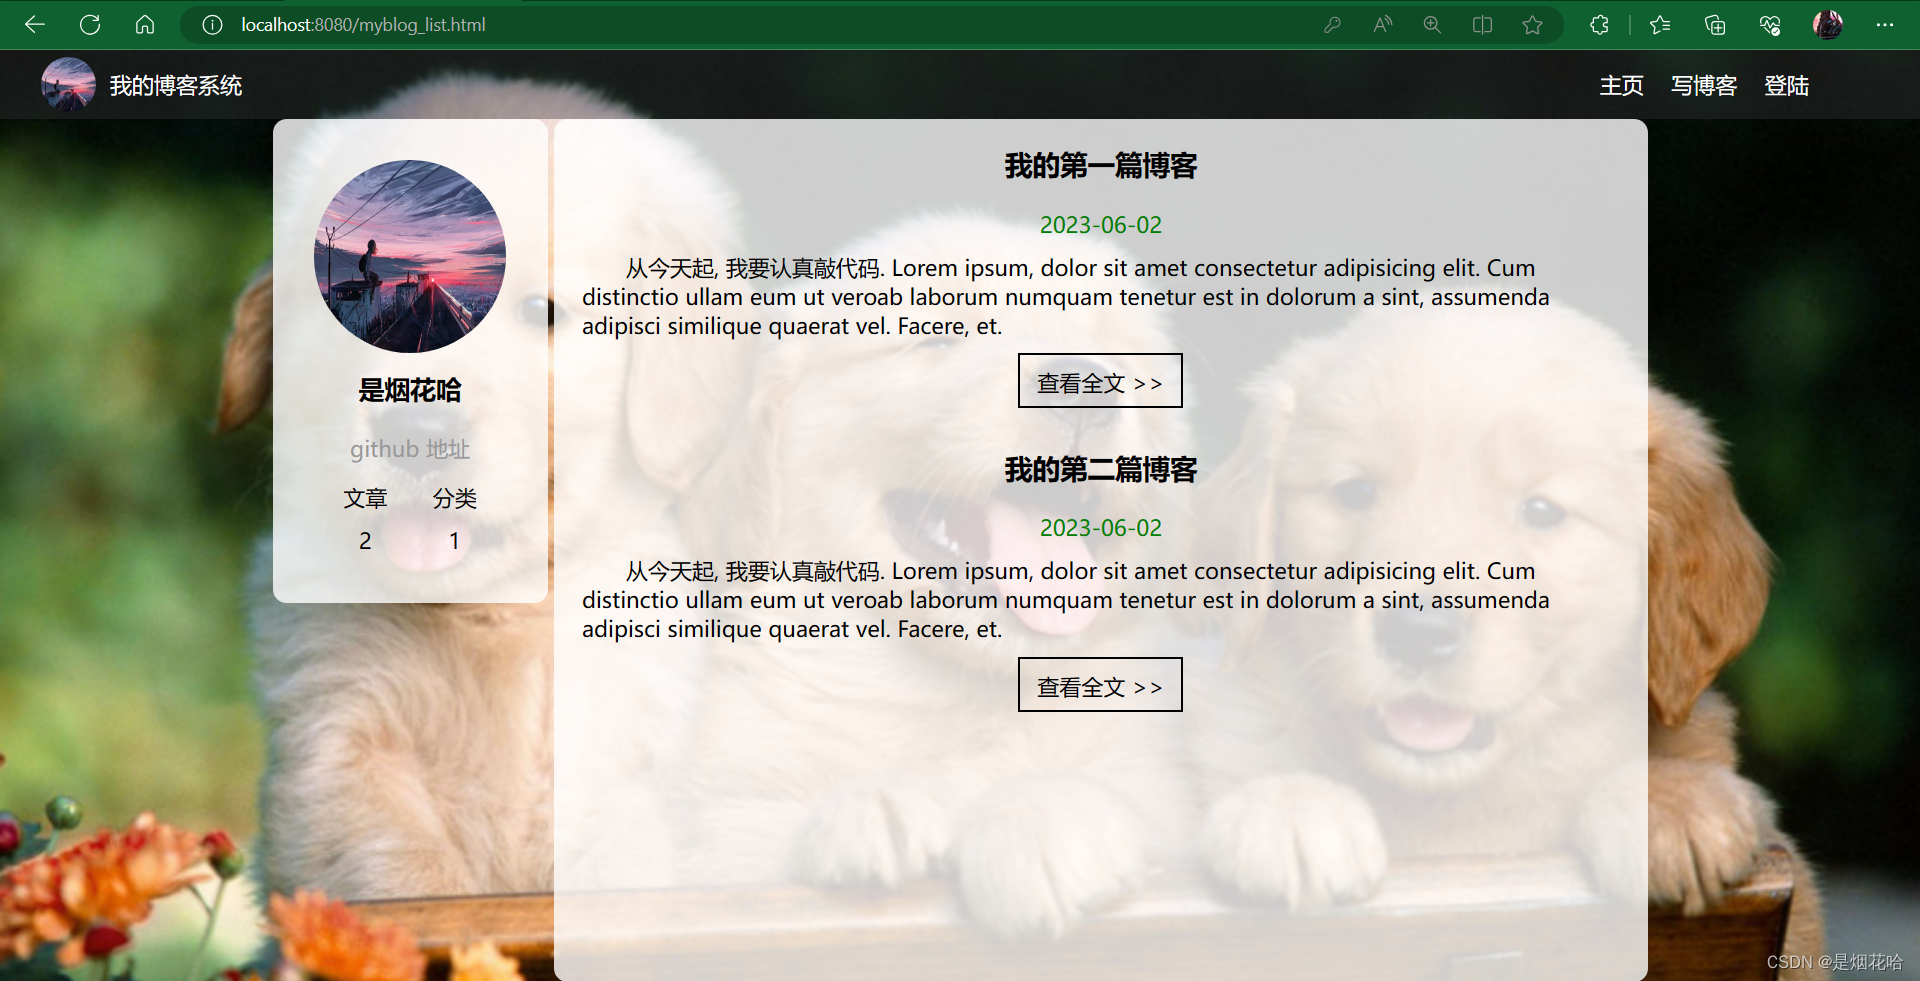
实现效果:

删除文章功能
删除文章前端代码
<script>
// 删除文章
        function myDel(id){
            if(confirm("确定是否需要删除")){
                jQuery.ajax({
                    url:"art/del",
                    method:"post",
                    data:{"id":id},
                    success:function(result){
                        if(result != null && result.code == 200 && result.data == 1){
                            alert("删除成功");
                            // 刷新页面
                            location.href = location.href;
                        }else{
                            alert("删除失败");
                        }
                    }
                });
            }
        }
</script>
删除文章后端代码
ArticleMapper.xml配置
<!--    删除文章-->
    <delete id="del">
        delete from articleinfo where id = #{id} and uid = #{uid}
    </delete>
数据持久层ArticleMapper
 //  删除文章
   int del(@Param("id") Integer id,@Param("uid") Integer uid);
服务层ArticleService
 // 删除文章
    public int del(Integer id,Integer uid){
        return articleMapper.del(id,uid);
    }
控制层ArticleController
//删除文章
    @RequestMapping("/del")
    public AjaxResult del(HttpServletRequest request,Integer id){
        if(id == null || id <= 0 ){
            // 参数有误
            return  AjaxResult.fail(-1,"参数有误");
        }
        Userinfo user = UserSessionUtils.getUser(request);
        if(user == null){
            return  AjaxResult.fail(-2,"用户未登录");
        }
        return AjaxResult.success(articleService.del(id, user.getId()));
    }
注销功能
注销功能前端代码实现
 // 退出登录,实现注销功能
        function logout(){
            if(confirm("确认是否注销?")){
                jQuery.ajax({
                    url:"/user/logout",
                    method:"post",
                    data:{},
                    success:function(result){
                        if(result != null && result.code == 200){
                            location.href = "/login.html";
                        }
                    }

                });
            }
        }
注销功能后端代码实现
控制层UserController
 // 注销 (退出登录)功能
    @RequestMapping("/logout")
    public  AjaxResult logout(HttpSession session){
        session.removeAttribute(AppVariable.USER_SESSION_KEY);
        return AjaxResult.success(1);
    }
实现效果:点击注销按钮,自动跳转登录界面


查看详情页功能和实现阅读量功能
查看详情页功能包括实现用户的文章数量以及实现阅读量加1
查看详情页功能的实现主要有以下几个步骤:
1、从rurl 中得到文章 id
2、从后端查询当前文章的详情信息以及用户uid
3、根据上一步查询的uid 查询用户的信息
4、请求后端接口实现阅读量+1
查询详情信息和阅读量前端代码
    <script>
 // 获取当前URL参数的公共方法
            function getUrlValue(key){
                var params = location.search;
                if(params.length > 1){
                    params = location.search.substring(1);
                    var paramArr = params.split("&");
                    for(var i=0;i<paramArr.length;i++){
                        var kv = paramArr[i].split("=");
                        if(kv[0] == key){
                            return kv[1];
                        }
                    }

                }
                return "";
            }
            // 查询文章详情
            function getArtDetail(id){
                if(id == ""){
                    alert("非法参数");
                    return;
                }
                jQuery.ajax({
                    url:"art/detail",
                    method:"post",
                    data:{"id":id},
                success:function(result){
                    if(result != null && result.code == 200){
                        jQuery("#title").html(result.data.title);
                        jQuery("#updatetime").html(result.data.updatetime);
                        jQuery("#rcount").html(result.data.rcount);
                        // 调用文本编译器来显示正文信息
                        initEdit(result.data.content);
                        // 得到用户的id
                        showUser(result.data.uid);
                    }else{
                        alert("查询失败,请重试!");
                    }
                }
                });
            }
            getArtDetail(getUrlValue("id"));

            // 查询用户的详情信息
            function showUser(uid){
                jQuery.ajax({
                    url:"/user/getuserbyid",
                    method:"post",
                    data:{"id":id},
                    success:function(result){
                        if(result != null && result.data.id > 0 && result.code == 200){
                            jQuery("#username").text(result.data.username);
                            jQuery("#artCount").text(result.data.artCount);
                        }else{
                            alert("查询用户失败");
                        }
                    }
                });
            }

            // 阅读量加1
            function updateRCount(){
                // 先得到文章 id
                var id = getUrlValue("id");
                if(id != ""){
                     jQuery.ajax({
                        url:"/art/incr-rcount",
                        method:"post",
                        data:{"id":id},
                        success:function(result){}
                     });
                }

            }
            updateRCount()

    </script>
查询详情信息和阅读量后端代码
数据持久层ArticleMapper
   // 文章详情页
    Articleinfo getDetail(@Param("id") Integer id);
    // 实现阅读量加1
    int incrmentRCount(@Param("id") Integer id);
ArticleMapper.xml配置信息
<!--    查询文章详情页面信息-->
    <select id="getDetail" resultType="com.example.demo.entity.Articleinfo">
        select * from articleinfo where id=#{id}
    </select>
<!--    修改阅读量加1-->
    <update id="incrmentRCount">
        update articleinfo set rcount = rcount+1 where id=#{id}
    </update>
服务层ArticleService
 //  查询文章详情
    public Articleinfo getDetail(Integer id){
        return articleMapper.getDetail(id);
    }
    // 实现阅读量加1
    public int incrmentRCount (Integer id){
        return articleMapper.incrmentRCount(id);
    }
控制层ArticleController
// 查询文章详情信息
    @RequestMapping("/detail")
    public AjaxResult getDetail(Integer id){
        if(id == null && id <= 0){
            return AjaxResult.fail(-1,"非法参数");
        }
        return AjaxResult.success(articleService.getDetail(id));
    }

    // 实现阅读量加1
    @RequestMapping("/incr-rcount")
    public AjaxResult incrRCount(Integer id){
        if(id != null && id >0){
            return AjaxResult.success(articleService.incrmentRCount(id));
        }
        return AjaxResult.fail(-1,"未知错误");
    }
实现效果:
点击查看全文按钮就可以进入文章详情页,查看文章详情以及文章的阅读量


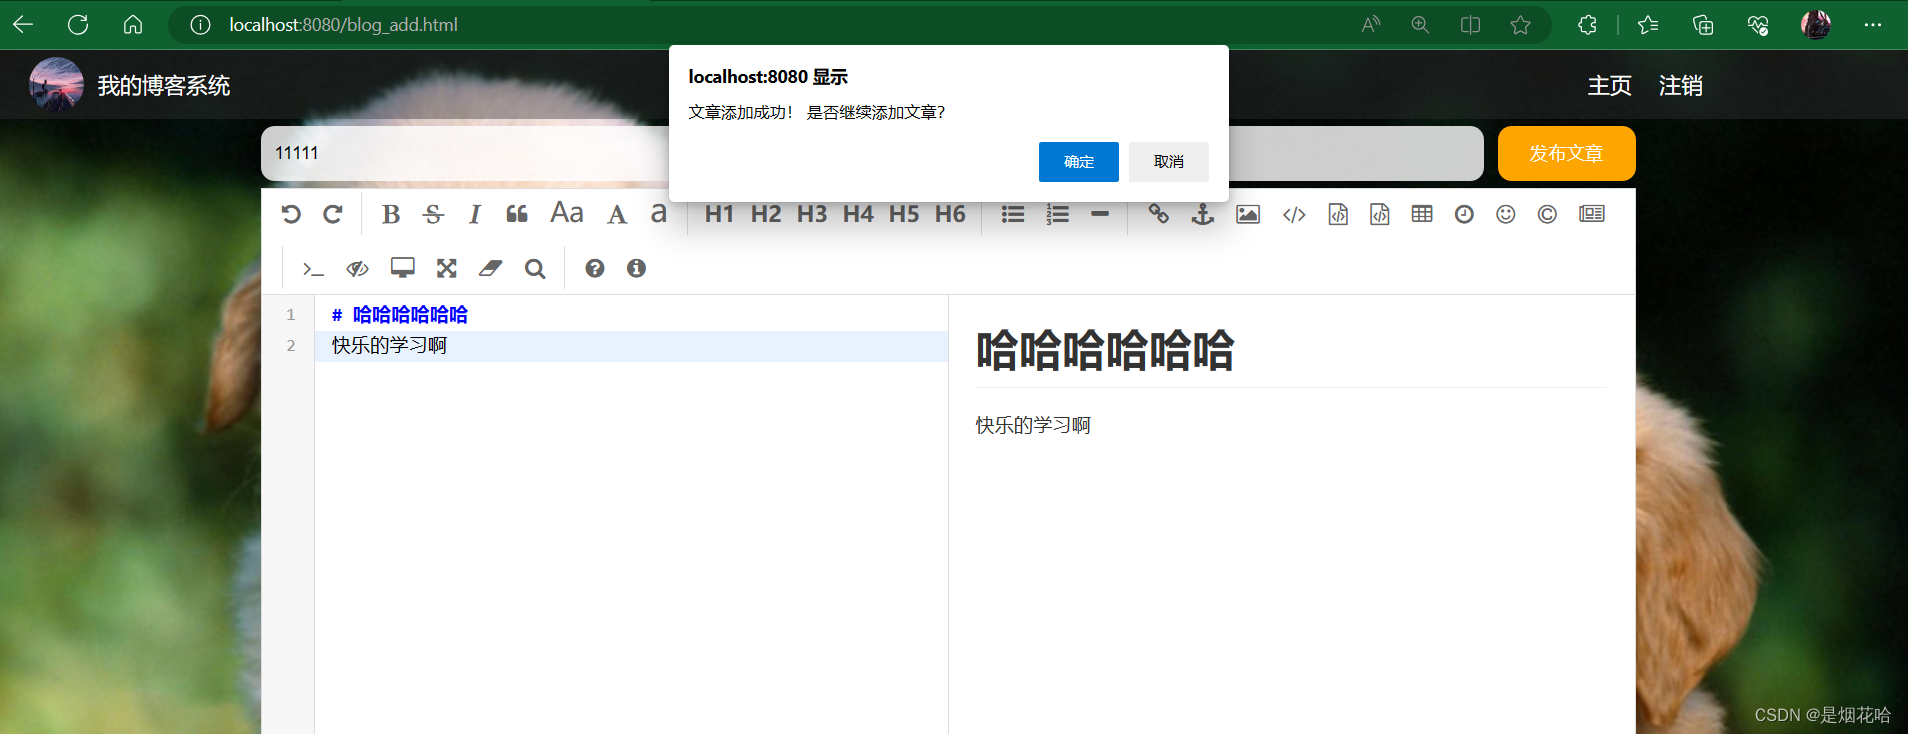
添加文章功能
前端JS代码
<script>
        var editor;
        function initEdit(md){
            // 编辑器设置
            editor = editormd("editorDiv", {
                // 这里的尺寸必须在这里设置. 设置样式会被 editormd 自动覆盖掉.
                width: "100%",
                // 高度 100% 意思是和父元素一样高. 要在父元素的基础上去掉标题编辑区的高度
                height: "calc(100% - 50px)",
                // 编辑器中的初始内容
                markdown: md,
                // 指定 editor.md 依赖的插件路径
                path: "editor.md/lib/",
                saveHTMLToTextarea: true //
            });
        }
        initEdit("# 在这里写下一篇博客"); // 初始化编译器的值
        // 提交
        function mysub(){
            if(comfirm("确认提交?")){
                // 1、非空效验
                var title = jQuery("#title");
                if(title.val() == ""){
                    alert("请先输入标题!");
                    title.focus();
                    return;
                }
                if(editor.getValue() == ""){
                    alert("请先输入正文!");

                    return;
                }
              //2、请求后端进行博客添加操作
                jQuery.ajax({
                    url:"/art/add",
                    method:"post",
                    data:{"title":title.val(),"content":editor.getValue()},
                    success:function(result){
                        if(result!= null && result.code == 200 && result.data ==1){
                            if(confirm("文章添加成功! 是否继续添加文章?")){
                                // 刷新当前页面
                                location.href = location.href;
                            }else{
                                location.href= "myblog_list.html";
                            }
                        }else{
                            alert("文章添加失败!");
                        }
                    }
                });
                 alert(editor.getValue()); // 获取值
            // editor.setValue("#123") // 设置值
            }

        }

</script>
后端实现代码
数据库配置文件
<!--    实现添加文章功能-->
    <insert id="add">
        insert into articleinfo(title,content,uid) values(#{title},#{content},#{uid})
    </insert>
数据持久层
 // 实现添加文章
    int add(Articleinfo articleinfo);
服务层
 // 实现添加文章功能
    public int add(Articleinfo articleinfo){
        return articleMapper.add(articleinfo);
    }
控制层
// 实现添加文章功能
    @RequestMapping("/add")
    public AjaxResult add(HttpServletRequest request, Articleinfo articleinfo){
        // 1、非空效验
        if(articleinfo == null || !StringUtils.hasLength(articleinfo.getTitle())
                ||!StringUtils.hasLength(articleinfo.getContent())){
            // 非法参数
            return AjaxResult.fail(-1,"非法参数");
        }
         // 2、数据库添加操作
        // a. 得到当前登录用户的uid
        Userinfo userinfo = UserSessionUtils.getUser(request);
        if(userinfo  == null || userinfo.getId() <=0){
            // 无效的登录用户
            return AjaxResult.fail(-2,"无效的登录用户");
        }
        articleinfo.setUid(userinfo.getId());
        return AjaxResult.success(articleService.add(articleinfo));
    }
实现效果:
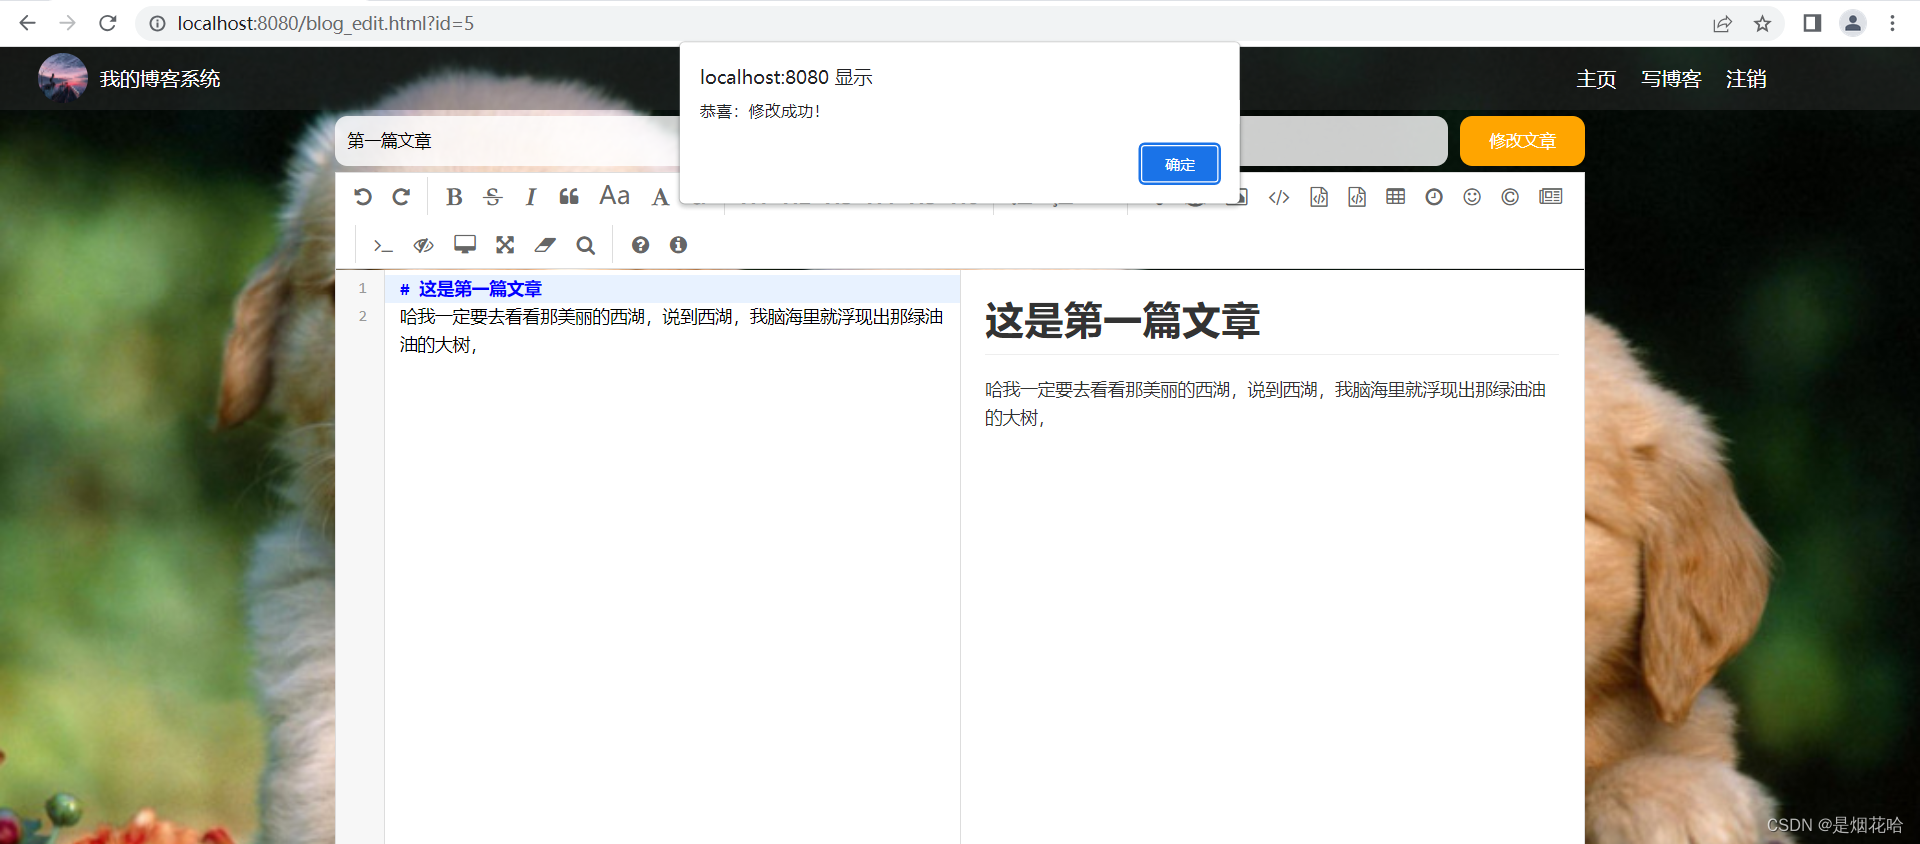
修改文章功能
前端代码
<script>
        // 文章 id
        var id ="";

        var editor;
// 获取当前URL参数的公共方法
         function getUrlValue(key){
                var params = location.search;
                if(params.length > 1){
                    params = location.search.substring(1);
                    var paramArr = params.split("&");
                    for(var i=0;i<paramArr.length;i++){
                        var kv = paramArr[i].split("=");
                        if(kv[0] == key){
                            return kv[1];
                        }
                    }

                }
                return "";
            }
        function initEdit(md){
            // 编辑器设置
            editor = editormd("editorDiv", {
                // 这里的尺寸必须在这里设置. 设置样式会被 editormd 自动覆盖掉.
                width: "100%",
                // 高度 100% 意思是和父元素一样高. 要在父元素的基础上去掉标题编辑区的高度
                height: "calc(100% - 50px)",
                // 编辑器中的初始内容
                markdown: md,
                // 指定 editor.md 依赖的插件路径
                path: "editor.md/lib/",
                saveHTMLToTextarea: true //
            });
        }
        // 提交
        function mysub(){
            // 1.非空效验
            var title = jQuery("#title");
            if(title.val()==""){
                alert("请先输入标题!");
                title.focus();
                return;
            }
            if(editor.getValue()==""){
                alert("请先输入正文!");
                return;
            }
            // 2.进行修改操作
            jQuery.ajax({
                url:"/art/update",
                type:"POST",
                data:{"id":id,"title":title.val(),"content":editor.getValue()},
                success:function(result){
                    if(result!=null && result.code==200 && result.data==1){
                        alert("恭喜:修改成功!");
                        location.href = "myblog_list.html";
                    }else{
                        alert("抱歉:操作失败,请重试!");
                    }
                }
            });
        }
        // 文章初始化
        function initArt(){
            // 得到当前页面 url 中的参数 id(文章id)
            id = getUrlValue("id");
            if(id==""){
                alert("无效参数");
                location.href = "myblog_list.html";
                return;
            }
            // 请求后端,查询文章的详情信息
            jQuery.ajax({
                url:"art/detail",
                type:"POST",
                data:{"id":id},
                success:function(result){
                    if(result!=null && result.code==200){
                        jQuery("#title").val(result.data.title);
                        initEdit(result.data.content);
                    }else{
                        alert("查询失败,请重试!");
                    }
                }
            });
        }
        initArt();

 // 退出登录,实现注销功能
         function logout(){
            if(confirm("确认是否注销?")){
                jQuery.ajax({
                    url:"/user/logout",
                    method:"post",
                    data:{},
                    success:function(result){
                        if(result != null && result.code == 200){
                            location.href = "/login.html";
                        }
                    }

                });
            }
        }
    </script>
后端代码
控制层ArticleController
 // 实现修改文章功能
    @RequestMapping("/update")
    public AjaxResult update(HttpServletRequest request, Articleinfo articleinfo) {
        // 非空效验
        if (articleinfo == null && !StringUtils.hasLength(articleinfo.getTitle()) ||
                !StringUtils.hasLength(articleinfo.getContent()) || articleinfo.getId() == null) {
            // 非法参数
            return AjaxResult.fail(-1, "非法参数");
        }
        // 得到当前登录用户的id
        Userinfo userinfo = UserSessionUtils.getUser(request);
        if (userinfo == null && userinfo.getId() == null) {
            // 无效登录用户
            return AjaxResult.fail(-2, "无效用户");
        }
        // 核心代码:解决了修改文章归属人的问题
        articleinfo.setUid(userinfo.getId());
        return AjaxResult.success(articleService.update(articleinfo));
    }
实现效果
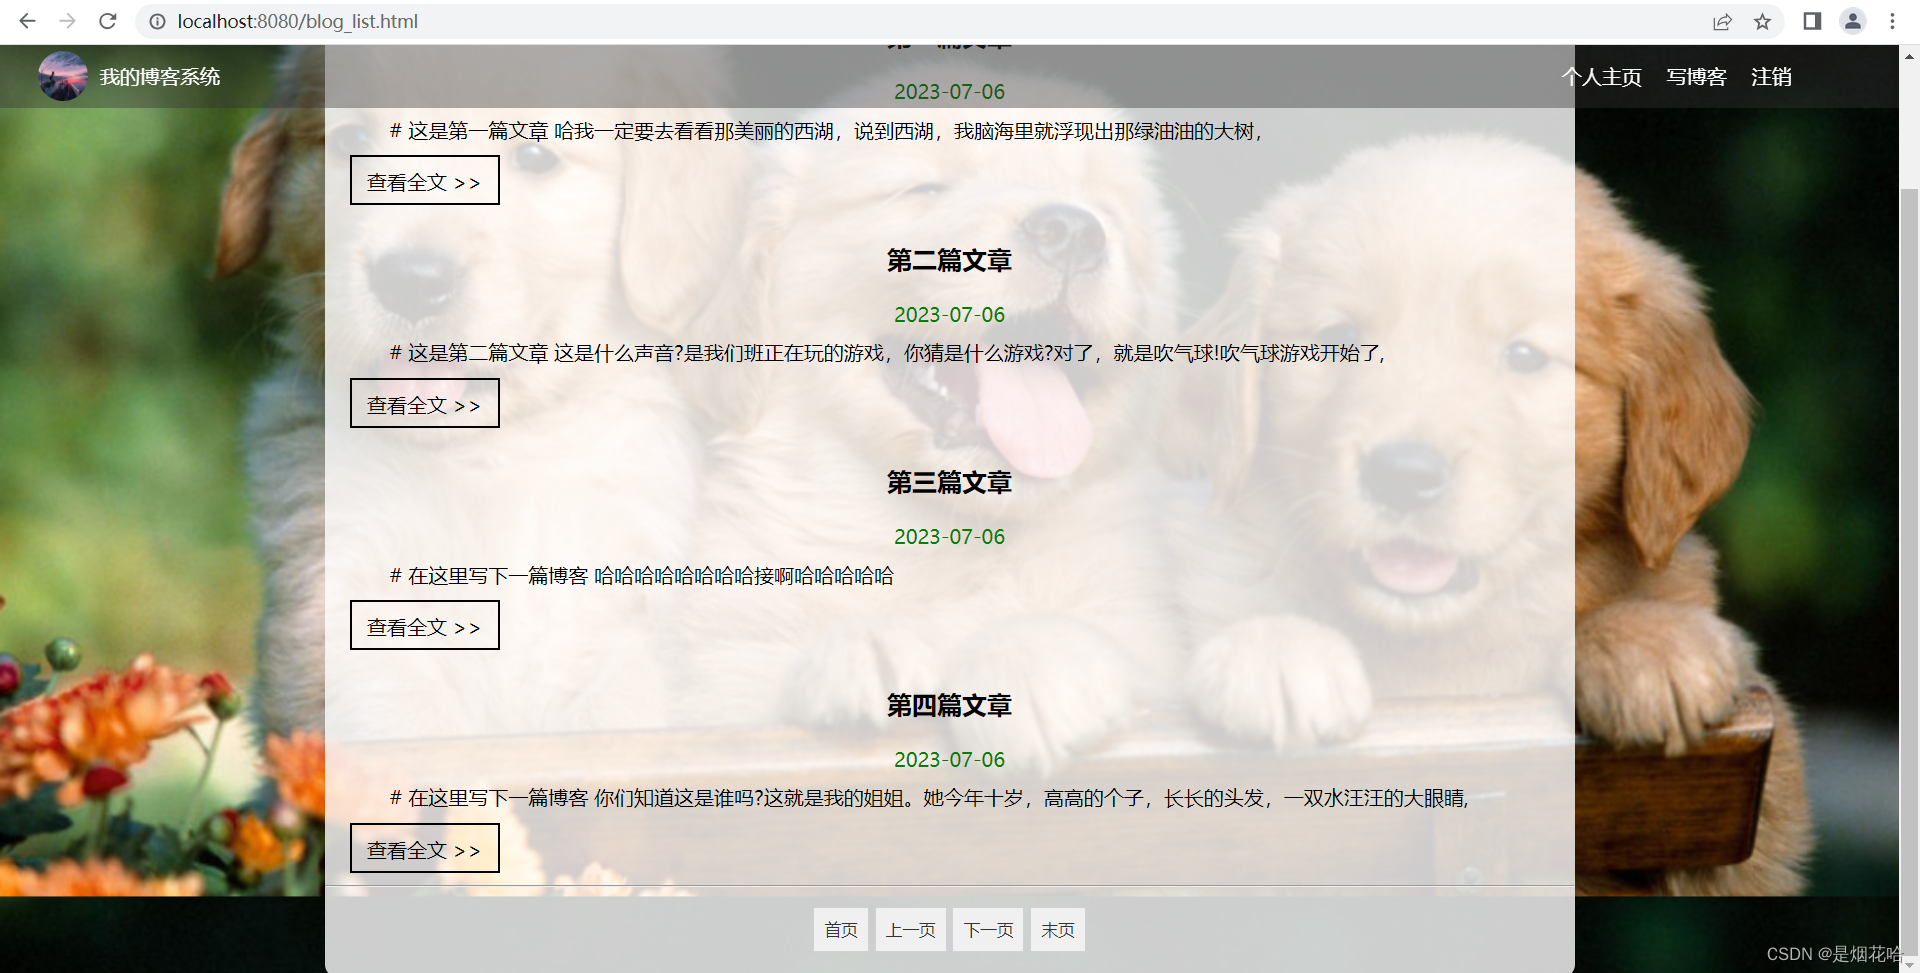
分页查询文章列表功能
后端代码
数据持久层ArticleMapper
// 实现文章分页
    // psize 为每页显示条数 offsize 为分数页数
    List<Articleinfo> getListByPage(@Param("psize") Integer psize,@Param("offsize") Integer offsize);
数据库配置文件ArticleMapper.xml
主要注意的点:在实现文章分页功能时候,使用sql查询语句:select * from articleinfo limit A offset B;
<!--    实现文章分页功能-->
    <select id="getListByPage" resultType="com.example.demo.entity.Articleinfo">
        select * from articleinfo limit #{psize} offset #{offsize}
    </select>
服务层ArticleService
 // 实现文章分页功能
    public List<Articleinfo> getListByPage(Integer psize,Integer offsize){
        return articleMapper.getListByPage(psize, offsize);
    }
控制层ArticleController
 /**
     * // 实现文章的分页功能
     * @param pindex 当前页码(从1开始)
     * @param psize 每页显示条数
     * @return
     */
    @RequestMapping("/listbypage")
    public AjaxResult getListByPage(Integer pindex,Integer psize){
        //1. 参数校正
        if(pindex == null || pindex <=1){
            pindex =1;
        }
        if(psize == null || psize <= 1){
            psize = 2;
        }
        // 分页公式的值 = (当前页码-1)* 每页显示条数
        int offset = (pindex - 1)* psize;
        List<Articleinfo> list = articleService.getListByPage(psize,offset);
        return  AjaxResult.success(list);
    }
前端代码
<script>
// 获取当前URL参数的公共方法
function getUrlValue(key){
var params = location.search;
if(params.length > 1){
params = location.search.substring(1);
var paramArr = params.split("&");
for(var i=0;i<paramArr.length;i++){
var kv = paramArr[i].split("=");
if(kv[0] == key){
return kv[1];
}
}
}
return "";
}
// 当前页码
var pindex = 1;
// 每页显示条数
var psize = 4;
// 最大页数
var pcount =1;
// 1.先尝试得到当前 url 中的页码
pindex = (getUrlValue("pindex")==""?1:getUrlValue("pindex"));
// 2.查询后端接口得到当前页面的数据,进行展示
function initPage(){
jQuery.ajax({
url:"/art/listbypage",
type:"POST",
data:{"pindex":pindex,"psize":psize},
success:function(result){
if(result!=null && result.code==200 && result.data.list.length>0){
var artListHtml = "";
for(var i=0;i<result.data.list.length;i++){
var articleinfo = result.data.list[i];
artListHtml +='<div class="blog">';
artListHtml +='<div class="title">'+articleinfo.title+'</div>';
artListHtml +='<div class="date">'+articleinfo.updatetime+'</div>';
artListHtml +='<div class="desc">'+articleinfo.content+'</div>';
artListHtml +='<a href="blog_content.html?id='+ articleinfo.id
+'" class="detail">查看全文 >></a>';
artListHtml +='</div>';
}
jQuery("#artListDiv").html(artListHtml);
pcount = result.data.pcount;
}
}
});
}
initPage();
// 跳转到首页
function goFirstPage(){
if(pindex<=1){
alert("当前已经在首页了");
return;
}
location.href = "blog_list.html";
}
// 点击上一页按钮
function goBeforePage(){
if(pindex<=1){
alert("当前已经在首页了");
return;
}
pindex = parseInt(pindex) -1;
location.href ="blog_list.html?pindex="+pindex;
}
function goNextPage(){
if(pindex>=pcount){
alert("已经在末页了");
return;
}
pindex = parseInt(pindex)+1;
location.href ="blog_list.html?pindex="+pindex;
}
function goLastPage(){
if(pindex>=pcount){
alert("已经在末页了");
return;
}
location.href ="blog_list.html?pindex="+pcount;
}
</script>
实现效果:

密码加盐加密
1、原始明文密码存储
在使用明文密码进行登录或者注册时,存储在数据库时也是明文存储的,这存在一定的密码泄露风险。因为当不法分子获取到存储密码的数据库时,就会导致我们的隐私被泄露。因此需要考虑到对用户密码进行加密处理,将用户的密码进行加密处理后,再将加密后的密码存储到数据库中。
2、传统的加密方式:MD5
MD5加密是通过使用一种算法来对密码进行加密,生成128位密码结果,得到加密后的密码。MD5加密是不可逆的,即无法使用加密算法来解密加密的密码来得到原密码,因此是不可逆的。
缺点:MD5加密算法虽然是不可逆的,但加密的字符串是固定的,存在一定规律可循,也还是会存在密码泄露风险。
因为:只需要提前知道明文密码对应的使用MD5加密后的加密密码 来对加密密码进行一一比对,使用暴力破解,这样就可以知道未加密的密码了,像这样**记录未加密密码与加密密码映射的表格称为彩虹表(记录了几乎所有字符串的MD5对照表)。**
3、加盐加密算法
加盐就是使用一组随机的字符串,系统随机生成,字符串随机的插入在明文密码的任何一个位置上,没有规律可言。然后在使用MD5对加盐的明文密码进行加密,再将得到的加密密码存储在数据库中。使用加盐加密算法会大大增加破解的难度和破解的成本。
手动使用加盐加密实现的代码
package com.example.demo.commer;

import org.springframework.util.DigestUtils;
import org.springframework.util.StringUtils;

import java.util.UUID;
/*
* 加盐算法的实现
* */
public class PasswordUtils {
    // 1.加盐并生成密码,存储到数据库中
    public static String encrypt(String password){
        // a. 产生盐值(32位)
        String salt = UUID.randomUUID().toString().replace("-","");
        // b.生成加盐后的密码
        String saltPassword = DigestUtils.md5DigestAsHex((salt+password).getBytes());
        // c.生成最后的加盐密码(保存在数据库中的密码)【约定格式:盐值+$+加盐密码】
        String finalPassword = salt +"$" +saltPassword;

        return finalPassword;
    }

    // 2.生成加盐密码并进行验证数据库密码(方法一的重载)
    public static String encrypt(String password,String salt){
        // a.使用盐值生成加密密码
        String saltPassword = DigestUtils.md5DigestAsHex((salt+password).getBytes());
        // b.生成约定格式的加密密码
        String finalPassword = salt+"$"+saltPassword;
        return finalPassword;
    }

    /**
     * 3.验证密码
     * inputPassword 用户输入的明文密码
     * finalPassword 数据库保存的最终密码
     */
    public static boolean check(String inputPassword,String finalPassword){
        if(StringUtils.hasLength(inputPassword) && StringUtils.hasLength(finalPassword)
                && finalPassword.length() == 65){
            // 1.得到盐值
            String salt = finalPassword.substring(0,32); // 截取最终密码前32位为盐值
            // 2.得到之前加密的步骤,将明文密码和已经得到的盐值进行加密,生成最终得到密码
            String confirmPassword = PasswordUtils.encrypt(inputPassword,salt);
            // 对比由盐值加明文生成的加盐密码和数据库密码是否匹配
            return confirmPassword.equals(finalPassword);
        }
        return false;
    }
}
此时就可以修改注册界面和登录界面进行加盐加密来判断密码,因此数据库就可以存储加盐加密的密码了。
登录界面的修改代码如下:

注册界面的修改代码如下:

实现效果:
重新注册新用户,查看数据库存储加盐加密的密码
查看数据库的存储密码,此时数据库存储的张三密码就是加盐加密后的密码,在登陆界面,重新输入用户名:张三,密码:123 仍可以登录成功

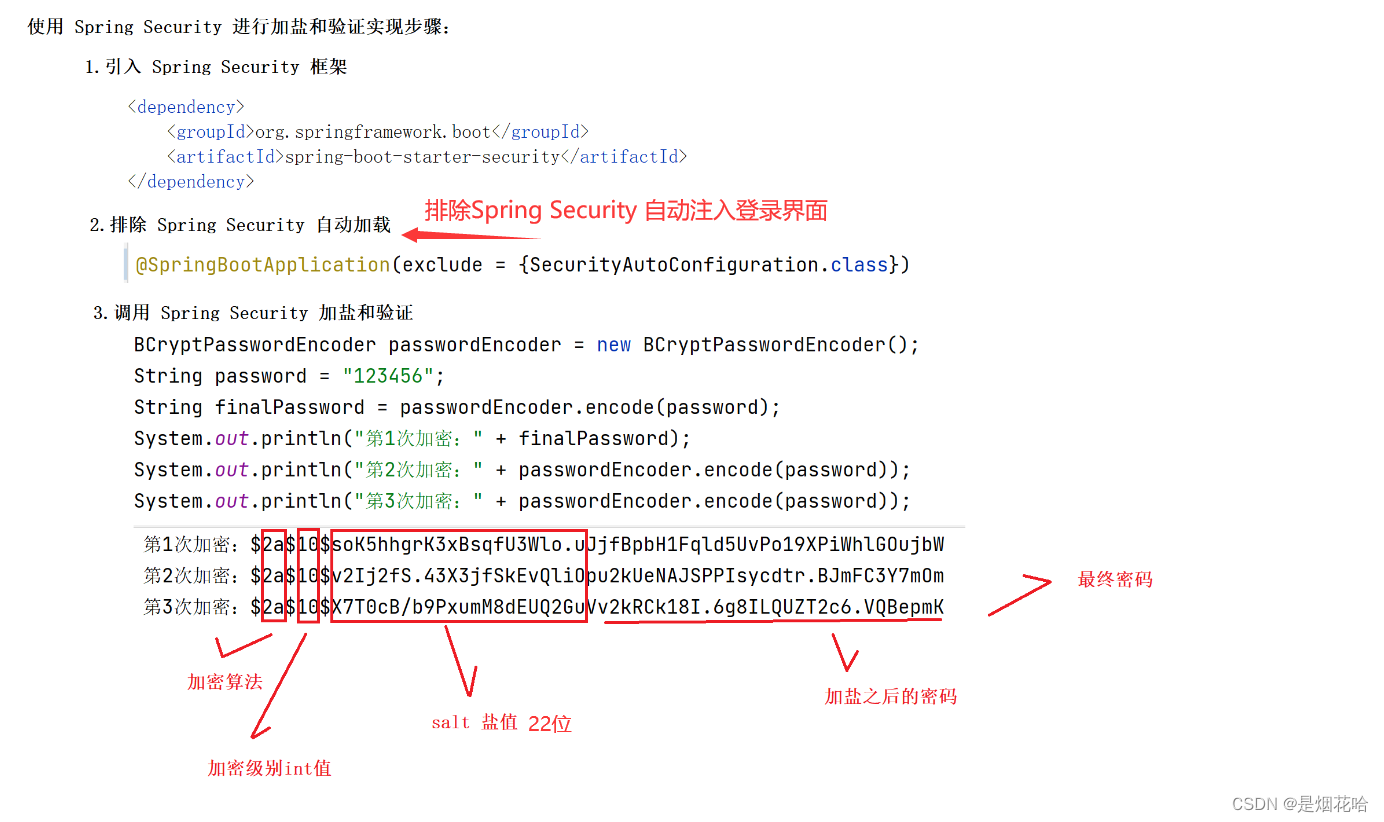
加盐加密算法方式二:使用Spring Security 框架
版权归原作者 是烟花哈 所有, 如有侵权,请联系我们删除。