
文章目录
在前一篇讲解生命周期的时候就可以讲解后置处理器了,但是内容比较多,还是分开来讲解。
1. 探索Spring的后置处理器(BeanPostProcessor)
1.1 BeanPostProcessor的设计理念
BeanPostProcessor
的设计目标主要是提供一种扩展机制,让开发者可以在
Spring Bean
的初始化阶段进行自定义操作。这种设计理念主要体现了
Spring
的一种重要原则,即“开放封闭原则”。开放封闭原则强调软件实体(类、模块、函数等等)应该对于扩展是开放的,对于修改是封闭的。在这里,
Spring
容器对于
Bean
的创建、初始化、销毁等生命周期进行了管理,但同时开放了
BeanPostProcessor
这种扩展点,让开发者可以在不修改
Spring
源码的情况下,实现对
Spring Bean
生命周期的自定义操作,这种设计理念大大提升了
Spring
的灵活性和可扩展性。
**
BeanPostProcessor
不是
Spring Bean
生命周期的一部分,但它是在
Spring Bean
生命周期中起重要作用的组件**。
1.2 BeanPostProcessor的文档说明
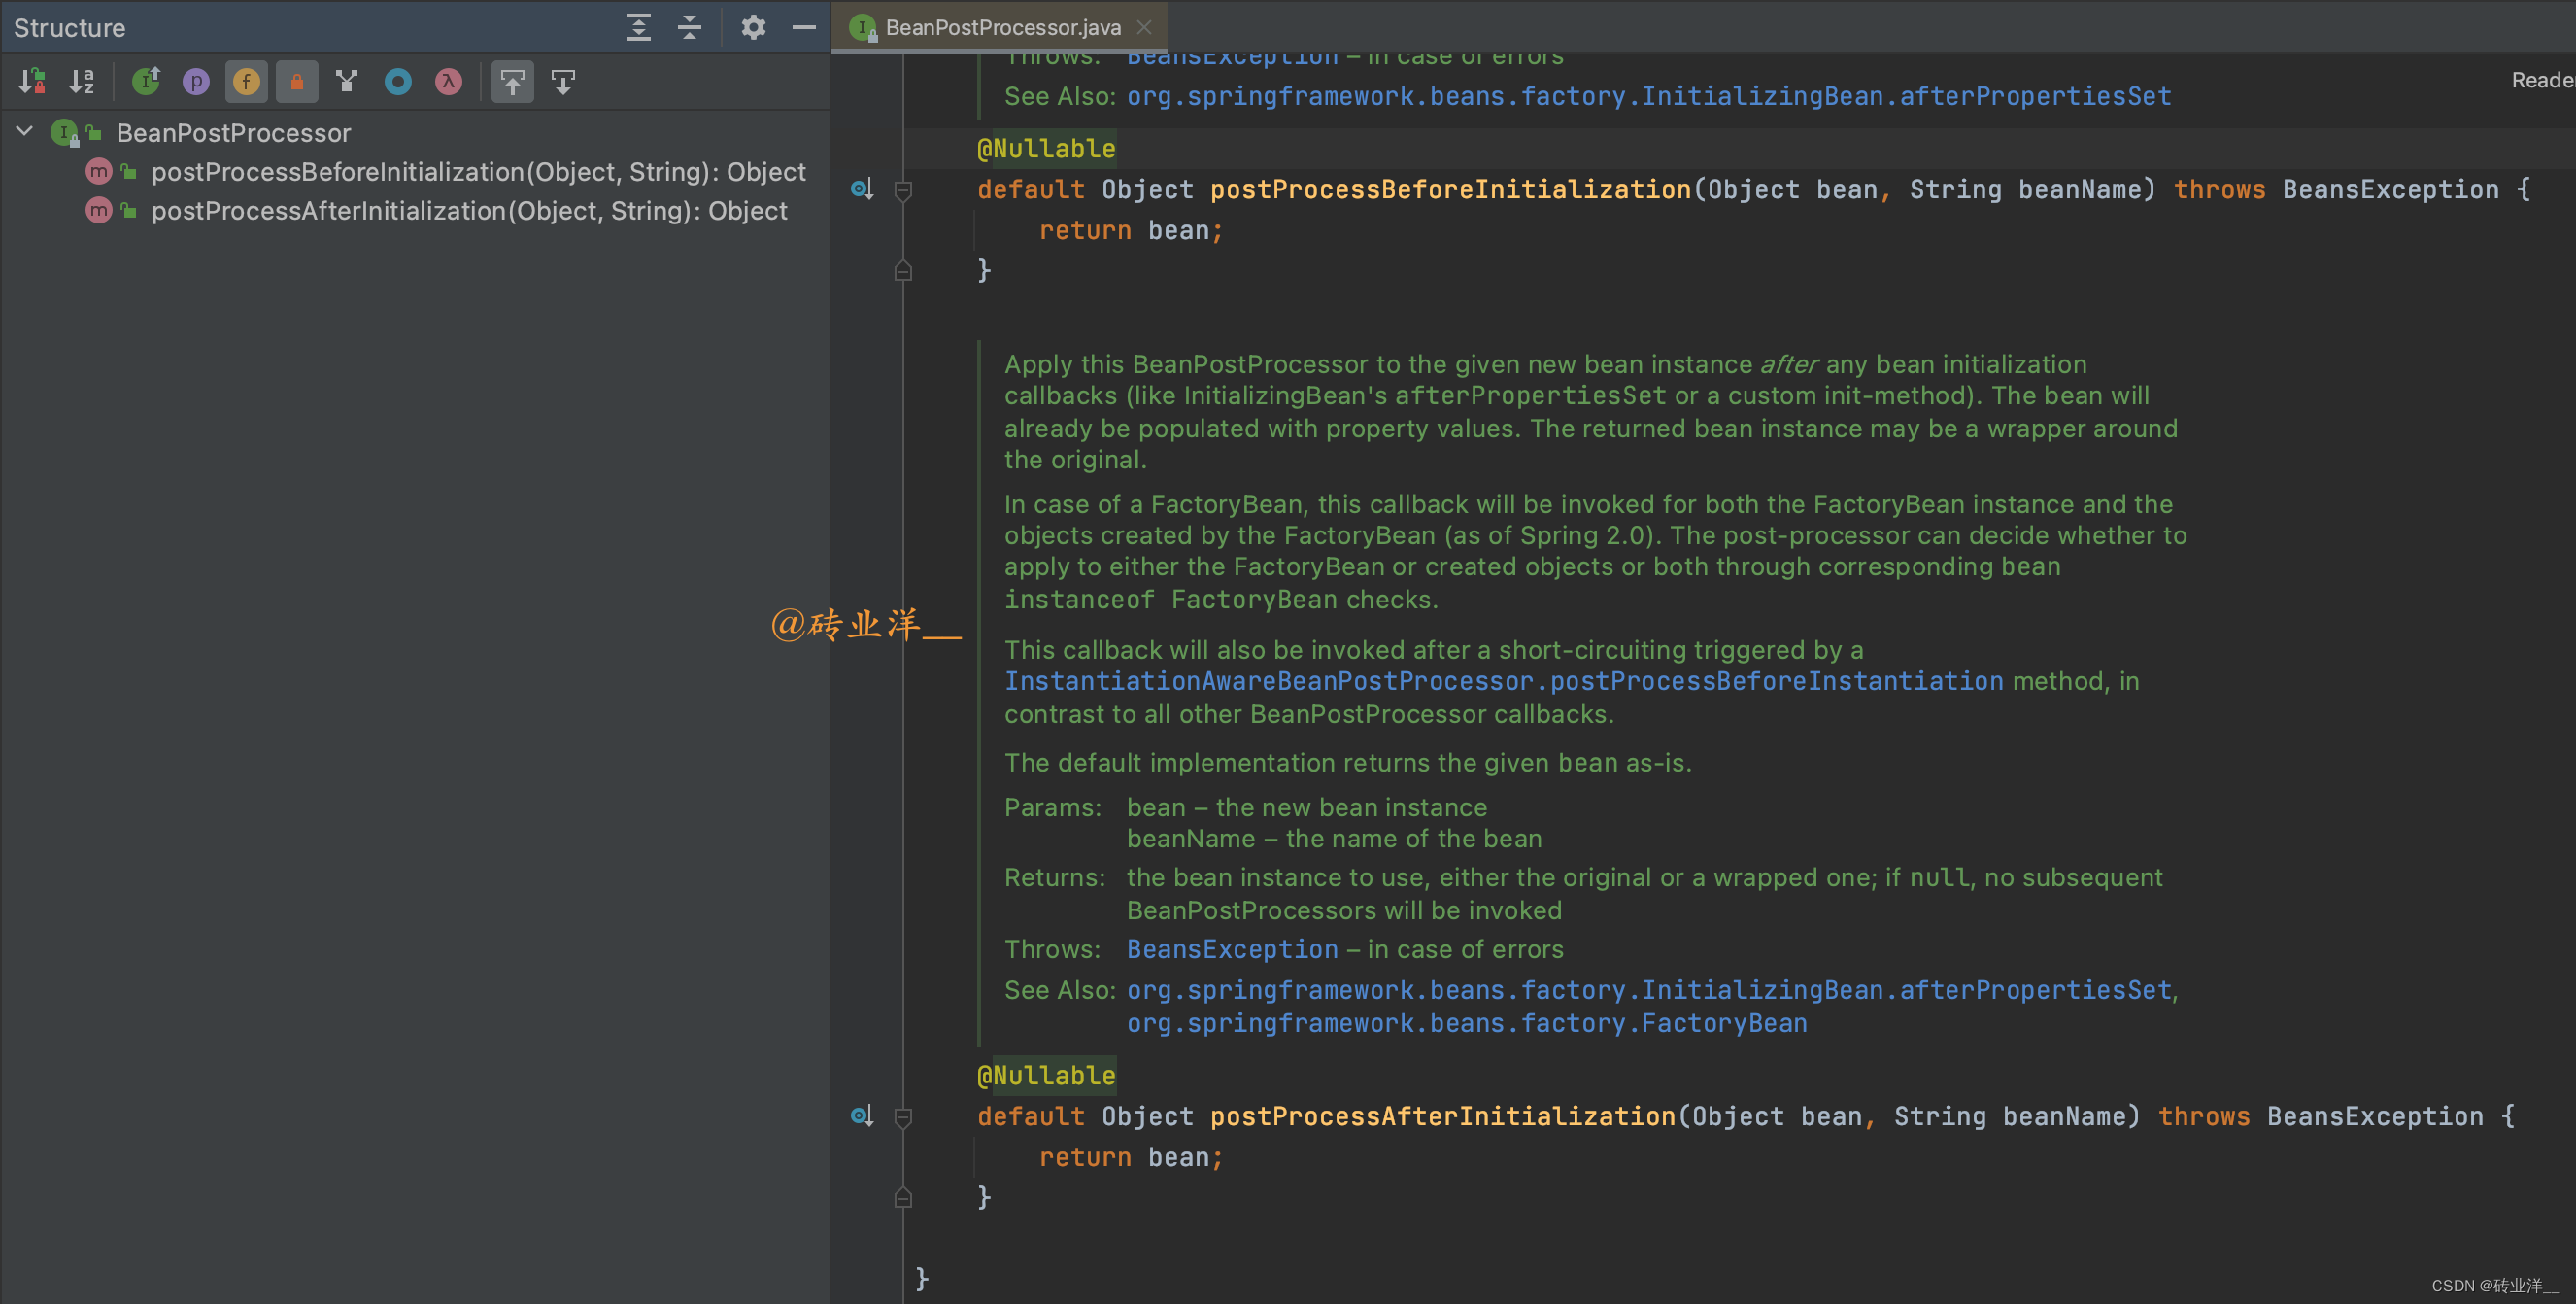
我们来看看这个方法的文档注释,从图中可以看到,
BeanPostProcessor
接口定义了两个方法,
postProcessBeforeInitialization
和
postProcessAfterInitialization

postProcessBeforeInitialization
方法会在任何
bean
初始化回调(如
InitializingBean
的
afterPropertiesSet
方法或者自定义的
init-method
)之前被调用。也就是说,这个方法会在
bean
的属性已经设置完毕,但还未进行初始化时被调用。
postProcessAfterInitialization
方法在任何
bean
初始化回调(比如
InitializingBean
的
afterPropertiesSet
或者自定义的初始化方法)之后被调用。这个时候,
bean
的属性值已经被填充完毕。返回的
bean
实例可能是原始
bean
的一个包装。
2. BeanPostProcessor的使用
2.1 BeanPostProcessor的基础使用示例
全部代码如下:
首先定义两个简单的
Bean
:
Lion
和
Elephant
Lion.java
packagecom.example.demo.bean;publicclassLion{privateString name;publicStringgetName(){return name;}publicvoidsetName(String name){this.name = name;}}
Elephant.java
packagecom.example.demo.bean;publicclassElephant{privateString name;publicStringgetName(){return name;}publicvoidsetName(String name){this.name = name;}}
然后定义一个简单的
BeanPostProcessor
,它只是打印出被处理的
Bean
的名字:
packagecom.example.demo.processor;importorg.springframework.beans.BeansException;importorg.springframework.beans.factory.config.BeanPostProcessor;publicclassMyBeanPostProcessorimplementsBeanPostProcessor{@OverridepublicObjectpostProcessBeforeInitialization(Object bean,String beanName)throwsBeansException{System.out.println("Before initialization: "+ beanName);return bean;}@OverridepublicObjectpostProcessAfterInitialization(Object bean,String beanName)throwsBeansException{System.out.println("After initialization: "+ beanName);return bean;}}
接着我们定义一个配置类,其中包含对
Lion
、
Elephant
类和
MyBeanPostProcessor
类的
Bean
定义:
packagecom.example.demo.configuration;importcom.example.demo.bean.Elephant;importcom.example.demo.bean.Lion;importcom.example.demo.processor.MyBeanPostProcessor;importorg.springframework.context.annotation.Bean;importorg.springframework.context.annotation.Configuration;@ConfigurationpublicclassAnimalConfig{@BeanpublicLionlion(){returnnewLion();}@BeanpublicElephantelephant(){returnnewElephant();}@BeanpublicMyBeanPostProcessormyBeanPostProcessor(){returnnewMyBeanPostProcessor();}}
最后,我们在主程序中创建ApplicationContext对象:
importorg.springframework.context.ApplicationContext;importorg.springframework.context.annotation.AnnotationConfigApplicationContext;publicclassMain{publicstaticvoidmain(String[] args){ApplicationContext context =newAnnotationConfigApplicationContext(AnimalConfig.class);((AnnotationConfigApplicationContext)context).close();}}
运行结果:
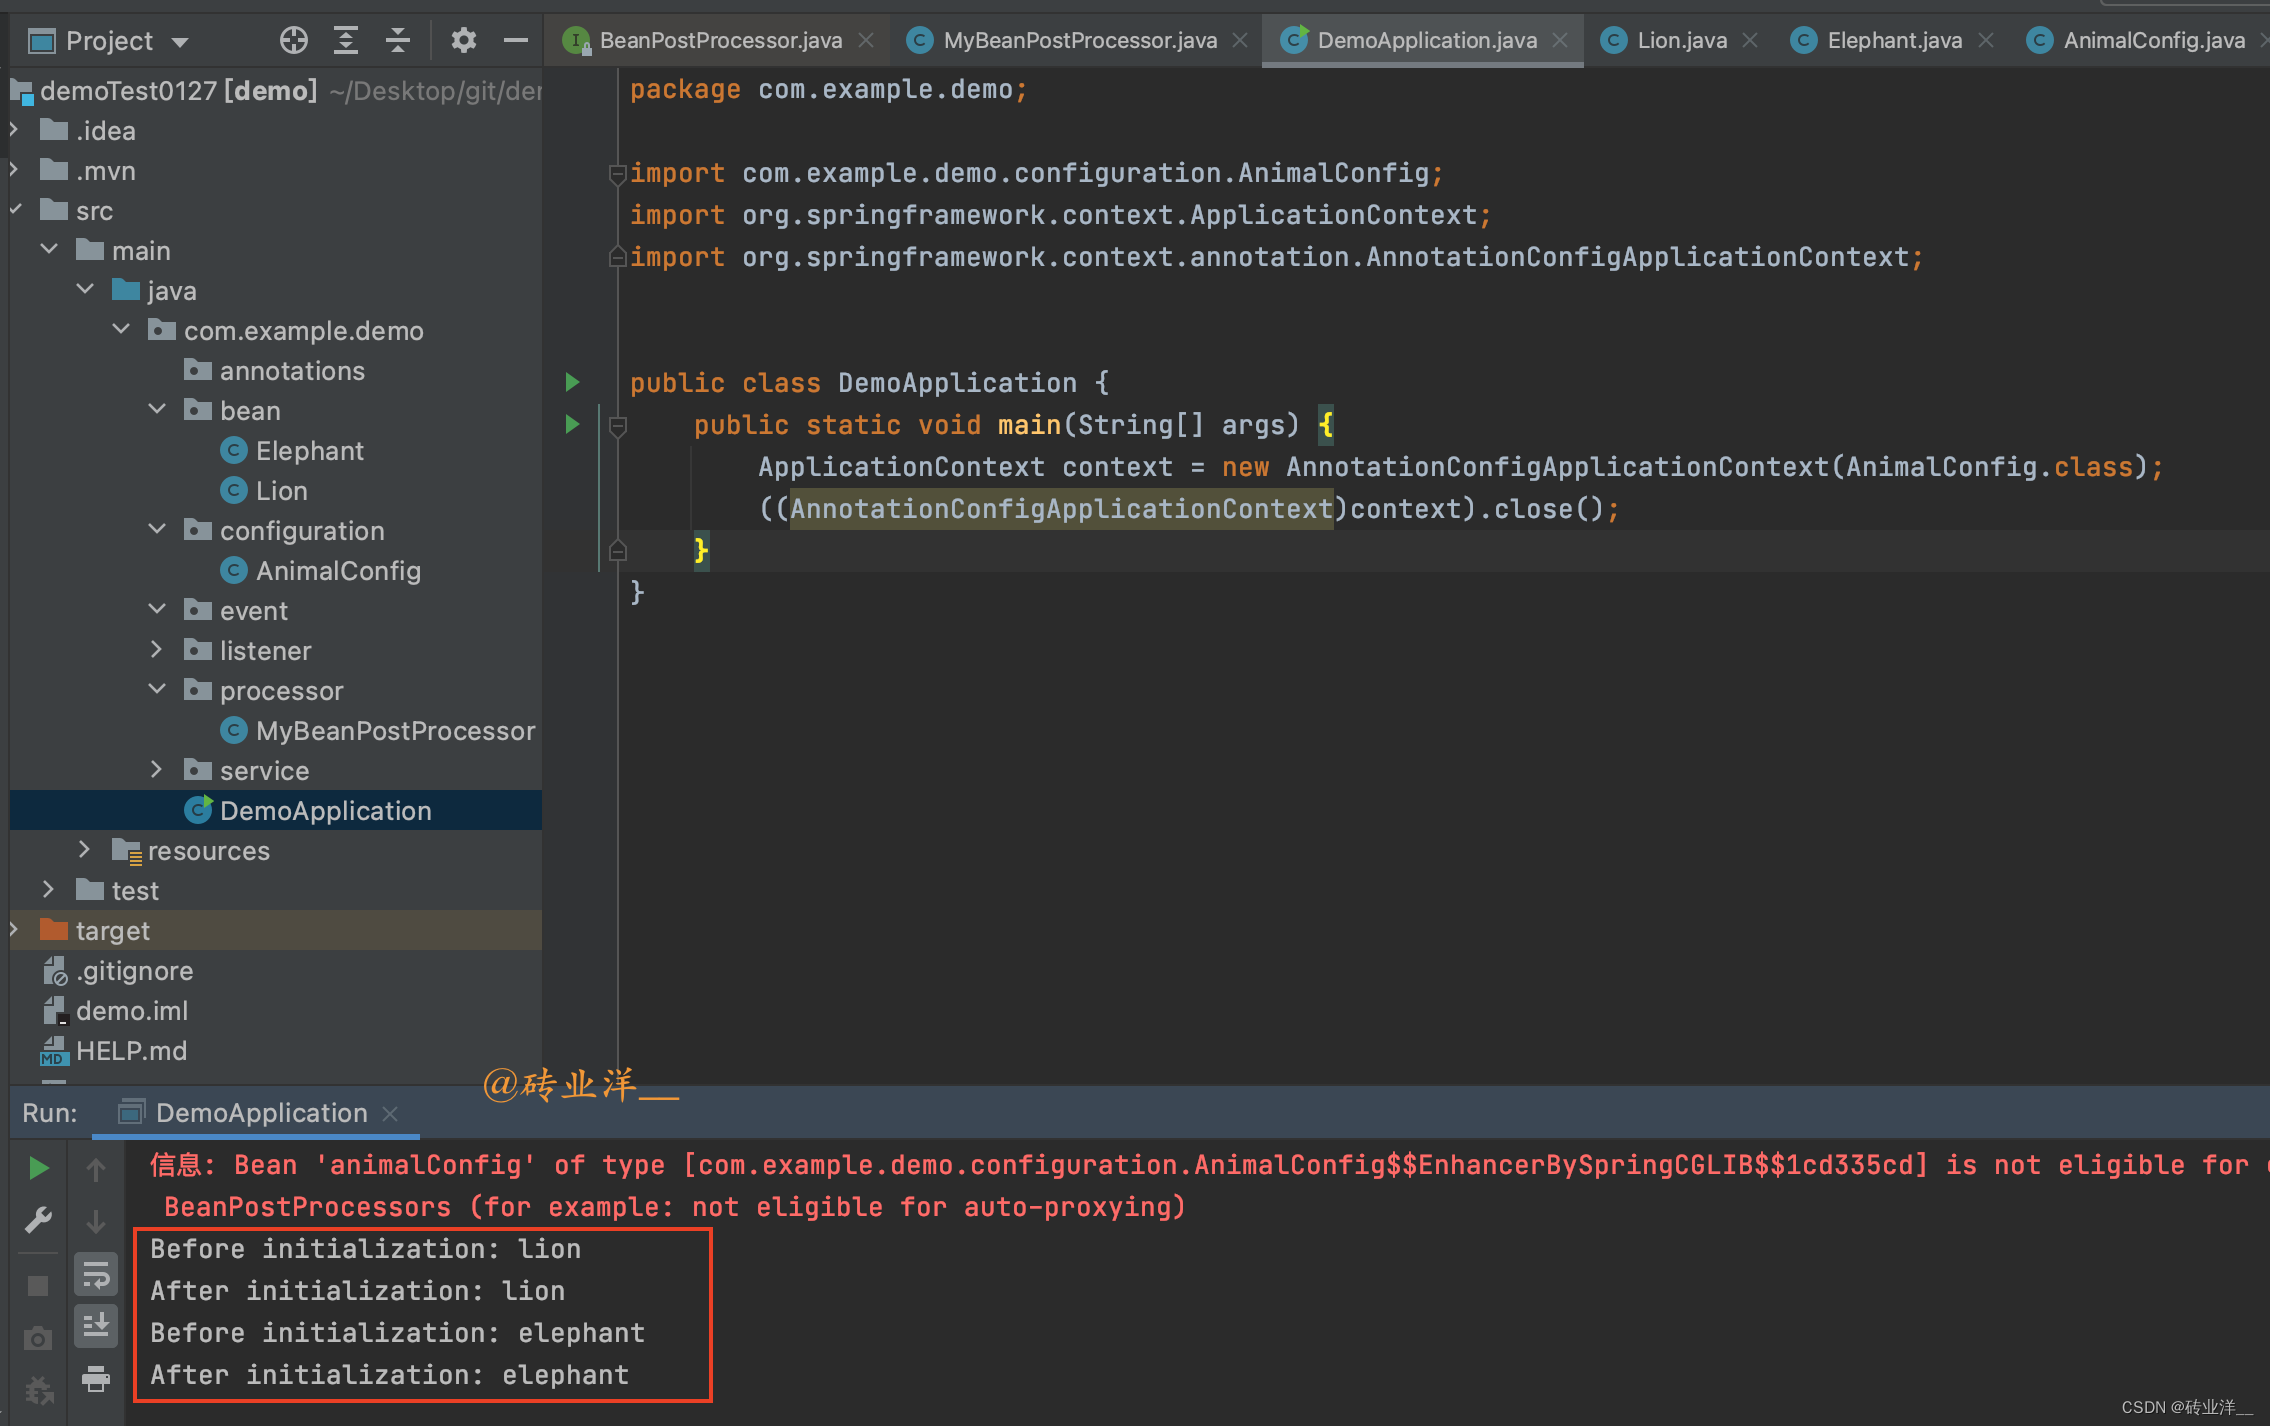
以上代码在执行时,将先创建
Lion
和
Elephant
对象,然后在初始化过程中和初始化后调用
postProcessBeforeInitialization
和
postProcessAfterInitialization
方法,打印出被处理的
Bean
的名字。
细心的小伙伴可能观察到这里有红色日志
信息: Bean 'animalConfig' of type [com.example.demo.configuration.AnimalConfig$$EnhancerBySpringCGLIB$$ee4adc7e] is not eligible for getting processed by all BeanPostProcessors (for example: not eligible for auto-proxying)**在
Spring中,
BeanPostProcessor是被特殊处理的,它们会在其他普通
Bean之前被实例化和初始化,这样设计的原因是
BeanPostProcessor的存在可以影响其他
Bean的创建和初始化过程。**
Spring应用上下文中可以存在多个
BeanPostProcessor,
Spring本身就提供了很多内置的
BeanPostProcessor。
但是,如果在初始化
BeanPostProcessor的过程中需要依赖其他的
Bean,那么这些被依赖的
Bean会先于后置处理器进行初始化。然而,由于这些被依赖的
Bean是在该
BeanPostProcessor初始化完成之前就已经进行了初始化,它们就会错过这个
BeanPostProcessor的处理。在这个例子中,
MyBeanPostProcessor就是这样的一个
BeanPostProcessor,而
"animalConfig"是它所依赖的
Bean。所以这个日志信息就是说,
'animalConfig'这个
Bean在初始化的时候,没有被所有的
BeanPostProcessor处理,这里它无法得到
MyBeanPostProcessor的处理。
我们只需要把实例化过程直接交给
Spring容器来管理,而不是在配置类中手动进行实例化,就可以消除这个提示信息,也就是在
MyBeanPostProcessor上加
@Component即可。
在第
3节的例子中就使用了
@Component处理这个
MyBeanPostProcessor,这个提示就消失了。
2.2 利用BeanPostProcessor修改Bean的初始化结果的返回值
还是上面的例子,我们只修改一下
MyBeanPostProcessor
类的方法后再次运行
packagecom.example.demo.processor;importcom.example.demo.bean.Elephant;importcom.example.demo.bean.Lion;importorg.springframework.beans.BeansException;importorg.springframework.beans.factory.config.BeanPostProcessor;publicclassMyBeanPostProcessorimplementsBeanPostProcessor{@OverridepublicObjectpostProcessBeforeInitialization(Object bean,String beanName)throwsBeansException{System.out.println("Before initialization: "+ bean);if(bean instanceofLion){returnnewElephant();}return bean;}@OverridepublicObjectpostProcessAfterInitialization(Object bean,String beanName)throwsBeansException{System.out.println("After initialization: "+ bean);return bean;}}
运行结果:
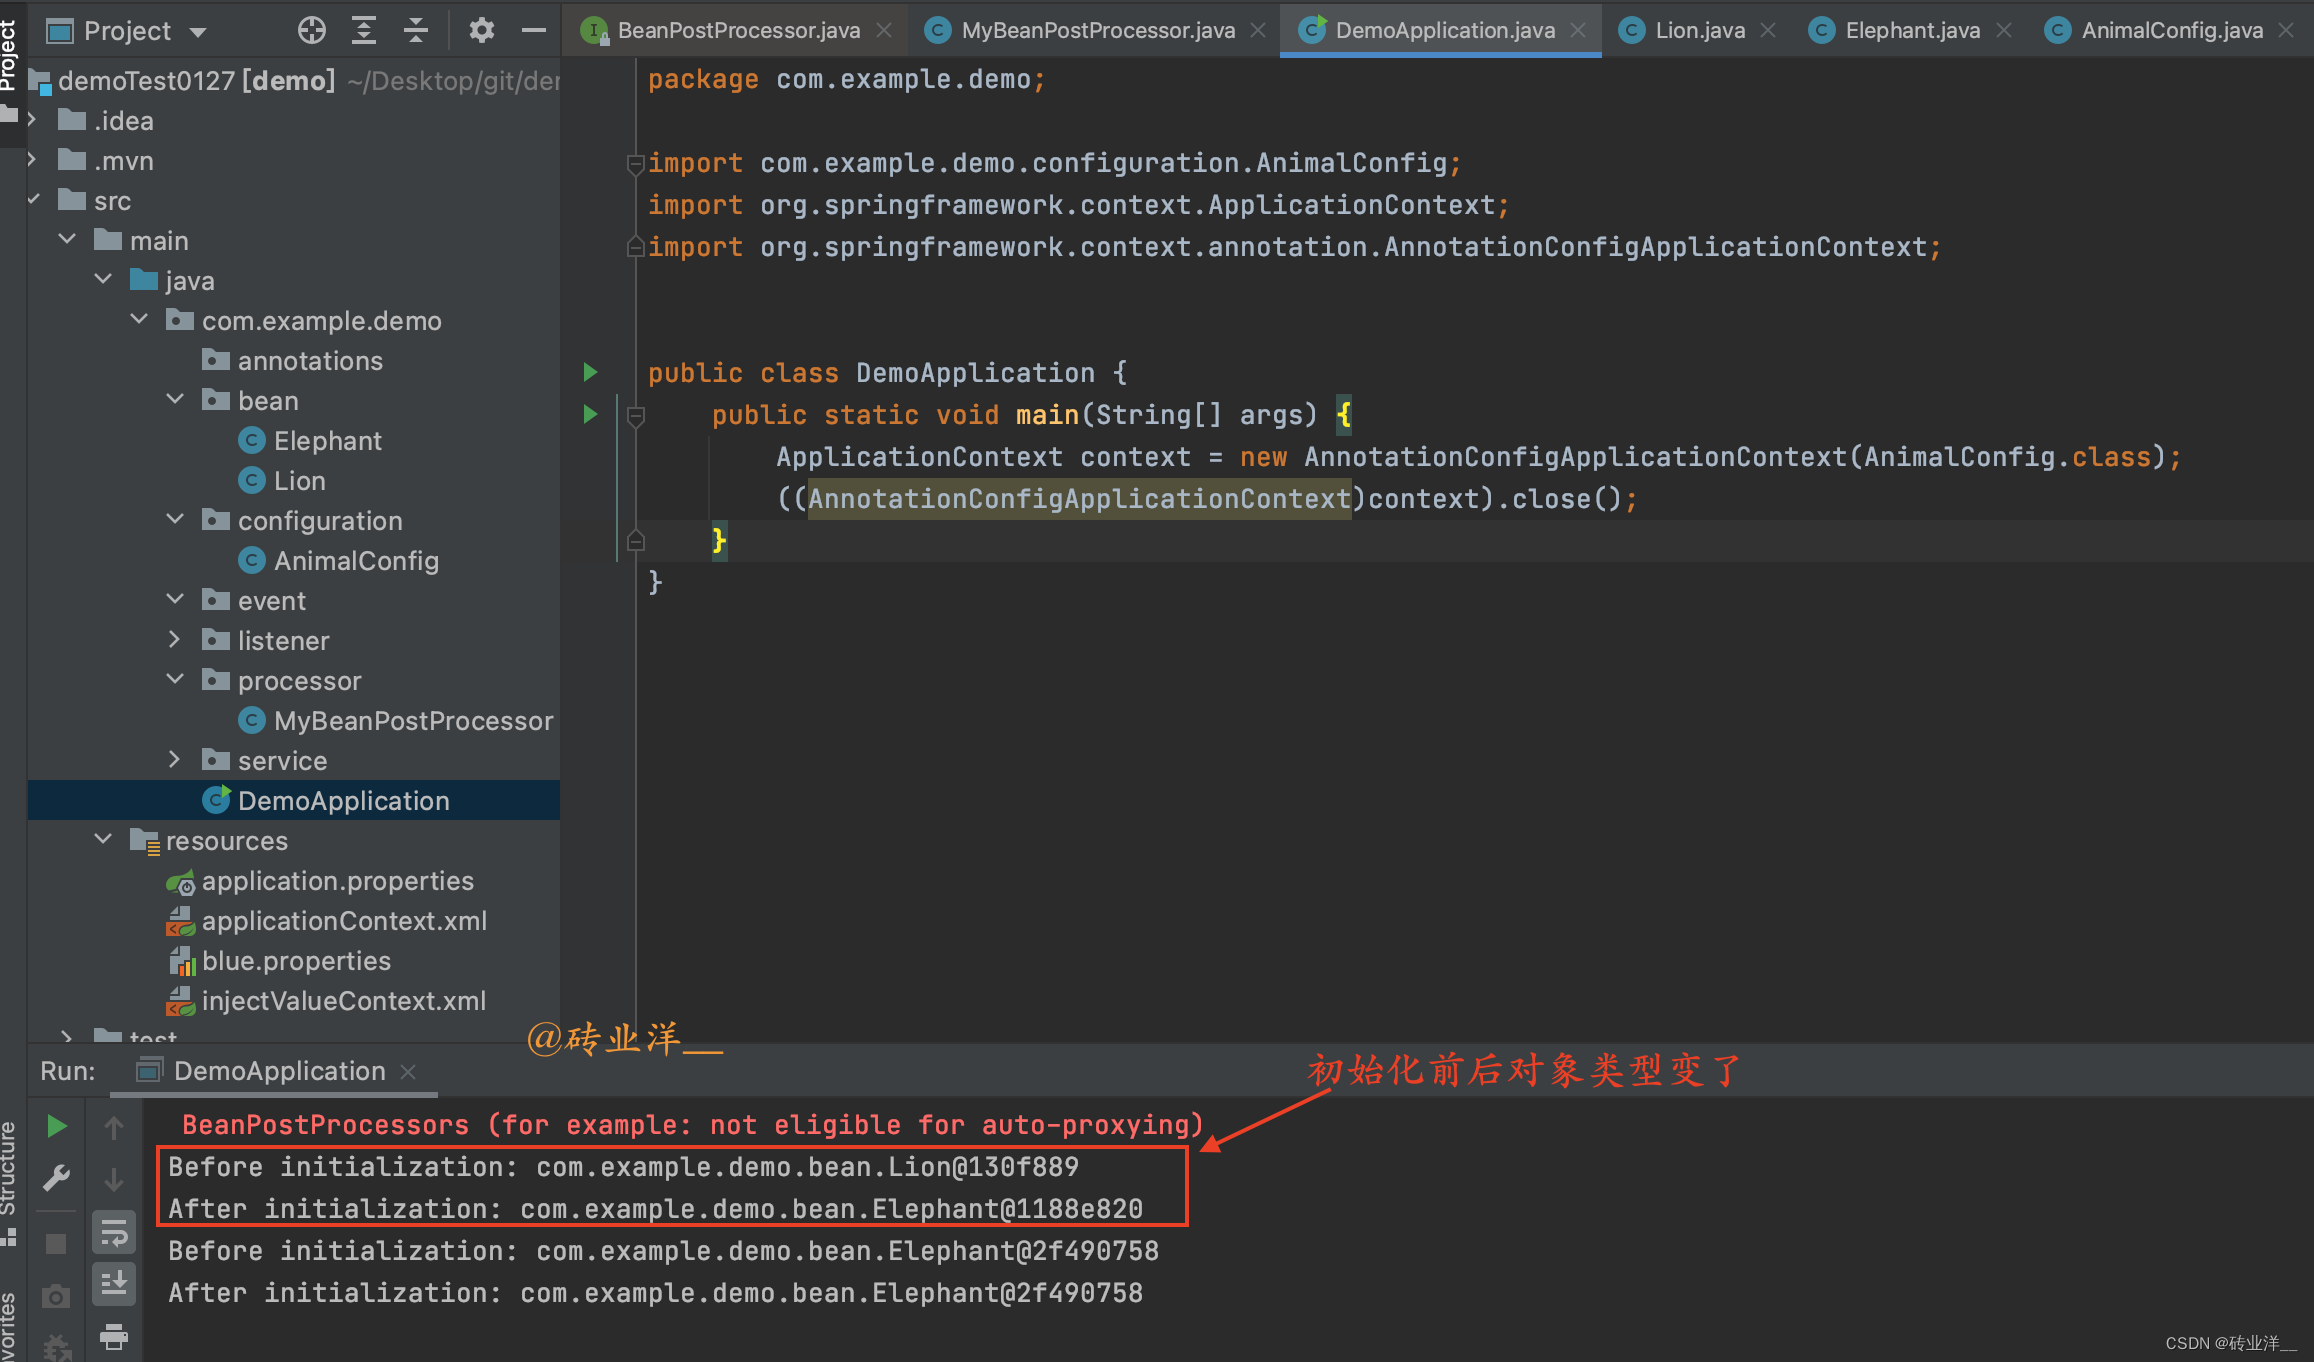
BeanPostProcessor
的两个方法都可以返回任意的
Object
,这意味着我们可以在这两个方法中更改返回的
bean
。例如,如果我们让
postProcessBeforeInitialization
方法在接收到
Lion
实例时返回一个新的
Elephant
实例,那么我们将会看到
Lion
实例变成了
Elephant
实例。
那既然
BeanPostProcessor
的两个方法都可以返回任意的
Object
,那我搞点破坏返回
null
会怎么样,会不会因为初始化
bean
为
null
而导致异常呢?
答案是不会的,我们来看一下:
packagecom.example.demo.processor;importorg.springframework.beans.BeansException;importorg.springframework.beans.factory.config.BeanPostProcessor;publicclassMyBeanPostProcessorimplementsBeanPostProcessor{@OverridepublicObjectpostProcessBeforeInitialization(Object bean,String beanName)throwsBeansException{System.out.println("Before initialization: "+ bean);returnnull;}@OverridepublicObjectpostProcessAfterInitialization(Object bean,String beanName)throwsBeansException{System.out.println("After initialization: "+ bean);return bean;}}
我们运行看结果
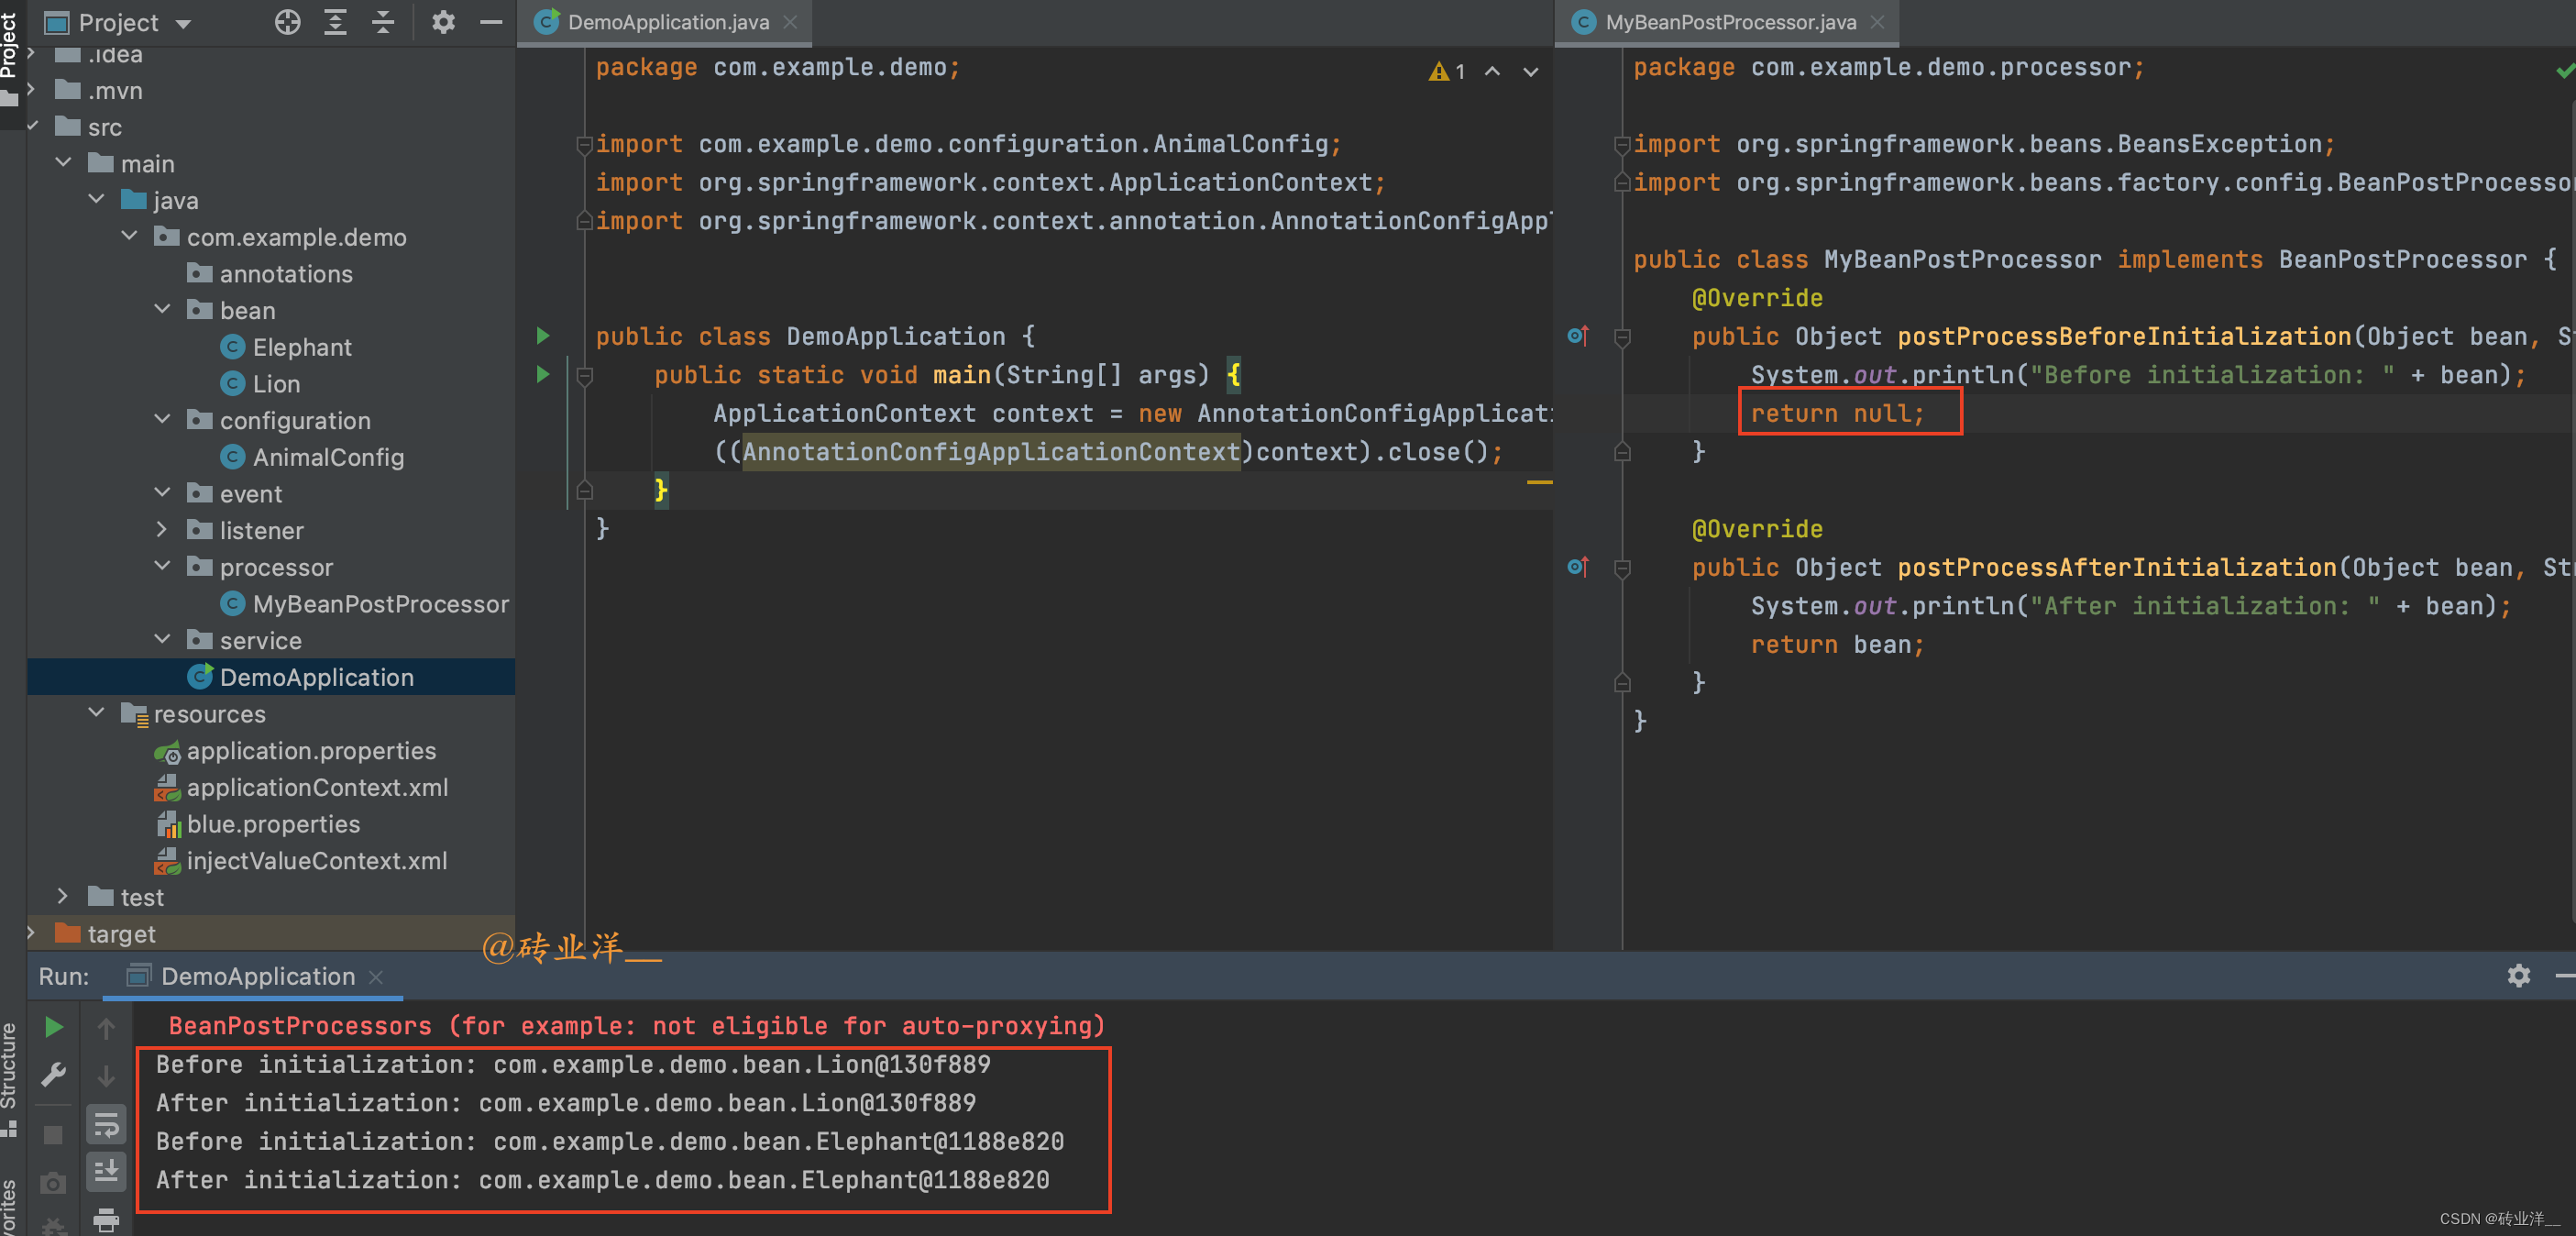
结果发现还是正常初始化的
bean
类型,不会有任何改变,我们继续调试看看是为什么
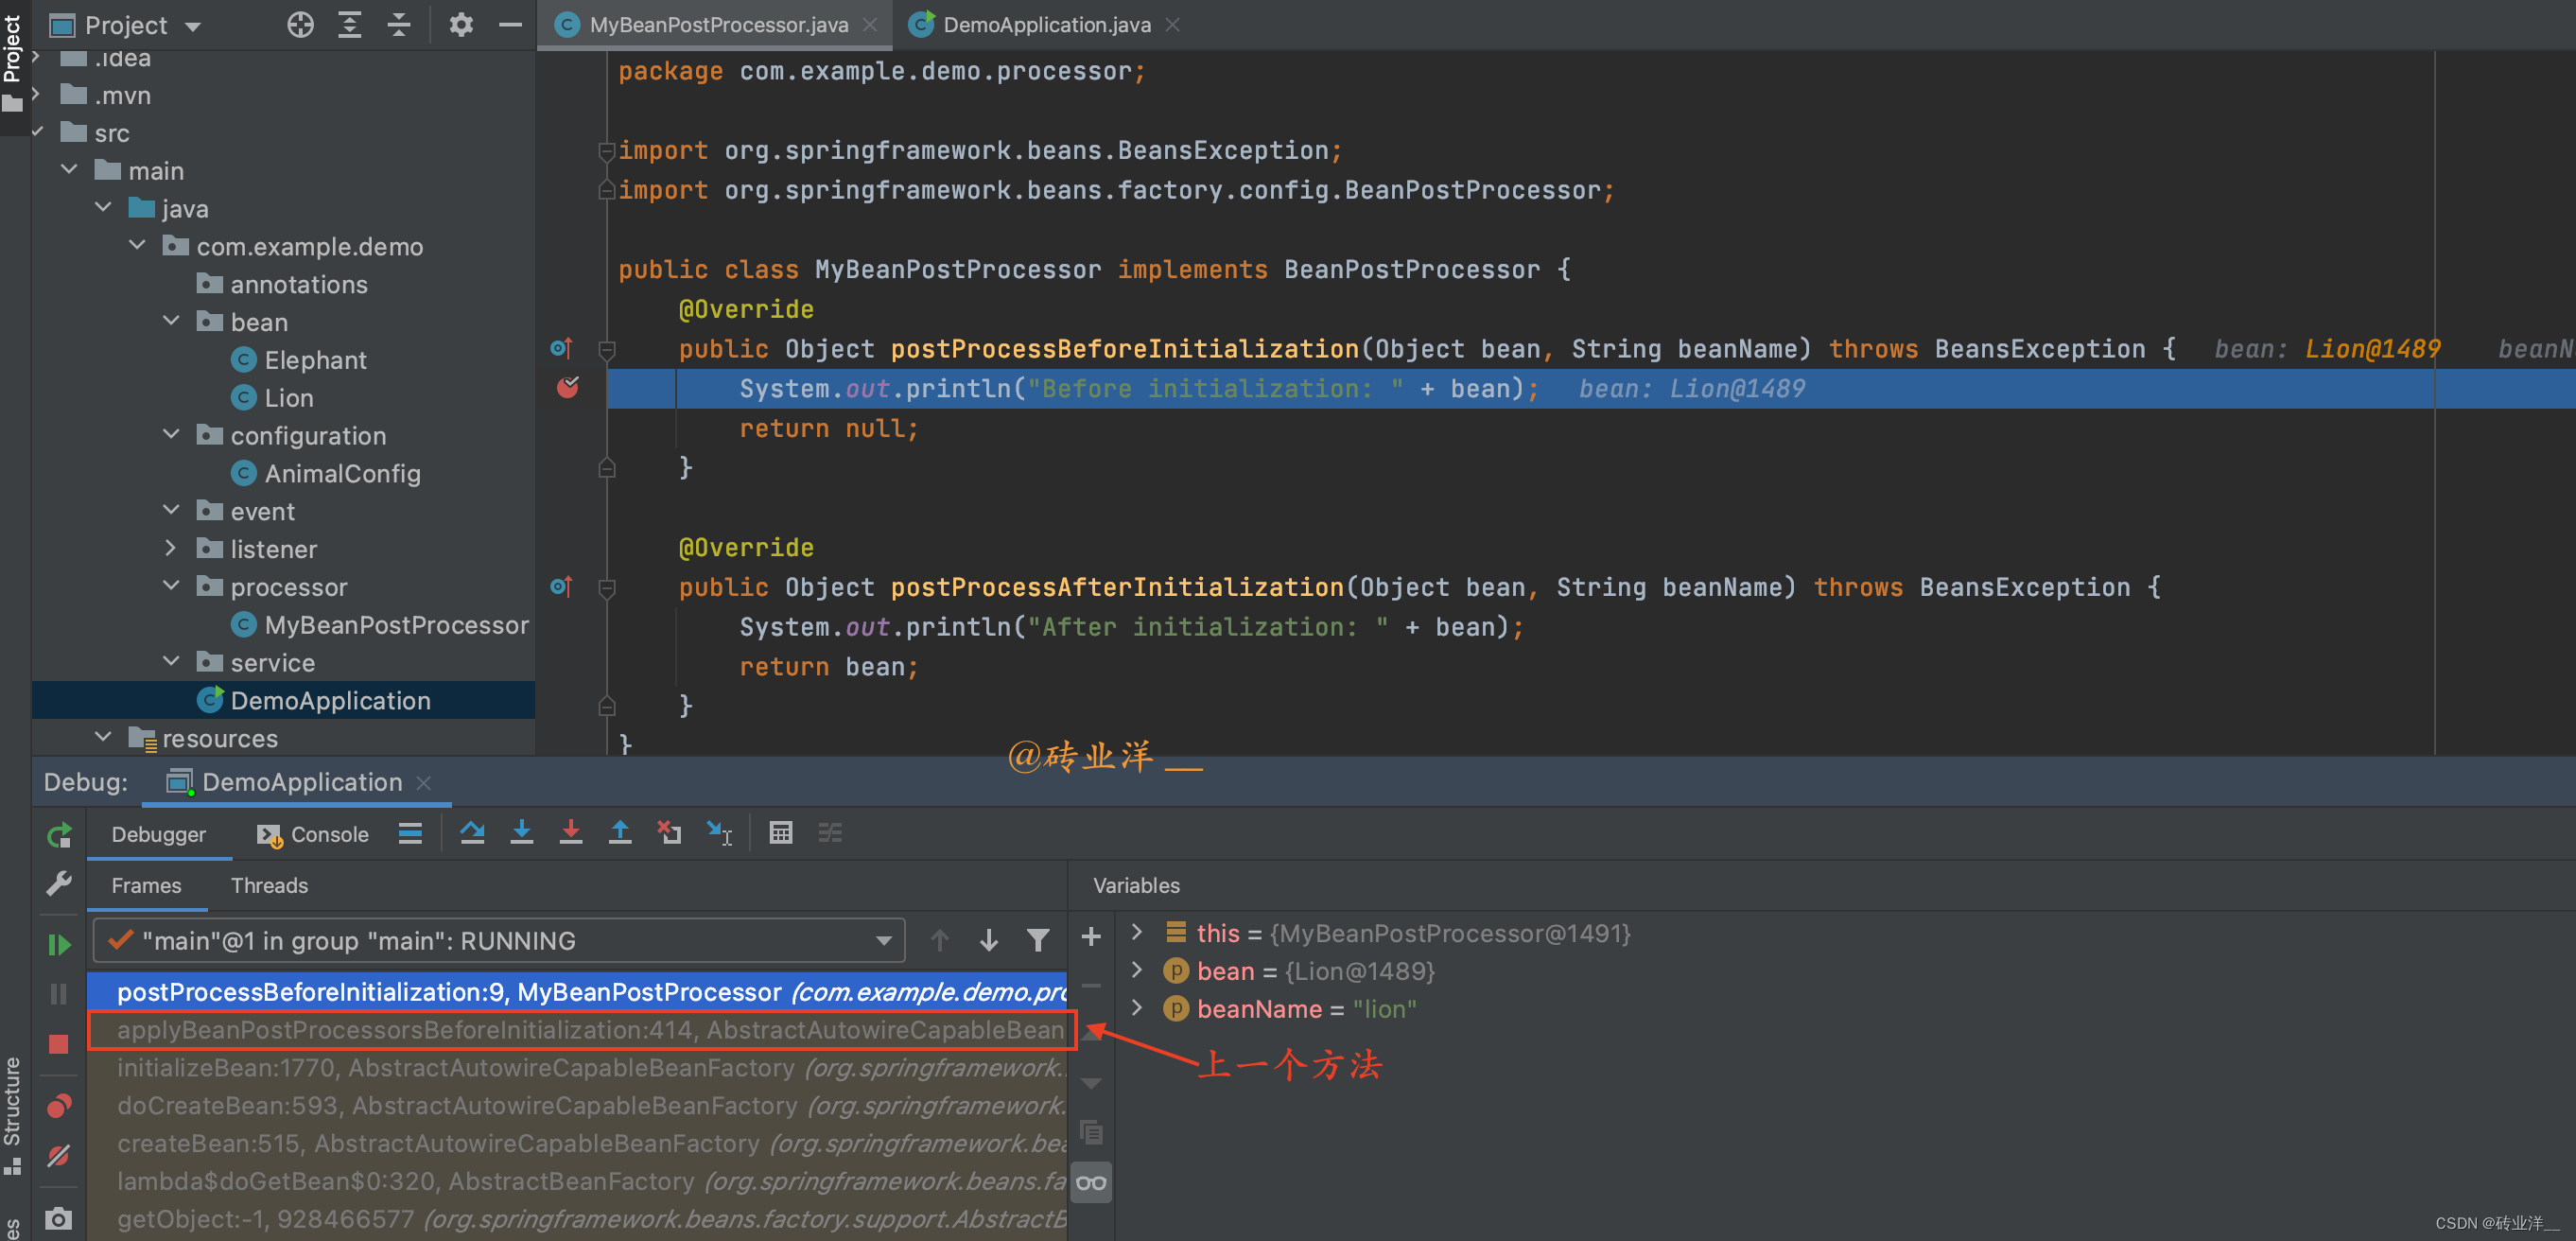
我们通过堆栈帧看到调用
postProcessBeforeInitialization
方法的上一个方法是
applyBeanPostProcessorsBeforeInitialization
,双击点开看一看这个方法

从我这个调试图中可以看到,如果
postProcessBeforeInitialization
返回
null
,
Spring
仍然用原始的
bean
进行后续的处理,同样的逻辑在
postProcessAfterInitialization
也是一样。这就是为什么我们在
BeanPostProcessor
类的方法中返回
null
,原始
bean
实例还是存在的原因。
2.3 通过BeanPostProcessor实现Bean属性的动态修改
来看看是怎么拦截
bean
的初始化的
全部代码如下:
首先,我们定义一个
Lion
类:
publicclassLion{privateString name;publicLion(){this.name ="Default Lion";}publicLion(String name){this.name = name;}publicStringgetName(){return name;}publicvoidsetName(String name){this.name = name;}@OverridepublicStringtoString(){return"Lion{"+"name='"+ name +'\''+'}';}}
接下来,我们定义一个
BeanPostProcessor
,我们称之为
MyBeanPostProcessor
:
packagecom.example.demo.processor;importcom.example.demo.bean.Lion;importorg.springframework.beans.BeansException;importorg.springframework.beans.factory.config.BeanPostProcessor;publicclassMyBeanPostProcessorimplementsBeanPostProcessor{@OverridepublicObjectpostProcessBeforeInitialization(Object bean,String beanName)throwsBeansException{System.out.println("Bean的初始化之前:"+ bean);return bean;}@OverridepublicObjectpostProcessAfterInitialization(Object bean,String beanName)throwsBeansException{System.out.println("Bean的初始化之后:"+ bean);if(bean instanceofLion){((Lion) bean).setName("Simba");}return bean;}}
然后我们定义一个配置类,其中包含对
Lion
类的
Bean
定义和对
MyBeanPostProcessor
类的
Bean
定义:
packagecom.example.demo.configuration;importcom.example.demo.bean.Lion;importcom.example.demo.processor.MyBeanPostProcessor;importorg.springframework.context.annotation.Bean;importorg.springframework.context.annotation.Configuration;@ConfigurationpublicclassAnimalConfig{@BeanpublicLionlion(){returnnewLion();}@BeanpublicMyBeanPostProcessormyBeanPostProcessor(){returnnewMyBeanPostProcessor();}}
最后,我们在主程序中创建
ApplicationContext
对象,并获取
Lion
对象:
packagecom.example.demo;importcom.example.demo.bean.Lion;importcom.example.demo.configuration.AnimalConfig;importorg.springframework.context.ApplicationContext;importorg.springframework.context.annotation.AnnotationConfigApplicationContext;publicclassDemoApplication{publicstaticvoidmain(String[] args){ApplicationContext context =newAnnotationConfigApplicationContext(AnimalConfig.class);Lion lion = context.getBean("lion",Lion.class);System.out.println(lion);((AnnotationConfigApplicationContext)context).close();}}
运行结果:
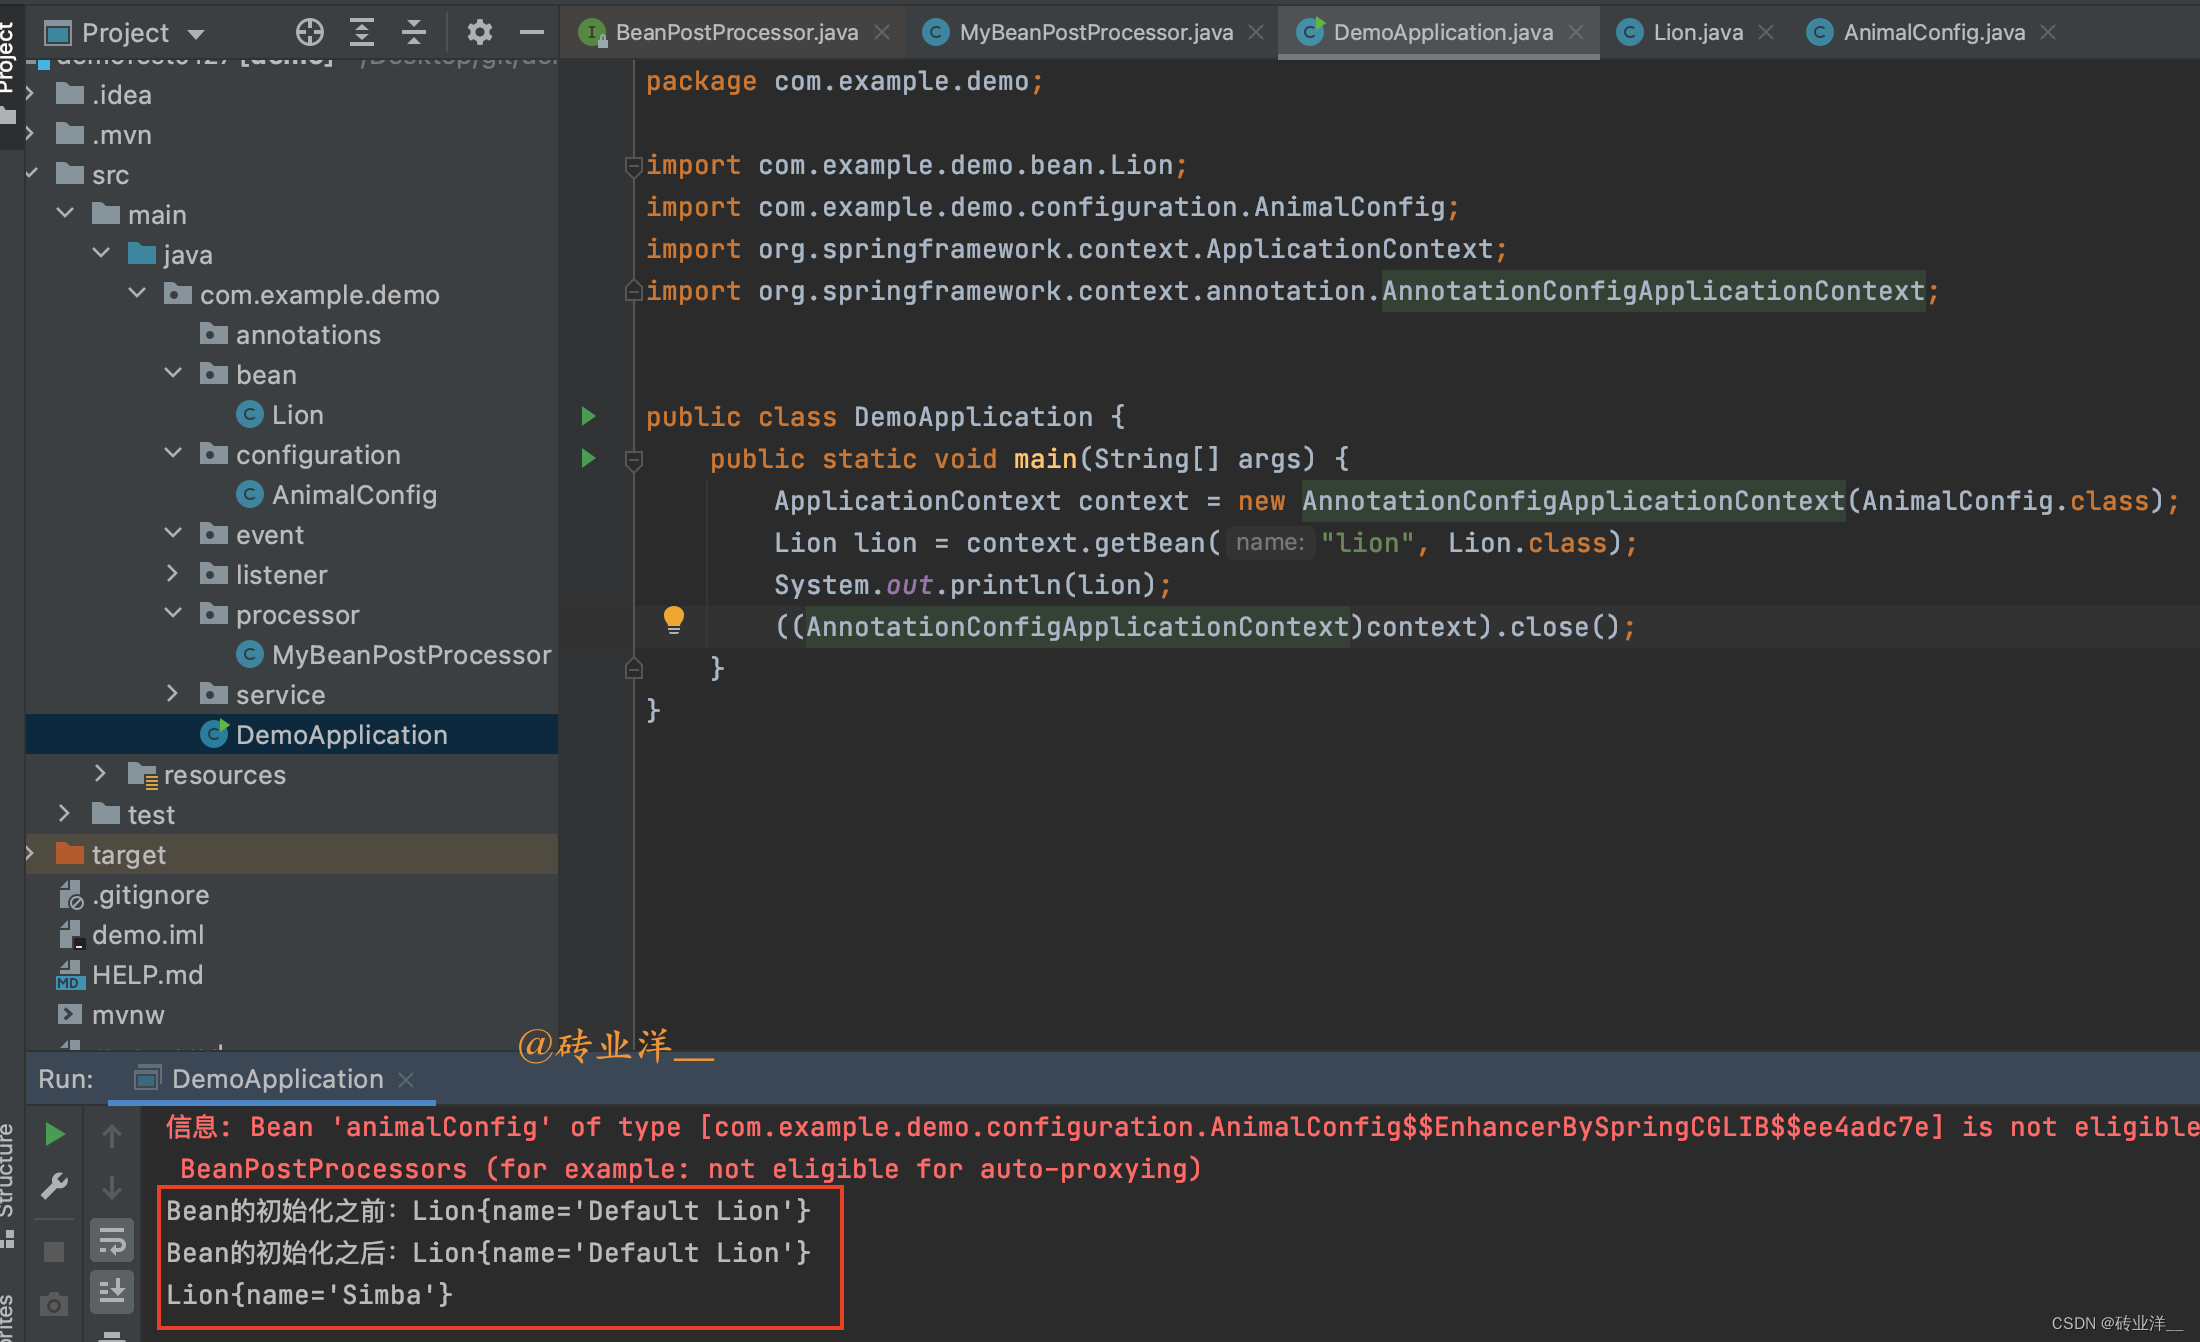
上面代码在执行时,先创建一个
Lion
对象,然后在初始化过程中和初始化后调用
postProcessBeforeInitialization
和
postProcessAfterInitialization
方法,修改
Lion
的名字为"
Simba
",最后在主程序中输出
Lion
对象,显示其名字为
"Simba"
。
3. 深度剖析BeanPostProcessor的执行时机
3.1 后置处理器在Bean生命周期中的作用及执行时机
在这个例子中,我们将创建一个名为
Lion
和
Elephant
的
Bean
,它会展示属性赋值和生命周期的各个步骤的执行顺序。同时,我们还将创建一个
BeanPostProcessor
来打印消息并显示它的执行时机。
全部代码如下:
首先,我们定义我们的
Lion
:
packagecom.example.demo.bean;importorg.springframework.beans.factory.DisposableBean;importorg.springframework.beans.factory.InitializingBean;importjavax.annotation.PostConstruct;importjavax.annotation.PreDestroy;importjavax.annotation.Resource;publicclassLionimplementsInitializingBean,DisposableBean{privateString name;privateElephant elephant;publicLion(){System.out.println("1. Bean Constructor Method Invoked!");}publicStringgetName(){return name;}publicvoidsetName(String name){this.name = name;System.out.println("2. Bean Setter Method Invoked! name: "+ name);}/**
     * setter注入
     * @param elephant
     */@ResourcepublicvoidsetElephant(Elephant elephant){this.elephant = elephant;System.out.println("2. Bean Setter Method Invoked! elephant: "+ elephant);}@PostConstructpublicvoidpostConstruct(){System.out.println("4. @PostConstruct Method Invoked!");}@OverridepublicvoidafterPropertiesSet()throwsException{System.out.println("5. afterPropertiesSet Method Invoked!");}publicvoidcustomInitMethod(){System.out.println("6. customInitMethod Method Invoked!");}@PreDestroypublicvoidpreDestroy(){System.out.println("8. @PreDestroy Method Invoked!");}@Overridepublicvoiddestroy()throwsException{System.out.println("9. destroy Method Invoked!");}publicvoidcustomDestroyMethod(){System.out.println("10. customDestroyMethod Method Invoked!");}}
创建
Lion
所依赖的
Elephant
packagecom.example.demo.bean;importorg.springframework.stereotype.Component;@ComponentpublicclassElephant{privateString name;publicStringgetName(){return name;}publicvoidsetName(String name){this.name = name;}}
然后,我们定义一个简单的
BeanPostProcessor
:
packagecom.example.demo.processor;importcom.example.demo.bean.Lion;importorg.springframework.beans.BeansException;importorg.springframework.beans.factory.config.BeanPostProcessor;importorg.springframework.stereotype.Component;@ComponentpublicclassMyBeanPostProcessorimplementsBeanPostProcessor{@OverridepublicObjectpostProcessBeforeInitialization(Object bean,String beanName)throwsBeansException{if(bean instanceofLion){System.out.println("3. postProcessBeforeInitialization Method Invoked!");}return bean;}@OverridepublicObjectpostProcessAfterInitialization(Object bean,String beanName)throwsBeansException{if(bean instanceofLion){System.out.println("7. postProcessAfterInitialization Method Invoked!");}return bean;}}
创建一个配置类
AnimalConfig
packagecom.example.demo.configuration;importcom.example.demo.bean.Lion;importorg.springframework.context.annotation.Bean;importorg.springframework.context.annotation.Configuration;@ConfigurationpublicclassAnimalConfig{@Bean(initMethod ="customInitMethod", destroyMethod ="customDestroyMethod")publicLionlion(){Lion lion =newLion();
        lion.setName("my lion");return lion;}}
主程序:
packagecom.example.demo;importcom.example.demo.bean.Lion;importorg.springframework.context.annotation.AnnotationConfigApplicationContext;publicclassDemoApplication{publicstaticvoidmain(String[] args){System.out.println("容器初始化之前...");AnnotationConfigApplicationContext context =newAnnotationConfigApplicationContext("com.example");System.out.println("容器初始化完成");Lion bean = context.getBean(Lion.class);
        bean.setName("oh!!! My Bean set new name");System.out.println("容器准备关闭...");
        context.close();System.out.println("容器已经关闭");}}
控制台上看到所有的方法调用都按照预期的顺序进行,这可以更好地理解
Bean
属性赋值和生命周期以及
BeanPostProcessor
的作用。
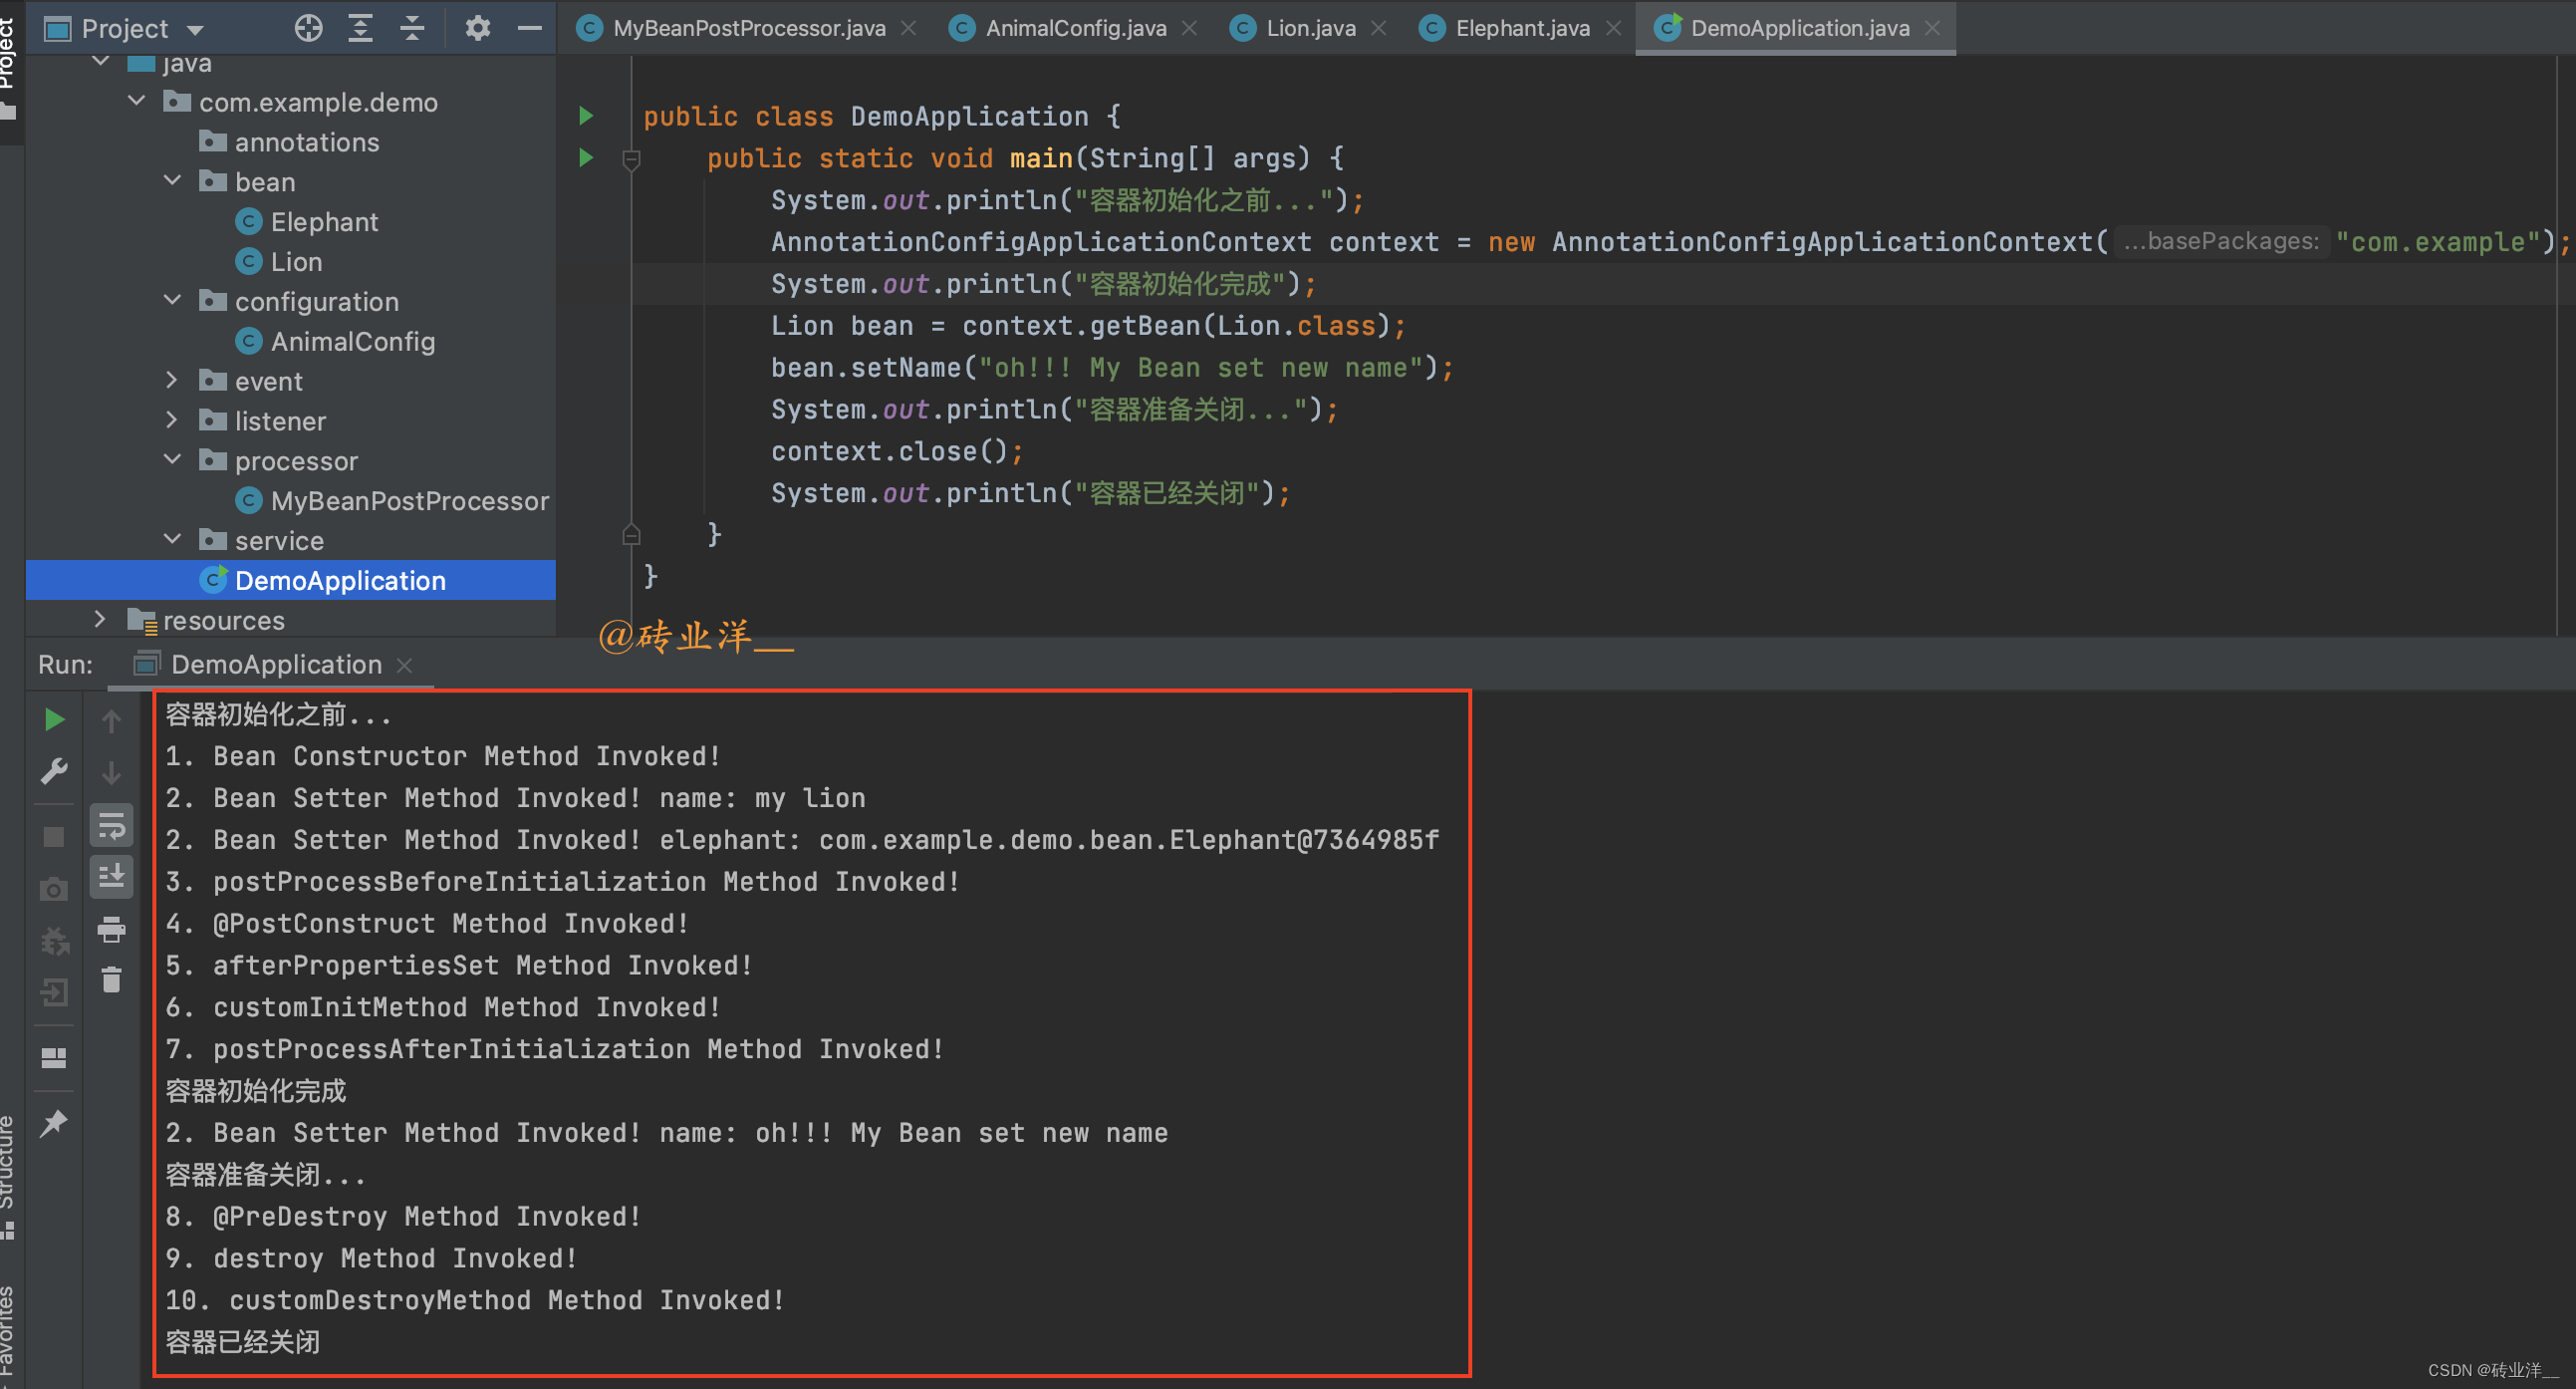
根据打印日志我们可以分析出
- 首先,
Bean Constructor Method Invoked!表明Lion的构造器被调用,创建了一个新的 Lion 实例。 - 接着,
Bean Setter Method Invoked! name: my lion和Bean Setter Method Invoked! elephant: com.example.demo.bean.Elephant@7364985f说明Spring对Lion实例的依赖注入。在这一步,Spring调用了Lion的setter方法,为name属性设置了值 “my lion”,同时为elephant属性注入了一个Elephant实例。 - 然后,
postProcessBeforeInitialization Method Invoked!说明MyBeanPostProcessor的postProcessBeforeInitialization方法被调用,这是在初始化Lion实例之前。 @PostConstruct Method Invoked!说明@PostConstruct注解的方法被调用,这是在Bean初始化之后,但是在Spring执行任何进一步初始化之前。afterPropertiesSet Method Invoked!说明Spring调用了InitializingBean的afterPropertiesSet方法customInitMethod Method Invoked!表示调用了Lion实例的init-method方法。postProcessAfterInitialization Method Invoked!说明MyBeanPostProcessor的postProcessAfterInitialization方法被调用,这是在初始化Lion实例之后。
然后
Spring
完成了整个初始化过程。
- 主程序中手动调用了
Lion实例的setter方法,因此在Bean Setter Method Invoked! name: oh!!! My Bean set new name可见,name属性被设置了新的值"oh!!! My Bean set new name"。
当容器准备关闭时:
@PreDestroy Method Invoked!说明@PreDestroy注解的方法被调用,这是在Bean销毁之前。destroy Method Invoked!表示Lion实例开始销毁。在这一步,Spring调用了DisposableBean的destroy方法。customDestroyMethod Method Invoked!表示Lion实例开始销毁,调用了Lion实例的destroy-method方法。
最后,
Spring
完成了整个销毁过程,容器关闭。
这个日志提供了
Spring Bean
生命周期的完整视图,显示了从创建到销毁过程中的所有步骤。
注意:
DisposableBean
的
destroy
方法和
destroy-method
方法调用,这个销毁过程不意味着
bean
实例就被立即从内存中删除了,
Java
的垃圾收集机制决定了对象什么时候被从内存中删除。
Spring
容器无法强制进行这个操作,比如解除
bean
之间的关联和清理缓存,这并不是
Spring
在销毁
bean
时会做的,而是由
Java
的垃圾回收器在一个对象不再被引用时做的事情。
BeanPostProcessor
的执行顺序是在
Spring Bean
的生命周期中非常重要的一部分。例如,如果一个
Bean
实现了
InitializingBean
接口,那么
afterPropertiesSet
方法会在所有的
BeanPostProcessor
的
postProcessBeforeInitialization
方法之后调用,以确保所有的前置处理都完成了。同样,
BeanPostProcessor
的
postProcessAfterInitialization
方法会在所有的初始化回调方法之后调用,以确保
Bean
已经完全初始化了。
我们可以注册多个
BeanPostProcessor
。在这种情况下,
Spring
会按照它们的
Ordered
接口或者
@Order
注解指定的顺序来调用这些后置处理器。如果没有指定顺序,那么它们的执行顺序是不确定的。
3.2 图解:Bean生命周期与后置处理器的交互时序
综合上面的执行结果,我们来总结一下,下面是
Spring Bean
生命周期的时序图,它详细地描绘了
Spring Bean
从实例化到准备使用的整个过程,包括
Bean
的实例化、属性赋值、生命周期方法的执行和后置处理器的调用。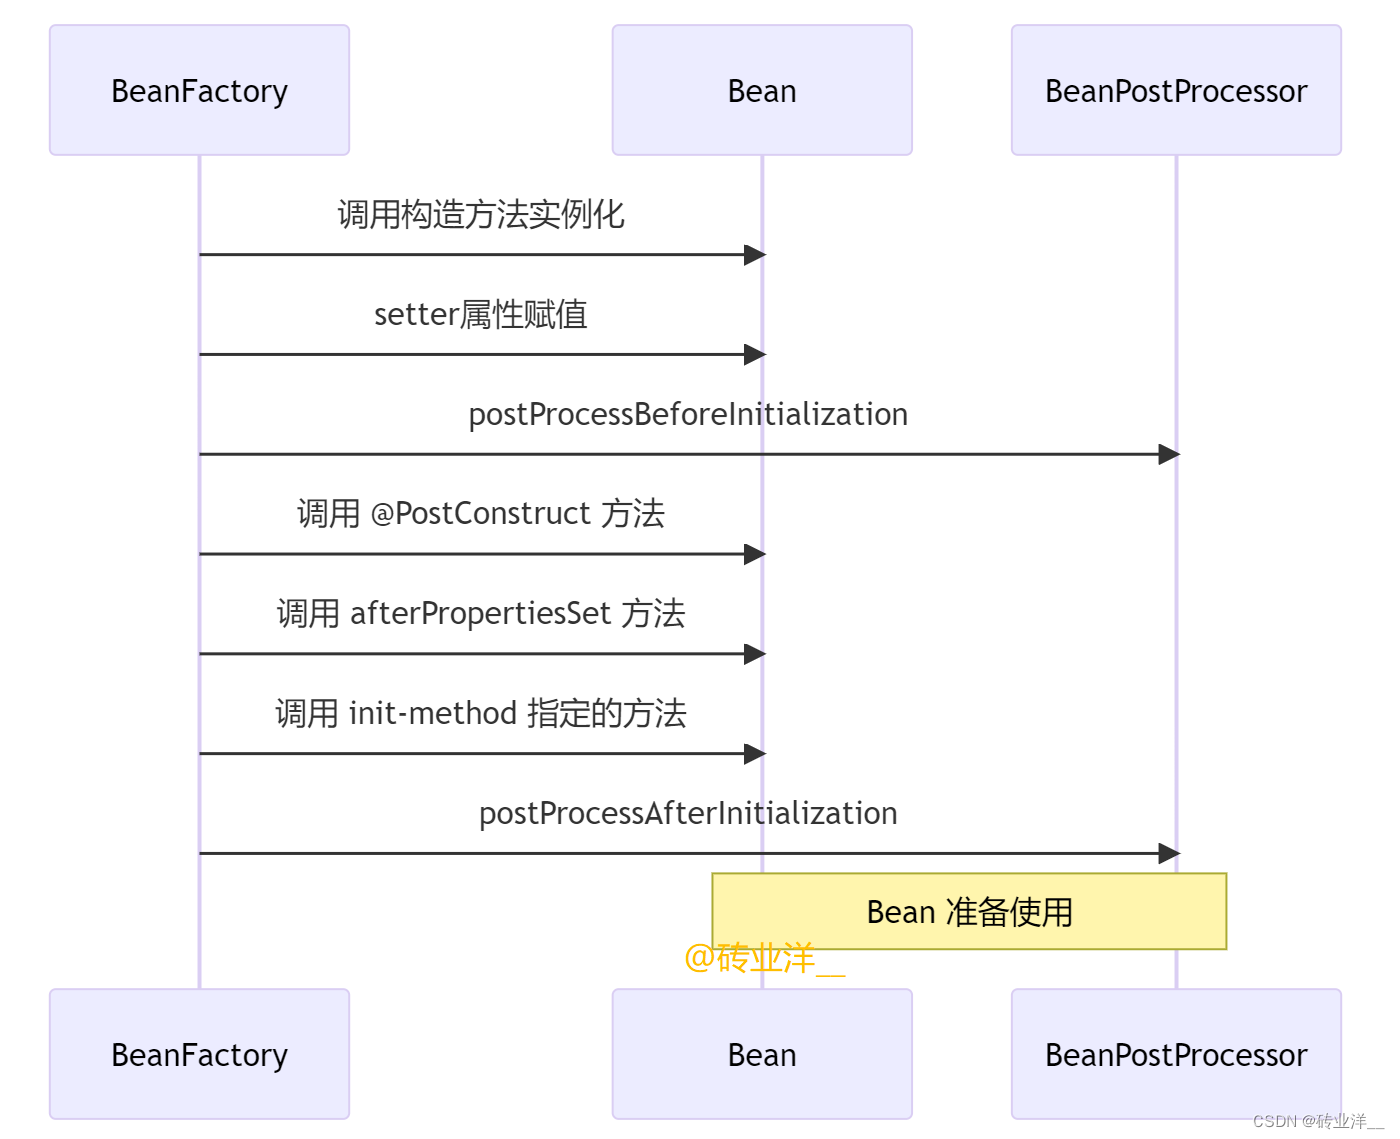
欢迎一键三连~
有问题请留言,大家一起探讨学习
----------------------Talk is cheap, show me the code-----------------------
版权归原作者 砖业洋__ 所有, 如有侵权,请联系我们删除。