
父组件传值给子组件:props $parent
子组件传值给父组件:$emit $refs $children
$attrs 进行跨层级传值,比如,爷爷组件传值孙子组件
$listeners 孙子传值爷爷
slot 插槽传值
bus 任意组件传值
路由传参
vuex
==================================================================================================================================================
1,父组件传值子组件 props
子组件有时候需要接收来自父组件的数据,这时候就需要给子组件绑定props的值,
props表示期待的获取的数据
步骤:
1、创建父子组件
2、在子组件组件中添加props属性,值可以是数组或者对象形式,
// 子组件
 components: {
                    son:{
                        template:'#s',
                        // 1、props定义在子组件中,表示期望接收到的值
                        // props中接收到的值,可以像data中的值一样自由调用
                        props: ['txt'],
                        data(){
                            return{
                                msg:'我是子组件数据'
                            }
                        }
                    }
                }
3、父组件给子组件传值
在调用子组件的地方 以组件自定义标签属性的方式传递数据
下图中实例的txt,就是上面props中添加的属性
<!--2、 在调用子组件的地方 以组件自定义标签属性的方式传递数据 -->
<!-- 直接属性名 = '具体的值 ,会把具体的值直接传过去,写死了' -->
<!-- <son txt='info'></son> -->
<!-- 动态绑定传递的数据 -->
<son v-bind:txt="info"></son>
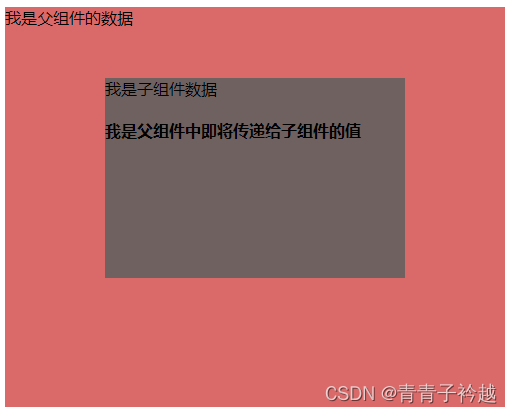
此时,给子组件传递的值,在子组件模板中,可以像调用data数据一样调用
 <!-- 子组件 模板 -->
    <template id="s">
        <div class="son">
            {{msg}}
            <!-- 3、子元素中调用props的值 -->
            <h4>{{txt}}</h4>
        </div>
    </template>
示例:
<style>
.father{
width: 500px;
height: 400px;
background-color: rgb(218, 105, 105);
}
.son{
width: 300px;
height: 200px;
background-color: rgb(112, 97, 97);
margin: 50px auto;
}
</style>
</head>
<body>
<div id ="app">
<father> </father>
</div>
<!-- 父组件 模板 -->
<template id="f">
<div class="father">
{{msg}}
<!--2、 在调用子组件的地方 以组件自定义标签属性的方式传递数据 -->
<!-- 直接属性名 = '具体的值 ,会把具体的值直接传过去,写死了' -->
<!-- <son txt='info'></son> -->
<!-- 动态绑定传递的数据 -->
<son v-bind:txt="info"></son>
</div>
</template>
<!-- 子组件 模板 -->
<template id="s">
<div class="son">
{{msg}}
<!-- 3、子元素中调用props的值 -->
<h4>{{txt}}</h4>
</div>
</template>
<script>
//创建Vue实例,得到 ViewModel
var vm = new Vue({
el: '#app',
data: {},
methods: {},
// 父组件
components: {
father:{
template:'#f',
data(){
return{
msg:'我是父组件的数据',
info:'我是父组件中即将传递给子组件的值'
}
},
// 子组件
components: {
son:{
template:'#s',
// 1、props定义在子组件中,表示期望接收到的值
// props中接收到的值,可以像data中的值一样自由调用
props: ['txt'],
data(){
return{
msg:'我是子组件数据'
}
}
}
}
}
}
});
</script>
</body>
结果:
2,子组件传值给父组件 $emit
#子组件中
this.$emit(‘event’,val);
//$emit:实例方法,用来触发事件监听
//参数
event:自定义事件名称
val:通过自定义事件传递的值(val为可选参数)
#子组件主动触发事件监听 (抛)
<button @click="go">向父组件传值</button>
methods:{
    go(){
        this.$emit('自定义事件名',事件传递的可选参数);
    }
}

#父组件中接收自定义事件监听 (接)
<component @自定义事件名='事件处理函数/fn'></component>
methods:{
    fn(v){
        v//自定义事件传递的值,会作为fn的参数来传递
    }
}
1、编写父子组件
<!DOCTYPE html>
<html lang="en">
<head>
<meta charset="UTF-8">
<meta name="viewport" content="width=device-width, initial-scale=1.0">
<meta http-equiv="X-UA-Compatible" content="ie=edge">
<title>Document</title>
<script src="../lib/vue.js"></script>
<style>
.father{
width: 500px;
height: 400px;
background-color: rgb(218, 105, 105);
}
.son{
width: 300px;
height: 200px;
background-color: rgb(112, 97, 97);
margin: 50px auto;
}
</style>
</head>
<body>
<div id ="app">
<father> </father>
</div>
<!-- 父组件 模板 -->
<template id="f">
<div class="father">
{{msg}}
<son></son>
</div>
</template>
<!-- 子组件 模板 -->
<template id="s">
<div class="son">
{{msg}}
</div>
</template>
<script>
//创建Vue实例,得到 ViewModel
var vm = new Vue({
el: '#app',
data: {},
methods: {},
// 父组件
components: {
father:{
template:'#f',
data(){
return{
msg:'我是父组件的数据',
}
},
// 子组件
components: {
son:{
template:'#s',
data(){
return{
msg:'我是子组件数据',
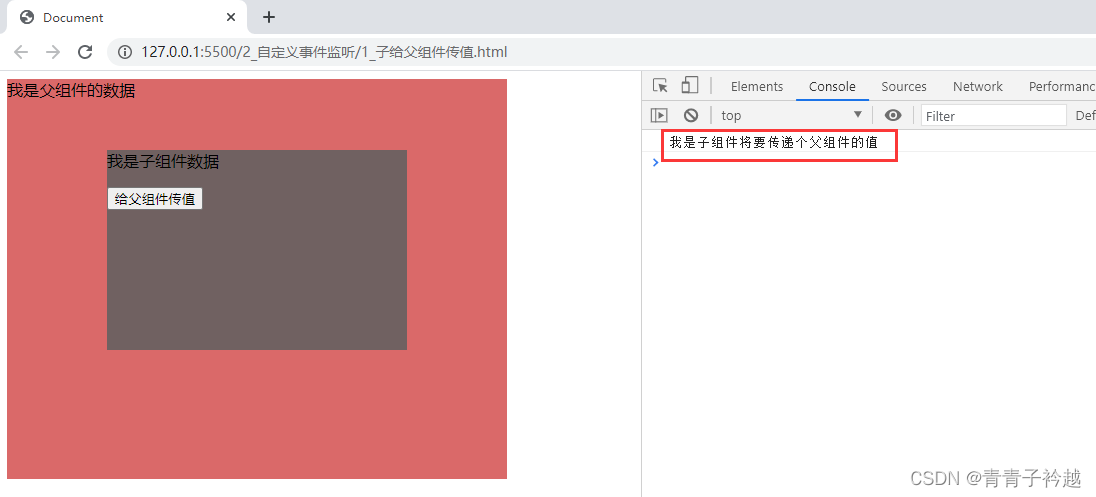
info:'我是子组件将要传递个父组件的值'
}
}
}
}
}
}
});
</script>
</body>
</html>
2、在子组件模板中编写给父组件传值的按钮 绑定点击事件
<!-- 子组件 模板 -->
<template id="s">
<div class="son">
<p>{{msg}}</p>
#<!-- 1、子组件中添加一个给父组件传值的按钮 -->
<button @click='change'>给父组件传值</button>
</div>
</template>
3、编写子组件中传值的方法
 // 子组件
                components: {
                    son:{
                        template:'#s',
                        data(){
                            return{
                                msg:'我是子组件数据',
                                info:'我是子组件将要传递个父组件的值'
                            }
                        },
                        // 2、在子组件中添加方法,给父组件传值的方法
                        methods:{

                            change(){
                                this.$emit('to_father',this.info);
                            }
                        }
                    }
                }
3、在父组件调用子组件的位置,监听自定义事件
 <!-- 父组件 模板 -->
    <template id="f">
        <div class="father">
            {{msg}}
            #<!-- 3、父组件接收传值  监听自定义的事件 执行对应函数 接下来编写函数-->
            <son @to_father='accept_'></son>
        </div>
    </template>
4、父组件中编写监听事件对应的方法
 methods:{
                    accept_(v){
                        console.log(v);
                    }
                },
3,通过refs进行组件传值 子组件传值给父组件
1、ref 加在普通的元素上,用this.$refs.ref值 , 获取到的是dom元素。
2、ref 加在子组件上,用this.$refs.ref值 , 获取到的是组件实例,可以使用组件的所有方法、属性。
<!DOCTYPE html>
<html lang="en">
<head>
<meta charset="UTF-8">
<meta name="viewport" content="width=device-width, initial-scale=1.0">
<meta http-equiv="X-UA-Compatible" content="ie=edge">
<title>Document</title>
<style>
* {
margin: 0;
padding: 0;
}
html,
body,
#app {
width: 100%;
height: 100%;
}
.fatherBox {
width: 100%;
height: 100%;
background-color: rgb(253, 234, 234);
padding: 20px;
box-sizing: border-box;
}
.sonBox {
width: 50%;
height: 200px;
background-color: rgb(241, 209, 28);
padding: 20px;
box-sizing: border-box;
margin: 20px 0;
}
</style>
</head>
<body>
<div id="app">
<Father></Father>
</div>
<template id="father">
<div class="fatherBox">
<h2>欢迎来到父组件</h2>
<p>父组件将要接收子组件传递的值:{{msg}}</p>
<br>
<button @click="getRef">借助ref获取子组件的值</button>
<!-- ref 写在组件上 指向当前组件 可以获取到当前组件一切内容 -->
<Son ref="son"></Son>
</div>
</template>
<!--子组件模板 -->
<template id="son">
<div class="sonBox">
<h2>欢迎来到子组件</h2>
<p>将要孝敬爸爸的礼物:{{gift1}}</p>
<p>将要孝敬爸爸的礼物:{{gift2}}</p>
</div>
</template>
</body>
</html>
<script src="./js/vue.js"></script>
<script>
//创建Vue实例,得到 ViewModel
var vm = new Vue({
el: '#app',
data: {},
methods: {},
components: {
Father: {
template: '#father',
data() {
return {
msg: null,
}
},
methods: {
getRef() {
console.log(this.$refs.son.gift1);
this.msg = this.$refs.son.gift1;
}
},
components: {
Son: {
template: '#son',
data() {
return {
gift1: '茅台',
gift2: '华子'
}
},
}
}
}
}
});
</script>
4,通过$parent 进行父子传值
this.$parent,可以获取到当前组件的父组件实例,
即,可以直接调用使用父组件内的方法、属性、一切
例:
this.$parent.$parent.msg // 获取当前组件的父组件中的msg值
方法调用同理
<!DOCTYPE html>
<html lang="en">

<head>
    <meta charset="UTF-8">
    <meta name="viewport" content="width=device-width, initial-scale=1.0">
    <meta http-equiv="X-UA-Compatible" content="ie=edge">
    <title>Document</title>

    <style>
        * {
            margin: 0;
            padding: 0;
        }

        html,
        body,
        #app {
            width: 100%;
            height: 100%;
        }

        .fatherBox {
            width: 100%;
            height: 100%;
            background-color: rgb(253, 234, 234);
            padding: 20px;
            box-sizing: border-box;
        }

        .sonBox {
            width: 50%;
            height: 200px;
            background-color: rgb(241, 209, 28);
            padding: 20px;
            box-sizing: border-box;
            margin: 20px 0;
        }
    </style>
</head>

<body>
    <div id="app">
        <Father></Father>
    </div>

    <template id="father">
        <div class="fatherBox">
            <h2>欢迎来到父组件</h2>
            <p>父组件将要接收子组件传递的值:{{msg}}</p>
            <br>
            <Son></Son>
        </div>
    </template>

    <!--子组件模板 -->
    <template id="son">
        <div class="sonBox">
            <h2>欢迎来到子组件</h2>
            <p>将要获取父组件的内容:{{getFather}}</p>
            <button @click="getParent">获取父组件</button>

        </div>
    </template>
</body>

</html>
<script src="./js/vue.js"></script>
<script>
    //创建Vue实例,得到 ViewModel
    var vm = new Vue({
        el: '#app',
        data: {
            msg: 'app中的数据'
        },
        methods: {

        },
        components: {
            Father: {
                template: '#father',
                data() {
                    return {
                        msg: '父组件的值',

                    }
                },
                methods: {

                },
                components: {
                    Son: {
                        template: '#son',
                        data() {
                            return {
                                getFather: ''
                            }
                        },
                        methods: {
                            getParent() {
                                console.log(this);
                                //通过this.$parent 可以获取到整个父组件 把父组件的值 转存一下 就可以了
                                console.log(this.$parent);
                                console.log(this.$parent.msg);//父组件的值
                                this.getFather = this.$parent.msg;
                            }
                        }
                    }
                }
            }
        }
    });
</script>
5,通过$children 进行子组件传值父组件
vm.$children可以获取到所有的子组件
以数组形式展现,可以通过下标获取对应组件的实例属性方法。。。
使用子传父: 父组件通过$children,获取到对应子组件的值,把值转存到自己的data中,完成传值
<!DOCTYPE html>
<html lang="en">

<head>
    <meta charset="UTF-8">
    <meta name="viewport" content="width=device-width, initial-scale=1.0">
    <meta http-equiv="X-UA-Compatible" content="ie=edge">
    <title>$children</title>
    <style>
        * {
            margin: 0;
            padding: 0;
        }

        html,
        body,
        #app {
            width: 100%;
            height: 100%;
        }

        .fatherBox {
            width: 100%;
            height: 100%;
            background-color: rgb(253, 234, 234);
            padding: 20px;
            box-sizing: border-box;
        }

        .sonBox {
            width: 50%;
            height: 200px;
            background-color: rgb(241, 209, 28);
            padding: 20px;
            box-sizing: border-box;
            margin: 20px 0;
        }
    </style>
</head>

<body>
    <div id="app">
        <Father></Father>
    </div>

    <template id="father">
        <div class="fatherBox">
            <h1>Father组件</h1>
            <p>Faher组件将要传递给子组件的值:{{msg}}</p>
            <button @click="get">获取子组件值</button>
            <Son></Son>

        </div>
    </template>

    <template id="son">
        <div class="sonBox">
            <h1>Son组件</h1>
            <p>son组件将要传给父组件的值:{{info}}</p>

        </div>
    </template>

</body>

</html>
<script src="./js/vue.js"></script>
<script>

    let Son = {
        template: "#son",
        data() {
            return {
                info: '孝敬爸爸的礼物'
            }

        }
    }
    let Father = {
        template: '#father',
        data() {
            return {
                msg: ''
            }
        },
        methods: {
            get() {
                console.log('chufa');
                console.log(this.$children);//获取到所有的子组件  按下标取对应的子组件
                console.log(this.$children[0].info);
                this.msg = this.$children[0].info;
            }
        },
        components: {
            Son
        }
    }
    //创建Vue实例,得到 ViewModel
    var vm = new Vue({
        el: '#app',
        data: {},
        methods: {},
        components: {
            Father
        }
    });
</script>
利用watch监听,当子组件数据发生变化的时候,立马把值传递给父组件
思路: 监听子组件的数据,当变化的时候,利用this.$parent调用父组件获取子组件值的方法
<!DOCTYPE html>
<html lang="en">

<head>
    <meta charset="UTF-8">
    <meta name="viewport" content="width=device-width, initial-scale=1.0">
    <meta http-equiv="X-UA-Compatible" content="ie=edge">
    <title>$children</title>
    <style>
        * {
            margin: 0;
            padding: 0;
        }

        html,
        body,
        #app {
            width: 100%;
            height: 100%;
        }

        .fatherBox {
            width: 100%;
            height: 100%;
            background-color: rgb(253, 234, 234);
            padding: 20px;
            box-sizing: border-box;
        }

        .sonBox {
            width: 50%;
            height: 200px;
            background-color: rgb(241, 209, 28);
            padding: 20px;
            box-sizing: border-box;
            margin: 20px 0;
        }
    </style>
</head>

<body>
    <div id="app">
        <Father></Father>
    </div>

    <template id="father">
        <div class="fatherBox">
            <h1>Father组件</h1>
            <p>Faher组件将要传递给子组件的值:{{msg}}</p>
            <button @click="get">获取子组件值</button>
            <Son></Son>

        </div>
    </template>

    <template id="son">
        <div class="sonBox">
            <h1>Son组件</h1>
            <!-- 数据变化立马传递 -->
            <input type="text" v-model="info">
            <p>son组件将要传给父组件的值:{{info}}</p>

        </div>
    </template>

</body>

</html>
<script src="./js/vue.js"></script>
<script>

    let Son = {
        template: "#son",
        data() {
            return {
                info: '孝敬爸爸的礼物'
            }

        },
        watch: {
            //监听数据 发现变化了,立即调用父组件的获取子组件值的方法
            info: {
                handler(newVal) {
                    console.log('监听到了');
                    console.log(this);
                    console.log(this.$parent.get());
                },
                  //立即监听
                immediate: true
            }
        }
    }
    let Father = {
        template: '#father',
        data() {
            return {
                msg: ''
            }
        },
        methods: {
            get() {
                console.log('chufa');
                console.log(this.$children);//获取到所有的子组件  按下标取对应的子组件
                console.log(this.$children[0].info);
                this.msg = this.$children[0].info;
            }
        },
        components: {
            Son
        }
    }
    //创建Vue实例,得到 ViewModel
    var vm = new Vue({
        el: '#app',
        data: {},
        methods: {},
        components: {
            Father
        }
    });
</script>
6,vue2.6以后插入具名插槽不包含2.60!!!!!!!!
插口:
  // <template v-slot:usb>
   <template #usb>
       <p>插入usb</p>
       <p>哈哈哈,开心</p>
   </template>

 插槽:
  <slot name='usb'></slot>
7,$attrs进行爷孙传值
v-bind='$attrs'
个人理解: 爷爷传值给孙子 爸爸作为中介 如果爸爸拦截了(用props接收) 就传不到孙子那里了
$attrs
是在vue的2.40版本以上添加的。是一个包含组件透传属性的对象
所谓的组件透传属性,就是非属性特性,透传给内部的子组件
作用:进行跨层级传值,比如,爷爷组件传值孙子组件
应用场景:爷爷组件传值孙子组件
传统的爷爷组件传值孙子组件,我们可以使用爷爷——> 爸爸——>孙子
即:爷爷组件传值给父组件,父组件接受后,再次传值给孙子组件
这样的方式可以完成,但是太过繁琐。我们可以利用$attrs进行
使用方式:
- 爷爷组件把想要传递给孙子组件的值,通过自定义属性值的方式,即传统的正向传值方式,传递给父组件
- 父组件可以通过props接受父组件想要的数据,父组件中没有使用props接受的值,可以通过$attrs传递给孙子组件
- $attrs添加在父组件模板调用孙子组件的位置,给孙子组件添加
v-bind='$attrs', - 孙子组件在自己的组件中,使用props,接收爷爷组件传递给父组件的值,(父组件没有用pros接收的值)

1、爷爷组件传递给父组件四个值
GrandFather.vue
<template>
<div class="about">
<h1>about Page 爷爷组件</h1>
<p>爷爷组件传递给父组件的值1:{{ giveVal1 }}</p>
<p>爷爷组件传递给父组件的值2:{{ giveVal2 }}</p>
<p>爷爷组件传递给父组件的值3:{{ giveVal3 }}</p>
<p>爷爷组件传递给父组件的值4:{{ giveVal4 }}</p>
<!-- 引入父亲组件 Father -->
<Father
:giveVal1="giveVal1"
:giveVal2="giveVal2"
:giveVal3="giveVal2"
:giveVal4="giveVal2"
></Father>
</div>
</template>
<script>
import Father from "@/components/Father.vue";
export default {
props: {},
data() {
return {
giveVal1: "传递的值1",
giveVal2: "传递的值2",
giveVal3: "传递的值3",
giveVal4: "传递的值4",
};
},
methods: {},
components: {
Child,
},
};
</script>
<style scoped lang="less">
.about {
width: 100%;
padding: 40px;
box-sizing: border-box;
background-color: rgb(248, 223, 223);
}
</style>
2、父组件接收一个,剩余的三个不接收
在调用孙子组件的位置,添加
v-bind='$attrs'
属性值
Father.vue
<template>
<div class="fatherBox">
<h3>父亲组件</h3>
<p>通过props结收的值giveVal1:{{ giveVal1 }}</p>
<!-- 在子组件中 给调用孙子组件的位置 添加$attrs属性 -->
<GrandChild v-bind="$attrs"></GrandChild>
</div>
</template>
<script>
import GrandChild from "@/components/GrandChild.vue";
export default {
//不想继承所有父组件的内容,同时也不在组件根元素dom上显示属性
inheritAttrs: false,
props: {
giveVal1: {
type: String,
},
},
data() {
return {};
},
methods: {},
components: {
GrandChild,
},
};
</script>
<style scoped lang="less">
.fatherBox {
width: 80%;
padding: 20px;
box-sizing: border-box;
margin: 0 auto;
background-color: orange;
}
</style>
3、孙子组件使用props接收值
孙子组件使用props,接受爷爷组件传递的,没有被父组件的props接受的值
GrandChild.vue
<template>
<div class="grandChildBox">
<h4>孙子组件</h4>
<p>孙子组件接收爷爷的值1:{{ giveVal1 }}</p>
<p>孙子组件接收爷爷的值2:{{ giveVal2 }}</p>
<p>孙子组件接收爷爷的值3:{{ giveVal3 }}</p>
<p>孙子组件接收爷爷的值4:{{ giveVal4 }}</p>
</div>
</template>
<script>
export default {
props: {
giveVal1: {
type: String,
},
giveVal2: {
type: String,
},
giveVal3: {
type: String,
},
giveVal4: {
type: String,
},
},
data() {
return {};
},
methods: {},
components: {},
};
</script>
<style scoped lang="less">
.grandChildBox {
width: 80%;
padding: 20px;
box-sizing: border-box;
margin: 0 auto;
background-color: white;
}
</style>
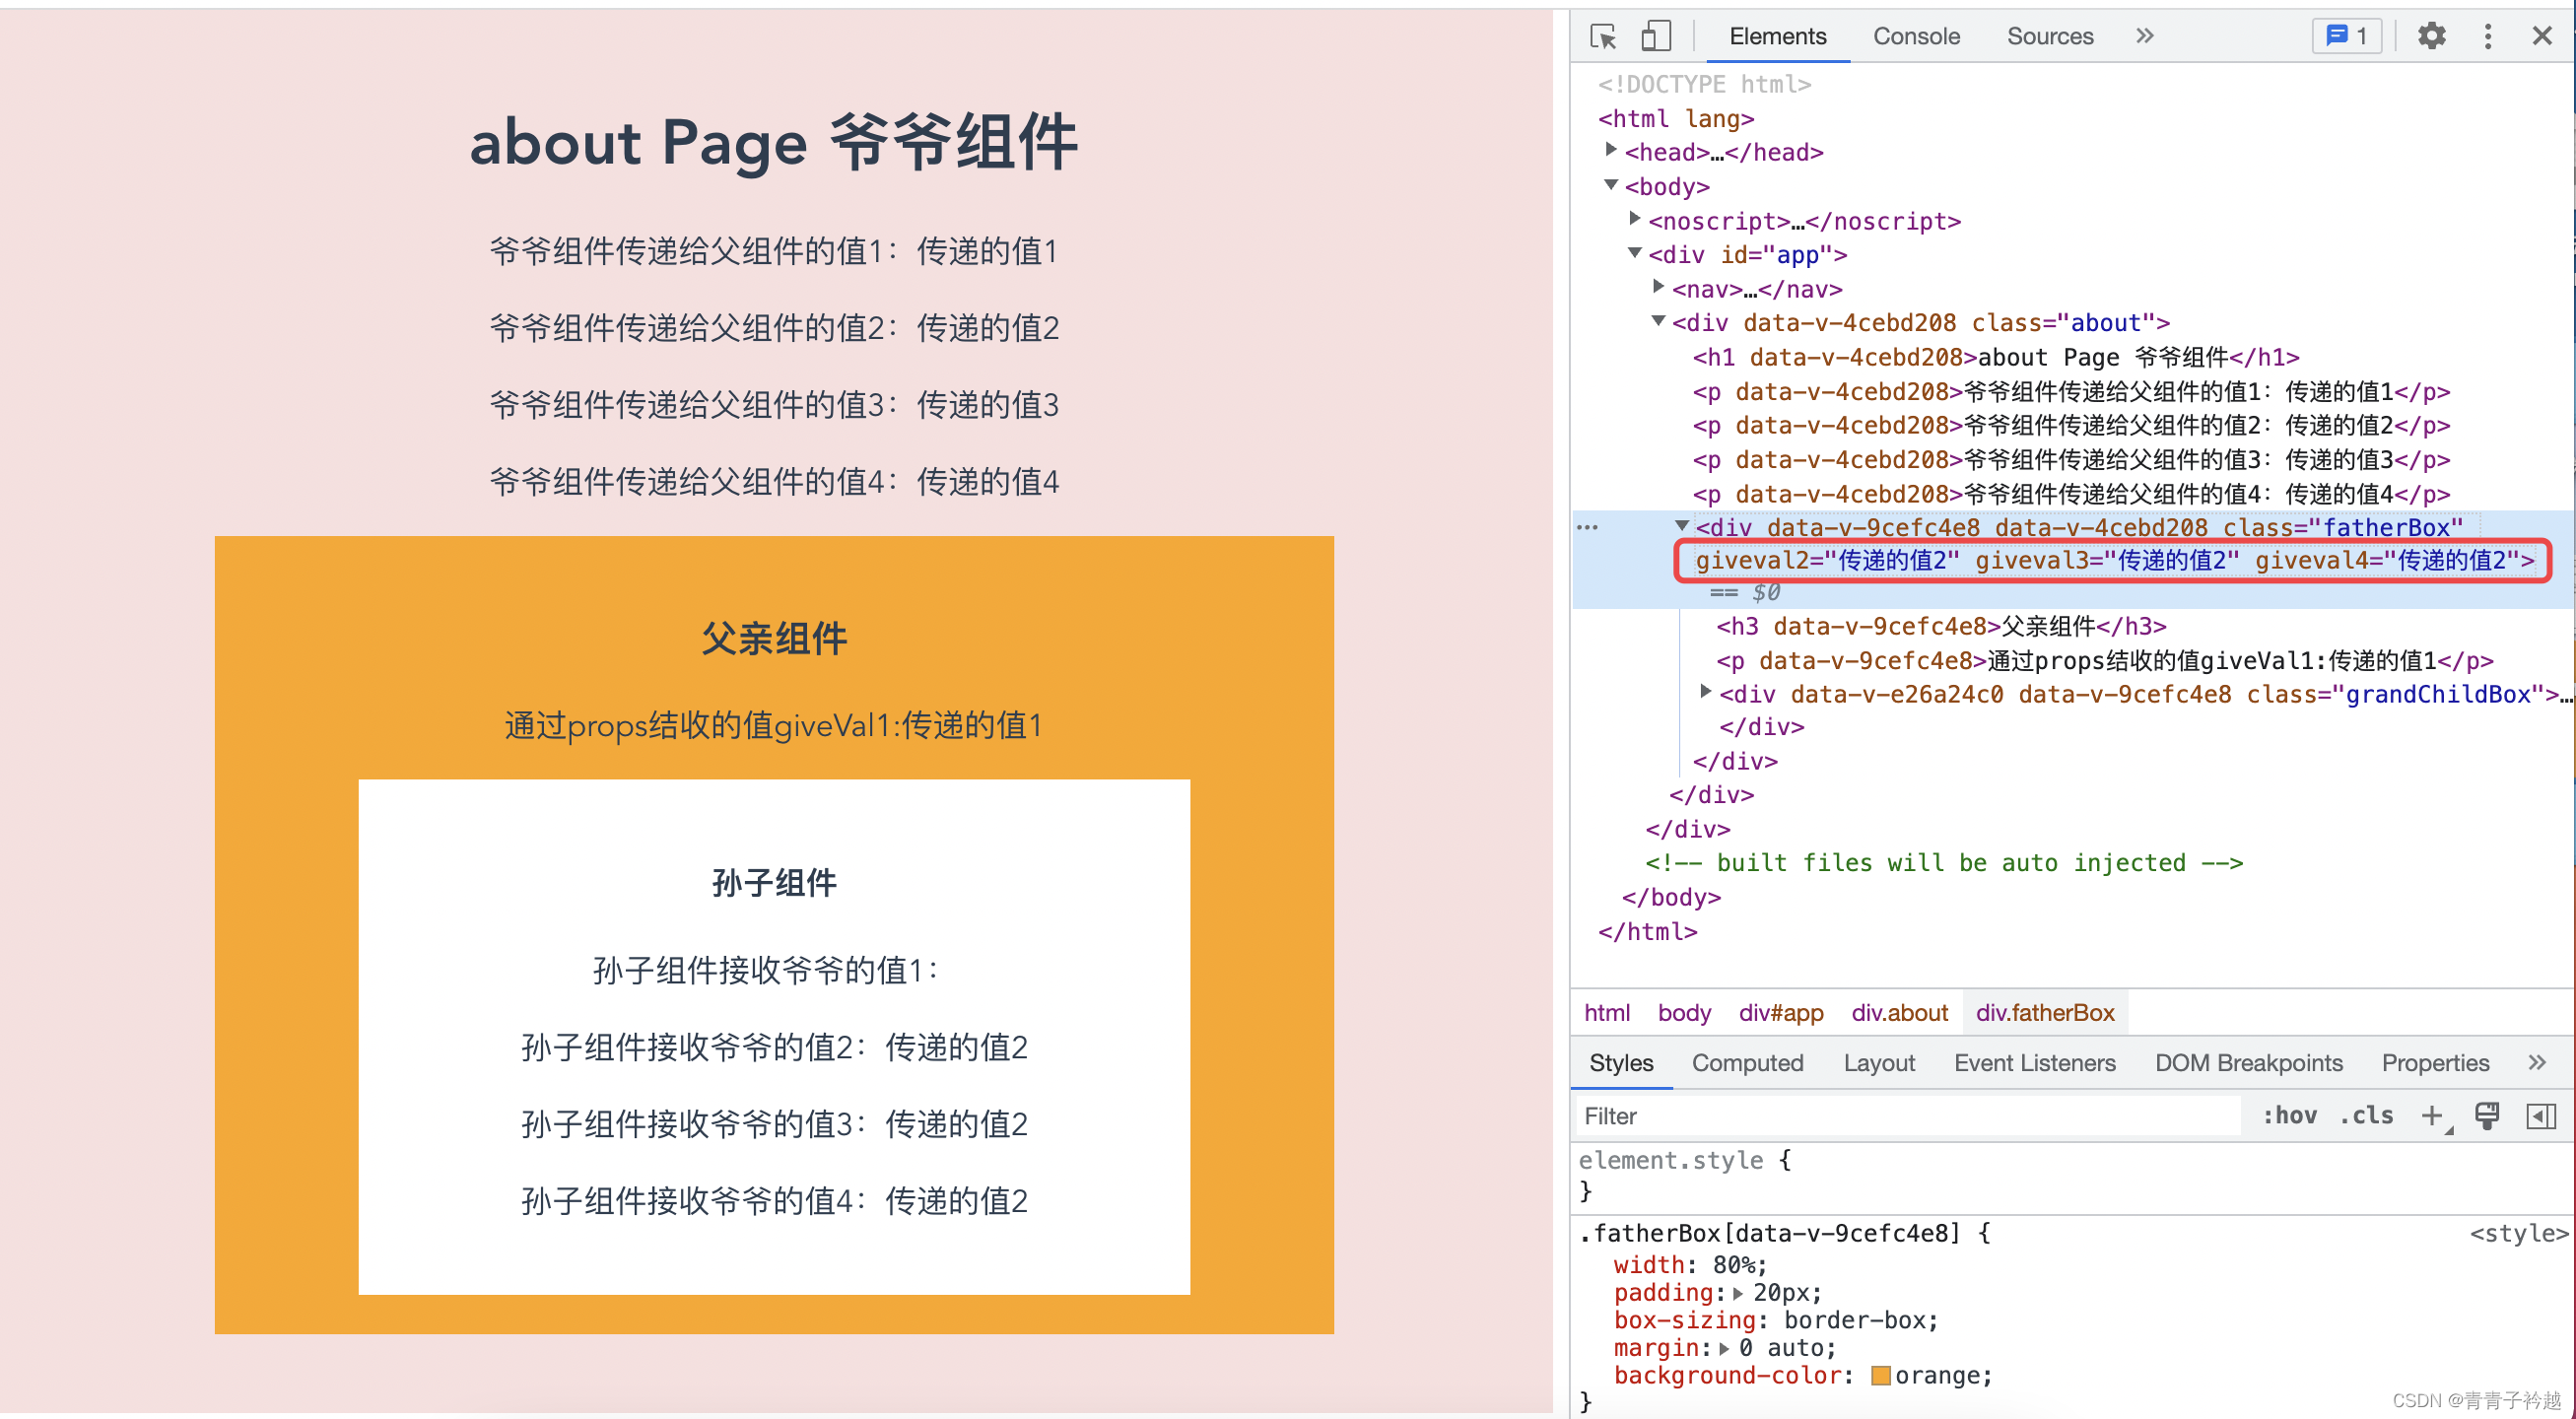
4、核心原理
使用$attrs的核心,是爷爷组件传递给父亲组件的值,父亲组件如果没有使用props接受,则会作为一个dom属性显示在页面中。
也就是说,上面例子中,所有没有被父亲组件props接收的值,全部都作为了一个dom节点的属性值展示在页面中,如下图所示:
所以,父亲组件在调用孙子组件的位置,绑定的v-bind='$attrs',其实就是把父组件自身所有的属性,正向传值给孙子组件
所以,孙子组件可以通过props接受父组件没有使用props接收的值。
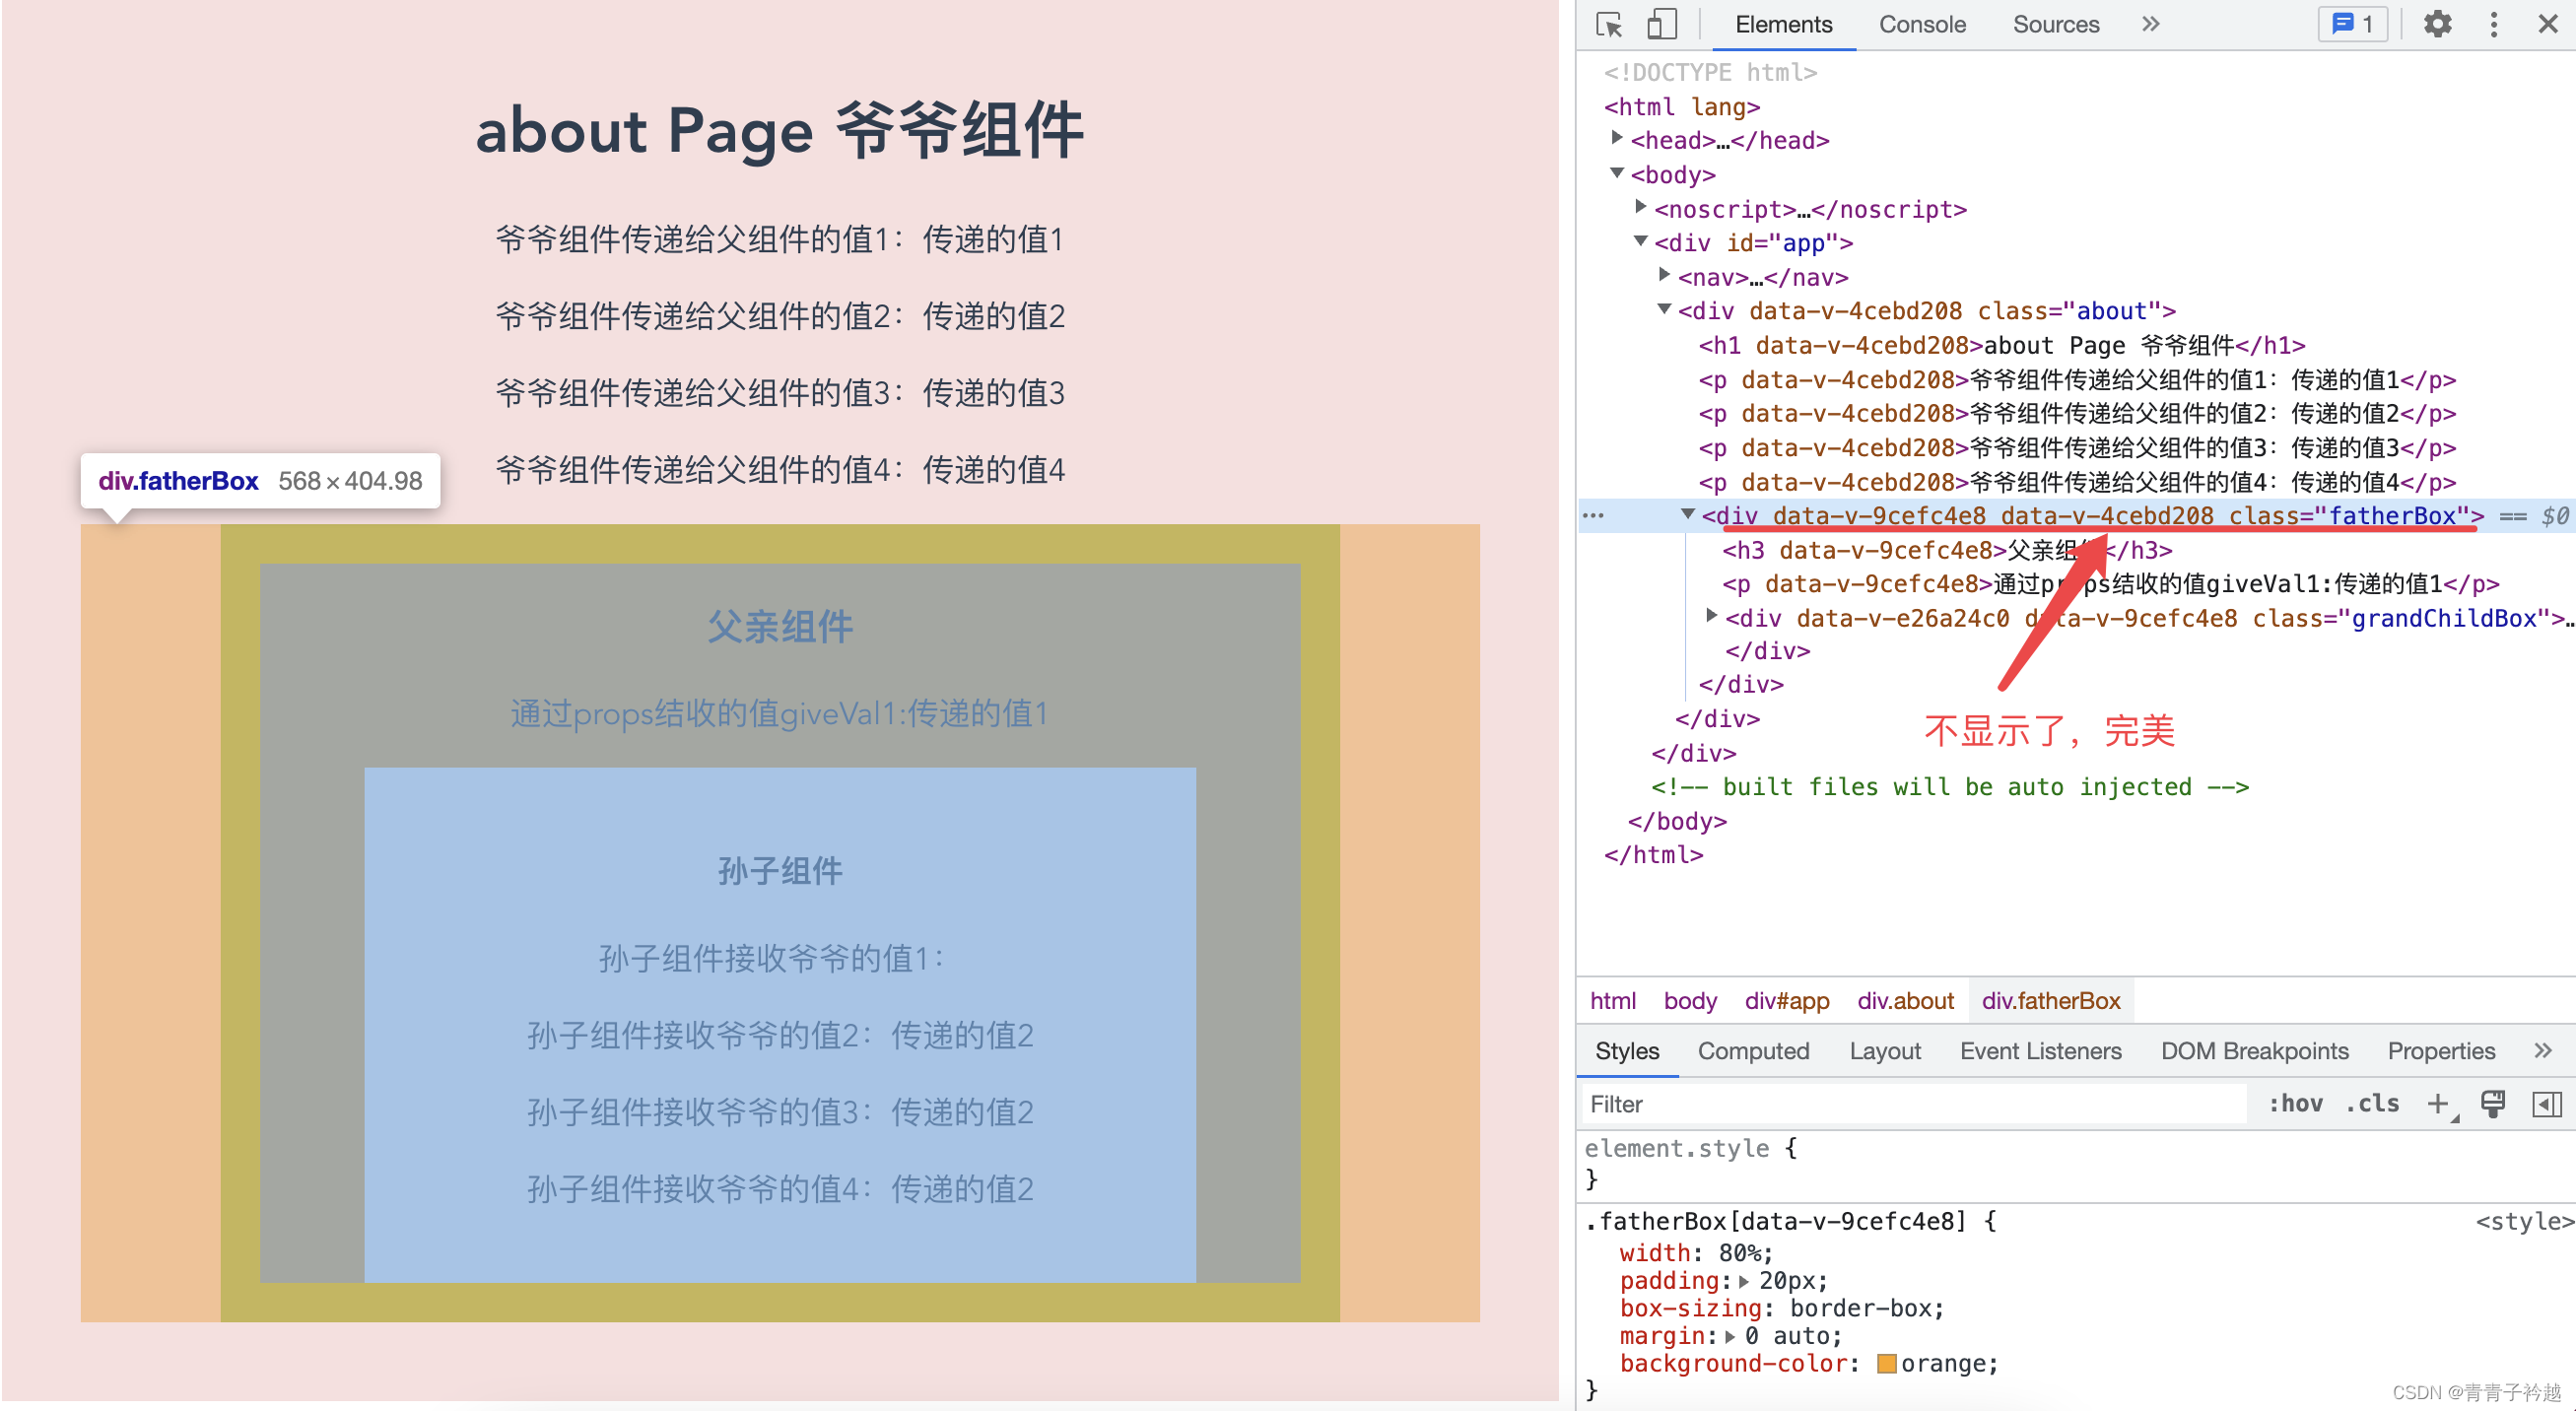
那么问题来了
传值你随便传,能不能不要在页面显示父亲组件没有使用props接受的值呢,看起来太乱了
简单
在Father.vue组件的js位置,书写一个属性

8,$listeners 孙子传值爷爷
使用方法:
1、孙子组件自定义事件传值,传给上级组件
2、在父组件中 ,给调用孙子组件的位置 添加
v-on="$listeners"
3、爷爷组件中,在调用父亲组件的位置,监听孙子组件的自定义事件,取值
1、孙子组件进行自定义事件传值
孙子组件使用自定义事件this.$emit传值给爷爷组件
GrandChild.vue组件
<template>
<div class="grandChildBox">
<h4>孙子组件</h4>
<p>孙子组件将要传给爷爷的值:{{ gift }}</p>
<button @click="change">传值给爷爷</button>
</div>
</template>
<script>
export default {
props: {},
data() {
return {
gift: "茅台",
};
},
methods: {
change() {
this.$emit("changeGift", this.gift);
},
},
components: {},
};
</script>
<style scoped lang="less">
.grandChildBox {
width: 80%;
padding: 20px;
box-sizing: border-box;
margin: 0 auto;
background-color: white;
}
</style>
2、父亲组件调用孙子组件的位置,添加v-on="$listeners"
在父组件中 给调用孙子组件的位置 添加v-on="$listeners"
Father.vue
<template>
<div class="fatherBox">
<h3>父亲组件</h3>
<!-- 在父组件中 给调用孙子组件的位置 添加v-on="$listeners" -->
<GrandChild v-on="$listeners"></GrandChild>
</div>
</template>
<script>
import GrandChild from "@/components/GrandChild.vue";
export default {
props: {},
data() {
return {};
},
methods: {},
components: {
GrandChild,
},
};
</script>
<style scoped lang="less">
.fatherBox {
width: 80%;
padding: 20px;
box-sizing: border-box;
margin: 0 auto;
background-color: orange;
}
</style>
3、爷爷组件,监听自定义事件
爷爷组件,在调用父亲组件的位置,监听孙子组件的自定义事件,取值
GranderFater.vue
<template>
<div class="about">
<h1>about Page 爷爷组件</h1>
<p>期待接收孙子的值:{{ gift }}</p>
<!-- 引入父亲组件 Father -->
<!-- 在爷爷组件引入父组件的位置,监听孙子组件的自定义事件 -->
<Father @changeGift="getVal"></Father>
</div>
</template>
<script>
import Father from "@/components/Father.vue";
export default {
props: {},
data() {
return {
gift: "",
};
},
methods: {
getVal(v) {
this.gift = v;
},
},
components: {
Father,
},
};
</script>
<style scoped lang="less">
.about {
width: 100%;
padding: 40px;
box-sizing: border-box;
background-color: rgb(248, 223, 223);
}
</style>
9,bus传值
bus可以用在任何组件之间的传值
举个例子,我们现在有A、B、C、D、E、F五个组件,其中,E和F是兄弟组件,D是EF的父亲、C是D的父亲,依次类推
如图:
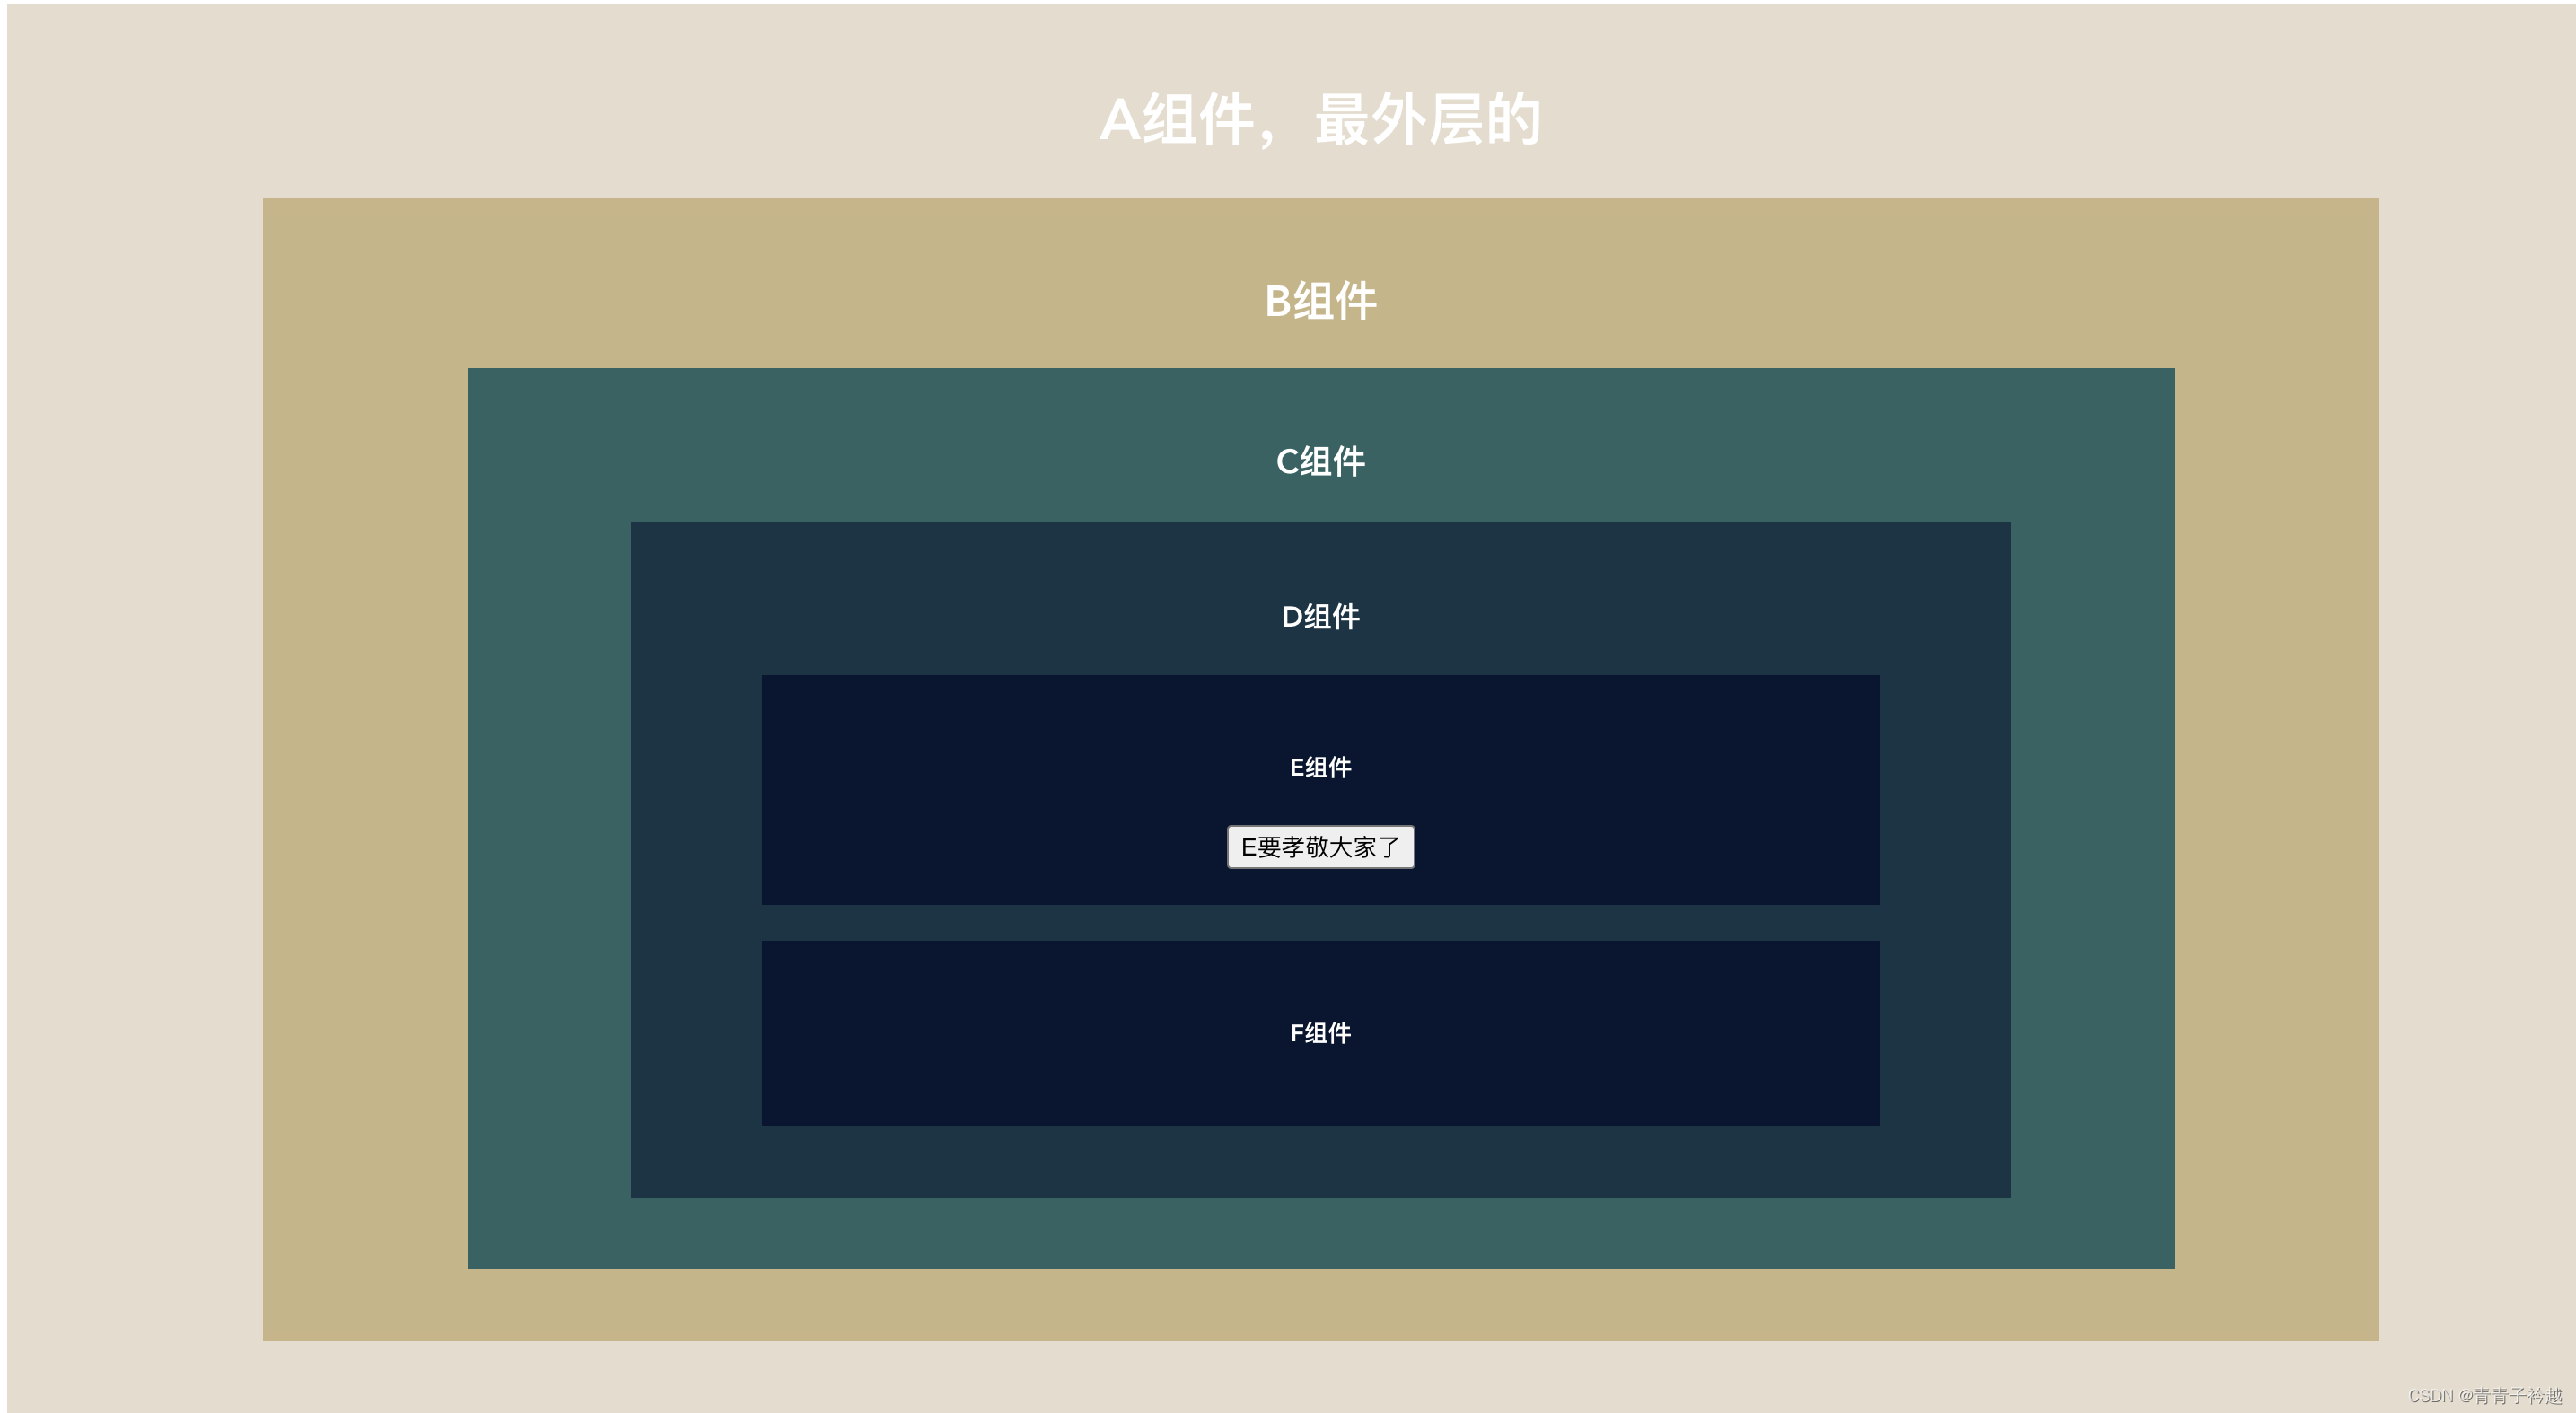
如果我们在E组件中,使用bus完成一个组件的传值,那么E组件传递的值,在A、B、C、D、F任意一个组件中,都可以接收到,并且,可以同时接收。所以我们说,bus可以完成任意组件的传值
使用方法:
1、在main.js中全局挂载bus
2、在要传值的组件中,使用this.bus.$emit('自定义事件',要传递的值)
3、在需要接收传值的组件中,mounted钩子函数中,使用this.bus.$on('自定义事件名',(v)=>{v}) 接受传递的数据
我们先自定义6个组件完成如上图的嵌套
A.vue
<template>
<div class="abox">
<h1>A组件,最外层的</h1>
<B></B>
</div>
</template>
<script>
import B from "../components/B";
export default {
props: {},
data() {
return {};
},
methods: {},
components: {
B,
},
};
</script>
<style scoped lang="less">
.abox {
width: 100%;
padding: 20px;
background-color: #e6ddcd;
color: white;
}
</style>
B.vue
<template>
<div class="bbox">
<h2>B组件</h2>
<C></C>
</div>
</template>
<script>
import C from "./C";
export default {
props: {},
data() {
return {};
},
methods: {},
components: {
C,
},
};
</script>
<style scoped lang="less">
.bbox {
width: 80%;
margin: 20px auto;
padding: 20px;
color: white;
background-color: #c9b486;
}
</style>
C.vue
<template>
<div class="cbox">
<h3>C组件</h3>
<D></D>
</div>
</template>
<script>
import D from "./D";
export default {
props: {},
data() {
return {};
},
methods: {},
components: {
D,
}
};
</script>
<style scoped lang="less">
.cbox {
width: 80%;
margin: 20px auto;
padding: 20px;
background-color: #2b6363;
}
</style>
D.vue
<template>
<div class="dbox">
<h4>D组件</h4>
<E></E>
<F></F>
</div>
</template>
<script>
import F from "./F";
import E from "./E";
export default {
props: {},
data() {
return {};
},
methods: {},
components: {
F,
E,
},
};
</script>
<style scoped lang="less">
.dbox {
width: 80%;
margin: 20px auto;
padding: 20px;
color: white;
background-color: #153547;
}
</style>
E.vue
<template>
<div class="ebox">
<h5>E组件</h5>
</div>
</template>
<script>
export default {
props: {},
data() {
return {
egift: "E孝敬的茅台",
};
},
methods: {
},
components: {},
};
</script>
<style scoped lang="less">
.ebox {
width: 80%;
margin: 20px auto;
padding: 20px;
color: white;
background-color: #071632;
}
</style>
F.vue
<template>
<div class="ebox">
<h5>F组件</h5>
</div>
</template>
<script>
export default {
props: {},
data() {
return {};
},
methods: {},
components: {},
mounted() {
},
};
</script>
<style scoped lang="less">
.ebox {
width: 80%;
margin: 20px auto;
padding: 20px;
color: white;
background-color: #071632;
}
</style>
1、在main.js中全局挂载bus
Vue.prototype.bus = new Vue();
main.js
import Vue from 'vue'
//import App from './App.vue'
import A from '@/components/A.vue'
import router from './router'
Vue.config.productionTip = false
//1、把bus属性 挂载在vue原型对象上
Vue.prototype.bus = new Vue();
new Vue({
router,
render: function (h) { return h(A) }
}).$mount('#app')
2、在需要传递数据的组件中使用bus触发自定义事件
this.bus.$emit('自定义事件名',要传递的值)
此处以E.vue为例
<template>
<div class="ebox">
<h5>E组件</h5>
<button @click="EChange">E要孝敬大家了</button>
</div>
</template>
<script>
export default {
props: {},
data() {
return {
egift: "E孝敬的茅台",
};
},
methods: {
EChange() {
this.bus.$emit("ESend", this.egift);
},
},
components: {},
};
</script>
<style scoped lang="less">
.ebox {
width: 80%;
margin: 20px auto;
padding: 20px;
color: white;
background-color: #071632;
}
</style>
3、需要接收的组件接收,使用this.bus.$on('自定义事件名',()=>{v})
在需要结收的组件的mounted钩子函数中,使用bus监听通bus的自定义事件
this.bus.$on('自定义事件名',()=>{v})
此处以A.vue组件为例
<template>
<div class="abox">
<h1>A组件,最外层的</h1>
<B></B>
</div>
</template>
<script>
import B from "../components/B";
export default {
props: {},
data() {
return {};
},
methods: {},
components: {
B,
},
mounted() {
this.bus.$on("ESend", (v) => {
console.log("a接收E孝敬的:", v);
});
},
};
</script>
<style scoped lang="less">
.abox {
width: 100%;
padding: 20px;
background-color: #e6ddcd;
color: white;
}
</style>
在c组件,F组件中如法炮制,同样的写法
当我们触发E组件传值时,神奇的现象来了:
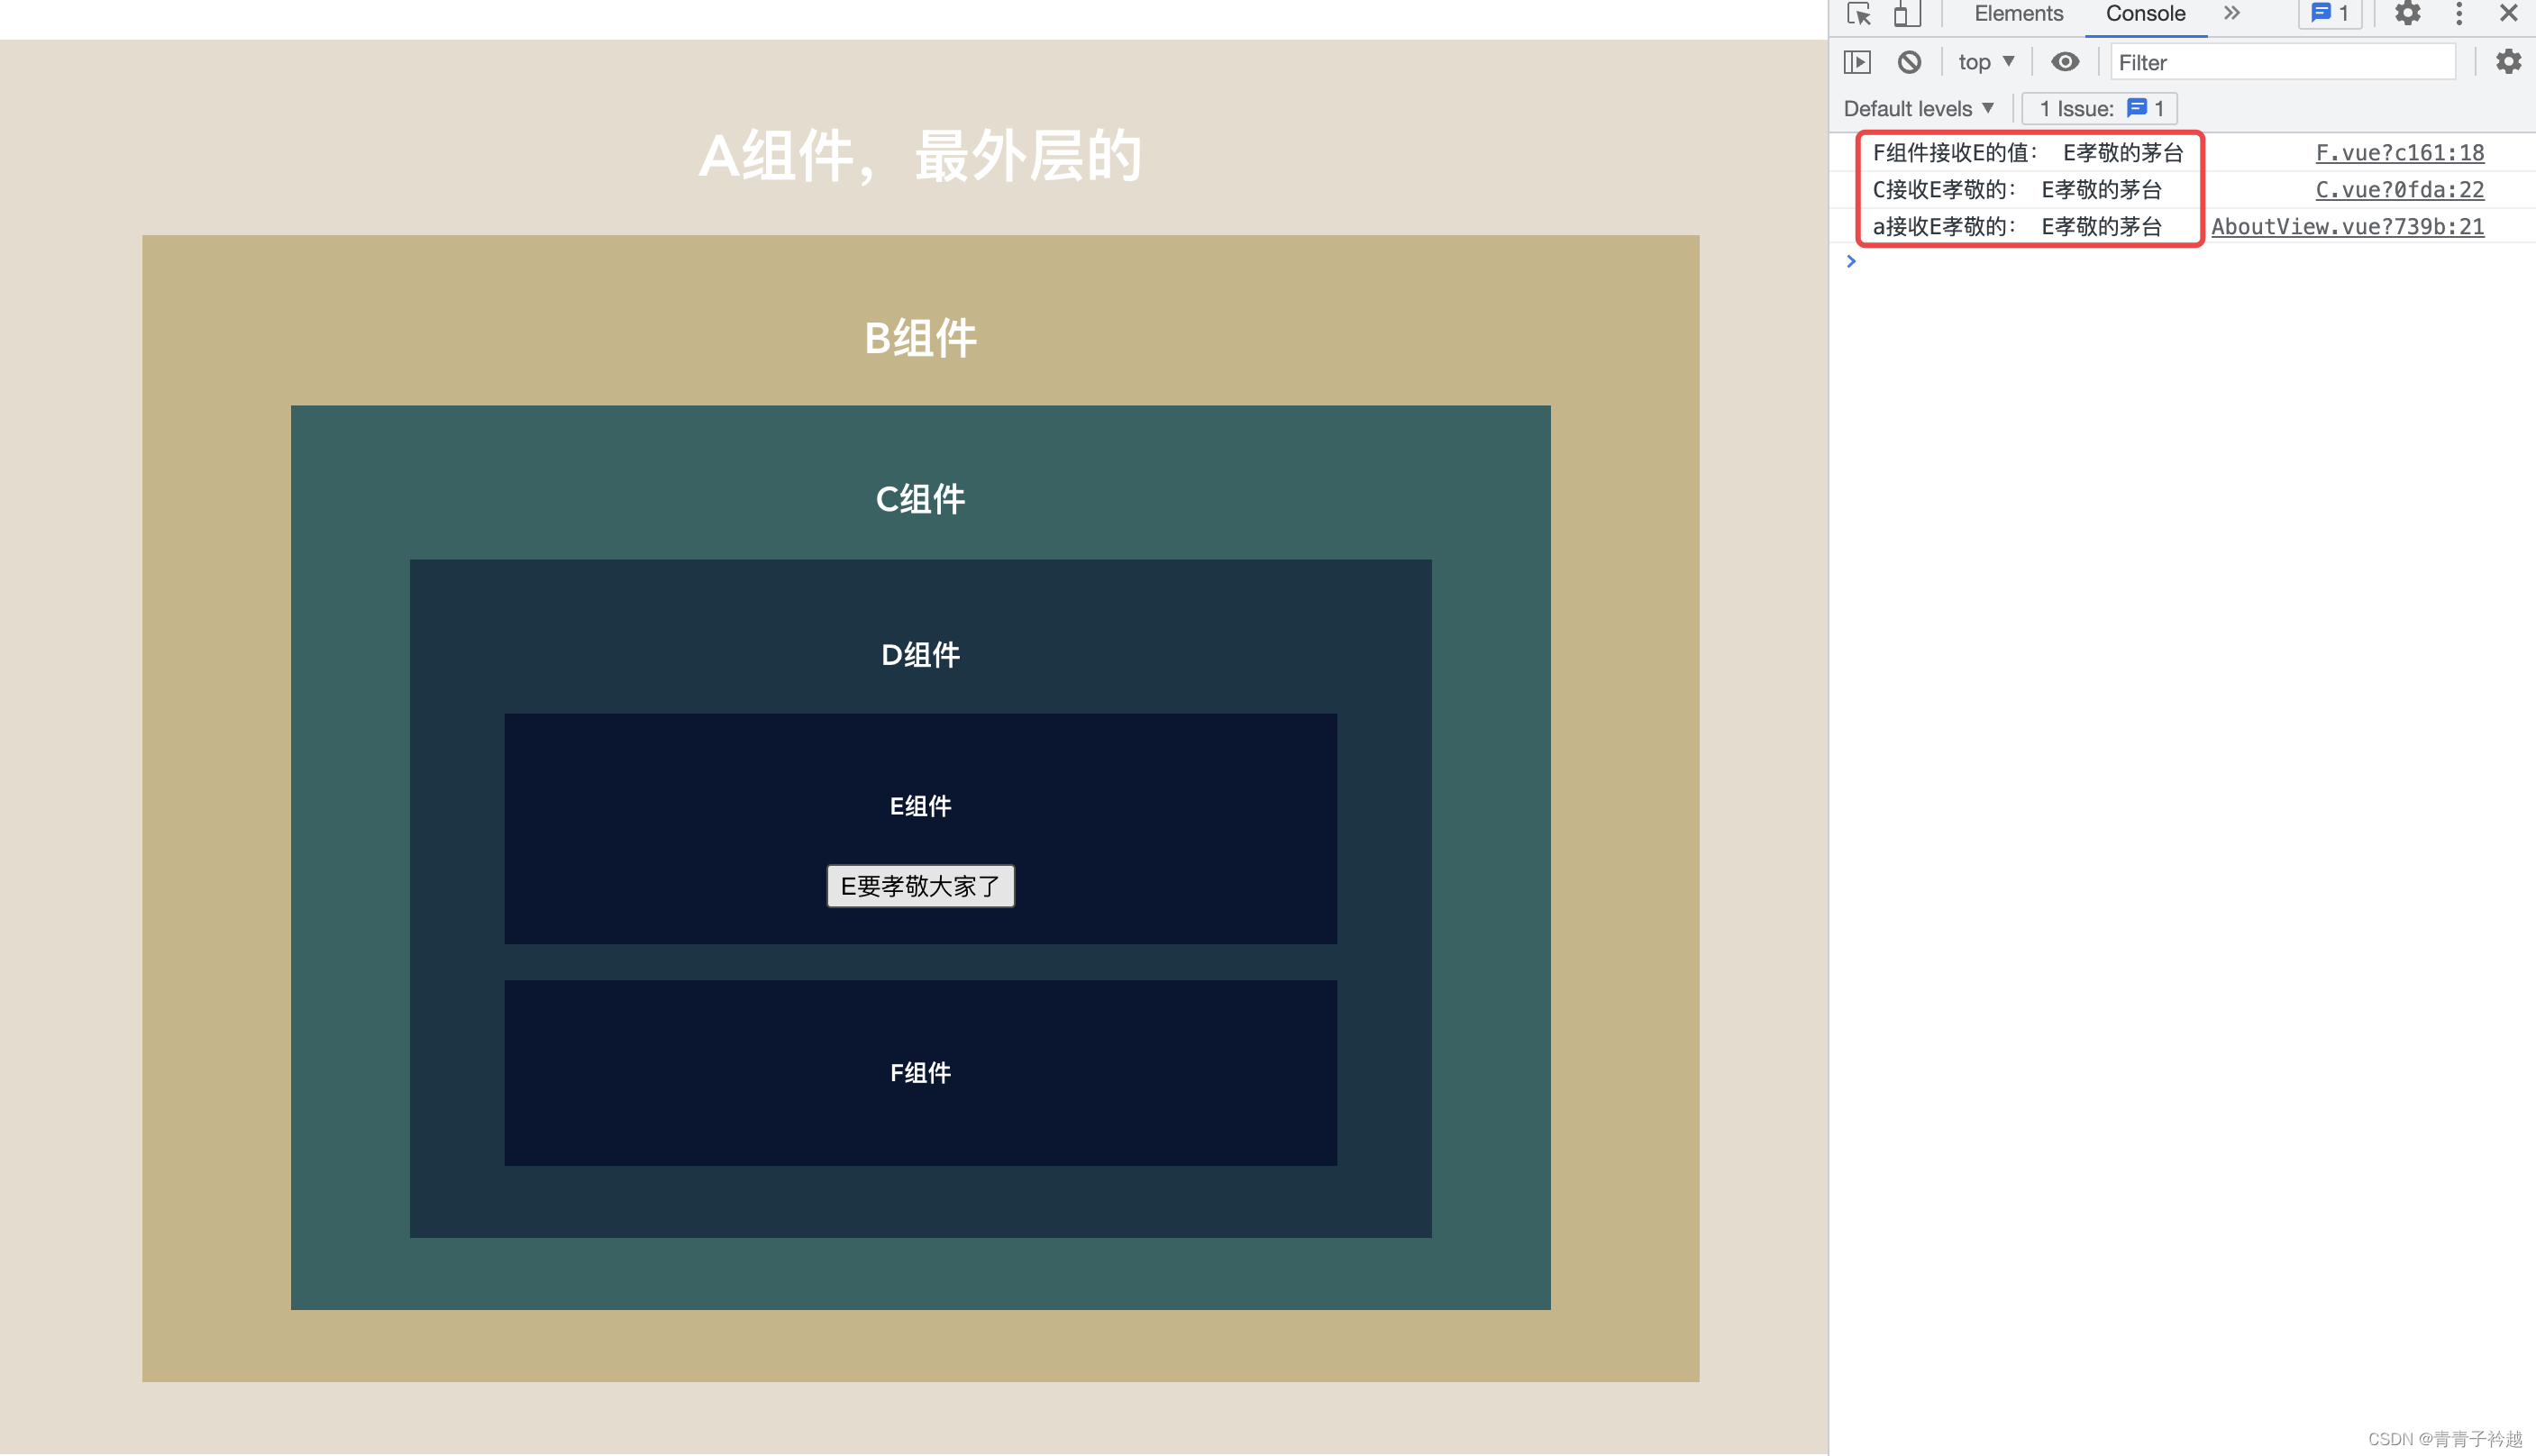
太厉害了,那么问题来了,是不是只能子组件通过bus传递给父组件和兄弟组件,
父组件可以通过这样的方法传递给子组件吗??
注意!!!!!!!!!!!!!!!!
我们说,bus是什么?可以进行任意组件的传值,所以,答案是,没问题
自己写代码,测试一下
版权归原作者 青青子衿越 所有, 如有侵权,请联系我们删除。