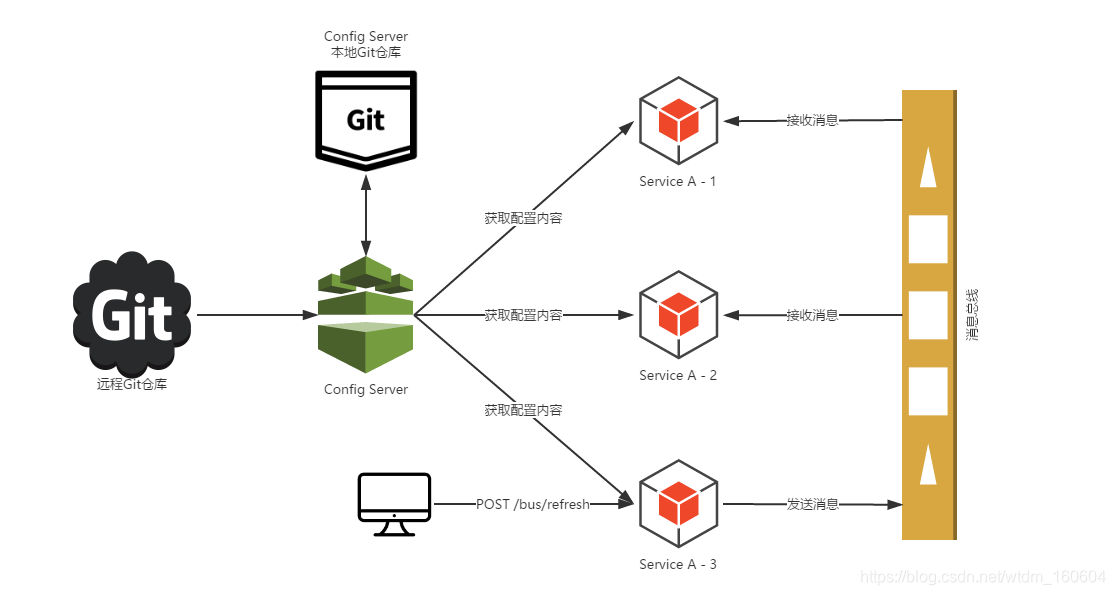
一、实现原理
1、ConfigServer(配置中心服务端)从远端git拉取配置文件并在本地git一份,ConfigClient(微服务)从ConfigServer端获取自己对应 配置文件;
2、当远端git仓库配置文件发生改变,ConfigServer如何通知到ConfigClient端,即ConfigClient如何感知到配置发生更新?
Spring Cloud Bus会向外提供一个http接口,即图中的/bus/refresh。我们将这个接口配置到远程的git的webhook上,当git上的文件内容发生变动时,就会自动调用/bus-refresh接口。Bus就会通知config-server,config-server会发布更新消息到消息总线的消息队列中,其他服务订阅到该消息就会信息刷新,从而实现整个微服务进行自动刷新。
二:实现方式
实现方式一:某个微服务承担配置刷新的职责

1、提交配置触发post调用客户端A的bus/refresh接口
2、客户端A接收到请求从Server端更新配置并且发送给Spring Cloud Bus总线
3、Spring Cloud bus接到消息并通知给其它连接在总线上的客户端,所有总线上的客户端均能收到消息
4、其它客户端接收到通知,请求Server端获取最新配置
5、全部客户端均获取到最新的配置
存在问题:
1、打破了微服务的职责单一性。微服务本身是业务模块,它本不应该承担配置刷新的职责。2、破坏了微服务各节点的对等性。3、有一定的局限性。WebHook的配置随着承担刷新配置的微服务节点发生改变。
改进如下方式二:配置中心Server端承担起配置刷新的职责,原理图如下:

1、提交配置触发post请求给server端的bus/refresh接口
2、server端接收到请求并发送给Spring Cloud Bus总线
3、Spring Cloud bus接到消息并通知给其它连接到总线的客户端
4、其它客户端接收到通知,请求Server端获取最新配置
5、全部客户端均获取到最新的配置
三:实现步骤
基本步骤:1、添加依赖 2、修改配置文件 3、添加注解
备注:这里给出方式二配置方法,方式一的区别在:因为是某个微服务承担配置刷新的职责,所以Server端不需要配置 Rabbitmq和添加bus-amqp的依赖。
<一>Config Server端配置(提前安装rabbitmq移步链接:)
1、添加依赖
<!-- config-server依赖 -->
<dependency>
    <groupId>org.springframework.cloud</groupId>
    <artifactId>spring-cloud-config-server</artifactId>
</dependency>

<!-- springcloud-bus依赖实现配置自动更新,rabbitmq -->
<dependency>
    <groupId>org.springframework.cloud</groupId>
    <artifactId>spring-cloud-starter-bus-amqp</artifactId>
</dependency>
2、修改配置文件Bootstrap.yml文件
server:
  port: 9090

spring:
  application:
    name: config-server
  cloud:                                                  #config服务端,从git拉取数据
    config:
      server:
        git:
          uri: https://github.com/****/config-repo        # 配置git仓库的地址
          username:                                       # git仓库的账号
          password:                                       # git仓库的密码
          search-paths: /*/*/*,/*                         #仓库下配置文件搜索路径
  rabbitmq:                    #本地环境不需要配置mq,但是需要启动mq,Springboot会自动连接本地mq
    host: localhost
    port: 5672
    username: guest
    password: guest

eureka:                         #注册服务
  client:
    serviceUrl:
      defaultZone: http://localhost:8761/eureka/
      #defaultZone: http://localhost:8761/eureka/,http://localhost:8762/eureka/    #eureka高可用

management:                    #SpringCloud 1.5版本暴露接口,暴露/bus-refresh接口
  security:
    enabled: false
#  endpoints:                  #SpringCloud 2.0.0版本以后暴露接口方式
#    web:
#      exposure:
#        include: "*"

security:                       #是否开启基本的鉴权,默认为true
  basic:
    enabled: false
备注:关于git仓库配置那块,参考这篇博客:http://www.cnblogs.com/hellxz/p/9306507.html
本地环境不需要配置mq,但是需要启动mq,Springboot会自动连接本地mq,后面客户端也是,如果是线上环境的话,必须要进行配置,原因看看SpringCloud bus如下说明:

3、启动类增加注解 @EnableConfigServer

至此Config-Server端已配置完毕
<二>Config Client端配置
1、添加依赖
<dependency>
    <groupId>org.springframework.cloud</groupId>
    <artifactId>spring-cloud-starter-config</artifactId>
</dependency>

<dependency>
    <groupId>org.springframework.cloud</groupId>
    <artifactId>spring-cloud-starter-bus-amqp</artifactId>
</dependency>

<dependency>
    <groupId>org.springframework.boot</groupId>
    <artifactId>spring-boot-starter-actuator</artifactId>
</dependency>
2、修改配置文件Bootstrap.yml文件
server:
  port: 9092

spring:
  application:
    name: config-client                         #对应微服务配置文件名称
  cloud:
    config:
      uri: http://localhost:9090/                    #config server 端地址
      profile: dev                                      #项目配置文件选择
      label: master                                     #git仓库的分支
      discovery:
        enabled: true
        service-id: config-server                       #config-server服务名称

rabbitmq:                                #本地环境不需要配置mq
    host: localhost
    port: 5672
    username: guest
    password: guest

security:                                #
  basic:
    enabled: false
3、添加注解: @RefreshScope添加在需要刷新的配置文件上
注明:自动刷新只能刷新 @RefreshScope 注解下的配置,一些特殊配置,如数据库等,需要同样先设置数据库链接ConfigServer类,然后通过加 @RefreshScope 注解方式


到这里Config-Server端和Client端已经配置完毕,先后启动Server端和Client端,post请求方式进行测试:http://localhost:9090/bus/refresh
<三>配置git的webhook
前面已准备就绪,启动Server端和Client端,要实现配置自动刷新需要调用/bus-refresh接口通知config-Server
方式一:手动调用(post请求):http://localhost:9090/bus/refresh(Server端地址)
方式二:配置git的webhook ,当git端配置发生改变,自动调用/bus-refresh接口

<四>附件
config-client-dev.yml配置文件:
spring:
  datasource:
    type: com.alibaba.druid.pool.DruidDataSource
    url: jdbc:mysql://127.0.0.1:3306/test_mybatis_db?autoReconnect=true&useSSL=false&useUnicode=true&characterEncoding=UTF-8
    username: root
    password: 1234
    driverClassName: com.mysql.jdbc.Driver
    druid:
      initialSize: 5
      minIdle: 5
      maxActive: 20
      maxWait: 60000
      timeBetweenEvictionRunsMillis: 60000
      minEvictableIdleTimeMillis: 300000
      validationQuery: SELECT 1
      testWhileIdle: true
      filters: stat,wall,log4j

mybatis:
  type-aliases-package: com.scnu.springcloudconfigclient.domain
  mapper-locations: classpath*:mapper/*.xml

eureka:                                 #注册服务
  client:
    serviceUrl:
      defaultZone: http://localhost:8761/eureka/

custom:
  username: guest-new
  passwd: guest-new

profile: test-new
<五>加解密
引入:配置文件统一放在配置中心,配置中心文件明文存在不安全,容易泄露比如数据库用户名、密码等,如何实现git仓库配置文件为密文时,通过配置中心在Config-Server端进行解密。
<一>对称加密
1、JCE加密,Oracl官网下载,替换本机JDK下JRE的lib下在两个文件。
https://www.oracle.com/technetwork/java/javase/downloads/jce-all-download-5170447.html
2、
a) Config-Server 端配置文件添加:
encrypt:                                 #加密因子
  key: foobar
加密因子为foobar,这里借助了Server端的加密,因此配置完毕需要启动Config-Server
b) 启动Config-Server
$ curl -X post http://localhost:9090/encrypt -d mysecret
加密mysecret为密码,得到如下加密字串:
682bc583f4641835fa2db009355293665d2647dade3375c0ee201de2a49f7bda
c) 逆向操作:
$ curl -X post http://localhost:9090/decrypt -d682bc583f4641835fa2db009355293665d2647dade3375c0ee201de2a49f7bda
解密得到:
mysecret
3、使用:
a) Config-Server端配置文件中加入:
encrypt: #加密因子foobar
key: foobar
b) Git仓库中配置文件caiyun-test-dev.yml
profile: ‘{cipher}682bc583f4641835fa2db009355293665d2647dade3375c0ee201de2a49f7bda’
备注:.properties文件吧引号去掉
c) Config-client不需要做任何操作
<二>非对称加密
RSA算法
1、命令行下执行
$ keytool -genkeypair -alias mytestkey -keyalg RSA -dname “CN=WebServer,OU=Unit,O=Organization,L=City,S=State,C=US” -keypass changeme -keystore server.jks-storepass letmein
执行完生成server.jks 文件,加密文件
2、将Server.jks 文件放在Config-Server的ClassPass路径下,
Config-Server 端配置文件bootstrap.yml中添加:
encrypt:
  keyStore:
    location: classpath:/server.jks        #生成在jks文件路径
    password: letmein            #key store 秘钥
    alias: mytestkey            #别名
    secret: changeme            #私钥
启动Config-Server
3、加密
$ curl -X post http://localhost:9090/encrypt -d caiyun-mima
加密caiyun-mima,得到如下加密字串:
682bc583f4641835fa2db009355293665d2647dade3375c0ee201de2a49f7bda
4、使用:
a)Config-Server端配置文件中加入:
encrypt:
  keyStore:
    location: classpath:/server.jks        #生成在jks文件路径
    password: letmein            #key store 秘钥
    alias: mytestkey            #别名
    secret: changeme            #私钥
b) Git仓库中配置文件caiyun-test-dev.yml
profile: ‘{cipher}682bc583f4641835fa2db009355293665d2647dade3375c0ee201de2a49f7bda’
备注:.properties文件吧引号去掉
c) Config-client不需要做任何操作
项目Demo代码见github:
版权归原作者 m0_67392661 所有, 如有侵权,请联系我们删除。