1、概 述
典型应用全屏窗口UI元素包括状态栏、应用界面和底部导航条。
其中状态栏和导航条,通常在沉浸式布局下称为避让区,避让区之外的区域称为安全区。
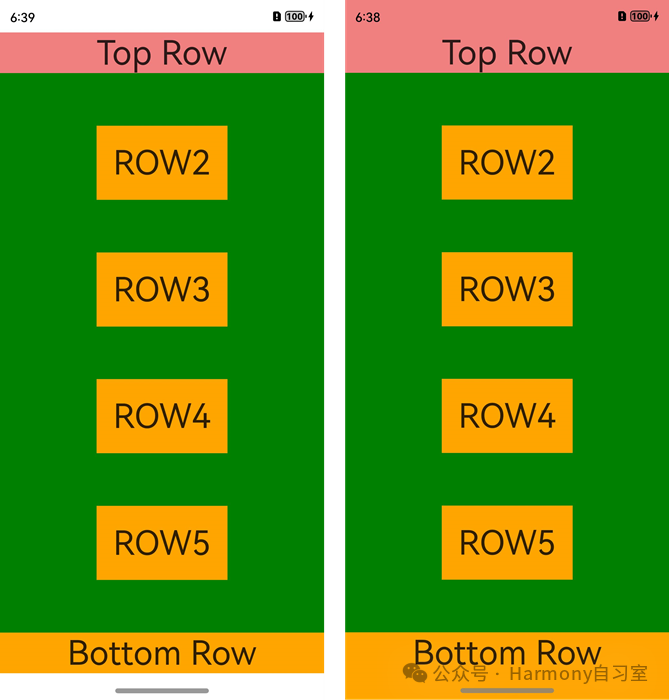
开发应用沉浸式效果主要指:通过调整状态栏、应用界面和导航条的显示效果来减少状态栏导航条等系统界面的突兀感,保证应用的整体观感。
作为对比(未沉浸式左图、沉浸式的右图),示意如下:

大部分情况下,为了保证应用界面的一致性,我们都需要做沉浸式界面适配。
实现沉浸式效果的方式有两种:
- 窗口全屏布局:调整布局系统为全屏布局,界面元素延伸到状态栏和导航条区域(当不隐藏避让区时,可通过接口查询状态栏和导航条区域进行可交互元素避让处理,还可以设置状态栏或导航条的颜色等属性与界面元素匹配。当隐藏避让区时,通过对应接口设置全屏布局)
- 组件安全区: 布局系统保持安全区内布局,然后通过接口延伸绘制内容(如背景色,背景图)到状态栏和导航条区域(本方案中界面元素仅做绘制延伸,无法单独布局到状态栏和导航条区域,如果需要单独布局UI元素到状态栏和导航条区域的场景最好还是使用窗口全屏布局方案处理)。
2、窗口全屏布局
全屏布局方式有两个场景:1)不隐藏避让区、2)隐藏避让区。
- 针对普通的应用场景,我们一般不会隐藏避让区(显示状态和导航条);- 针对游戏场景,我们一般会隐藏避让区(隐藏状态栏和导航条);
2.1、不隐藏避让区
不隐藏避让区一般常见于常规的应用界面中,他保留了界面中的导航栏和顶部的状态栏。开发方式大致分两步,介绍如下:
👉🏻 step 1
我们可以通过调用窗口强制全屏布局接口setWindowLayoutFullScreen()实现界面元素延伸到状态栏和导航条;
**👉🏻 step 2 **
再通过接口getWindowAvoidArea()和on('avoidAreaChange')获取并动态监听避让区域的变更信息,页面布局根据避让区域信息进行动态调整(也可以设置状态栏或导航条的颜色等属性与界面元素进行匹配)。
开发实例如下:
a. 调用 setWindowLayoutFullScreen() 接口设置窗口全屏
// EntryAbility.etsimport { AbilityConstant, UIAbility, Want } from '@kit.AbilityKit';import { window } from '@kit.ArkUI';import { BusinessError } from '@kit.BasicServicesKit';export default class EntryAbility extends UIAbility { // ... onWindowStageCreate(windowStage: window.WindowStage): void { windowStage.loadContent('pages/Index', (err, data) => { if (err.code) { return; } let windowClass: window.Window = windowStage.getMainWindowSync(); // 获取应用主窗口 // 1. 设置窗口全屏 let isLayoutFullScreen = true; windowClass.setWindowLayoutFullScreen(isLayoutFullScreen).then(() => { console.info('Succeeded in setting the window layout to full-screen mode.'); }).catch((err: BusinessError) => { console.error('Failed to set the window layout to full-screen mode. Cause:' + JSON.stringify(err)); }); }); }}
b. 使用 getWindowAvoidArea() 接口获取当前布局遮挡区域(例如: 状态栏、导航条)
// EntryAbility.etsimport { AbilityConstant, UIAbility, Want } from '@kit.AbilityKit';import { window } from '@kit.ArkUI';export default class EntryAbility extends UIAbility { // ... onWindowStageCreate(windowStage: window.WindowStage): void { windowStage.loadContent('pages/Index', (err, data) => { if (err.code) { return; } let windowClass: window.Window = windowStage.getMainWindowSync(); // 获取应用主窗口 // 1. 设置窗口全屏 // ... // 2. 获取布局避让遮挡的区域 let type = window.AvoidAreaType.TYPE_NAVIGATION_INDICATOR; // 以导航条避让为例 let avoidArea = windowClass.getWindowAvoidArea(type); let bottomRectHeight = avoidArea.bottomRect.height; // 获取到导航条区域的高度 AppStorage.setOrCreate('bottomRectHeight', bottomRectHeight); type = window.AvoidAreaType.TYPE_SYSTEM; // 以状态栏避让为例 avoidArea = windowClass.getWindowAvoidArea(type); let topRectHeight = avoidArea.topRect.height; // 获取状态栏区域高度 AppStorage.setOrCreate('topRectHeight', topRectHeight); }); }}
c. 注册监听函数,动态获取避让区域的实时数据
// EntryAbility.etsimport { AbilityConstant, UIAbility, Want } from '@kit.AbilityKit';import { window } from '@kit.ArkUI';export default class EntryAbility extends UIAbility { // ... onWindowStageCreate(windowStage: window.WindowStage): void { windowStage.loadContent('pages/Index', (err, data) => { if (err.code) { return; } let windowClass: window.Window = windowStage.getMainWindowSync(); // 获取应用主窗口 // 1. 设置窗口全屏 // ... // 2. 获取当前布局避让遮挡的区域 // ... // 3. 注册监听函数,动态获取避让区域数据 windowClass.on('avoidAreaChange', (data) => { if (data.type === window.AvoidAreaType.TYPE_SYSTEM) { let topRectHeight = data.area.topRect.height; AppStorage.setOrCreate('topRectHeight', topRectHeight); } else if (data.type == window.AvoidAreaType.TYPE_NAVIGATION_INDICATOR) { let bottomRectHeight = data.area.bottomRect.height; AppStorage.setOrCreate('bottomRectHeight', bottomRectHeight); } }); }); }}
d. 布局中的UI元素需要避让状态栏和导航条(否则可能产生UI元素重叠等情况)
对控件顶部设置padding(具体数值与状态栏高度一致),实现对状态栏的避让;对底部设置padding(具体数值与底部导航条区域高度一致),实现对底部导航条的避让(如果去掉顶部和底部的padding设置,即不避让状态栏和导航条,UI元素就会发生重叠)@Entry
@Componentstruct Index { @StorageProp('bottomRectHeight') bottomRectHeight: number = 0; @StorageProp('topRectHeight') topRectHeight: number = 0; build() { Row() { Column() { Row() { Text('DEMO-ROW1').fontSize(40) }.backgroundColor(Color.Orange).padding(20) Row() { Text('DEMO-ROW2').fontSize(40) }.backgroundColor(Color.Orange).padding(20) Row() { Text('DEMO-ROW3').fontSize(40) }.backgroundColor(Color.Orange).padding(20) Row() { Text('DEMO-ROW4').fontSize(40) }.backgroundColor(Color.Orange).padding(20) Row() { Text('DEMO-ROW5').fontSize(40) }.backgroundColor(Color.Orange).padding(20) Row() { Text('DEMO-ROW6').fontSize(40) }.backgroundColor(Color.Orange).padding(20) } .width('100%') .height('100%') .alignItems(HorizontalAlign.Center) .justifyContent(FlexAlign.SpaceBetween) .backgroundColor('#008000') // top数值与状态栏区域高度保持一致;bottom数值与导航条区域高度保持一致 .padding({ top: this.topRectHeight, bottom: this.bottomRectHeight }) } }}
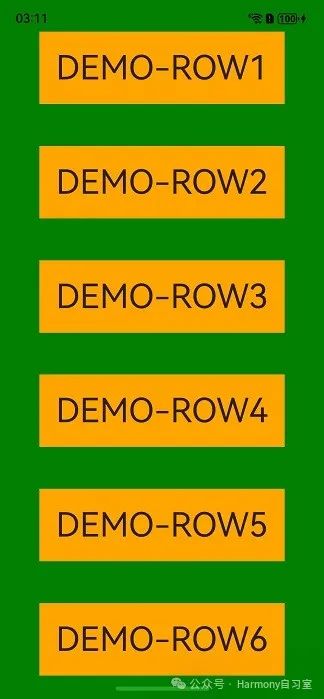
布局避让状态栏和导航条效果如下(顶部状态栏和底部导航栏没有于DEMO-ROWx重叠):

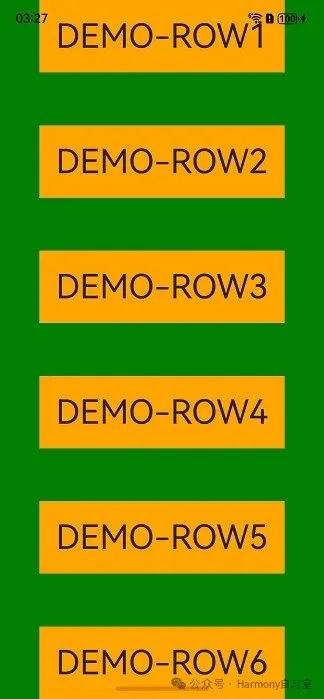
布局未避让状态栏和导航条(DEMO-ROWx与顶部状态栏和底部导航栏元素重叠):

e. 根据实际的UI界面显示或相关UI元素背景颜色等,还可以按需设置状态栏的文字颜色、背景色或设置导航条的显示或隐藏,以使UI界面效果呈现和谐(状态栏默认是透明的,透传的是应用界面的背景色)
【此例中UI颜色比较简单,没有对状态栏文字颜色、背景色进行单独设置】
如果需要设置,示例如下:
// EntryAbility.etsimport { UIAbility } from '@kit.AbilityKit';import { BusinessError } from '@kit.BasicServicesKit';export default class EntryAbility extends UIAbility { // ... onWindowStageCreate(windowStage: window.WindowStage): void { console.info('onWindowStageCreate'); let windowClass: window.Window | undefined = undefined; windowStage.getMainWindow((err: BusinessError, data) => { const errCode: number = err.code; if (errCode) { console.error(`Failed to obtain the main window. Cause code: ${err.code}, message: ${err.message}`); return; } windowClass = data; let systemBarProperties: window.SystemBarProperties = { statusBarColor: '#ff00ff', // 状态栏背景颜色 navigationBarColor: '#00ff00', // 导航栏背景颜色 statusBarContentColor: '#ffffff', // 状态栏文字颜色 navigationBarContentColor: '#00ffff' // 导航栏文字颜色 }; try { // 设置自定义d的状态栏和导航栏的样式 let promise = windowClass.setWindowSystemBarProperties(systemBarProperties); promise.then(() => { console.info('Succeeded in setting the system bar properties.'); }).catch((err: BusinessError) => { console.error(`Failed to set the system bar properties. Cause code: ${err.code}, message: ${err.message}`); }); } catch (exception) { console.error(`Failed to set the system bar properties. Cause code: ${exception.code}, message: ${exception.message}`); } }); }}
2.2、隐藏避让区
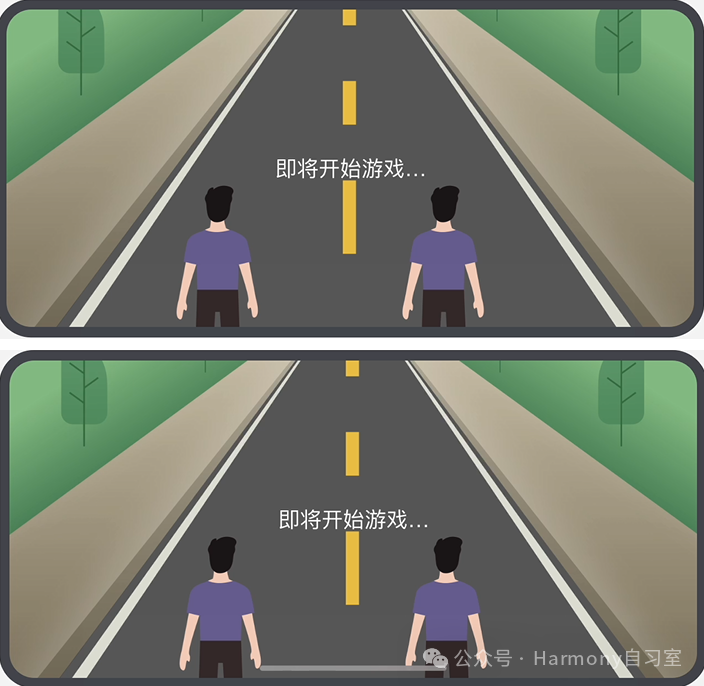
隐藏避让区一般常见于游戏、视频全屏播放类型的场景,顶部状态栏和底部的导航栏都常驻显示在界面中(可以通过从底部上滑唤出导航条)。例如:

开发实例如下:
a. 调用 setWindowLayoutFullScreen() 接口设置窗口全屏。
import { AbilityConstant, UIAbility, Want } from '@kit.AbilityKit';import { window } from '@kit.ArkUI';import { BusinessError } from '@kit.BasicServicesKit';export default class EntryAbility extends UIAbility { // ... onWindowStageCreate(windowStage: window.WindowStage): void { windowStage.loadContent('pages/Index', (err, data) => { if (err.code) { return; } let windowClass: window.Window = windowStage.getMainWindowSync(); // 获取应用主窗口 // 1. 设置窗口全屏 let isLayoutFullScreen = true; windowClass.setWindowLayoutFullScreen(isLayoutFullScreen) .then(() => { console.info('Succeeded in setting the window layout to full-screen mode.'); }) .catch((err: BusinessError) => { console.error(`Failed to set the window layout to full-screen mode. Code is ${err.code}, message is ${err.message}`); }); }); }}
b. 调用 setSpecificSystemBarEnabled() 接口设置状态栏和导航条的具体显示/隐藏状态。
import { AbilityConstant, UIAbility, Want } from '@kit.AbilityKit';import { window } from '@kit.ArkUI';import { BusinessError } from '@kit.BasicServicesKit';export default class EntryAbility extends UIAbility { // ... onWindowStageCreate(windowStage: window.WindowStage): void { windowStage.loadContent('pages/Index', (err, data) => { if (err.code) { return; } let windowClass: window.Window = windowStage.getMainWindowSync(); // 获取应用主窗口 // 1. 设置窗口全屏 // ... // 2. 设置状态栏和导航条隐藏 windowClass.setSpecificSystemBarEnabled('status', false) .then(() => { console.info('Succeeded in setting the status bar to be invisible.'); }) .catch((err: BusinessError) => { console.error(`Failed to set the status bar to be invisible. Code is ${err.code}, message is ${err.message}`); }); }); }}
c. 在界面中无需进行导航条避让操作(导航条不显示在界面中,没必要做避让操作)
@Entry()@Componentstruct Index { build() { Row() { Column() { Row() { Text('ROW1').fontSize(40) }.backgroundColor(Color.Orange).padding(20) Row() { Text('ROW2').fontSize(40) }.backgroundColor(Color.Orange).padding(20) Row() { Text('ROW3').fontSize(40) }.backgroundColor(Color.Orange).padding(20) Row() { Text('ROW4').fontSize(40) }.backgroundColor(Color.Orange).padding(20) Row() { Text('ROW5').fontSize(40) }.backgroundColor(Color.Orange).padding(20) Row() { Text('ROW6').fontSize(40) }.backgroundColor(Color.Orange).padding(20) } .width('100%') .height('100%') .alignItems(HorizontalAlign.Center) .justifyContent(FlexAlign.SpaceBetween) .backgroundColor('#008000') } }}
3、尾 巴
由于篇幅原因,本文暂只介绍基于全屏方案的沉浸式界面实现案例,除了基于全屏的方案,我们还可以使用基于组件安全区的方案实现沉浸式界面,后续再继续讨论。
版权归原作者 鸿蒙自习室 所有, 如有侵权,请联系我们删除。