
一个社区最重要的就是交流氛围与审查违规,而这两者都少不了对于敏感词进行过滤的自动维护措施。基于这样的措施,我们才能基本保证用户在使用社区的过程中,不至于被敏感违规词汇包围,才能够正常的进行发布帖子和评论,享受美好的社区氛围。目前,对于 springboot 项目也有较为成熟的敏感词过滤方案。
文章目录
敏感词过滤方案
本文将采用 Github 上 houbb 大神开源的 sensitive-word 工具包来进行敏感词过滤操作,它具备以下优秀特点:
- 包含 6W+ 词库,且不断优化更新
- 基于 fluent-api 实现,使用优雅简洁
- 完美兼容 spring boot 项目
- 支持自定义敏感词一对一替换成对应正常词汇
- 支持敏感词的判断、返回、脱敏等常见操作
- 支持全角半角互换
- 支持英文大小写互换
- 支持数字常见形式的互换
- 支持中文繁简体互换
- 支持英文常见形式的互换
- 支持用户自定义敏感词和白名单
- 支持数据的数据动态更新,实时生效
敏感词过滤效果如下:
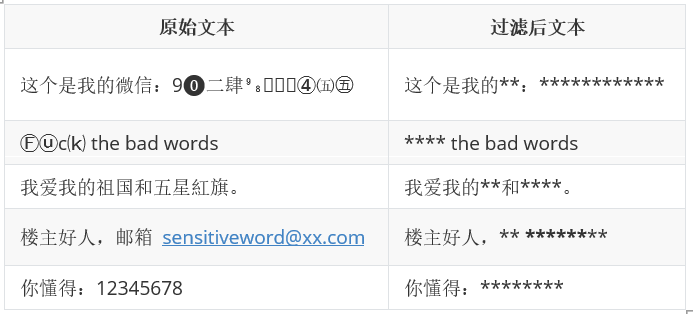
它不仅可以通过自定义替换词,也就是过滤后文本的 * 号可以随意更改,如果想要删去敏感词,替换词直接选为空即可,他还可以通过自定义对应词的替换词,比如说:五星红旗指定为国家旗帜,毛主席指定为教员,示例如下:
“五星红旗迎风飘扬,毛主席的画像屹立在广场前”。变为 “国家旗帜迎风飘扬,教员的画像屹立在广场前。”
实现思路
- 实现 sensitive-word 的配置文件
- 利用自定义的 SensitiveWordUtil 进行封装
- 调用 SensitiveWordUtil 即可
XML导包模板:
<!-- 敏感词工具包 --><dependency><groupId>com.github.houbb</groupId><artifactId>sensitive-word</artifactId><version>0.2.1</version></dependency>
sensitive-word 配置是通过 SensitiveWordBs.newInstance() 进行配置的,它传回的是 SensitiveWordBs 对象,而不是默认的 SensitiveWordHelper 对象。配置类注意添加 @Configuration 注解
它的配置项如下:
序号方法说明默认值1ignoreCase忽略大小写true2ignoreWidth忽略半角圆角true3ignoreNumStyle忽略数字的写法true4ignoreChineseStyle忽略中文的书写格式true5ignoreEnglishStyle忽略英文的书写格式true6ignoreRepeat忽略重复词false7enableNumCheck是否启用数字检测。true8enableEmailCheck是有启用邮箱检测true9enableUrlCheck是否启用链接检测true10numCheckLen数字检测,自定义指定长度。8
在完成配置之前,我们可以先添加两个词库文本,作为自定义的敏感词库以及非敏感词库,第一个词库大家都理解,为什么还要定义非敏感词库呢?因为默认的 6w+ 敏感词中免不了存在部分在社区业务中不算过于敏感的词汇,想要予以保留,这样的话,我们就需要使用非敏感词库进行排除。当然,敏感词库不能够频繁更新以及初始化,会耗费过多的时间和性能。这两个词库放置在 resource 目录下,博主使用的是 jdk17 ,所以采用 NIO 进行文件读取,简洁高效。两个文件名称如下:
- myAllowWords.txt:非敏感词库
- mySensitiveWords.txt:敏感词库
要使 sensitive-word 配置上自定义两个词库内容,必须分别继承以下两个接口:
- IWordDeny:敏感词继承方法
- IWordAllow:非敏感词继承方法
不仅需要实现这两个接口,还要配置默认词库、自定义词库合并的词库,否则,如果在 SensitiveWordBs.newInstance() 直接配置继承方法,就只生效自定义词库。合并词库的方法为:WordDenys.chains(),默认词库分别为WordDenys.system()、WordAllows.system(),合并后词库分别赋值给 IWordDeny、IWordAllow
模板配置如下:
// 自定义敏感词// 注意每一行为一个敏感词,单行不能只包括空格,否则,也会把空格识别为敏感词publicclassMyWordDenyimplementsIWordDeny{@OverridepublicList<String>deny(){List<String> list =newArrayList<String>();;try{Resource mySensitiveWords =newClassPathResource("mySensitiveWords.txt");Path mySensitiveWordsPath =Paths.get(mySensitiveWords.getFile().getPath());
            list =Files.readAllLines(mySensitiveWordsPath,StandardCharsets.UTF_8);}catch(IOException ioException){
            logger.error("读取敏感词文件错误!"+ ioException.getMessage());}return list;}}// 自定义非敏感词// 注意每一行为一个非敏感词,单行不能只包括空格,否则,也会把空格识别为非敏感词publicclassMyWordAllowimplementsIWordAllow{@OverridepublicList<String>allow(){List<String> list =newArrayList<String>();;try{Resource myAllowWords =newClassPathResource("myAllowWords.txt");Path myAllowWordsPath =Paths.get(myAllowWords.getFile().getPath());
            list =Files.readAllLines(myAllowWordsPath,StandardCharsets.UTF_8);}catch(IOException ioException){
            logger.error("读取非敏感词文件错误!"+ ioException.getMessage());}return list;}}// 配置默认敏感词 + 自定义敏感词IWordDeny wordDeny =WordDenys.chains(WordDenys.system(),newMyWordDeny());// 配置默认非敏感词 + 自定义非敏感词IWordAllow wordAllow =WordAllows.chains(WordAllows.system(),newMyWordAllow());
而自定义替换规则就必须继承并实现 ISensitiveWordReplace 接口其中的 replace() 方法。实现模板代码如下:
publicclass mySensitiveWordReplace implementsISensitiveWordReplace{@OverridepublicStringreplace(ISensitiveWordReplaceContext context){String sensitiveWord = context.sensitiveWord();// 自定义不同的敏感词替换策略,可以从数据库等地方读取if("五星红旗".equals(sensitiveWord)){return"国家旗帜";}if("毛主席".equals(sensitiveWord)){return"教员";}// 其他默认使用 * 代替int wordLength = context.wordLength();returnCharUtil.repeat('*', wordLength);}}
最后就是通过 SensitiveWordBs.newInstance() 进行配置,模板代码如下:
@BeanpublicSensitiveWordBssensitiveWordBs(){returnSensitiveWordBs.newInstance()// 忽略大小写.ignoreCase(true)// 忽略半角圆角.ignoreWidth(true)// 忽略数字的写法.ignoreNumStyle(true)// 忽略中文的书写格式:简繁体.ignoreChineseStyle(true)// 忽略英文的书写格式.ignoreEnglishStyle(true)// 忽略重复词.ignoreRepeat(false)// 是否启用数字检测.enableNumCheck(true)// 是否启用邮箱检测.enableEmailCheck(true)// 是否启用链接检测.enableUrlCheck(true)// 数字检测,自定义指定长度.numCheckLen(8)// 配置自定义敏感词.wordDeny(wordDeny)// 配置非自定义敏感词.wordAllow(wordAllow).init();}
配置完成之后,我们就可以使用 SensitiveWordUtil 进行封装使用了,实现代码如下:
@ComponentpublicclassSensitiveWordUtil{@AutowiredprivateSensitiveWordBs sensitiveWordBs;// 刷新敏感词库与非敏感词库缓存publicvoidrefresh(){
        sensitiveWordBs.init();}// 判断是否含有敏感词publicbooleancontains(String text){return sensitiveWordBs.contains(text);}// 指定替换符进行替换敏感词publicStringreplace(String text,char replaceChar){return sensitiveWordBs.replace(text,replaceChar);}// 使用默认替换符 * 进行替换敏感词publicStringreplace(String text){return sensitiveWordBs.replace(text);}// 返回所有敏感词publicList<String>findAll(String text){return sensitiveWordBs.findAll(text);}}
调用就不用说明了吧,我们敏感词过滤的部分就完成了。放一下 API 文档
方法参数返回值说明contains(String)待验证的字符串布尔值验证字符串是否包含敏感词replace(String, ISensitiveWordReplace)使用指定的替换策略替换敏感词字符串返回脱敏后的字符串replace(String, char)使用指定的 char 替换敏感词字符串返回脱敏后的字符串replace(String)使用
*
替换敏感词字符串返回脱敏后的字符串findAll(String)待验证的字符串字符串列表返回字符串中所有敏感词findFirst(String)待验证的字符串字符串返回字符串中第一个敏感词findAll(String, IWordResultHandler)IWordResultHandler 结果处理类字符串列表返回字符串中所有敏感词findFirst(String, IWordResultHandler)IWordResultHandler 结果处理类字符串返回字符串中第一个敏感词
测试方法:
@RunWith(SpringRunner.class)@SpringBootTest@ContextConfiguration(classes =CommunityApplication.class)publicclassSensitiveTest{@AutowiredprivateSensitiveWordUtil sensitiveWordUtil;@TestpublicvoidutilTest02(){String result = sensitiveWordUtil.replace("法网恢恢 哇 nnd 复活");System.out.println(result);}}

版权归原作者 yumuing 所有, 如有侵权,请联系我们删除。