
前言
前面我们讲了《nacos源码分析-服务注册(客户端)》 和 《nacos源码分析-服务注册(服务端)》,主要是讲的服务注册流程,本章节我们来讲服务心跳检测机制。
心跳续约客户端
其实我们在讲 nacos服务注册客户端的时候顺带就说了心跳,服务注册流程是:
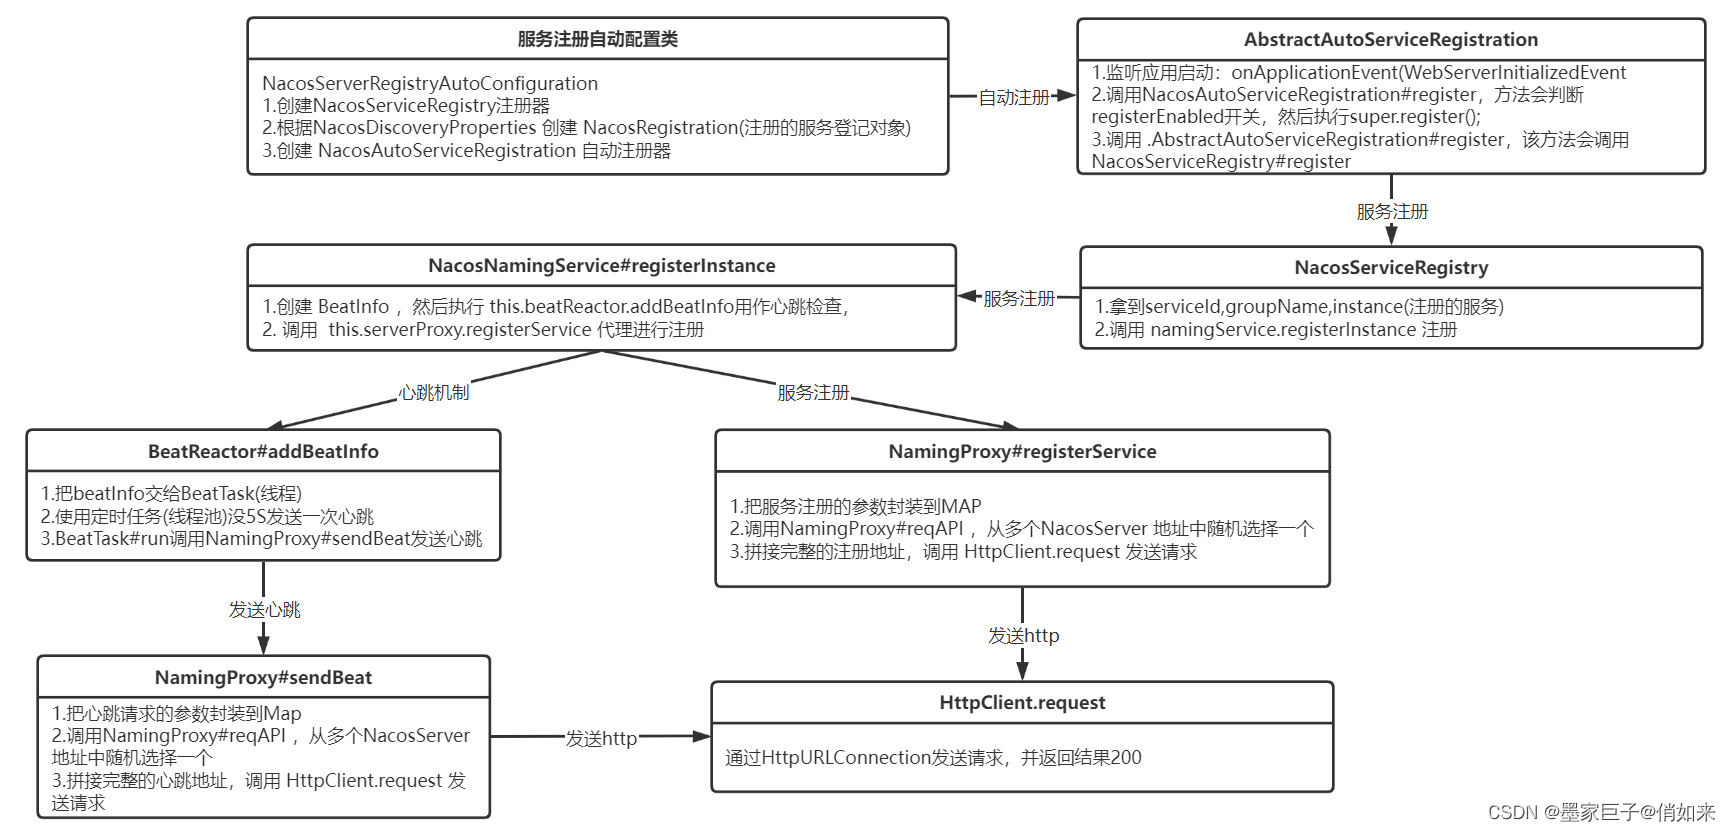
nacos客户端服务心跳在服务注册的流程中触发,这里我再贴一下源码, NacosNamingService#registerInstance的源码:
publicvoidregisterInstance(String serviceName,String groupName,Instance instance)throwsNacosException{if(instance.isEphemeral()){BeatInfo beatInfo =newBeatInfo();
            beatInfo.setServiceName(NamingUtils.getGroupedName(serviceName, groupName));
            beatInfo.setIp(instance.getIp());
            beatInfo.setPort(instance.getPort());
            beatInfo.setCluster(instance.getClusterName());
            beatInfo.setWeight(instance.getWeight());
            beatInfo.setMetadata(instance.getMetadata());
            beatInfo.setScheduled(false);
            beatInfo.setPeriod(instance.getInstanceHeartBeatInterval());//添加心跳this.beatReactor.addBeatInfo(NamingUtils.getGroupedName(serviceName, groupName), beatInfo);}this.serverProxy.registerService(NamingUtils.getGroupedName(serviceName, groupName), groupName, instance);}
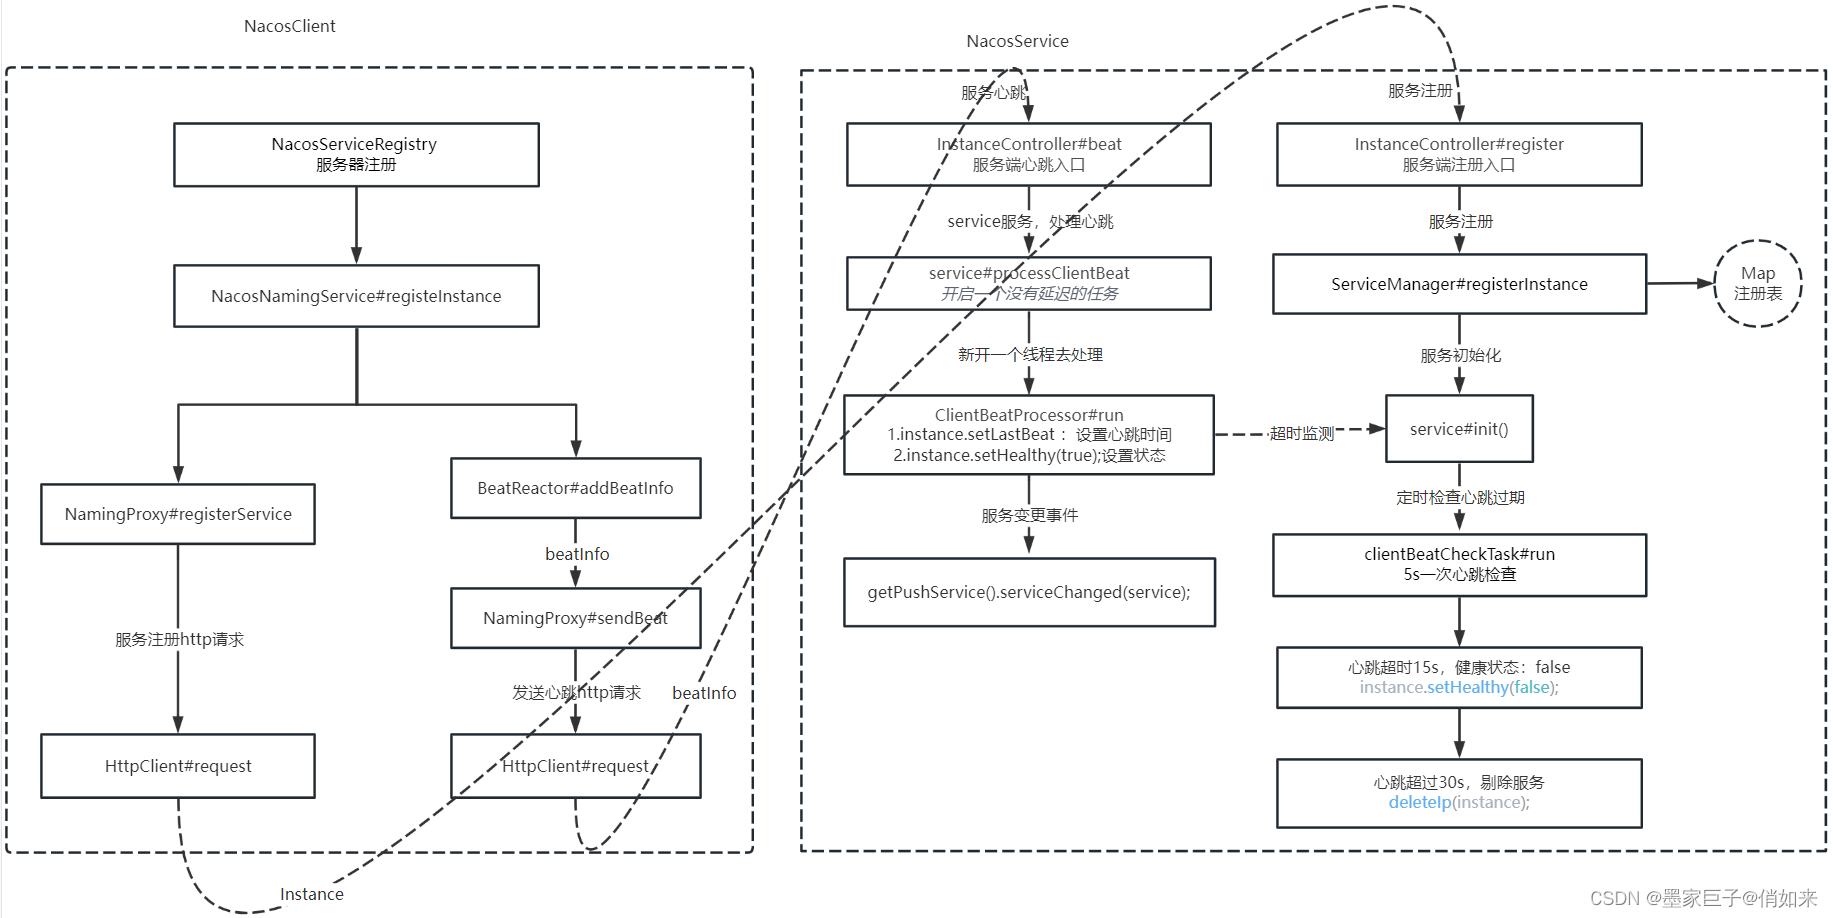
这里就看的比较清楚了,这里会把服务的ip,端口,服务名等信息封装到 BeatInfo 对象中,beatReactor.addBeatInfo是把当前服务实例加入心跳机制(心跳续约),然后通过serverProxy.registerService注册
代码在 BeatReactor#addBeatInfo中添加的心跳续约,在 NacosNamingService#registerInstance方法中把服务信息封装为一个 BeatInfo ,然后加入this.beatReactor.addBeatInfo 心跳机制。我们来看一下心跳是如何做的,下面是beatReactor.addBeatInfo的源码
publicvoidaddBeatInfo(String serviceName,BeatInfo beatInfo){LogUtils.NAMING_LOGGER.info("[BEAT] adding beat: {} to beat map.", beatInfo);String key =this.buildKey(serviceName, beatInfo.getIp(), beatInfo.getPort());BeatInfo existBeat =null;if((existBeat =(BeatInfo)this.dom2Beat.remove(key))!=null){
            existBeat.setStopped(true);}this.dom2Beat.put(key, beatInfo);//线程池,定时任务,5000毫秒发送一次心跳。beatInfo.getPeriod()是定时任务执行的频率this.executorService.schedule(newBeatTask(beatInfo), beatInfo.getPeriod(),TimeUnit.MILLISECONDS);MetricsMonitor.getDom2BeatSizeMonitor().set((double)this.dom2Beat.size());}//心跳任务classBeatTaskimplementsRunnable{BeatInfo beatInfo;publicBeatTask(BeatInfo beatInfo){this.beatInfo = beatInfo;}publicvoidrun(){if(!this.beatInfo.isStopped()){long nextTime =this.beatInfo.getPeriod();try{//发送心跳请求,拿到结果JSONObject result =BeatReactor.this.serverProxy.sendBeat(this.beatInfo,BeatReactor.this.lightBeatEnabled);long interval =(long)result.getIntValue("clientBeatInterval");boolean lightBeatEnabled =false;if(result.containsKey("lightBeatEnabled")){
                        lightBeatEnabled = result.getBooleanValue("lightBeatEnabled");}BeatReactor.this.lightBeatEnabled = lightBeatEnabled;if(interval >0L){
                        nextTime = interval;}int code =10200;if(result.containsKey("code")){
                        code = result.getIntValue("code");}if(code ==20404){//实例不存在就创建Instance instance =newInstance();
                        instance.setPort(this.beatInfo.getPort());
                        instance.setIp(this.beatInfo.getIp());
                        instance.setWeight(this.beatInfo.getWeight());
                        instance.setMetadata(this.beatInfo.getMetadata());
                        instance.setClusterName(this.beatInfo.getCluster());
                        instance.setServiceName(this.beatInfo.getServiceName());
                        instance.setInstanceId(instance.getInstanceId());
                        instance.setEphemeral(true);try{//注册服务BeatReactor.this.serverProxy.registerService(this.beatInfo.getServiceName(),NamingUtils.getGroupName(this.beatInfo.getServiceName()), instance);}catch(Exception var10){}}}catch(NacosException var11){LogUtils.NAMING_LOGGER.error("[CLIENT-BEAT] failed to send beat: {}, code: {}, msg: {}",newObject[]{JSON.toJSONString(this.beatInfo), var11.getErrCode(), var11.getErrMsg()});}//定时任务:5s一次执行心跳任务BeatReactor.this.executorService.schedule(BeatReactor.this.newBeatTask(this.beatInfo), nextTime,TimeUnit.MILLISECONDS);}}}
和Eureka一样,心跳也是通过线程池 ScheduledExecutorService 来实现的,时间频率默认是5秒一次。
- BeatInfo : 心跳续约的对象,其中包括服务的IP,端口,服务名,权重等
- executorService.schedule :定时任务,beatInfo.getPeriod()是定时任务执行频率,默认是5000 毫秒发送一次心跳续约请求到NacosServer
- BeatTask :是一个Runnable线程,run方法中会调用 BeatReactor.this.serverProxy.sendBeat 发送心跳请求。
BeatTask作为心跳续约的线程对象,他的run方法中 通过 BeatReactor.this.serverProxy.sendBeat发送心跳,如果发现服务未注册会通过 BeatReactor.this.serverProxy.registerService 注册服务。
下面是 com.alibaba.nacos.client.naming.net.NamingProxy#sendBeat 发送心跳的方法
publicJSONObjectsendBeat(BeatInfo beatInfo,boolean lightBeatEnabled)throwsNacosException{if(LogUtils.NAMING_LOGGER.isDebugEnabled()){LogUtils.NAMING_LOGGER.debug("[BEAT] {} sending beat to server: {}",this.namespaceId, beatInfo.toString());}Map<String,String> params =newHashMap(8);String body ="";if(!lightBeatEnabled){try{
                body ="beat="+URLEncoder.encode(JSON.toJSONString(beatInfo),"UTF-8");}catch(UnsupportedEncodingException var6){thrownewNacosException(500,"encode beatInfo error", var6);}}

        params.put("namespaceId",this.namespaceId);
        params.put("serviceName", beatInfo.getServiceName());
        params.put("clusterName", beatInfo.getCluster());
        params.put("ip", beatInfo.getIp());
        params.put("port",String.valueOf(beatInfo.getPort()));String result =this.reqAPI(UtilAndComs.NACOS_URL_BASE+"/instance/beat", params, body,"PUT");returnJSON.parseObject(result);}
这里也是会拼接好心跳的地址 :127.0.0.1:8848/nacos/v1/ns/instance/beat ,参数包括namespaceId命名空间ID;serviceName 服务名;clusterName 集群名;ip 服务的IP;port 端口。然后发送一个PUT请求。底层依然是从多个NacosServer随机选择一个发起心跳请求。底层交给httpClient去执行
心跳续约服务端
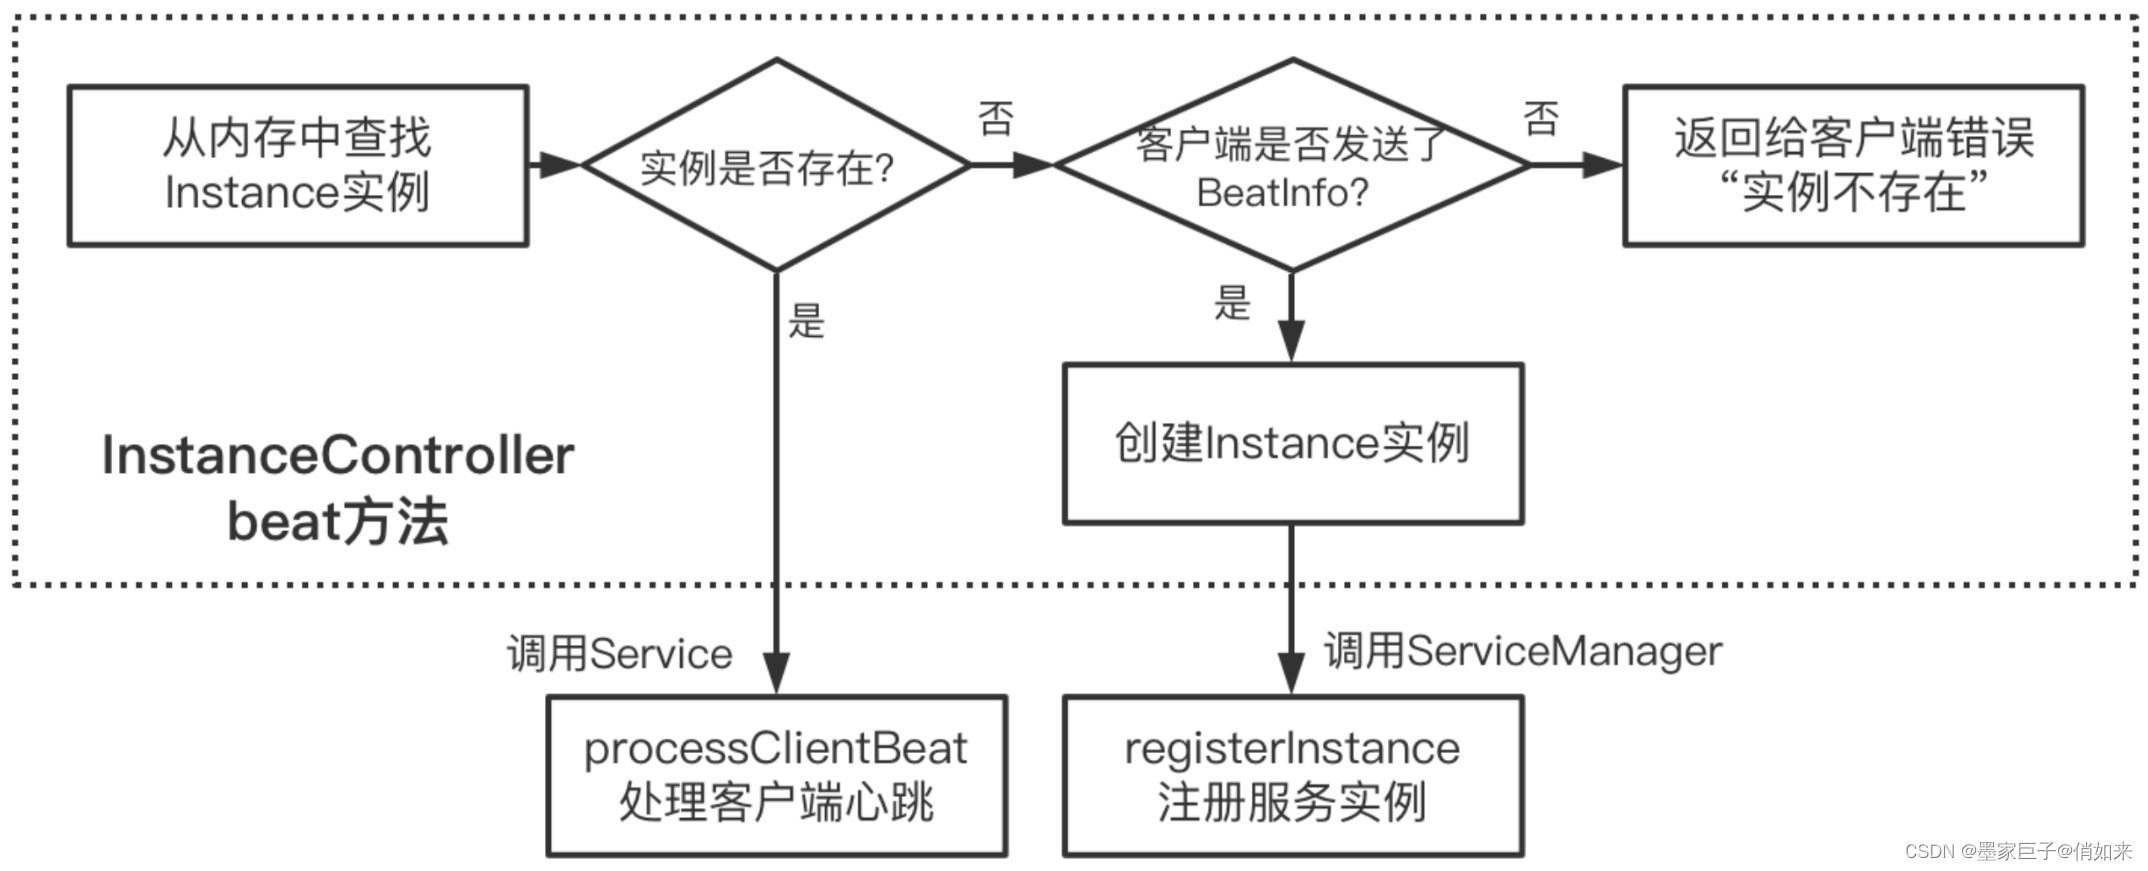
服务端还是在InstanceController中,其中提供了一个beat方法,我们出了要考虑他是如何处理心跳请求外,还要考虑他是如何做心跳过期检查的。源码如下
/**
     * Create a beat for instance.
     * 心跳检测
     * @param request http request
     * @return detail information of instance
     * @throws Exception any error during handle
     */@CanDistro@PutMapping("/beat")@Secured(parser =NamingResourceParser.class, action =ActionTypes.WRITE)publicObjectNodebeat(HttpServletRequest request)throwsException{//客户端心跳频率 5s/次ObjectNode result =JacksonUtils.createEmptyJsonNode();
        result.put(SwitchEntry.CLIENT_BEAT_INTERVAL, switchDomain.getClientBeatInterval());//拿到请求中的beat数据,转成clientBeat对象String beat =WebUtils.optional(request,"beat",StringUtils.EMPTY);RsInfo clientBeat =null;if(StringUtils.isNotBlank(beat)){
            clientBeat =JacksonUtils.toObj(beat,RsInfo.class);}//集群名String clusterName =WebUtils.optional(request,CommonParams.CLUSTER_NAME,UtilsAndCommons.DEFAULT_CLUSTER_NAME);//拿到客户端IP,端口String ip =WebUtils.optional(request,"ip",StringUtils.EMPTY);int port =Integer.parseInt(WebUtils.optional(request,"port","0"));if(clientBeat !=null){if(StringUtils.isNotBlank(clientBeat.getCluster())){
                clusterName = clientBeat.getCluster();}else{// fix #2533
                clientBeat.setCluster(clusterName);}
            ip = clientBeat.getIp();
            port = clientBeat.getPort();}//拿到命名空间ID和服务名String namespaceId =WebUtils.optional(request,CommonParams.NAMESPACE_ID,Constants.DEFAULT_NAMESPACE_ID);String serviceName =WebUtils.required(request,CommonParams.SERVICE_NAME);//检查服务名NamingUtils.checkServiceNameFormat(serviceName);Loggers.SRV_LOG.debug("[CLIENT-BEAT] full arguments: beat: {}, serviceName: {}", clientBeat, serviceName);//拿到服务表中的服务实例Instance instance = serviceManager.getInstance(namespaceId, serviceName, clusterName, ip, port);// 如果获取失败,说明心跳失败,实例尚未注册if(instance ==null){if(clientBeat ==null){//如果客户端心跳出现为空(请求参数中没beat),返回资源没找到
                result.put(CommonParams.CODE,NamingResponseCode.RESOURCE_NOT_FOUND);return result;}Loggers.SRV_LOG.warn("[CLIENT-BEAT] The instance has been removed for health mechanism, "+"perform data compensation operations, beat: {}, serviceName: {}", clientBeat, serviceName);//创建一个实例
            instance =newInstance();
            instance.setPort(clientBeat.getPort());
            instance.setIp(clientBeat.getIp());
            instance.setWeight(clientBeat.getWeight());
            instance.setMetadata(clientBeat.getMetadata());
            instance.setClusterName(clusterName);
            instance.setServiceName(serviceName);
            instance.setInstanceId(instance.getInstanceId());
            instance.setEphemeral(clientBeat.isEphemeral());//注册实例
            serviceManager.registerInstance(namespaceId, serviceName, instance);}//获取服务Service service = serviceManager.getService(namespaceId, serviceName);if(service ==null){//服务为空thrownewNacosException(NacosException.SERVER_ERROR,"service not found: "+ serviceName +"@"+ namespaceId);}if(clientBeat ==null){
            clientBeat =newRsInfo();
            clientBeat.setIp(ip);
            clientBeat.setPort(port);
            clientBeat.setCluster(clusterName);}//处理心跳请求
        service.processClientBeat(clientBeat);

        result.put(CommonParams.CODE,NamingResponseCode.OK);if(instance.containsMetadata(PreservedMetadataKeys.HEART_BEAT_INTERVAL)){
            result.put(SwitchEntry.CLIENT_BEAT_INTERVAL, instance.getInstanceHeartBeatInterval());}
        result.put(SwitchEntry.LIGHT_BEAT_ENABLED, switchDomain.isLightBeatEnabled());return result;}
方法大致逻辑如下
- 拿到心跳请求参数,beat,其中包括客户端服务的IP,端口,服务名,命名空间等
- 通过serviceManager 从服务端服务注册表中拿到当前心跳请求的服务实例
- 如果实例为空会创建新的instance,通过serviceManager注册实例
- 然后拿到当前服务的service对象,调用 service.processClientBeat 方法处理心跳
- 最后返回OK
下面是 service#processClientBeat方法源码
publicvoidprocessClientBeat(finalRsInfo rsInfo){//心跳处理器,runnable对象ClientBeatProcessor clientBeatProcessor =newClientBeatProcessor();
        clientBeatProcessor.setService(this);
        clientBeatProcessor.setRsInfo(rsInfo);//这里HealthCheckReactor.scheduleNow(clientBeatProcessor);// 开启一个没有延迟的任务,可以理解为这里就是开启了一个异步线程处理心跳续约逻辑HealthCheckReactor.scheduleNow(clientBeatProcessor);}/**    没有延迟的任务
     * Schedule client beat check task without a delay.
     *
     * @param task health check task
     * @return scheduled future
     */publicstaticScheduledFuture<?>scheduleNow(Runnable task){returnGlobalExecutor.scheduleNamingHealth(task,0,TimeUnit.MILLISECONDS);}
看得出来,心跳是通过 ClientBeatProcessor去处理的。通过定时任务去执行。ClientBeatProcessor是一个线程对象
publicclassClientBeatProcessorimplementsRunnable{publicstaticfinallongCLIENT_BEAT_TIMEOUT=TimeUnit.SECONDS.toMillis(15);privateRsInfo rsInfo;privateService service;@JsonIgnorepublicPushServicegetPushService(){returnApplicationUtils.getBean(PushService.class);}publicRsInfogetRsInfo(){return rsInfo;}publicvoidsetRsInfo(RsInfo rsInfo){this.rsInfo = rsInfo;}publicServicegetService(){return service;}publicvoidsetService(Service service){this.service = service;}@Overridepublicvoidrun(){//拿到续约的服务Service service =this.service;if(Loggers.EVT_LOG.isDebugEnabled()){Loggers.EVT_LOG.debug("[CLIENT-BEAT] processing beat: {}", rsInfo.toString());}//拿到ip,端口,集群名等String ip = rsInfo.getIp();String clusterName = rsInfo.getCluster();int port = rsInfo.getPort();//拿到服务中的cLuster对象Cluster cluster = service.getClusterMap().get(clusterName);//拿到所有实例List<Instance> instances = cluster.allIPs(true);for(Instance instance : instances){//找到当前发送心跳的instance,通过IP和端口对比if(instance.getIp().equals(ip)&& instance.getPort()== port){if(Loggers.EVT_LOG.isDebugEnabled()){Loggers.EVT_LOG.debug("[CLIENT-BEAT] refresh beat: {}", rsInfo.toString());}//设置心跳最后发送时间【重要】
                instance.setLastBeat(System.currentTimeMillis());if(!instance.isMarked()&&!instance.isHealthy()){//设置健康状态为true
                    instance.setHealthy(true);Loggers.EVT_LOG.info("service: {} {POS} {IP-ENABLED} valid: {}:{}@{}, region: {}, msg: client beat ok",
                                    cluster.getService().getName(), ip, port, cluster.getName(),UtilsAndCommons.LOCALHOST_SITE);//发布一个改变事件:ServiceChangeEvent//PushService发布ServiceChangeEvent事件,使用udpPush推送给所有的客户端getPushService().serviceChanged(service);}}}}}
方法中会从服务注册表中取出心跳续约对应的服务,然后设置最后心跳时间和健康状态。
- instance.setLastBeat(System.currentTimeMillis()); :就是把最后续约时间修改为当前系统时间
- instance.setHealthy(true);:把健康状态设置为tue
心跳超时检测
Nacos中的实例分为临时实例和永久实例,临时实例会在心跳续约超时后被注册中心剔除,则不会。对于非临时实例(ephemeral=false),Nacos会采用主动的健康检测,定时向实例发送请求,根据响应来判断实例健康状态。
上面只是心跳续约的处理流程,心跳过期检测入口在servieManager#registerInstance 注册服务方法中,会调用servieManager#putServiceAndInit(service)方法对service进行初始化,在该方法中调用Service#init方法来开启心跳检查,
该方法是在服务注册成功之后就会被调用
。
// servieManager#putServiceAndInit 服务初始化privatevoidputServiceAndInit(Service service)throwsNacosException{putService(service);
        service =getService(service.getNamespaceId(), service.getName());//服务初始化,心跳检查入口
        service.init();
        consistencyService
                .listen(KeyBuilder.buildInstanceListKey(service.getNamespaceId(), service.getName(),true), service);
        consistencyService
                .listen(KeyBuilder.buildInstanceListKey(service.getNamespaceId(), service.getName(),false), service);Loggers.SRV_LOG.info("[NEW-SERVICE] {}", service.toJson());}
下面是service#init()方法
@JsonInclude(Include.NON_NULL)publicclassServiceextendscom.alibaba.nacos.api.naming.pojo.ServiceimplementsRecord,RecordListener<Instances>{publicvoidinit(){//心跳检查。对临时服务的初始化    HealthCheckReactor.scheduleCheck(clientBeatCheckTask);//遍历注册表,初始化集群for(Map.Entry<String,Cluster> entry : clusterMap.entrySet()){
            entry.getValue().setService(this);//对永久实例初始化,调用Cluster.init()
            entry.getValue().init();}}//定时心跳超时检查 5s一次publicstaticvoidscheduleCheck(ClientBeatCheckTask task){
        futureMap.computeIfAbsent(task.taskKey(),
                k ->GlobalExecutor.scheduleNamingHealth(task,5000,5000,TimeUnit.MILLISECONDS));}
临时服务,心跳检查通过定时任务5s一次,通过 ClientBeatCheckTask 线程对象来完成,
//客户端心跳检查publicclassClientBeatCheckTaskimplementsRunnable{@Overridepublicvoidrun(){try{if(!getDistroMapper().responsible(service.getName())){return;}if(!getSwitchDomain().isHealthCheckEnabled()){return;}//拿到注册表中的所有实例List<Instance> instances = service.allIPs(true);// first set health status of instances:for(Instance instance : instances){//判断心跳是否超时:系统时间 - 最后心跳时间 > 超时时间if(System.currentTimeMillis()- instance.getLastBeat()> instance.getInstanceHeartBeatTimeOut()){if(!instance.isMarked()){//如果是健康的,设置为不健康if(instance.isHealthy()){
                            instance.setHealthy(false);Loggers.EVT_LOG.info("{POS} {IP-DISABLED} valid: {}:{}@{}@{}, region: {}, msg: client timeout after {}, last beat: {}",
                                            instance.getIp(), instance.getPort(), instance.getClusterName(),
                                            service.getName(),UtilsAndCommons.LOCALHOST_SITE,
                                            instance.getInstanceHeartBeatTimeOut(), instance.getLastBeat());//抛出服务改变时间getPushService().serviceChanged(service);//抛出服务超时事件ApplicationUtils.publishEvent(newInstanceHeartbeatTimeoutEvent(this, instance));}}}}if(!getGlobalConfig().isExpireInstance()){return;}//移除过时的实例// then remove obsolete instances:for(Instance instance : instances){//是否超时的标记if(instance.isMarked()){continue;}//超时时间大于30s就要把服务剔除if(System.currentTimeMillis()- instance.getLastBeat()> instance.getIpDeleteTimeout()){// delete instanceLoggers.SRV_LOG.info("[AUTO-DELETE-IP] service: {}, ip: {}", service.getName(),JacksonUtils.toJson(instance));//剔除服务deleteIp(instance);}}}catch(Exception e){Loggers.SRV_LOG.warn("Exception while processing client beat time out.", e);}}
方法做如下几个事情
- 拿到注册表中所有的服务实例
- 使用算法: 系统时间 - 最后心跳时间 > 超时时间 。来判断是否心跳超时,心跳超时默认是15s
- 超时的实例会设置健康状态为false,然后抛出服务改变事件ServiceChangeEvent和抛出心跳超时事件InstanceHeartbeatTimeoutEvent.也就是说你通过nacos的控制台看到服务的健康状态是false
- 最后还会判断如果超时时间超过 30s ,会删除当前服务
对于serviceChanged 服务改变事件的话是通过:PushService#serviceChanged来发布的,他会采用 udpPush 协议push给所有的客户端,当前服务状态。
永久实例的检查
下面是 com.alibaba.nacos.naming.core.Cluster#init 方法源码
publicsynchronizedvoidinit(){if(inited){return;}
        checkTask =newHealthCheckTask(this);//开启对 永久实例的 定时健康检测HealthCheckReactor.scheduleCheck(checkTask);
        inited =true;}publicstaticScheduledFuture<?>scheduleCheck(HealthCheckTask task){
        task.setStartTime(System.currentTimeMillis());//开启定时任务心跳检查returnGlobalExecutor.scheduleNamingHealth(task, task.getCheckRtNormalized(),TimeUnit.MILLISECONDS);}
这里通过HealthCheckTask来处理永久实例的健康检查,通过定时任务定时检查。下面是 HealthCheckTask源码
//这里在计算定时任务的时间频率privatevoidinitCheckRT(){// first check time delay 计算主动检测的时间频率//周期为2000 + 5000毫秒内的随机数
        checkRtNormalized =2000+RandomUtils.nextInt(0,RandomUtils.nextInt(0, switchDomain.getTcpHealthParams().getMax()));
        checkRtBest =Long.MAX_VALUE;
        checkRtWorst =0L;}@Overridepublicvoidrun(){try{if(distroMapper.responsible(cluster.getService().getName())&& switchDomain
                    .isHealthCheckEnabled(cluster.getService().getName())){//执行检查逻辑,使用的是 TcpSuperSenseProcessor 处理,基于TCP模式
                healthCheckProcessor.process(this);if(Loggers.EVT_LOG.isDebugEnabled()){Loggers.EVT_LOG.debug("[HEALTH-CHECK] schedule health check task: {}", cluster.getService().getName());}}}catch(Throwable e){Loggers.SRV_LOG.error("[HEALTH-CHECK] error while process health check for {}:{}", cluster.getService().getName(),
                            cluster.getName(), e);}finally{...}}
代码 healthCheckProcessor.process(this); 是处理心跳检查,使用的是实现类 TcpSuperSenseProcessor ,他是一个Runnable,源码如下
@Overridepublicvoidprocess(HealthCheckTask task){//拿到集群中的所有实例,非临时ephemeral=false的实例List<Instance> ips = task.getCluster().allIPs(false);if(CollectionUtils.isEmpty(ips)){return;}for(Instance ip : ips){...Beat beat =newBeat(ip, task);//添加到队列LinkedBlockingQueue,可以看到,所有的健康检测任务都被放入一个阻塞队列
           taskQueue.add(beat);MetricsMonitor.getTcpHealthCheckMonitor().incrementAndGet();}}//处理任务privatevoidprocessTask()throwsException{Collection<Callable<Void>> tasks =newLinkedList<>();do{Beat beat = taskQueue.poll(CONNECT_TIMEOUT_MS/2,TimeUnit.MILLISECONDS);if(beat ==null){return;}//把任务封装到TaskProcessor
            tasks.add(newTaskProcessor(beat));}while(taskQueue.size()>0&& tasks.size()<NIO_THREAD_COUNT*64);//执行所有任务,批量执行for(Future<?> f :GlobalExecutor.invokeAllTcpSuperSenseTask(tasks)){
            f.get();}}@Overridepublicvoidrun(){//循环,不停的从队列中拿到beat心跳任务去执行while(true){try{//执行任务processTask();int readyCount = selector.selectNow();if(readyCount <=0){continue;}Iterator<SelectionKey> iter = selector.selectedKeys().iterator();while(iter.hasNext()){SelectionKey key = iter.next();
                    iter.remove();GlobalExecutor.executeTcpSuperSense(newPostProcessor(key));}}catch(Throwable e){SRV_LOG.error("[HEALTH-CHECK] error while processing NIO task", e);}}}
看到这里我们大概明白,healthCheckProcessor通过TCP来向客户端发送心跳检查,底层通过队列LinkedBlockingQueue来存储心跳任务Beat 。 然后TcpSuperSenseProcessor 本身是一个Runnable,通过定时从队列中取出Beat任务,并封装陈 TaskProcessor批量执行。下面是 TaskProcessor源码
privateclassTaskProcessorimplementsCallable<Void>{privatestaticfinalintMAX_WAIT_TIME_MILLISECONDS=500;Beat beat;publicTaskProcessor(Beat beat){this.beat = beat;}@OverridepublicVoidcall(){long waited =System.currentTimeMillis()- beat.getStartTime();if(waited >MAX_WAIT_TIME_MILLISECONDS){Loggers.SRV_LOG.warn("beat task waited too long: "+ waited +"ms");}SocketChannel channel =null;try{Instance instance = beat.getIp();BeatKey beatKey = keyMap.get(beat.toString());if(beatKey !=null&& beatKey.key.isValid()){if(System.currentTimeMillis()- beatKey.birthTime <TCP_KEEP_ALIVE_MILLIS){
                        instance.setBeingChecked(false);returnnull;}

                    beatKey.key.cancel();
                    beatKey.key.channel().close();}

                channel =SocketChannel.open();
                channel.configureBlocking(false);// only by setting this can we make the socket close event asynchronous
                channel.socket().setSoLinger(false,-1);
                channel.socket().setReuseAddress(true);
                channel.socket().setKeepAlive(true);
                channel.socket().setTcpNoDelay(true);Cluster cluster = beat.getTask().getCluster();int port = cluster.isUseIPPort4Check()? instance.getPort(): cluster.getDefCkport();
                channel.connect(newInetSocketAddress(instance.getIp(), port));SelectionKey key = channel.register(selector,SelectionKey.OP_CONNECT|SelectionKey.OP_READ);
                key.attach(beat);
                keyMap.put(beat.toString(),newBeatKey(key));

                beat.setStartTime(System.currentTimeMillis());GlobalExecutor.scheduleTcpSuperSenseTask(newTimeOutTask(key),CONNECT_TIMEOUT_MS,TimeUnit.MILLISECONDS);}catch(Exception e){
                beat.finishCheck(false,false, switchDomain.getTcpHealthParams().getMax(),"tcp:error:"+ e.getMessage());if(channel !=null){try{
                        channel.close();}catch(Exception ignore){}}}returnnull;}}
看得出来他是一个 Callable,通过 NIO去发送TCP请求。这里做个小总结
Nacos的健康检测分为临时实例和永久实例两种:
- 对于临时实例:客户端5秒发送一次心跳,超过15秒则标记为不健康,超时30秒则从服务列表删除
- 对于永久实例:服务端主动健康检测,周期为2000 + 5000毫秒内的随机数,检测超时只会标记为不健康,不会删除
好了文章到此结束,用一个图来总结一下服务注册和心跳
如果文章对你有所帮助,请给个好评把,你的肯定是我最大的动力
版权归原作者 墨家巨子@俏如来 所有, 如有侵权,请联系我们删除。