
前言
在前一篇使用C#发送邮箱验证码已经完成使用.net core web api写了完成往登录邮箱发送验证码的接口。现在就用前端调用接口模拟登录功能。
接口
publicclassApiResp{publicbool Success {get;set;}publicint Code {get;set;}publicint count {get;set;}publicstring msg {get;set;}publicobject Data {get;set;}}
usingMicrosoft.AspNetCore.Http;usingMicrosoft.AspNetCore.Mvc;usingModel;usingSystem.IO;namespaceTestSystem.Controllers{[Route("api/[controller]/[action]")][ApiController]publicclassUserController:ControllerBase{[HttpPost]publicApiRespemail(string username,string email){var resp =newApiResp();if(username =="admin")//模拟数据库读取 UserName是唯一属性{EmaliSend e =newEmaliSend();string str = e.emailsendone(email);
                resp.Data = str;
                resp.Success =true;return resp;}
            resp.Success =false;return resp;}}}
前端
前端使用是layui样式+Vue写的功能。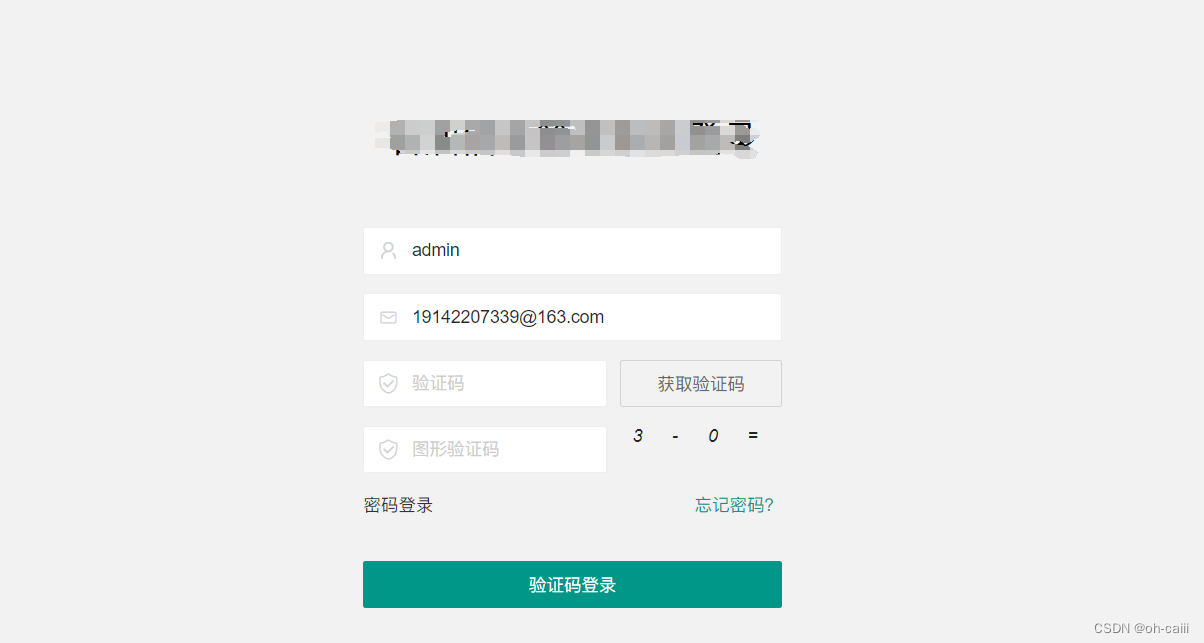
引入Vue
记得把
<div id = "app"></div>
把前端样式包含
<scriptsrc="https://cdn.jsdelivr.net/npm/vue/dist/vue.js"></script>
<divclass="layui-form-item"v-if="vercodeVisible"><divclass="layui-form-item"><labelclass="layadmin-user-login-icon layui-icon layui-icon-email"for="LAY-user-login-email"></label><inputtype="text"name="email"v-model="email"placeholder="请输入邮箱"autocomplete="off"class="layui-input"></div><divclass="layui-row"><divclass="layui-col-xs7"><labelclass="layadmin-user-login-icon layui-icon layui-icon-vercode"for="LAY-user-login-vercode"></label><inputtype="text"name="vercode"id="LAY-user-login-vercode"lay-verify="required"v-model="emalistr"placeholder="验证码"class="layui-input"></div><divclass="layui-col-xs5"><divstyle="margin-left: 10px;"><buttontype="button"class="layui-btn layui-btn-primary layui-btn-fluid"@click="EmailSend"id="emailButton">获取验证码</button></div></div></div></div><divclass="layui-form-item"><buttonclass="layui-btn layui-btn-fluid"v-if="vercodeVisible"lay-submitlay-filter="LAY-user-login-submit"@click="loginEmail">验证码登录
                            </button></div>
Vue写调用发送邮箱api
<script>// 提前引入layui并初始化layer模块
            layui.use('layer',function(){var layer = layui.layer;newVue({el:'#app',data:{username:'admin',email:'[email protected]',//邮箱emalistr:'',//邮箱验证码remalistr:'',//缓存邮箱验证码},mounted(){},methods:{EmailSend(){const button = document.getElementById('emailButton');// 获取按钮元素const originalText = button.innerText;// 原始按钮文本const username =this.username;const email =this.email;// 邮箱格式验证正则表达式const emailRegex =/^[^\s@]+@[^\s@]+\.[^\s@]+$/;if(!emailRegex.test(email)){
                                layer.msg('请输入正确的邮箱地址',{time:1000,icon:5,shade:[0.5,'#000'],shadeClose:true});return;// 邮箱格式不正确,停止执行发送邮件操作}const headers =newHeaders();
                            headers.append('Content-Type','application/json');const body =JSON.stringify({
                                username,
                                email
                            });

                            button.disabled =true;// 禁用按钮let countDown =60;// 倒计时时间const timer =setInterval(()=>{if(countDown >=1){
                                    button.innerText =`${countDown}秒后可重发`;// 更新按钮文本
                                    countDown--;}else{clearInterval(timer);
                                    button.innerText = originalText;// 还原按钮文本
                                    button.disabled =false;// 启用按钮}},1000);fetch('https://localhost:44301/api/Login/EmaliSendLogin',{method:'POST',headers: headers,body: body
                                }).then(response=> response.json()).then(data=>{if(data.success){
                                        layer.msg('发送成功',{time:500,icon:6,shade:[0.5,'#000'],shadeClose:true,end:function(){
                                                console.log("验证码"+ data.data);
                                                localStorage.setItem('remalistr', data.data);}});}else{
                                        layer.msg('发送失败',{time:1000,icon:5,shade:[0.5,'#000'],shadeClose:true});}}).catch(error=>{
                                  console.log(error);
                                  layer.msg('发送失败,请检查网络连接',{time:1000,icon:5,shade:[0.5,'#000'],shadeClose:true});});},loginEmail(){const username =this.username;const email =this.email;const emalistr =this.emalistr;const remalistr = localStorage.getItem('remalistr');const vercode =this.vercode;const operator =this.operator;const headers =newHeaders();
                            headers.append('Content-Type','application/json');const body =JSON.stringify({
                                username,
                                email,});fetch('https://localhost:44301/api/Login/LoginEmail',{method:'POST',headers: headers,body: body
                                }).then(response=> response.json()).then(data=>{if(data.success && localStorage.getItem('remalistr')===this.emalistr &&this.vercode ==this.rvercode){
                                        layer.msg('登录成功',{time:1000,icon:6,shade:[0.5,'#000'],shadeClose:true,end:function(){
                                                console.log(data.data);

                                                localStorage.setItem('data',JSON.stringify(data
                                                    .data));
                                                location.href ='../';}});}else{
                                        layer.msg('登录失败',{time:1000,icon:5,shade:[0.5,'#000'],shadeClose:true});}}).catch(error=>{
                                    console.log(error);});},}});});</script>
结果
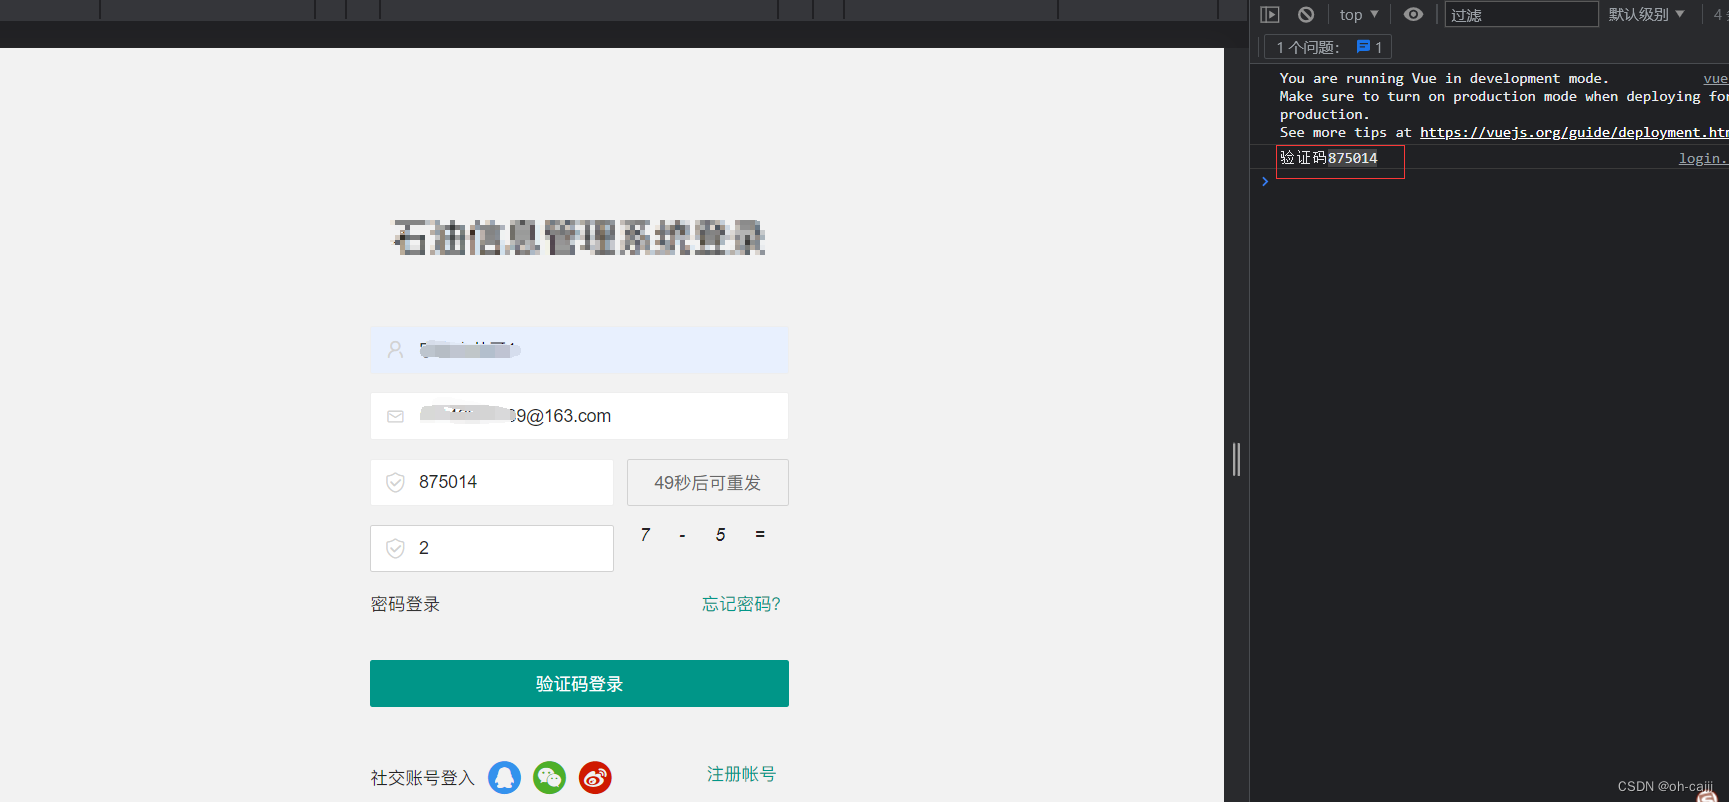
右侧那验证码是缓存中的验证码,一般是看不见的。
主要逻辑
前端调用后端发送验证码的方法,传入username和邮箱。username是唯一,在数据库不可重复。
后端返回JSON格式给前端,前端解析返回的验证码以及其他用户信息可以进行验证码的读取,然后用户收到邮箱发来的验证码可以进行登录,进行用户输入的验证码和浏览器缓存的验证码进行比对然后登录成功。
还可以添加进行验证码的过期策略以及添加多种验证登录。
标签:
前端
本文转载自: https://blog.csdn.net/m0_67528197/article/details/135372487
版权归原作者 oh-caiii 所有, 如有侵权,请联系我们删除。
版权归原作者 oh-caiii 所有, 如有侵权,请联系我们删除。