
一、基本应用
虚拟环境下安装(虚拟环境参考:Python版本控制和虚拟环境_我辈李想的博客-CSDN博客)
1.安装
pip install django-ckeditor
2.配置ckeditor
在项目的settings.py文件的INSTALLED_APPS中加上ckeditor
INSTALLED_APPS = [
    'django.contrib.admin',
    'django.contrib.auth',
    'django.contrib.contenttypes',
    'django.contrib.sessions',
    'django.contrib.messages',
    'django.contrib.staticfiles',

    'ckeditor',#这个
]
在项目的settings.py文件的最下边加上ckeditor配置内容(使用界面上的功能)
#使用ck的工具栏并修改,宽度自适应
CKEDITOR_CONFIGS = {
    # django-ckeditor默认使用default配置
    'default': {
        # 编辑器宽度自适应
        'width':'auto',
        'height':'300px',
        # tab键转换空格数
        'tabSpaces': 4,
        # 工具栏风格
        'toolbar': 'Custom',
        # 工具栏按钮
        'toolbar_Custom': [
            # 预览、表情
            ['Preview','Smiley'],
            # 字体风格
            ['Bold', 'Italic', 'Underline', 'RemoveFormat', 'Blockquote'],
            # 字体颜色
            ['TextColor', 'BGColor'],
            #格式、字体、大小
            ['Format','Font','FontSize'],
            # 链接
            ['Link', 'Unlink'],
            # 列表
            ['Image', 'NumberedList', 'BulletedList'],
            #居左,居中,居右
            ['JustifyLeft','JustifyCenter','JustifyRight','JustifyBlock'],
            # 最大化
            ['Maximize']
        ],
        # 加入代码块插件
        'extraPlugins': ','.join(['codesnippet','image2','filebrowser','widget', 'lineutils']),
    },
    #评论
    'comment': {
        # 编辑器宽度自适应
        'width': 'auto',
        'height': '140px',
        # tab键转换空格数
        'tabSpaces': 4,
        # 工具栏风格
        'toolbar': 'Custom',
        # 工具栏按钮
        'toolbar_Custom': [
            # 表情 代码块
            ['Smiley', 'CodeSnippet'],
            # 字体风格
            ['Bold', 'Italic', 'Underline', 'RemoveFormat', 'Blockquote'],
            # 字体颜色
            ['TextColor', 'BGColor'],
            # 链接
            ['Link', 'Unlink'],
            # 列表
            ['NumberedList', 'BulletedList'],
        ],
        # 加入代码块插件
        'extraPlugins': ','.join(['codesnippet']),
    }
}
3.models字段使用,引用步骤2中的ckeditor配置
from ckeditor.fields import RichTextField

class QAmodel(models.Model):
    content = RichTextField(verbose_name='正文内容',config_name='default')#config_name指定ckeditor配置文件,不指定就使用default
4.forms字段使用
from django import forms
from ckeditor.fields import RichTextFormField

from .models import QAmodel

class Add_questionsForm(forms.ModelForm):

    content = RichTextFormField(label='内容',config_name='default')

    class Meta:
        model = QAmodel
        fields = ['content',]
5.admin后台使用
我这里后台是xadmin
import xadmin
from .models import QAmodel,Tags_QA

class QAmodeladmin(object):

    list_display = ['start_time','content','conclusion','delete_state']

xadmin.site.register(QAmodel,QAmodeladmin)
二、前端应用
1.基本使用中的全部执行完后可以设置前端页面了(没有步骤5也可以)
一种的CKEDITOR_CONFIGS,需要深入了解下,里边有一些插件,看实际情况。
2.urls路由
from django.urls import path,include
from .views import Add_questions,

urlpatterns = [
    path('', home,name='home'),
    #添加问题
    path('add_questions/', Add_questions.as_view(), name='add_questions'),
]
3.views配置
from django.contrib.auth.decorators import login_required
from django.utils.decorators import method_decorator
from django.views.generic.base import View

from .forms import Add_questionsForm

class Add_questions(View):
    @method_decorator(login_required(login_url='/users/login'))
    def get(self,request):
        add_questionsForm = Add_questionsForm()
        content = {}
        content['add_questionsForm'] = add_questionsForm
        return render(request, 'qatemplates/add_questions.html',content)
4.html页面配置
                  <div class="form-group">
                    <label for="content">内容</label>
                      <div>
                        {{ add_questionsForm.media }}
                        {{ add_questionsForm.content }}
                      </div>
                  </div>
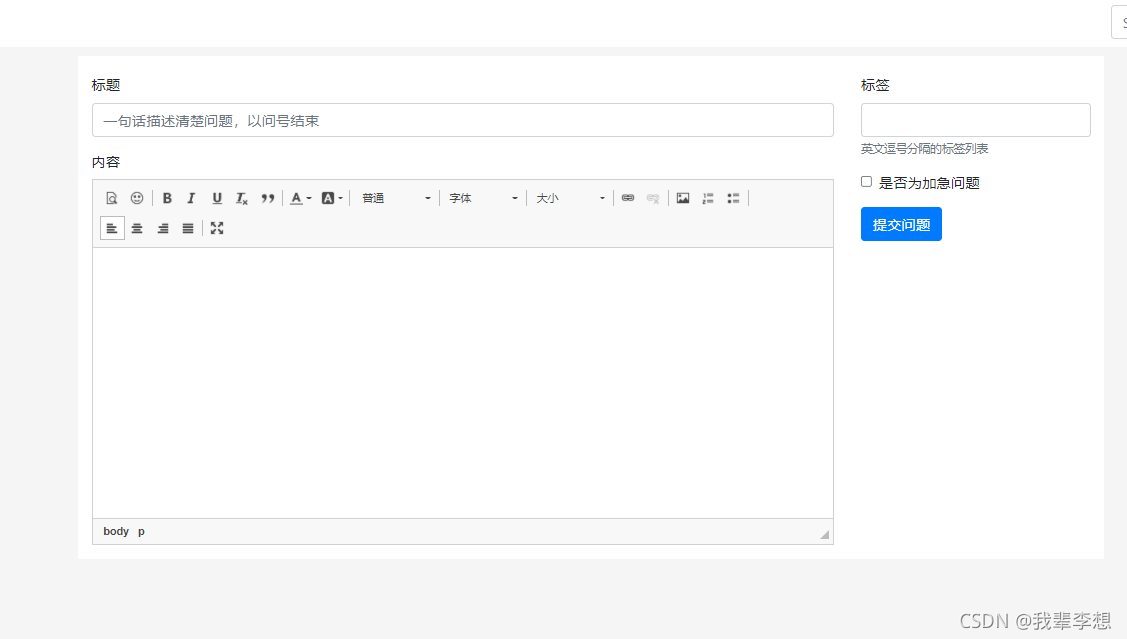
现在界面已经是下图的样子了
5.post后台处理数据
这里接刚才的views,上边是get,这里是post
from django.contrib.auth.decorators import login_required
from django.utils.decorators import method_decorator
from django.views.generic.base import View
from django.shortcuts import render,HttpResponse,HttpResponseRedirect

from .forms import Add_questionsForm

#提问页
class Add_questions(View):
    @method_decorator(login_required(login_url='/users/login'))
    def get(self,request):
        add_questionsForm = Add_questionsForm()
        content = {}
        content['add_questionsForm'] = add_questionsForm
        return render(request, 'qatemplates/add_questions.html',content)

    def post(self,request):
        add_questionsForm = Add_questionsForm(request.POST)
        if add_questionsForm.is_valid():
            add_question = add_questionsForm.save(commit=False)
            add_question.author = request.user
            add_question.save()

            # 新增代码,保存 tags 的多对多关系
            add_questionsForm.save_m2m()

            return HttpResponseRedirect(reverse("home"))#home是首页
                # redirect(request.GET.get('from',reversed('home')))

        content = {}
        content['add_questionsForm'] = add_questionsForm
        return render(request, 'qatemplates/add_questions.html',content)
三、带图片上传的编辑器
一和二中实现的是布袋图片上传的,在此基础上稍加修改就可以实现图片上传。
1.安装pillow(所有屠屏功能都需要这个库)
pip install pillow
2.添加配置ckeditor
在项目的settings.py文件的INSTALLED_APPS中加上ckeditor,ckeditor_uploader
INSTALLED_APPS = [
    'django.contrib.admin',
    'django.contrib.auth',
    'django.contrib.contenttypes',
    'django.contrib.sessions',
    'django.contrib.messages',
    'django.contrib.staticfiles',

    'ckeditor',#这个
    'ckeditor_uploader',#带图片上传的ckeditor
]
在项目的settings.py文件的最下边添加文件存储相关配置,最好在CKEDITOR_CONFIGS上边
MEDIA_URL = '/media/'  # 上传图片的路径
MEDIA_ROOT = os.path.join(BASE_DIR, '/media/')  # 上传图片的根路径
#CK
CKEDITOR_UPLOAD_PATH = "uploads/"#文件保存为止,因为上边配置了media, 图片将保存至media/uploads下
在项目的settings.py文件的CKEDITOR_CONFIGS,中配置图片上传的类型,我这里使用的是image2
3.urls文件配置
from django.urls import path,include,re_path
import xadmin
from django.views.static import serve
from .settings import MEDIA_ROOT

urlpatterns = [
    path('xadmin/', xadmin.site.urls),

    #上传media的文件可以被查看,这个很重要,更后边的一个bug有关
    re_path(r'^media/(?P<path>.*)$', serve, {"document_root": MEDIA_ROOT}),

    #ckckeditor图片上传
    path('ckeditor/', include('ckeditor_uploader.urls')),
]
4.修改modes
from ckeditor.fields import RichTextField
from ckeditor_uploader.fields import RichTextUploadingField

class QAmodel(models.Model):
    content = RichTextUploadingField(verbose_name='正文内容',config_name='default')#config_name指定ckeditor配置文件,不指定就使用default
5.修改forms
from django import forms
from ckeditor.fields import RichTextFormField
from ckeditor_uploader.fields import RichTextUploadingFormField

from .models import QAmodel

class Add_questionsForm(forms.ModelForm):

    content = RichTextUploadingFormField(label='内容')

    class Meta:
        model = QAmodel
        fields = ['content',]
到此,已经可以上传图片了


四、踩坑
1.Browse for the image you want, then click ‘Embed Image‘ to continue...
解决参考:Django+Cekeditor(排错)Browse for the image you want, then click ‘Embed Image‘ to continue..._我辈李想的博客-CSDN博客
2.ckeditor更换版本会出现的bug,TypeError: render() got an unexpected keyword argument 'renderer'
解决参考:Django报错:TypeError: render() got an unexpected keyword argument 'renderer'_冷子夜的博客-CSDN博客
3.前端图片里没有上传选项
解决:在forms中,将RichTextFormField替换成RichTextUploadingFormField。
from ckeditor.fields import RichTextField
from ckeditor_uploader.fields import RichTextUploadingField

class QAmodel(models.Model):
    content = RichTextUploadingField(verbose_name='正文内容',config_name='default')#config_name指定ckeditor配置文件,不指定就使用default
本文转载自: https://blog.csdn.net/qq_15028721/article/details/119985342
版权归原作者 我辈李想 所有, 如有侵权,请联系我们删除。
版权归原作者 我辈李想 所有, 如有侵权,请联系我们删除。