vue2写法
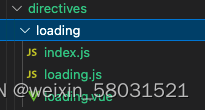
1. 目录结构:

2. 代码实现
/directives/loading/loading.vue loading效果页面(此处使用的antd下面的组件,可自定义)
<template>
    <div v-show="visible" class="loading-box">
      <a-spin tip="正在加载中,请耐心等待" />
    </div>
</template>

<script>
export default {
  data() {
    return {
      visible: false,
    };
  },
};
</script>
<style scoped lang="less">
.loading-box {
    width: 100%;
    height: 100%;
    display: flex;
    align-items: center;
    justify-content: center;
    background: rgb(0 0 0 / 20%);;

    position: absolute;
    top: 0;
    left: 0;
}
</style>
/directives/loading/loading.js(实现loading组件的插入及销毁)
import Vue from 'vue'
import Loading from './loading.vue'

const Mask = Vue.extend(Loading)

const toggleLoading = (el, binding) => {
    if (binding.value) {
        Vue.nextTick(() => {
            // 控制loading组件显示
            el.instance.visible = true
            // 插入到目标元素
            insertDom(el, el, binding)
        })
    } else {
        el.instance.visible = false
    }
}

const insertDom = (parent, el) => {
    // 给父元素加个定位,让loading元素定位
    el.style.position='relative';
    parent.appendChild(el.mask)
}

export default {
    bind: function (el, binding, vnode) {
        const mask = new Mask({
            el: document.createElement('div'),
            data() { }
        })
        el.instance = mask
        el.mask = mask.$el
        el.maskStyle = {}
        binding.value && toggleLoading(el, binding)
    },
    update: function (el, binding) {
        if (binding.oldValue !== binding.value) {
            toggleLoading(el, binding)
        }
    },
    unbind: function (el, binding) {
        el.style.position='';
        el.instance && el.instance.$destroy()
    }
}
/directives/loading/index.js(loading指令的注册)
import loading from './loading';
export default {
  install(Vue) {
    Vue.directive("loading", loading) // 全局loading
  }
}
3. 全局引入(main.js文件)
// 引入loading
import loading from './vue-tool/directives/loading'
Vue.use(loading);
4. 使用
<div v-loading="isLoading">我是loading父元素(isLoading为控制loading展示的自定义变量)</div>
vue3写法
1. 目录结构

2. 代码实现
/directives/loading/index.vue loading效果页面(此处使用的antd下面的组件,可自定义)
<template>
  <div class="loading-box">
    <a-spin tip="正在加载中,请耐心等待" />
  </div>
</template>

<script lang="ts" setup>
    import { } from 'vue';
</script>

<style scoped lang="less">
.loading-box {
    width: 100%;
    height: 100%;
    display: flex;
    align-items: center;
    justify-content: center;
    background: rgb(0 0 0 / 20%);

    position: absolute;
    top: 0;
    left: 0;
    :deep(.ant-spin-dot-item) {
      background-color: #FFF;
    }
    :deep(.ant-spin.ant-spin-show-text .ant-spin-text)  {
      color: #FFF;
    }
}
</style>
/directives/loading/index.ts(实现loading组件的插入及销毁)
import {createApp, Directive } from 'vue';
import Loading from './index.vue';

export const loading: Directive = {
    mounted(el,binding){
        const app = createApp(Loading);
        const instance = app.mount(document.createElement('div'));
        el.instance = instance;
        if (binding.value) {
            appendEl(el);
        }
    },
    updated(el,binding) {
        if (binding.value !== binding.oldValue) {
            binding.value ? appendEl(el) : removeEl(el);
        }
    },
};
// 插入元素
const appendEl = (el) =>{
    // 给父元素加个定位,让loading元素定位
    el.style.position='relative';
    el?.appendChild(el.instance.$el);
};
// 移除元素
const removeEl = (el) =>{
    el.style.position='';

    // 踩坑:el?.removeChild(el.instance.$el)->直接这样写会报错:Failed to execute 'removeChild' on 'Node': The node to be removed is not a child of this node.(要删除的节点不是此节点的子节点)
    // 解决:判断一下是否为此节点的子元素再移除(参考:https://www.freesion.com/article/2620879355/)
    let $el = el.instance.$el;
    if (el?.contains($el)) {
        el?.removeChild($el);
    }
};
/directives/index.ts
export * from './loading'
3. 全局引入(main.js文件)
// 循环注册指令
import * as directives from './tool/directives';
Object.keys(directives).forEach(key => {
  Vue.directive(key, (directives as { [key: string ]: Directive })[key]);
});
4. 使用 v-loading=“”
补充:a-spin为antd组件,显示不了的可以把a-spin部分替换为一个简单的loading效果组件,下面提供两种可直接使用的:
- 效果1

<template>
    <div class="ant-spin ant-spin-spinning">
        <span class="ant-spin-dot ant-spin-dot-spin">
            <i class="ant-spin-dot-item"></i>
            <i class="ant-spin-dot-item"></i>
            <i class="ant-spin-dot-item"></i>
            <i class="ant-spin-dot-item"></i>
        </span>
        <div class="ant-spin-text">正在加载中... ...</div>
    </div>
</template>

<style scoped>
.ant-spin {
    box-sizing: border-box;
    margin: 0;
    padding: 0;
    color: #000000d9;
    font-size: 14px;
    font-variant: tabular-nums;
    line-height: 1.5715;
    list-style: none;
    font-feature-settings: "tnum";
    position: absolute;
    display: none;
    color: #1890ff;
    text-align: center;
    vertical-align: middle;
    opacity: 0;
    transition: transform .3s cubic-bezier(.78,.14,.15,.86)
}
.ant-spin-spinning {
    position: static;
    display: inline-block;
    opacity: 1
}
.ant-spin-container {
    position: relative;
    transition: opacity .3s
}
.ant-spin-container:after {
    position: absolute;
    top: 0;
    right: 0;
    bottom: 0;
    left: 0;
    z-index: 10;
    display: none;
    width: 100%;
    height: 100%;
    background: #fff;
    opacity: 0;
    transition: all .3s;
    content: "";
    pointer-events: none
}
.ant-spin-blur {
    clear: both;
    opacity: .5;
    -webkit-user-select: none;
    -moz-user-select: none;
    user-select: none;
    pointer-events: none
}
.ant-spin-blur:after {
    opacity: .4;
    pointer-events: auto
}
.ant-spin-tip {
    color: #00000073
}
.ant-spin-dot {
    position: relative;
    display: inline-block;
    font-size: 20px;
    width: 1em;
    height: 1em
}
.ant-spin-dot-item {
    position: absolute;
    display: block;
    width: 9px;
    height: 9px;
    background-color: #1890ff;
    border-radius: 100%;
    transform: scale(.75);
    transform-origin: 50% 50%;
    opacity: .3;
    animation: antSpinMove 1s infinite linear alternate
}
.ant-spin-dot-item:nth-child(1) {
    top: 0;
    left: 0
}
.ant-spin-dot-item:nth-child(2) {
    top: 0;
    right: 0;
    animation-delay: .4s
}
.ant-spin-dot-item:nth-child(3) {
    right: 0;
    bottom: 0;
    animation-delay: .8s
}
.ant-spin-dot-item:nth-child(4) {
    bottom: 0;
    left: 0;
    animation-delay: 1.2s
}
.ant-spin-dot-spin {
    transform: rotate(45deg);
    animation: antRotate 1.2s infinite linear
}
.ant-spin-sm .ant-spin-dot {
    font-size: 14px
}
.ant-spin-sm .ant-spin-dot i {
    width: 6px;
    height: 6px
}
.ant-spin-lg .ant-spin-dot {
    font-size: 32px
}
.ant-spin-lg .ant-spin-dot i {
    width: 14px;
    height: 14px
}
.ant-spin.ant-spin-show-text .ant-spin-text {
    display: block
}
@media all and (-ms-high-contrast: none),(-ms-high-contrast: active) {
    .ant-spin-blur {
        background: #fff;
        opacity: .5
    }
}
.ant-spin-rtl {
    direction: rtl
}
.ant-spin-rtl .ant-spin-dot-spin {
    transform: rotate(-45deg);
    animation-name: antRotateRtl
}
@keyframes antSpinMove {
    to {
        opacity: 1
    }
}
@keyframes antRotate {
    to {
        transform: rotate(405deg)
    }
}
</style>
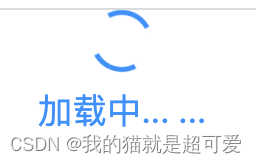
- 效果2

<template>
    <div class="loading">
        <div class="circle"></div>
        <span>加载中... ...</span>
    </div>
</template>

<style scoped>
.loading {
    color: #1890ff;
    font-size: 12px;

    display: flex;
    flex-direction: column;
    align-items: center;
}
.circle{
    width: 18px;
    height: 18px;
    border: 2px white solid;
    border-left-color: #1890ff;
    border-right-color:#1890ff;
    border-radius: 100%;
    animation: loading1 1s infinite linear;

    margin-bottom: 5px;
}
@keyframes loading1{
    from{transform: rotate(0deg)}to{transform: rotate(360deg)}
}
</style>
版权归原作者 我的猫就是超可爱 所有, 如有侵权,请联系我们删除。