
引言
在实际开发中,经常会定义一些公共的组件,提供给各个项目团队使用。而在SpringBoot项目中,一般会将这些公共组件封装成SpringBoot的starter。
如果想要自定义starter的话,就要先了解自动配置原理。
1 自动配置原理
1.1 什么是自动配置?
遵循约定大于配置的原则,在boot程序启动后,起步依赖中的一些bean对象会自动注入到ios容器中。
先引入一个例子:
假设现在有一个自己写的jar包,里面有两个类
Country
和
Province
,我们先将这个jar包导入项目,然后建一个
Config类
,然后在Config类里面配置属性,利用
@Bean
注册这个类,然后在启动类上用
@Import
导入config类,这样country和promise就注入到IOC容器里了。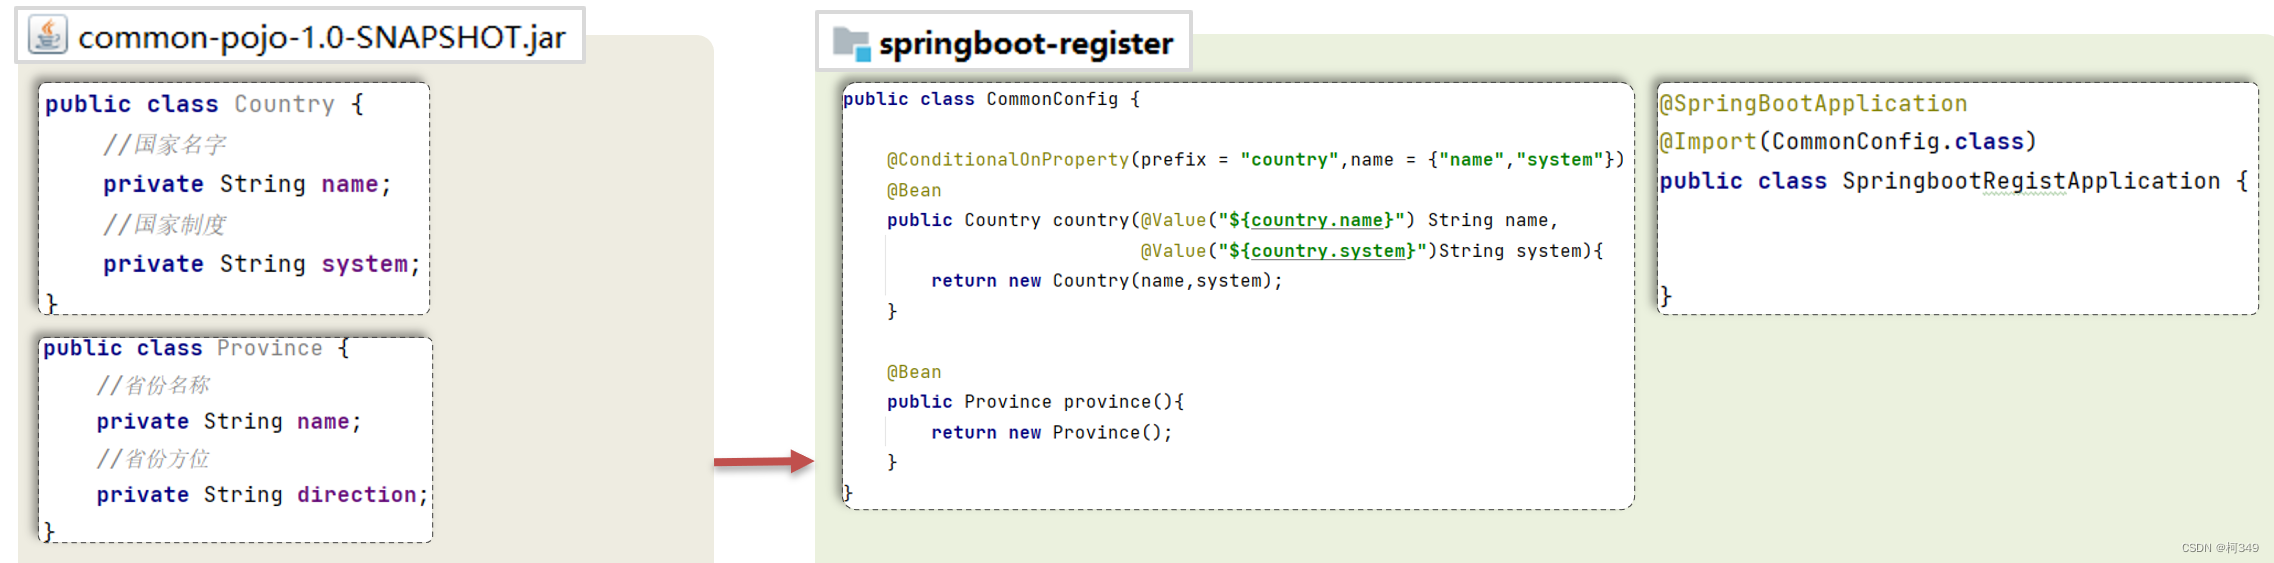
那么,这样算是自动配置吗?这么繁琐,显然不是。
我们先来通过翻看源码的方式来了解springboot的
自动配置
是怎么一回事。
程序引入spring-boot-starter-web起步依赖,启动后,会自动往ioc容器中注入
DispatcherServlet
,这里我们就来看看,它是如何自动装配的吧。
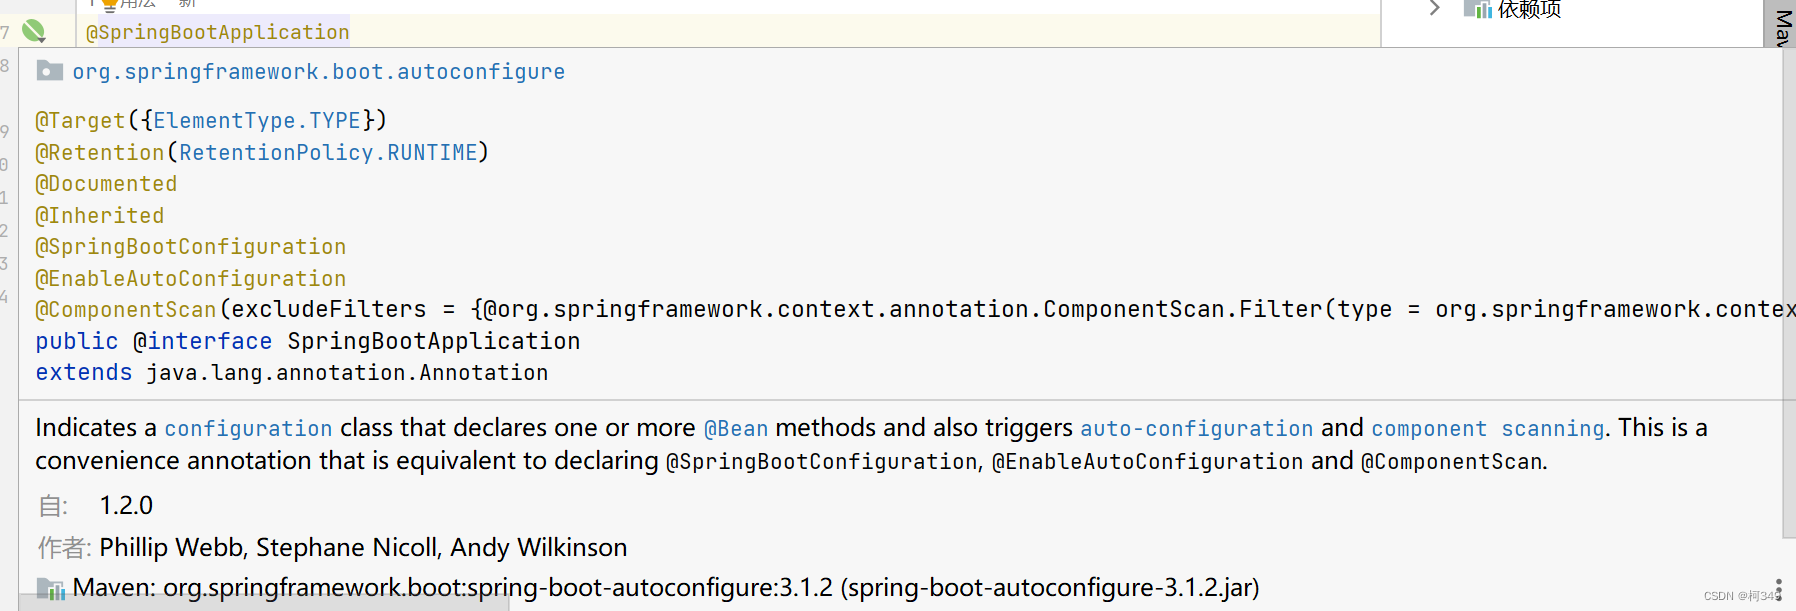
去看看
@SpringBootApplication
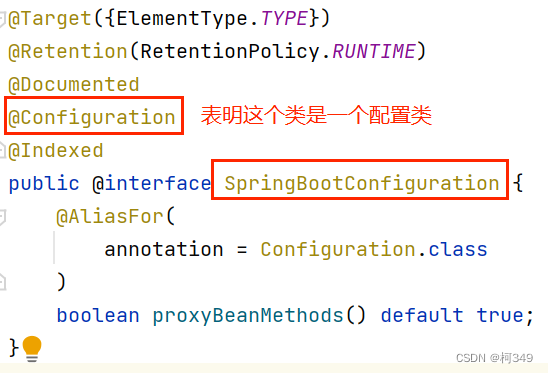
@Target(ElementType.TYPE),@Retention(RetentionPolicy.RUNTIME),@Documented,@Inherited: 这些都是注解的元信息,分别表示了该注解可以被应用于类、在运行时保留、生成 Javadoc 文档、并且可以被子类继承。@ComponentScan:用于指定 Spring 在哪些包中寻找组件类(带有 @Component 注解的类),并且可以通过 excludeFilters 属性排除特定的组件。在这里,使用了两个自定义的过滤器 TypeExcludeFilter 和 AutoConfigurationExcludeFilter 来排除特定类型的组件。@SpringBootConfiguration(重点)@EnableAutoConfiguration要看懂这里首先我们要了解
Bean是如何注册的
首先呢是注册自定义的Bean,主要就是通过
@Compnent
注解和它的衍生注解: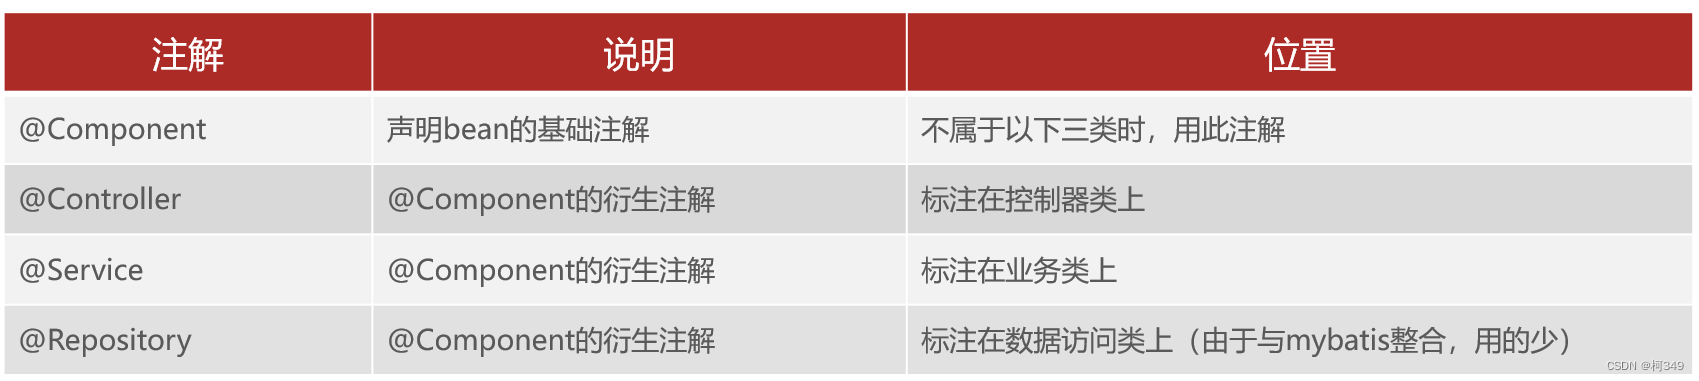
然后,当我们要注册的bean来自第三方时,是不能去修改第三方的类去加上以上的注解的,所以我们可以通过
@Bean
注解来实现。如:
@ConfigrationpublicclassMyConfig{@Beanpublic `第三方bean` 返回值(){returnnew `第三方bean`;}}
@Bean
:将方法返回值交个IOC容器管理,称为IOC容器的bean对象,也可以放在启动类注册,但是我们一般想让启动类的职责单一,所以会自己建一个配置类而不是在启动类注册。
@Configration
:表明该类是一个配置类。
如果MyConfig在启动类的同一级包或者子包下,就可以自动扫描上,但是如果不在同一级包或者同一级包的子包下,就必须要用
@Import
导入:
@Import(MyConfig.class)
如果有多个配置类,就需要多次导入,这样很繁琐,不够简洁,所以我们导入
ImportSelector
接口实现类:
publicclassMyImportSelectorimplementsImportSelector{@OverridepublicString[]selectImports(AnnotationMetadata importingClassMetadata){returnnewString[]{"com.lly.springbootAutoConfig.config.MyConfig"};}}
这样即使有多个配置类,只要将它写在这个字符串数组中,然后在启动类导入用@Import导入这一个类就可以了。但是这样的话,耦合性就太高了,我们可以使用一个
配置文件
来降低耦合性。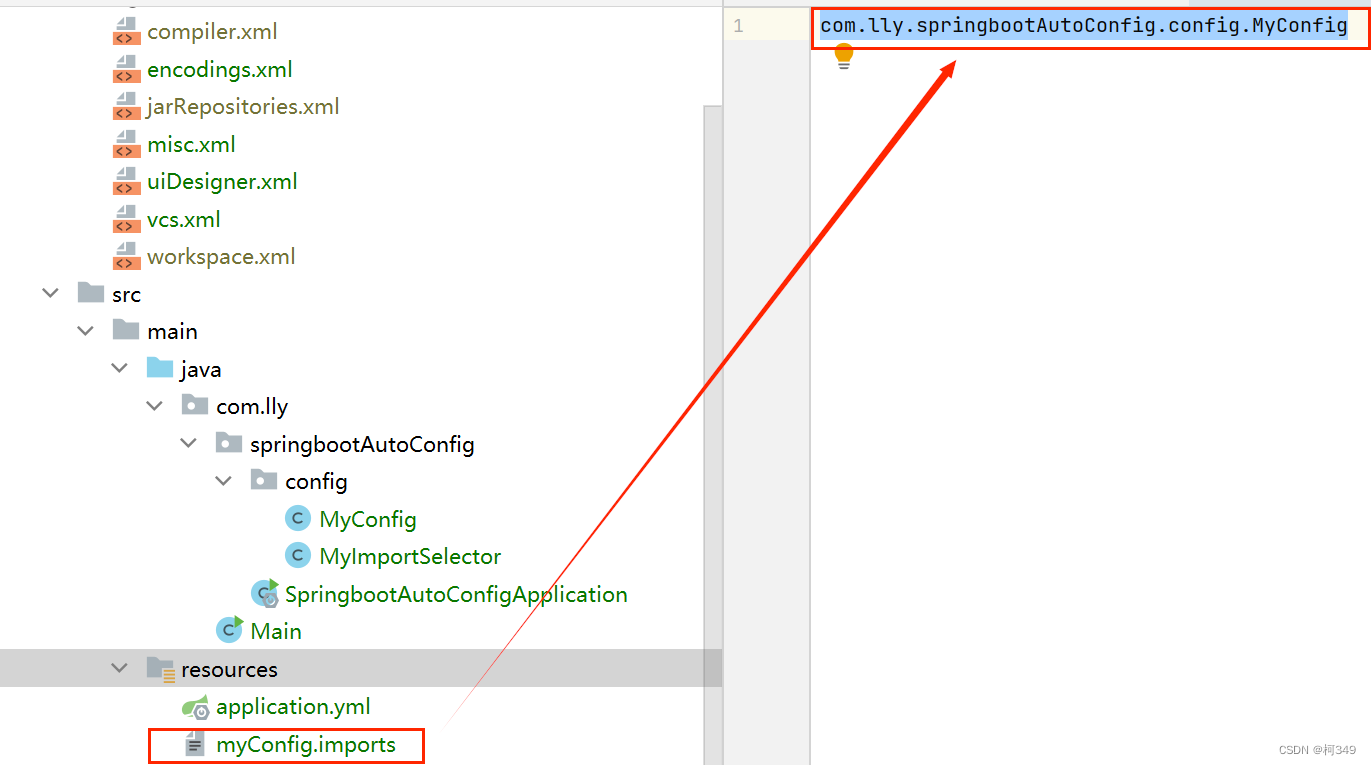
publicclassMyImportSelectorimplementsImportSelector{@OverridepublicString[]selectImports(AnnotationMetadata importingClassMetadata){//读取配置文件的内容List<String> imports =newArrayList<>();//将配置文件每一行的内容作为需要导入的类的类的全限定名InputStream is =MyImportSelector.class.getClassLoader().getResourceAsStream("myConfig.imports");BufferedReader br =newBufferedReader(newInputStreamReader(is));String line =null;while(true){try{if(!((line = br.readLine())!=null))break;}catch(IOException e){thrownewRuntimeException(e);}finally{if(br!=null){try{
                        br.close();}catch(IOException e){thrownewRuntimeException(e);}}}
            imports.add(line);}return imports.toArray(newString[0]);}}
那么如果我们想让让我们的代码看着更高级一些呢?
- 我们可以使用组合注解,自定义一个注解,封装
@Import注解
@Target(ElementType.TYPE)@Retention(RetentionPolicy.RUNTIME)@Import(MyImportSelector.class)public@interfaceEnableMyConfig{}
最后再在启动类上添加这个注解就可以了,这样都不能直接看出来用的哪个类,不明觉厉,是不是很高级,maybe吧。
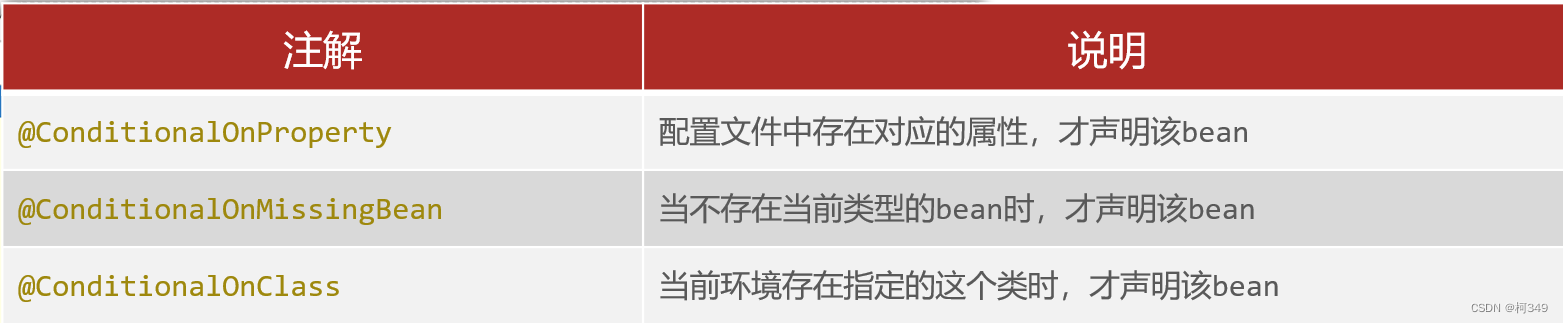
再让我们来了解一下SpringBoot提供的**设置注解条件生效的注解
@Conditional
**
最后,让我们回到
@EnableAutoConfiguration结合以上Bean是如何注册的是不是就能理解那张图了,这样就实现了DispatcherServlet的自动装配。
再回到我们之前的例子,要达到自动配置的效果:
- 首先,配置类要由我们的jar包来提供
- 提供一个自动配置类,使用
@AutoConfiguration表示这个类为自动配置类,使用@Import注解将配置类导入进来 - 提供
.imports配置文件 - 将自动配置类的
全类名,配置到.imports配置文件里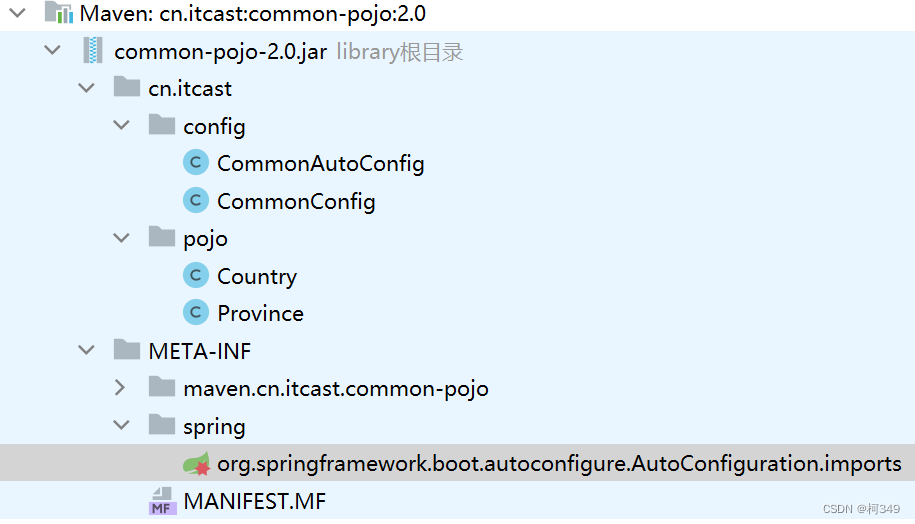
测试:
@SpringBootApplicationpublicclassSpringbootAutoConfigApplication{publicstaticvoidmain(String[] args){ApplicationContext context =SpringApplication.run(SpringbootAutoConfigApplication.class, args);System.out.println(context.getBean("dispatcherServlet"));System.out.println(context.getBean("province"));}}
结果:
org.springframework.web.servlet.DispatcherServlet@295bf2a
Province{name='null', direction='null'}
1.2 SpringBoot自动装配原理
总结:
SpringBoot自动装配的原理:首先在主启动类添加了@SpringBootApplication注解,这个注解组合了
@EnableAutoConfiguration注解,而它又组合了
@Import注解,导入了
AutoConfigrationImportSelector类,这个类实现了
selectImports方法,这个方法经过层层调用,最终会读取META-INF目录下的后缀名为
.imports的文件,在文件中读取到了
全类名之后,会解析注册条件,也就是
@Conditional及其衍生注解,把满足注册条件的Bean对象自动注入到IOC容器中。
2 自定义starter
我们先参考一下mybatis的starter,一般情况下,
起步依赖
会有两个工程组成:
一般会在
starter
中引入
autoconfigure
,在使用时只要引入starter就相当于把autoconfigure引入进来了。当我们把这两个工程提供好了之后,自定义的starter也就制作好了。
2.1 自定义mybatis的starter
步骤:
- 创建
dmybatis-spring-boot-autoconfigure模块,提供自动配置功能,并自定义配置文件META-INF/spring/xxx.imports. - 创建
dmybatis-spring-boot-starter模块,在starter中引入自动配置模块。
2.1.1 dmybatis-spring-boot-autoconfigure模块:
- 在dmybatis-spring-boot-autoconfigure中引入依赖:
<dependency><groupId>org.springframework.boot</groupId><artifactId>spring-boot-starter</artifactId><version>3.1.2</version></dependency><dependency><groupId>org.springframework.boot</groupId><artifactId>spring-boot-starter-data-jdbc</artifactId><version>3.0.0</version></dependency><dependency><groupId>org.mybatis</groupId><artifactId>mybatis</artifactId><version>3.5.13</version></dependency><dependency><groupId>org.mybatis</groupId><artifactId>mybatis-spring</artifactId><version>3.0.0</version></dependency>
- 编写
自动配置类
@AutoConfiguration//表明当前类是一个自动配置类publicclassMybatisAutoConfig{/**
     * SqlSessionFactoryBean
     * @param dataSource 导入jdbc起步依赖时自动注入的
     * @return
     */@BeanpublicSqlSessionFactoryBeansqlSessionFactoryBean(DataSource dataSource){SqlSessionFactoryBean sqlSessionFactoryBean =newSqlSessionFactoryBean();
        sqlSessionFactoryBean.setDataSource(dataSource);return sqlSessionFactoryBean;}/**
     * MapperScannerConfigure
     * @param beanFactory
     * @return
     */@BeanpublicMapperScannerConfigurermapperScannerConfigurer(BeanFactory beanFactory){MapperScannerConfigurer mapperScannerConfigurer =newMapperScannerConfigurer();//扫描的包:启动类所在的包及其子包//springboot的核心启动依赖提供了对应的apiList<String> packages =AutoConfigurationPackages.get(beanFactory);String p = packages.get(0);
        mapperScannerConfigurer.setBasePackage(p);//扫描的注解
        mapperScannerConfigurer.setAnnotationClass(Mapper.class);return mapperScannerConfigurer;}}
- 提供
.imports配置文件,并将自动配置类的全类名,配置到.imports配置文件里
2.1.2 dmybatis-spring-boot-starter模块
- dmybatis-spring-boot-starter模块提供依赖管理的功能。
- 引入依赖
<dependency><groupId>com.lly</groupId><artifactId>dmybatis-spring-boot-autoconfigure</artifactId><version>1.0-SNAPSHOT</version></dependency><!--
        在dmybatis-spring-boot-autoconfigure里引入过的依赖在这里再引入一遍,
        方便以后对里面引入的依赖进行排除exclusion
        --><dependency><groupId>org.springframework.boot</groupId><artifactId>spring-boot-starter</artifactId><version>3.1.2</version></dependency><!--jdbc起步依赖,会自动注入dataSource--><dependency><groupId>org.springframework.boot</groupId><artifactId>spring-boot-starter-data-jdbc</artifactId><version>3.0.0</version></dependency><dependency><groupId>org.mybatis</groupId><artifactId>mybatis</artifactId><version>3.5.13</version></dependency><dependency><groupId>org.mybatis</groupId><artifactId>mybatis-spring</artifactId><version>3.0.0</version></dependency>
补:在 Maven 中,exclusion(排除)指的是在依赖关系中排除特定的传递性依赖。当你引入一个依赖库时,有时候你可能不希望引入这个库所依赖的某些其他库,这时就可以使用 exclusion 来排除这些传递性依赖。
在 Maven 的 pom.xml 文件中,你可以在依赖声明中使用 元素来排除传递性依赖。例如:
<dependency><groupId>org.sample</groupId><artifactId>sample-artifact</artifactId><version>1.0</version><exclusions><exclusion><groupId>org.unwanted</groupId><artifactId>unwanted-artifact</artifactId></exclusion></exclusions></dependency>
上述示例中,sample-artifact 依赖会被引入,但是其中排除了对 unwanted-artifact 的传递性依赖。
通过使用 exclusion,你可以更精确地控制项目中所引入的依赖,避免不必要的冲突或版本问题。
2.2 测试
starter结构: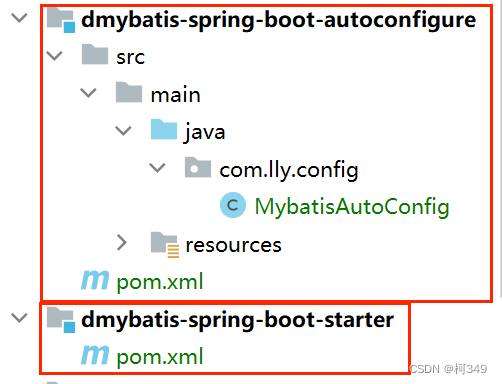
- 导入依赖:
<!--mysql驱动依赖--><dependency><groupId>com.mysql</groupId><artifactId>mysql-connector-j</artifactId></dependency><!--自定义的mybatis起步依赖--><dependency><groupId>com.lly</groupId><artifactId>dmybatis-spring-boot-starter</artifactId><version>1.0-SNAPSHOT</version></dependency><dependency><groupId>org.springframework.boot</groupId><artifactId>spring-boot-starter-web</artifactId></dependency><dependency><groupId>org.springframework.boot</groupId><artifactId>spring-boot-starter-test</artifactId></dependency>
- 数据库准备
 3. 配置yml
spring:datasource:driver-class-name: com.mysql.jdbc.Driver
    url: jdbc:mysql://localhost:3306/test
    username: root
    password: root
- 实体类
publicclassTeachers{privateInteger tid;privateString tpwd;privateString tname;privateString tacademy;//省略get,set方法}
- mapper
@MapperpublicinterfaceTeachersMapper{@Select("select * from teachers where tid = #{id}")publicTeachersfindById(Integer id);}
- Service接口及其实现
publicinterfaceTeachersService{publicTeachersfindById(Integer id);}
@ServicepublicclassTeachersServiceImplimplementsTeachersService{@AutowiredprivateTeachersMapper teachersMapper;@OverridepublicTeachersfindById(Integer id){return teachersMapper.findById(id);}}
- Controller
@RestControllerpublicclassTeachersController{@AutowiredprivateTeachersService teachersService;@RequestMapping("/findById")publicTeachersfindById(Integer id){return teachersService.findById(id);}}
- 启动测试
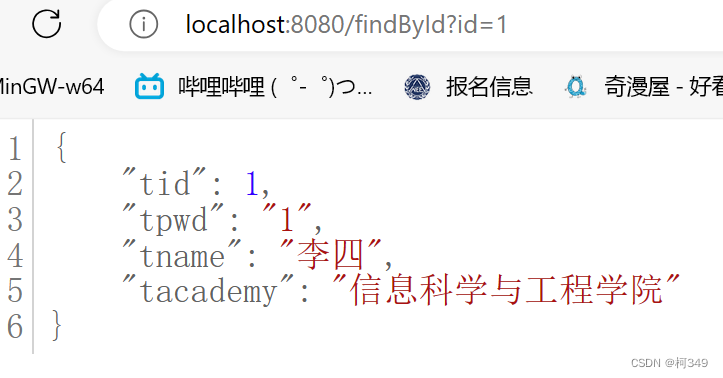 这样我们自定义starter就成功了。
版权归原作者 柯349 所有, 如有侵权,请联系我们删除。