
快速上手 Spring Boot:基础使用详解
文章目录
1、什么是SpringBoot
- Spring Boot 是一个基于 Spring 的框架,旨在简化 Spring 应用的配置和开发过程,通过自动配置和约定大于配置的原则,使开发者能够快速搭建独立、生产级别的应用程序。
- Spring程序缺点 - 配置繁琐- 依赖设置繁琐
- SpringBoot程序优点 - 自动配置- 起步依赖(简化依赖配置)- 版本锁定- 内置tomcat服务器- 辅助功能(内置服务器,……)

2、Springboot快速入门搭建
新建项目选择Spring Initializr
因为官网网速会很慢,这边Server URL可以修改成国内阿里云地址:https://start.aliyun.com
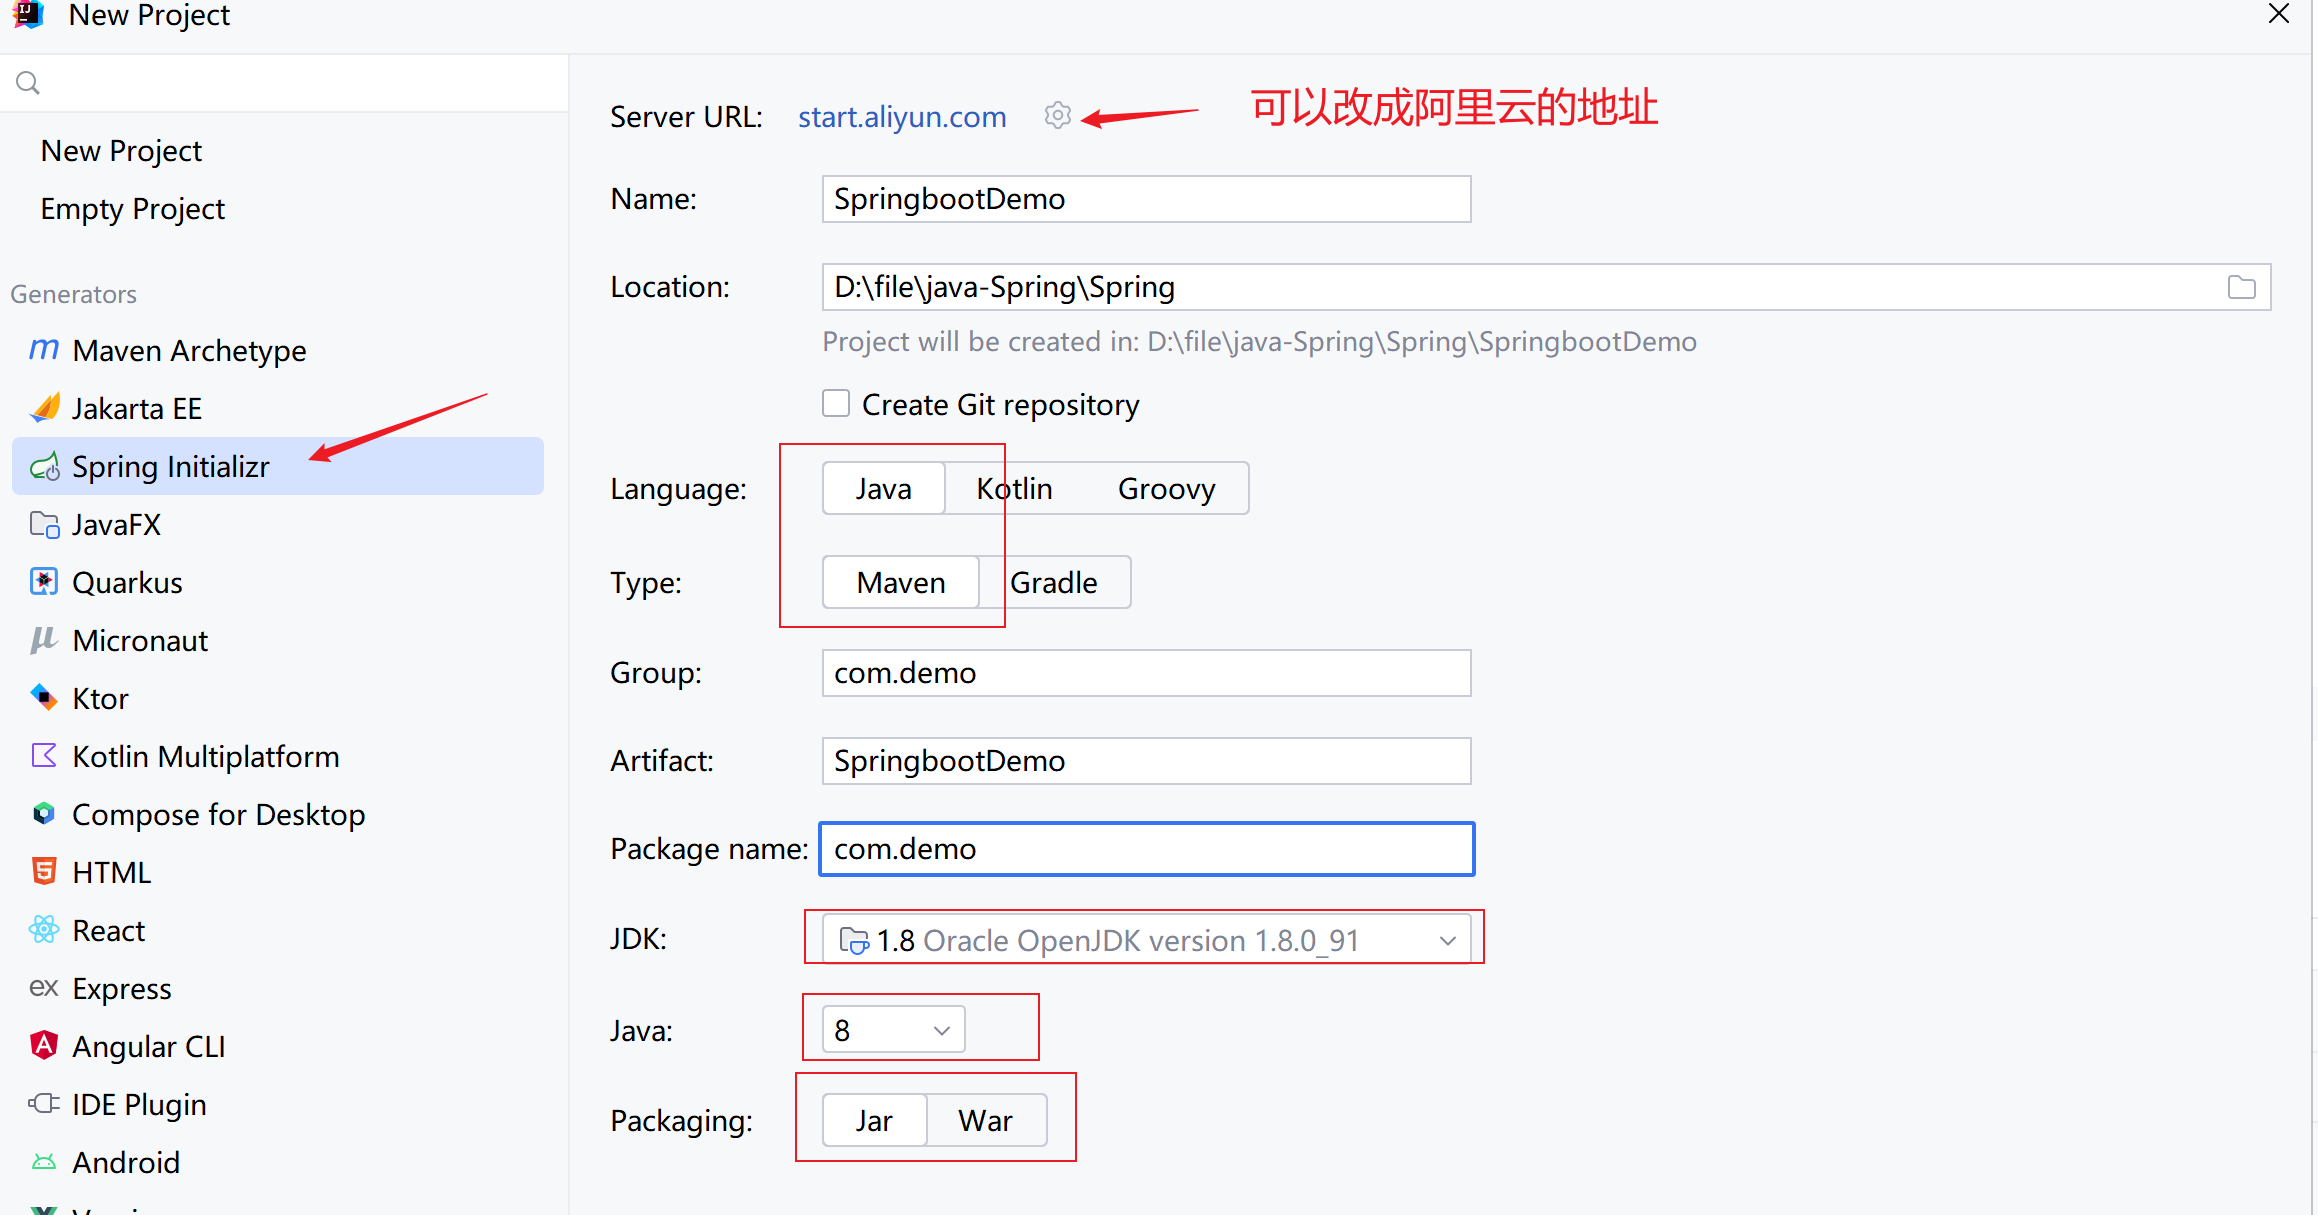
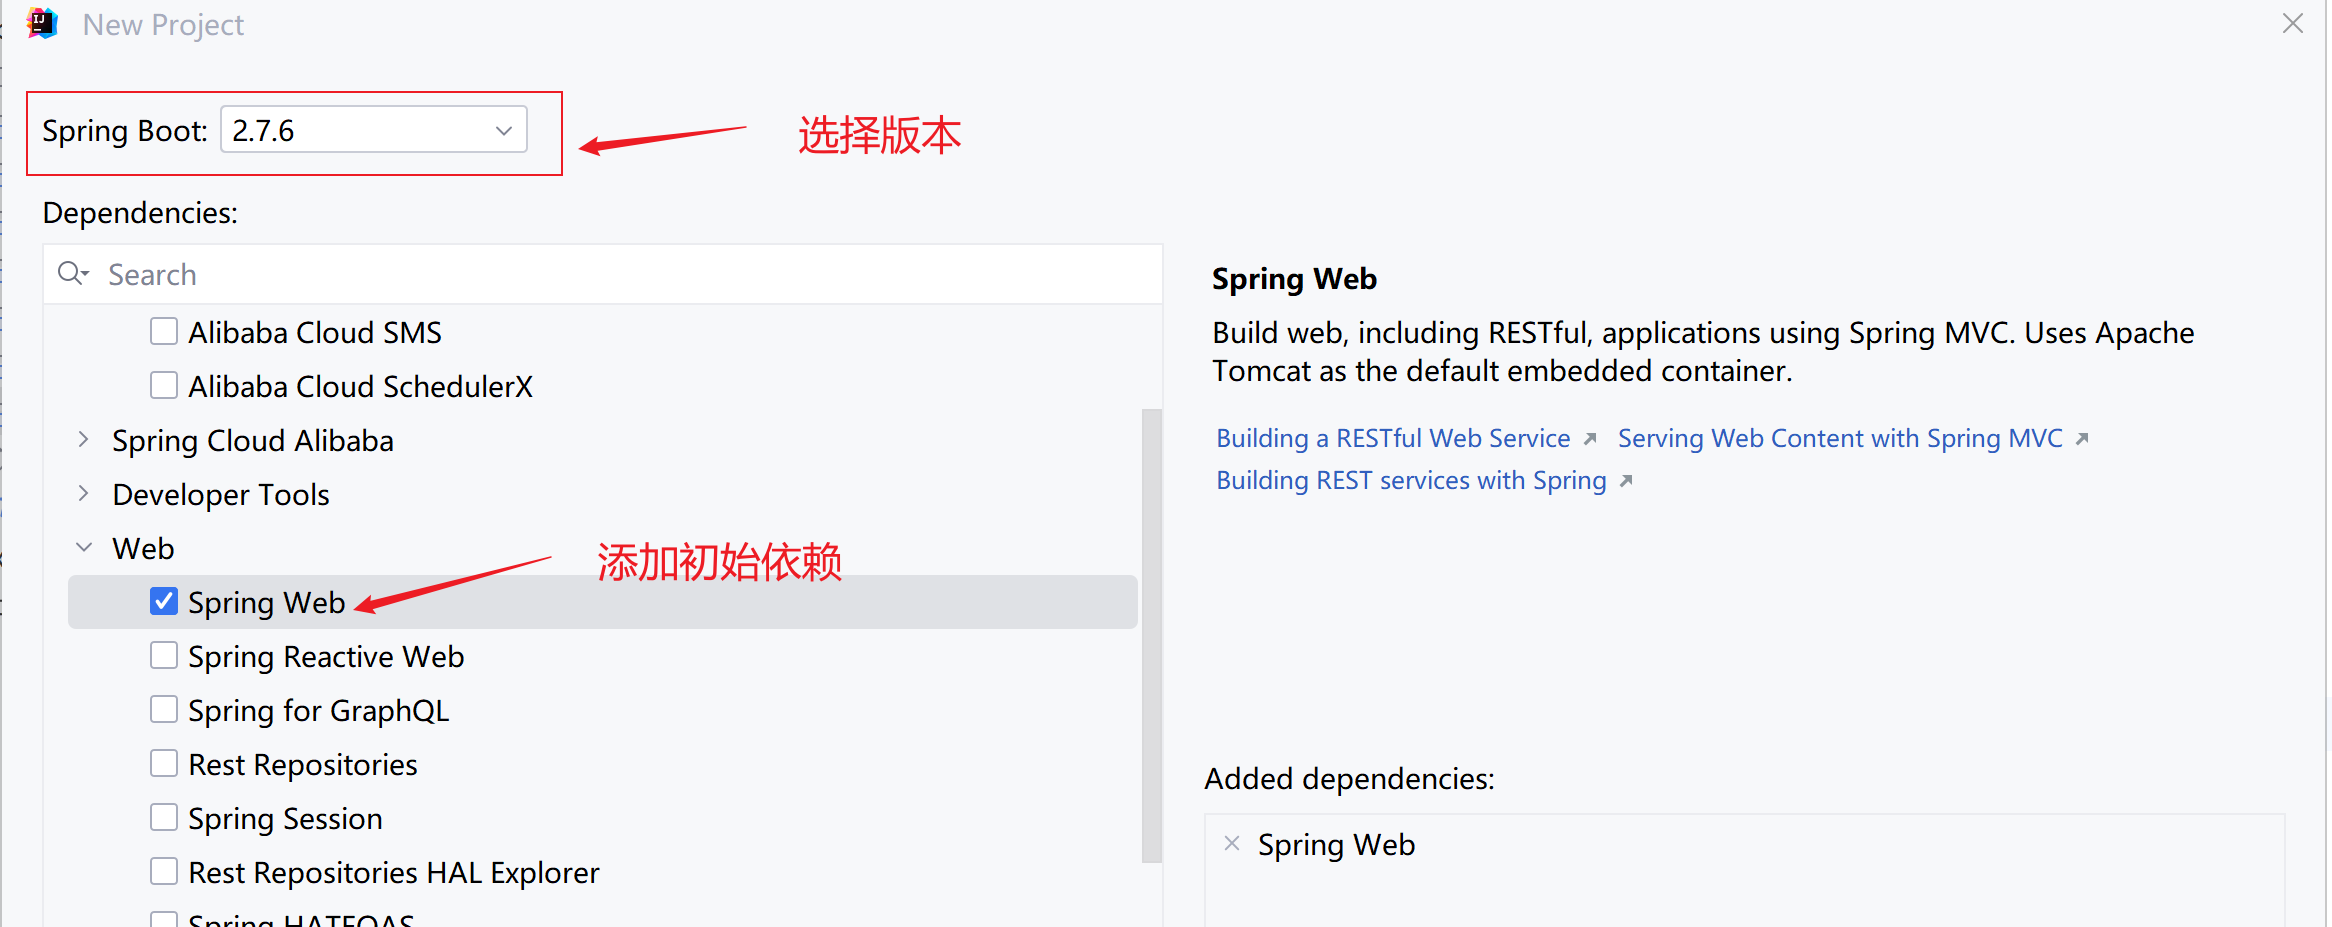
在下一步之后,可以选择Springboot版本并添加Spring web依赖,最后点击完成就可以了
找到springboot启动类,点击运行测试
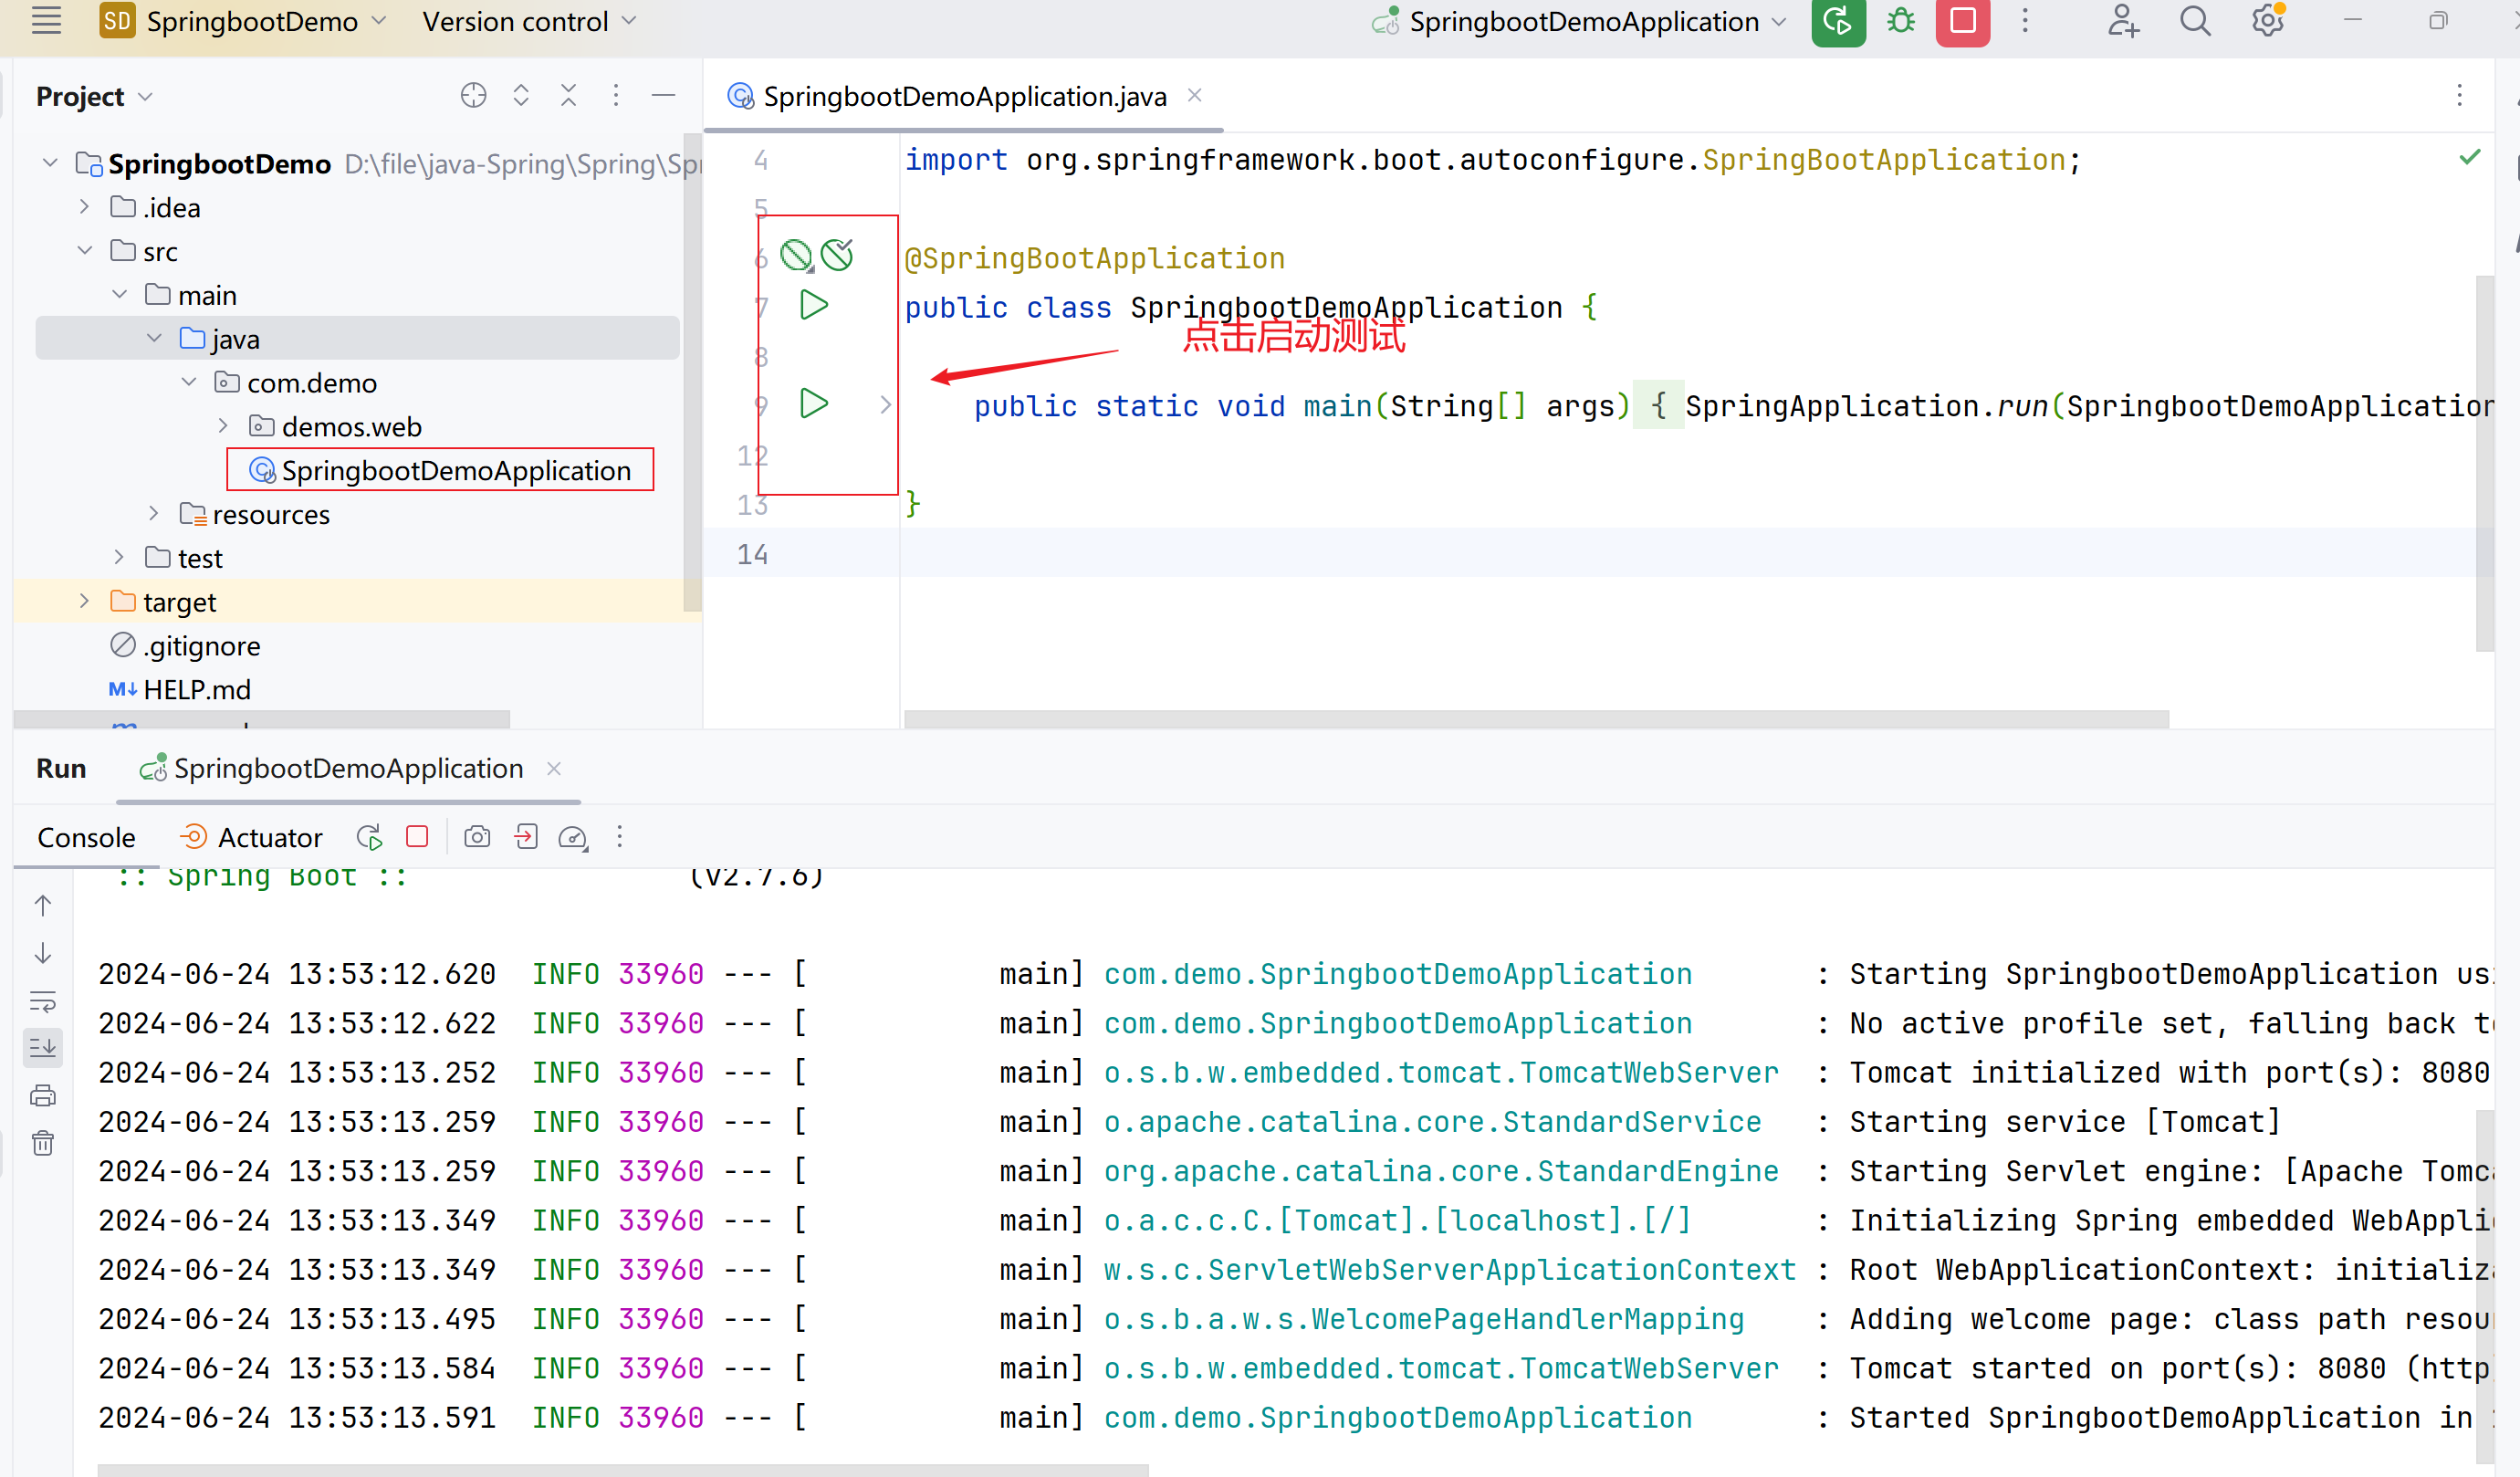
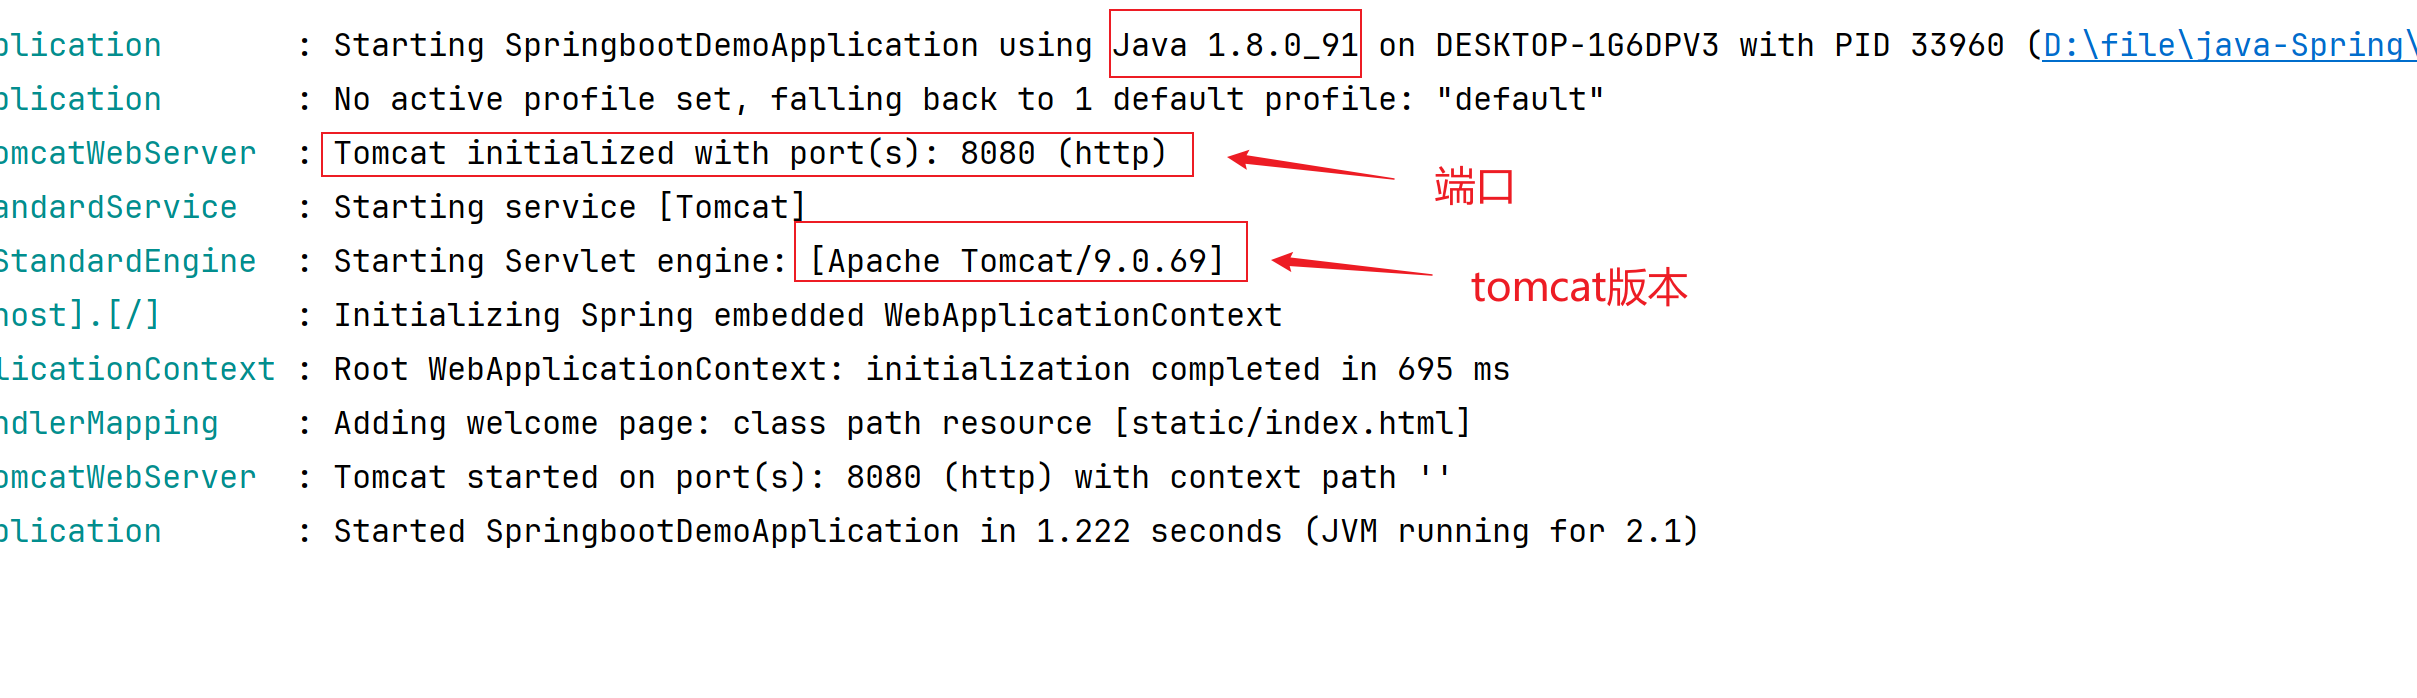
在日志中,我们可以看到java的版本,tomcat版本和端口,我们并没有配置tomcat,这也说明了Springboot是内置了tomcat的
可以写个代码进行测试一下,之后访问localhost:8080/user
@RestController@RequestMapping("/user")publicclassUserController{@GetMapping()publicStringgetUser(){return"hello springboot";}}

3、SpringBoot起步依赖
- starter - SpringBoot中常见项目名称,定义了当前项目使用的所有项目坐标,以达到减少依赖配置的目的
<?xml version="1.0" encoding="UTF-8"?><projectxmlns="http://maven.apache.org/POM/4.0.0"xmlns:xsi="http://www.w3.org/2001/XMLSchema-instance"xsi:schemaLocation="http://maven.apache.org/POM/4.0.0 https://maven.apache.org/xsd/maven-4.0.0.xsd"><modelVersion>4.0.0</modelVersion><parent><groupId>org.springframework.boot</groupId><artifactId>spring-boot-starter-parent</artifactId><version>2.5.0</version></parent><groupId>com.demo</groupId><artifactId>springboot-01-quickstart</artifactId><version>0.0.1-SNAPSHOT</version><dependencies><dependency><groupId>org.springframework.boot</groupId><artifactId>spring-boot-starter-web</artifactId></dependency></dependencies></project>
<projectxmlns="http://maven.apache.org/POM/4.0.0"xsi:schemaLocation="http://maven.apache.org/POM/4.0.0 http://maven.apache.org/xsd/maven-4.0.0.xsd"xmlns:xsi="http://www.w3.org/2001/XMLSchema-instance"><modelVersion>4.0.0</modelVersion><groupId>org.springframework.boot</groupId><artifactId>spring-boot-dependencies</artifactId><version>2.5.0</version><packaging>pom</packaging><properties><servlet-api.version>4.0.1</servlet-api.version>
        ...
    </properties></project>
- parent - 所有SpringBoot项目要继承的项目,定义了若干个坐标版本号(依赖管理,而非依赖),以达到减少依赖冲突的目的
<?xml version="1.0" encoding="UTF-8"?><projectxmlns="http://maven.apache.org/POM/4.0.0"xsi:schemaLocation="http://maven.apache.org/POM/4.0.0 http://maven.apache.org/xsd/maven-4.0.0.xsd"xmlns:xsi="http://www.w3.org/2001/XMLSchema-instance"><modelVersion>4.0.0</modelVersion><parent><groupId>org.springframework.boot</groupId><artifactId>spring-boot-dependencies</artifactId><version>2.5.0</version></parent><artifactId>spring-boot-starter-parent</artifactId><packaging>pom</packaging>
    ...
</project>
- 实际开发 - 使用任意坐标时,仅书写GAV中的G和A,V由SpringBoot提供- 如发生坐标错误,再指定version(要小心版本冲突)
<?xml version="1.0" encoding="UTF-8"?><projectxmlns="http://maven.apache.org/POM/4.0.0"xmlns:xsi="http://www.w3.org/2001/XMLSchema-instance"xsi:schemaLocation="http://maven.apache.org/POM/4.0.0 https://maven.apache.org/xsd/maven-4.0.0.xsd"><parent><groupId>org.springframework.boot</groupId><artifactId>spring-boot-starter-parent</artifactId><version>2.5.0</version></parent><dependencies><dependency><groupId>org.springframework.boot</groupId><artifactId>spring-boot-starter-web</artifactId></dependency><dependency><groupId>org.springframework.boot</groupId><artifactId>spring-boot-starter-test</artifactId><scope>test</scope></dependency></dependencies></project>
- SpringBoot程序启动
@SpringBootApplicationpublicclassSpringBootQuickStartApplication{publicstaticvoidmain(String[] args){SpringApplication.run(SpringBootQuickStartApplication.class, args);}}
- SpringBoot在创建项目时,采用jar的打包方式
- SpringBoot的引导类是项目的入口,运行main方法就可以启动项目
- 使用maven依赖管理变更起步依赖项
4、SpringBoot自动配置:以tomcat启动为例
- 查看自动配置的spring-boot-autoconfigure的包下的配置文件spring.factories
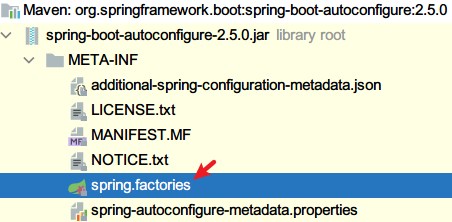
- 文件中包含所有Web容器(Tomcat)自动启动的配置类
org.springframework.boot.autoconfigure.web.servlet.ServletWebServerFactoryAutoConfiguration,\ - 找到Tomcat的启动类

- 进入ServerProperties类中查看代码,可以看到端口号的set方法
publicvoidsetPort(Integer port){this.port = port;} - 在ServerProperties类中存在一个静态内部类Tomcat,配置了服务器的属性

- 查看默认配置:spring-configuration-metadata.json文件,大约在1213行
{"name":"server.port","type":"java.lang.Integer","description":"Server HTTP port.","sourceType":"org.springframework.boot.autoconfigure.web.ServerProperties","defaultValue":8080}
5、SpringBoot基础配置
配置格式
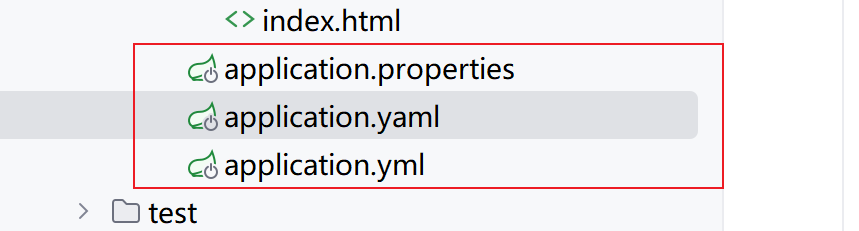
SpringBoot提供了多种属性配置方式
- application.properties
server.port=80
- application.yml
server:port:81
- application.yaml
server:port:82
SpringBoot配置文件加载顺序
- application.properties > application.yml > application.yaml
注意事项:
- SpringBoot核心配置文件名为application
- SpringBoot内置属性过多,且所有属性集中在一起修改,在使用时,通过提示键+关键字修改属性
6、yaml
什么是yaml,和properties有什么区别?
- YAML(YAML Ain’t Markup Language),一种数据序列化格式
- 优点: - 容易阅读- 容易与脚本语言交互- 以数据为核心,重数据轻格式
- YAML文件扩展名 - .yml(主流)- .yaml
yaml语法规则
- 大小写敏感
- 属性层级关系使用多行描述,每行结尾使用冒号结束
- 使用缩进表示层级关系,同层级左侧对齐,只允许使用空格(不允许使用Tab键)
- 属性值前面添加空格(属性名与属性值之间使用冒号+空格作为分隔)
student:name: xiaolin age:18 - #表示注释
- 核心规则:数据前面要加空格与冒号隔开
数据读取
stu:name:'小林'age:18
1.使用@Value读取单个数据,属性名引用方式:${一级属性名.二级属性名……}
@Value("${stu.name}")String name;@Value("${stu.age}")Integer age;
2.封装全部数据到Environment对象
注:数组元素也只能一个个取出来

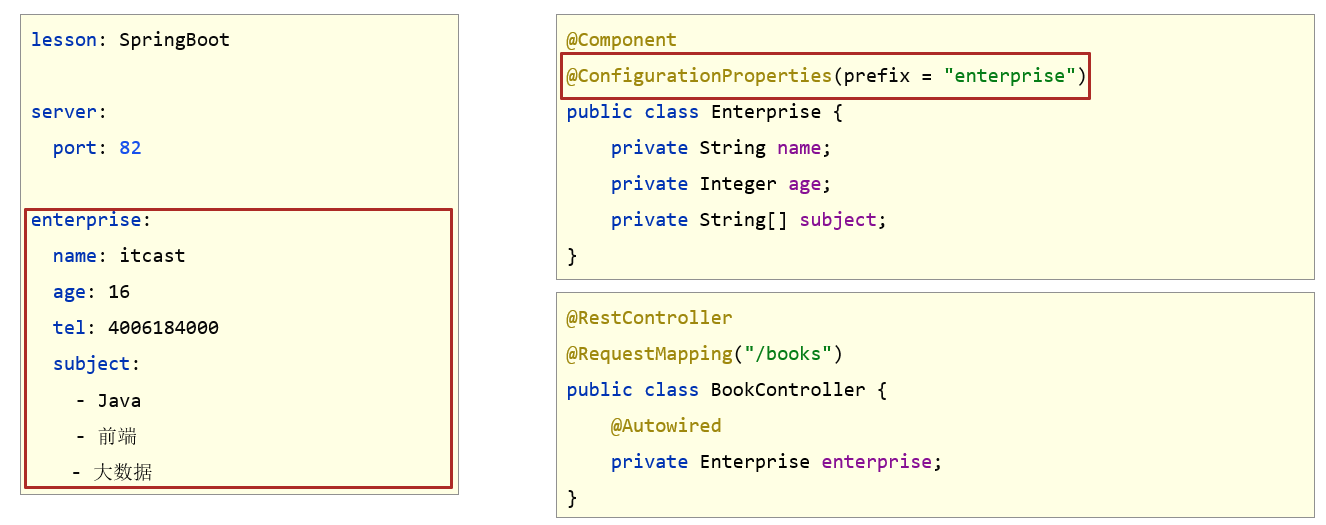
3.自定义对象封装指定数据【常用】
- 将对象添加Spring容器中,在类上添加@Component注解
- 在类上添加@ConfigurationProperties(prefix=“指定前缀”)
- 添加get和set方法,toString方法
- 在控制器中注入下面Enterprise对象
@Component@ConfigurationProperties(prefix ="enterprise")@DatapublicclassEnterprise{privateString name;privateInteger age;privateString tel;privateString subject[];}
注:如果使用lombok需要在pom.xml中导入坐标
<dependency><groupId>org.projectlombok</groupId><artifactId>lombok</artifactId></dependency>
当输入@ConfigurationProperties注解的时候,自定义对象封装数据警告解决方案

在pom.xml文件添加以下
<dependency><groupId>org.springframework.boot</groupId><artifactId>spring-boot-configuration-processor</artifactId><optional>true</optional></dependency>
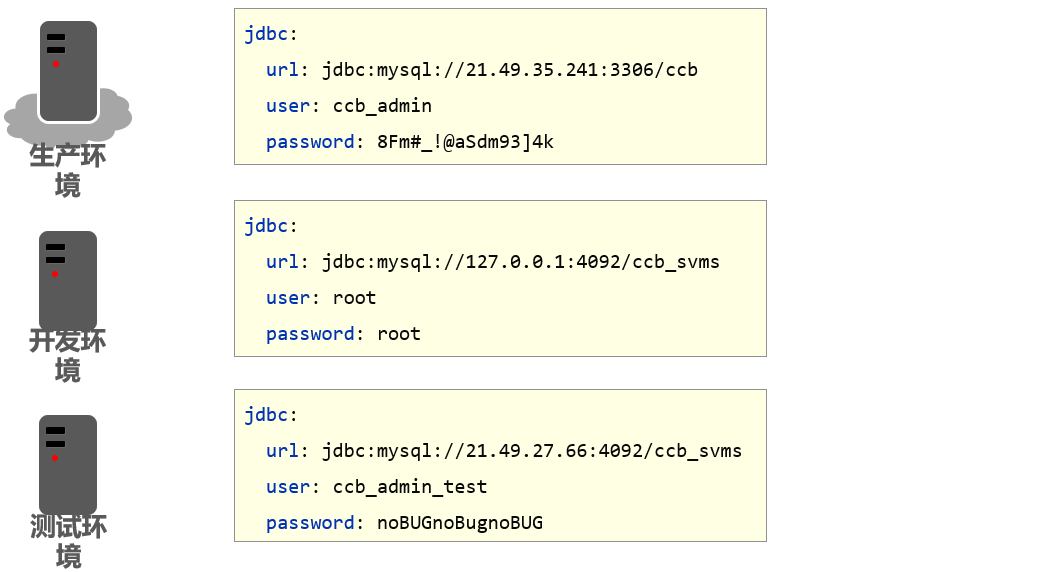
7、多环境开发配置
在实际开发中,项目的开发环境、测试环境、生产环境的配置信息是否会一致?如何快速切换?
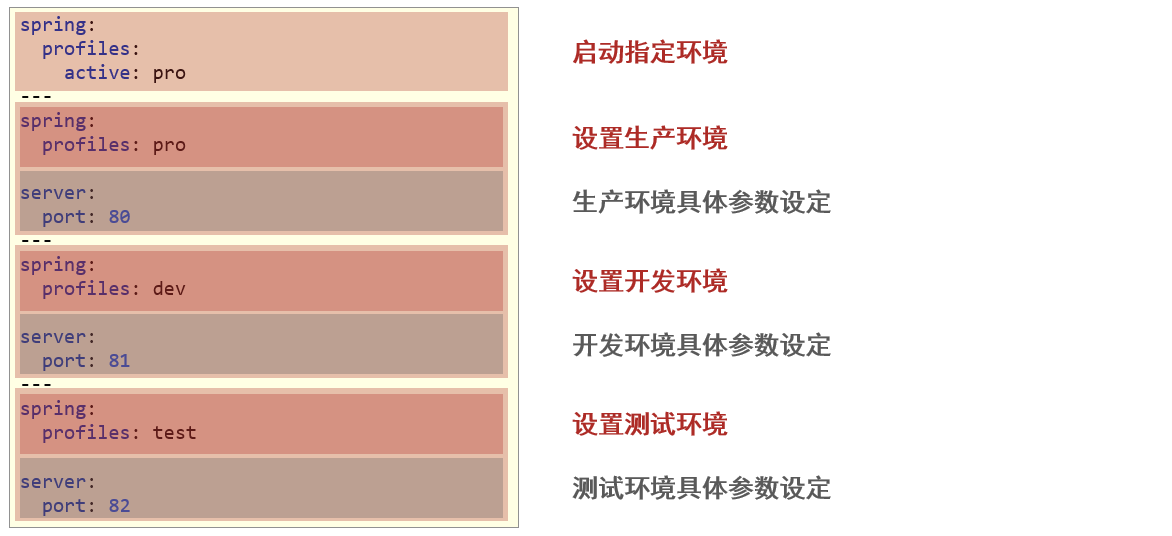
多环境启动配置
- yaml文件多环境启动
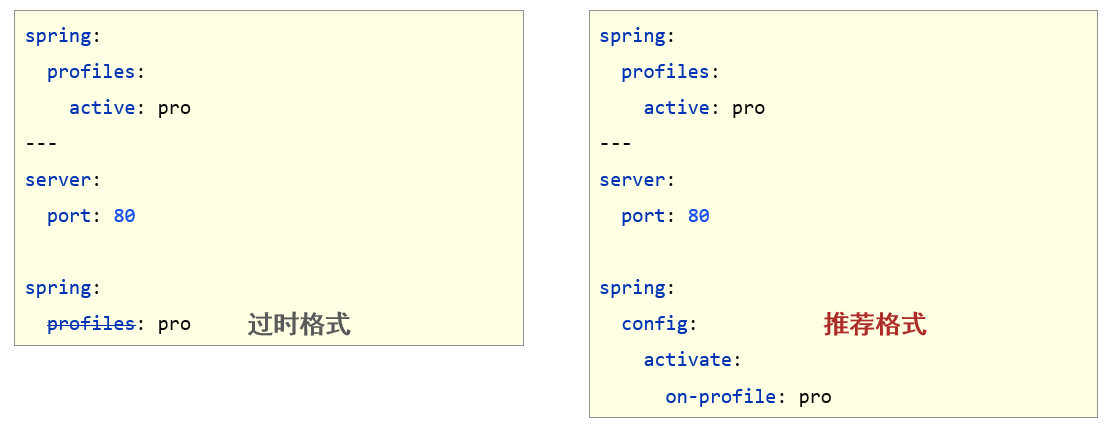
基本配置
新的写法
application.yml
spring:profiles:active: pro

---spring:config:activate:on-profile: pro
server:port:80---spring:config:activate:on-profile: test
server:port:81---spring:config:activate:on-profile: dev
server:port:82
- properties文件多环境启动
#主启动配置文件 application.properties
spring.profiles.active=pro
#环境分类配置文件 application-pro.properties
server.port=80
#环境分类配置文件 application-dev.properties
server.port=81
#环境分类配置文件application-test.properties
server.port=82
多环境启动命令格式
- 带参数启动SpringBoot
# 指定哪个配置名
java –jar springboot.jar --spring.profiles.active=test
# 指定具体的参数
java –jar springboot.jar --server.port=88
# 同时指定配置名 端口号
java –jar springboot.jar --server.port=88 --spring.profiles.active=test
多环境开发控制
Maven与SpringBoot多环境兼容(步骤)
先将application.properties中配置全部先注释了
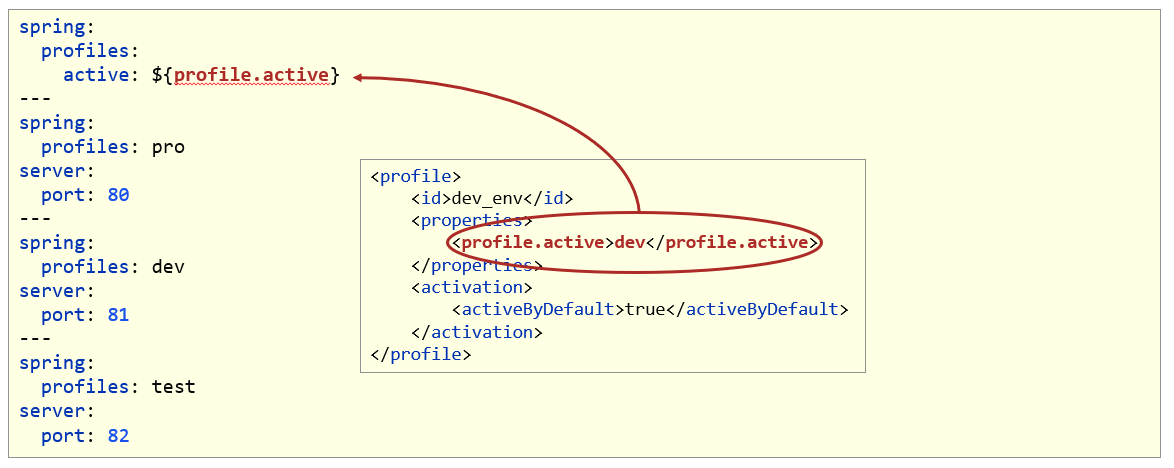
- Maven中设置多环境属性
<profiles><profile><id>dev_env</id><properties><profile.active>dev</profile.active></properties><!-- 默认激活 --><activation><activeByDefault>true</activeByDefault></activation></profile><profile><id>pro_env</id><properties><profile.active>pro</profile.active></properties></profile><profile><id>test_env</id><properties><profile.active>test</profile.active></properties></profile></profiles>
- SpringBoot中引用Maven属性
- 对资源文件开启对默认占位符的解析
<build><plugins><plugin><artifactId>maven-resources-plugin</artifactId><configuration><encoding>utf-8</encoding><useDefaultDelimiters>true</useDefaultDelimiters></configuration></plugin></plugins></build>
- 启动查看控制台输出的结果
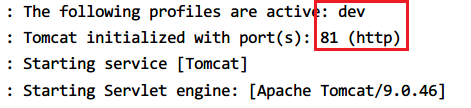
注:如果application-dev.properties中的配置也存在,则优先使用这里面的配置,再使用yml中的配置
本文转载自: https://blog.csdn.net/weixin_53961667/article/details/139928291
版权归原作者 小林学习编程 所有, 如有侵权,请联系我们删除。
版权归原作者 小林学习编程 所有, 如有侵权,请联系我们删除。