
一、启动hive集群
首先保证hadoop集群正常启动:
start -dfs.sh
start -yarn.sh

再启动hive集群
hive

二、启动hiveserver2
通过远程终端输入以下命令,启动并测试:
cd /opt/apache-hive-2.3.3-bin/bin/
hive --service hiveserver2 &

注意:启动后不要关闭窗口
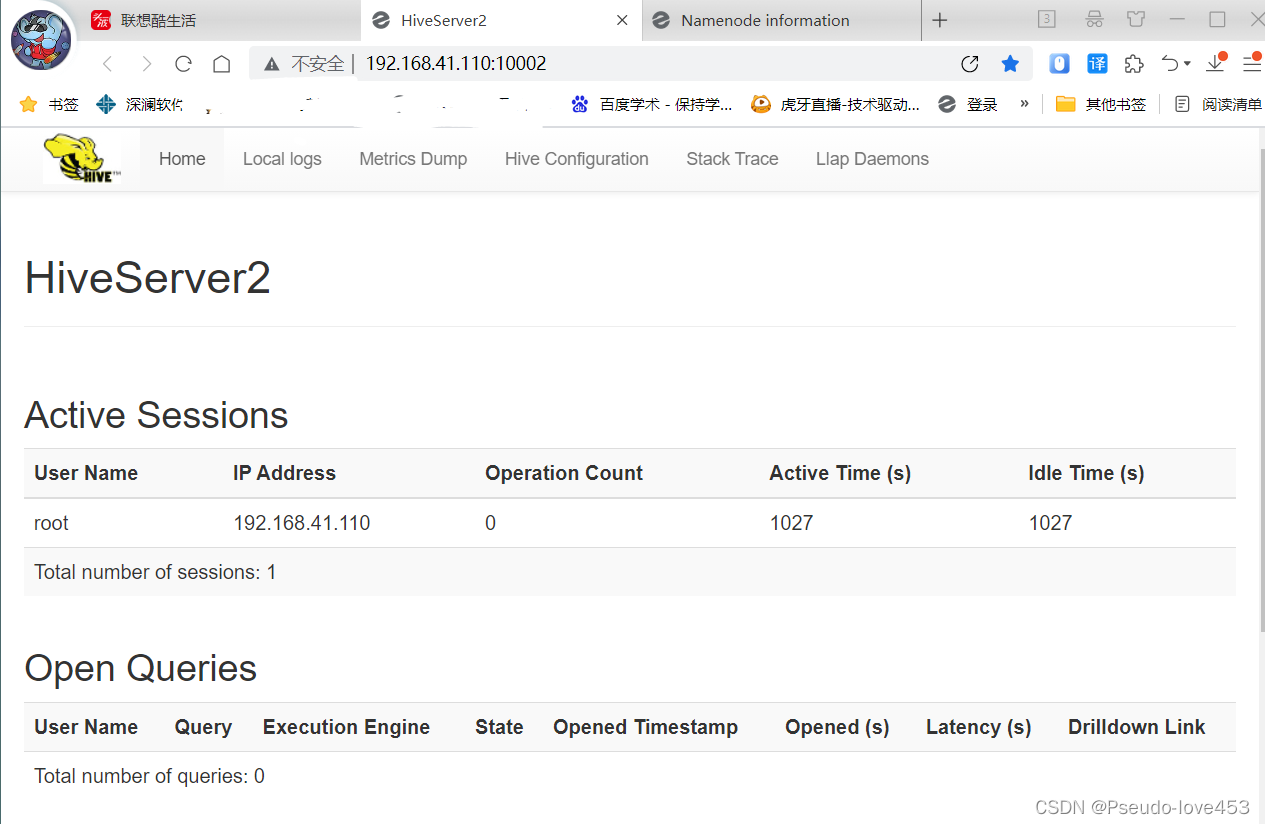
在windows下打开浏览器,输入地址:http://master的IP:10002/hiveserver2.jsp
如果出现访问页面,说明Thrift Server启动成功:
开启第二个终端,进入:/opt/apache-hive-2.3.3-bin/bin/目录,启动并测试:
cd /opt/apache-hive-2.3.3-bin/bin/
beeline
然后开始连接hive2:
beeline> !connect jdbc:hive2://10.244.2.126:10000
连接过程中,输入之前设置的账户名和密码。

通过beeline进行数据查询的测试:
输入:
show databases;

三、相关设置
三、开发环境准备
建议在本地WINDOWS下准备开发环境:
1.安装JDK1.8+
2.安装Eclipse
3.配置HOSTS文件
修改C:\Windows\System32\drivers\etc 目录下的HOSTS文件,在末尾加入要访问的Hive节点的IP 和机器名映射关系,并确保通过机器名能PING 通:

四、Java代码
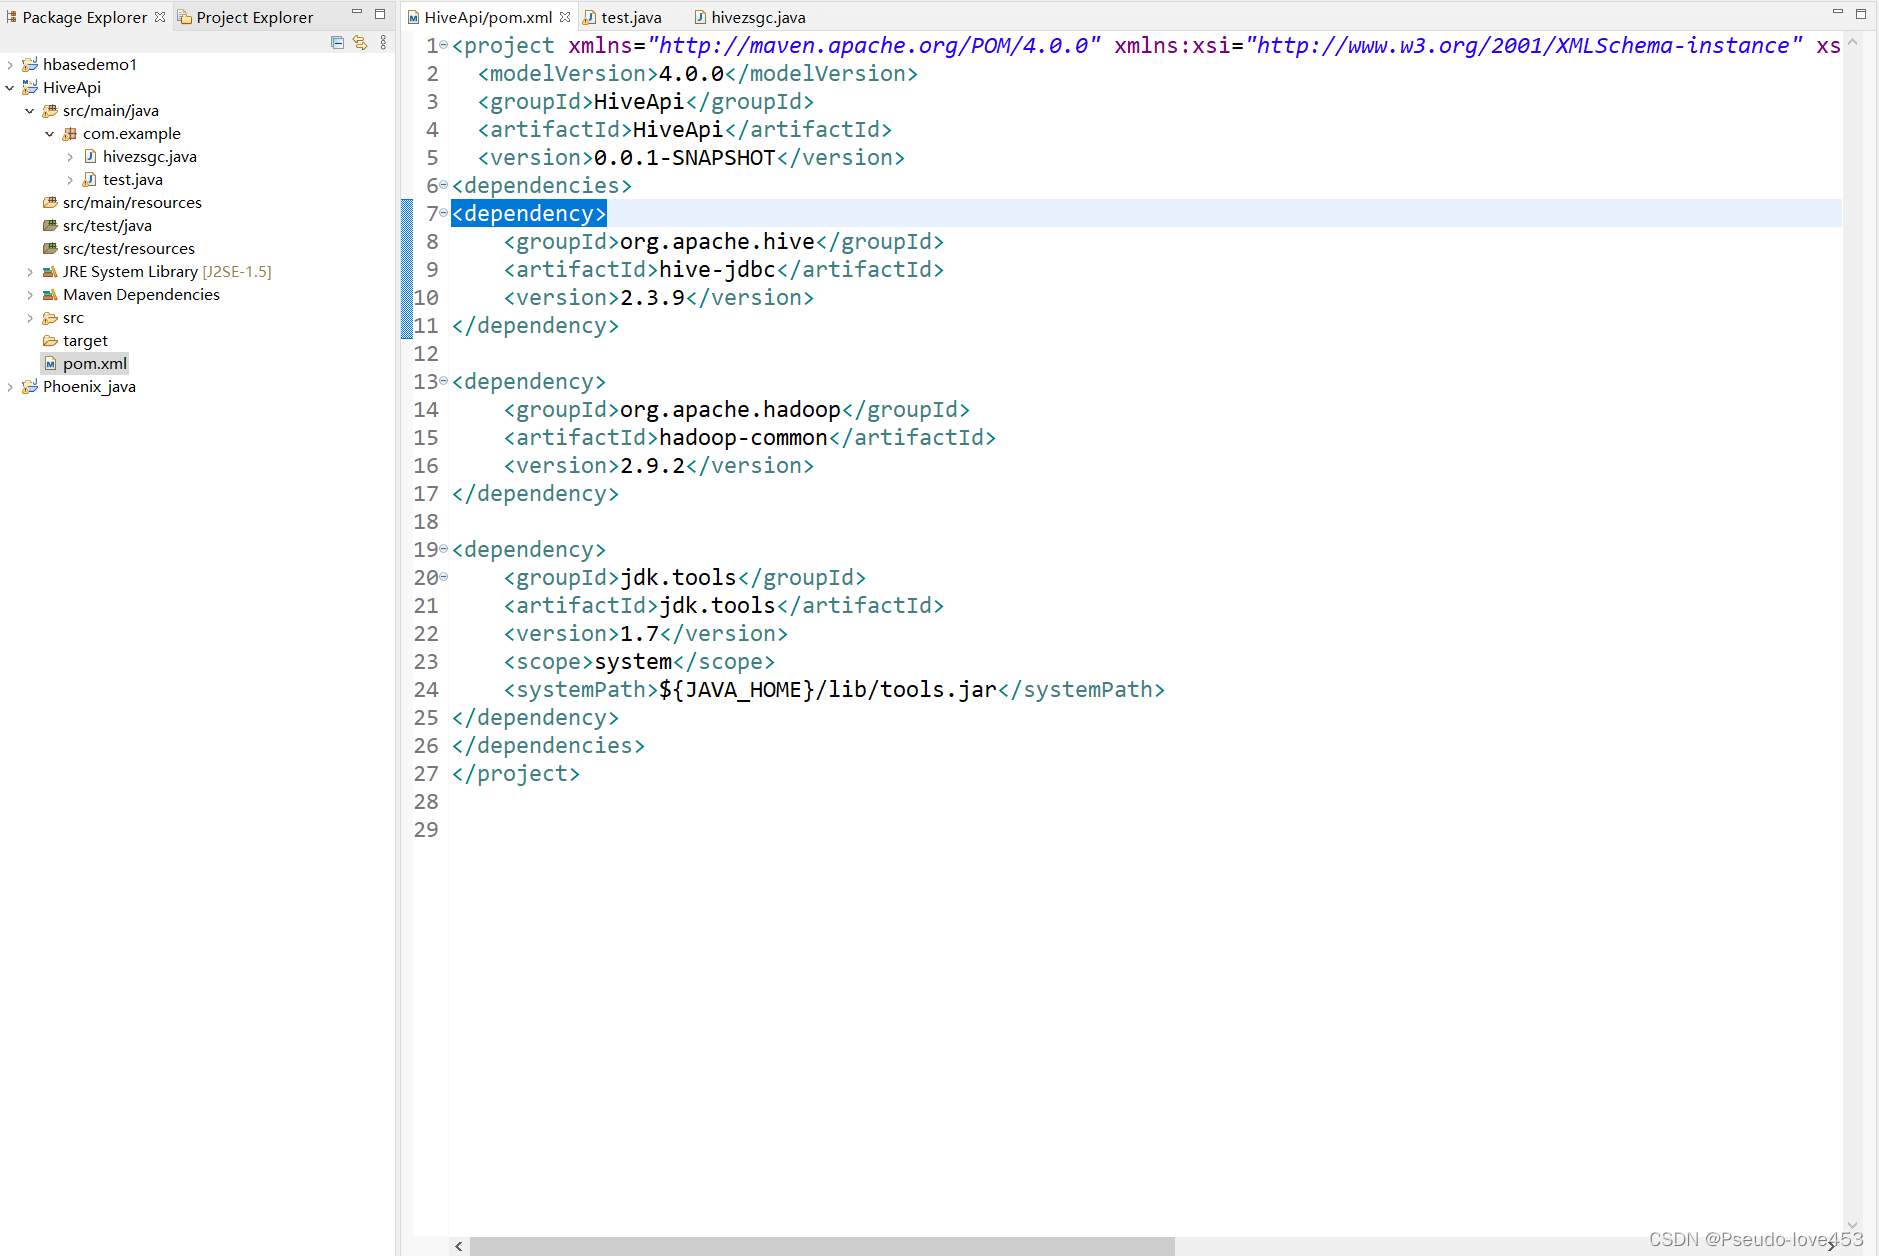
1.新建MAVEN工程

2.配置pom.xml
在pom.xml中加入以下部分即可 注:版本需要根据实际情况调整:
org.apache.hive hive-jdbc 2.3.9
org.apache.hadoop hadoop-common 2.9.2
jdk.tools jdk.tools 1.7 system ${JAVA_HOME}/lib/tools.jar
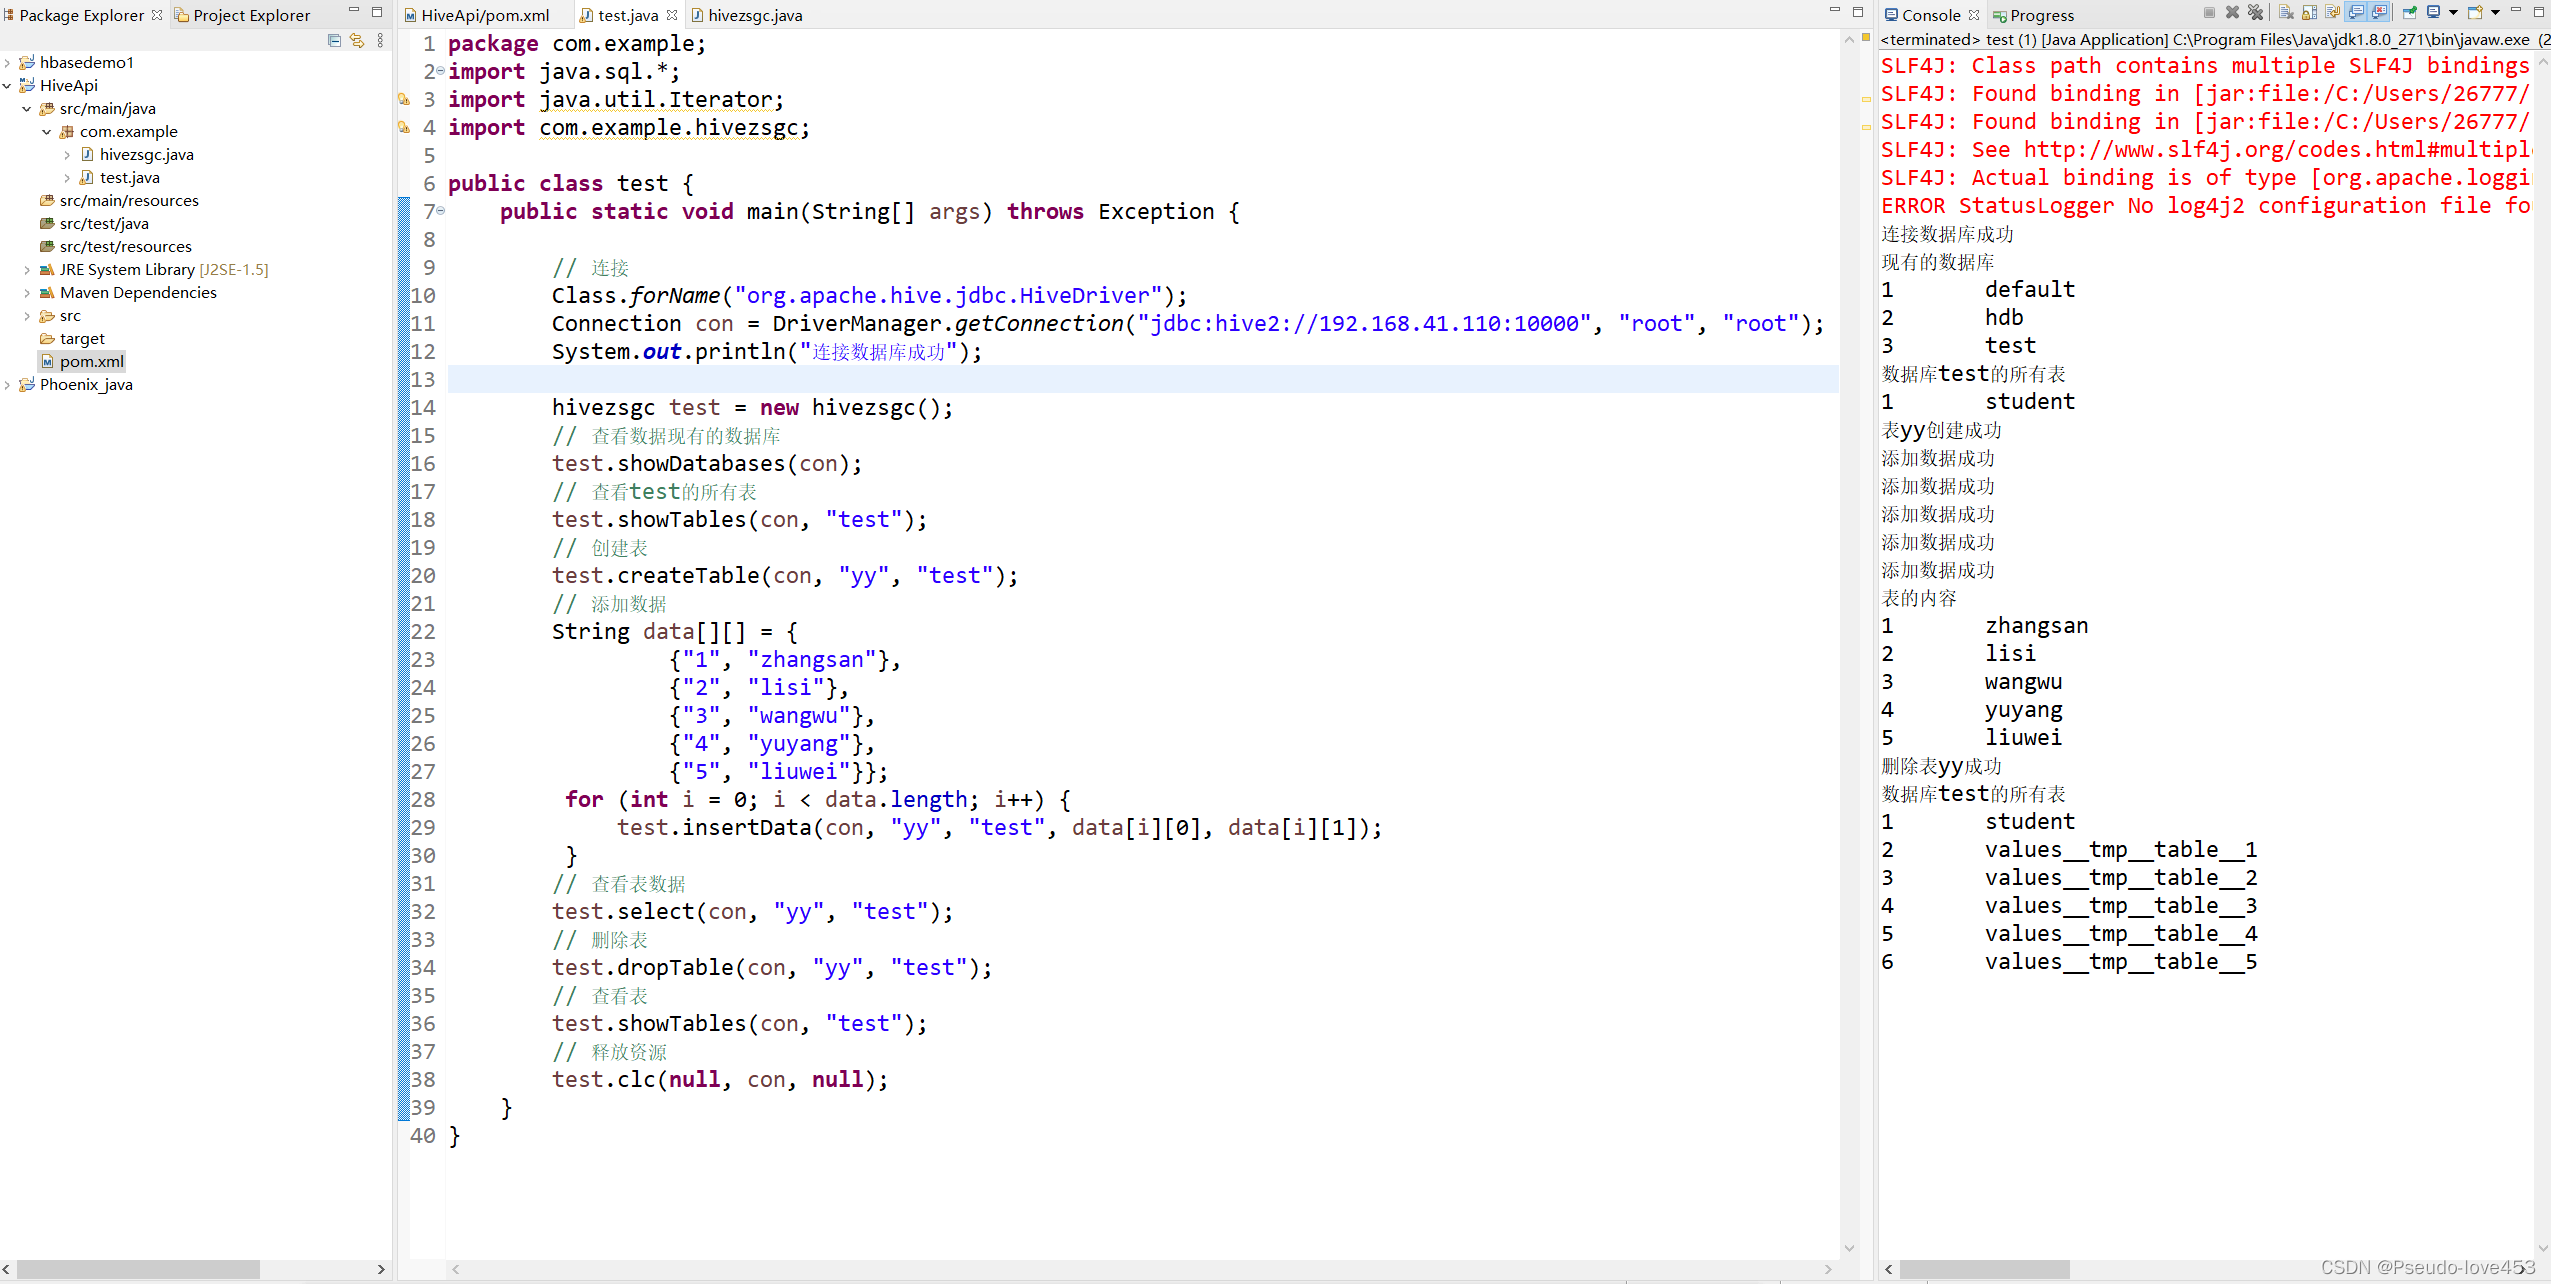
3.Java编写访问hive代码:
package com.example;
import java.sql.*;
import java.util.Iterator;
import com.example.hivezsgc;

public class test {
public static void main(String[] args) throws Exception {

// 连接
Class.forName("org.apache.hive.jdbc.HiveDriver");
Connection con = DriverManager.getConnection("jdbc:hive2://192.168.41.110:10000", "root", "root");
System.out.println("连接数据库成功");

hivezsgc test = new hivezsgc();
// 查看数据现有的数据库
test.showDatabases(con);
// 查看test的所有表
test.showTables(con, "test");
// 创建表
test.createTable(con, "yy", "test");
// 添加数据
String data[][] = {
 {"1", "zhangsan"},
 {"2", "lisi"},
 {"3", "wangwu"},
 {"4", "yuyang"},
 {"5", "liuwei"}};
 for (int i = 0; i < data.length; i++) {
 test.insertData(con, "yy", "test", data[i][0], data[i][1]);
 }
// 查看表数据
test.select(con, "yy", "test");
// 删除表
test.dropTable(con, "yy", "test");
// 查看表
test.showTables(con, "test");
// 释放资源
test.clc(null, con, null);
}
}
截图展示:

4.Java编写增删改查hive代码
package com.example;

import java.sql.*;

public class hivezsgc {
// 查看数据库
public void showDatabases(Connection con) {
String sql = "show databases";
try {
PreparedStatement pst = con.prepareStatement(sql);
ResultSet res = pst.executeQuery();
System.out.println("现有的数据库");
int i = 1;
while (res.next()) {
System.out.println(i + "\t" + res.getString(1));
i += 1;
}
} catch (Exception e) {
System.out.println(e);
}
}

// 查看表
public void showTables(Connection con, String dbName) {

String sql_1 = "use " + dbName;
String sql = "show tables";
try {
if (dbName != null) {
PreparedStatement pst_1 = con.prepareStatement(sql_1);
pst_1.execute();
}
PreparedStatement pst = con.prepareStatement(sql);
ResultSet res = pst.executeQuery();
int i = 1;
System.out.println("数据库" + dbName + "的所有表");
while (res.next()) {
System.out.println(i + "\t" + res.getString(1));
i++;
}
} catch (Exception e) {
// TODO: handle exception
System.out.println(e);
}
}

// 创建表
public void createTable(Connection con, String tableName, String dbName) {
if (dbName != null) {
dbName += ".";
}else {
dbName = "";
}
String  sql = "create table " + dbName + tableName +
"(id int, name string)";
try {
PreparedStatement pst = con.prepareStatement(sql);
pst.executeUpdate();
System.out.println("表" + tableName + "创建成功");
} catch (Exception e) {
System.out.println(e);
}
}

// 添加数据
public void insertData(Connection con, String tableName, String dbName, String id, String name) {
if (dbName != null) {
dbName += ".";
}else {
dbName = "";
}
String sql = "insert into " + dbName + tableName + " values(" + id + ",'" + name + "')";

try {
PreparedStatement pst = con.prepareStatement(sql);
pst.execute();
System.out.println("添加数据成功");

} catch (Exception e) {

System.out.println(e);
}
}

// 删除表
public void dropTable(Connection con, String tableName, String dbName) {
if (dbName != null) {
dbName += ".";
}else {
dbName = "";
}
String sql = "drop table " + dbName + tableName;
try {
PreparedStatement pst = con.prepareStatement(sql);
pst.execute();
System.out.println("删除表" + tableName + "成功");
} catch (Exception e) {

System.out.println(e);
}
}

// 查询
public void select(Connection con, String tableName, String dbName) {

if (dbName != null) {
dbName += ".";
}else {
dbName = "";
}
String sql = "select * from " + dbName + tableName;
try {
// 将 sql 发送到数据库,预编译
PreparedStatement pst = con.prepareStatement(sql);
// 接收查询结果
ResultSet res = pst.executeQuery();
// 输出结果
System.out.println("表的内容");
while (res.next()) {
System.out.println(res.getString(1) + '\t' + res.getString(2));
}
} catch (Exception e) {

System.out.println(e);
}

}

// 释放资源
public void clc(ResultSet res, Connection con, PreparedStatement pst) {
try {
if (res != null) {
res.close();
}
if (con != null) {
con.close();
}
if (pst != null) {
pst.close();
}
} catch (Exception e) {

System.out.println(e);
}
}
}
截图展示:

运行结果:
集群响应:

网页展示:


实验完成!
本文转载自: https://blog.csdn.net/qq_56520755/article/details/130551463
版权归原作者 Pseudo-love453 所有, 如有侵权,请联系我们删除。
版权归原作者 Pseudo-love453 所有, 如有侵权,请联系我们删除。