

💗wei_shuo的个人主页
💫wei_shuo的学习社区
🌐Hello World !
Vue.js概述
Vue 是一套用于构建
用户界面的渐进式
JavaScript框架。 与其它大型框架不同的是,Vue 被设计为可以自底向上逐层应用。Vue 的核心库只关注
视图层,不仅易于上手,还便于与第三方库或既有项目
整合。另一方面,当与现代化的工具链以及各种支持
类库结合使用时,Vue 也完全能够为复杂的单页应用(
SPA)提供驱动
MVVM模型
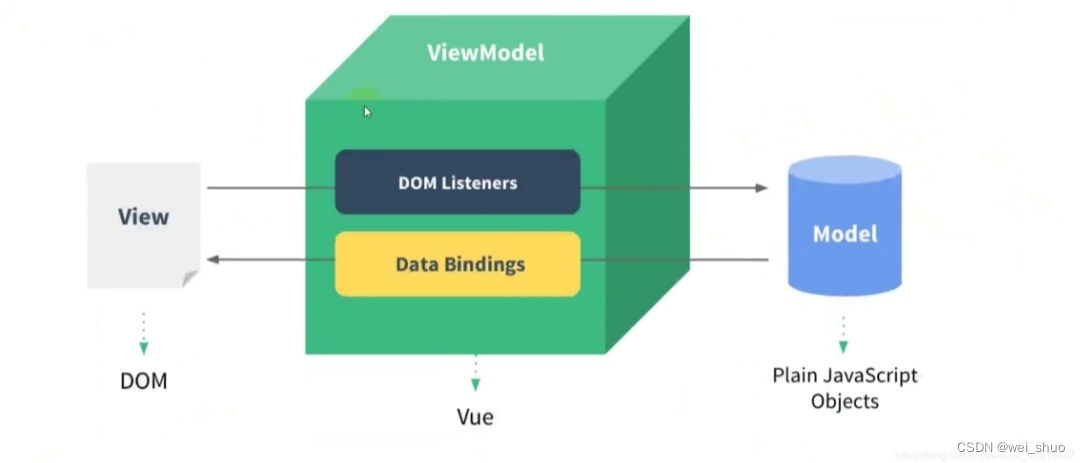
- Model:模型层,表示JavaScript对象
- View:视图层,表示DOM(HTML操作的元素)
- ViewModel:连接视图层和数据的中间件,Vue.js就是MVVM中的ViewModel层的实现者
MVVM模型的特点:
- 低耦合:视图(View)可以独立Model变化和修改,一个ViewModel可以绑定到不同的View上,当View变化的时候Model可以不变,当Model变化的时候View也可以不变
- 可复用:可以将视图逻辑放在ViewModel中,让更多View重用这段视图逻辑
- 独立开发:开发人员可以专注于业务逻辑和数据开发(ViewModel),设计人员可以专注于页面设计
- 可测试:测试可以针对ViewModel编写
Hello Vue
<!doctypehtml><htmllang="en"><head><metacharset="UTF-8"><metaname="viewport"content="width=device-width, user-scalable=no, initial-scale=1.0, maximum-scale=1.0, minimum-scale=1.0"><metahttp-equiv="X-UA-Compatible"content="ie=edge"><title>Document</title><scriptsrc="../sources/vue.js"></script></head><body><!--view层 模板--><divid="app"><h1>{{message}}</h1></div><script>var vm =newVue({el:"#app",//绑定元素//Model:数据data:{message:"Hello,Vue!"}});</script></body></html>
缩写 v-bind & v-on
- v-bind缩写
<!-- 完整语法 --><av-bind:href="url">...</a><!-- 缩写 --><a:href="url">...</a><!-- 动态参数的缩写 (2.6.0+) --><a:[key]="url"> ... </a>
- v-on缩写
<!-- 完整语法 --><av-on:click="doSomething">...</a><!-- 缩写 --><a@click="doSomething">...</a><!-- 动态参数的缩写 (2.6.0+) --><a@[event]="doSomething"> ... </a>总结:
它们看起来可能与普通的 HTML 略有不同,但
:与
@对于 attribute 名来说都是合法字符,在所有支持 Vue 的浏览器都能被正确地解析。而且,它们不会出现在最终渲染的标记中
Vue的7个属性
- el属性
指示vue编译器从什么地方开始解析 vue的语法
- data属性
组织从view中抽象出来的属性,可以说将视图的数据抽象出来存放在data中
- methods属性
放置页面中的业务逻辑,js方法一般都放置在methods中
- template属性
设置模板,会替换页面元素
- computed属性
用来计算,根据已经存在的属性计算出新的属性,对于同样的数据,会缓存
- render属性
创建真正的Virtual Dom
- watch属性
监听data中数据的变化
双向数据绑定
双向数据绑定,是指视图 View 的变化能实时地让数据模型 Model 发生变化,而数据的变化也能实时更新到视图层
- 输入框双向数据绑定
<!--view层 模板--><divid="app">
    输入的文本:<inputtype="text"v-model="message">{{message}}
</div><script>var vm =newVue({el:"#app",//绑定元素//Model:数据data:{message:"同步更新"}});</script>
- 单选框双向数据绑定
<!--view层 模板--><divid="app">
    性别:
    <inputtype="radio"name="sex"value="男"v-model="wei_shuo"> 男
    <inputtype="radio"name="sex"value="女"v-model="wei_shuo"> 女

    <p>
        选中了谁:{{wei_shuo}}
    </p></div><script>var vm =newVue({el:"#app",//绑定元素//Model:数据data:{wei_shuo:""}});</script>
- 下拉框双向数据绑定
<!--view层 模板--><divid="app">
        下拉框:
        <selectv-model="selected"><option>---请选择---</option><optionvalue="A">A</option><optionvalue="B">B</option><optionvalue="C">C</option><optionvalue="D">D</option></select></div><script>var vm =newVue({el:"#app",//绑定元素//Model:数据data:{selected:"---请选择---"}});</script>
组件
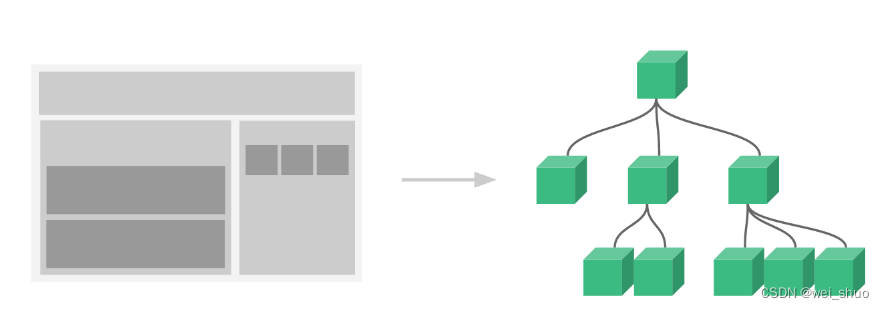
组件可以扩展 HTML 元素,封装可重用的代码;组件系统让我们可以用独立可复用的小组件来构建大型应用,几乎任意类型的应用的界面都可以抽象为一个组件树
格式:
Vue.component('my-component-name',{/* ... */})该组件名就是
Vue.component的第一个参数

<!--view层 模板--><divid="app"><!--组件:传递给组件中的值;只能通过props参数接受--><wei_shuov-for="item in items"v-bind:wei="item"></wei_shuo></div><script><!--定义一个Vue组件component-->
    Vue.component("wei_shuo",{//接受参数props:['wei'],//模板template:'<li>{{wei}}</li>'});var vm =newVue({el:"#app",//绑定元素//Model:数据data:{items:["Java","Linux","前端","后端"]}});</script>
Axios异步通讯
Axios是一个开源的可以用在浏览器和NodeJS的异步通讯框架,主要作用是实现AJAX异步通讯
特点:
- 浏览器创建XMLHttpRequests
- 从node.js创建http请求
- 支持Promise API(JS中链式编程)
- 拦截请求和响应
- 转换请求数据和响应数据
- 取消请求
- 自动转换JSON数据
- 客户端支持防御XSRF(跨站请求伪造)
背景
Vue.js是一个视图层框架,作者(尤雨溪)严格准守SoC(关注度分离原则),所以Vue.js并不包含AJAX的通讯功能,为了解决通信问题,作者单独开发了名为vue-resource的插件,2.0版本以后停止了对该插件的维护并推荐了Axios框架
Vue声明周期

Vue实例有完整的声明周期,开始创建、编译模板、挂载DOM、渲染->更新->渲染、卸载等一系列操作,也就是Vue实例从创建到销毁的过程,称为Vue的声明周期
声明周期钩子函数
- 创建前(beforeCreate)
Vue实例开始初始化时调用
- 创建后(created)
实例创建之后进行调用,此时尚未开始DOM编译
- 载入前(beforeMount)
依然得不到具体的DOM元素,但vue挂载的根节点已经创建
- 载入后(mounted)
在DOM文档渲染完毕之后进行调用
- 更新前(beforeUpdate)
data更新时触发
- 更新后(updated)
data更新时触发
- 销毁前(beforeDestroy)
销毁实例前进行调用,此时实例任然有效
- 销毁后(destroyed)
实例被销毁之后进行调用
- 创建data.json文件
{"name":"wei_shuo","url":"http://baidu.com","page":"1","isNonProfit":"true","address":{"street":"陕西","city":"西安","country":"中国"},"links":[{"name":"B站","url":"https://www.bilibili.com/"},{"name":"4399","url":"https://www.4399.com/"},{"name":"百度","url":"https://www.baidu.com/"}]}
- 引入vue.js和axios.js
<script src="../sources/vue.js"></script><script src="https://unpkg.com/axios/dist/axios.min.js"></script>
- Vue.html文件
<!doctypehtml><htmllang="en"><head><metacharset="UTF-8"><metaname="viewport"content="width=device-width, user-scalable=no, initial-scale=1.0, maximum-scale=1.0, minimum-scale=1.0"><metahttp-equiv="X-UA-Compatible"content="ie=edge"><title>Document</title><scriptsrc="../sources/vue.js"></script><scriptsrc="https://unpkg.com/axios/dist/axios.min.js"></script><!--    v-cloak 解决闪烁问题 --><style>[v-clock]{display: none;}</style></head><body><divid="app"v-clock><div>{{info.name}}</div><div>{{info.address.street}}</div><av-bind:href="info.url">点击</a></div><script>var vm =newVue({el:"#app",data(){return{//请求的返回参数,必须和json字符串一致info:{name:null,address:{street:null,city:null,contry:null},url:null}}},mounted(){//钩子函数  链式编程
            axios.get('../data.json').then(response=>(this.info = response.data));}})</script></body></html>
/*
浏览器显示结果:
wei_shuo
陕西
点击
*/
内容分发(Slot插槽)
Vue.js中使用元素作为承载分发内容的出口,作者称为
插槽,可以应用在组合组件的场景中
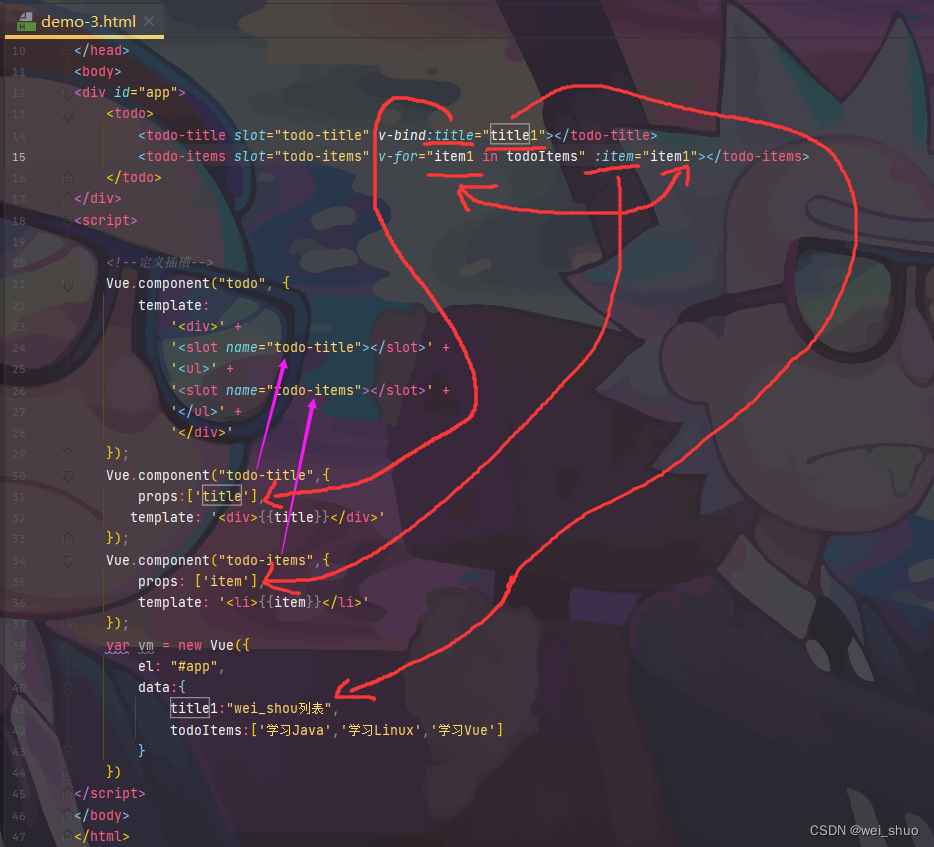
<!doctypehtml><htmllang="en"><head><metacharset="UTF-8"><metaname="viewport"content="width=device-width, user-scalable=no, initial-scale=1.0, maximum-scale=1.0, minimum-scale=1.0"><metahttp-equiv="X-UA-Compatible"content="ie=edge"><title>Document</title><scriptsrc="../sources/vue.js"></script></head><body><divid="app"><todo><todo-titleslot="todo-title"v-bind:title="title1"></todo-title><todo-itemsslot="todo-items"v-for="item1 in todoItems":item="item1"></todo-items></todo></div><script><!--定义插槽-->
    Vue.component("todo",{template:'<div>'+'<slot name="todo-title"></slot>'+'<ul>'+'<slot name="todo-items"></slot>'+'</ul>'+'</div>'});
    Vue.component("todo-title",{props:['title'],template:'<div>{{title}}</div>'});
    Vue.component("todo-items",{props:['item'],template:'<li>{{item}}</li>'});var vm =newVue({el:"#app",data:{title1:"wei_shou列表",todoItems:['学习Java','学习Linux','学习Vue']}})</script></body></html>
自定义事件($emit)
自定义事件分发
格式:this.$emit('自定义事件名',参数)this.$emit('remove', index);
<!doctypehtml><htmllang="en"><head><metacharset="UTF-8"><metaname="viewport"content="width=device-width, user-scalable=no, initial-scale=1.0, maximum-scale=1.0, minimum-scale=1.0"><metahttp-equiv="X-UA-Compatible"content="ie=edge"><title>Document</title><scriptsrc="../sources/vue.js"></script></head><body><divid="app"><todo><todo-titleslot="todo-title"v-bind:title="title1"></todo-title><todo-itemsslot="todo-items"v-for="(item1,index) in todoItems":item="item1"v-bind:index="index"v-on:remove="removeItems(index)"v-bind:key="index"></todo-items></todo></div><script><!--定义插槽-->
    Vue.component("todo",{template:'<div>'+'<slot name="todo-title"></slot>'+'<ul>'+'<slot name="todo-items"></slot>'+'</ul>'+'</div>'});
    Vue.component("todo-title",{props:['title'],template:'<div>{{title}}</div>'});
    Vue.component("todo-items",{props:['item','index'],//只能绑定当前组件的方法template:'<li>{{index}}---{{item}}<button @click="remove">删除</button></li>',methods:{remove:function(index){//自定义事件分发//this.$emit('自定义事件名',参数)this.$emit('remove', index)}}});var vm =newVue({el:"#app",data:{title1:"wei_shou列表",todoItems:['学习Java','学习Linux','学习Vue'],removeItems:function(index){
                console.log("删除"+this.todoItems[index]+"OK")this.todoItems.splice(index,1);//一次删除一个元素}}})</script></body></html>
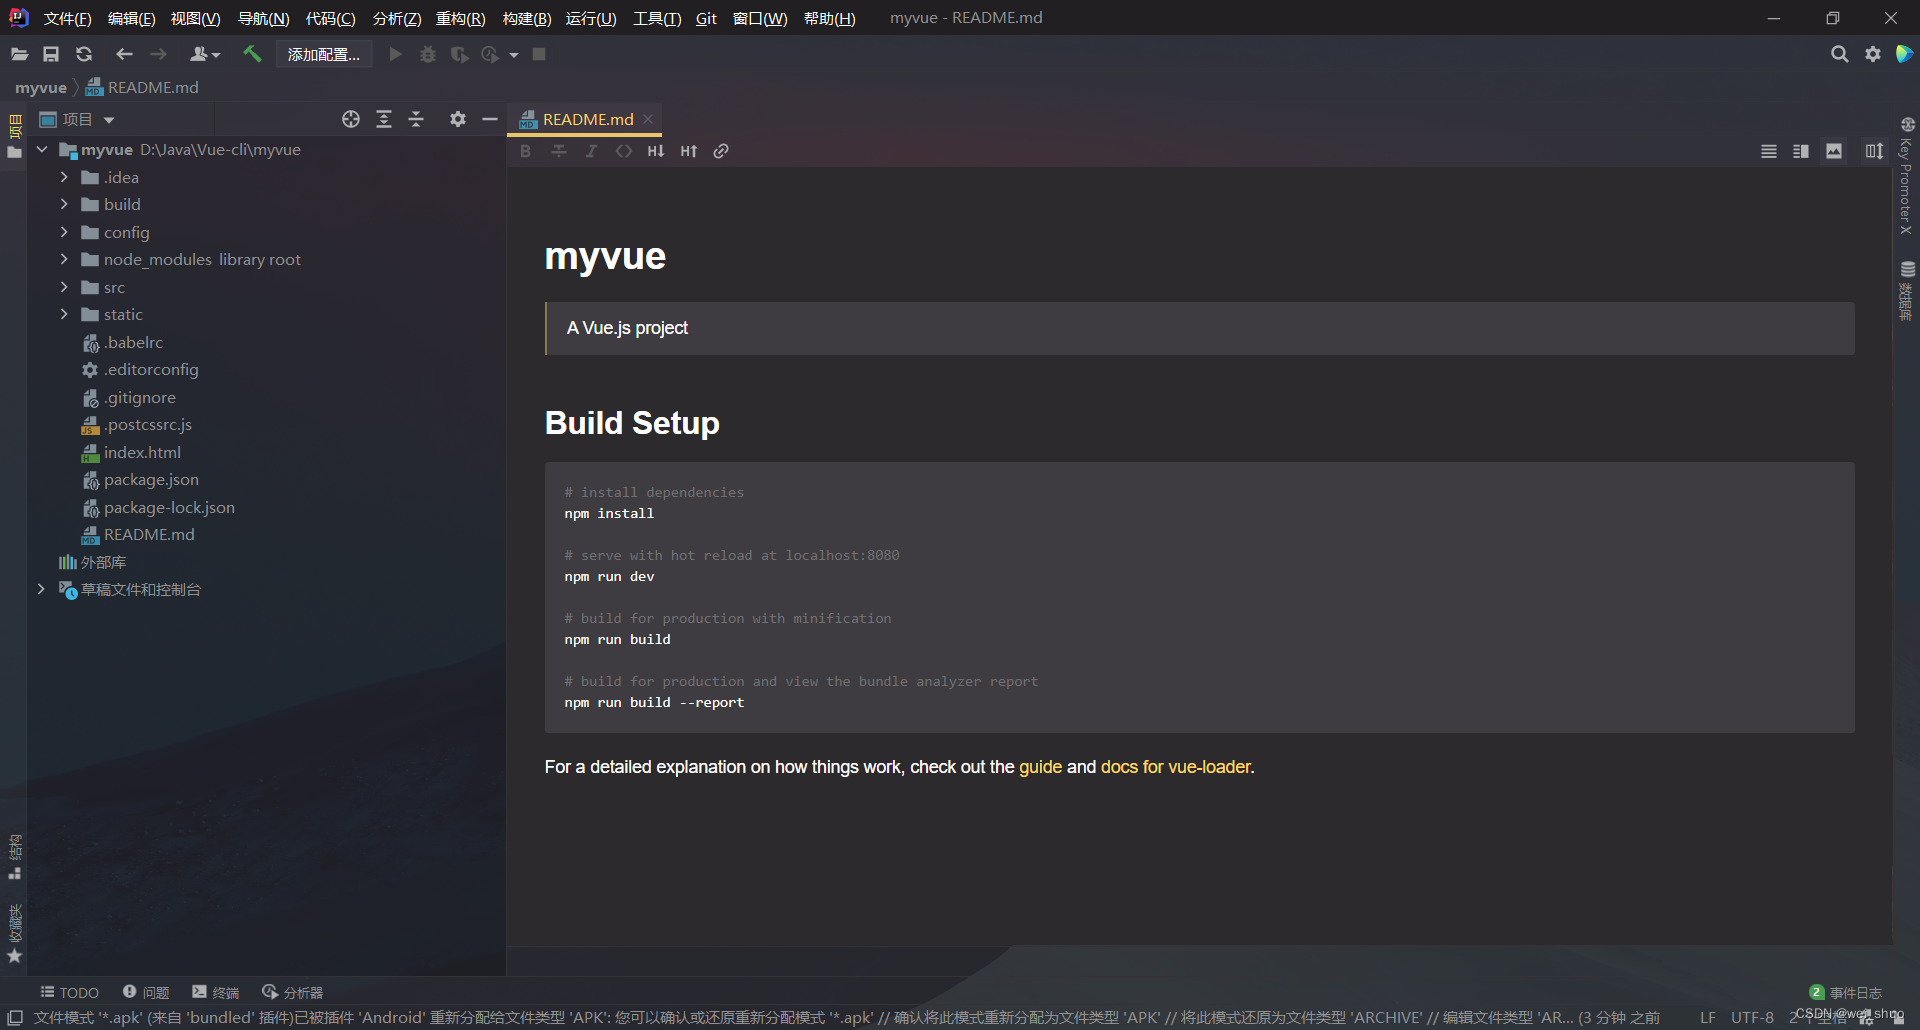
vue-cli项目
vue-cli是官方提供的一个脚手架,用于快速生成一个vue的项目模板;预先定义的目录结构及基础代码,使开发更加快速
功能:
- 统一项目结构
- 本地调试
- 热部署
- 单元测试
- 集成打包上线
- 创建Vue项目,新建目录
- cmd目录窗进入创建的目录路径
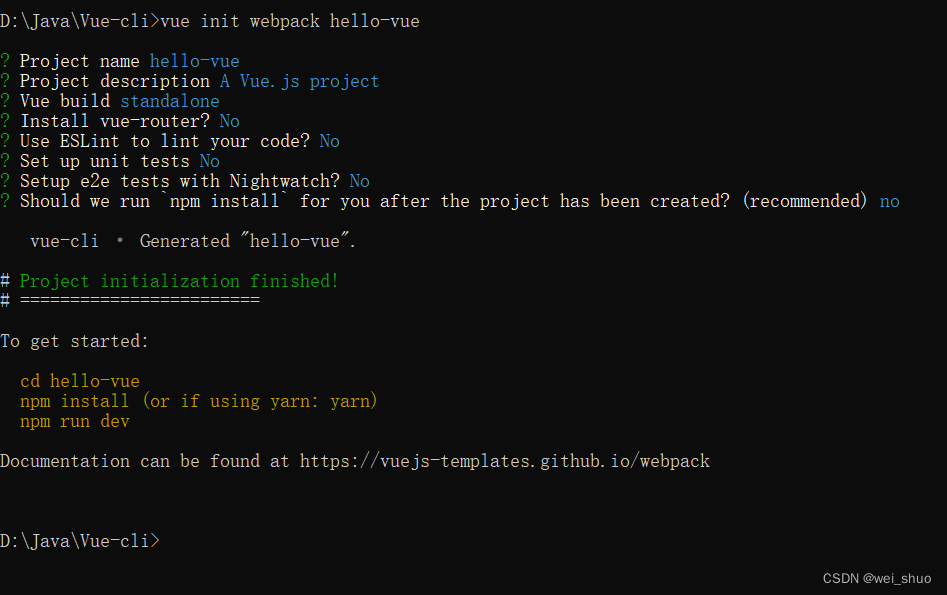
- 运行vue init webpack myvue命令初始化
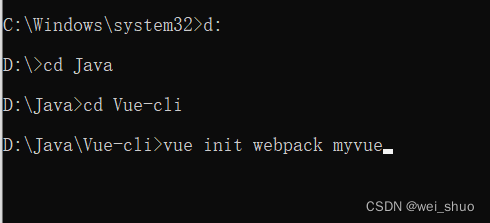
等待5分钟左右,即可初始化完成
项目名称? Project name (myvue)
项目描述? Project description (A Vue.js project)
作者? Author
构建(选择第一个即可:运行时编译)? Vue build (Use arrow keys)
vue路由,以下n即是手动创建,y即是自动创建? Install vue-router? (Y/n)
? Use ESLint to lint your code?(Y/n)
? Set up unit tests (Y/n)
? Setup e2e tests with Nightwatch? (Y/n)No即不会自动npm install,yes就会自动npm install? Should we run
npm installfor you after the project has been created? (recommended) (Use arrow keys)
Yes, use NPM
Yes, use Yarn
No, I will handle that myselfD:\Java\Vue-cli>vue init webpack myvue ? Project name (myvue) ? Project description (A Vue.js project) ? Author ? Vue build (Use arrow keys)> Runtime + Compiler: recommended formostusers Runtime-only: about 6KB lighter min+gzip, but templates (or any Vue-specific HTML) are ONLY allowed in .vue files - re nder functions are required elsewhere ? Install vue-router? No ? Use ESLint to lint your code? No ? Set up unit tests No ? Setup e2e tests with Nightwatch? No ? Should we run `npminstall`for you after the project has been created? (recommended)(Use arrow keys)> Yes, use NPM Yes, use Yarn No, I will handle that myself
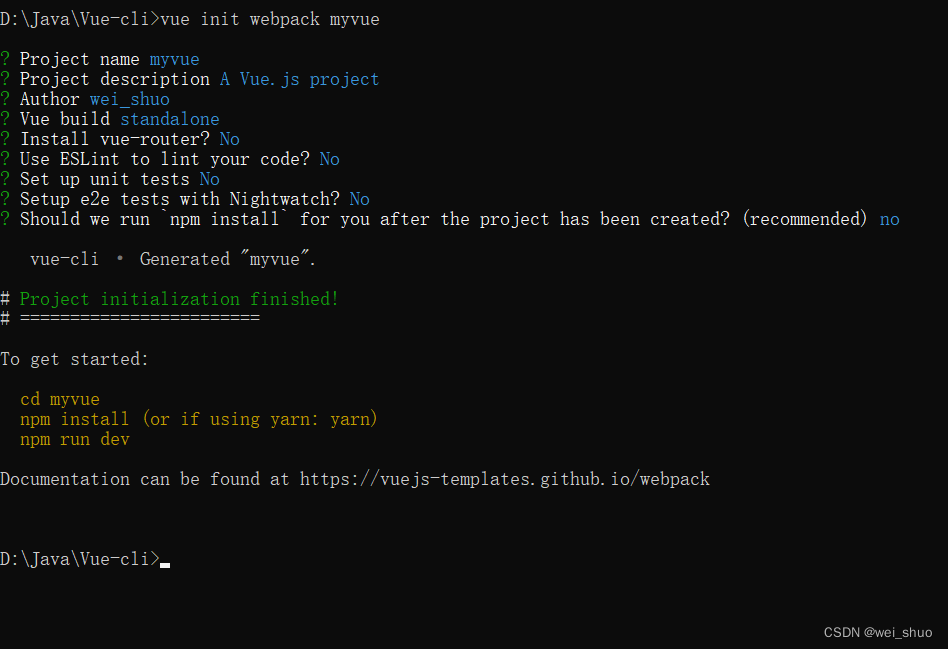
- 目录路径即会产生myvue目录
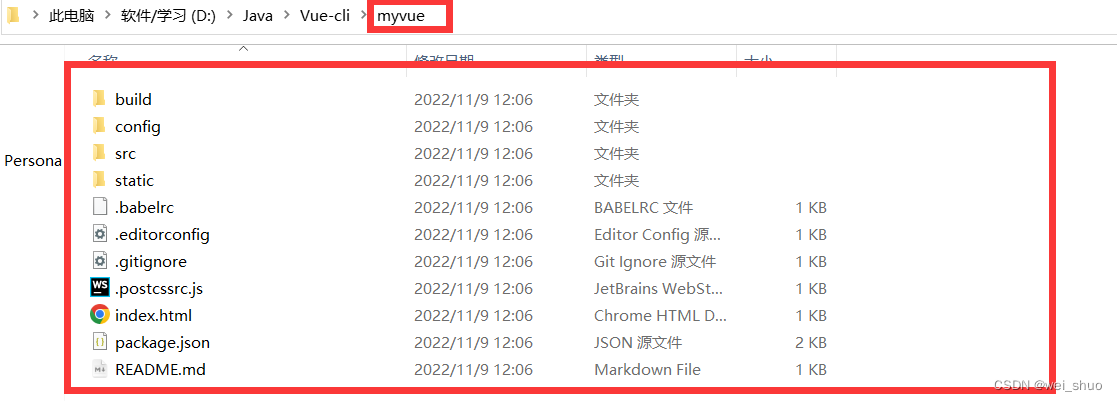
初始化运行
cd myvue
npm install
npm run dev
- cmd窗口进入myvue路径
- 执行npm install命令
- 如果中途报错,安装命令窗口提示执行提示命令即可修复

- 执行npm run dev 启动当前项目
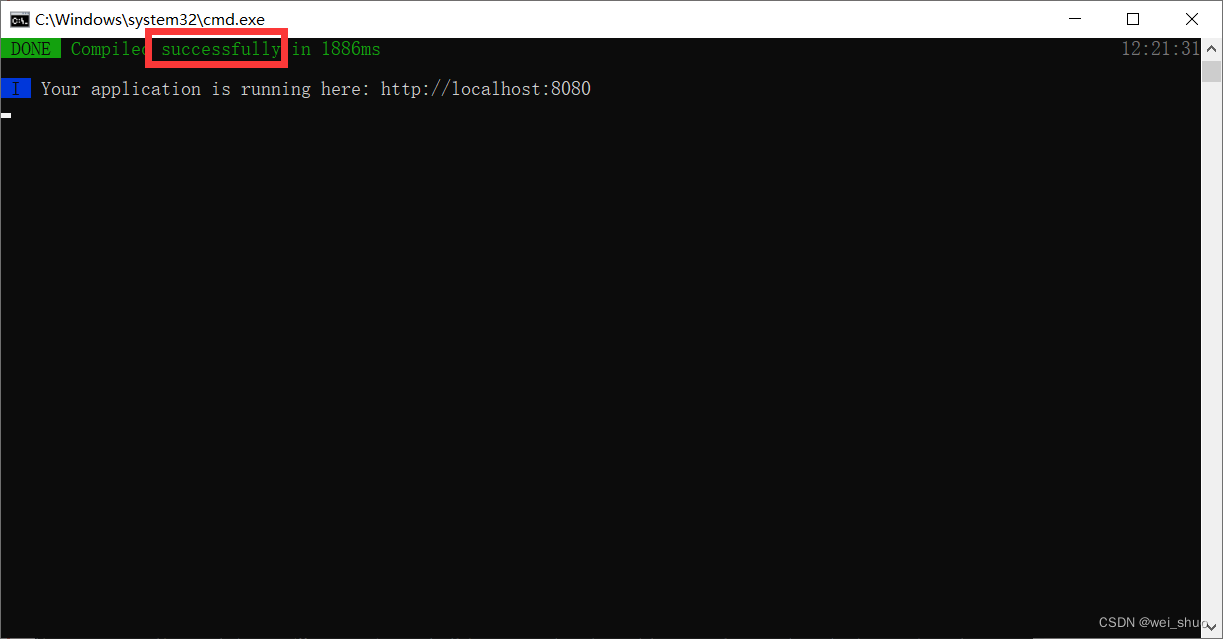
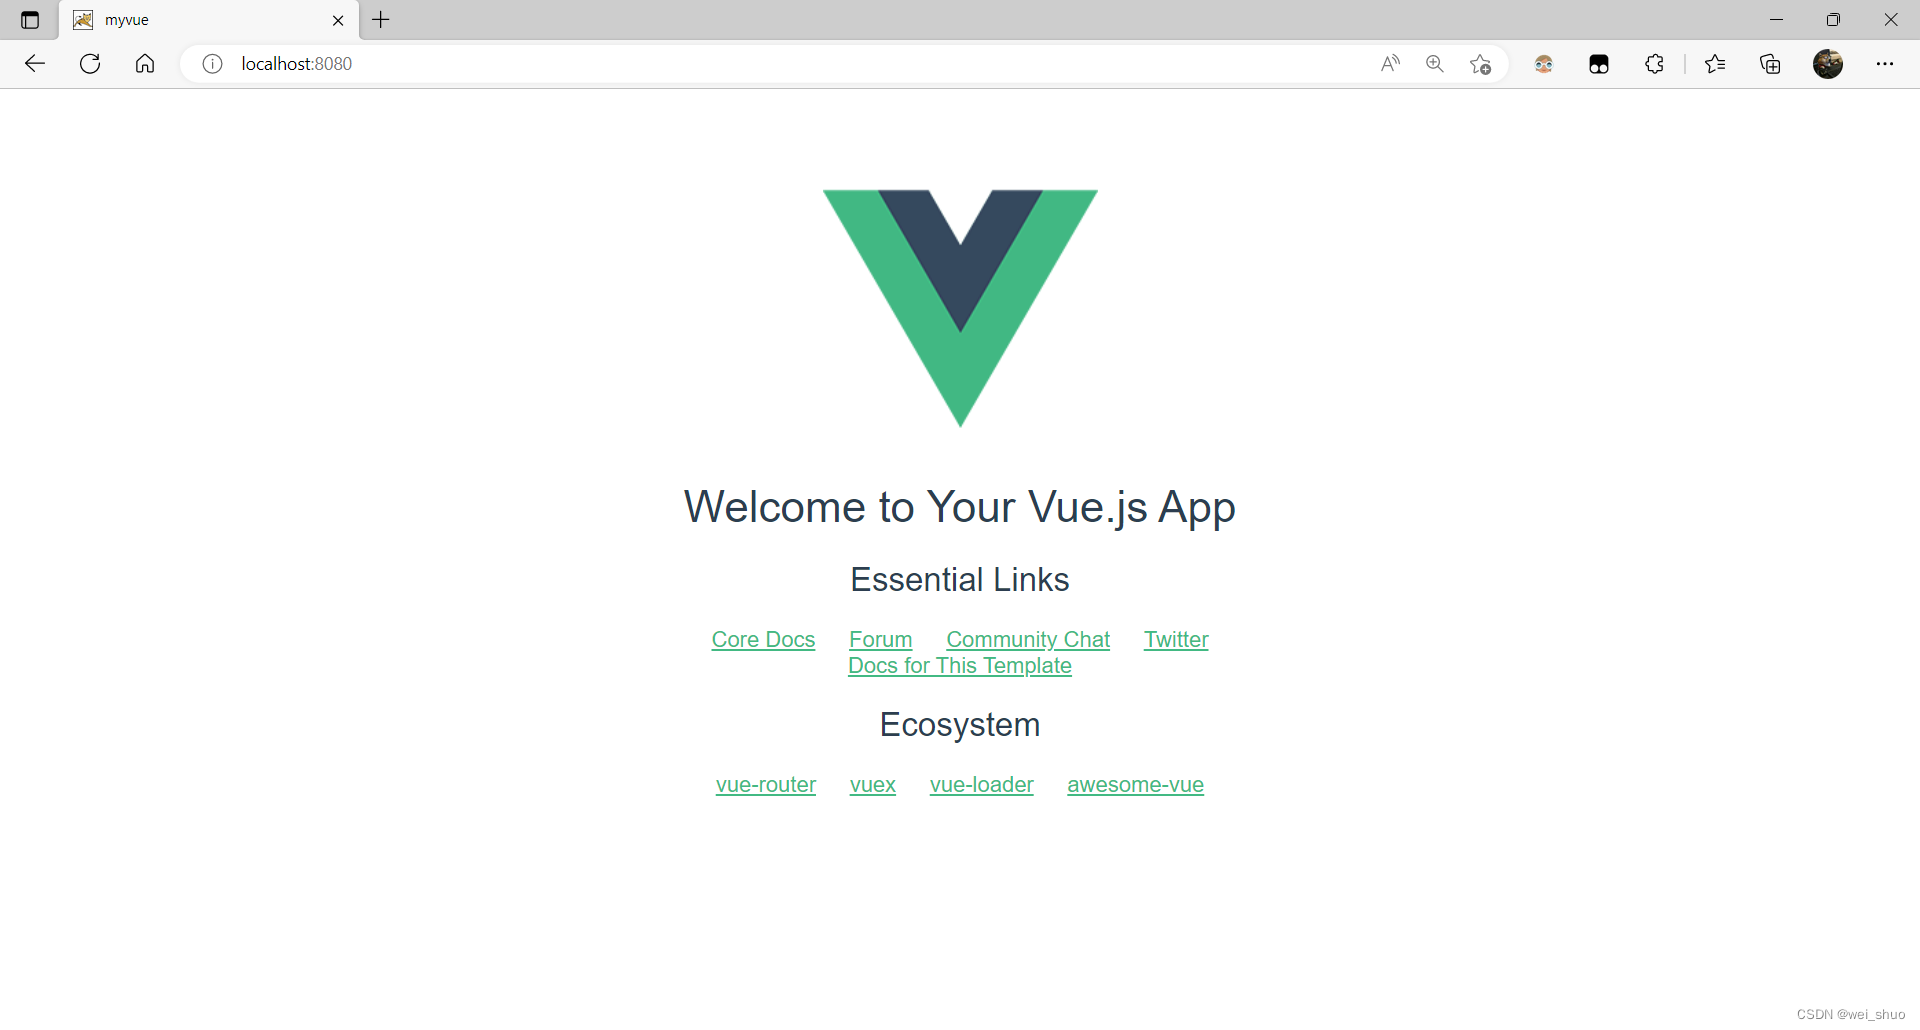
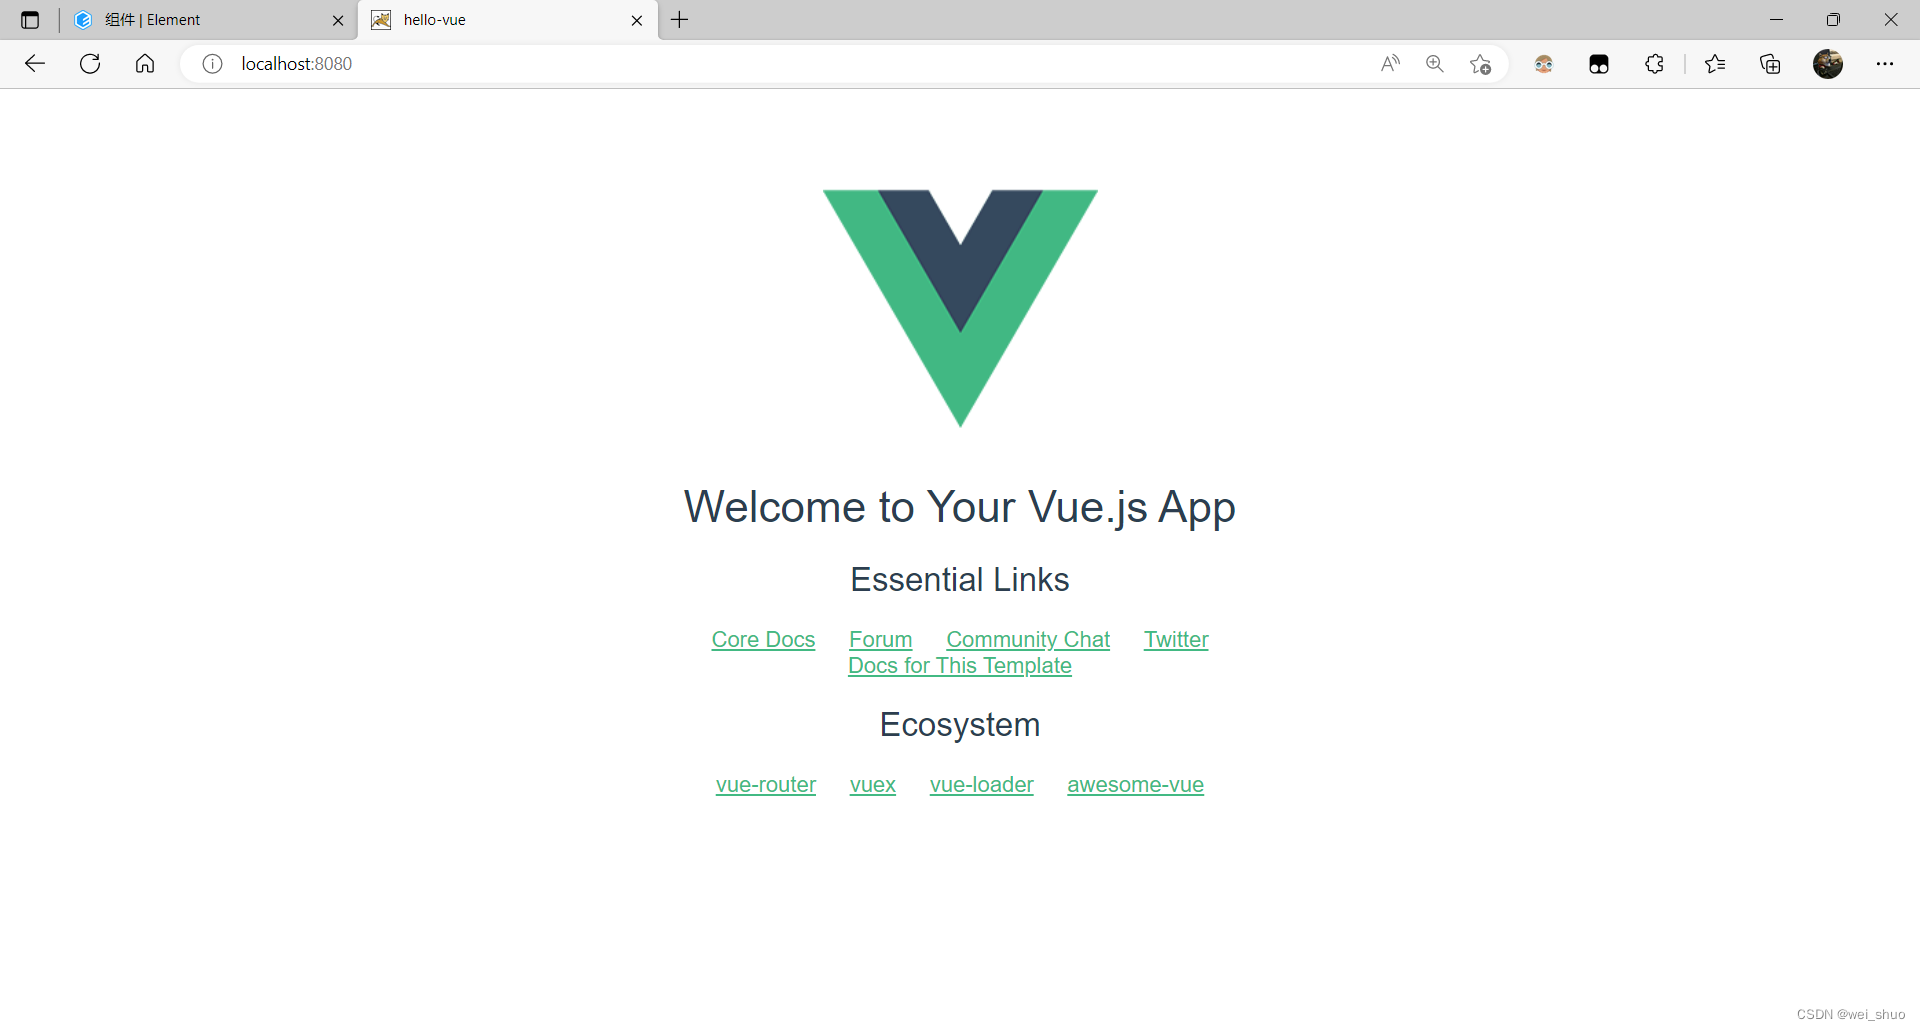
- cmd上面的cmd窗口别关闭,直接访问http://localhost:8080会出现如下页面
IDEA搭建vue-cli项目
- 直接用IDEA——OPEN——myvue目录即可
Webpack学习
webpack 是代码编译工具,有入口、出口、loader 和插件。webpack 是一个用于现代
JavaScript应用程序的静态模块打包工具,当 webpack 处理应用程序时,它会在内部构建一个依赖图(dependency graph),此依赖图对应映射到项目所需的每个模块,并生成一个或多个
bundle。
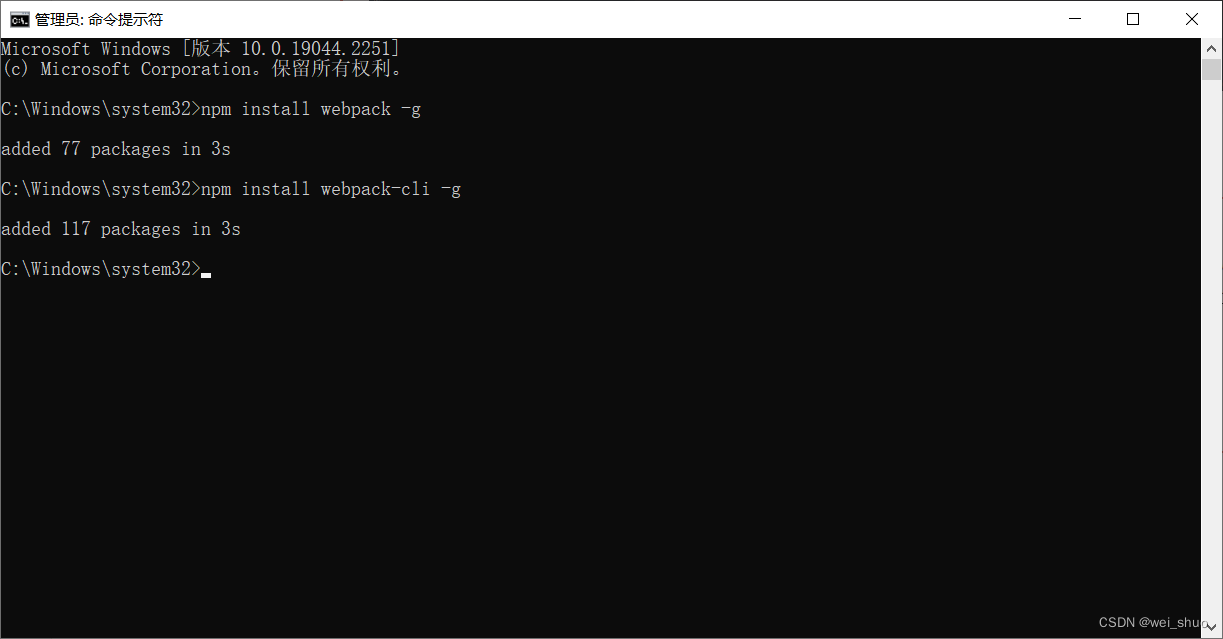
安装Webpack
- npm install webpack -g
- npm install webpack-cli -g
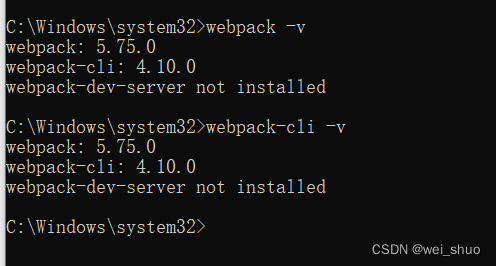
测试安装成功
- webpack -v
- webpack-cli -v
配置
创建webpack.config.js配置文件
- entry:入口文件,指定webpack用哪个文件作为项目入口
- output:输出,指定webpack把处理完成的文件放置到指定路径
- module:模板,用于处理各类类型的文件
- plugins:插件,如:热更新、代码重用……
- resolve:设置路径指向
- watch:监听,用于设置文件改动后直接打包
webpack使用
- 创建项目
- 创建名为modules的目录,用于放置JS模板等资源文件
- modules下创建模板文件,用于编写JS模板相关代码(hello.js)
//暴露一个方法
exports.sayHi=function(){
    document.write("<h1>wei_shuo</h1>")}
- modules下创建入口文件,用于打包时设置entry属性(main.js)
var hello =require("./hello");
hello.sayHi();
- 项目目录下创建配置文件(webpack.config.js)
module.exports ={entry:'./modules/main.js',output:{filename:"./js/bundle.js"}};
- 在IDEA终端使用webpack命令打包(bundle.js)
(()=>{var r={645:(r,t)=>{t.sayHi=function(){document.write("<h1>wei_shuo</h1>>")}}},t={};(functione(o){var i=t[o];if(void0!==i)return i.exports;var n=t[o]={exports:{}};return r[o](n,n.exports,e),n.exports})(645).sayHi()})();
- 项目目录下创建HTML页面,导入webpack打包后的JS文件(index.html)
<!doctypehtml><htmllang="en"><head><metacharset="UTF-8"><metaname="viewport"content="width=device-width, user-scalable=no, initial-scale=1.0, maximum-scale=1.0, minimum-scale=1.0"><metahttp-equiv="X-UA-Compatible"content="ie=edge"><title>Document</title></head><body><!--前端的模块化开发--><scriptsrc="dist/js/bundle.js"></script></body></html>
- 说明> 参数 --watch 用于监听变化> > webpack --watch
vue-router路由
Vue Router 是
Vue.js的官方路由。它与 Vue.js 核心深度集成,让用 Vue.js 构建单页应用变得轻而易举
功能:vue-router官方
- 嵌套路由映射
- 动态路由选择
- 模块化、基于组件的路由配置
- 路由参数、查询、通配符
- 展示由 Vue.js 的过渡系统提供的过渡效果
- 细致的导航控制
- 自动激活 CSS 类的链接
- HTML5 history 模式或 hash 模式
- 可定制的滚动行为
- URL 的正确编码
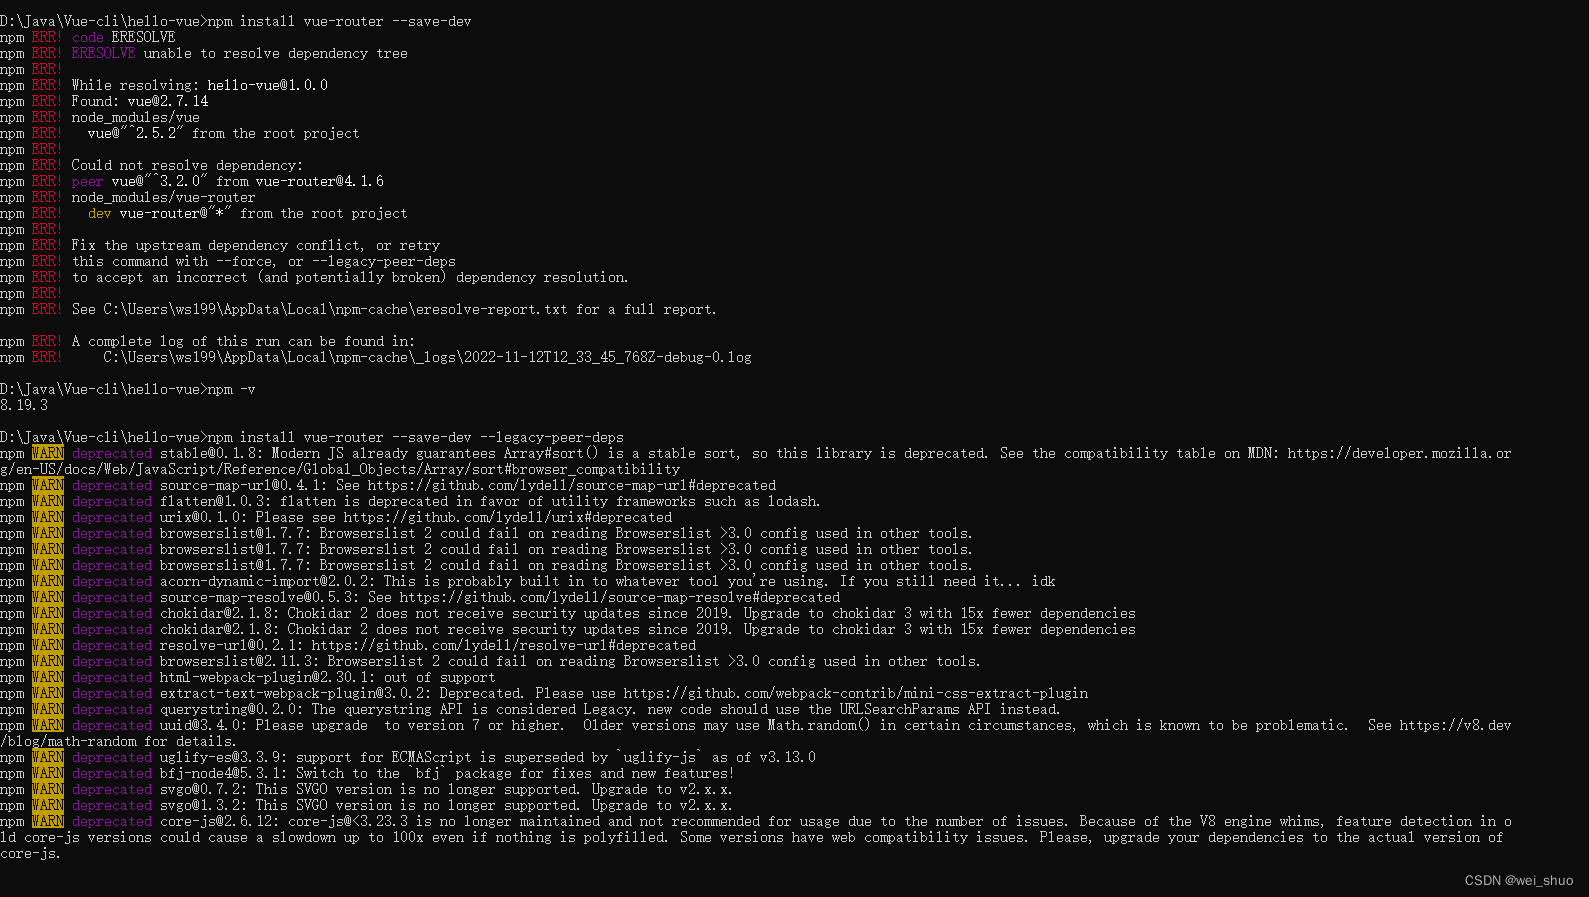
安装vue-router
- 基于第一个
vue-cli进行测试学习;查看node_modules中是否存在vue-router- vue-router是一个插件包,所以需要用npm&cnpm进行安装
- 打开IDEA终端,输入命令,安装vue-router
npminstall vue-router --save-dev
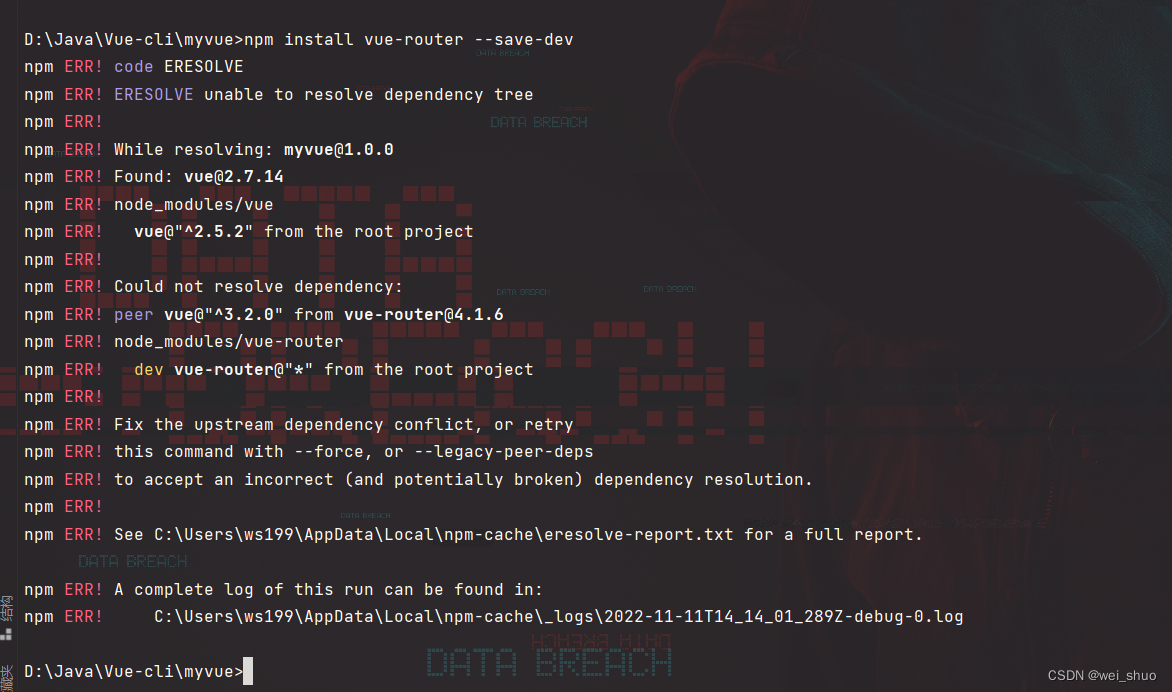
- 因为依赖关系报错则,使用如下安装命令
npminstall --legacy-peer-deps vue-router --save-dev

- 如果报错信息显示run
npm audit fixto fix them,ornpm auditfor details;根据信息执行提示命令即可npm audit fix npm audit
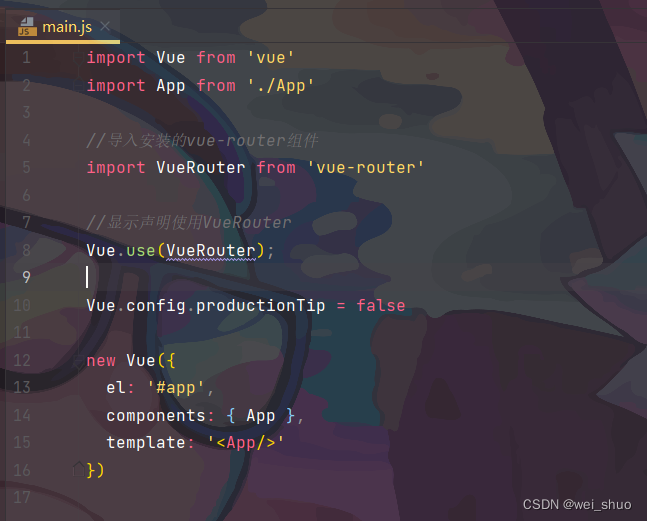
- 在项目main.js中导入,并使用
//导入安装的vue-router组件import VueRouter from'vue-router'//显示声明使用VueRouter
Vue.use(VueRouter);
测试
- IDEA终端运行项目
npm run dev
- 如果出现报错
"export 'default'(imported as 'VueRouter') was not found in'vue-router'
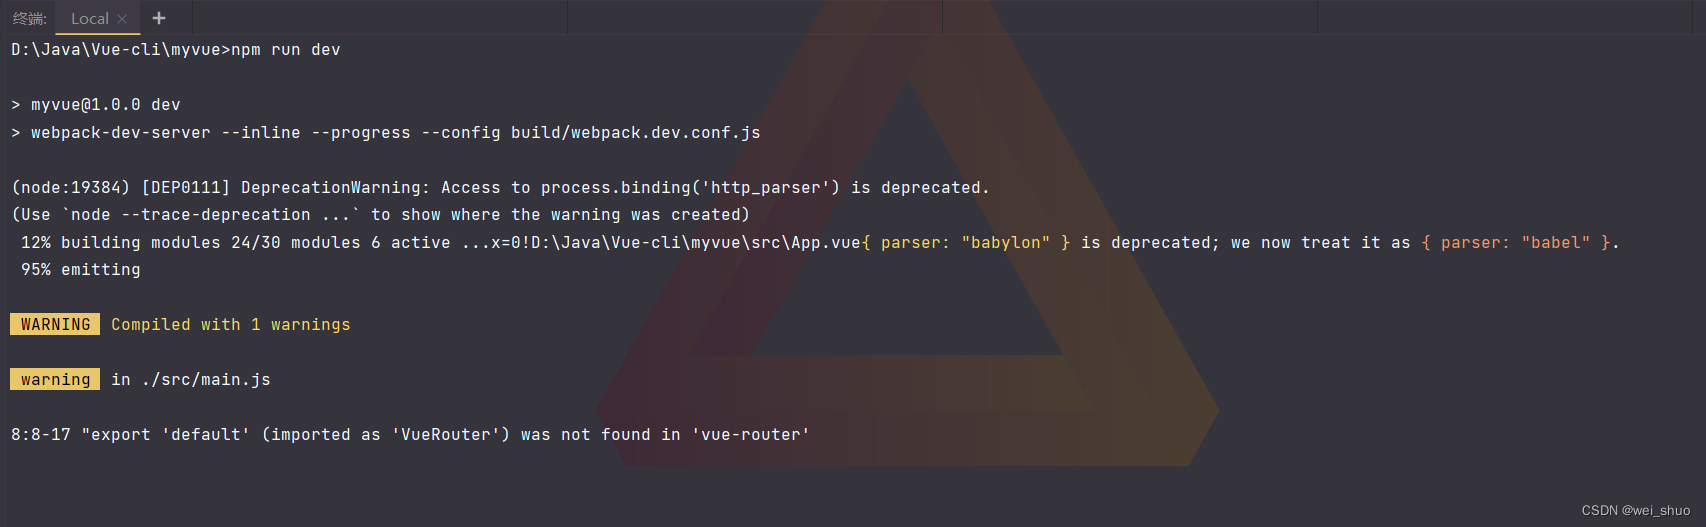
两种原因:
- 路由格式编写错误
路由格式
routes:[{// 路径path:'/home',// 组件名component: Home
}];
- 对应版本不兼容
安装的时候默认安装最新版本可能与其他插件不兼容,推荐使用稳定版本vue-router@3.5.2
   卸载:npm uninstall vue-router
   下载&降级:npm install [email protected]    //   @xxx 自己指定版本

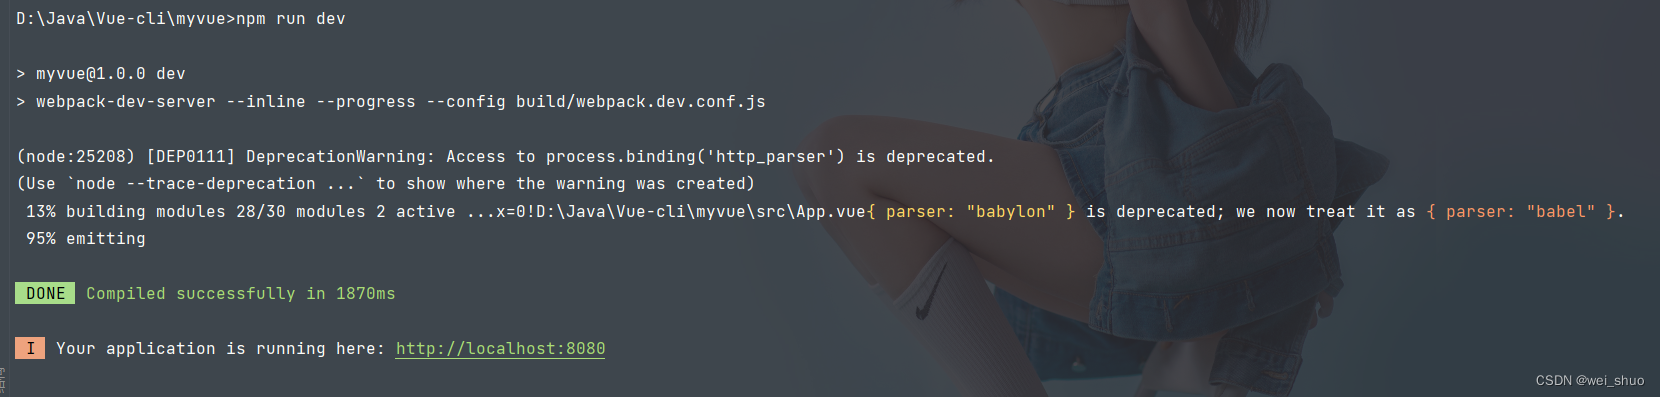
- 再次运行项目(npm run dev)
- main.js 代码
import Vue from'vue'import App from'./App'//导入安装的vue-router组件import VueRouter from'vue-router'//显示声明使用VueRouter
Vue.use(VueRouter);

Vue.config.productionTip =falsenewVue({el:'#app',components:{ App },template:'<App/>'})
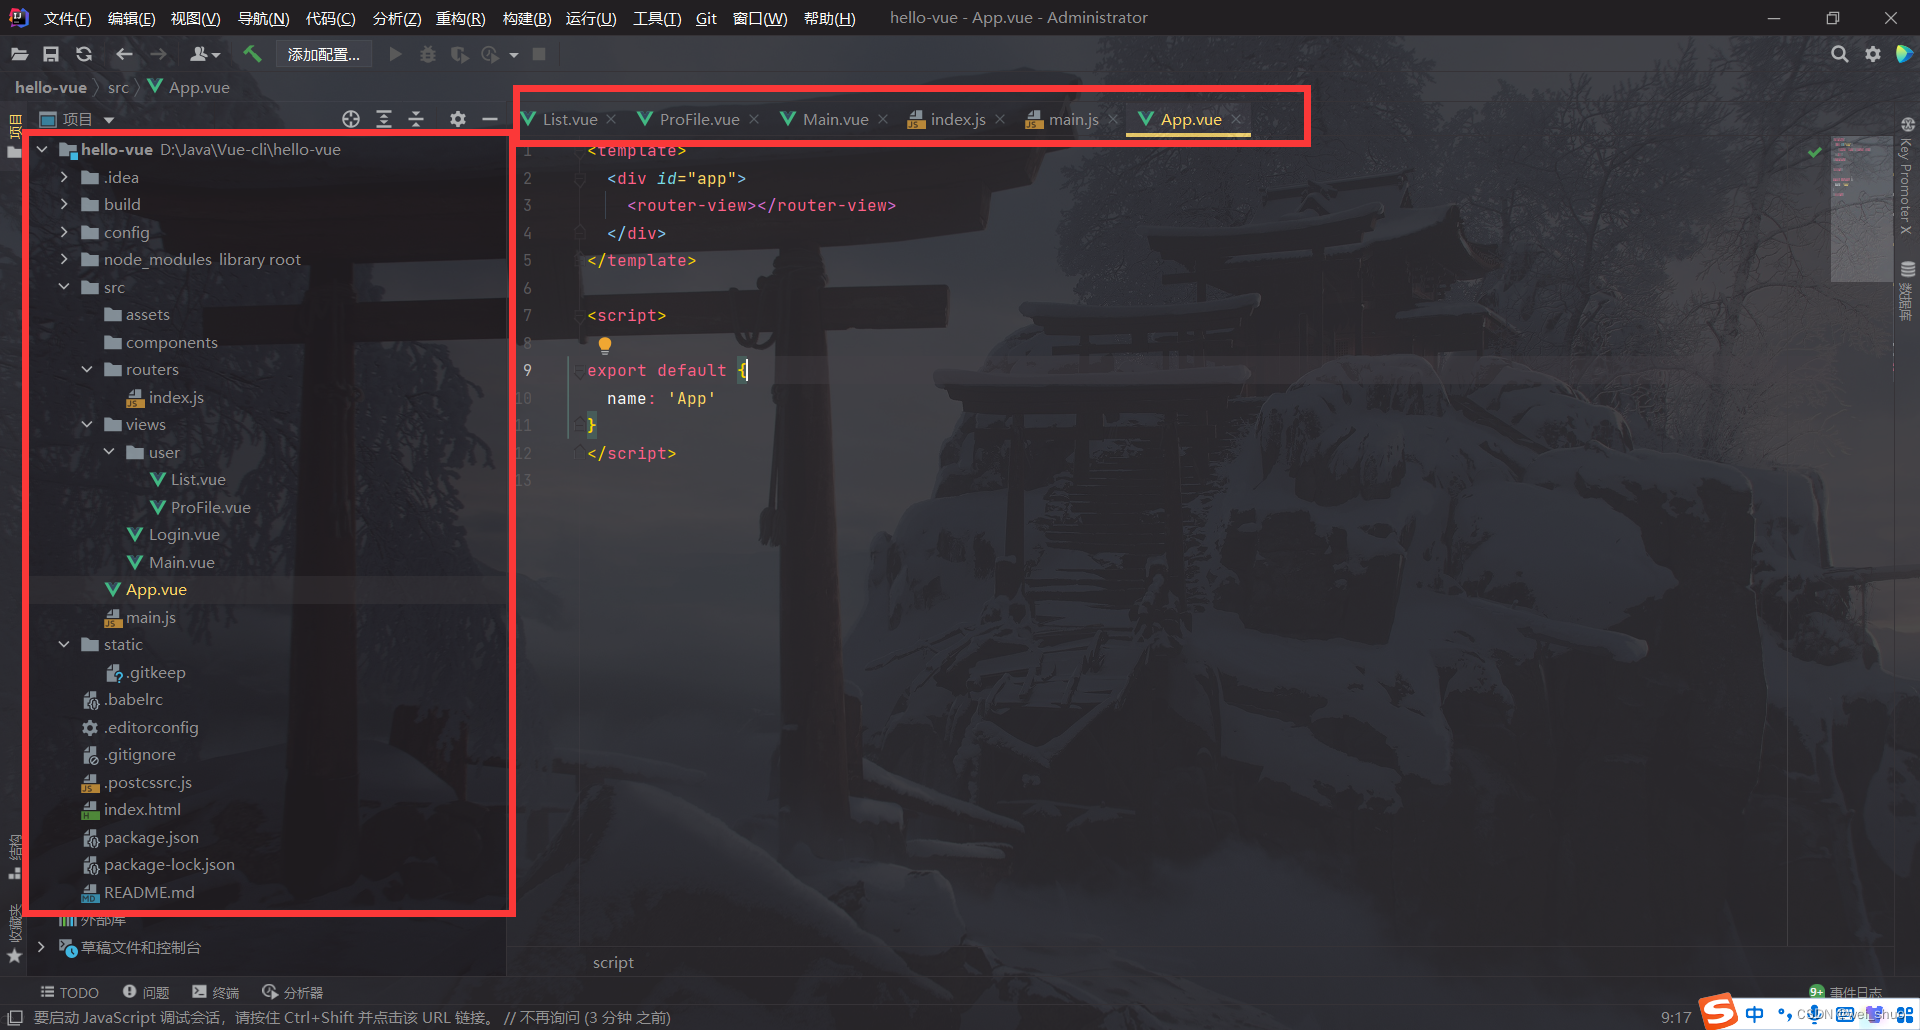
- App.vue代码
<template>
  <div id="app">
    <h1>欢迎wei_shuo</h1>
  </div>
</template>

<script>
export default {
  name: 'App'
}
</script>

<style>
#app {
  font-family: 'Avenir', Helvetica, Arial, sans-serif;
  -webkit-font-smoothing: antialiased;
  -moz-osx-font-smoothing: grayscale;
  text-align: center;
  color: #2c3e50;
  margin-top: 60px;
}
</style>

vue-router使用
创建公共组件目录components
目录components下创建vue组件
- Content.vue
<!--页面编写-->
<template>
  <h1>内容页面</h1>
</template>

<!--vue对象-->
<script>
export default {
  name: "Content"
}

</script>

<!--scoped作用域,添加scoped只在当前页面生效-->
<style scoped>

</style>
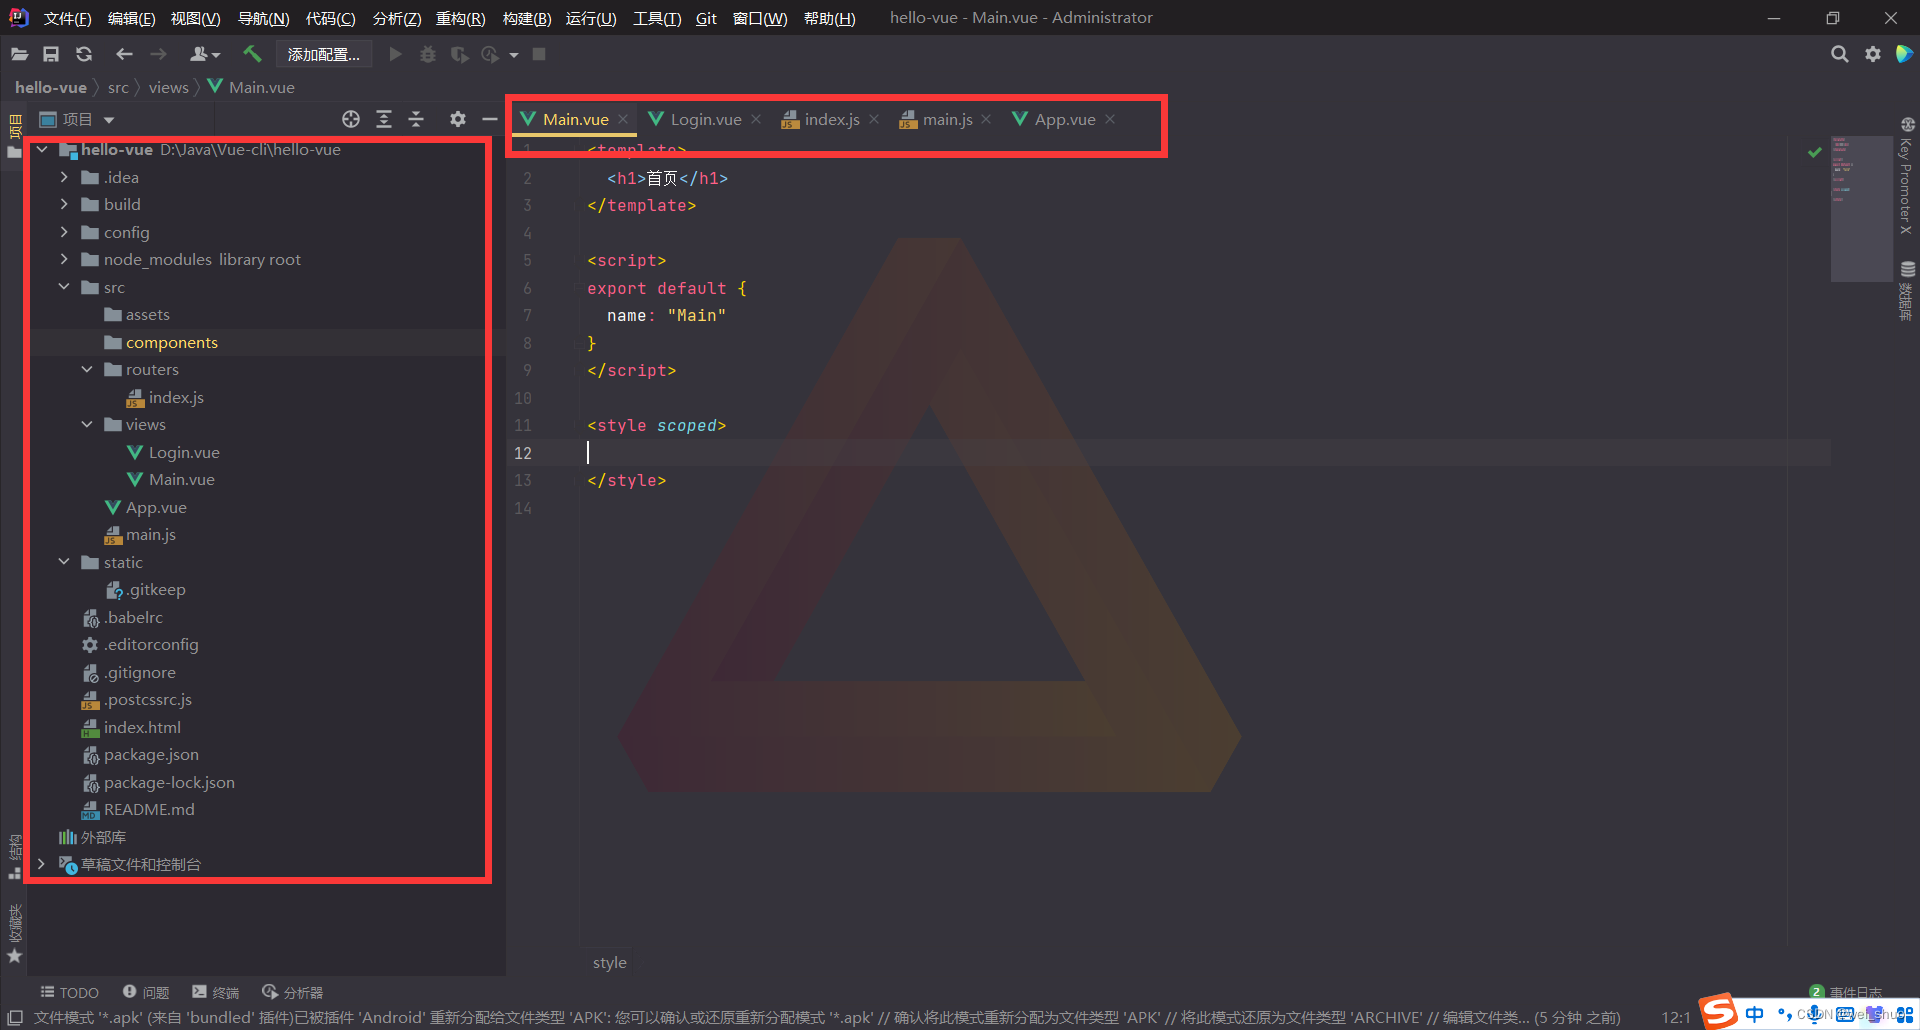
- Main.vue
<template>
  <h1>首页</h1>
</template>

<script>
export default {
  name: "Main"
}
</script>

<style scoped>

</style>
创建存放路由的文件夹router
目录router创建router路由
- index.js
//导入vue和vue-router组件import Vue from"vue";import VueRouter from"vue-router";import Content from"../components/Content";import Main from"../components/Main";//安装路由
Vue.use(VueRouter);//配置导出路由exportdefaultnewVueRouter({routes:[{//路由路径path:'/content',name:'content',//跳转组件component:Content
    },{//路由路径path:'/main',name:'content',//跳转组件component:Main
    }]});
配置路由
在main.js中配置路由
import Vue from'vue'import App from'./App'//导入配置路由文件import router from'./router'//自动扫描里面的路由配置

Vue.config.productionTip =falsenewVue({el:'#app',//配置路由
  router,components:{ App },template:'<App/>'})
使用路由
在App.vue中使用路由
<template>
  <div id="app">
    <h1>欢迎wei_shuo</h1>
    <!--跳转连接-->
    <router-link to="/main">首页</router-link>
    <router-link to="/content">内容页面</router-link>
    <!--展示视图-->
    <router-view></router-view>

  </div>
</template>

<script>
export default {
  name: 'App',
}
</script>

<style>
#app {
  font-family: 'Avenir', Helvetica, Arial, sans-serif;
  -webkit-font-smoothing: antialiased;
  -moz-osx-font-smoothing: grayscale;
  text-align: center;
  color: #2c3e50;
  margin-top: 60px;
}
</style>
vue-router使用流程
- components目录下创建vue组件(wei.vue)
<template>
  <h1>wei</h1>
</template>

<script>
export default {
  name: "wei"
}
</script>

<style scoped>

</style>
- 目录router创建router路由(index.js)
//导入vue和vue-router组件import Vue from"vue";import VueRouter from"vue-router";//导入components目录中vue组件import wei from"../components/wei"//安装路由
Vue.use(VueRouter);//配置导出路由exportdefaultnewVueRouter({routes:[{//路由路径path:'/wei',//name 可省略name:'content',//跳转组件component:wei
    }]});
- 在main.js中配置路由
<template><div id="app"><h1>欢迎wei_shuo</h1><!--跳转连接--><router-link to="/wei">wei</router-link><!--展示视图--><router-view></router-view></div></template><script>exportdefault{name:'App',}</script><style>
#app {
  font-family:'Avenir', Helvetica, Arial, sans-serif;-webkit-font-smoothing: antialiased;-moz-osx-font-smoothing: grayscale;
  text-align: center;color: #2c3e50;
  margin-top: 60px;}</style>
- 在App.vue中使用、导入配置路由
import Vue from'vue'import App from'./App'//导入配置路由文件import router from'./router'//自动扫描里面的路由配置

Vue.config.productionTip =falsenewVue({el:'#app',//配置路由
  router,components:{ App },template:'<App/>'})
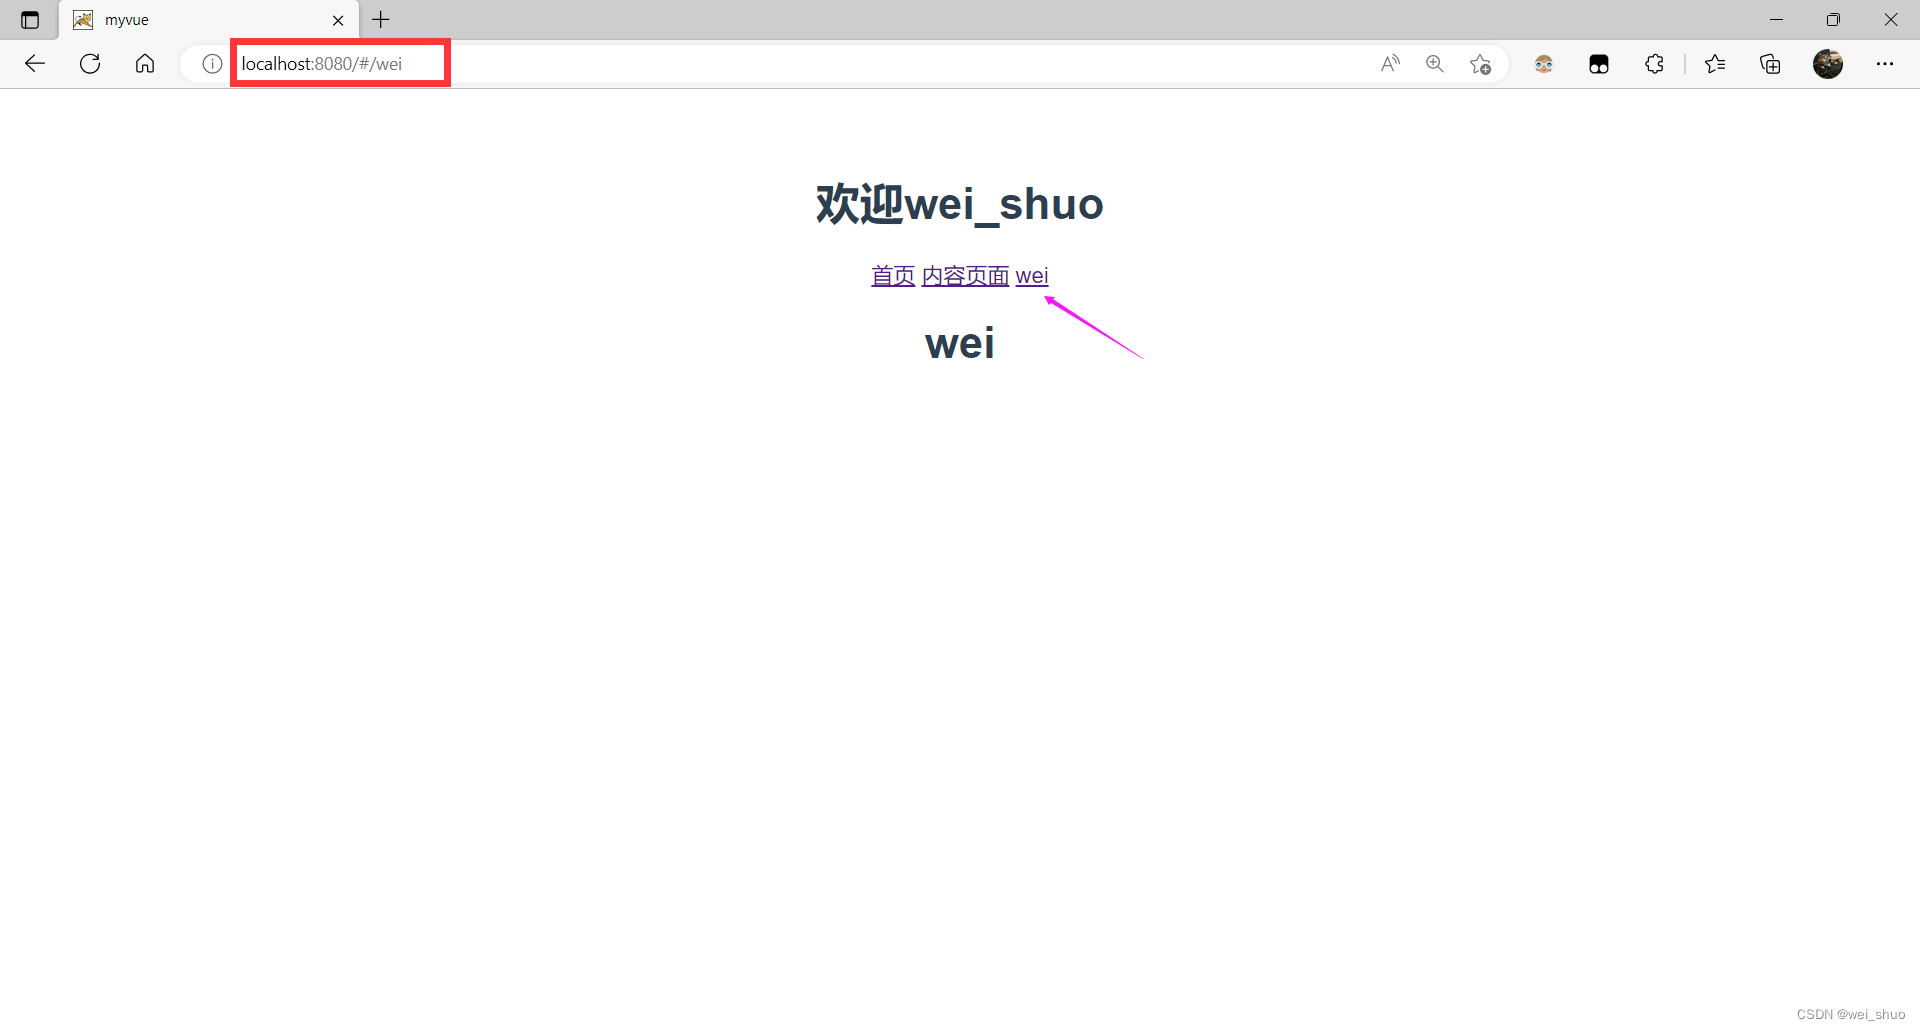
结果测试
- 网页点击
首页
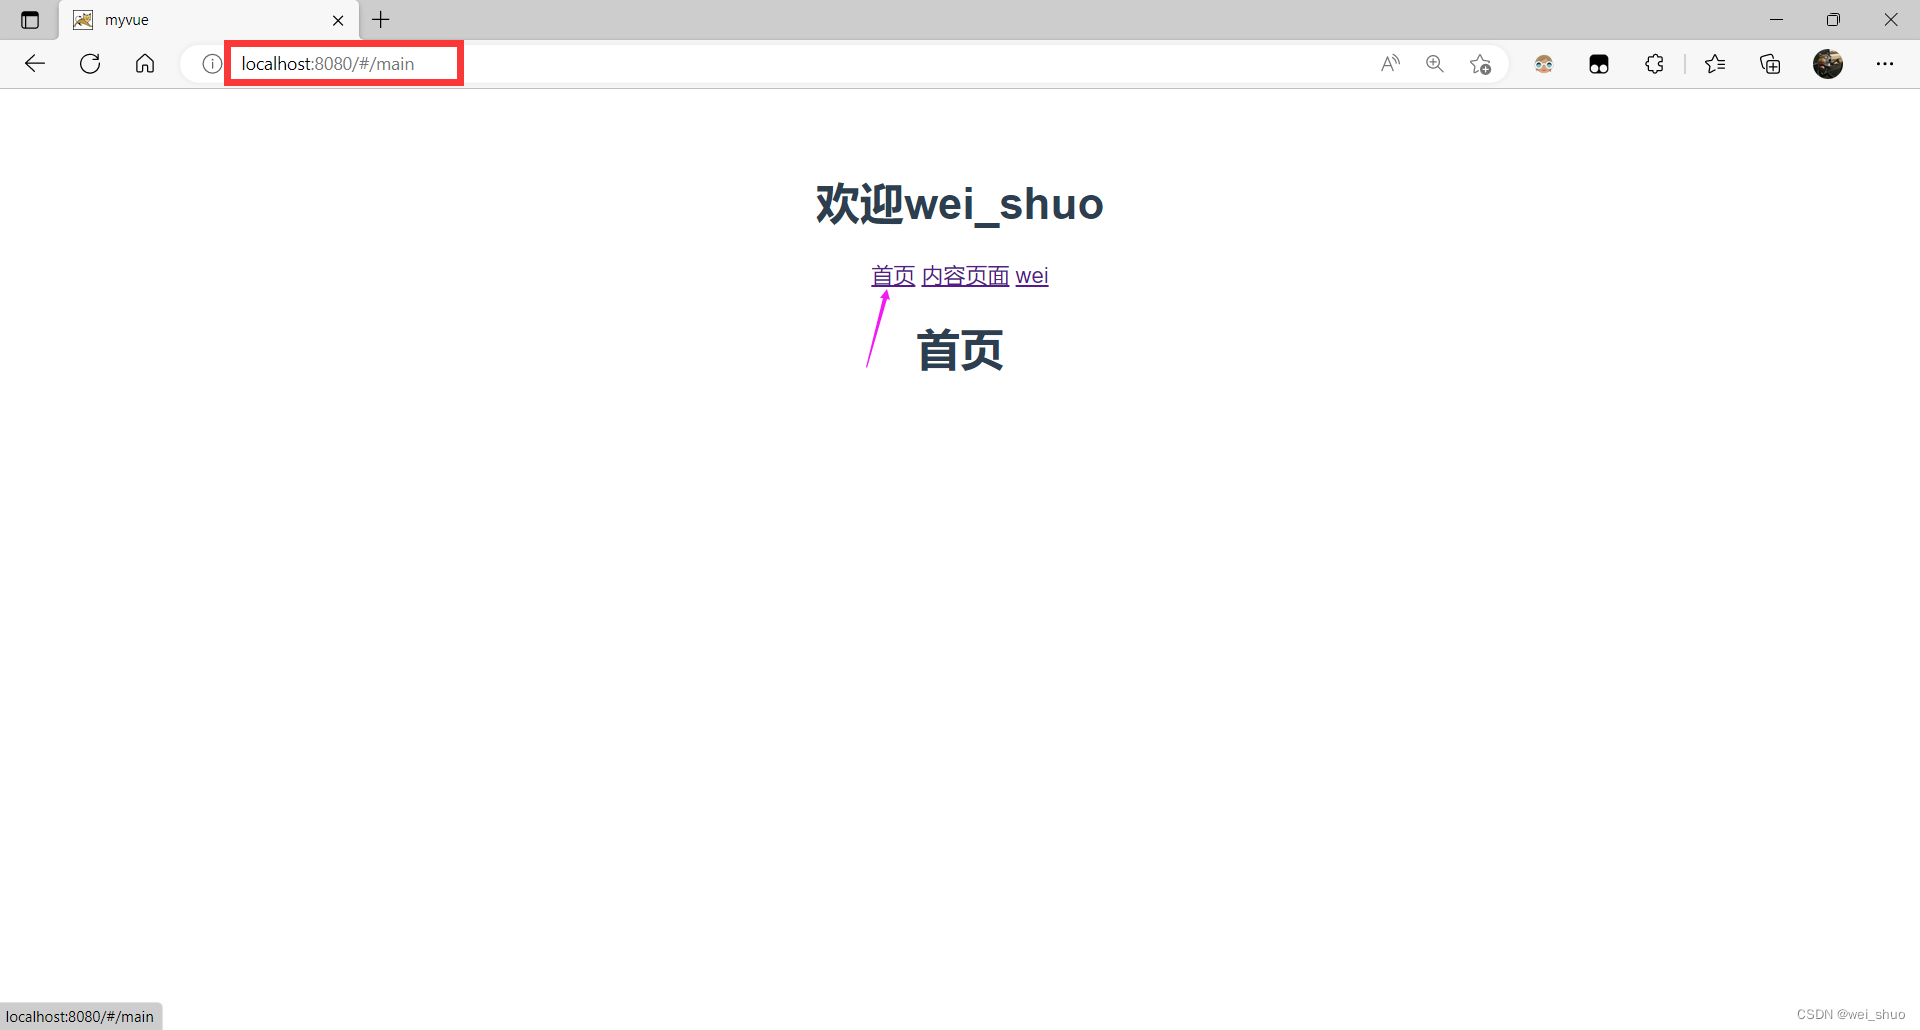
- 点击
内容页面
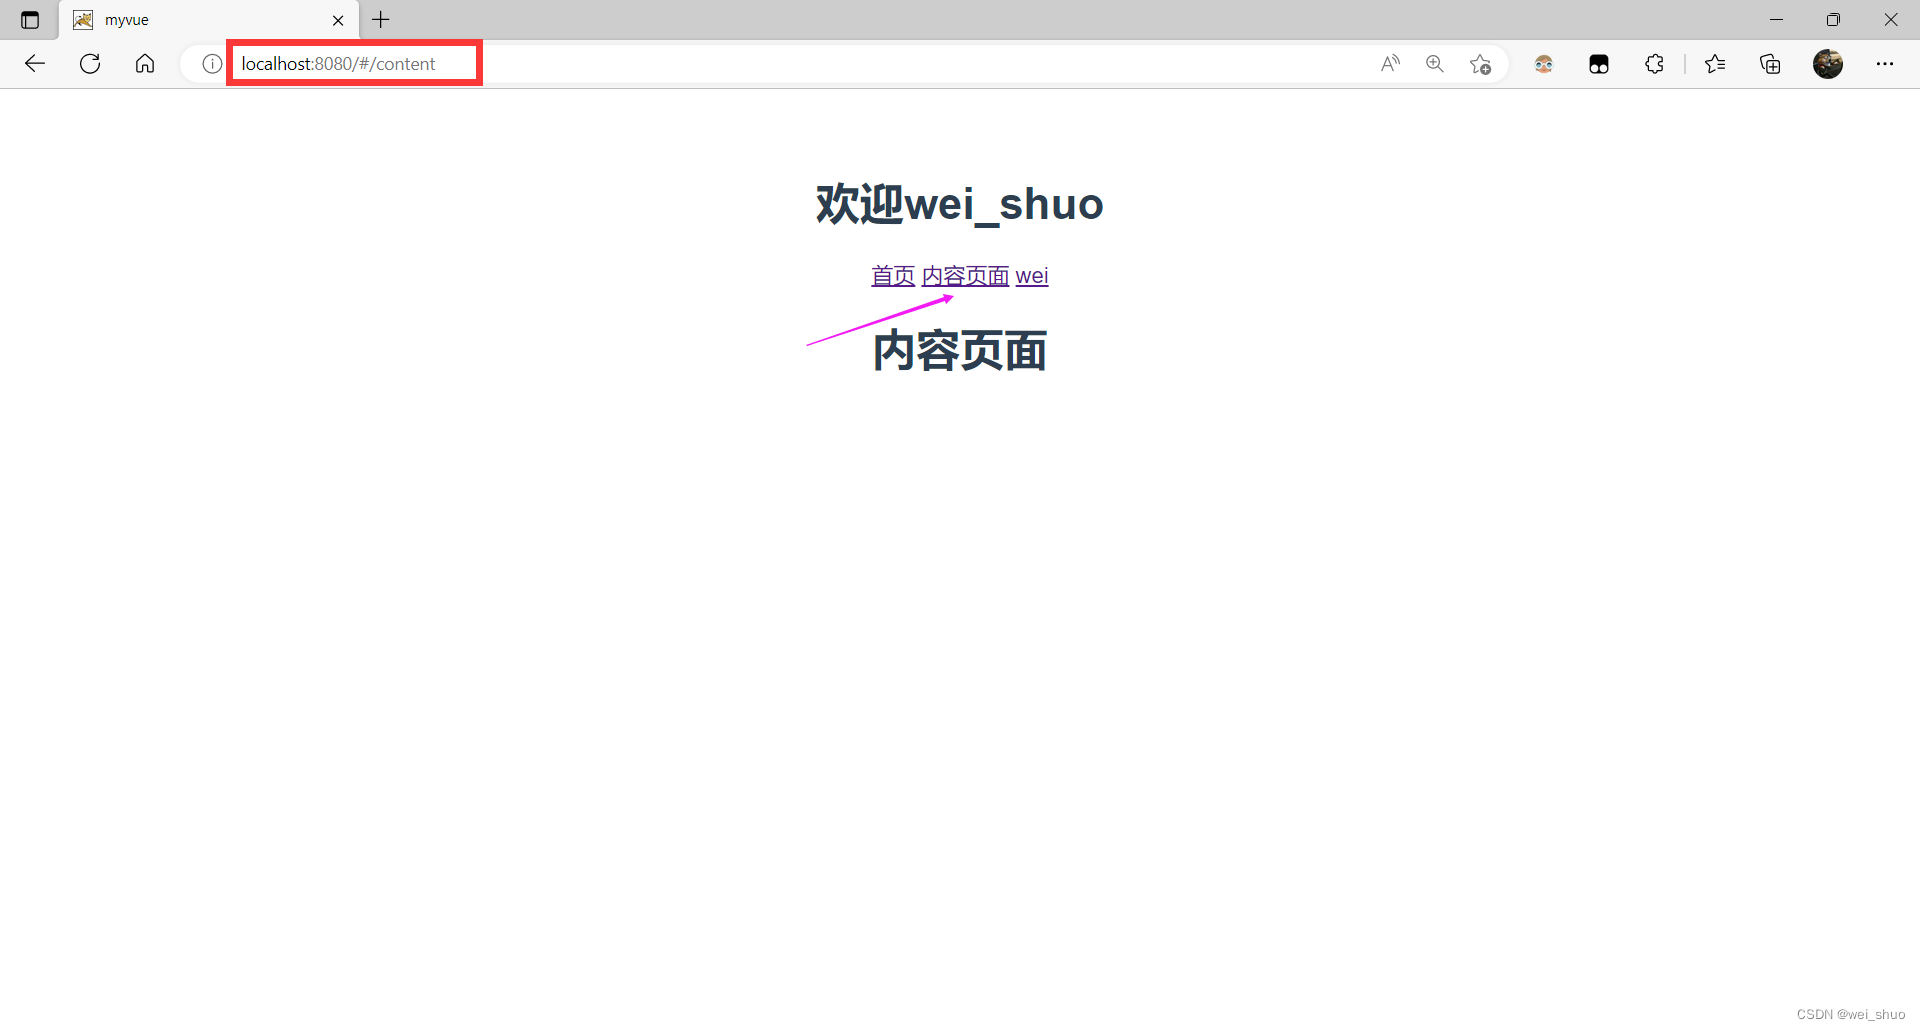
- 点击
wei
Axios
Axios 是一个基于
promise(
异步编程的一种解决方案)网络请求库,作用于
node.js和浏览器中, 它是
isomorphic(即同一套代码可以运行在浏览器和node.js中);服务端它使用原生 node.js
http模块,,而在客户端 (浏览端)则使用 XMLHttpRequests
异步编程:异步编程是让程序并发运行的一种手段
功能:Axios中文网
- 从浏览器创建
XMLHttpRequests- 从 node.js 创建
http请求- 支持
PromiseAPI- 拦截请求和响应
- 转换请求和响应数据
- 取消请求
- 自动转换JSON数据
- 客户端支持防御
XSRF
安装
$ npminstall axios
Vue+ElementUI
Element,一套为开发者、设计师和产品经理准备的基于 Vue 2.0 的桌面端组件库
Element官网
创建工程
- 创建hello-vue工程
vue init webpack hello-vue

- 安装依赖,需要安装vue-router、element-ui、sass-loader、node-sass四个插件
# 进入工程目录cd hello-vue
# 安装 vue-routernpminstall vue-router --save-dev
# 安装 element-uinpm i element-ui -S# 安装依赖npminstall# 安装 SASS 加载器
cnpm install sass-loader node-sass --save-dev
# 启动测试npm run dev
- 安装 vue-router过程中如果报错依赖错误,则绕过依赖安装
npminstall vue-router --save-dev --legacy-peer-deps
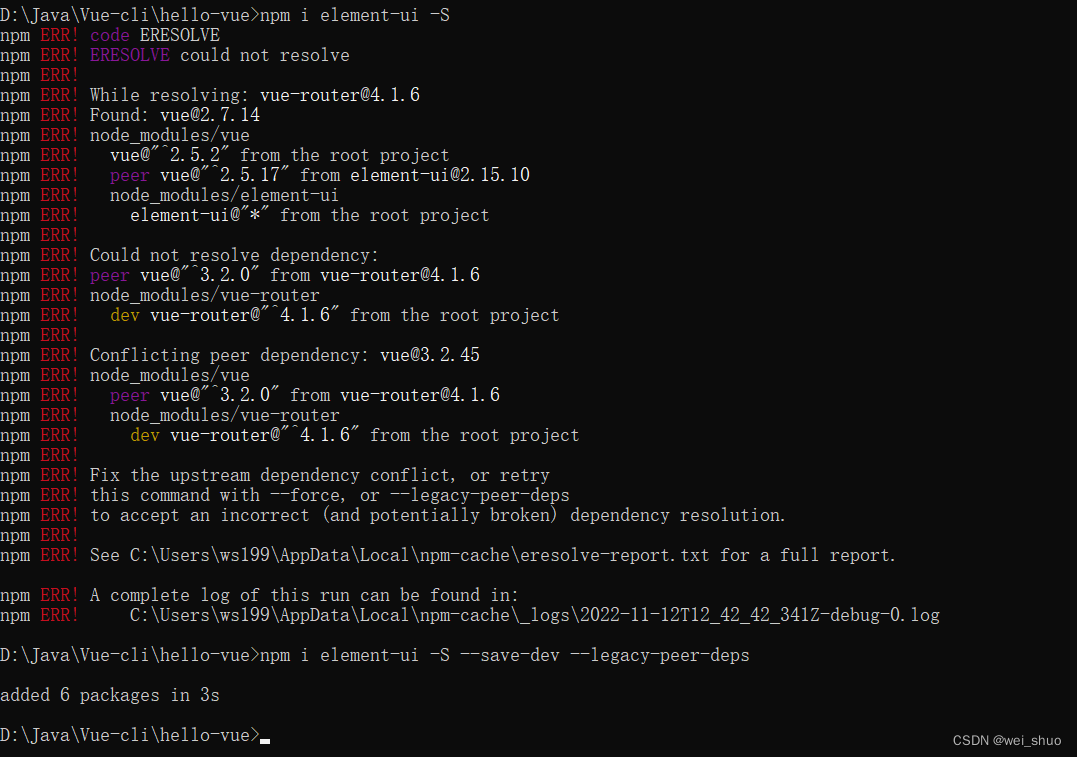
- 安装element-ui报错依赖过程中如果报错依赖错误,则绕过依赖安装
npm i element-ui -S --save-dev --legacy-peer-deps
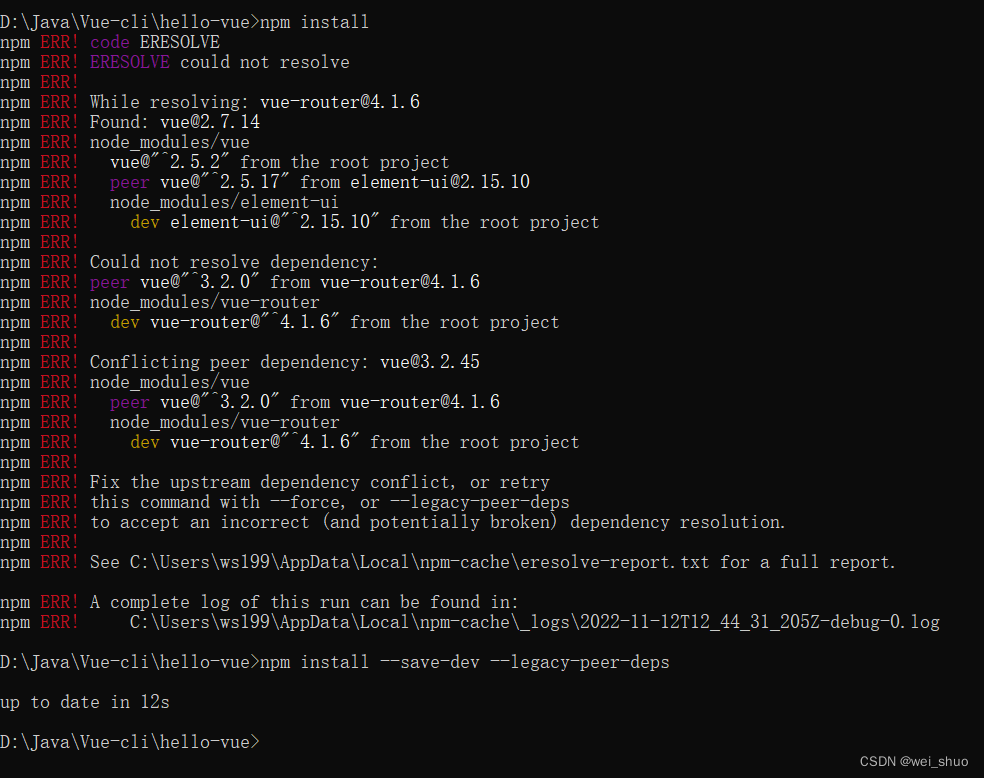
- 安装依赖过程中如果报错依赖错误,则绕过依赖安装
npminstall --save-dev --legacy-peer-deps
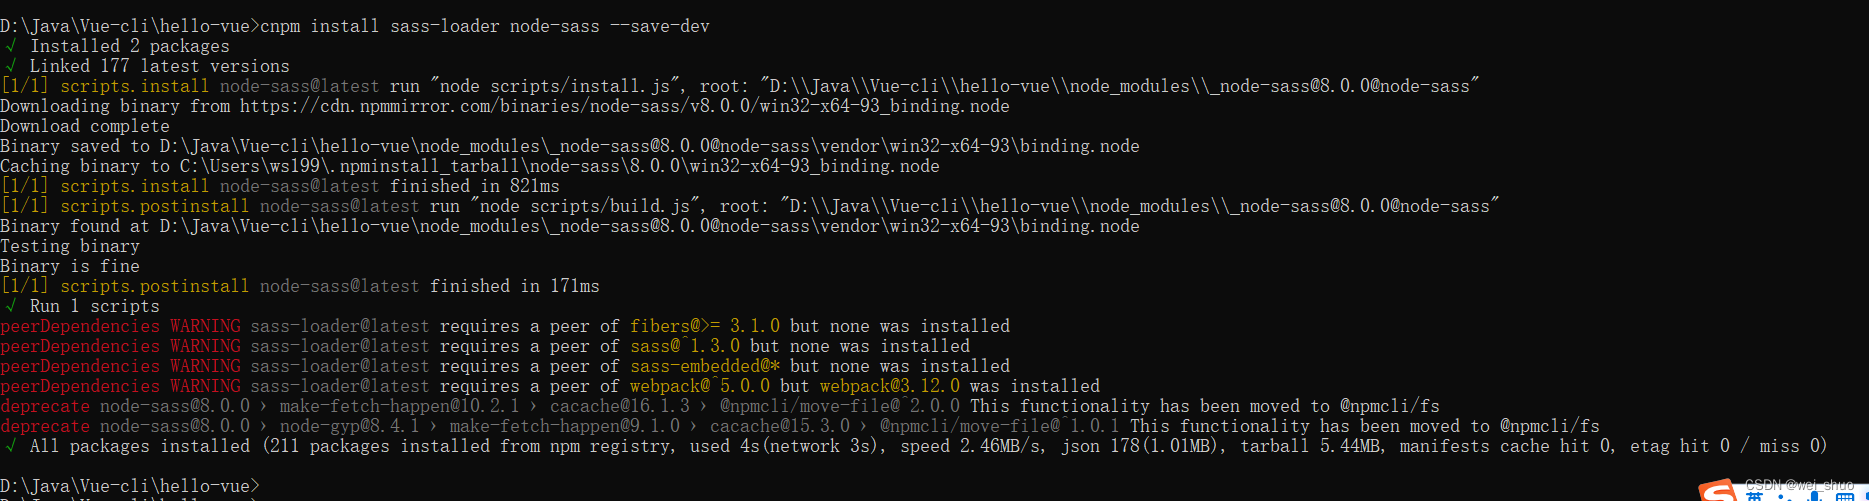
- 安装 SASS 加载器WARNING是警告,可以忽略
cnpm install sass-loader node-sass --save-dev
- 启动测试
npm run dev
- 使用IDEA打开hello-vue项目
项目搭建
- 创建页面目录(views)和前端路由目录(routers)
- 页面目录(views)下创建
- Main.vue(首页)
<template>
  <h1>首页</h1>
</template>

<script>
export default {
  name: "Main"
}
</script>

<style scoped>

</style>
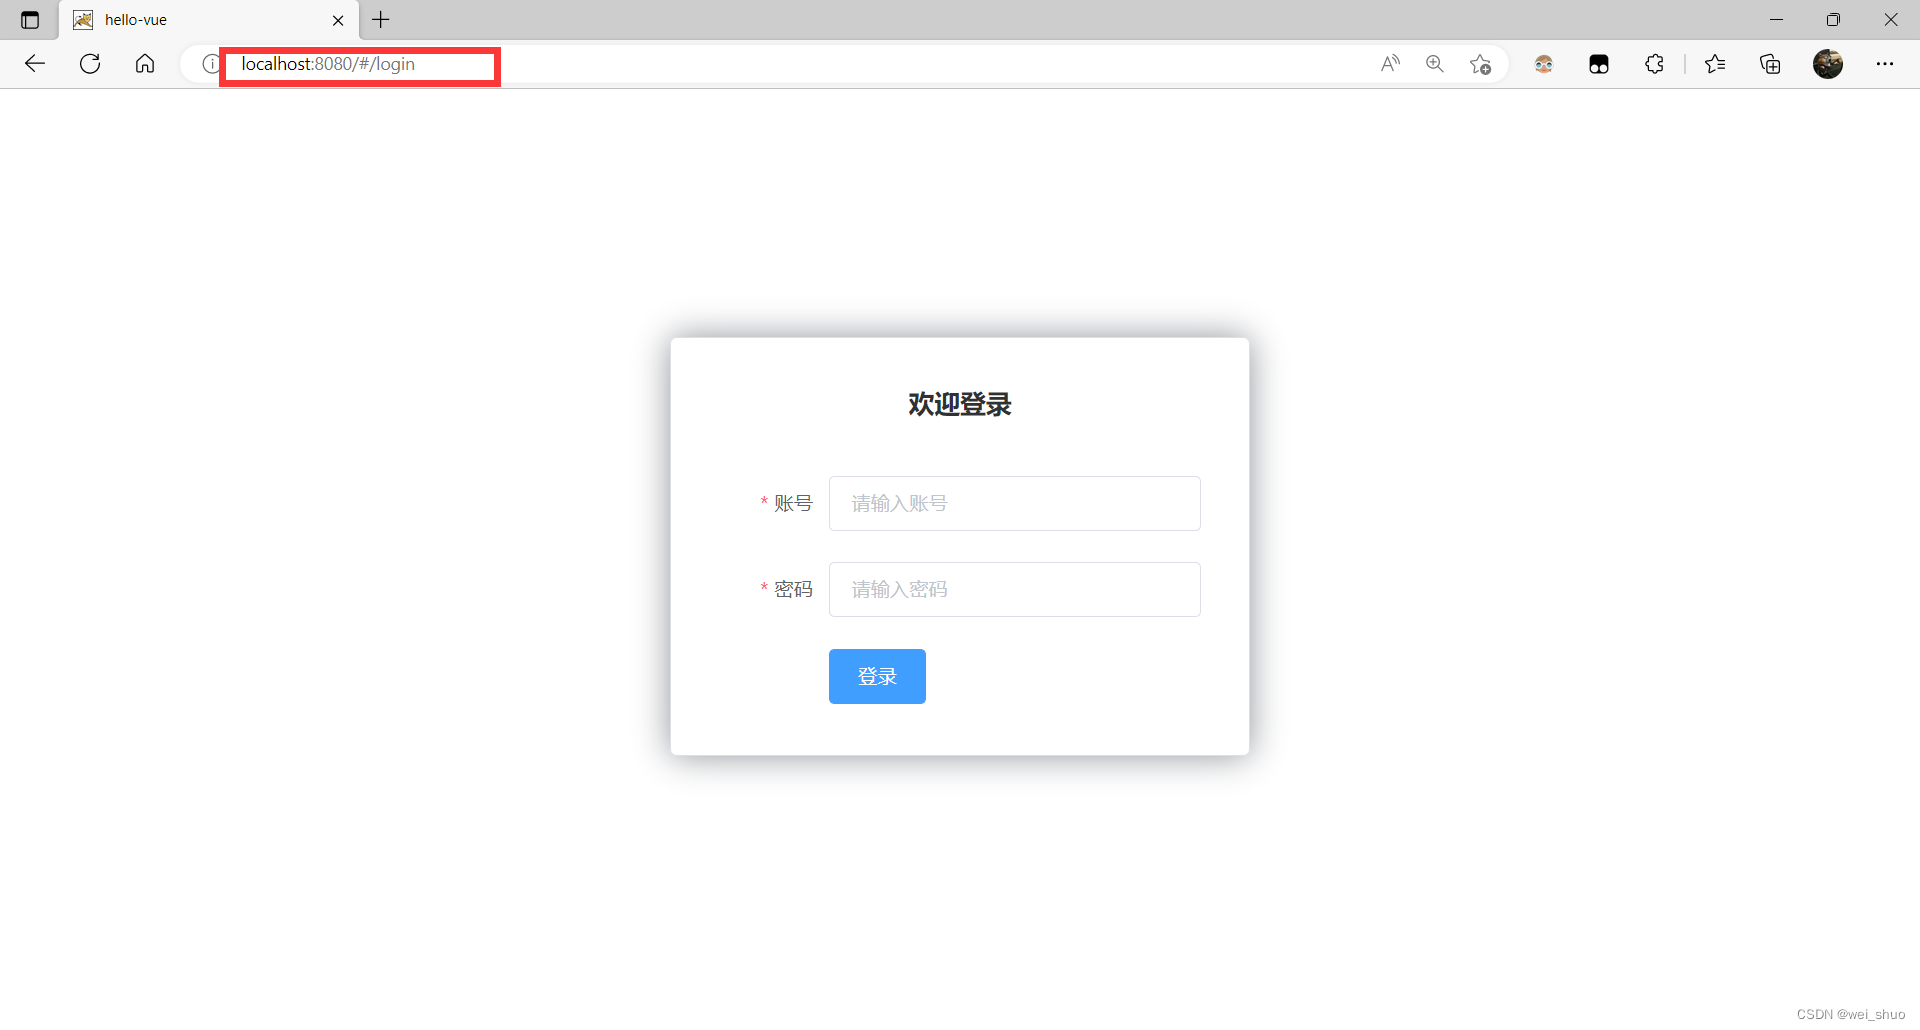
- Login.vue(登录页面)
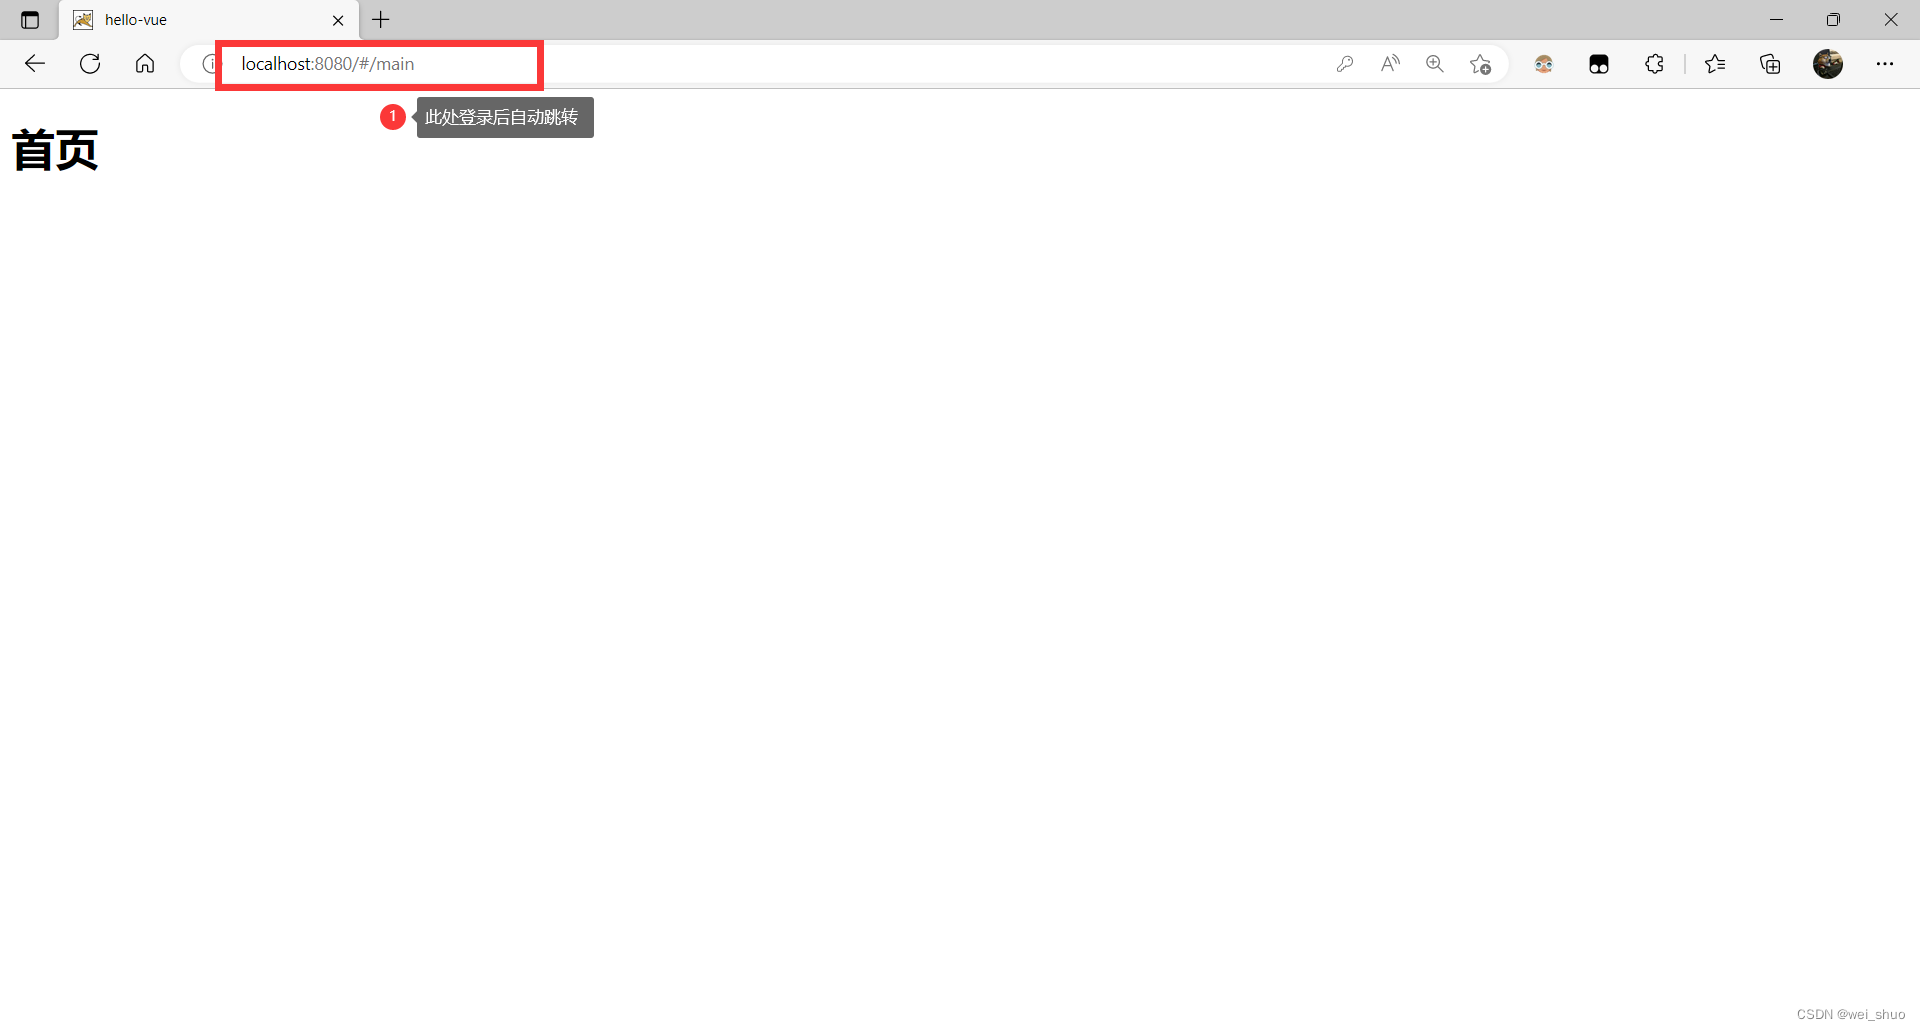
<template>
  <div>
    <el-form ref="loginForm" :model="form" :rules="rules" label-width="80px" class="login-box">
      <h3 class="login-title">欢迎登录</h3>
      <el-form-item label="账号" prop="username">
        <el-input type="text" placeholder="请输入账号" v-model="form.username"/>
      </el-form-item>
      <el-form-item label="密码" prop="password">
        <el-input type="password" placeholder="请输入密码" v-model="form.password"/>
      </el-form-item>
      <el-form-item>
        <el-button type="primary" v-on:click="onSubmit('loginForm')">登录</el-button>
      </el-form-item>
    </el-form>

    <el-dialog
      title="温馨提示"
      :visible.sync="dialogVisible"
      width="30%"
      :before-close="handleClose">
      <span>请输入账号和密码</span>
      <span slot="footer" class="dialog-footer">
        <el-button type="primary" @click="dialogVisible = false">确 定</el-button>
      </span>
    </el-dialog>
  </div>
</template>

<script>
export default {
  name: "Login",
  data() {
    return {
      form: {
        username: '',
        password: ''
      },

      // 表单验证,需要在 el-form-item 元素中增加 prop 属性
      rules: {
        username: [
          {required: true, message: '账号不可为空', trigger: 'blur'}
        ],
        password: [
          {required: true, message: '密码不可为空', trigger: 'blur'}
        ]
      },

      // 对话框显示和隐藏
      dialogVisible: false
    }
  },
  methods: {
    onSubmit(formName) {
      // 为表单绑定验证功能
      this.$refs[formName].validate((valid) => {
        if (valid) {
          // 使用 vue-router 路由到指定页面,该方式称之为编程式导航
          this.$router.push("/main");
        } else {
          this.dialogVisible = true;
          return false;
        }
      });
    }
  }
}
</script>

<style lang="scss" scoped>
.login-box {
  border: 1px solid #DCDFE6;
  width: 350px;
  margin: 180px auto;
  padding: 35px 35px 15px 35px;
  border-radius: 5px;
  -webkit-border-radius: 5px;
  -moz-border-radius: 5px;
  box-shadow: 0 0 25px #909399;
}

.login-title {
  text-align: center;
  margin: 0 auto 40px auto;
  color: #303133;
}
</style>
- 前端路由目录(routers)下创建index.js
//导入vue和vue-router组件import Vue from"vue";import Router from'vue-router'//添加路由组件import Main from"../views/Main";import Login from"../views/Login";//使用vue-router组件
Vue.use(Router)//导出默认接口路由exportdefaultnewRouter({routes:[{//路由路径path:'/main',//跳转组件component:Main
    },{//路由路径path:'/login',//跳转组件component:Login
    }]});
- main.js(入口js文件)
import Vue from'vue'import App from'./App'//导入配置路由文件,自动扫描里面的路由配置import router from'./routers'//导入ElementUIimport Element from'element-ui'//导入ElementUI的CSSimport'element-ui/lib/theme-chalk/index.css';//安装路由
Vue.use(router);//安装ElementUI
Vue.use(Element)

Vue.config.productionTip =falsenewVue({el:'#app',//路由
  router,//ElementUIrender:h=>h(App)})
- App.vue(根组件)
<template>
  <div id="app">
    <router-view></router-view>
  </div>
</template>

<script>

export default {
  name: 'App'
}
</script>
- IDEA终端运行
npm run dev
排错分析
排错一
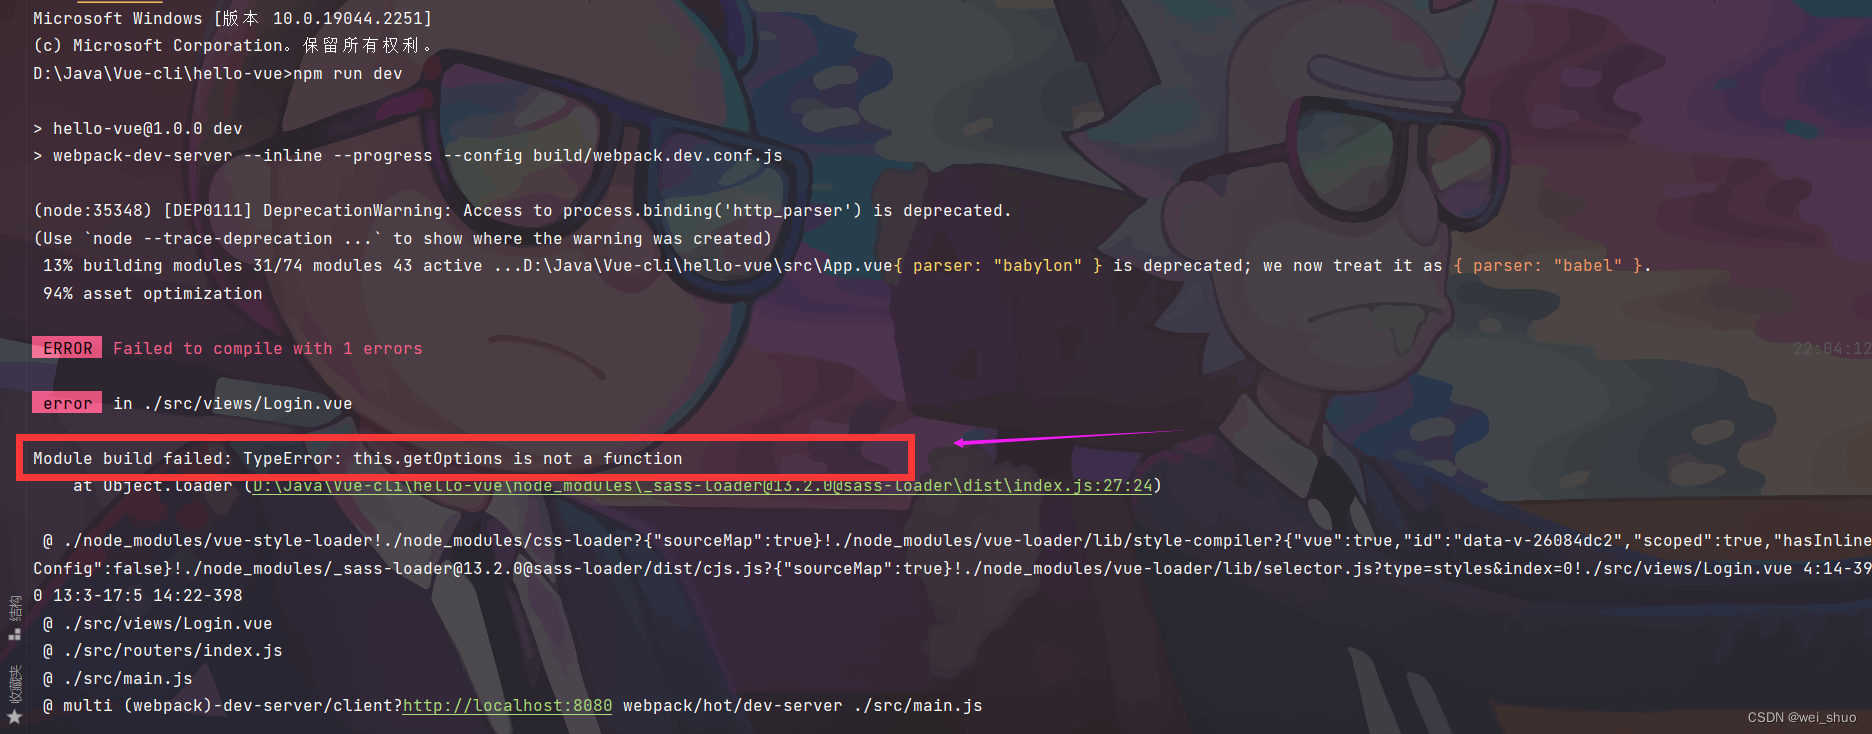
- 运行项目报错,this.getOptions is not a function,说明sass-loader版本太高
npm run dev
- package.json文件中降低sass-loader版本

- 更改完sass-loader版本,然后在终端使用npm install命令
- 如果报错依赖无法解析如下
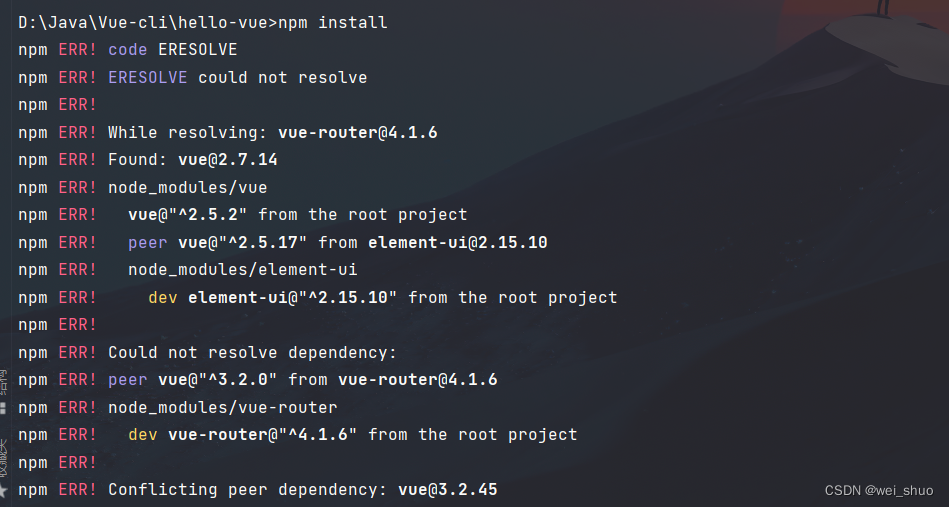
- 则执行命令,如下所示则成功
npminstall --legacy-peer-deps

排错二
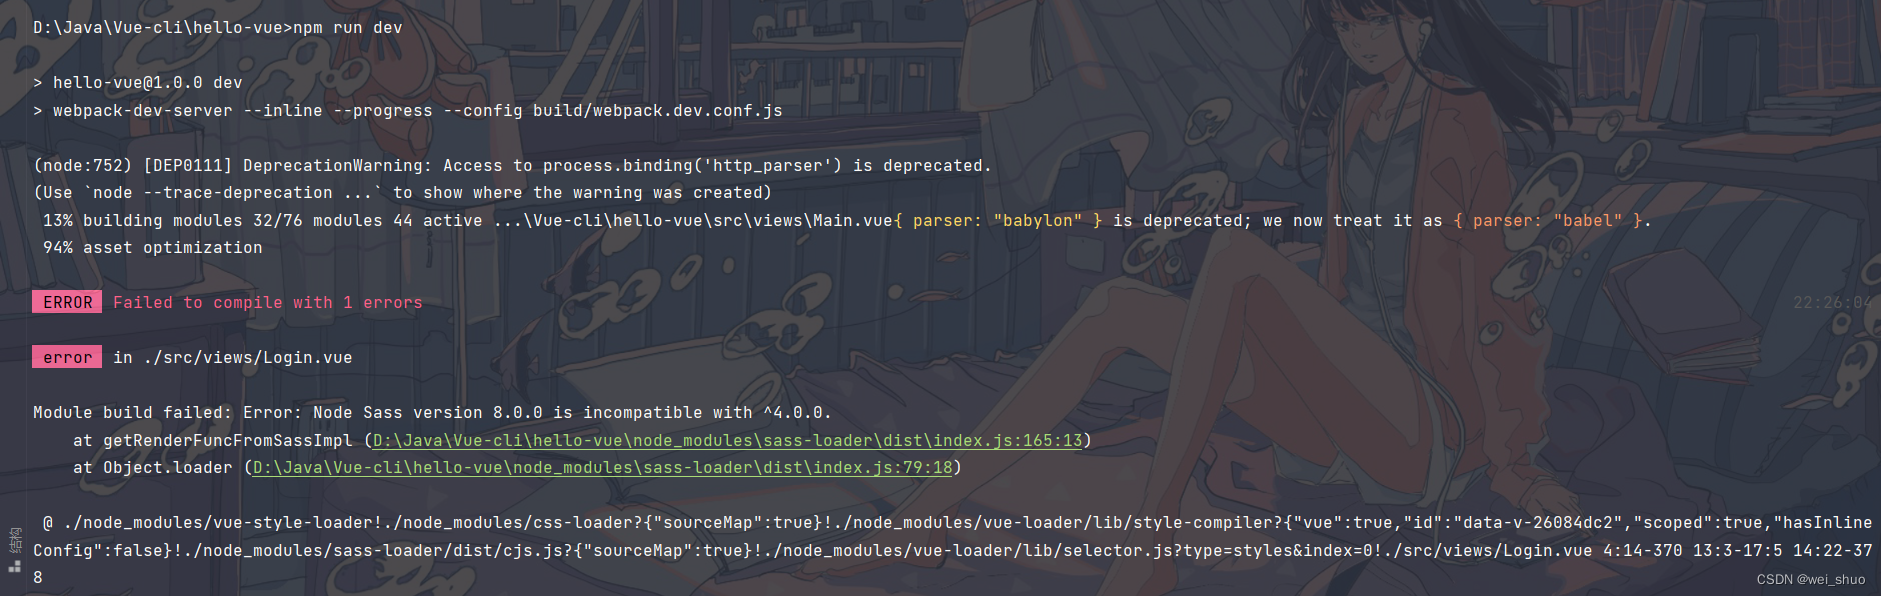
Module build failed: Error: Node Sass version 8.0.0 is incompatible with ^4.0.0.
- 错误来自sass-loader,因为node-sass @latest为v8.0.0,而sass-loader期望值为^ 4.0.0
- 卸载5.0 重装系统提示需求版本即可(4.0.0)的就可以了
// 卸载node-sass
npm uninstall node-sass --legacy-peer-deps

// 然后安装需求版本
cnpm install [email protected] --legacy-peer-deps
排错三

Module build failed: Error: Node Sass does not yet support your current environment: Windows 64-bit with Unsupported runtime (93)
查看本机安装的node版本安装对应的node-sass版本

- 部分对应版本
node版本:v14.18.3
node-sass版本:4.7.2
sass-loader版本:7.3.1

node版本:16.13.1
node-sass版本:6.0.1
sass-loader版本:10.0.1
- 查看自己的node版本,我的是node16,所以应安装node-sass 6.0+版本
D:\Java\Vue-cli\hello-vue>node -v
v16.18.0
- 安装node-sass 6.0+版本(6.0.1)
- package.json调整版本
"sass-loader":"^6.0.1"
- 终端执行命令更新依赖项
npminstall --legacy-peer-deps
- 安装对应版本的node-sass
cnpm install [email protected] --legacy-peer-deps
排错四
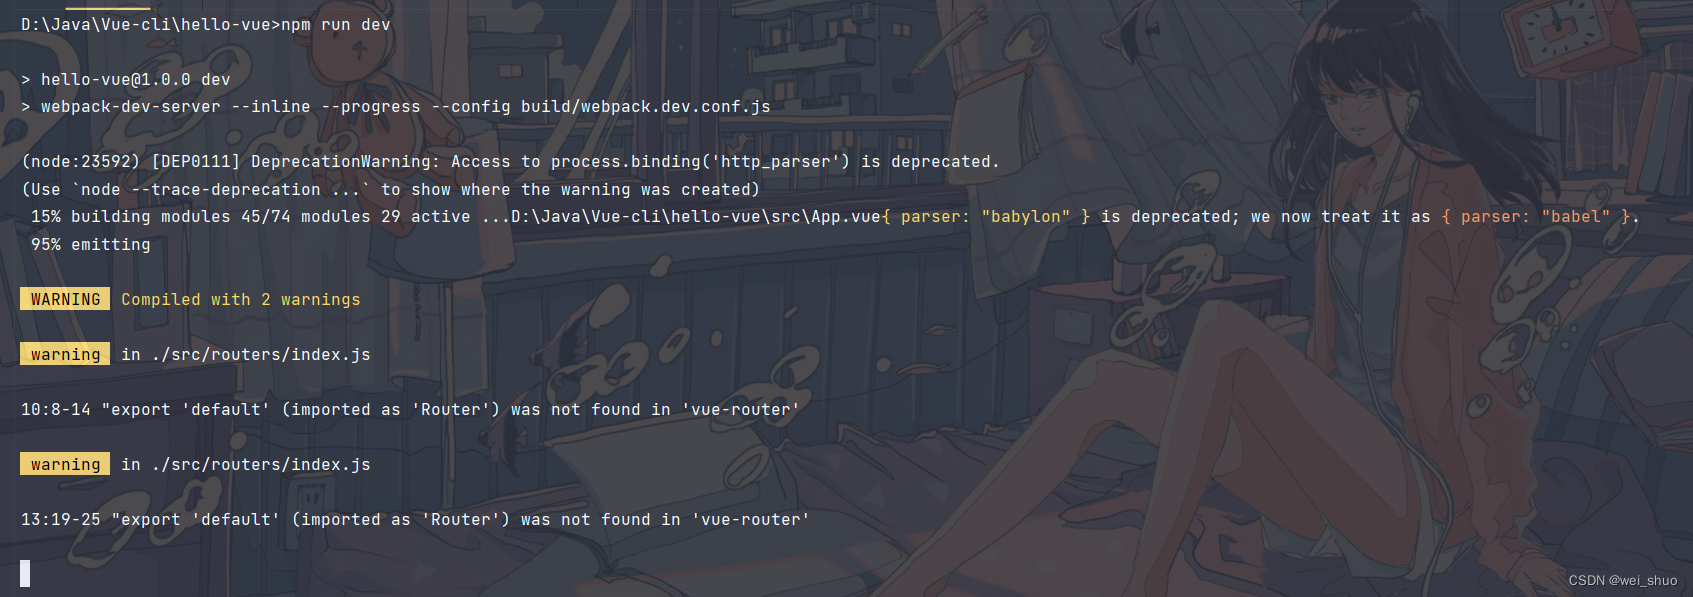
"export 'default'(imported as 'Router') was not found in'vue-router'
- 原因一:路由格式编写错误
routes:[{// 路径path:'/home',// 组件名component: Home
}];
- 原因二:下载或者卸载已有版本
   卸载:npm uninstall vue-router
   下载&降级:npm install [email protected] --save-dev    //   @xxx 自己指定版本
降级之后,需要使用命令更新依赖
npminstall --legacy-peer-deps
排错总结
- 版本问题,更改package.json版本后,需要执行更新依赖的命令
npminstall --legacy-peer-deps
- 系统提示执行命令,可以直接执行即可
- 错误多半是版本兼容错误,调整对应版本即可,如果是依赖错误的话,需要在命令后加上
--legacy-peer-deps
运行项目
- 运行项目
npm run dev
vue项目目录分析
build:构建脚本目录
config:项目配置
node_modules:npm加载项目的依赖模块
src:源码目录
- main.js——入口js文件
- App.vue——根组件
- components——共组件目录
- assets——资源目录,这里的资源会被wabpack构建
- routes——前端路由
- store——应用级数据(state)
- views——页面目录
static:静态资源目录,不会被webpack构建
package.json:npm包配置文件,定义项目的npm脚本、依赖包等信息
README.md:项目的说明文档,markdown格式
npm命令解析
- 安装模块到项目下
npminstall moduleName
- -g:模块安装到全局
npminstall-g moduleName
- –save:模块安装到项目下,并在package文件的devDependencies结点写入依赖,-S 为缩写
npminstall--save moduleName
- –save-dev:将模块安装到项目目录下,并且在package文件devDependencies结点写入依赖,-D为缩写
npminstall --save-dev moduleName
路由嵌套
嵌套路由(子路由),实际应用中,通常由多层嵌套的组件组合而成,同样的URL中各段动态路径也按某种结构对应嵌套的各层组件
/user/johnny/profile                     /user/johnny/posts
+------------------+                  +-----------------+
| User             || User            || +--------------+ || +-------------+ ||| Profile      ||  +------------>|| Posts       ||||||||||| +--------------+ || +-------------+ |
+------------------+                  +-----------------+
项目结构
- 创建页面目录(views)和前端路由目录(routers)
- 页面目录(views)下创建,user目录
- main.vue(首页)
<template>
  <div>
    <el-container>
      <el-aside width="200px">
        <el-menu :default-openeds="['1']">

          <el-submenu index="1">
            <template slot="title"><i class="el-icon-caret-right"></i>用户管理</template>
            <el-menu-item-group>
              <el-menu-item index="1-1">
                <!--插入的地方-->
                <router-link to="/user/profile">个人信息</router-link>
              </el-menu-item>
              <el-menu-item index="1-2">
                <!--插入的地方-->
                <router-link to="/user/list">用户列表</router-link>
              </el-menu-item>
            </el-menu-item-group>
          </el-submenu>

          <el-submenu index="2">
            <template slot="title"><i class="el-icon-caret-right"></i>内容管理</template>
            <el-menu-item-group>
              <el-menu-item index="2-1">分类管理</el-menu-item>
              <el-menu-item index="2-2">内容列表</el-menu-item>
            </el-menu-item-group>
          </el-submenu>

          <el-submenu index="3">
            <template slot="title"><i class="el-icon-caret-right"></i>系统管理</template>
            <el-menu-item-group>
              <el-menu-item index="3-1">系统信息</el-menu-item>
              <el-menu-item index="3-2">系统内容</el-menu-item>
            </el-menu-item-group>
          </el-submenu>

        </el-menu>
      </el-aside>


      <el-container>
        <el-header style="text-align: right; font-size: 12px">
          <el-dropdown>
            <i class="el-icon-setting" style="margin-right: 15px"></i>
            <el-dropdown-menu slot="dropdown">
              <el-dropdown-item>个人信息</el-dropdown-item>
              <el-dropdown-item>退出登录</el-dropdown-item>
            </el-dropdown-menu>
          </el-dropdown>
        </el-header>
        <el-main>
          <!--在这里展示视图-->
          <router-view/>
        </el-main>
      </el-container>
    </el-container>
  </div>
</template>
<script>
export default {
  name: "Main"
}
</script>
<style scoped lang="scss">
.el-header {
  background-color: #B3C0D1;
  color: #333;
  line-height: 60px;
}

.el-aside {
  color: #333;
}
</style>
- ProFile.vue(个人信息)
<template>
  <h1>个人信息</h1>
</template>

<script>
export default {
  name: "UserProFile"
}
</script>

<style scoped>

</style>
- List.vue(用户列表)
<template>
  <h1>用户列表</h1>
</template>

<script>
export default {
  name: "UserList"
}
</script>

<style scoped>

</style>
- 前端路由目录(routers)下创建index.js
//导入vue和vue-router组件import Vue from"vue";import Router from'vue-router'//添加路由组件import Main from"../views/Main"import Login from"../views/Login"import UserList from'../views/user/List'import UserProFile from'../views/user/ProFile'//使用vue-router组件
Vue.use(Router)//导出默认接口路由exportdefaultnewRouter({routes:[{//路由路径path:'/main',//跳转组件component: Main,//嵌套路由children:[{path:'/user/profile',component: UserProFile},{path:'/user/list',component: UserList}]},{//路由路径path:'/login',//跳转组件component: Login
    }]});
- main.js(入口js文件)
import Vue from'vue'import App from'./App'//导入配置路由文件,自动扫描里面的路由配置import router from'./routers'//导入ElementUIimport Element from'element-ui'//导入ElementUI的CSSimport'element-ui/lib/theme-chalk/index.css';//安装路由
Vue.use(router);//安装ElementUI
Vue.use(Element)

Vue.config.productionTip =falsenewVue({el:'#app',//路由
  router,//ElementUIrender:h=>h(App)})
- App.vue(根组件)
<template>
  <div id="app">
    <router-view></router-view>
  </div>
</template>

<script>

export default {
  name: 'App'
}
</script>
- IDEA终端运行

路由模式
- hash:带路径#符号,如:http://localhost/#/login
- history:路径不带#符号,如:http://localhost/login
exportdefaultnewRouter({mode:'history',routes:[]});
参数传递&重定向
参数传递
- Main.vue
<!--插入的地方 name:传递组件名 params:传递参数-->
<router-link v-bind:to="{name:'UserProFile',params:{id:1}}">个人信息</router-link>
- ProFile.vue
<template><div><h1>个人信息</h1><!--{{ 方式一:$route.params.id }}-->
    {{id}}
  </div></template><script>exportdefault{//方式二: props:['id'],name:"UserProFile"}</script><stylescoped></style>
重定向
//导出默认接口路由exportdefaultnewRouter({mode:'history',routes:[//重定向{path:'/goHome',redirect:'/main'//重定向路径}]});
404页面
- views页面目录,创建404页面
- NotFound.vue
<template>
  <div>
    <h1>404,你的页面走丢了!</h1>
  </div>
</template>

<script>
export default {
  name: "NotFound"
}
</script>

<style scoped>

</style>
- index.js配置
import NotFound from"../views/NotFound"//导出默认接口路由exportdefaultnewRouter({mode:'history',routes:[{path:'/*',component:NotFound
    }]});
路由钩子&异步请求
路由钩子
beforeRouteEnter:在进入路由前执行
beforeRouteLeave:在离开路由前执行
- to:路由将要跳转的路径信息
- from:路径跳转前的路径信息
- next:路由的控制参数 - next() 跳入下一个页面- next(‘/path’) 改变路由的跳转方向,使其跳到另一个路由- next(false) 返回原来页面- next((vm)=>{}) 仅在beforeRouteEnter中使用,vm是组件实例
<script>exportdefault{//进入路由之前执行beforeRouteEnter:(to,from,next)=>{
    console.log("STARE");next();},//进入路由之后执行beforeRouteLeave:(to,from,next)=>{
    console.log("END");next();}}</script>
异步请求
- 安装Axios和vue-axios
cnpm install axios -s
cnpm install--save vue-axios
- 安装Axios
- main.js中导入Axios组件
//导入Axiosimport axios from'axios'import VueAxios from'vue-axios'//安装axios和VueAxios
Vue.use(VueAxios, axios)
Vue工程化项目目录结构
- node_modules 通过npm install命令安装的软件包存放的目录(非全局安装)
- dist 项目打包发布目录
- public 最后打包时,该目录中的文件会直接复制到dist目录中
- public/index.html 首页入口文件- public/favicon.ico 图标文件
- src
- src/assets 静态资源文件目录- src/components 组件文件目录- src/router 路由插件目录- - src/router/index.js 路由插件配置文件- src/store 状态管理插件目录- - src/store/index.js 状态管理插件配置文件- src/plugins 插件目录,一般存放axios.js插件文件- src/views 组件文件目录(仅仅具有模板和样式,没有js程序)- src/App.vue 应用组件- src/main.js 程序逻辑入口文件
- package.json 包管理配置文件,记录项目需要的各种软件包信息
- package-lock.json 包版本锁定配置文件
- vue.config.js vue项目配置文件
🌼 结语:创作不易,如果觉得博主的文章赏心悦目,还请——
点赞👍
收藏⭐️
评论📝
冲冲冲🤞
版权归原作者 wei_shuo 所有, 如有侵权,请联系我们删除。