
随着CMake工具越来越强大便捷,越来越多的C/C++项目转而使用CMake来进行编译管理,它还提供了用于测试的ctest命令来执行项目中编写的单元测试。
本文就以一个实例来介绍如何使用ctest来进行单元测试。
一、环境准备
本文实例环境VSCode+MinGW64+CMake+gtest。
需要在MinGW中安装gtest,如果没有安装也没有关系,在CMakeLists.txt中进行检测,如果发现没有安装,则自动下载源码进行编译。
二、新建项目
新建一个目录,比如demo,然后使用VSCode打开目录,创建一个CMake项目。
创建CMake项目可以使用VSCode的CMake向导来创建,也可以直接在目录中编写一个CMakeLists.txt来创建。
使用VSCode的CMake向导创建项目
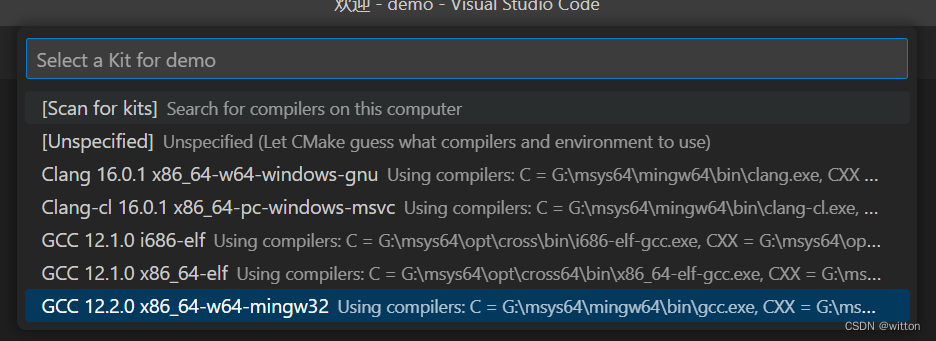
在VSCode中按F1,在弹出的选项中选择
CMake:快速入门

然后选择编译套件,如果需要搜索,可以选择
[Scan for kits]
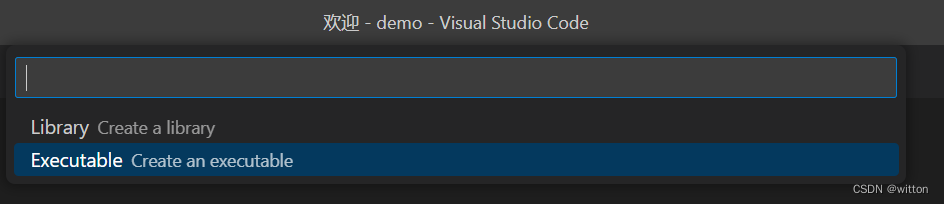
然后输入项目名称,比如
demo

根据项目需要选择库(Library)或者可执行体(Executable),这里选择
Executable
然后向导会自动新建CMakeLists.txt和main.cpp:
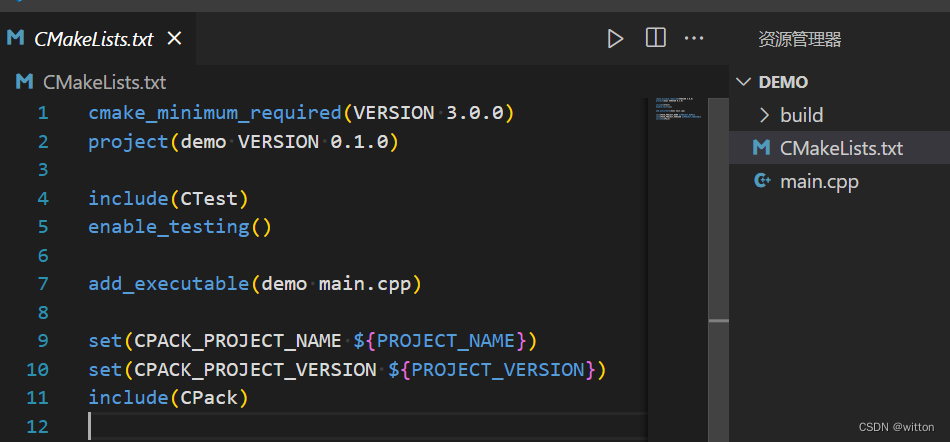
CMakeLists.txt:
cmake_minimum_required(VERSION 3.0.0)project(demo VERSION 0.1.0)include(CTest)enable_testing()add_executable(demo main.cpp)set(CPACK_PROJECT_NAME ${PROJECT_NAME})set(CPACK_PROJECT_VERSION ${PROJECT_VERSION})include(CPack)
Main.cpp:
#include<iostream>intmain(int,char**){
    std::cout <<"Hello, world!\n";}
自行创建CMake项目
其实就是自己编写上面的CMakeLists.txt和项目源码
可以从CMakeLists.txt中看到已经添加并启用了CTest
三、创建单元测试
1、添加需要测试的功能,比如建立一个func.h和func.cpp
func.h
:
#ifndef__FUNC_H_INCLUDE_#define__FUNC_H_INCLUDE_intFactorial(int n);
bool IsPrime(int n);#endif
func.cpp
:
#include"func.h"// Returns n! (the factorial of n).  For negative n, n! is defined to be 1.intFactorial(int n){int result =1;for(int i =1; i <= n; i++){
    result *= i;}return result;}// Returns true if and only if n is a prime number.boolIsPrime(int n){// Trivial case 1: small numbersif(n <=1)returnfalse;// Trivial case 2: even numbersif(n %2==0)return n ==2;// Now, we have that n is odd and n >= 3.// Try to divide n by every odd number i, starting from 3for(int i =3;; i +=2){// We only have to try i up to the square root of nif(i > n / i)break;// Now, we have i <= n/i < n.// If n is divisible by i, n is not prime.if(n % i ==0)returnfalse;}// n has no integer factor in the range (1, n), and thus is prime.returntrue;}
2、创建测试目录test,并在目录中添加CMakeLists.txt、tmain.cpp和单元测试代码test.cpp。
test/CMakeLists.txt
:
add_executable(t tmain.cpp test.cpp ../func.cpp)target_link_libraries(t PRIVATE gtest)add_test(NAME t COMMAND t)
tmain.cpp
:
#include<gtest/gtest.h>intmain(){
    testing::InitGoogleTest();returnRUN_ALL_TESTS();}
test.cpp
:
#include<gtest/gtest.h>#include"../func.h"// Tests Factorial().// Tests factorial of negative numbers.TEST(FactorialTest, Negative){// This test is named "Negative", and belongs to the "FactorialTest"// test case.EXPECT_EQ(1,Factorial(-5));EXPECT_EQ(1,Factorial(-1));EXPECT_GT(Factorial(-10),0);// <TechnicalDetails>//// EXPECT_EQ(expected, actual) is the same as//// EXPECT_TRUE((expected) == (actual))//// except that it will print both the expected value and the actual// value when the assertion fails. This is very helpful for// debugging. Therefore in this case EXPECT_EQ is preferred.//// On the other hand, EXPECT_TRUE accepts any Boolean expression,// and is thus more general.//// </TechnicalDetails>}// Tests factorial of 0.TEST(FactorialTest, Zero){EXPECT_EQ(1,Factorial(0));}// Tests factorial of positive numbers.TEST(FactorialTest, Positive){EXPECT_EQ(1,Factorial(1));EXPECT_EQ(2,Factorial(2));EXPECT_EQ(6,Factorial(3));EXPECT_EQ(40320,Factorial(8));}// Tests IsPrime()// Tests negative input.TEST(IsPrimeTest, Negative){// This test belongs to the IsPrimeTest test case.EXPECT_FALSE(IsPrime(-1));EXPECT_FALSE(IsPrime(-2));EXPECT_FALSE(IsPrime(INT_MIN));}// Tests some trivial cases.TEST(IsPrimeTest, Trivial){EXPECT_FALSE(IsPrime(0));EXPECT_FALSE(IsPrime(1));EXPECT_TRUE(IsPrime(2));EXPECT_TRUE(IsPrime(3));}// Tests positive input.TEST(IsPrimeTest, Positive){EXPECT_FALSE(IsPrime(4));EXPECT_TRUE(IsPrime(5));EXPECT_FALSE(IsPrime(6));EXPECT_TRUE(IsPrime(23));}
项目的目录结构如下:

3、修改根目录CMakeLists.txt
需要在CMakeLists.txt中引用test目录,添加如下命令:
add_subdirectory(test)
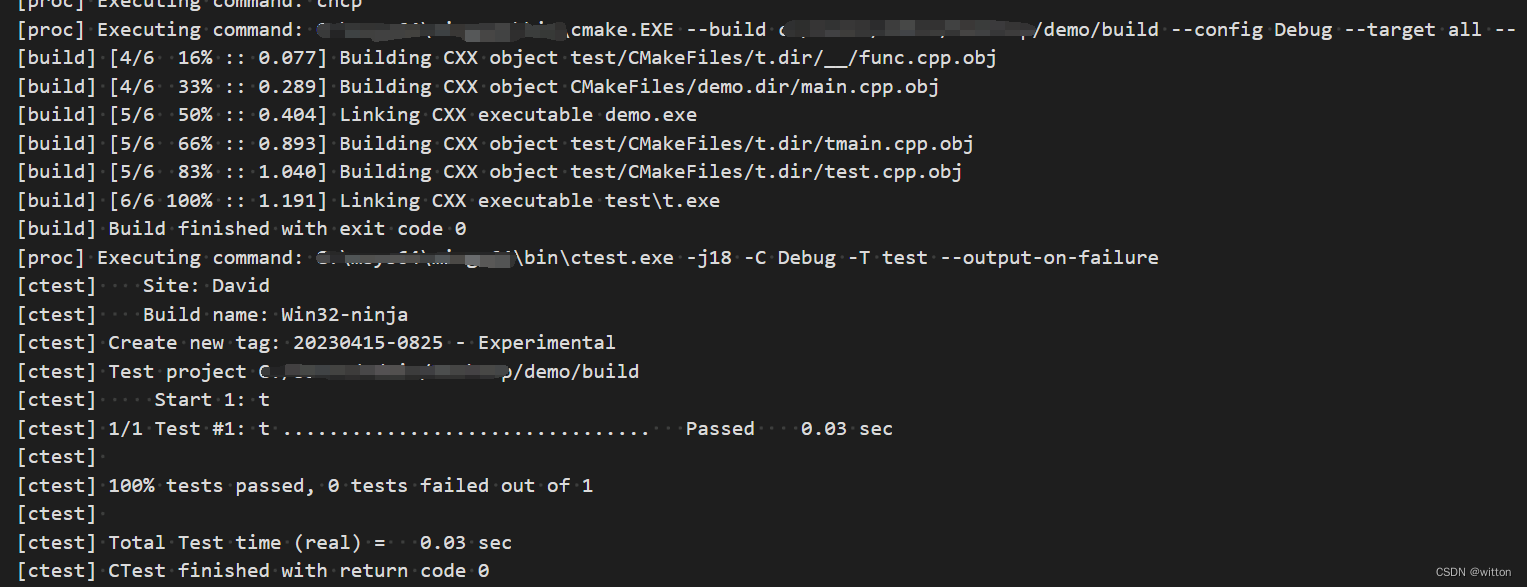
4、运行测试
如果MinGW中安装有gtest则可以在VSCode中执行
Run CTest
了:

输出如下:
当然,也可以在VSCode中选择测试目标t直接运行测试:
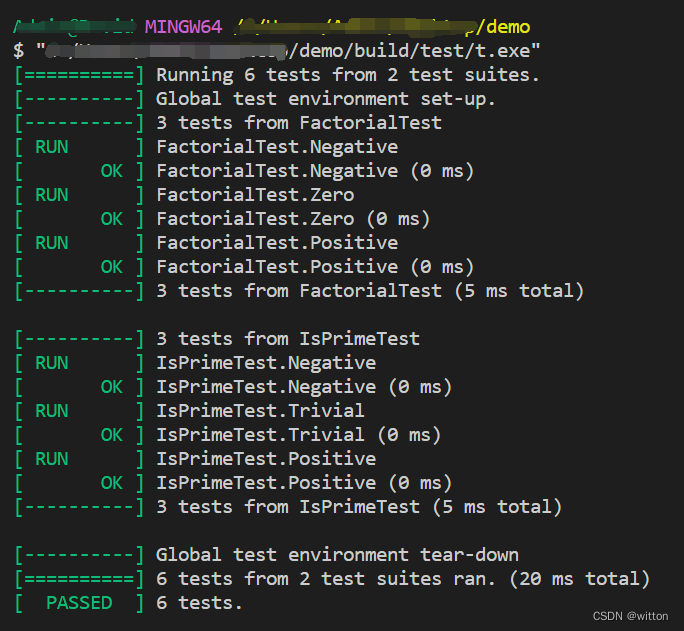
有没发现使用ctest并不能像直接运行测试目标t那样显示出详细的测试项目,那是因为在CMakeLists.txt中是使用的通用方法
add_test(NAME t COMMAND t)
添加的测试,其实CMake是直接支持gtest的,只需要把
add_test(NAME t COMMAND t)
换成下面两句即可:
include(GoogleTest)gtest_add_tests(TARGET t)
可以看到各测试项目的情况了:
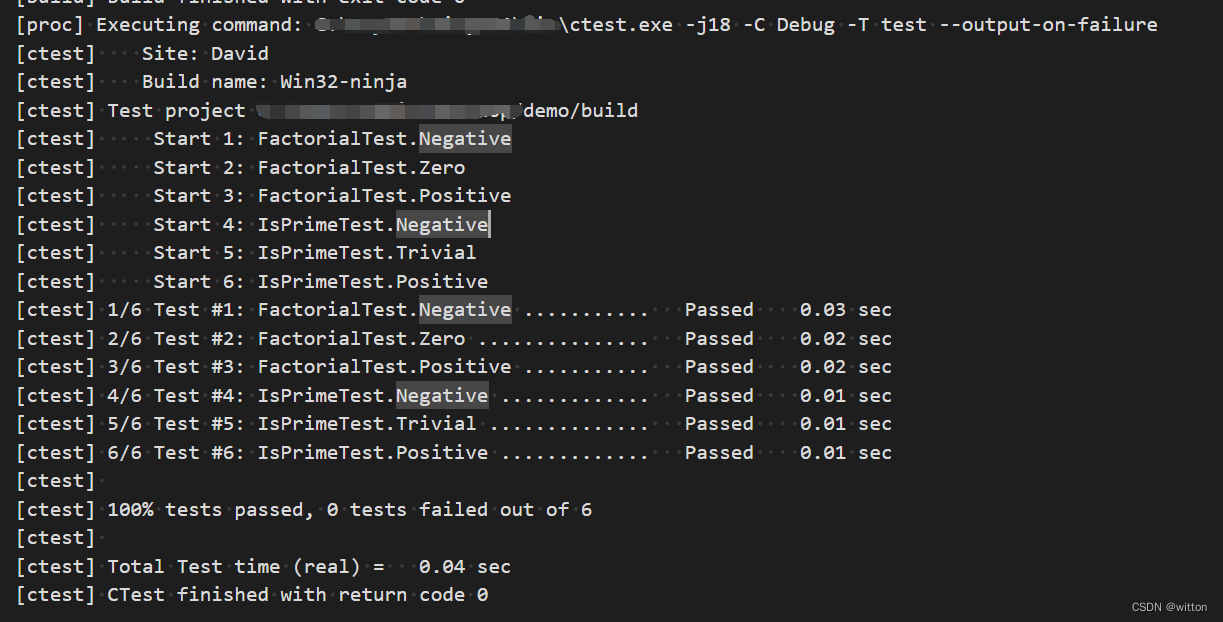
而且运行
Run CTest
后,VSCode中也会提示有几个测试用例和通过情况:

**使用
gtest_add_tests
有一个问题:一旦测试用例改变,它就需要重新执行cmake,否则无法知道改变后的测试用例。** 所以CMake添加了
gtest_discover_tests
指令,它通过调用编译后的执行程序并添加参数
--gtest_list_tests
来获取测试用例的,所以不需要重新执行CMake。
既然如此,那前面的
tmain.cpp
需要作修改以接收参数:
tmain.cpp
:
#include<gtest/gtest.h>intmain(int argc,char*argv[]){
    testing::InitGoogleTest(&argc, argv);returnRUN_ALL_TESTS();}
此时把
gtest_add_tests(TARGET t)
替换成
gtest_discover_tests(t)
即可,修改后的
CMakeLists.txt
完整源码:
add_executable(t tmain.cpp test.cpp ../func.cpp)target_link_libraries(t PRIVATE gtest)include(GoogleTest)gtest_discover_tests(t)
其实,**gtest本身是带有一个main函数库的,只需要包链接
gtest_main
即可,不需要自己写
tmain.cpp
中的内容**。可以把
tmain.cpp
删除,使用下面的
CMakeLists.txt
即可:
add_executable(t test.cpp ../func.cpp)target_link_libraries(t PRIVATE gtest gtest_main)include(GoogleTest)gtest_discover_tests(t)
四、让CMake自动下载、编译依赖
前面有提到,要运行示例,必须要求安装了gtest,可以写入CMakeLists.txt中,使用CMake的
find_package
命令来查找,本例是需要
GTest
,添加
find_package(GTest REQUIRED)
,并且是必须要安装有,所有后面添加了
REQUIRED
参数,注意必须是大写。
如果找不到GTest则会报错:
这种方式要求在MinGW中安装有GTest,可以使用MinGW命令:
pacman -S mingw-w64-x86_64-gtest
来安装。
当然更友好的方式是如果系统没有安装则自己下载源码进行编译引用,在根目录的CMakeLists.txt中添加:
cmake_policy(SET CMP0135 NEW)
find_package(GTest)
if(NOT GTest_FOUND)
message("GTest not found, download it...")
include(FetchContent)
FetchContent_Declare(googletest URL https://github.com/google/googletest/archive/refs/heads/main.zip)
FetchContent_MakeAvailable(googletest)
endif()
这里
find_package
没有添加
REQUIRED
参数来强制要求,只是检测,后面判断检测结果
GTest_FOUND
,如果没有找到则从指定URL下载(FetchContent_Declare)并编译(FetchContent_MakeAvailable),由于使用URL下载需要添加
cmake_policy(SET CMP0135 NEW)
,不然会报警告:
[cmake]   The DOWNLOAD_EXTRACT_TIMESTAMP option was not given and policy CMP0135 is
[cmake]   not set.  The policy's OLD behavior will be used.  When using a URL
[cmake]   download, the timestamps of extracted files should preferably be that of
[cmake]   the time of extraction, otherwise code that depends on the extracted
[cmake]   contents might not be rebuilt if the URL changes.  The OLD behavior
[cmake]   preserves the timestamps from the archive instead, but this is usually not
[cmake]   what you want.  Update your project to the NEW behavior or specify the
[cmake]   DOWNLOAD_EXTRACT_TIMESTAMP option with a value of true to avoid this
[cmake]   robustness issue.
FetchContent_Declare也可以使用GIT_REPOSITORY从Git克隆下来,但是这种方式如果网络不好则比较慢。
注意为了使用这些高级指令,最好是安装最新的CMake版本,FetchContent最低要求3.11:
cmake_minimum_required(VERSION 3.11.0)
写得非常详细,如果觉得对你有帮助,欢迎点赞收藏!
版权归原作者 witton 所有, 如有侵权,请联系我们删除。