
活动地址:CSDN21天学习挑战赛
- 本文为🔗365天深度学习训练营 中的学习记录博客
- 参考文章地址: 🔗深度学习100例-卷积神经网络(CNN)识别验证码 | 第12天
1、数据准备及配置
使用的是老师提供的验证码数据,共
1070张
图片数据。
1.1导入数据
data_dir ="./captcha"# 数据存放目录
data_dir = pathlib.Path(data_dir)
all_image_paths =list(data_dir.glob('*'))
all_image_paths =[str(path)for path in all_image_paths]# 通过数据文件名,获取数据标签
all_label_names =[path.split("\\")[1].split(".")[0]for path in all_image_paths]
image_count =len(all_image_paths)print("图片总数为:",image_count)

可视化预览
plt.figure(figsize=(10,5))for i inrange(20):
    plt.subplot(5,4,i+1)
    plt.xticks([])
    plt.yticks([])
    plt.grid(False)# 显示图片
    images = plt.imread(all_image_paths[i])
    plt.imshow(images)# 显示标签
    plt.xlabel(all_label_names[i])
plt.show()

1.2 标签数字化处理
number   =['0','1','2','3','4','5','6','7','8','9']
alphabet =['a','b','c','d','e','f','g','h','i','j','k','l','m','n','o','p','q','r','s','t','u','v','w','x','y','z']
char_set = number + alphabet
char_set_len =len(char_set)
label_name_len =len(all_label_names[0])# 将字符串数字化deftext2vec(text):
    vector = np.zeros([label_name_len, char_set_len])for i, c inenumerate(text):
        idx = char_set.index(c)
        vector[i][idx]=1.0return vector
all_labels =[text2vec(i)for i in all_label_names]
1.3 构建tf.data.Dataset,配置、加载数据
这里使用
from_tensor_slices
方法来构建
tf.data.Dataset
然后通过自建函数对数据进行预处理:
- load_and_preprocess_image函数从目录读取文件
- preprocess_image函数进行归一化处理和单通道处理
defpreprocess_image(image):
    image = tf.image.decode_jpeg(image, channels=1)
    image = tf.image.resize(image,[50,200])return image/255.0defload_and_preprocess_image(path):
    image = tf.io.read_file(path)return preprocess_image(image)

AUTOTUNE = tf.data.experimental.AUTOTUNE

path_ds  = tf.data.Dataset.from_tensor_slices(all_image_paths)
image_ds = path_ds.map(load_and_preprocess_image, num_parallel_calls=AUTOTUNE)
label_ds = tf.data.Dataset.from_tensor_slices(all_labels)

image_label_ds = tf.data.Dataset.zip((image_ds, label_ds))
image_label_ds

train_ds = image_label_ds.take(1000)# 前1000个batch
val_ds   = image_label_ds.skip(1000)# 跳过前1000,选取后面的
BATCH_SIZE =16

train_ds = train_ds.batch(BATCH_SIZE)
train_ds = train_ds.prefetch(buffer_size=AUTOTUNE)

val_ds = val_ds.batch(BATCH_SIZE)
val_ds = val_ds.prefetch(buffer_size=AUTOTUNE)
val_ds
2、搭建网络模型
from tensorflow.keras import datasets, layers, models

model = models.Sequential([

    layers.Conv2D(32,(3,3), activation='relu', input_shape=(50,200,1)),#卷积层1,卷积核3*3
    layers.MaxPooling2D((2,2)),#池化层1,2*2采样
    layers.Conv2D(64,(3,3), activation='relu'),#卷积层2,卷积核3*3
    layers.MaxPooling2D((2,2)),#池化层2,2*2采样

    layers.Flatten(),#Flatten层,连接卷积层与全连接层
    layers.Dense(1000, activation='relu'),#全连接层,特征进一步提取

    layers.Dense(label_name_len * char_set_len),
    layers.Reshape([label_name_len, char_set_len]),
    layers.Softmax()#输出层,输出预期结果])# 打印网络结构
model.summary()

3、配置模型
model.compile(optimizer="adam",
              loss='categorical_crossentropy',
              metrics=['accuracy'])
4、训练模型
epochs =20

history = model.fit(
    train_ds,
    validation_data=val_ds,
    epochs=epochs
)

5、评估模型
acc = history.history['accuracy']
val_acc = history.history['val_accuracy']

loss = history.history['loss']
val_loss = history.history['val_loss']

epochs_range =range(epochs)

plt.figure(figsize=(12,4))
plt.subplot(1,2,1)

plt.plot(epochs_range, acc, label='Training Accuracy')
plt.plot(epochs_range, val_acc, label='Validation Accuracy')
plt.legend(loc='lower right')
plt.title('Training and Validation Accuracy')

plt.subplot(1,2,2)
plt.plot(epochs_range, loss, label='Training Loss')
plt.plot(epochs_range, val_loss, label='Validation Loss')
plt.legend(loc='upper right')
plt.title('Training and Validation Loss')
plt.show()
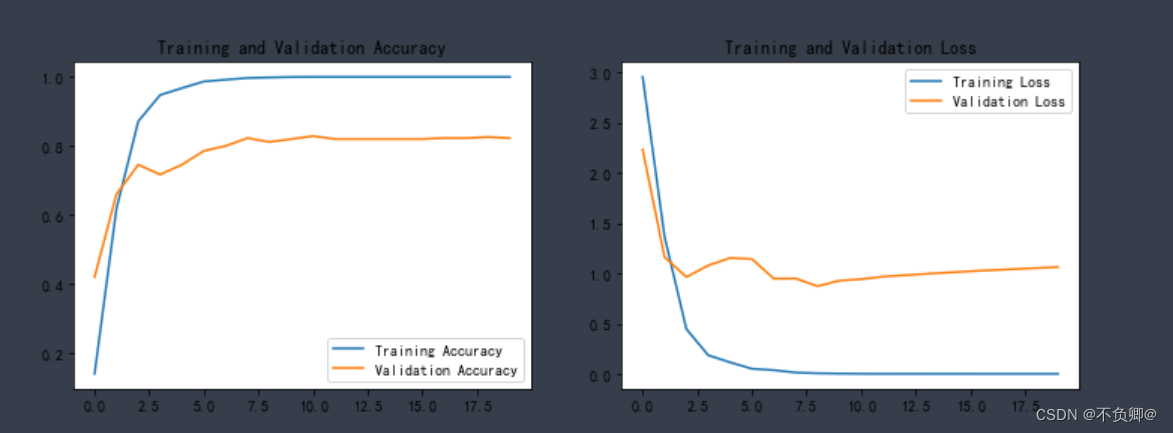
可以看出,还是存在过拟合的问题的
6、保存和加载模型
# 保存模型
model.save('12.h5')
# 加载模型
new_model = tf.keras.models.load_model('12.h5')
7、验证模型
defvec2text(vec):"""
    还原标签(向量->字符串)
    """
    text =[]for i, c inenumerate(vec):
        text.append(char_set[c])return"".join(text)

plt.figure(figsize=(10,8))# 图形的宽为10高为8for images, labels in val_ds.take(1):for i inrange(6):
        ax = plt.subplot(5,2, i +1)# 显示图片
        plt.imshow(images[i])# 需要给图片增加一个维度
        img_array = tf.expand_dims(images[i],0)# 使用模型预测验证码
        predictions = model.predict(img_array)
        plt.title(vec2text(np.argmax(predictions, axis=2)[0]))

        plt.axis("off")

准确率有待提高,刚刚训练完,其实就发现了过拟合的迹象,我会继续尝试调优,后续会发出解决过程。
完整源码
import matplotlib.pyplot as plt
# 支持中文
plt.rcParams['font.sans-serif']=['SimHei']# 用来正常显示中文标签
plt.rcParams['axes.unicode_minus']=False# 用来正常显示负号import os,PIL,random,pathlib
# 设置随机种子尽可能使结果可以重现import numpy as np
np.random.seed(1)# 设置随机种子尽可能使结果可以重现import tensorflow as tf
tf.random.set_seed(1)
data_dir ="./captcha"
data_dir = pathlib.Path(data_dir)
all_image_paths =list(data_dir.glob('*'))
all_image_paths =[str(path)for path in all_image_paths]# print(all_image_paths)# 打乱数据
random.shuffle(all_image_paths)# 获取数据标签# for p in all_image_paths:#     print (p.split("\\")[1].split(".")[0])
all_label_names =[path.split("\\")[1].split(".")[0]for path in all_image_paths]
image_count =len(all_image_paths)print("图片总数为:",image_count)

plt.figure(figsize=(10,5))for i inrange(20):
    plt.subplot(5,4,i+1)
    plt.xticks([])
    plt.yticks([])
    plt.grid(False)# 显示图片
    images = plt.imread(all_image_paths[i])
    plt.imshow(images)# 显示标签
    plt.xlabel(all_label_names[i])
plt.show()

number   =['0','1','2','3','4','5','6','7','8','9']
alphabet =['a','b','c','d','e','f','g','h','i','j','k','l','m','n','o','p','q','r','s','t','u','v','w','x','y','z']
char_set = number + alphabet
char_set_len =len(char_set)
label_name_len =len(all_label_names[0])# 将字符串数字化deftext2vec(text):
    vector = np.zeros([label_name_len, char_set_len])for i, c inenumerate(text):
        idx = char_set.index(c)
        vector[i][idx]=1.0return vector

all_labels =[text2vec(i)for i in all_label_names]# all_labelsdefpreprocess_image(image):
    image = tf.image.decode_jpeg(image, channels=1)
    image = tf.image.resize(image,[50,200])return image/255.0defload_and_preprocess_image(path):
    image = tf.io.read_file(path)return preprocess_image(image)
AUTOTUNE = tf.data.experimental.AUTOTUNE

path_ds  = tf.data.Dataset.from_tensor_slices(all_image_paths)
image_ds = path_ds.map(load_and_preprocess_image, num_parallel_calls=AUTOTUNE)
label_ds = tf.data.Dataset.from_tensor_slices(all_labels)

image_label_ds = tf.data.Dataset.zip((image_ds, label_ds))
image_label_ds

train_ds = image_label_ds.take(1000)# 前1000个batch
val_ds   = image_label_ds.skip(1000)# 跳过前1000,选取后面的

BATCH_SIZE =16

train_ds = train_ds.batch(BATCH_SIZE)
train_ds = train_ds.prefetch(buffer_size=AUTOTUNE)

val_ds = val_ds.batch(BATCH_SIZE)
val_ds = val_ds.prefetch(buffer_size=AUTOTUNE)
val_ds

from tensorflow.keras import datasets, layers, models

model = models.Sequential([

    layers.Conv2D(32,(3,3), activation='relu', input_shape=(50,200,1)),#卷积层1,卷积核3*3
    layers.MaxPooling2D((2,2)),#池化层1,2*2采样
    layers.Conv2D(64,(3,3), activation='relu'),#卷积层2,卷积核3*3
    layers.MaxPooling2D((2,2)),#池化层2,2*2采样

    layers.Flatten(),#Flatten层,连接卷积层与全连接层
    layers.Dense(1000, activation='relu'),#全连接层,特征进一步提取

    layers.Dense(label_name_len * char_set_len),
    layers.Reshape([label_name_len, char_set_len]),
    layers.Softmax()#输出层,输出预期结果])# 打印网络结构
model.summary()

model.compile(optimizer="adam",
              loss='categorical_crossentropy',
              metrics=['accuracy'])
epochs =20

history = model.fit(
    train_ds,
    validation_data=val_ds,
    epochs=epochs
)

acc = history.history['accuracy']
val_acc = history.history['val_accuracy']

loss = history.history['loss']
val_loss = history.history['val_loss']

epochs_range =range(epochs)

plt.figure(figsize=(12,4))
plt.subplot(1,2,1)

plt.plot(epochs_range, acc, label='Training Accuracy')
plt.plot(epochs_range, val_acc, label='Validation Accuracy')
plt.legend(loc='lower right')
plt.title('Training and Validation Accuracy')

plt.subplot(1,2,2)
plt.plot(epochs_range, loss, label='Training Loss')
plt.plot(epochs_range, val_loss, label='Validation Loss')
plt.legend(loc='upper right')
plt.title('Training and Validation Loss')
plt.show()# 保存模型
model.save('12.h5')# 加载模型
new_model = tf.keras.models.load_model('12.h5')# 验证defvec2text(vec):"""
    还原标签(向量->字符串)
    """
    text =[]for i, c inenumerate(vec):
        text.append(char_set[c])return"".join(text)

plt.figure(figsize=(10,8))# 图形的宽为10高为8for images, labels in val_ds.take(1):for i inrange(6):
        ax = plt.subplot(5,2, i +1)# 显示图片
        plt.imshow(images[i])# 需要给图片增加一个维度
        img_array = tf.expand_dims(images[i],0)# 使用模型预测验证码
        predictions = model.predict(img_array)
        plt.title(vec2text(np.argmax(predictions, axis=2)[0]))

        plt.axis("off")
学习日记
还存在准确率不高和过拟合的问题
我会继续尝试调优,后续会发调整过程
继续补充基础知识
本文转载自: https://blog.csdn.net/m0_48300767/article/details/126295384
版权归原作者 不负卿@ 所有, 如有侵权,请联系我们删除。
版权归原作者 不负卿@ 所有, 如有侵权,请联系我们删除。