
1. 前言
想减少开发过程中产生Bug,尤其是迭代开发过程中新引入的Bug。进行单元测试是一个非常的方法,可以用来减少开发过程的Bug,尤其是通过CI自动化,每次有新的修改,都进行回归测试,可以大大增强代码的鲁棒性。
1.1. 单元测试
单元测试(unit testing),是指对软件中的最小可测试单元进行检查和验证。“单元”一般情况定义为函数(包括类中的方法),因为函数是最小的可测试代码。跨模块的测试以及集成测试,各有各的优势,需要相互结合,而不是只用一个就可以解决所有问题。
代码覆盖率,用来衡量代码测试中的测试程序,主要包括语句覆盖、判定覆盖、条件覆盖、条件判定组合覆盖、多条件覆盖和路径覆盖。很多自动检测代码覆盖率的工具,主要还是针对的语句覆盖(即行覆盖)。有时,虽然行覆盖到了,但是一行中有多个判定逻辑的语句,多个判定逻辑不一定覆盖到了。如何提高条件覆盖,判定覆盖,除了自我注意以外,还可以通过CodeReview来协助。
VS2010自带的基于.NET的单元测试框架及代码覆盖率检查都非常好。但是这种测试框架绑定了VS2010,使其只能在Windows下使用。
gtest是Google开发的开源C++单元测试框架,被广泛使用,且其兼具跨平台的特性。另外,gtest+OpenCppCoverage也能很好地完成代码覆盖率的统计和展示。如果是Linux下则可以使用gcc和lcov来进行代码覆盖率统计。
2. gtest
2.1. 简介
gtest是Google开源的一套跨平台的C++单元测试框架。它提供了丰富的断言及其他判断,另外还有参数化及死亡测试等功能。
2.2. 编译
VS2017及之后的版本,可以直接安装gtest组件,但是VS2010需要自行编译生成相关库。只有V1.8.1版本只支持VS2010,下载地址:https://github.com/google/googletest/releases/tag/release-1.8.1。
解压之后,直接进入msvc\2010目录,其中有gtest.sln和gtest-md.sln,两个sln代码一样,前者为静态运行时库版本,后者为动态运行时库版本。
编译会生成gtest.lib,gtest_prod_test.exe。前者是gtest的测试框架静态库,后者是测试示例。
2.3. 用法
2.3.1. 初始化
在main函数中添加下面的代码会初始化测试框架,并自动执行所有注册的测试单元。
intmain(int argc,char**argv){printf("Running main() from %s\n",__FILE__);
  testing::InitGoogleTest(&argc, argv);returnRUN_ALL_TESTS();}
初始化的时候,还可以接受命令行参数。
常用的命令行参数有:
● --gtest_filter,测试案例过滤。
● --gtest_output,测试报告输出。
● --gtest_break_on_failure,异常时中断。
更多命令行参数见附录4.1.。
2.3.2. 断言
单元测试,必然有一个检测的过程,也即测试结果与实际期待值是否一致。如果不一致,触发断言,显示断言代码在哪个文件,哪一行,以方便调试问题。
2.3.2.1. 基本判断
gtest的基本判断断言主要有两类:
- ASSERT_*系列,其测试失败会立即退出当前测试函数。
- EXPECT_*系列,其测试失败会继续顺序执行。 ● 例如: EXPECT_TRUE(false); ● 测试输出: error: Value of: false Actual: false Expected: true ● 附加输出信息: ASSERT_TRUE(false)<<“For test!”; 测试失败时,不仅会输出上述信息,另外还会附加自定义信息。 断言有判断真假的,有比较两个值的,比较两个字符串,还有比较浮点类型的,详见附录4.2.。
2.3.2.2. 标记成功失败
在一些多逻辑判断分支中,可以直接标记成功与失败。
● SUCCEED(),标记当前的判断是成功的。
● ADD_FAILURE(),标记当前判断失败,输出相关代码位置信息,继续往下执行。
● FAIL(),标记当前判断重大失败,退出当前函数。
2.3.2.3. 判断抛出异常
判断抛出的异常类型是否符合预期。
例如: EXPECT_THROW(Fun(0), int);
会判断Fun(0)函数是否抛出了int类型的异常。
更多见附录4.2.5.。
2.3.2.4. 参数名输出断言
在调用函数的同时,输出其参数值,相当于自定义判断。
ASSERT_PRED2(GreaterThan, a, b);
测试结果:
error: GreaterThanevaluates to false, where
a evaluates to 5
b evaluates to 6
ASSERT_PRED1,ASSERT_PRED3,ASSERT_PRED4,ASSERT_PRED2分别对应不同参数个数的版本。
2.3.2.5. 子过程中使用断言
SCOPED_TRACE来标记接下来的子函数,如果触发断言,会显示子过程前面设置的追踪标记,以方便确认是调用的哪个子函数。
voidSub(int n){ASSERT_EQ(1, n);}TEST(SubTest, Test1){SCOPED_TRACE("Step1");Sub(1);SCOPED_TRACE("Step2");Sub(3);}
2.3.3. 测试用例的注册
gtest提供了非常多的宏用来注册测试用例。
2.3.3.1. TEST 宏
TEST宏主要针对一般的函数或类的测试。
- 解析TEST宏
#defineTEST(test_case_name, test_name)GTEST_TEST(test_case_name, test_name)
- 示例
// Tests factorial of 0.TEST(FactorialTest, Zero){EXPECT_EQ(1,Factorial(0));}// Tests factorial of negative numbers.TEST(FactorialTest, Negative){EXPECT_EQ(1,Factorial(-5));EXPECT_EQ(1,Factorial(-1));EXPECT_GT(Factorial(-10),0);}
可以看出FactorialTest是作为测试示例名,Zero是作为测试示例下的一个子具体测试项名。
如果一个测试示例下有多个测试项,可以如上面的代码中,写多个相同测试示例名的TEST。
2.3.3.2. TEST_F宏
#defineTEST_F(test_fixture, test_name)\GTEST_TEST_(test_fixture, test_name, test_fixture,\::testing::internal::GetTypeId<test_fixture>())
通过宏定义可以看出,第一个宏参数必须是一个特定的类型,而不是任意的类型。每个测试实例其实都是test_fixture的实例的接口实现。多个相同类名的测试套件就有多个实例,并且它们是注册在同一个类名之下的。针对类的时候,常有初始化以及清理的操作,测试套件下有三种情况,分别为:每个测试实例单独初始化及清理,同名测试类共享初始化及清理,不同测试套件共享初始化及清理。
2.3.3.2.1. 测试实例单独初始化及清理
gtest要求test_fixture必须是从::testing::Test派生而来的。test_fixture类可以重写SetUp和TealDown两个函数,前者是为初始化测试实例,后者为测试结束前进行相关清理。
- 示例
classTestFixtures:public::testing::Test{public:TestFixtures(){printf("\nTestFixtures\n");};~TestFixtures(){printf("\n~TestFixtures\n");}protected:voidSetUp(){printf("\nSetUp\n");
        data =0;};voidTearDown(){printf("\nTearDown\n");}protected:int data;};TEST_F(TestFixtures, First){EXPECT_EQ(data,0);
    data =1;EXPECT_EQ(data,1);}TEST_F(TestFixtures, Second){EXPECT_EQ(data,0);
    data =1;EXPECT_EQ(data,1);}
- 测试结果 下面的测试结果可以看出,每个测试实例都是单独初始化及清理的。
[----------]2 tests from TestFixtures
[ RUN      ] TestFixtures.First
TestFixtures
SetUp
TearDown
~TestFixtures
[       OK ] TestFixtures.First (9877 ms)[ RUN      ] TestFixtures.Second
TestFixtures
SetUp
TearDown
~TestFixtures
[       OK ] TestFixtures.Second (21848 ms)[----------]2 tests from TestFixtures (37632 ms total)
2.3.3.2.2. 测试类初始化及清理
gtest要求test_fixture必须是从::testing::Test派生而来的,然后可以重写类静态函数完成类层面的初始化及清理。
- 示例
classTestFixturesS:public::testing::Test{public:TestFixturesS(){printf("\nTestFixturesS\n");};~TestFixturesS(){printf("\n~TestFixturesS\n");}protected:voidSetUp(){};voidTearDown(){};staticvoidSetUpTestCase(){
        UnitTest& unit_test =*UnitTest::GetInstance();const TestCase& test_case =*unit_test.current_test_case();printf("Start Test Case %s \n", test_case.name());};staticvoidTearDownTestCase(){
        UnitTest& unit_test =*UnitTest::GetInstance();const TestCase& test_case =*unit_test.current_test_case();int failed_tests =0;int suc_tests =0;for(int j =0; j < test_case.total_test_count();++j){const TestInfo& test_info =*test_case.GetTestInfo(j);if(test_info.result()->Failed()){
                failed_tests++;}else{
                suc_tests++;}}printf("End Test Case %s. Suc : %d, Failed: %d\n", test_case.name(), suc_tests, failed_tests);};};TEST_F(TestFixturesS, SUC){EXPECT_EQ(1,1);}TEST_F(TestFixturesS, FAI){EXPECT_EQ(1,2);}
- 结果 可以看到同名类的测试只有一个初始化及清理。
[----------]2 tests from TestFixturesS
Start Test Case TestFixturesS
[ RUN      ] TestFixturesS.SUC
TestFixturesS
~TestFixturesS
[       OK ] TestFixturesS.SUC (2 ms)[ RUN      ] TestFixturesS.FAI
TestFixturesS
..\test\gtest_unittest.cc(126): error:       Expected: 1
To be equal to: 2
~TestFixturesS
[  FAILED  ] TestFixturesS.FAI (5 ms)
End Test Case TestFixturesS. Suc :1, Failed: 1[----------]2 tests from TestFixturesS (12 ms total)
2.3.3.2.3. 全局的初始化及清理
有时需要有一个全局统一的一个初始化及退出前的清理操作,此时可以从testing::Environment派生一个类,并重写Setup和TearDown。然后在main函数中调用AddGlobalTestEnvironment添加实例。
- 示例
namespace testing {namespace internal {classEnvironmentTest:public::testing::Environment{public:EnvironmentTest(){printf("\nEnvironmentTest\n");};~EnvironmentTest(){printf("\n~EnvironmentTest\n");}public:voidSetUp(){printf("\n~Start Test\n");};voidTearDown(){
        UnitTest& unit_test =*UnitTest::GetInstance();for(int i =0; i < unit_test.total_test_case_count();++i){int failed_tests =0;int suc_tests =0;const TestCase& test_case =*unit_test.GetTestCase(i);for(int j =0; j < test_case.total_test_count();++j){const TestInfo& test_info =*test_case.GetTestInfo(j);// Counts failed tests that were not meant to fail (those without// 'Fails' in the name).if(test_info.result()->Failed()){
                    failed_tests++;}else{
                    suc_tests++;}}printf("End Test Case %s. Suc : %d, Failed: %d\n", test_case.name(), suc_tests, failed_tests);}};};}}

GTEST_API_ intmain(int argc,char**argv){printf("Running main() from gtest_main.cc\n");::testing::AddGlobalTestEnvironment(new testing::internal::EnvironmentTest);
  testing::InitGoogleTest(&argc, argv);returnRUN_ALL_TESTS();}
2.3.3.3. TEST_P宏
测试代码写好了之后,如果想添加新的验证数据,最好能够不修改原有的测试代码,有一种方法直接添加测试数据。gtest针对这种情况提供了TEST_P宏来将测试参数化,也即将测试参数独立出来。
2.3.3.3.1. 单一参数
- 代码
classIsPrimeParamTest:public testing::TestWithParam<int>{public:boolIsPrime(int n){if(n <=1)returnfalse;if(n %2==0)return n ==2;for(int i =3;; i +=2){if(i > n / i)break;if(n % i ==0)returnfalse;}returntrue;}};TEST_P(IsPrimeParamTest, HandleTrueReturn){int n =GetParam();EXPECT_TRUE(IsPrime(n));}INSTANTIATE_TEST_CASE_P(TrueReturn, IsPrimeParamTest, testing::Values(3,5,11,23,17));INSTANTIATE_TEST_CASE_P(TrueReturnEx, IsPrimeParamTest, testing::Values(2));
- 测试结果
Running main() from ..\..\src\gtest_main.cc
[==========] Running 6 tests from 2test cases.
[----------] Global test environment set-up.
[----------]5 tests from TrueReturn/IsPrimeParamTest
[ RUN      ] TrueReturn/IsPrimeParamTest.HandleTrueReturn/0
[       OK ] TrueReturn/IsPrimeParamTest.HandleTrueReturn/0 (0 ms)[ RUN      ] TrueReturn/IsPrimeParamTest.HandleTrueReturn/1
[       OK ] TrueReturn/IsPrimeParamTest.HandleTrueReturn/1 (0 ms)[ RUN      ] TrueReturn/IsPrimeParamTest.HandleTrueReturn/2
[       OK ] TrueReturn/IsPrimeParamTest.HandleTrueReturn/2 (1 ms)[ RUN      ] TrueReturn/IsPrimeParamTest.HandleTrueReturn/3
[       OK ] TrueReturn/IsPrimeParamTest.HandleTrueReturn/3 (0 ms)[ RUN      ] TrueReturn/IsPrimeParamTest.HandleTrueReturn/4
[       OK ] TrueReturn/IsPrimeParamTest.HandleTrueReturn/4 (0 ms)[----------]5 tests from TrueReturn/IsPrimeParamTest (1 ms total)[----------]1test from TrueReturnEx/IsPrimeParamTest
[ RUN      ] TrueReturnEx/IsPrimeParamTest.HandleTrueReturn/0
[       OK ] TrueReturnEx/IsPrimeParamTest.HandleTrueReturn/0 (0 ms)[----------]1test from TrueReturnEx/IsPrimeParamTest (0 ms total)[----------] Global test environment tear-down
[==========]6 tests from 2test cases ran. (3 ms total)[  PASSED  ]6 tests.
2.3.3.3.2. 多参数
- 代码
classOddEvenTest:public testing::TestWithParam<::testing::tuple<bool,int>>{protected:boolIsOdd(int n){return(1== n%2);}boolIsEven(int n){return(0== n%2);}};TEST_P(OddEvenTest, Case1){bool bOdd =::testing::get<0>(GetParam());int nVal =::testing::get<1>(GetParam());if(bOdd){EXPECT_TRUE(IsOdd(nVal));}else{EXPECT_TRUE(IsEven(nVal));}}INSTANTIATE_TEST_CASE_P(TestBisValuesCombine, OddEvenTest,::testing::Combine(::testing::Bool(),::testing::Values(0,1,2,3,4)));
多参数时,会用到可变参数模板,VS2010不支持,VS2013才开始支持。
2.3.3.4. TYPED_TEST宏
针对模板,gtest提供了TYPED_TEST宏来测试其参数的兼容性。
- 代码
#include<list>template<typenameT>classFooTest:public testing::Test{public:typedef std::list<T> List;static T shared_;
T value_;};template<typenameT> T FooTest<T>::shared_ ;typedef testing::Types<char,int,unsignedint> MyTypes;TYPED_TEST_CASE(FooTest, MyTypes);TYPED_TEST(FooTest, DoesBlah){// Inside a test, refer to the special name TypeParam to get the type// parameter.  Since we are inside a derived class template, C++ requires// us to visit the members of FooTest via 'this'.
    TypeParam n =this->value_;// To visit static members of the fixture, add the 'TestFixture::'// prefix.// 测试T类型的vlaue_和shared_的运算兼容性
    n += TestFixture::shared_;// To refer to typedefs in the fixture, add the 'typename TestFixture::'// prefix.  The 'typename' is required to satisfy the compiler.// 测试List的可用性typenameTestFixture::List values;
    values.push_back(n);}
- 结果
Running main() from ..\..\src\gtest_main.cc
[==========] Running 3 tests from 3 test cases.[----------] Global test environment set-up.[----------]1 test from FooTest/0, where TypeParam =char[ RUN      ] FooTest/0.DoesBlah
[       OK ] FooTest/0.DoesBlah(0 ms)[----------]1 test from FooTest/0(1 ms total)[----------]1 test from FooTest/1, where TypeParam =int[ RUN      ] FooTest/1.DoesBlah
[       OK ] FooTest/1.DoesBlah(0 ms)[----------]1 test from FooTest/1(0 ms total)[----------]1 test from FooTest/2, where TypeParam =unsignedint[ RUN      ] FooTest/2.DoesBlah
[       OK ] FooTest/2.DoesBlah(0 ms)[----------]1 test from FooTest/2(0 ms total)[----------] Global test environment tear-down
[==========]3 tests from 3 test cases ran.(3 ms total)[  PASSED  ]3 tests.
2.3.3.5. TYPED_TEST_P
TYPED_TEST可以测试指定的类型,但是如果想添加新的类型来测试呢?gtest同样提供了类型参数的参数化测试宏TYPED_TEST_P。
- 代码 REGISTER_TYPED_TEST_CASE_P还可以注册多个测试实例。
template<typenameT>classFooTest:public testing::Test{public: T val;};TYPED_TEST_CASE_P(FooTest);TYPED_TEST_P(FooTest, DoesBlah){// Inside a test, refer to TypeParam to get the type parameter. TypeParam n =0; val = n;}TYPED_TEST_P(FooTest, HasPropertyA){ TypeParam n ='a'; val = n;}REGISTER_TYPED_TEST_CASE_P(FooTest, DoesBlah, HasPropertyA);typedef testing::Types<char,int,unsignedint> MyTypes;INSTANTIATE_TYPED_TEST_CASE_P(My, FooTest, MyTypes); - 结果
Running main() from ..\..\src\gtest_main.cc[==========] Running 6 tests from 3 test cases.[----------] Global test environment set-up.[----------]2 tests from My/FooTest/0, where TypeParam =char[ RUN ] My/FooTest/0.DoesBlah[ OK ] My/FooTest/0.DoesBlah(0 ms)[ RUN ] My/FooTest/0.HasPropertyA[ OK ] My/FooTest/0.HasPropertyA(0 ms)[----------]2 tests from My/FooTest/0(1 ms total)[----------]2 tests from My/FooTest/1, where TypeParam =int[ RUN ] My/FooTest/1.DoesBlah[ OK ] My/FooTest/1.DoesBlah(0 ms)[ RUN ] My/FooTest/1.HasPropertyA[ OK ] My/FooTest/1.HasPropertyA(0 ms)[----------]2 tests from My/FooTest/1(0 ms total)[----------]2 tests from My/FooTest/2, where TypeParam =unsignedint[ RUN ] My/FooTest/2.DoesBlah[ OK ] My/FooTest/2.DoesBlah(0 ms)[ RUN ] My/FooTest/2.HasPropertyA[ OK ] My/FooTest/2.HasPropertyA(0 ms)[----------]2 tests from My/FooTest/2(1 ms total)[----------] Global test environment tear-down[==========]6 tests from 3 test cases ran.(4 ms total)[ PASSED ]6 tests.
2.3.4. 死亡测试
程序的“死亡”,即是崩溃。但是如果真的崩溃了,测试也就自然终止了,无法继续后面的测试了。gtest提供了一个测试环境来进行崩溃测试,可以保证代码的继续执行而不中止。
- 代码 针对崩溃的代码,gtest提供EXPECT_DEATH利用创建一个子进程来测试,当子进程崩溃了,不会影响当前测试进程。针对子进程的异常退出,gtest提供EXPECT_EXIT来检测退出码与预期的退出码是否一致。
voidFoo(){int*pInt =0;*pInt=42;}TEST(FooDeathTest, Demo){EXPECT_DEATH(Foo(),"");}voidFooEx(){_exit(1);}TEST(ExitDeathTest, Demo){EXPECT_EXIT(FooEx(), testing::ExitedWithCode(1),"");} - 结果
Running main() from ..\..\src\gtest_main.cc[==========] Running 2 tests from 2test cases.[----------] Global test environment set-up.[----------]1test from FooDeathTest[ RUN ] FooDeathTest.Demo1Running main() from ..\..\src\gtest_main.cc[ OK ] FooDeathTest.Demo1 (115 ms)[----------]1test from FooDeathTest (116 ms total)[----------]1test from ExitDeathTest[ RUN ] ExitDeathTest.Demo2Running main() from ..\..\src\gtest_main.cc[ OK ] ExitDeathTest.Demo2 (110 ms)[----------]1test from ExitDeathTest (111 ms total)[----------] Global test environment tear-down[==========]2 tests from 2test cases ran. (229 ms total)[ PASSED ]2 tests. - 死亡测试宏最后一个参数是检测子进程执行死亡测试函数时输出的错误信息,此参数支持简单的正则表达式。 如下面的代码,可以自定义错误输出,然后检测不匹配,会报测试失败。关于正则表达式的详细用法,见官方文档。
voidFoo(){fprintf(stderr,"Test");int*pInt =0;*pInt=42;}TEST(FooDeathTest, Demo){EXPECT_DEATH(Foo(),"pInt");}``````Running main() from ..\..\src\gtest_main.cc[==========] Running 1test from 1test case.[----------] Global test environment set-up.[----------]1test from FooDeathTest[ RUN ] FooDeathTest.DemoRunning main() from ..\..\src\gtest_main.cce:\svn\pcsw\public\opensource\googletest\trunk\googletest\test001\test001.cpp(149): error: Death test: Foo() Result: died but not with expected error. Expected: pIntActual msg:[ DEATH ][ FAILED ] FooDeathTest.Demo (114 ms)[----------]1test from FooDeathTest (115 ms total)[----------] Global test environment tear-down[==========]1test from 1testcase ran. (117 ms total)[ PASSED ]0 tests.[ FAILED ]1 test, listed below:[ FAILED ] FooDeathTest.Demo - 死亡测试是调用子进程来完成的,异常退出是否安全,影响测试的性。 死亡测试有两种风格,在初始化时指定。 a. testing::FLAGS_gtest_death_test_style = “threadsafe”; // 增加线程的安全性,但是影响执行效率 b. testing::FLAGS_gtest_death_test_style = “fast”; // 默认方式,执行效率更高
2.3.5. 测试私有成员
主要是用宏FRIEND_TEST来创建一个友元类来访问私有成员,一般情况下不建议这样做,这会破坏被测代码。
// foo.hclassFoo{...private:FRIEND_TEST(FooTest, BarReturnsZeroOnNull);intBar(void* x);};// foo_test.cc...TEST(FooTest, BarReturnsZeroOnNull){
  Foo foo;EXPECT_EQ(foo.Bar(NULL),0);// Uses Foo's private member Bar().}
2.3.6. 监听测试事件
gtest测试启动后,结束前,还有失败后,成功后等等事件,都可以通过派生EmptyTestEventListener类,重写相关事件接口,并完成想要监听的任务。事例来自gtes,监听内存的申请与释放。
#include"gtest/gtest.h"using::testing::EmptyTestEventListener;using::testing::InitGoogleTest;using::testing::Test;using::testing::TestEventListeners;using::testing::TestInfo;using::testing::TestPartResult;using::testing::UnitTest;namespace{// We will track memory used by this class.classWater{public:// Normal Water declarations go here.// operator new and operator delete help us control water allocation.void*operatornew(size_t allocation_size){
            allocated_++;returnmalloc(allocation_size);}voidoperatordelete(void* block, size_t /* allocation_size */){
            allocated_--;free(block);}staticintallocated(){return allocated_;}private:staticint allocated_;};int Water::allocated_ =0;// This event listener monitors how many Water objects are created and// destroyed by each test, and reports a failure if a test leaks some Water// objects. It does this by comparing the number of live Water objects at// the beginning of a test and at the end of a test.classLeakChecker:publicEmptyTestEventListener{private:// Called before a test starts.virtualvoidOnTestStart(const TestInfo&/* test_info */){
            initially_allocated_ =Water::allocated();}// Called after a test ends.virtualvoidOnTestEnd(const TestInfo&/* test_info */){int difference =Water::allocated()- initially_allocated_;// You can generate a failure in any event handler except// OnTestPartResult. Just use an appropriate Google Test assertion to do// it.EXPECT_LE(difference,0)<<"Leaked "<< difference <<" unit(s) of Water!";}int initially_allocated_;};TEST(ListenersTest, DoesNotLeak){
        Water* water =new Water;delete water;}// This should fail when the --check_for_leaks command line flag is// specified.TEST(ListenersTest, LeaksWater){
        Water* water =new Water;//EXPECT_TRUE(water != NULL);}}// namespaceintmain(int argc,char**argv){InitGoogleTest(&argc, argv);bool check_for_leaks =false;if(argc >1&&strcmp(argv[1],"--check_for_leaks")==0)
        check_for_leaks =true;elseprintf("%s\n","Run this program with --check_for_leaks to enable ""custom leak checking in the tests.");// If we are given the --check_for_leaks command line flag, installs the// leak checker.if(check_for_leaks){
        TestEventListeners& listeners =UnitTest::GetInstance()->listeners();// Adds the leak checker to the end of the test event listener list,// after the default text output printer and the default XML report// generator.//// The order is important - it ensures that failures generated in the// leak checker's OnTestEnd() method are processed by the text and XML// printers *before* their OnTestEnd() methods are called, such that// they are attributed to the right test. Remember that a listener// receives an OnXyzStart event *after* listeners preceding it in the// list received that event, and receives an OnXyzEnd event *before*// listeners preceding it.//// We don't need to worry about deleting the new listener later, as// Google Test will do it.
        listeners.Append(new LeakChecker);}returnRUN_ALL_TESTS();}
2.4. 模拟
2.4.1. 模拟文件外的类和函数
单元测试一般是针对单个源文件进行测试,这样可以避免引入其他源文件干扰测试。那么在测试一个函数时,函数中调用了另外一个文件中的函数A时,那么测试此文件时,自然无法链接函数A。此时则自行模拟一个A函数,实现相应输入输出。
2.4.2. 模拟文件中的全局函数
测试文件中的待测函数B中有调用另外一个文件中的函数A,那么此时可以直接测试B函数。也可以模拟函数A编写一个新的函数A_Stub,再来测试B。这个模拟函数A的过程,被称为打桩,A_Stub被称为A的桩函数。打桩,可以使用宏替换,但是要修改待测文件,此方法并不推荐。还可以运行时,修改函数A的跳转地址为桩函数A_Stub的地址。开源打桩代码,有提供接口,使用非常方便。说见:https://github.com/coolxv/cpp-stub。
#include<iostream>#include"stub.h"usingnamespace std;intfoo(int a){
    cout<<"I am foo"<<endl;return0;}intfoo_stub(int a){
    cout<<"I am foo_stub"<<endl;return0;}intmain(){
    Stub stub;
    stub.set(foo, foo_stub);foo(1);return0;}
2.4.3. 模拟类中的成员函数
测试一个类的的成员函数B时,函数B中调用了成员函数A,如果想隔离成员A的影响,也可以对成员A进行打桩。
#include<iostream>#include"stub.h"usingnamespace std;classFoo{public:voidoperator()(int a){
        cout<<"I am foo"<<endl;}staticintfoo(int a){
        cout<<"I am A_foo"<<endl;return0;}};classB{public:intfoo_stub(int a){
        cout<<"I am foo_stub"<<endl;return0;}};intfoo_stub(int a){
    cout<<"I am foo_stub"<<endl;return0;}intmain(){
    Stub stub;
    stub.set(ADDR(Foo,operator()),ADDR(B,foo_stub));
    Foo foo;foo(1);

    stub.set(ADDR(Foo,foo), foo_stub);Foo::foo(1);return0;}
2.4.4. 其他
有一些模拟功能需要用到VS2019,其他虚函数,模板函数的模拟见https://github.com/coolxv/cpp-stub。
gmock也提供了全面的模拟接口,但是gmock也需要VS2013+的版本才支持。
3. OpenCppCoverage
3.1. 简介
OpenCppCoverage是Windows下的开源C++代码覆盖率工具,主要用于单元测试覆盖率统计,也可以用于其他监控代码执行的地方。
OpenCppCoverage支持代码行覆盖统计,支持过程不同模块,不同代码目录,并生成HTML/XML报告,并且支持报告合并。另外,还支持Visual Studio Plugin和Jenkins。
OpenCppCoverage只支持Visual Studio 2008及之后的版本。
可以下载开源的版本自行编译,也可以直接在https://github.com/OpenCppCoverage/OpenCppCoverage/releases上下载二进制版本使用。
3.2. 基本原理
VS2010自带的代码覆盖率统计工具,是对二进制文件进行修改,进行静态插桩。OpenCppCoverage则是利用pdb文件进行动态检测。
待测模块(exe/dll)中,有记录其pdb文件的路径,而pdb文件则有记录源代码路径,以及类名,函数名,源代码每一行对应的调试信息等。利用pdb文件,给所有待测的代码都添加断点信息,而每次断点被执行,都会调用一个回调函数,回调函数中,有记录该断点的详细信息,包括断点所在文件太代码行数。依据上述信息,可以完成代码覆盖统计。
3.3. 用法
3.3.1. 基本用法
调用YourProgram.exe并附加命令行参数arg1,arg2
OpenCppCoverage.exe – YourProgram.exe arg1 arg2
此用法只能用在当前编译的电脑,这样OpenCppCoverage才能通过exe中记录的pdb路径,找到pdb,再找到源代码进行分析统计。此方法会统计YourProgram.exe及其引用的所有相关系统DLL的代码覆盖,会导致很多无效统计。
3.3.2. 统计指定模块
OpenCppCoverage.exe --modules d:\Project\Bin – YourProgram.exe arg1 arg2
此方法只统计路径包括d:\Project\Bin的模块
指定模块支持通配符
OpenCppCoverage.exe --modules d:\Project\Bin\P*oject – YourProgram.exe arg1 arg2
3.3.3. 统计指定源代码
OpenCppCoverage.exe --sources d:\Project\src – YourProgram.exe arg1 arg2
此方法只统计源代码路径包括d:\Project\src的源文件
指定源代码支持通配符
OpenCppCoverage.exe --sources d:\Project\src\main*.cpp – YourProgram.exe arg1 arg2
3.3.4. 指定生成报告
OpenCppCoverage默认在当前目录生成以年月日时分秒为名的html为名的报告。
可以指定生成xml到指定目录
OpenCppCoverage.exe --export_type=cobertura:outputPath – MyProgram.exe
生成html到指定目录
OpenCppCoverage.exe --export_type=html:outputPath – MyProgram.exe
3.3.5. 过程指定模块和源代码
excluded_modules可以过滤包括指定名字的模块
OpenCppCoverage.exe --excluded_modules C:\Dev\MyProgram – MyProgram.exe
excluded_sources可以过滤包括指定名字的源代码
OpenCppCoverage.exe --excluded_sources d:\Project\src\main*.cpp – YourProgram.exe arg1 arg2
excluded_modules和excluded_sources都支持通配符。
3.3.6. 其他
- 合并多份报告
- 统计子进程代码覆盖
- 过滤指定行代码统计(支持正则表达式)
- 支持diff.path文件统计
- 安静执行不显示非异常信息
- 支持配置文件配置常用参数
3.4. 报告
见附录4.4.。
3.5. 注意
代码优化之后,pdb文件中记录的执行代码与源代码中的行号不是一一对应。因此建立只在Debug下使用OpenCppCoverage。
4. 附录
4.1. gtest命令行参数
4.1.1. 测试案例集合
命令行参数说明–gtest_list_tests使用这个参数时,将不会执行里面的测试案例,而是输出一个案例的列表。–gtest_filter对执行的测试案例进行过滤,支持通配符
? 单个字符
- 任意字符
- 排除,如,-a 表示除了
: 取或,如,a:b 表示a或b
比如下面的例子:
./foo_test 没有指定过滤条件,运行所有案例
./foo_test --gtest_filter=* 使用通配符,表示运行所有案例
./foo_test --gtest_filter=FooTest. 运行所有“测试案例名称(testcase_name)”为FooTest的案例
./foo_test --gtest_filter=Null:Constructor 运行所有“测试案例名称(testcase_name)”或“测试名称(test_name)”包含Null或Constructor的案例。
./foo_test --gtest_filter=-DeathTest. 运行所有非死亡测试案例。
./foo_test --gtest_filter=FooTest.*-FooTest.Bar 运行所有“测试案例名称(testcase_name)”为FooTest的案例,但是除了FooTest.Bar这个案例–gtest_also_run_disabled_tests执行案例时,同时也执行被置为无效的测试案例。关于设置测试案例无效的方法为:
在测试案例名称或测试名称中添加DISABLED前缀,比如:
// Tests that Foo does Abc.
TEST(FooTest, DISABLED_DoesAbc) { }
class DISABLED_BarTest : public testing::Test { };
// Tests that Bar does Xyz.TEST_F(DISABLED_BarTest, DoesXyz) { }–gtest_repeat=[COUNT]设置案例重复运行次数,非常棒的功能!比如:
–gtest_repeat=1000 重复执行1000次,即使中途出现错误。
–gtest_repeat=-1 无限次数执行。。。。
–gtest_repeat=1000 --gtest_break_on_failure 重复执行1000次,并且在第一个错误发生时立即停止。这个功能对调试非常有用。
–gtest_repeat=1000 --gtest_filter=FooBar 重复执行1000次测试案例名称为FooBar的案例。
4.1.2. 测试案例输出
4.1.3. 对案例的异常处理

4.3. 覆盖率测试报告
4.3.1. 被测exe的总覆盖率
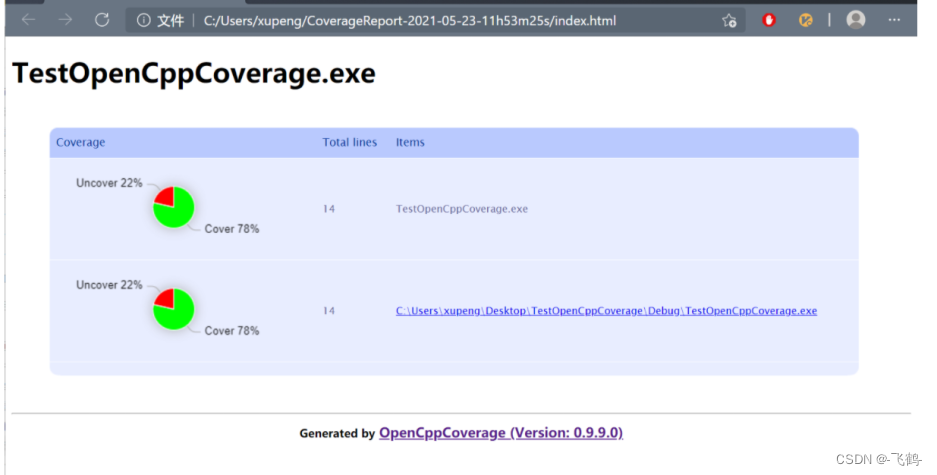
4.3.2. 指定模块文件的覆盖率
4.3.3. 指定文件的代码覆盖率
绿色背景的代码表示已经覆盖,红色背景的表示未覆盖。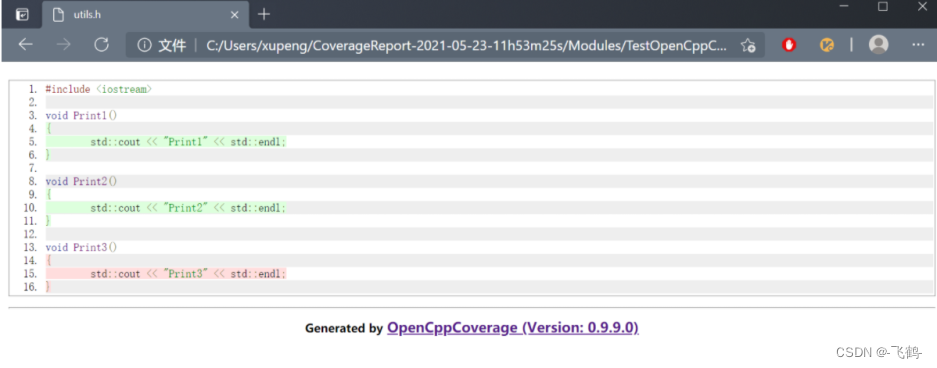
版权归原作者 -飞鹤- 所有, 如有侵权,请联系我们删除。