
直播弹幕系统(五)- 整合Stomp替换原生WebSocket方案探究
前言
本篇文章是基于 SpringBoot - WebSocket的使用和聊天室练习 来讲解的。
在设计弹幕系统(目前还是从设计聊天室开始入手,弹幕的
React
实现后面会开始写)这块,我还是用最原生的
WebSocket
来进行的。对于服务端而言。无非就是添加
@ServerEndpoint
注解修饰,通过
@OnOpen
进行监听等操作。
但是最最最重要的一点是,这种设计系统,
WebSocket
信息是存储于本地缓存的。而且,在分布式架构下,还需要考虑到消息的一致性。
因此本篇文章,先简单了解下
Stomp
以及它的聊天室替代方案实现。
一. STOMP 协议简单介绍
STOMP(Simple (or Streaming) Text Orientated Messaging Protocol)
,即简单文本定向消息协议。
- 主要用途:它主要用于
STOMP客户端和任意的STOMP消息代理之间进行信息交互。 - 特点:可以建立在
WebSocket之上,也可以建立在其他应用协议之上。
STOMP
客户端库:
ActiveMQ
、
RabbitMQ
(后期要接入)
STOMP
服务端库:
stomp.js
,附上下载链接 密码: l3qv
STOMP
服务端方面,相当于消息队列的
Producer
。而客户端方面,主要有这么几个操作:
操作内容
CONNECT
启动与服务器的流或
TCP
连接
SEND
发送消息
SUBSCRIBE
订阅主题
UNSUBSCRIBE
取消订阅
BEGIN
启动事物
COMMIT
提交事物
ABORT
回滚事物
ACK
消息的确认
NACK
告诉服务器客户端没有消费该消息
DISCONNECT
断开连接
1.1 客户端编码基础
首先,客户端方面,往往需要引入两个
js
作为支撑:(下载链接上文也给了)
stomp.min.js:STOMP客户端实现库。sockjs.min.js:sockjs,是对原生Websocket的一种封装。
1.初始化
STOMP
客户端:
const socket =newSockJS('http://localhost:8080/ws');const stompClient = Stomp.over(socket);
SocketJs
构造里面传入
WebSocket
服务器地址。没错,它使用的是
http
协议开头,而不是
ws
协议开头。
2.初始化链接操作,一般有三个参数:
- 发送的消息头信息。
- 链接成功时的回调函数
onConnected。 - 链接失败时的回调函数
onError。
stompClient.connect({}, onConnected, onError);
3.订阅主题的方式,一般两个参数:
- 订阅的主题地址。
- 接收消息的回调函数
onMessageReceived
stompClient.subscribe('/topic/public', onMessageReceived);
4.发送消息的方式,一般有三个参数:
- 发送的地址。
- 发送的消息头信息。
- 发送的消息体信息。
stompClient.send('/chat/addUser',{},JSON.stringify({ sender:getValueByParam('userId'), type:'JOIN'}),);
1.2 服务端编码基础
这里我们以
Spring
整合
STOMP
的基础上来说。配置类就不说了,下文会贴代码。主要讲一下几个注解的用法。
以上文中,订阅了主题
/topic/public
,并发送一条消息到
/chat/addUser
为例。在Java代码中,我们可以像编写正常的
RestFul
接口一样,写个
Controller
:
@RestControllerpublicclassMyController{@AutowiredprivateSimpMessagingTemplate messagingTemplate;@MessageMapping("/chat/addUser")@SendTo({"/topic/public"})publicStringsendMessage(@PayloadEntity entity){return"Hello";}@PostMapping("/chat/single")publicvoidsendSingleMessage(@RequestBodyEntity entity){
        messagingTemplate.convertAndSendToUser("消息接受者userName或者ID","/single",chatMessage);}}
关注几个重点信息:
1.2.1 SimpMessagingTemplate
SimpMessagingTemplate
用于将消息发送给特定的用户。从上述Demo中我们可以看到有三个参数,发送给特定用户的路由地址就是由前两个参数来决定的。默认情况下,客户端接收一对一消息主题的路径是:
/user/ + "消息接受者userName或者ID" + "/single"(第二个参数)。- 第三个参数则是消息体。
默认前缀
/user/
可以修改,在配置类中修改
@Configuration@EnableWebSocketMessageBrokerpublicclassWebSocketConfigimplementsWebSocketMessageBrokerConfigurer{@OverridepublicvoidconfigureMessageBroker(MessageBrokerRegistry config){// 前缀修改,默认是/user/
        config.setUserDestinationPrefix("/user/");}}
备注:为何默认是
/user/
,因为代码里面直接定死了默认值。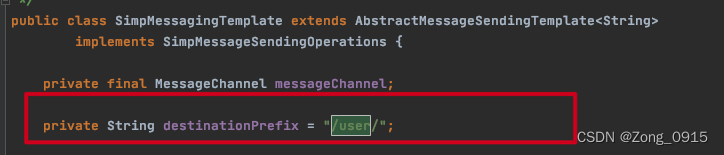
1.2.2 @SendTo 和 @MessageMapping
我们来看下这俩注解的组合使用:
@MessageMapping("/chat/addUser")@SendTo({"/topic/public"})
意思就是:
- 能够接收到路径为
/chat/addUser的消息。 - 并将这个方法的返回值,返回给订阅了主题为
/topic/public的所有订阅者。也就是一个广播的功能。
当然,也有一对一的通知,也就是
@SendToUser
注解。使用方法相同。
二. SpringBoot整合STOMP并实现聊天室
先来看下整体的项目架构: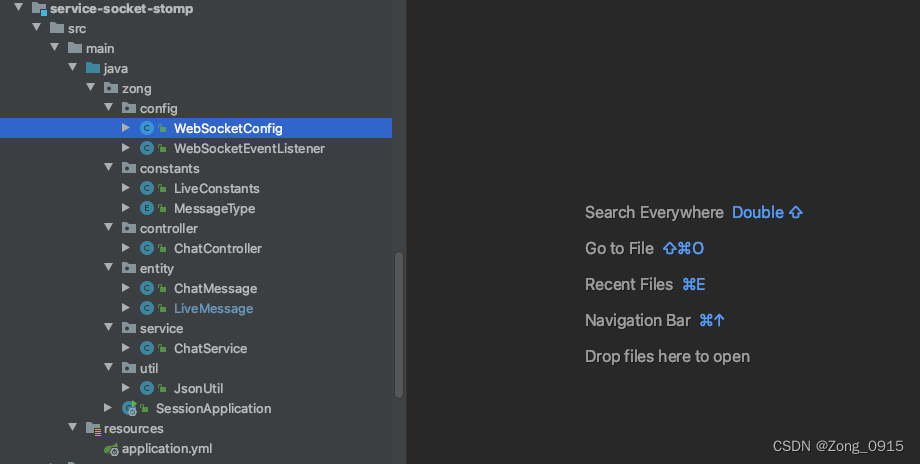
2.1 基础配置和依赖
依赖:pom
<parent><groupId>org.springframework.boot</groupId><artifactId>spring-boot-starter-parent</artifactId><version>2.3.2.RELEASE</version></parent><dependencies><dependency><groupId>org.springframework.boot</groupId><artifactId>spring-boot-starter-websocket</artifactId></dependency><dependency><groupId>org.springframework.boot</groupId><artifactId>spring-boot-starter-web</artifactId></dependency><dependency><groupId>org.apache.commons</groupId><artifactId>commons-lang3</artifactId></dependency><dependency><groupId>org.projectlombok</groupId><artifactId>lombok</artifactId></dependency><dependency><groupId>com.alibaba</groupId><artifactId>fastjson</artifactId><version>2.0.2</version></dependency><dependency><groupId>org.springframework.boot</groupId><artifactId>spring-boot-starter-data-redis</artifactId><version>2.6.7</version><exclusions><exclusion><artifactId>log4j-api</artifactId><groupId>org.apache.logging.log4j</groupId></exclusion></exclusions></dependency></dependencies>
2.我们再来思考下,聊天室,一般它的信息类型有三种:
- 某个用户进入:
JOIN。 - 用户的常规聊天:
CHAT。 - 某个用户退出:
LEAVE。
因此我们定义一个枚举类
MessageType
:
publicenumMessageType{/** 用户聊天 */CHAT,/** 用户进入直播间 */JOIN,/** 用户离开直播间 */LEAVE}
3.定义一个常量类
LiveConstants
,这里只定义了一个
RedisKey
:
publicclassLiveConstants{publicstaticfinalStringLIVE_SET_HASH_KEY="LiveSetHashKey_";}
4.工具类
JsonUtil
:
importcom.alibaba.fastjson.JSONObject;/**
 * @author Zong0915
 * @date 2022/12/23 下午12:09
 */publicclassJsonUtil{publicstaticStringtoJSON(Object entity){if(entity ==null){return"";}String res;try{
            res =JSONObject.toJSONString(entity);}catch(Exception e){
            res ="";}return res;}}
5.客户端向服务器传输的实体类
ChatMessage
:
importlombok.Data;/**
 * 消息模型类
 */@DatapublicclassChatMessage{/** 消息类型 */privateMessageType type;/** 消息正文 */privateString content;/** 消息发送者 */privateString sender;/** 直播间号 */privateString roomId;}
6.服务器向客户端传输的实体类
LiveMessage
:
importlombok.Data;/**
 * @author Zong0915
 * @date 2022/12/23 上午11:58
 */@DatapublicclassLiveMessage{privateString content;privateLong count;privateString type;}
7.整合
STOMP
的相关配置类
WebSocketConfig
:
importorg.springframework.context.annotation.Configuration;importorg.springframework.messaging.simp.config.MessageBrokerRegistry;importorg.springframework.web.socket.config.annotation.EnableWebSocketMessageBroker;importorg.springframework.web.socket.config.annotation.StompEndpointRegistry;importorg.springframework.web.socket.config.annotation.WebSocketMessageBrokerConfigurer;/**
 * @author Zong0915
 * @date 2022/12/22 下午2:54
 */@Configuration@EnableWebSocketMessageBrokerpublicclassWebSocketConfigimplementsWebSocketMessageBrokerConfigurer{/**
     * 注册stomp的端点
     * 注册一个STOMP协议的节点,并映射到指定的URL
     */@OverridepublicvoidregisterStompEndpoints(StompEndpointRegistry registry){
        registry.addEndpoint("/ws").setAllowedOrigins("*")// 跨域处理.withSockJS();// 支持socketJs}/**
     * 配置用户路由的前缀,默认是/user/
     * @param config
     */@OverridepublicvoidconfigureMessageBroker(MessageBrokerRegistry config){
        config.setUserDestinationPrefix("/user/");}}
8.application.yml文件:
server:port:8080spring:redis:database:0# Redis数据库索引(默认为0)host: 你的服务器地址 # Redis的服务地址port:6379# Redis的服务端口password: 你的密码
    jedis:pool:max-active:8# 连接池最大连接数(使用负值表示没有限制)max-wait:-1# 连接池最大阻塞等待时间(使用负值表示没有限制)max-idle:8# 连接池中的最大空闲连接min-idle:0# 连接池中的最小空闲链接timeout:30000# 连接池的超时时间(毫秒)
2.2 WebSocket监听器
主要监听两个类型的事件:
SessionConnectEvent:连接初始化事件。SessionDisconnectEvent:连接断开事件。
importlombok.extern.slf4j.Slf4j;importorg.apache.commons.lang3.StringUtils;importorg.springframework.beans.factory.annotation.Autowired;importorg.springframework.context.event.EventListener;importorg.springframework.data.redis.core.StringRedisTemplate;importorg.springframework.messaging.simp.SimpMessageSendingOperations;importorg.springframework.messaging.simp.stomp.StompHeaderAccessor;importorg.springframework.stereotype.Component;importorg.springframework.web.socket.messaging.SessionConnectEvent;importorg.springframework.web.socket.messaging.SessionDisconnectEvent;importzong.constants.LiveConstants;importzong.constants.MessageType;importzong.entity.LiveMessage;importzong.util.JsonUtil;importjava.util.concurrent.TimeUnit;/**
 * @author Zong0915
 * @date 2022/12/22 下午3:02
 */@Component@Slf4jpublicclassWebSocketEventListener{@AutowiredprivateStringRedisTemplate redisTemplate;@AutowiredprivateSimpMessageSendingOperations messagingTemplate;/**
     * 连接建立事件
     *
     * @param event
     */@EventListenerpublicvoidhandleWebSocketConnectListener(SessionConnectEvent event){StompHeaderAccessor headerAccessor =StompHeaderAccessor.wrap(event.getMessage());String userId = headerAccessor.getFirstNativeHeader("userId");String roomId = headerAccessor.getFirstNativeHeader("roomId");String sessionId = headerAccessor.getSessionId();if(StringUtils.isBlank(userId)||StringUtils.isBlank(roomId)||StringUtils.isBlank(sessionId)){return;}
        log.info("建立一个新的连接,用户ID:{}", userId);// 当前直播间的人数(先不计入当前的用户)String hashKey =LiveConstants.LIVE_SET_HASH_KEY+ roomId;// 如果不存在这个HashKey,添加元素并设置过期时间if(!redisTemplate.hasKey(hashKey)){// 维护userId和roomId的关系
            redisTemplate.opsForSet().add(hashKey, userId);// 这么做是为了让当前直播间维护的活跃人数缓存,只维护一天,避免每次新用户加入,都刷新过期时间
            redisTemplate.expire(hashKey,1,TimeUnit.DAYS);}else{
            redisTemplate.opsForSet().add(hashKey, userId);}// 建立sessionId和roomId之间的关系
        redisTemplate.opsForValue().set(sessionId, roomId +"-"+ userId);
        redisTemplate.expire(sessionId,1,TimeUnit.DAYS);// 这里如果发送群发主题,当前这个Socket链接是接收不到的,因为还没建立完毕。// 因此需要前端在建立Socket的时候,手动发起一个问候信息(此时已经建立完链接)。让后端感应然后再次群发。// messagingTemplate.convertAndSend("/live/topic_" + roomId, JsonUtil.toJSON(liveMessage));}/**
     * 连接断开事件
     *
     * @param event
     */@EventListenerpublicvoidhandleWebSocketDisconnectListener(SessionDisconnectEvent event){StompHeaderAccessor headerAccessor =StompHeaderAccessor.wrap(event.getMessage());String sessionId = headerAccessor.getSessionId();if(StringUtils.isBlank(sessionId)){return;}String roomIdAndUserId = redisTemplate.opsForValue().get(sessionId);if(StringUtils.isBlank(roomIdAndUserId)){return;}String[] ids = roomIdAndUserId.split("-");String roomId = ids[0];String userId = ids[1];// 去除Redis中对应roomId下的用户(Set)String hashKey =LiveConstants.LIVE_SET_HASH_KEY+ roomId;
        redisTemplate.opsForSet().remove(hashKey, userId);Long size = redisTemplate.opsForSet().size(hashKey);// 删除sessionId
        redisTemplate.delete(sessionId);LiveMessage liveMessage =newLiveMessage();
        liveMessage.setContent("用户["+ userId +"]离开直播间");
        liveMessage.setCount(size);
        liveMessage.setType(MessageType.LEAVE.toString());// 向其他用户进行广播,当前用户都退出了,肯定是无需广播的,因此这里可以直接这么写
        messagingTemplate.convertAndSend("/live/topic_"+ roomId,JsonUtil.toJSON(liveMessage));}}
主要在连接初始化的时候做这么几个事情:
- 维护当前直播间有哪些用户(
Redis) - 维护当前会话(
SessionId)和用户直播信息直接的关联(Redis)
那么在链接断开的时候,同理需要去维护这么几个信息:
- 需要删除
Redis中的会话信息,以及将当前直播间中的当前用户剔除。 - 通知其他客户端,在线人数发生变更。
2.3 其他代码
业务层代码ChatService:
importorg.apache.commons.lang3.StringUtils;importorg.springframework.beans.factory.annotation.Autowired;importorg.springframework.data.redis.core.StringRedisTemplate;importorg.springframework.messaging.simp.SimpMessageHeaderAccessor;importorg.springframework.messaging.simp.SimpMessagingTemplate;importorg.springframework.stereotype.Service;importzong.constants.LiveConstants;importzong.constants.MessageType;importzong.entity.ChatMessage;importzong.entity.LiveMessage;importzong.util.JsonUtil;/**
 * @author Zong0915
 * @date 2022/12/22 下午5:15
 */@ServicepublicclassChatService{@AutowiredprivateSimpMessagingTemplate messagingTemplate;@AutowiredprivateStringRedisTemplate redisTemplate;publicvoidmessageProcess(ChatMessage chatMessage){if(chatMessage ==null){return;}// 当前直播间的人数(先不计入当前的用户)String hashKey =LiveConstants.LIVE_SET_HASH_KEY+ chatMessage.getRoomId();if(chatMessage.getType()==MessageType.JOIN){// 更新在线人数和提示Long size = redisTemplate.opsForSet().size(hashKey);LiveMessage liveMessage =newLiveMessage();
            liveMessage.setContent("欢迎用户["+ chatMessage.getSender()+"]加入直播间");
            liveMessage.setCount(size);
            liveMessage.setType(MessageType.JOIN.toString());
            messagingTemplate.convertAndSend("/live/topic_"+ chatMessage.getRoomId(),JsonUtil.toJSON(liveMessage));return;}// 如果是普通的聊天,即CHAT类型、稍微封装下消息广播即可。LEAVE用户离开的类型在监听器里面完成了LiveMessage liveMessage =newLiveMessage();
        liveMessage.setContent("用户 ["+ chatMessage.getSender()+"] 说:"+ chatMessage.getContent());
        liveMessage.setType(MessageType.CHAT.toString());// 当前直播间人数
        messagingTemplate.convertAndSend("/live/topic_"+ chatMessage.getRoomId(),JsonUtil.toJSON(liveMessage));}}
Controller
层代码
ChatController
:
importorg.springframework.beans.factory.annotation.Autowired;importorg.springframework.messaging.handler.annotation.MessageMapping;importorg.springframework.messaging.handler.annotation.Payload;importorg.springframework.messaging.simp.SimpMessageHeaderAccessor;importorg.springframework.web.bind.annotation.RestController;importzong.entity.ChatMessage;importzong.service.ChatService;/**
 * @author Zong0915
 * @date 2022/12/22 下午3:01
 */@RestControllerpublicclassChatController{@AutowiredprivateChatService chatService;/**
     * 客户端发送消息入口,群发消息
     */@MessageMapping("/live/sendMessage")publicvoidsendMessage(@PayloadChatMessage chatMessage,SimpMessageHeaderAccessor headerAccessor){
        chatService.messageProcess(chatMessage);}}
2.4 前端代码
前端代码可以看我的这篇文章 UmiJs整合Egg,里面附带完整的代码链接。
主要有这么几个更改点:
2.4.1 EJS模板修改
EJS
模板修改,引入
socket
和
stomp
的
js
文件。这里可以使用我上文给出的链接,也可以使用
CDN
(我这里用的就是)。
修改的部分内容截图如下:
值得注意的是:
- 引入的外部文件要最好优先于
umi.js文件的加载。因为默认是从上往下进行顺序加载的。 - 我们将前端页面需要用到的几个对象
SockJS和Stomp挂载到window上,这样前端就可以引用了。(或许也有其他的方法)
文件所在位置: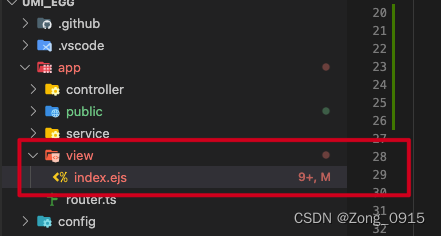
完整代码:
<!DOCTYPE html><html lang="en"><head><meta charset="UTF-8"><meta name="viewport" content="width=device-width, initial-scale=1.0"><meta http-equiv="X-UA-Compatible" content="ie=edge"><title>Test</title><%if(envName =="dev"){%><%- helper.assets.getStyle('umi.css')%><%}else{%><link rel="stylesheet" type="text/css" href='/<%- contextPath %>/public/umi.css?v=<%- fileVersion %>' /><%}%></head><body><div id='root'class='subRootContent'></div><script src="https://cdnjs.cloudflare.com/ajax/libs/sockjs-client/1.1.4/sockjs.min.js"></script><script src="https://cdnjs.cloudflare.com/ajax/libs/stomp.js/2.3.3/stomp.min.js"></script><%if(envName =='dev'){%><%-(helper.assets.getScript('umi.js'))%><%}else{%><script src='/<%- contextPath %>/public/umi.js?v=<%- fileVersion %>'></script><%}%><script>
        window.resourceBaseUrl = '<%= helper.assets.resourceBase %>';<%if(envName !="dev"){%>
        window.staticUrl = '/<%- contextPath %>/public'
        window.resourceBaseUrl = '/<%- contextPath %><%= helper.assets.resourceBase %>';<%}%>
        window.publicPath = resourceBaseUrl;window.SockJS=SockJS;window.Stomp=Stomp;</script></body></html>
2.4.2 前端页面修改
先给个工具函数,用于获取
URL
上的参数
exportfunctiongetValueByParam(param:string):any{const url = window.location.href;const queryParams = url.split('?');if(queryParams?.length <2){return'';}const queryList = queryParams[1].split('&');for(const key of queryList){if(key.split('=')[0]=== param){return key.split('=')[1];}}return'';}
主要修改
index.tsx
文件,完整内容如下:
import React,{ useEffect, useState }from'react';import{ Button, Row, Col, Input }from'antd';import{ getValueByParam }from'../utils/pageHelper';const SockJS = window.SockJS;const Stomp = window.Stomp;const socket =newSockJS('http://localhost:8080/ws');const stompClient = Stomp.over(socket);const roomId =getValueByParam('roomId');const userId =getValueByParam('userId');constUserPage=()=>{const[ message, setMessage ]=useState<string>('');const[ bulletList, setBulletList ]=useState<any>([]);const[ onlineCount, setOnlineCount ]=useState<number>(0);useEffect(()=>{constonMessageReceived=(msg:any)=>{const entity =JSON.parse(msg.body);const arr :any=[ entity.content ];setBulletList((pre:any[])=>[].concat(...pre,...arr));if(entity.type ==='JOIN'|| entity.type ==='LEAVE'){setOnlineCount(entity.count ??0);}};constonConnected=()=>{// 订阅群发主题
      stompClient.subscribe(`/live/topic_${roomId}`, onMessageReceived);const chatMessage ={
        sender: userId,
        type:'JOIN',
        roomId,};

      stompClient.send('/live/sendMessage',{},JSON.stringify(chatMessage),);};constonError=(error:any)=>{console.log(error);};// 请求头const header ={ userId, roomId };
    stompClient.connect(header, onConnected, onError);},[]);constsendMsg=()=>{const chatMessage ={
      sender: userId,
      content: message,
      type:'CHAT',
      roomId,};

    stompClient.send('/live/sendMessage',{},JSON.stringify(chatMessage),);};return<><Row style={{ width:2000, marginTop:200}}><Col offset={6}><Input onChange={event =>setMessage(event.target.value)}/></Col><Col><Button
          onClick={sendMsg}
          type='primary'>发送弹幕</Button></Col><Col style={{ marginLeft:100}}>{'在线人数: '+ onlineCount}</Col><Col style={{ marginLeft:10}}><div style={{ border:'1px solid', width:500, height:500}}>{bulletList.map((item:string, index:number)=>{return<Row key={index}>{item}</Row>;})}</div></Col></Row></>;};exportdefault UserPage;
2.5 最终效果
这里偷个懒,动图演示就不做了。首先访问页面1:
http://localhost:4396/zong/?userId=LJJ&roomId=1
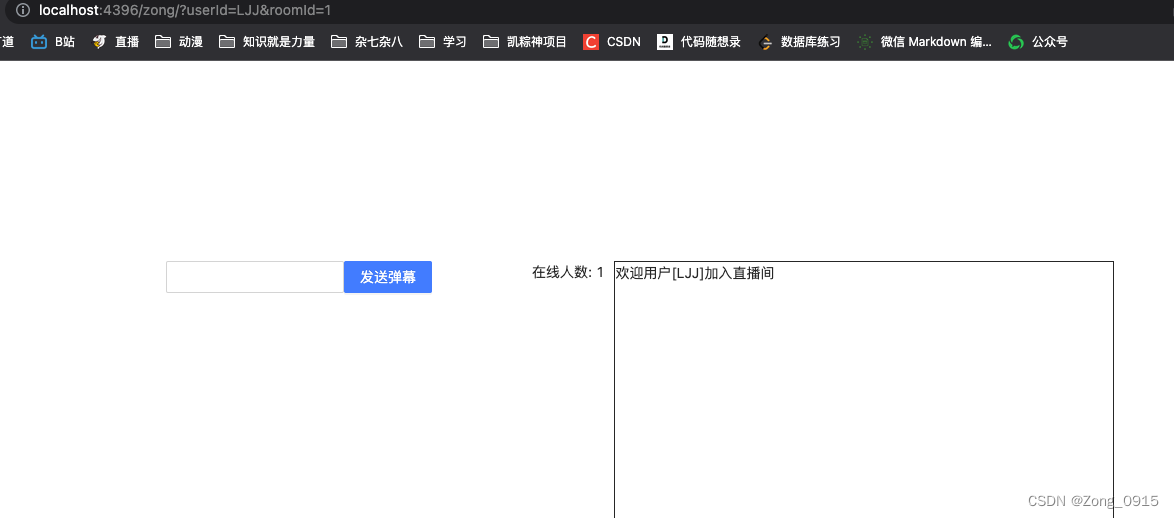
打开另外一个窗口:
http://localhost:4396/zong/?userId=Zong&roomId=1
,页面1出现提示,并且实时更新了在线人数。
倘若页面1当中发送文字: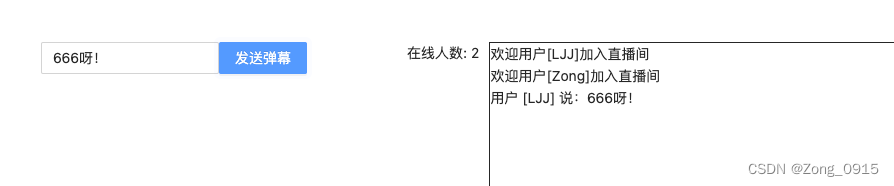
页面2中提示: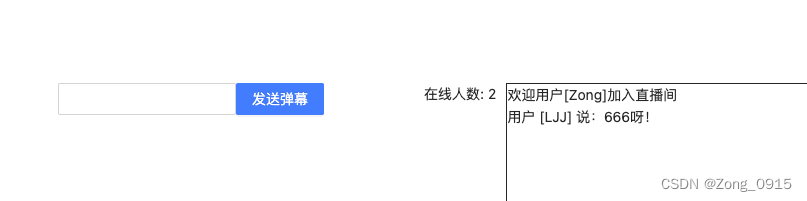
关闭页面2,页面1提示:
到这里
SpringBoot
整合
STOMP
,并且替代原有的
WebSocket
完成在线聊天室的功能就完成了。
版权归原作者 Zong_0915 所有, 如有侵权,请联系我们删除。