实现Linux服务器配置深度学习环境并跑代码完整步骤
目录
安装pytorch
cuda版本10.1,python3.7
第一步 安装anaconda创建虚拟环境
参考在服务器上搭建自己的python环境
1、下载安装包
使用清华镜像文件下载
wget https://mirrors.tuna.tsinghua.edu.cn/anaconda/archive/Anaconda3-2021.05-Linux-x86_64.sh
2、安装
bash Anaconda3-2021.05-Linux-x86_64.sh
3、更新环境变量
source ~/.bashrc
前面就变成了(base)
4、创建虚拟环境
conda create -n tf37 python=3.7
这样就创建了名为tf37的python3.7的环境
5、使用虚拟环境
激活创建的虚拟环境:
conda activate tf37
就把环境由base变为了tf37。
返回base环境:
conda deactivate
查看当前所有环境:
conda env list
删除环境:
conda env remove -n tf37
第二步 查看cuda版本安装对应的pytorch
1、查看cuda版本
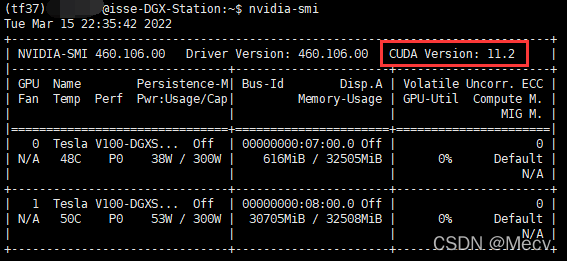
nvcc -V

nvidia-smi

这里用两种方式看到有两个不同版本的cuda,但是第一个10.1版本的才是正确的。
2、根据cuda版本去官网找对应的pytorch。
由于最新版本的pytorch不支持10.1版本的cuda,因此去找老版本pytorch以前版本
找到后,复制安装代码:
conda install pytorch==1.7.1 torchvision==0.8.2 torchaudio==0.7.2 cudatoolkit=10.1-c pytorch
3、添加镜像源下载
由于官网下载比较慢
添加清华镜像源:
conda config --add channels https://mirrors.tuna.tsinghua.edu.cn/anaconda/pkgs/free/
conda config --add channels https://mirrors.tuna.tsinghua.edu.cn/anaconda/cloud/pytorch/
conda config --add channels https://mirrors.tuna.tsinghua.edu.cn/anaconda/pkgs/main/
查看添加镜像源:
conda config --set show_channel_urls yes | cat ~/.condarc
显示:
添加成功!
注意:采用清华镜像源下载要删掉安装语句里的 -c pytorch,否则采用官网源下载。
4、测试是否安装成功
进入python环境
import torch
torch.cuda.is_available()
输出true即为成功,false不成功(可能是因为pytorch和cuda版本不匹配)
安装OpenCV
pip install opencv-python

安装成功!
Pycharm远程连接服务器跑代码
参考Pycharm远程连接服务器并运行代码
1、设置connection


2、设置Mappings

3、实现代码Ctrl+s自动上传


4、设置python编译器


出现提示后点move

点finish即可!
这样代码就会在服务器上运行。
提示缺少XXmodule,安装依赖包
直接在interpreter里安装即可。

2022.3.16
版权归原作者 Mecv 所有, 如有侵权,请联系我们删除。