
自从Transformer在“注意力就是你所需要的”的工作中被引入以来,在自然语言处理领域已经发生了一个转变,即用基于注意力的网络取代循环神经网络(RNN)。在当前的文献中,已经有很多很棒的文章描述了这种方法。下面是我在评论中发现的两个最好的:带注释的Transformer和Transformer的可视化解释。

然而,在研究了如何在计算机视觉中实现注意力(建议阅读:Understanding attention Modules, CBAM, Papers with code - attention, Self-Attention, Self-Attention and Conv),我注意到其中只有少数清楚地描述了注意力机制,包括详细代码和理论解释。因此,本文的目标是详细描述计算机视觉中两个最重要的注意力模块,并将它们应用到使用PyTorch的实际案例中。文章结构如下:
- 注意力模块介绍
- 计算机视觉中的注意方法
- 基于注意的网络的实现和结果
- 结论
注意力模块介绍
在机器学习中,注意力是一种模仿认知注意力的技术,被定义为选择并专注于相关刺激的能力。换句话说,注意力是一种试图增强重要部分同时淡出不相关信息的方法。
尽管这种机制可以分为几个系列,但是我们这里专注于自注意力,因为它是计算机视觉任务中最受欢迎的注意力类型。这是指将单个序列的不同位置关联起来,以计算同一序列的表示。
为了更好地理解这个概念,让我们想想下面的句子:Bank of a river。如果我们看不到River这个词,那么Bank这个词就失去了它的上下文信息,我们同意这一点吗?这就是自注意力背后的主旨。它试图给每个单词提供上下文信息,因为单词的个别意思不能代表它们在句子中的意思。
正如《An Intuitive Explanation of Self-attention》中所解释的,如果我们考虑上面给出的例子,自我注意的作用是将句子中的每个词与其他词进行比较,并重新衡量每个词的词嵌入向量,以包括上下文相关性。输出模块的输入是没有上下文信息的每个单词的嵌入,输出是类似的有上下文信息的嵌入。
计算机视觉中的注意力方法
这里列出了一个不断更新的注意力模块列表。从上面列出的,我们关注两个最流行的计算机视觉任务:多头注意力和卷积块注意模块(CBAM)。
多头注意力
多头注意力是一种注意机制模块,它可以多次并行运行一个注意力模块。因此,要理解它的逻辑,首先需要理解Attention模块。两个最常用的注意力函数是加性注意力和点积注意力,后者是这项工作感兴趣的一个。
Attention模块的基本结构是有两个向量列表x1和x2,一个是attention,另一个是attached。向量 x2 生成一个“查询”,而向量 x1 创建一个“键”和一个“值”。注意力函数背后的想法是将查询和设置的键值对映射到输出。“输出计算为值的加权总和,其中分配给每个值的权重由查询与相应键的兼容性函数计算,在”[Attention is all you need]论文中 输出计算如下:

正如本次讨论中提到的,键/值/查询概念来自检索系统。例如,当在 Youtube 上输入查询来搜索某个视频时,搜索引擎会将您的查询与数据库中与候选视频链接的一组键(视频标题、描述等)进行映射。然后,它会为您呈现最匹配的视频(值)。
在转向多头注意力之前,让我们运行这个点积注意力,这是这个模块的扩展。下面是 PyTorch 中的实现。输入是[128, 32, 1, 256],其中128对应batch,32对应序列长度,1对应head的数量(对于多个attention head我们会增加),256是特征的数量 .
 class ScaledDotProductAttention(nn.Module):
     ''' Scaled Dot-Product Attention '''
     def __init__(self, temperature, attn_dropout=0.0):
         super().__init__()
         self.temperature = temperature
         self.dropout = nn.Dropout(attn_dropout)

     def forward(self, q, k, v, mask=None):
         attn = torch.matmul(q / self.temperature, k.transpose(2, 3))
         if mask is not None:
             attn = attn.masked_fill(mask == 0, -1e9)
         attn = self.dropout(F.softmax(attn, dim=-1))
         output = torch.matmul(attn, v)
         return output, attn

 # Attention
 query = torch.rand(128, 32, 1, 256)
 key = value = torch.rand(128, 16, 1, 256)
 query, key, value = query.transpose(1, 2), key.transpose(1, 2), value.transpose(1, 2)
 multihead_attn = ScaledDotProductAttention(temperature=query.size(2))
 attn_output, attn_weights = multihead_attn(query, key, value)
 attn_output = attn_output.transpose(1, 2)
 print(f'attn_output: {attn_output.size()}, attn_weights: {attn_weights.size()}')

 # Self-attention
 query = torch.rand(128, 32, 1, 256)
 query = query.transpose(1, 2)
 multihead_attn = ScaledDotProductAttention(temperature=query.size(2))
 attn_output, attn_weights = multihead_attn(query, query, query)
 attn_output = attn_output.transpose(1, 2)
 print(f'attn_output: {attn_output.size()}, attn_weights: {attn_weights.size()}')
输出是:
 attn_output: [128, 32, 1, 256], attn_weights: [128, 1, 32, 32]
 attn_output: [128, 32, 1, 256], attn_weights: [128, 1, 32, 16]
这个基本实现的一些要点:
- 输出将具有与查询输入大小相同的形状。
- 每个数据的注意力权重必须是一个矩阵,其中行数对应于查询的序列长度,列数对应于键的序列长度。
- Dot-Product Attention 中没有可学习的参数。
所以,回到多头注意力,多头注意力会同事并行运行这个解释过的注意力模块几次。然后将独立的注意力输出连接起来并线性转换为预期的维度。这是实现:
 class MultiHeadAttention(nn.Module):
     ''' Multi-Head Attention module '''
     def __init__(self, n_head, d_model, d_k, d_v, dropout=0.1):
         super().__init__()
         self.n_head = n_head
         self.d_k = d_k
         self.d_v = d_v

         self.w_qs = nn.Linear(d_model, n_head * d_k, bias=False)
         self.w_ks = nn.Linear(d_model, n_head * d_k, bias=False)
         self.w_vs = nn.Linear(d_model, n_head * d_v, bias=False)
         self.fc = nn.Linear(n_head * d_v, d_model, bias=False)

         self.attention = ScaledDotProductAttention(temperature=d_k ** 0.5)

         self.dropout = nn.Dropout(dropout)
         self.layer_norm = nn.LayerNorm(d_model, eps=1e-6)

     def forward(self, q, k, v, mask=None):
         d_k, d_v, n_head = self.d_k, self.d_v, self.n_head
         sz_b, len_q, len_k, len_v = q.size(0), q.size(1), k.size(1), v.size(1)
         residual = q

         # Pass through the pre-attention projection: b x lq x (n*dv)
         # Separate different heads: b x lq x n x dv
         q = self.w_qs(q).view(sz_b, len_q, n_head, d_k)
         k = self.w_ks(k).view(sz_b, len_k, n_head, d_k)
         v = self.w_vs(v).view(sz_b, len_v, n_head, d_v)

         # Transpose for attention dot product: b x n x lq x dv
         q, k, v = q.transpose(1, 2), k.transpose(1, 2), v.transpose(1, 2)

         if mask is not None:
             mask = mask.unsqueeze(1)   # For head axis broadcasting.
         q, attn = self.attention(q, k, v, mask=mask)

         # Transpose to move the head dimension back: b x lq x n x dv
         # Combine the last two dimensions to concatenate all the heads together: b x lq x (n*dv)
         q = q.transpose(1, 2).contiguous().view(sz_b, len_q, -1)
         q = self.dropout(self.fc(q))
         q += residual

         q = self.layer_norm(q)

         return q, attn

 query = torch.rand(128, 32, 256)
 multihead_attn = MultiHeadAttention(n_head=8, d_model=256, d_k=32, d_v=32)
 attn_output, attn_weights = multihead_attn(query, query, query)
 print(f'attn_output: {attn_output.size()}, attn_weights: {attn_weights.size()}')

 query = torch.rand(128, 32, 256)
 multihead_attn = MultiHeadAttention(n_head=8, d_model=256, d_k=256, d_v=512)
 attn_output, attn_weights = multihead_attn(query, query, query)
 print(f'attn_output: {attn_output.size()}, attn_weights: {attn_weights.size()}')
输出是:
 attn_output: [128, 32, 256], attn_weights: [128, 8, 32, 32]
 attn_output: [128, 32, 256], attn_weights: [128, 8, 32, 32]
从代码中,我们看到:
例如,用于查询的线性层的输入是 [128, 32, 256]。但是,正如本文所述,线性层接受任意形状的张量,其中只有最后一个维度必须与您在构造函数中指定的 in_features 参数匹配。输出将具有与输入完全相同的形状,只有最后一个维度会更改为您在构造函数中指定为 out_features 的任何内容。对于我们的例子,输入形状是一组 128 * 32 = 4096 和 256 个特征。因此,我们将密集网络(线性层)应用于序列长度的每个元素和批次的每个数据。
此外,我们添加了残差连接和层归一化,因为它是在 Transformer 神经网络中实现的。但是,如果您只想实现多头注意力模块,则应该排除这些。
那么,此时你可能想知道,为什么我们要实现 Multi-Head Attention 而不是一个简单的 Attention 模块?根据论文Attention is all you need,“多头注意力允许模型共同关注来自不同位置的不同表示子空间的信息。用一个注意力头,平均值会抑制这一点。” 换句话说,将特征划分为头部允许每个注意力模块只关注一组特征,从而为每个单词编码多个关系和细微差别提供更大的能力。
在结束之前,我只想提一下,我们已经使用了这个注意力模块,就好像我们在处理序列一样,但这篇文章是关于图像的。如果您已经理解了所有解释的内容,那么序列和图像之间的唯一区别就是输入向量。对应于序列长度的,对于图像来说就是像素。因此,如果输入是 [batch=128, no_channels=256, height=24, width=24] ,一种可能的实现可能是:
 query = torch.rand(128, 256, 24, 24)
 query_ = torch.reshape(query, (query.size(0), -1 , query.size(1)))
 multihead_attn = MultiHeadAttention(n_head=8, d_model=256, d_k=32, d_v=32)
 attn_output, attn_weights = multihead_attn(query_, query_, query_)
 attn_output = attn_output.reshape(*list(query.size()))
 print(f'attn_output: {attn_output.size()}, attn_weights: {attn_weights.size()}')
输出是:
attn_output: [128, 256, 24, 24], attn_weights: [128, 8, 576, 576]
卷积块注意力模块 (CBAM)
2018 年,S. Woo 等人。(2018) 发布了一个名为卷积块注意力模块 (CBAM) 的新注意力模块,与卷积操作一样,它强调了沿通道和空间轴的有意义的特征。与多头注意力相比,这种注意力是专门为前馈卷积神经网络而设计的,可以应用于深度网络中的每个卷积块。
CBAM 包含两个连续的子模块,称为通道注意模块 (CAM) 和空间注意模块 (SAM)。在谈到卷积时,这两个概念可能是最重要的两个概念。通道是指每个像素的特征或通道的数量,而空间是指维度(h x w)的特征图。
这是实现:
 class BasicConv(nn.Module):
     def __init__(self, in_planes, out_planes, kernel_size, stride=1, padding=0, dilation=1, groups=1, relu=True, bn=True, bias=False):
         super(BasicConv, self).__init__()
         self.out_channels = out_planes
         self.conv = nn.Conv2d(in_planes, out_planes, kernel_size=kernel_size, stride=stride, padding=padding, dilation=dilation, groups=groups, bias=bias)
         self.bn = nn.BatchNorm2d(out_planes,eps=1e-5, momentum=0.01, affine=True) if bn else None
         self.relu = nn.ReLU() if relu else None

     def forward(self, x):
         x = self.conv(x)
         if self.bn is not None:
             x = self.bn(x)
         if self.relu is not None:
             x = self.relu(x)
         return x

 class Flatten(nn.Module):
     def forward(self, x):
         return x.view(x.size(0), -1)

 class ChannelGate(nn.Module):
     def __init__(self, gate_channels, reduction_ratio=16, pool_types=['avg', 'max']):
         super(ChannelGate, self).__init__()
         self.gate_channels = gate_channels
         self.mlp = nn.Sequential(
             Flatten(),
             nn.Linear(gate_channels, gate_channels // reduction_ratio),
             nn.ReLU(),
             nn.Linear(gate_channels // reduction_ratio, gate_channels)
             )
         self.pool_types = pool_types

     def forward(self, x):
         channel_att_sum = None
         for pool_type in self.pool_types:
             if pool_type=='avg':
                 avg_pool = F.avg_pool2d( x, (x.size(2), x.size(3)), stride=(x.size(2), x.size(3)))
                 channel_att_raw = self.mlp( avg_pool )
             elif pool_type=='max':
                 max_pool = F.max_pool2d( x, (x.size(2), x.size(3)), stride=(x.size(2), x.size(3)))
                 channel_att_raw = self.mlp( max_pool )
             elif pool_type=='lp':
                 lp_pool = F.lp_pool2d( x, 2, (x.size(2), x.size(3)), stride=(x.size(2), x.size(3)))
                 channel_att_raw = self.mlp( lp_pool )
             elif pool_type=='lse':
                 # LSE pool only
                 lse_pool = logsumexp_2d(x)
                 channel_att_raw = self.mlp( lse_pool )

             if channel_att_sum is None:
                 channel_att_sum = channel_att_raw
             else:
                 channel_att_sum = channel_att_sum + channel_att_raw

         scale = torch.sigmoid( channel_att_sum ).unsqueeze(2).unsqueeze(3).expand_as(x)
         return x * scale

 def logsumexp_2d(tensor):
     tensor_flatten = tensor.view(tensor.size(0), tensor.size(1), -1)
     s, _ = torch.max(tensor_flatten, dim=2, keepdim=True)
     outputs = s + (tensor_flatten - s).exp().sum(dim=2, keepdim=True).log()
     return outputs

 class ChannelPool(nn.Module):
     def forward(self, x):
         return torch.cat( (torch.max(x,1)[0].unsqueeze(1), torch.mean(x,1).unsqueeze(1)), dim=1 )

 class SpatialGate(nn.Module):
     def __init__(self):
         super(SpatialGate, self).__init__()
         kernel_size = 7
         self.compress = ChannelPool()
         self.spatial = BasicConv(2, 1, kernel_size, stride=1, padding=(kernel_size-1) // 2, relu=False)

     def forward(self, x):
         x_compress = self.compress(x)
         x_out = self.spatial(x_compress)
         scale = torch.sigmoid(x_out) # broadcasting
         return x * scale

 class CBAM(nn.Module):
     def __init__(self, gate_channels, reduction_ratio=16, pool_types=['avg', 'max'], no_spatial=True):
         super(CBAM, self).__init__()
         self.ChannelGate = ChannelGate(gate_channels, reduction_ratio, pool_types)
         self.no_spatial = no_spatial
         if not no_spatial:
             self.SpatialGate = SpatialGate()

     def forward(self, x):
         x_out = self.ChannelGate(x)
         if not self.no_spatial:
             x_out = self.SpatialGate(x_out)
         return x_out

 query = torch.rand(128, 256, 24, 24)
 attn = CBAM(gate_channels=256)
 attn_output = attn(query)
 print(attn_output.size())
输出是:
attn_output: [128, 256, 24, 24]
基于注意力的网络的实现和结果
在上面介绍的理论部分之后,本节重点介绍两个注意力层在实际案例中的实现。
具体来说,我们选择了 STL 数据集,并在一些图像中包含了一个白色补丁,如下所示。任务是创建一个神经网络,对两种类型的图像进行分类。
 from torchvision.datasets import STL10

 dataset = STL10("stl10", split='train', download=True)
 def getBatch(BS=10, offset=0, display_labels=False):
     xs = []
     labels = []
     for i in range(BS):
         x, y = dataset[offset + i]
         x = (np.array(x)-128.0)/128.0
         x = x.transpose(2, 0, 1)

         np.random.seed(i + 10)
         corrupt = np.random.randint(2)
         if corrupt:  # To corrupt the image, we'll just copy a patch from somewhere else
             pos_x = np.random.randint(96-16)
             pos_y = np.random.randint(96-16)
             x[:, pos_x:pos_x+16, pos_y:pos_y+16] = 1
         xs.append(x)
         labels.append(corrupt)

     if display_labels == True:
         print(labels)

     return np.array(xs), np.array(labels)

STL 图像。标记为 1 的图像属于图像有白斑的类别,而标记为 0 的图像是没有白斑的。
 class ConvPart(nn.Module):
     def __init__(self):
         super().__init__()
         self.c1a = nn.Conv2d(3, 32, 5, padding=2)
         self.p1 = nn.MaxPool2d(2)
         self.c2a = nn.Conv2d(32, 32, 5, padding=2)
         self.p2 = nn.MaxPool2d(2)
         self.c3 = nn.Conv2d(32, 32, 5, padding=2)
         self.bn1a = nn.BatchNorm2d(32)
         self.bn2a = nn.BatchNorm2d(32)

     def forward(self, x):
         z = self.bn1a(F.leaky_relu(self.c1a(x)))
         z = self.p1(z)
         z = self.bn2a(F.leaky_relu(self.c2a(z)))
         z = self.p2(z)
         z = self.c3(z)
         return z

 class Net(nn.Module):
     def __init__(self):
         super().__init__()
         self.conv = ConvPart()
         self.final = nn.Linear(32, 1)
         self.optim = torch.optim.Adam(self.parameters(), lr=1e-4)

     def forward(self, x):
         z = self.conv(x)
         z = z.mean(3).mean(2)
         p = torch.sigmoid(self.final(z))[:, 0]
         return p, _

 class NetMultiheadAttention(nn.Module):
     def __init__(self):
         super().__init__()
         self.conv = ConvPart()
         self.attn1 = MultiHeadAttention(n_head=4, d_model=32, d_k=8, d_v=8)
         self.final = nn.Linear(32, 1)
         self.optim = torch.optim.Adam(self.parameters(), lr=1e-4)

     def forward(self, x):
         z = self.conv(x)
         q = torch.reshape(z, (z.size(0), -1 , z.size(1)))
         q, w = self.attn1(q, q, q)
         q = torch.reshape(q, (z.size(0), z.size(1), z.size(2), z.size(3)))
         z = q.mean(3).mean(2)
         p = torch.sigmoid(self.final(z))[:, 0]
         return p, q

 class NetCBAM(nn.Module):
     def __init__(self):
         super().__init__()
         self.conv = ConvPart()
         self.attn1 = CBAM(gate_channels=32)
         self.final = nn.Linear(32, 1)
         self.optim = torch.optim.Adam(self.parameters(), lr=1e-4)

     def forward(self, x):
         z = self.conv(x)
         q = self.attn1(z)
         z = q.mean(3).mean(2)
         p = torch.sigmoid(self.final(z))[:, 0]
         return p, q
这是运行训练的代码。
import time
import numpy as np
import torch
import torch.nn as nn
import torch.nn.functional as F
import matplotlib.pyplot as plt
import IPython.display as display
device = 'cuda' if torch.cuda.is_available() else torch.device('cpu')
print(device)
def plot_without_attention(tr_err, ts_err, tr_acc, ts_acc, img):
plt.clf()
fig, axs = plt.subplots(1, 4, figsize=(20, 5))
axs[0].plot(tr_err, label='tr_err')
axs[0].plot(ts_err, label='ts_err')
axs[0].legend()
axs[1].plot(tr_acc, label='tr_err')
axs[1].plot(ts_acc, label='ts_err')
axs[1].legend()
axs[2].axis('off')
axs[3].axis('off')
display.clear_output(wait=True)
display.display(plt.gcf())
time.sleep(0.01)
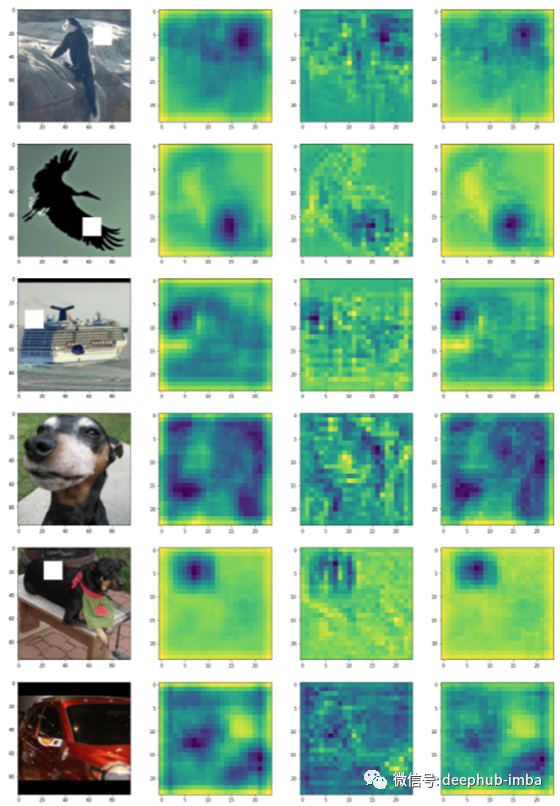
def plot_with_attention(tr_err, ts_err, tr_acc, ts_acc, img, att_out, no_images=6):
plt.clf()
fig, axs = plt.subplots(1+no_images, 4, figsize=(20, (no_images+1)*5))
axs[0, 0].plot(tr_err, label='tr_err')
axs[0, 0].plot(ts_err, label='ts_err')
axs[0, 0].legend()
axs[0, 1].plot(tr_acc, label='tr_err')
axs[0, 1].plot(ts_acc, label='ts_err')
axs[0, 1].legend()
axs[0, 2].axis('off')
axs[0, 3].axis('off')
for img_no in range(6):
im = img[img_no].cpu().detach().numpy().transpose(1, 2, 0)*0.5 + 0.5
axs[img_no+1, 0].imshow(im)
for i in range(3):
att_out_img = att_out[img_no, i+1].cpu().detach().numpy()
axs[img_no+1, i+1].imshow(att_out_img)
display.clear_output(wait=True)
display.display(plt.gcf())
time.sleep(0.01)
def train(model, att_flag=False):
net = model.to(device)
tr_err, ts_err = [], []
tr_acc, ts_acc = [], []
for epoch in range(50):
errs, accs = [], []
net.train()
for i in range(4000//BATCH_SIZE):
net.optim.zero_grad()
x, y = getBatch(BATCH_SIZE, i*BATCH_SIZE)
x = torch.FloatTensor(x).to(device)
y = torch.FloatTensor(y).to(device)
p, q = net.forward(x)
loss = -torch.mean(y*torch.log(p+1e-8) + (1-y)*torch.log(1-p+1e-8))
loss.backward()
errs.append(loss.cpu().detach().item())
pred = torch.round(p)
accs.append(torch.sum(pred == y).cpu().detach().item()/BATCH_SIZE)
net.optim.step()
tr_err.append(np.mean(errs))
tr_acc.append(np.mean(accs))
errs, accs = [], []
net.eval()
for i in range(1000//BATCH_SIZE):
x, y = getBatch(BATCH_SIZE, i*BATCH_SIZE+4000)
x = torch.FloatTensor(x).to(device)
y = torch.FloatTensor(y).to(device)
p, q = net.forward(x)
loss = -torch.mean(y*torch.log(p+1e-8) + (1-y)*torch.log(1-p+1e-8))
errs.append(loss.cpu().detach().item())
pred = torch.round(p)
accs.append(torch.sum(pred == y).cpu().detach().item()/BATCH_SIZE)
ts_err.append(np.mean(errs))
ts_acc.append(np.mean(accs))
if att_flag == False:
plot_without_attention(tr_err, ts_err, tr_acc, ts_acc, x[0])
else:
plot_with_attention(tr_err, ts_err, tr_acc, ts_acc, x, q)
print(f'Min train error: {np.min(tr_err)}')
print(f'Min test error: {np.min(ts_err)}')
CNN输出:
 Min train error: 0.0011167450276843738
 Min test error: 0.05411996720208516
训练:
 model = Net()
 train(model, att_flag=False)
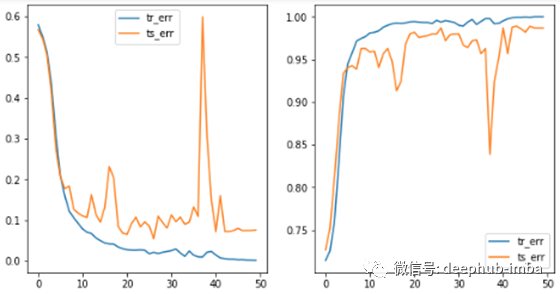
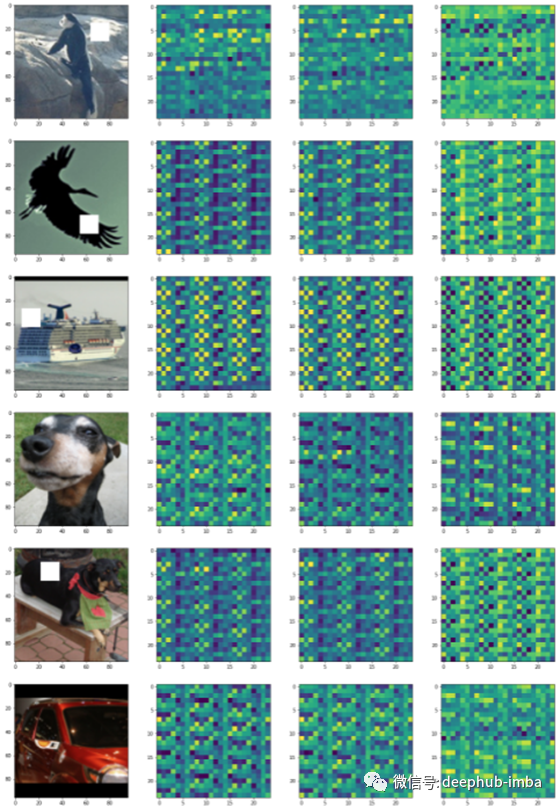
CNN + Multi-Head attention:添加注意力层时性能有所提高,但注意力图没有突出显示带有白斑的图像部分。
 Min train error: 9.811600781858942e-06
 Min test error: 0.04209221125441423
训练:
 model = NetMultiheadAttention()
 train(model, att_flag=True)

由于存在一些过拟合并且注意力层没有完成它应该做的事情,我使用卷积层重新实现了这一层。
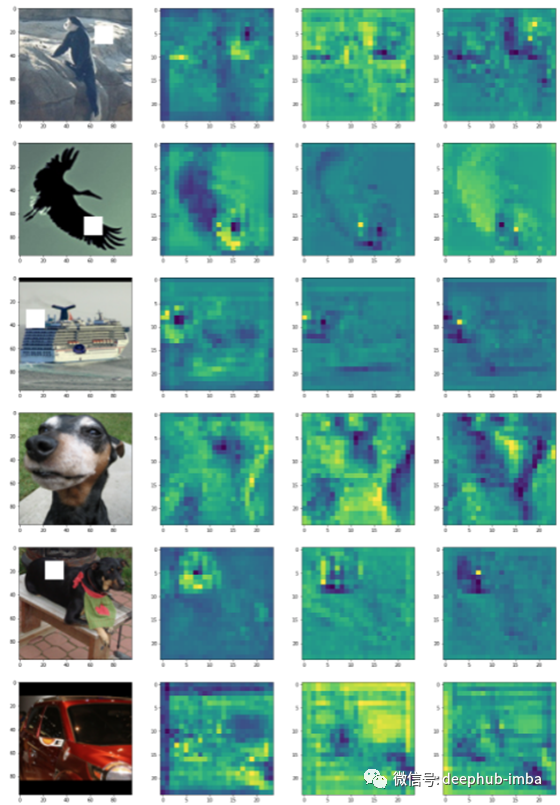
CNN + 1DConv-based Multi-Head attention:这一次,稳定性和性能显着提升。此外,还可以观察注意力层的输出如何突出显示包含它的图像的白色块。
 Min train error: 0.00025470180017873645
 Min test error: 0.014278276459193759
注意力代码
 class Attention(nn.Module):
     def __init__(self, mem_in=32, query_in=32, key_size=32, output_size=32):
         super(Attention, self).__init__()
         self.key = nn.Conv1d(mem_in, key_size, 1, padding=0)
         self.value = nn.Conv1d(mem_in, output_size, 1, padding=0)
         self.query = nn.Conv1d(query_in, key_size, 1, padding=0)
         self.key_size = key_size

     def forward(self, x1, x2):
         queries = self.query(x1)  # Batch x Values x Keys
         keys = self.key(x2)  # Batch x Keysize x Keys
         values = self.value(x2)  # Batch x Values x Keys
         u = torch.sum(queries.unsqueeze(2) * keys.unsqueeze(3), 1)/np.sqrt(self.key_size)
         w = F.softmax(u, dim=1)
         out = torch.sum(w.unsqueeze(1) * values.unsqueeze(3), 2)
         return out, w

 class MultiheadAttention(nn.Module):
     def __init__(self, mem_in=32, query_in=32, key_size=32, output_size=32, num_heads=4):
         super(MultiheadAttentionModified, self).__init__()
         self.layers = nn.ModuleList([Attention(mem_in, query_in, key_size, output_size) for i in range(num_heads)])
         self.proj_down = nn.Conv1d(num_heads*output_size, query_in, 1, padding=0)
         self.mixing_layer1 = nn.Conv1d(query_in, query_in, 1, padding=0)
         self.mixing_layer2 = nn.Conv1d(query_in, query_in, 1, padding=0)
         self.norm1 = nn.LayerNorm(query_in)
         self.norm2 = nn.LayerNorm(query_in)

     def forward(self, query, context):
         x1 = query.reshape(query.size(0), query.size(1), -1)
         x2 = context.reshape(context.size(0), context.size(1), -1)

         # Apply attention for each head
         z1, ws = [], []
         for i in range(len(self.layers)):
             z, w = self.layers[i](x1, x2)
             z1.append(z)
             ws.append(w)
         z1 = torch.cat(z1, 1)

         # Project down. Layer norm is a bit fiddly here - it wants the dimensions to normalize over to be the last dimensions
         z2 = self.norm1((self.proj_down(z1) + x2).transpose(1, 2).contiguous()).transpose(1, 2).contiguous()

         # Mixing layer
         z3 = self.norm2((self.mixing_layer2(F.relu(self.mixing_layer1(
             z2))) + z2).transpose(1, 2).contiguous()).transpose(1, 2).contiguous()

         if len(query.size()) == 4:
             z3 = z3.reshape(query.size(0), query.size(1), query.size(3), query.size(3))

         return z3, z1

  class NetMultiheadAttention(nn.Module):
     def __init__(self):
         super().__init__()
         self.conv = ConvPart()
         self.attn1 = MultiheadAttention(mem_in=32, query_in=32)
         self.final = nn.Linear(32, 1)
         self.optim = torch.optim.Adam(self.parameters(), lr=1e-4)

     def forward(self, x):
         z = self.conv(x)
         q = torch.reshape(z, (z.size(0) , z.size(1), -1))
         q, w = self.attn1(q, q)
         q = torch.reshape(q, (z.size(0), z.size(1), z.size(2), z.size(3)))
         z = q.mean(3).mean(2)
         p = torch.sigmoid(self.final(z))[:, 0]
         return p, q

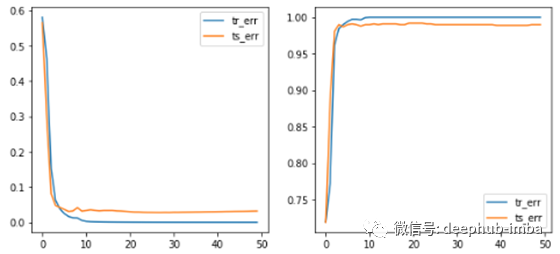
CNN + CBAM attention:这个是最好的结果。显然可以观察到注意力层输出中的白斑,并且训练非常稳定,实现了所有模型的最低验证损失。
 Min train error: 2.786791462858673e-05
 Min test error: 0.028047989653949175
训练
 model = NetCBAM()
 train(model, att_flag=True)
总结
本文介绍了多头注意力和 CBAM 模块,这是计算机视觉中最流行的两个注意力模块。此外,它还包括 PyTorch 中的一个实现,我们从包含白斑(手动添加)的 CIFAR 数据集中对图像进行分类。
对于未来的工作,我认为将位置编码与注意力一起包括在内是很有趣的。以后我们会翻译这方面的文章。
作者:Javier Fernandez
原文地址:https://towardsdatascience.com/attention-in-computer-vision-fd289a5bd7ad
deephub翻译组