前言
   📅大四是整个大学期间最忙碌的时光,一边要忙着备考或实习为毕业后面临的就业升学做准备,一边要为毕业设计耗费大量精力。近几年各个学校要求的毕设项目越来越难,有不少课题是研究生级别难度的,对本科同学来说是充满挑战。为帮助大家顺利通过和节省时间与精力投入到更重要的就业和考试中去,学长分享优质的选题经验和毕设项目与技术思路。

    **🚀对毕设有任何疑问都可以问学长哦!**

     选题指导:

    最新最全计算机专业毕设选题精选推荐汇总

设计思路
一、课题背景与意义
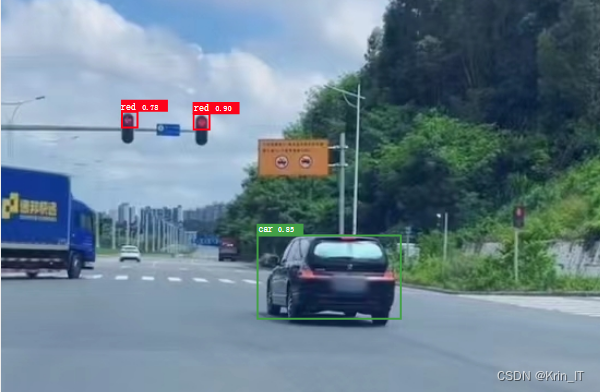
以图像或视频为研究对象,通过图像处理技术识别出道路情况,不仅要检测出汽车、行人等目标,还要判断出交通信号。而根据这项技术,通过提醒行人和车辆不要违反交通规则可以解决交通安全全世界死亡率排名前列的问题。
二、算法理论原理
2.1 YOLOv5算法
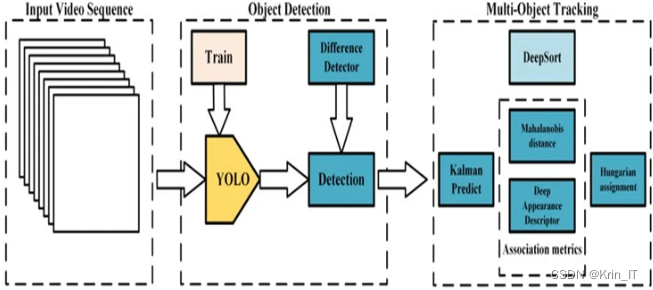
    YOLO算法用回归方法对目标进行检测,有着快速检测的能力。YOLOv5分为四个部分,分别为input端,backbone端,neck端,prediction端四个部分。

    YOLOv5在目标检测方面有着优秀的性能,其主要原因如下:
(1) Input端包括Mosaic数据增强,新增了图片尺寸处理、自适应锚框计算三部分,增强小目标检测性能,加快图片处理速率。
(2) Backbone新增了Focus结构并且改进了CSP结构,Focus结构减少了冗余信。CSP1用于特征提取部分,CSP2用于特征融合部分。

(3) Neck包括FPN+PAN的结构,加强网络特征融合的能力。
(4) Output端包括GIOU_Loss作为损失函数,新增了GIOU_NMS非极大值抑制。最小化预测框和目标框之间的归一化距离,增强了遮挡重叠的目标的识别率。

2.2 DeepSort算法
DeepSort是由sort升级而来。当物体发生遮挡的时候,使用sort算法容易丢失自己的ID,而新增的Deep Association Metric把轨迹分为确认态和不确认态,新产生的轨迹是不确认态的,不确认态的轨迹必须要和目标连续匹配多次(默认3次)才可以转化成确认态。确认态的轨迹必须和目标连续不匹配多次(默认30次),才可剔除ID。

相关代码示例:
import torch
import torch.nn as nn

class YOLO(nn.Module):
    def __init__(self, num_classes, num_anchors):
        super(YOLO, self).__init__()
        self.num_classes = num_classes
        self.num_anchors = num_anchors

        # Define your network architecture here

        self.conv = nn.Conv2d(in_channels, out_channels, kernel_size, stride, padding)
        self.fc = nn.Linear(in_features, out_features)
        self.sigmoid = nn.Sigmoid()

    def forward(self, x):
        # Forward pass through your network

        out = self.conv(x)
        out = self.fc(out)
        out = self.sigmoid(out)

        return out

    def detect_objects(self, output, confidence_threshold):
        # Perform post-processing to obtain object detections

        batch_size, _, grid_h, grid_w = output.size()
        num_attrib = self.num_classes + 5  # 5 = 4 (bbox offsets) + 1 (object confidence)
        num_anchors = self.num_anchors

        # Reshape the output to be compatible with bounding box calculations
        output = output.view(batch_size, num_attrib * num_anchors, grid_h * grid_w)
        output = output.transpose(1, 2).contiguous()
        output = output.view(batch_size, grid_h * grid_w * num_anchors, num_attrib)

        # Apply sigmoid activation to class scores and object confidence
        output[:, :, :2] = self.sigmoid(output[:, :, :2])

        # Get the class scores, object confidence, and bounding box parameters
        class_scores = output[:, :, 5:]  # Shape: (batch_size, grid_h * grid_w * num_anchors, num_classes)
        object_confidence = output[:, :, 4]  # Shape: (batch_size, grid_h * grid_w * num_anchors)
        bbox_offsets = output[:, :, :4]  # Shape: (batch_size, grid_h * grid_w * num_anchors, 4)
三、闯红灯检测的实现
3.1 数据集
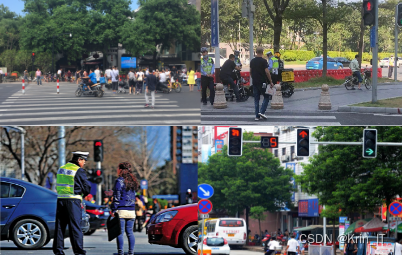
实验用学长自己制作的数据集训练的YOLOV5检测行人和车辆是否闯红灯红绿灯,数据集包括不同交通场景。识别行人和车辆闯红灯分为四个模块,分别为人行横道的检测;行人,车辆和红绿灯的检测;红绿灯识别;闯红灯识别。

人行横道检测:斑马线有四个特征,分别是梯度一致,等间隔,多根线,比车道线宽。梯度一致性和等间隔是两个强分类特征,其中梯度一致性特征易召回,等间隔特征强精度。
blob = cv2.dnn.blobFromImage(image, 1.0, (300, 300), (104.0, 177.0, 123.0), False, False)

model.setInput(blob)
detections = model.forward()

for i in range(detections.shape[2]):
    confidence = detections[0, 0, i, 2]
    if confidence > 0.5:  # 阈值可以根据实际情况进行调整
        box = detections[0, 0, i, 3:7] * np.array([image.shape[1], image.shape[0], image.shape[1], image.shape[0]])
        (startX, startY, endX, endY) = box.astype(int)
        cv2.rectangle(image, (startX, startY), (endX, endY), (0, 255, 0), 2)
红绿灯识别:用卷积神经网络CNN为输入红绿灯图片分类。CNN通过采用梯度下降法最小化损失函数对红绿灯图片中的权重参数逐层反向调节,通过频繁的迭代训练提高识别红绿灯的精度,CNN的第一个全连接层的输入是由卷积层和子采样层进行特征提取得到的红绿灯的特征图像。最后一层输出层是一个分类器,采用Softmax回归对红绿灯图像进行分类。
# 定义卷积神经网络模型
class CNN(nn.Module):
    def __init__(self, num_classes):
        super(CNN, self).__init__()
        # 定义网络结构

    def forward(self, x):
        # 前向传播逻辑
        return x

# 创建CNN模型实例
model = CNN(num_classes)

# 定义损失函数和优化器
criterion = nn.CrossEntropyLoss()
optimizer = optim.SGD(model.parameters(), lr=learning_rate)

# 迭代训练
for epoch in range(num_epochs):
    # 训练步骤
闯红灯识别:当视频中的交通灯为绿灯时相对于行人是红灯,计算行人的边界框和人行横道边界框的位置关系,当二者距离大于某个阈值,则说明该行人闯红灯。当视频中的交通灯为绿灯时,相对于行人是红灯,计算行人的边界框和人行横道边界框的位置关系,当二者距离大于某个阈值,则说明该行人闯红灯。当红灯为红灯时,检测车辆行驶的方向,如果朝红灯所在的方向行驶,则说明该车辆闯红灯。
def detect_red_light(image, pedestrian_bbox, crosswalk_bbox, traffic_light_color, distance_threshold):
    if traffic_light_color == "green":
        pedestrian_center = (pedestrian_bbox[0] + pedestrian_bbox[2]) / 2
        crosswalk_center = (crosswalk_bbox[0] + crosswalk_bbox[2]) / 2
        distance = abs(pedestrian_center - crosswalk_center)
        if distance > distance_threshold:
            return "Pedestrian violated red light"
        else:
            return "No violation"
    elif traffic_light_color == "red":
        vehicle_direction = detect_vehicle_direction(image)
        if vehicle_direction == "towards_red_light":
            return "Vehicle violated red light"
        else:
            return "No violation"
3.2 实验环境搭建
实验平台采用windows环境下,RAM为8G,显存4G,显卡为GTX1650,框架为PyTorch,语言为Python。
3.2 实验及结果分析
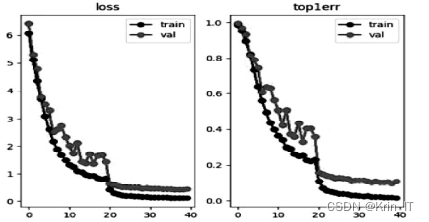
在训练过程中,模型在第100个epoch处开始收敛,整体结果呈线性发展,无过拟合发生。以下为训练数据集结果。

部分代码如下:
traffic_light_model = torch.hub.load('ultralytics/yolov5', 'yolov5s', pretrained=True)  #

def detect_red_light(image):
    # 在图像中检测红绿灯
    results = traffic_light_model(image)

    # 处理检测结果
    # ...

    return results

def detect_violations(image_path):
    # 打开图像
    image = Image.open(image_path)

    # 使用YOLOv5检测行人和机动车
    results = model(image)

    # 处理检测结果
    # ...

    # 检测红绿灯
    red_light_results = detect_red_light(image)
实现效果图样例

创作不易,欢迎点赞、关注、收藏。
毕设帮助,疑难解答,欢迎打扰!
最后
版权归原作者 weixin_55149953 所有, 如有侵权,请联系我们删除。