
一:前言
我们在布局管理器中已经知道了ImageView、TextView、Button等组件,在这里我们将会详细的介绍Android中基本组件。
二:文本框组件
文本框组件的作用是在页面中添加一些文本信息
文本框的基本代码
<TextView
            android:layout_width="wrap_content"
            android:layout_height="wrap_content"
            android:text="@string/login"
            android:textSize="19sp"
            android:textColor="#FF0000"
            android:singleLine="true"
            android:maxWidth="180dp"
    />
三:编辑框组件
编辑框组件的作用是提供给用户输入一些信息
<EditText
            android:id="@+id/it"
            android:layout_width="match_parent"
            android:layout_height="wrap_content"
            android:hint="密码"
            android:inputType="textPassword"
            android:drawableLeft=""
            android:drawableRight=""
            android:drawableBottom=""
            android:drawabletop=""
            android:drawablePadding=""
<!--            向下拖动-->
            android:lines=""
    />
我们可以在java类中通过
public class MainActivity extends AppCompatActivity {

    @Override
    protected void onCreate(Bundle savedInstanceState) {
        super.onCreate(savedInstanceState);
        setContentView(R.layout.activity_main);
        EditText editText  = findViewById(R.id.it);
        Editable text = editText.getText();
    }
}
四:按钮组件
按钮的更多作用时触发事件监听器
4.1 匿名内部类监听器
public class MainActivity extends AppCompatActivity {

    @Override
    protected void onCreate(Bundle savedInstanceState) {
        super.onCreate(savedInstanceState);
        setContentView(R.layout.activity_main);
        Button button = findViewById(R.id.b1);
        button.setOnClickListener(new View.OnClickListener() {
            @Override
            public void onClick(View v) {
                Toast.makeText(MainActivity.this,"单击了",Toast.LENGTH_SHORT).show();
            }
        });
    }
}
4.2 onClick属性实现
public void onClick(View view){
        Toast.makeText(MainActivity.this,"单击了",Toast.LENGTH_SHORT).show();
    }
使用这种方法需要在布局文件中指定声明才能使用
<Button
            android:id="@+id/b2"
            android:onClick="myClick"
            android:layout_width="match_parent"
            android:layout_height="wrap_content"
            android:text="按钮2"
    />
4.3 图像按钮(Imagebutton)
<ImageButton
            android:id="@+id/b2"
            android:src="@drawable/p1"
            android:onClick="myClick"
            android:layout_width="match_parent"
            android:layout_height="wrap_content"
            android:background="#0000"
            android:text="按钮2"
    />
4.4 单选按钮(radioButton)
单选按钮的xml文件设置
<RadioGroup
            android:id="@+id/button1"
            android:layout_height="166dp"
            android:layout_width="79dp">
        <RadioButton
                android:layout_width="wrap_content"
                android:layout_height="wrap_content"
                android:text="男"
        />
        <RadioButton
                android:layout_width="wrap_content"
                android:layout_height="wrap_content"
                android:text="女"
        />
        <RadioButton
                android:layout_width="wrap_content"
                android:layout_height="wrap_content"
                android:text="其他"
        />
    </RadioGroup>
    <Button
            android:id="@+id/button2"
            android:layout_width="wrap_content"
            android:layout_height="wrap_content"
            android:text="提交"
    />
java代码
package com.example;

import android.view.View;
import android.widget.Button;
import android.widget.RadioButton;
import android.widget.RadioGroup;
import android.widget.Toast;
import androidx.appcompat.app.AppCompatActivity;
import android.os.Bundle;

public class MainActivity extends AppCompatActivity {

    @Override
    protected void onCreate(Bundle savedInstanceState) {
        super.onCreate(savedInstanceState);
        setContentView(R.layout.activity_main);
        RadioGroup radioGroup = (RadioGroup) findViewById(R.id.button1);
        radioGroup.setOnCheckedChangeListener(new RadioGroup.OnCheckedChangeListener() {
            @Override
            public void onCheckedChanged(RadioGroup group, int checkedId) {
                RadioButton radioButton = findViewById(checkedId);
                CharSequence text = radioButton.getText();
                Toast.makeText(MainActivity.this, "性别" + text, Toast.LENGTH_SHORT).show();
            }
        });
        Button button = findViewById(R.id.button2);
        button.setOnClickListener(new View.OnClickListener() {
            @Override
            public void onClick(View v) {
                for (int i = 0; i < radioGroup.getChildCount(); i++) {
                    RadioButton r = (RadioButton) radioGroup.getChildAt(i);
                    if(r.isChecked()){
                        Toast.makeText(MainActivity.this, "性别" + r.getText(), Toast.LENGTH_SHORT).show();
                    }
                }
            }
        });

    }

}
4.5 复选框按钮(CheckBox)
复选框按钮的xml文件
<CheckBox
            android:id="@+id/cb1"
            android:layout_width="wrap_content"
            android:layout_height="wrap_content"
            android:text="跳水"
    />
    <CheckBox
            android:id="@+id/cb2"
            android:layout_width="wrap_content"
            android:layout_height="wrap_content"
            android:text="游泳"
    />
    <CheckBox
            android:id="@+id/cb3"
            android:layout_width="wrap_content"
            android:layout_height="wrap_content"
            android:text="羽毛球"
    />
java程序代码
package com.example;

import android.view.View;
import android.widget.*;
import androidx.appcompat.app.AppCompatActivity;
import android.os.Bundle;

public class MainActivity extends AppCompatActivity {
    CheckBox checkBox;
    @Override
    protected void onCreate(Bundle savedInstanceState) {
        super.onCreate(savedInstanceState);
        setContentView(R.layout.activity_main);
        checkBox = (CheckBox) checkBox.findViewById(R.id.cb1);
        checkBox.setOnCheckedChangeListener(new CompoundButton.OnCheckedChangeListener() {
            @Override
            public void onCheckedChanged(CompoundButton buttonView, boolean isChecked) {

            }
        });

    }
}
五:日期选择器(DatePicker)
xml文件代码
<?xml version="1.0" encoding="utf-8"?>
<LinearLayout
        xmlns:android="http://schemas.android.com/apk/res/android"
        xmlns:tools="http://schemas.android.com/tools"
        xmlns:app="http://schemas.android.com/apk/res-auto"
        android:layout_width="match_parent"
        android:orientation="horizontal"
        android:layout_height="match_parent"
        tools:context=".MainActivity">
    <DatePicker
            android:id="@+id/date"
            android:layout_width="match_parent"
            android:layout_height="match_parent"
    />

</LinearLayout>
java程序代码
package com.example;

import android.app.Activity;
import android.widget.DatePicker;
import android.widget.Toast;
import androidx.appcompat.app.AppCompatActivity;
import android.os.Bundle;

import java.util.Calendar;

public class MainActivity extends Activity {
    int year, mouth, data;
    DatePicker datePicker;
    @Override
    protected void onCreate(Bundle savedInstanceState) {
        super.onCreate(savedInstanceState);
        setContentView(R.layout.activity_main);
        datePicker = (DatePicker) findViewById(R.id.date);
        Calendar calendar = Calendar.getInstance();
        year = calendar.get(Calendar.YEAR);
        mouth = calendar.get(Calendar.MONTH);
        data = calendar.get(Calendar.DAY_OF_MONTH);
        datePicker.init(year, mouth, data, new DatePicker.OnDateChangedListener() {
            @Override
            public void onDateChanged(DatePicker view, int year, int monthOfYear, int dayOfMonth) {
                MainActivity.this.year = year;
                MainActivity.this.mouth = monthOfYear;
                MainActivity.this.data = dayOfMonth;
                show(year,mouth,data);
            }

        });
    }
    public void show(int year,int mouth,int date){
        String s = "年:" + year + "月:" + (mouth+1) + "日:" + date;
        Toast.makeText(MainActivity.this,s, Toast.LENGTH_LONG).show();
    }
}
六:时间选择器(timePicker)
xml文件代码
<?xml version="1.0" encoding="utf-8"?>
<LinearLayout
        xmlns:android="http://schemas.android.com/apk/res/android"
        xmlns:tools="http://schemas.android.com/tools"
        xmlns:app="http://schemas.android.com/apk/res-auto"
        android:layout_width="match_parent"
        android:orientation="horizontal"
        android:layout_height="match_parent"
        tools:context=".MainActivity">
    <TimePicker
            android:id="@+id/date"
            android:layout_width="match_parent"
            android:layout_height="match_parent"
    />

</LinearLayout>
java程序代码
package com.example;

import android.app.Activity;
import android.widget.DatePicker;
import android.widget.TimePicker;
import android.widget.Toast;
import androidx.appcompat.app.AppCompatActivity;
import android.os.Bundle;

import java.util.Calendar;

public class MainActivity extends Activity {
    @Override
    protected void onCreate(Bundle savedInstanceState) {
        super.onCreate(savedInstanceState);
        setContentView(R.layout.activity_main);
        TimePicker timePicker = findViewById(R.id.date);
        //24小时设置
        timePicker.setIs24HourView(true);
        timePicker.setOnTimeChangedListener(new TimePicker.OnTimeChangedListener() {
            @Override
            public void onTimeChanged(TimePicker view, int hourOfDay, int minute) {
                String s = "时:"  + hourOfDay + "分" + minute;
                Toast.makeText(MainActivity.this,s,Toast.LENGTH_LONG).show();
            }
        });

    }
}
七:计时器 (Chronometer)

xml文件代码
<?xml version="1.0" encoding="utf-8"?>
<RelativeLayout
        xmlns:android="http://schemas.android.com/apk/res/android"
        xmlns:tools="http://schemas.android.com/tools"
        xmlns:app="http://schemas.android.com/apk/res-auto"
        android:layout_width="match_parent"
        android:orientation="horizontal"
        android:layout_height="match_parent"
        tools:context=".MainActivity">
    <Chronometer
            android:id="@+id/date"
            android:layout_width="wrap_content"
            android:layout_height="wrap_content"
            android:textColor="#E91E63"
            android:layout_marginTop="10dp"
            android:layout_marginLeft="10dp"
            android:layout_marginRight="10dp"
            android:layout_alignParentRight="true"
            android:format="已用时间:%s"
    />

</RelativeLayout>
java程序代码
package com.example;

import android.app.Activity;
import android.os.SystemClock;
import android.view.WindowManager;
import android.widget.Chronometer;

import android.os.Bundle;

import java.util.Calendar;

public class MainActivity extends Activity {
    Chronometer chronometer;
    @Override
    protected void onCreate(Bundle savedInstanceState) {
        super.onCreate(savedInstanceState);
        setContentView(R.layout.activity_main);
        getWindow().setFlags(WindowManager.LayoutParams.FLAG_FULLSCREEN,WindowManager.LayoutParams.FLAG_FULLSCREEN);
        chronometer=findViewById(R.id.date);
        //设置系统时间
        chronometer.setBase(SystemClock.elapsedRealtime());
        //设置计时器的格式
        chronometer.setFormat("%s");
        //开启计时器
        chronometer.start();
        //设置监听器
        chronometer.setOnChronometerTickListener(new Chronometer.OnChronometerTickListener() {
            @Override
            public void onChronometerTick(Chronometer chronometer) {
                if(SystemClock.elapsedRealtime() - chronometer.getBase() >= 60000){
                    chronometer.stop();
                }
            }
        });

    }
}
八:进度条组件(progressBar)

水平进度条(实时加载)
圆形进度条(正在加载)
进度条与线程搭配才能实现实施更新,在anroid中handler的作用是给主线程发送消息,因为主线程不支持android的activity在主线程中更新UI。
xml文件
<?xml version="1.0" encoding="utf-8"?>
<RelativeLayout
        xmlns:android="http://schemas.android.com/apk/res/android"
        xmlns:tools="http://schemas.android.com/tools"
        xmlns:app="http://schemas.android.com/apk/res-auto"
        android:layout_width="match_parent"
        android:orientation="horizontal"
        android:layout_height="match_parent"
        tools:context=".MainActivity">
    <ProgressBar

            style="?android:attr/progressBarStyleHorizontal"
            android:max="100"
            android:progress="50"
            android:id="@+id/date"
            android:layout_width="match_parent"
            android:layout_height="wrap_content"
            android:layout_alignParentBottom="true"
            android:layout_marginBottom="30sp"
    />

</RelativeLayout>
java程序代码
package com.example;

import android.app.Activity;
import android.os.Handler;
import android.os.Message;
import android.os.SystemClock;
import android.view.View;
import android.view.WindowManager;
import android.widget.Chronometer;

import android.os.Bundle;
import android.widget.ProgressBar;
import android.widget.Toast;
import androidx.annotation.NonNull;

import java.util.Calendar;
import java.util.Random;

public class MainActivity extends Activity {
    private ProgressBar progressBar;
    private int mprogress = 0;
    private Handler mhandler;
    @Override
    protected void onCreate(Bundle savedInstanceState) {
        super.onCreate(savedInstanceState);
        setContentView(R.layout.activity_main);
        getWindow().setFlags(WindowManager.LayoutParams.FLAG_FULLSCREEN,WindowManager.LayoutParams.FLAG_FULLSCREEN);
        ProgressBar progressBar = findViewById(R.id.date);
        mhandler = new Handler(){
            @Override
            public void handleMessage(@NonNull Message msg) {
                if(msg.what == 0x111){
                    progressBar.setProgress(mprogress);
                }else{
                    Toast.makeText(MainActivity.this, "耗时操作完成", Toast.LENGTH_SHORT).show();
                    progressBar.setVisibility(View.GONE);
                }
            }
        };
        new Thread(new Runnable() {
            @Override
            public void run() {
                while (true){
                    mprogress=dowork();
                    //更新进度条的进度
                    Message m = new Message();
                    if(mprogress < 100){
                        m.what=0x111;
                        mhandler.sendMessage(m);
                    }else{
                        m.what=0x110;
                        mhandler.sendMessage(m);
                        break;
                    }
                }
            }

            private int dowork() {
                mprogress+= Math.random()*10;
                try {
                    Thread.sleep(200);
                } catch (InterruptedException e) {
                    e.printStackTrace();
                }
                return mprogress;
            }
        }).start();

    }
}
九:拖动条组件(seekBar)
实现一个图片的透明度
xml文件代码
<?xml version="1.0" encoding="utf-8"?>
<LinearLayout
        xmlns:android="http://schemas.android.com/apk/res/android"
        xmlns:tools="http://schemas.android.com/tools"
        xmlns:app="http://schemas.android.com/apk/res-auto"
        android:layout_width="match_parent"
        android:orientation="vertical"
        android:layout_height="match_parent"
        tools:context=".MainActivity">
    <ImageView
            android:id="@+id/img"
            android:layout_width="match_parent"
            android:layout_height="500dp"
            android:src="@mipmap/ic_launcher"
    />
    <SeekBar
            android:layout_width="match_parent"
            android:layout_height="wrap_content"
            android:id="@+id/date"
            android:max="10"
            android:layout_alignParentBottom="true"
            android:thumb="@mipmap/ic_launcher"
            android:progress="5"

    />

</LinearLayout>
java程序代码
package com.example;

import android.app.Activity;
import android.os.Handler;
import android.os.Message;
import android.os.SystemClock;
import android.view.View;
import android.view.WindowManager;
import android.widget.*;

import android.os.Bundle;
import androidx.annotation.NonNull;

import java.util.Calendar;
import java.util.Random;

public class MainActivity extends Activity {
    private ImageView imageView;
    private SeekBar seekBar;
    @Override
    protected void onCreate(Bundle savedInstanceState) {
        super.onCreate(savedInstanceState);
        setContentView(R.layout.activity_main);
        getWindow().setFlags(WindowManager.LayoutParams.FLAG_FULLSCREEN,WindowManager.LayoutParams.FLAG_FULLSCREEN);
        imageView = findViewById(R.id.img);
        seekBar = findViewById(R.id.date);
        seekBar.setOnSeekBarChangeListener(new SeekBar.OnSeekBarChangeListener() {
            @Override
            public void onProgressChanged(SeekBar seekBar, int progress, boolean fromUser) {
                imageView.setImageAlpha(progress);
            }

            @Override
            public void onStartTrackingTouch(SeekBar seekBar) {

            }

            @Override
            public void onStopTrackingTouch(SeekBar seekBar) {

            }
        });
    }
}
十:星级评分条(RatingBar)
xml文件
<?xml version="1.0" encoding="utf-8"?>
<LinearLayout
        xmlns:android="http://schemas.android.com/apk/res/android"
        xmlns:tools="http://schemas.android.com/tools"
        xmlns:app="http://schemas.android.com/apk/res-auto"
        android:layout_width="match_parent"
        android:orientation="vertical"
        android:layout_height="match_parent"
        tools:context=".MainActivity">
    <RatingBar
            android:id="@+id/ratebar"
            android:layout_width="wrap_content"
            android:layout_height="wrap_content"
            android:numStars="5"
            android:rating="2"
            android:stepSize="0.5"
            android:isIndicator="false"
    />

</LinearLayout>
java程序代码
package com.example;

import android.app.Activity;
import android.os.Handler;
import android.os.Message;
import android.os.SystemClock;
import android.view.View;
import android.view.WindowManager;
import android.widget.*;

import android.os.Bundle;
import androidx.annotation.NonNull;

import java.util.Calendar;
import java.util.Random;

public class MainActivity extends Activity {
    @Override
    protected void onCreate(Bundle savedInstanceState) {
        super.onCreate(savedInstanceState);
        setContentView(R.layout.activity_main);
        getWindow().setFlags(WindowManager.LayoutParams.FLAG_FULLSCREEN,WindowManager.LayoutParams.FLAG_FULLSCREEN);
        RatingBar ratingBar = findViewById(R.id.ratebar);
        //刚开始几颗星星
        String s = String.valueOf(ratingBar.getRating());
        Toast.makeText(this, "Rating:" + s, Toast.LENGTH_SHORT).show();
        String s1 = String.valueOf(ratingBar.getStepSize());
        Toast.makeText(this, "StepSize" + s1, Toast.LENGTH_SHORT).show();
        String s2 = String.valueOf(ratingBar.getProgress());
        Toast.makeText(this, "getProgress" + s2, Toast.LENGTH_SHORT).show();
    }
}
十一:图像视图(ImageView)
xml文件
<ImageView
            android:layout_width="500dp"
            android:layout_height="200dp"
            android:src="@drawable/ic_launcher_background"
            android:background="#FFFFFF"
            android:maxWidth="300dp"
            android:maxHeight="300dp"
            android:adjustViewBounds="true"
<!--            布局-->
            android:scaleType="fitXY"
<!--            着色-->
            android:tint="#FFFF00"
            android:layout_margin="30dp"

    />
java程序代码类似于前面
十二:网格视图适配器(GridView)
12.1 适配器
连接后端数据和前端数据的接口
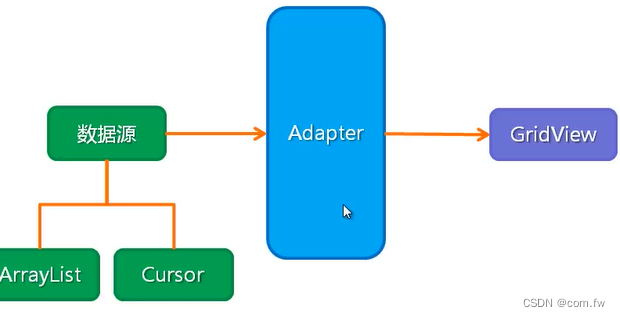
12.2 适配器的种类
ArrayAdapter:数组适配器将数组的多个值包装成列表项,显示一行文字
SmipleAdapter:简单适配器将list的值包装成列表项
SmipleCusorAdapter:将数据库的内容以列表的形式展示出来
BaseAdapter:对列表项进行定制
<?xml version="1.0" encoding="utf-8"?>
<LinearLayout
        xmlns:android="http://schemas.android.com/apk/res/android"
        xmlns:tools="http://schemas.android.com/tools"
        xmlns:app="http://schemas.android.com/apk/res-auto"
        android:layout_width="match_parent"
        android:orientation="vertical"
        android:layout_height="match_parent"
        tools:context=".MainActivity">
    <GridView
            android:id="@+id/grid"
            android:layout_width="match_parent"
            android:layout_height="match_parent"
    />

</LinearLayout>
十三:下拉列表框(Spinner)
13.1 xml文件设置下拉列表
<Spinner
            android:layout_width="wrap_content"
            android:layout_height="wrap_content"
            android:entries="@array/str"
    />
values资源文件
<?xml version="1.0" encoding="utf-8"?>
<resources>
    <string-array name="str">
        <item>全部</item>
        <item>电影</item>
        <item>图书</item>
        <item>游戏</item>
    </string-array>
</resources>
13.2 适配器模式设置下拉列表
package com.example;

import android.app.Activity;
import android.os.Handler;
import android.os.Message;
import android.os.SystemClock;
import android.view.LayoutInflater;
import android.view.MotionEvent;
import android.view.View;
import android.view.WindowManager;
import android.widget.*;

import android.os.Bundle;
import androidx.annotation.NonNull;

import java.util.*;

public class MainActivity extends Activity {

    @Override
    protected void onCreate(Bundle savedInstanceState) {
        super.onCreate(savedInstanceState);
        setContentView(R.layout.activity_main);
        getWindow().setFlags(WindowManager.LayoutParams.FLAG_FULLSCREEN, WindowManager.LayoutParams.FLAG_FULLSCREEN);
        String[] s = {"全部","美术","体育","音乐"};
        ArrayAdapter<String> arrayAdapter = new ArrayAdapter<>(this, android.R.layout.simple_spinner_item,s);
        arrayAdapter.setDropDownViewResource(android.R.layout.simple_spinner_dropdown_item);
        Spinner spinner = findViewById(R.id.spi);
        spinner.setAdapter(arrayAdapter);
    }
}
十四:列表视图
14.1 xml文件设置列表视图
xml文件
<ListView
            android:layout_width="match_parent"
            android:layout_height="wrap_content"
            android:entries="@array/str"
    />
values资源文件
<?xml version="1.0" encoding="utf-8"?>
<resources>
    <string-array name="str">
        <item>全部</item>
        <item>电影</item>
        <item>图书</item>
        <item>游戏</item>
    </string-array>
</resources>
14.2 适配器模式设置列表视图
package com.example;

import android.app.Activity;
import android.os.Handler;
import android.os.Message;
import android.os.SystemClock;
import android.view.LayoutInflater;
import android.view.MotionEvent;
import android.view.View;
import android.view.WindowManager;
import android.widget.*;

import android.os.Bundle;
import androidx.annotation.NonNull;

import java.util.*;

public class MainActivity extends Activity {

    @Override
    protected void onCreate(Bundle savedInstanceState) {
        super.onCreate(savedInstanceState);
        setContentView(R.layout.activity_main);
        getWindow().setFlags(WindowManager.LayoutParams.FLAG_FULLSCREEN, WindowManager.LayoutParams.FLAG_FULLSCREEN);
        String[] s = {"全部","美术","体育","音乐"};
        ArrayAdapter<String> arrayAdapter = new ArrayAdapter<>(this, android.R.layout.simple_list_item_1,s);
        arrayAdapter.setDropDownViewResource(android.R.layout.simple_spinner_dropdown_item);
        ListView listView = findViewById(R.id.img1);
        listView.setAdapter(arrayAdapter);
    }
}
十五:滚动视图
xml文件垂直滚动
<ScrollView
            android:id="@+id/img1"
            android:layout_width="match_parent"
            android:layout_height="wrap_content"
    <TextView
            android:layout_width="match_parent"
            android:layout_height="wrap_content"
            android:textSize="20dp"
            android:text="@string/movie"
    />
    <TextView
            android:layout_width="match_parent"
            android:layout_height="wrap_content"
            android:textSize="20dp"
            android:text="@string/music"
    />
    />
xml文件水平滚动
<?xml version="1.0" encoding="utf-8"?>
<LinearLayout
        xmlns:android="http://schemas.android.com/apk/res/android"
        xmlns:tools="http://schemas.android.com/tools"
        xmlns:app="http://schemas.android.com/apk/res-auto"
        android:layout_width="match_parent"
        android:orientation="vertical"
        android:layout_height="match_parent"
        tools:context=".MainActivity">
    <HorizontalScrollView
            android:id="@+id/img1"
            android:layout_width="match_parent"
            android:layout_height="wrap_content"
    <TextView
            android:layout_width="match_parent"
            android:layout_height="wrap_content"
            android:textSize="20dp"
            android:text="@string/movie"
    />
    <TextView
            android:layout_width="match_parent"
            android:layout_height="wrap_content"
            android:textSize="20dp"
            android:text="@string/music"
    />
    />

</LinearLayout>
标签:
android
本文转载自: https://blog.csdn.net/qq_56127002/article/details/127499080
版权归原作者 com.fw 所有, 如有侵权,请联系我们删除。
版权归原作者 com.fw 所有, 如有侵权,请联系我们删除。