python自动化爬虫实战
偶然的一次机会再次用到爬虫,借此机会记录一下爬虫的学习经历,方便后续复用。
需求:爬取网站数据并存入的csv文件中,总体分为两步
- 爬取网站数据
- 存到到csv文件中
1、配置爬虫环境
1.1、下载自动化测试驱动
由于需要实现模拟手动点击浏览器的效果,因此笔者使用到了
chromedriver.exe
自动化驱动文件。这里选择谷歌浏览器相同版本的驱动。
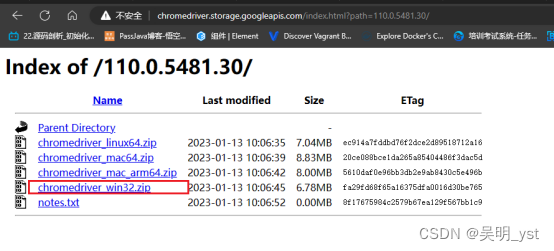
驱动下载中心
比如:笔者浏览器为110版本,因此下载110版本的driver,因为window只有32位,因此不用犹豫直接下载chromedriver_win32.zip文件

1.2、下载需要的库文件
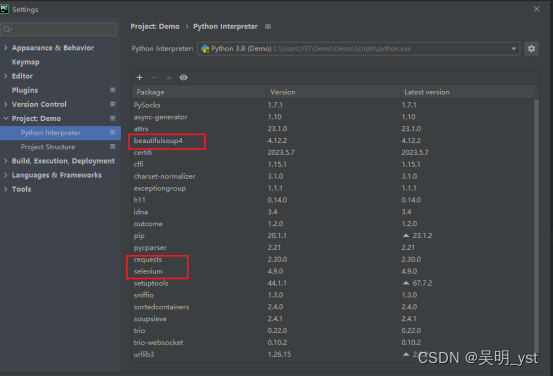
笔者这里用到了:
request
、
selenium
、
beautifulsoup4
在Setting中的Project项目下载对应的库文件
2、编写代码
以上爬虫环境配置完成后,接下来便可以编码了。
爬虫的基本逻辑:
- 配置谷歌浏览器的驱动文件和自动化测试文件
- 创建保存爬取数据的字典和设置读取的起始页码和结束页码
- 判断是否有下一页并进行等待,如果没有下一页则直接退出
- 解析读取到的页面信息
- 保存到csv文件中
根据以上的逻辑,大致就可以理解代码的意思了
from selenium import webdriver
from selenium.webdriver.common.by import By
from selenium.webdriver.support.ui import WebDriverWait
from selenium.webdriver.support import expected_conditions as EC
from selenium.webdriver.chrome.options import Options
from selenium.webdriver.chrome.service import Service
import csv

# 1、设置自动化启动的浏览器和浏览器的驱动器
options = Options()# 设置自己电脑的浏览器启动文件目录
options.binary_location ="C:\\Users\\wuming\\Google\\Chrome\\Application\\chrome.exe"
options.add_argument('–-incognito')
options.add_argument('--disable-infobars')
options.add_argument('--start-maximized')# 自动化浏览器驱动器
driver = webdriver.Chrome(options=options, service=Service("D:\\chromedriver.exe"))# 2、设置爬取的网站
url ='https://bj.zu.anjuke.com/fangyuan/'
driver.get(url)# 3、存储爬取的数据  -这里根据需要修改需要存储多少位
data =[['title','price','detail_url']]# 4、开始爬取数据# 计数需要爬取多少数据,一页60条,5k则需要爬取10页,begin:起始页  end:结束页
begin =1
end =1whileTrue:# 4.1、等待下一页按钮出现try:
        next_button = WebDriverWait(driver,10).until(
            EC.presence_of_element_located((By.LINK_TEXT,'下一页 >')))except:break# 4.2、点击下一页按钮
    next_button.click()# 判断是否到达结束页,到达则退出if begin > end:break
    begin = begin +1# 4.3、等待页面加载完成
    WebDriverWait(driver,10).until(
        EC.presence_of_element_located((By.CLASS_NAME,'zu-itemmod')))# 4.4、解析页面数据
    house_list = driver.find_elements(By.CLASS_NAME,'zu-itemmod')for house in house_list:
        title = house.find_element(By.TAG_NAME,'h3').text.strip()
        price = house.find_element(By.TAG_NAME,'strong').text.strip()
        detail_url = house.find_element(By.TAG_NAME,'a').get_attribute('href')print(title, price, detail_url)# 4.5、向data中添加数据
        data.append([title, price, detail_url])

driver.quit()# 5、将爬取的数据存入csv文件中withopen('D:\\wuming\\data.csv','w', newline='')asfile:
    writer = csv.writer(file)for row in data:
        writer.writerow(row)
根据以上代码,相信大家已经可以爬取数据,至于内容的提取,则需要大家各显神通,后面会详细写一篇文章,说一说如何从爬取的网页中获取想要的信息。
版权归原作者 吴明_yst 所有, 如有侵权,请联系我们删除。