- 💂 个人主页: 爱吃豆的土豆
- 🤟 版权: 本文由【爱吃豆的土豆】原创、在CSDN首发、需要转载请联系博主
- 💬 如果文章对你有帮助、欢迎关注、点赞、收藏(一键三连)和订阅专栏哦
- 🏆人必有所执,方能有所成!
- 🐋希望大家多多支持😘一起进步呀!
1,项目介绍&环境搭建
1.1:名称:UMS
UMS : User Manager System , 用户管理系统
1.2:整体需求
1)查询所有【阶段1】
2)添加【阶段1】
3)删除【阶段1】
4)查询详情【阶段1】
5)条件查询【阶段1】
6)修改【阶段2】

1.3:搭建环境
- 步骤1:创建web项目
- 步骤2:导入jar包,导入原型

把xml放置在了d:根目录(本次人员管理系统没有涉及数据库),数据存放xml文件中
3.步骤3:创建package包及JavaBean
public class User {
    private String id;                //唯一标识
    private String loginName;        //登录名
    private String loginPwd;        //登录密码
    private String userName;        //用户名(昵称)
    private String sex;                //性别
    private String education;        //学历
    private String birthday;        //生日
    private String telephone;        //电话
    private String[] interest;        //兴趣爱好
    private String remark;            //备注
    private String utype;            //权限: 管理员/普通用户
4.步骤4:创建Dao,service,servlet
public class UserDao {
    //成员位置 指定xml路径
    public static final String PATH="D:/javaweb1_ums.xml";
}
public class UserService {
    //成员位置,初始化一个UserDao,防止每个方法都创建一次的麻烦
    //将来UserService进行创建,对应一个UserDao,而不是多个Service对应一个Dao。不加static
    private UserDao userDao = new UserDao();
}
@WebServlet({"/user"})
public class UserServlet extends BaseServlet {
    private UserService userService = new UserService();
}
5,步骤5:配置并启动tomcat

2,UMS-查询所有【阶段1】
2.1:需求说明


2.2:需求分析
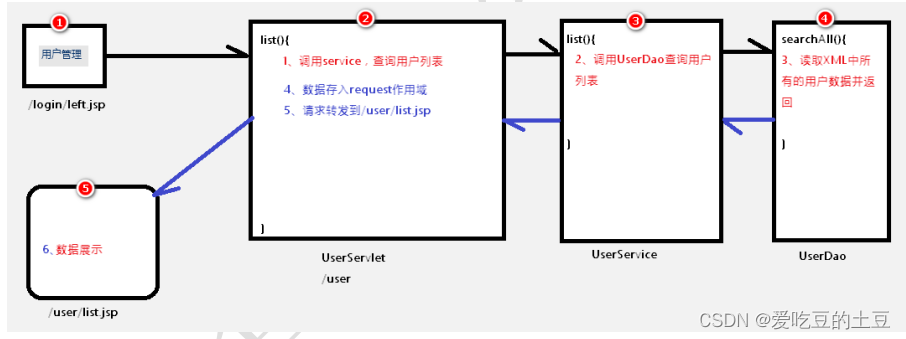
分析:
关键点:
1、XmlUtils.readAll
2、request域对象进行数据保存
3、请求转发
4、java脚本 <% %>
流程图:
2.3:代码实现
/login/left.jsp
<table width="100%" border="0">
   <tr>
      <td>
         <a href="<%=request.getContextPath() %>/login/welcome.jsp" target="mainFrame">员工管理</a> <br/>
         <a href="<%=pageContext.getServletContext().getContextPath()%>/user?method=list"  target="mainFrame">用户管理</a>
      </td>
   </tr>
</table>
**UserServlet **
/**
 * 查询所有用户信息
 * @return
 */
public String list(){
    //1、调用service,查询用户列表
    List<User> ulist =  userService.list();
    System.out.println(ulist);
    //2、查询结果存入request作用域
    getRequest().setAttribute("ulist",ulist);
    //3、请求转发到/user/list.jsp
    return "forward:/user/list.jsp";
}
UserService
/**
 * 查询所有用户信息
 * @return
 */
public List<User> list() {
    return userDao.searchAll();
}
UserDao
/**
 * 读取xml中所有的用户信息
 * @return
 */
public List<User> searchAll() {
    return XmlUtils.readAll(PATH,User.class);
}
/user/list.jsp
<tr
   style="FONT-WEIGHT: bold; FONT-SIZE: 12pt; HEIGHT: 25px; BACKGROUND-COLOR: #afd1f3">

   <td align="center" width="18%">
      登录名
   </td>
   <td align="center" width="17%">
      用户姓名
   </td>
   <td align="center" width="8%">
      性别
   </td>
   <td align="center" width="23%">
      联系电话
   </td>
   <td width="11%" align="center">
      学历
   </td>
   <td width="7%" align="center">
      编辑
   </td>
   <td width="7%" align="center">
      查看
   </td>
   <td width="7%" align="center">
      删除
   </td>
</tr>

<%
   //1、尝试从request作用域获取ulist集合数据
   List<User> ulist = (List<User>) request.getAttribute("ulist");
   //2、若ulist不为null,进行遍历展示
   if(ulist!=null){
      //3、进行遍历展示即可
      for (User user : ulist) {
         %>
         <tr onmouseover="this.style.backgroundColor = 'white'"
            onmouseout="this.style.backgroundColor = '#F5FAFE';">
            <td style="CURSOR: hand; HEIGHT: 22px" align="center"
               width="18%">
               <%=user.getLoginName()%>
            </td>
            <td style="CURSOR: hand; HEIGHT: 22px" align="center"
               width="17%">
               <%=user.getUserName()%>
            </td>
            <td style="CURSOR: hand; HEIGHT: 22px" align="center"
               width="8%">
               <%=user.getSex()%>
            </td>
            <td style="CURSOR: hand; HEIGHT: 22px" align="center"
               width="23%">
               <%=user.getTelephone()%>
            </td>
            <td style="CURSOR: hand; HEIGHT: 22px" align="center">
               <%=user.getEducation()%>
            </td>
            <td align="center" style="HEIGHT: 22px">
               <a href="<%=request.getContextPath() %>/">
                  <img src="<%=request.getContextPath() %>/images/i_edit.gif" border="0" style="CURSOR: hand">
               </a>
            </td>
            <td align="center" style="HEIGHT: 22px">
               <a href="<%=request.getContextPath() %>/">
                  <img src="<%=request.getContextPath() %>/images/button_view.gif" border="0" style="CURSOR: hand">
               </a>
            </td>
            <td align="center" style="HEIGHT: 22px">
               <a href="<%=request.getContextPath() %>/">
                  <img src="<%=request.getContextPath() %>/images/i_del.gif" width="16" height="16" border="0" style="CURSOR: hand">
               </a>
            </td>
         </tr>

         <%
      }
   }
%>

3,UMS-添加用户【阶段1】
3.1:需求说明

要求:跳转使用重定向。
3.2:需求分析
分析:
关键点:
1、JS事件 onclick
2、location.href
3、toBean()
4、生成随机ID。 UUID.randomUUID().toString().replaceAll("-","");
5、XmlUtils.write
6、重定向:return "redirect:/";
流程图:
3.3:代码实现
/user/list.jsp
<td class="ta_01" align="right">
   <a class="button_add" style="padding: 2px 4px 2px 10px; border: 1px solid #8AA2CC;" href="<%=request.getContextPath() %>/user/add.jsp" id="add">添加</a>
</td>
**/user/add.jsp **
<form name="Form1" method="post"  action="<%=pageContext.getServletContext().getContextPath()%>/user" >
   <input type="hidden" name="method" value="addUser"/>
UserServlet
/**
 * 添加用户
 * @return
 */
public String addUser(){
    //1、接收表单数据
    User param = toBean(User.class);
    //2、调用service进行保存
    boolean result = userService.addUser(param);
    //3、根据service处理结果,做不同的跳转
    if(result){
        //添加成功
        return "redirect:/user?method=list";
    }else{
        //添加失败
        getRequest().setAttribute("errorMsg","添加失败");
        return "forward:/user/error.jsp";
    }
}
**UserService **
/**
 * 添加用户
 * @param param
 * @return
 */
public boolean addUser(User param) {
    //1、生成随机ID
    param.setId(UUID.randomUUID().toString().replaceAll("-",""));
    //2、调用Dao进行数据保存
    //3、try...catch对处理结果进行判断:没有出现异常,保存成功,否则保存失败
    try {
        userDao.addUser(param);
    } catch (Exception e) {
        //出现异常,添加失败
        return false;
    }
    //没有出现异常,添加成功
    return true;
}
**UserDao **
/**
 * 向xml中追加一个新用户
 * @param param
 */
public void addUser(User param) {
    XmlUtils.write(PATH,param);
}
/user/error.jsp
<tr>
   <td height="220" align="center" valign="middle"
      background="<%=request.getContextPath() %>/images/loginbg.gif">
      <p class="style1">
         <font color="red">${errorMsg}</font><br>
         <font color="red"></font>
      </p>
      <p>

      </p>
   </td>
</tr>

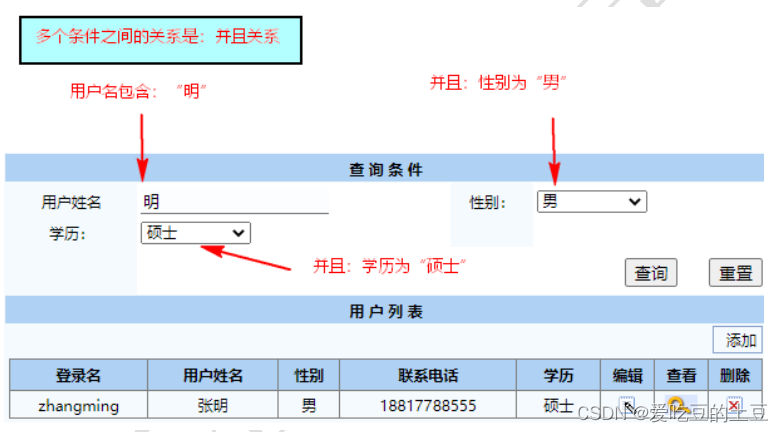
4,UMS-查询指定用户信息【进阶】
4.1:需求说明



4.2:需求分析
分析:
关键点:
1、查询条件获取,采取toBean,创建对应的JavaBean类
2、对集合进行条件筛选,进行集合转储/ 对集合进行条件筛选,对不满足集合要求的数据进行删除
内存占用高,效率高 内存占用低,效率低
3、查询条件要进行数据回显
查看域对象中是否存在该数据,若存在该数据,进行回显:
文本框:value
单选/复选框:checked="checked"
选择框:selected="selected"
文本域:内容体
流程:

4.3:代码实现
UserQueryParam:
public class UserQueryParam implements Serializable {
    private String userName;      //用户名(昵称)
    private String sex;             //性别
    private String education;     //学历

    @Override
    public String toString() {
        return "UserQueryParam{" +
                "userName='" + userName + '\'' +
                ", sex='" + sex + '\'' +
                ", education='" + education + '\'' +
                '}';
    }

    public String getUserName() {
        return userName;
    }

    public void setUserName(String userName) {
        this.userName = userName;
    }

    public String getSex() {
        return sex;
    }

    public void setSex(String sex) {
        this.sex = sex;
    }

    public String getEducation() {
        return education;
    }

    public void setEducation(String education) {
        this.education = education;
    }

    public UserQueryParam(String userName, String sex, String education) {
        this.userName = userName;
        this.sex = sex;
        this.education = education;
    }

    public UserQueryParam() {
    }
}
/user/list.jsp
<form name="Form1" method="post"  action="<%=pageContext.getServletContext().getContextPath()%>/user" id="Form1">
   <input type="hidden" name="method" value="findUsers"/>
UserServlet
/**
 * 条件查询
 * @return
 */
public String findUsers(){
    //1、接收查询条件
    UserQueryParam userQueryParam = toBean(UserQueryParam.class);
    //2、调用service,进行条件查询
    List<User> ulist = userService.findUsers(userQueryParam);
    //3、查询结果存入request作用域
    getRequest().setAttribute("ulist",ulist);
    //4、跳转页面
    return "forward:/user/list.jsp";
}
UserService
/**
 * 条件查询
 * @param userQueryParam
 * @return
 */
public List<User> findUsers(UserQueryParam userQueryParam) {
    //1、查询所有用户信息
    List<User> temp = userDao.searchAll();
    //2、遍历所有用户信息,将符合要求的用户信息进行转储
    //2.1、定义一个转储集合
    List<User> ulist = new ArrayList<>();
    //2.2、对temp进行非空判断,不为空就进行遍历
    if(temp!=null){
        for (User u : temp) {
            //2.3、每遍历一个用户,判断是否符合查询条件,不符合条件不保存,符合条件的转储到新集合
            //2.3.1、如果条件中,用户名不是null,用户名不是空字符串,判断当前用户是否不满足包含条件,不满足遍历下一个User
            String userName = userQueryParam.getUserName();
            if(userName!=null && !userName.equals("") && !u.getUserName().contains(userName)){
                continue;
            }
            //2.3.2、如果条件中,性别不是null,性别不是空字符串,判断当前用户性别是否不满足等于条件,不满足遍历下一个User
            String sex = userQueryParam.getSex();
            if(sex!=null && !sex.equals("") && !u.getSex().equals(sex)){
                continue;
            }
            //2.3.3、如果条件中,学历不是null,学历不是空字符串,判断当前用户学历是否不满足等于条件,不满足遍历下一个User
            String education = userQueryParam.getEducation();
            if(education!=null && !education.equals("") && !u.getEducation().equals(education)){
                continue;
            }
            //2.3.4、同时满足 用户名包含、性别等于、学历等于 条件
            ulist.add(u);
        }
    }
    //3、返回转储结果
    return ulist;
}
4.4:“并且 并且 ” 业务逻辑优化【重点】
满足逻辑: 符合A 并且符合B 并且符合C 就执行D
if(不符合A){
continue;
}
if(不符合B){
continue;
}
if(不符合C){
continue;
}
执行D
4.5:请求转发-JSP获参回显技巧【阶段重点】
/user/list.jsp
<%
   String sex = request.getParameter("sex");
   String education = request.getParameter("education");
%>
<table cellpadding="0" cellspacing="0" border="0" width="100%">
   <tr>
      <td height="22" align="center" bgColor="#f5fafe" class="ta_01">
         用户姓名
      </td>
      <td class="ta_01" bgColor="#ffffff">
         <input name="userName" class="bg" size="15" value="${param.userName}"/>
      </td>
      <td height="22" align="center" bgColor="#f5fafe" class="ta_01">
         性别:
      </td>
      <td class="ta_01" bgColor="#ffffff">
         <select name="sex" id="sex">
            <option value="">--选择性别--</option>
            <option value="男"
               <%
                  if(sex!=null && sex.equals("男")){
                     %>
                        selected="selected"
                     <%
                  }
               %>
            >男</option>
            <option value="女"
                  <%
                     if(sex!=null && sex.equals("女")){
                        %>
                        selected="selected"
                        <%
                     }
                  %>
            >女</option>
         </select>
      </td>
   </tr>
   <tr>
      <td height="22" align="center" bgColor="#f5fafe" class="ta_01">
         学历:
      </td>
      <td class="ta_01" bgColor="#ffffff">
         <select name="education" id="education" >
            <option value="">--选择学历--</option>
            <option value="博士"
                  <%
                     if(education!=null && education.equals("博士")){
                        %>
                        selected="selected"
                        <%
                     }
                  %>
            >博士</option>
            <option value="硕士"
                  <%
                     if(education!=null && education.equals("硕士")){
                        %>
                        selected="selected"
                        <%
                     }
                  %>
            >硕士</option>
            <option value="本科"
                  <%
                     if(education!=null && education.equals("本科")){
                        %>
                        selected="selected"
                        <%
                     }
                  %>
            >本科</option>
            <option value="专科"
                  <%
                     if(education!=null && education.equals("专科")){
                        %>
                        selected="selected"
                        <%
                     }
                  %>
            >专科</option>
            <option value="高中"
                  <%
                     if(education!=null && education.equals("高中")){
                        %>
                        selected="selected"
                        <%
                     }
                  %>
            >高中</option>
         </select>
      </td>
JSP:请求转发进行数据回显
若参数在请求体:
文本框:value="${param.参数名}"
文本域:<textarea>${param.参数名}</textarea>
单选框/复选框:
<% ********String 变量名 = request.getParameter("参数名");********%>
<input type="radio/checkbox"
**** <%****
**** if(变量名!=null && 变量名.equals("值")){****
**** %>****
**** checked="checked"****
**** <%****
**** }****
**** %>********>****
选择框:
<%********String 变量名 = request.getParameter("参数名");********%>
<option
**** <%****
**** if(变量名!=null && 变量名.equals("值")){****
**** %>****
**** selected="selected"****
**** <%****
**** }****
**** %>****
>
若参数在域对象(request/session):
文本框:value="${参数名}"
文本域:<textarea>${参数名}</textarea>
单选框/复选框:
<%********String 变量名 = (String)request.getAttribute("参数名");********%>
<input type="radio/checkbox"
**** <%****
**** if(变量名!=null && 变量名.equals("值")){****
**** %>****
**** checked="checked"****
**** <%****
**** }****
**** %>****
>
选择框:
<%
String 变量名 = (String)request.getAttribute("参数名");
%>
<option
**** <%****
**** if(变量名!=null && 变量名.equals("值")){****
**** %>****
**** selected="selected"****
**** <%****
**** }****
**** %>****
>
5,UMS-删除指定用户信息
5.1:需求说明

点击删除,弹出对话框,点击确定,真正删除数据,删除完成,回到列表页面展示所有内容。
5.2:需求分析
分析:
关键点:
1、根据ID删除
2、点击事件,监听器代码
3、JS页面跳转:location.href=""
4、request.getParameter()
5、删除逻辑:①查询所有用户信息 ②迭代删除 ③覆盖保存
流程:

5.3:代码实现
/user/list.jsp
<script>
   function delUserById(uid) {
      if(confirm("是否删除该数据?")){
         location.href="<%=pageContext.getServletContext().getContextPath()%>/user?method=delUserById&id="+uid;
      }
   }
</script>

<td align="center" style="HEIGHT: 22px">
   <a href="javascript:delUserById('<%=user.getId()%>')">
      <img src="<%=request.getContextPath() %>/images/i_del.gif" width="16" height="16" border="0" style="CURSOR: hand">
   </a>
</td>
UserServlet
/**
 * 根据ID删除用户信息
 * @return
 */
public String delUserById(){
    //1、接收参数
    String id = getRequest().getParameter("id");
    //2、调用service根据ID进行删除
    boolean result = userService.delUserById(id);
    //3、根据service处理结果,进行跳转
    if(result){
        //删除成功
        return "redirect:/user?method=list";
    }else{
        getRequest().setAttribute("errorMsg","删除失败");
        return "forward:/user/error.jsp";
    }
}
UserService
/**
 * 根据ID删除用户信息
 * @param id
 * @return
 */
public boolean delUserById(String id) {
    try {
        //1、查询所有用户信息
        List<User> ulist = userDao.searchAll();
        //2、进行迭代操作
        Iterator<User> it = ulist.iterator();
        while (it.hasNext()){
            User next = it.next();
            //3、迭代中,若当前迭代用户的id 等于 待删除用户的id, 删除当前用户
            if(next.getId().equals(id)){
                it.remove();
                break;
            }
        }
        //4、以覆盖方式写回
        userDao.saveUlist(ulist);
    } catch (Exception e) {
        return false;
    }
    //5、没有出异常,删除成功;出现异常,删除失败
    return true;
}
UserDao
/**
 * 以覆盖方式写出list集合
 * @param ulist
 */
public void saveUlist(List<User> ulist) {
    XmlUtils.write(PATH,ulist,false);
}
1,根据ID删除
2,点击时间,监听器代码
3,JS页面跳转:location.href=""
4,request.getParameter()
5,删除逻辑:查询所有用户,迭代删除,覆盖保存
5.4:a标签href属性问题
<a href="" οnclick="">
起冲突:
先执行onclick,再执行href.
若在onclick监听器中,编写location.href=""跳转A页面,
没有生效,执行的是a标签href属性的路径
解决方案1:(治标不治本)
删除href属性
解决方案2:【建议】
href属性执行javascript代码,让JavaScript具备控制权
6,UMS-查询详情
6.1:需求说明

6.2:需求分析
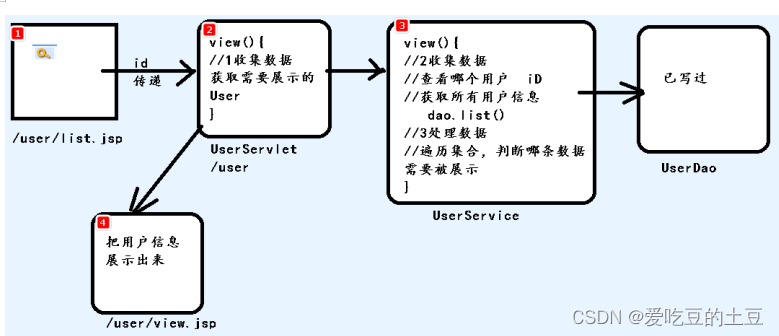
分析:
关键点:
1、向servlet传递id数据
2、根据id查询并返回指定User对象
3、对数据进行数据回显操作---JavaBean---EL
流程:
6.3:代码实现
/user/list.jsp
<td align="center" style="HEIGHT: 22px"**>
<*a href="****<%=**pageContext.getServletContext().getContextPath()**%>/user?method=view&id=<%=**user.getId()**%>***">
<img src="<%=**request.getContextPath() **%>/images/button_view.gif" border="0" style="CURSOR: hand">
</**a**>
</**td**>
UserServlet
/**
- 根据ID查看用户信息*
- ****@return***
*** *****/*
**public **String view(){
HttpServletRequest request = getRequest();
//1、获取参数id
- *String id = request.getParameter("id");
//2、调用service根据id查询用户信息 - *User user = userService.searchUserById(id);
//3、存入request作用域 - *request.setAttribute("user",user);
//4、请求转发 - ***return ****"forward:/user/view.jsp"**;
}
UserService
/**
- 根据ID查询用户信息*
- ****@param ***id
*** ***** ****@return***
*** *****/*
**public **User searchUserById(String id) {
//1、获取所有的用户信息
- *List<User> ulist = userDao.searchAll();
if(ulist!=null){
**for **(User user : ulist) {
//2、遍历所有用户信息,根据ID查找用户,找到符合要求的用户,直接进行返回
}***if**(user.getId().equals(id)){ **return **user; } }
//3、若找不到,返回空user对象。不建议为null,因为null使用时会有空指针异常风险- ***return new **User();
}
/user/view.jsp
<**tr**>
<**td ****width****="18%" ****align****="center" ****bgColor****="#f5fafe" ****class****="ta_01"**>
登录名:
</**td**>
<**td ****class****="ta_01" ****bgColor****="#ffffff"**>
${user.loginName}
** **</**td**>
<**td ****align****="center" ****bgColor****="#f5fafe" ****class****="ta_01"**>
用户姓名:
</**td**>
<**td ****class****="ta_01" ****bgColor****="#ffffff"**>
${user.userName}
** **</**td**>
</**tr**>
<**tr**>
<**td ****align****="center" ****bgColor****="#f5fafe" ****class****="ta_01"**>
性别:
</**td**>
<**td ****class****="ta_01" ****bgColor****="#ffffff"**>
${user.sex}
** **</**td**>
<**td ****align****="center" ****bgColor****="#f5fafe" ****class****="ta_01"**>
学历:
</**td**>
<**td ****class****="ta_01" ****bgColor****="#ffffff"**>
${user.education}
** **</**td**>
</**tr**>
<**tr**>
<**td ****align****="center" ****bgColor****="#f5fafe" ****class****="ta_01"**>
出生日期:
</**td**>
<**td ****class****="ta_01" ****bgColor****="#ffffff"**>
${user.birthday}
** **</**td**>
<**td ****align****="center" ****bgColor****="#f5fafe" ****class****="ta_01"**>
电话:
</**td**>
<**td ****class****="ta_01" ****bgColor****="#ffffff"**>
${user.telephone}
** **</**td**>
</**tr**>
<**tr**>
<**td ****align****="center" ****bgColor****="#f5fafe" ****class****="ta_01"**>
兴趣爱好:
</**td**>
<**td ****class****="ta_01" ****bgColor****="#ffffff" ****colSpan****="3"**>
<%--
//解决方法1:*//1、获取request作用域user对象*User user = (User) request.getAttribute("user");*//2、判断:只要user不为空,并且 interest数组也不为空,对数组进行遍历*if(user!=null && user.getInterest()!=null){*//3、每遍历一个爱好,展示一个*String[] interest = user.getInterest();*for (int i = 0; i < interest.length; i++) {*out.write(interest[i]);*if(i!=interest.length-1)*out.write(",");*}*}*--%>*- **<%-- 解决方法2 ${参数名.方法名} 方法名应该忽略get,将get后的第一个字母进行小写*
${user.interestString}*${参数名.方法名()} 方法按原名进行*--%>*- ***${user.getInterestString()}**
** **</**td**>
</**tr**>
<**TR**>
<**TD ****class****="ta_01" ****align****="center" ****bgColor****="#f5fafe"**>
备注:
</**TD**>
<**TD ****class****="ta_01" ****bgColor****="#ffffff" ****colSpan****="3"**>
${user.remark}
** **</**TD**>
</**TR**>
<**TR**>
<**TD ****class****="ta_01" ****align****="center" ****bgColor****="#f5fafe"**>
用户权限:
</**TD**>
<**TD ****class****="ta_01" ****bgColor****="#ffffff" ****colSpan****="3"**>
${user.utype}
** **</**TD**>
</**TR**>

原因:
因为servlet默认是单例模式,request成员变量就只是能保存一个请求对象。
一个Servlet将来是要处理非常多的请求,一个请求就是一个request对象。
不可能用同一个request对象处理所有请求。
不建议抽取为request成员变量。
建议:每个方法执行时,现场获取
6.4:数组在JSP回显的技巧
解决方案1:(新手容易接受)
书写java脚本,通过java脚本进行数组遍历,代码实现
<**tr**>
<**td ****align****="center" ****bgColor****="#f5fafe" ****class****="ta_01"**>
兴趣爱好:
</**td**>
<**td ****class****="ta_01" ****bgColor****="#ffffff" ****colSpan****="3"**>
<%
** ***//1、获取request作用域user对象*
    *User user = (User) request.getAttribute(**"user"**);
    *//2、判断:只要user不为空,并且 interest数组也不为空,对数组进行遍历*
***if**(user!=**null **&& user.getInterest()!=**null**){ *//3、每遍历一个爱好,展示一个**String[] interest = user.getInterest(); **for **(**int **i = 0; i < interest.**length**; i++) { out.write(interest[i]); **if**(i!=interest.**length**-1) out.write(**","**); } } **%>**
** **</**td**>
</**tr**>
解决方案2:【传统大型开发】
EL表达式,调用getXxx方法,进行操作。
在JavaBean类中,即User类中,添加一个方法:
getInterestString,方法内部对数组拼接字符串,将字符串进行返回。
EL表达式调用该方法,获取字符串,并展示在页面
itcast-tools 1.5.7
如何向xml填充数据的?
依靠的是getXxx方法。
getName() getSex()
在向xml填充数据时,分别调用两个方法,形成 字段:name字段 sex字段
getInterestString()
向xml填充数据时,多个一个interestString字段,该方法的返回值即为字段值
xml在读取数据时:
发现有getInterestString(),没有setInterestString(),工具认为无法为interestString,会报java.lang.NoSuchFieldException: interestString
注意:方法起名时,如果不想在xml存在多余字段,尽可能避免get开头或者set开头方法
User类
**public class **User **implements **Serializable {
- /***
* 专门用来在JSP进行EL表达式回显 数组** ****@return***
*** *****/*
- ***public **String interestString(){
StringBuilder builder = **new **StringBuilder();
if(getInterest()!=null){
//3、每遍历一个爱好,展示一个
}*String[] interest = getInterest(); **for **(**int **i = 0; i < interest.**length**; i++) { builder.append(interest[i]); **if**(i!=interest.**length**-1) builder.append(**","**); } } **return **builder.toString();
//其他内容暂时省略,不粘贴在笔记上
/user/view.jsp
*<%-- 解决方法2 *
${参数名.方法名()} 方法按原名进行*--%>*
${user.interestString()}
7,UMS-编辑用户
7.1:需求说明

遇到这样的复杂需求,我们需要拆分成两步来做:
1、用户数据查询回显:跳转到编辑页面,在编辑页面回显该用户的数据
2、用户数据修改:编辑页面修改完毕后,点击“确定”,真正修改数据到xml中
7.2:用户数据查询回显
7.2.1:需求分析
分析:
关键点:
1、地址栏传递id
2、request作用域及请求转发
3、对User数据在JSP进行回显
如果数据在request作用域:
文本框:value="${参数名.属性名}"
文本域:<textarea>${参数名.属性名}</textarea>
单选框/复选框:
JavaBean javaBean = (JavaBean)request.getAttribute("参数名");
if(javaBean!=null && javaBean.getXxx()!=null){
    if(javaBean.getXxx().equals("值")){

            out.write("checked='checked'");

            }

    }
选择框:
JavaBean javaBean = (JavaBean)request.getAttribute("参数名");
if(javaBean!=null && javaBean.getXxx()!=null){
    if(javaBean.getXxx().equals("值")){

            out.write("selected='selected'");

    }
}
流程分析:

7.2.2:代码实现
/user/list.jsp
<td align="center" style="HEIGHT: 22px"**>
<*a href="****<%=**pageContext.getServletContext().getContextPath()**%>/user?method=editView&id=<%=**user.getId()**%>***">
<img src="<%=**request.getContextPath() **%>/images/i_edit.gif" border="0" style="CURSOR: hand">
</**a**>
</**td**>
UserServlet
/**
- 跳转到编辑页面*
- ****@return***
*** *****/*
**public **String editView(){
HttpServletRequest request = getRequest();
//1、获取参数id
- *String id = request.getParameter("id");
//2、调用service根据id查询用户信息 - *User user = userService.searchUserById(id);
//3、存入request作用域 - *request.setAttribute("user",user);
//4、请求转发 - ***return ****"forward:/user/edit.jsp"**;
}
/user/edit.jsp
<%**
** **User u = (User) request.getAttribute(**"user"**);
**%>
** **<**form ****method****="post" ****action****=""**>
<**input ****type****="hidden" ****name****="id" ****value****="" **/>
** **
** **<**table ****cellSpacing****="1" ****cellPadding****="5" ****width****="100%" ****align****="center" ****bgColor****="#eeeeee" ****style****="****border**: 1**px solid ****#8ba7e3****" ****border****="0"**>
<**tr**>
<**td ****class****="ta_01" ****align****="center" ****bgColor****="#afd1f3" ****colSpan****="4"**
** ****height****="26"**>
<**strong**><**STRONG**>编辑用户</**STRONG**>
</**strong**>
</**td**>
</**tr**>
      <**tr**>
         <**td ****align****="center" ****bgColor****="#f5fafe" ****class****="ta_01"**>
            登录名:
         </**td**>
         <**td ****class****="ta_01" ****bgColor****="#ffffff"**>
            <**input ****type****="text" ****name****="loginName" ****id****="loginName" ****class****="bg" ****value****="****${**user.loginName**}****"**/>
         </**td**>
         <**td ****align****="center" ****bgColor****="#f5fafe" ****class****="ta_01"**>
           用户类型:
         </**td**>
         **<%**
** **String utype = null;
if(u!=null){
utype = u.getUtype();
}
%>
** <**td ****class****="ta_01" ****bgColor****="#ffffff"**>
<**input ****type****="radio" ****name****="utype" ****value****="管理员"**
** **** ****<%**
** if**(utype!=**null **&& utype.equals(**"管理员"**)){
out.write(**"checked='checked'"**);
}
**%>
** />管理员
<**input ****type****="radio" ****name****="utype" ****value****="普通用户"**
** **** ****<%**
** if**(utype!=**null **&& utype.equals(**"普通用户"**)){
out.write(**"checked='checked'"**);
}
**%>
** **/>普通用户
</**td**>
</**tr**>
<**tr**>
<**td ****align****="center" ****bgColor****="#f5fafe" ****class****="ta_01"**>
密码:
</**td**>
<**td ****class****="ta_01" ****bgColor****="#ffffff"**>
<**input ****type****="password" ****name****="loginPwd" ****id****="loginPwd" ****value****="****${**user.loginPwd**}****"**/>
</**td**>
<**td ****align****="center" ****bgColor****="#f5fafe" ****class****="ta_01"**>
用户姓名:
</**td**>
<**td ****class****="ta_01" ****bgColor****="#ffffff"**>
<**input ****type****="text" ****name****="userName" ****class****="bg" ****value****="****${**user.userName**}****"**** **/>
</**td**>
</**tr**>
<**tr**>
<**td ****align****="center" ****bgColor****="#f5fafe" ****class****="ta_01"**>
性别:
</**td**>
<**td ****class****="ta_01" ****bgColor****="#ffffff"**>
<%**
** **String sex = **null**;
**if**(u!=**null**){
sex = u.getSex();
}
**%>
** <**input ****type****="radio" ****value****="男" ****name****="sex" ****id****="sex0"**
** **** ****<%**
** if**(sex!=**null **&& sex.equals(**"男"**)){
out.write(**"checked='checked'"**);
}
**%>
** />男
<**input ****type****="radio" ****value****="女" ****name****="sex" ****id****="sex1"**
** **** ****<%**
** if**(sex!=**null **&& sex.equals(**"女"**)){
out.write(**"checked='checked'"**);
}
**%>
** **/>女
</**td**>
<**td ****align****="center" ****bgColor****="#f5fafe" ****class****="ta_01"**>
学历:
</**td**>
<**td ****class****="ta_01" ****bgColor****="#ffffff"**>
<%**
** **String education = **null**;
**if**(u!=**null**){
education = u.getEducation();
}
**%>
** <**select ****name****="education" ****id****="education"**>
<**option ****value****=""**>--选择学历--</**option**>
<**option ****value****="博士"**
** **** ****<%**
** if**(education!=**null **&& education.equals(**"博士"**)){
out.write(**"selected='selected'"**);
}
**%>
** >博士</**option**>
<**option ****value****="硕士"**
** **** ****<%**
** if**(education!=**null **&& education.equals(**"硕士"**)){
out.write(**"selected='selected'"**);
}
**%>
** >硕士</**option**>
<**option ****value****="本科"**
** **** ****<%**
** if**(education!=**null **&& education.equals(**"本科"**)){
out.write(**"selected='selected'"**);
}
**%>
** >本科</**option**>
<**option ****value****="专科"**
** **** ****<%**
** if**(education!=**null **&& education.equals(**"专科"**)){
out.write(**"selected='selected'"**);
}
**%>
** >专科</**option**>
<**option ****value****="高中"**
** **** ****<%**
** if**(education!=**null **&& education.equals(**"高中"**)){
out.write(**"selected='selected'"**);
}
**%>
** >高中</**option**>
</**select**>
</**td**>
</**tr**>
<**tr**>
<**td ****align****="center" ****bgColor****="#f5fafe" ****class****="ta_01"**>
出生日期:
</**td**>
<**td ****class****="ta_01" ****bgColor****="#ffffff"**>
<**input ****type****="text" ****name****="birthday" ****id****="birthday" ****size****="20" ****readonly****="true" **** ****value****="****${**user.birthday**}****"**** ****onclick****="*****c***.show(**this**)**" **/>
</**td**>
<**td ****align****="center" ****bgColor****="#f5fafe" ****class****="ta_01"**>
电话:
</**td**>
<**td ****class****="ta_01" ****bgColor****="#ffffff"**>
<**input ****type****="text" ****name****="telephone" ****id****="telephone" ****value****="****${**user.telephone**}****"**/>
</**td**>
</**tr**>
<**tr**>
<**td ****align****="center" ****bgColor****="#f5fafe" ****class****="ta_01"**>
兴趣爱好:
</**td**>
<%**
** **String[] interest = **null**;
**if**(u!=**null**){
interest = u.getInterest();
}
**%>
** <**td ****class****="ta_01" ****bgColor****="#ffffff" ****colSpan****="3"**>
<**input ****type****="checkbox" ****name****="interest" ****value****="看电影"**
** **** ****<%**
** if**(interest!=**null**){
**for **(String s : interest) {
**if**(s.equals(**"看电影"**)){
out.write(**"checked='checked'"**);
**break**;
}
}
}
**%>
** /> 看电影
<**input ****type****="checkbox" ****name****="interest" ****value****="旅游"**
** **** ****<%**
** if**(interest!=**null**){
**for **(String s : interest) {
**if**(s.equals(**"旅游"**)){
out.write(**"checked='checked'"**);
**break**;
}
}
}
**%>
** />旅游
<**input ****type****="checkbox" ****name****="interest" ****value****="健身"**
** **** ****<%**
** if**(interest!=**null**){
**for **(String s : interest) {
**if**(s.equals(**"健身"**)){
out.write(**"checked='checked'"**);
**break**;
}
}
}
**%>
** />健身
<**input ****type****="checkbox" ****name****="interest" ****value****="购物"**
** **** ****<%**
** if**(interest!=**null**){
**for **(String s : interest) {
**if**(s.equals(**"购物"**)){
out.write(**"checked='checked'"**);
**break**;
}
}
}
**%>
** />购物
<**input ****type****="checkbox" ****name****="interest" ****value****="睡觉"**
** ****<%**
** if**(interest!=**null**){
**for **(String s : interest) {
**if**(s.equals(**"睡觉"**)){
out.write(**"checked='checked'"**);
**break**;
}
}
}
**%>
** />睡觉
</**td**>
</**tr**>
<**TR**>
<**TD ****class****="ta_01" ****align****="center" ****bgColor****="#f5fafe"**>
备注:
</**TD**>
<**TD ****class****="ta_01" ****bgColor****="#ffffff" ****colSpan****="3"**>
<**textarea ****cols****="30" ****rows****="3" ****name****="remark" ****style****="****WIDTH**: 96%**"**>${user.remark}</**textarea**>
</**TD**>
</**TR**>
7.3:用户数据修改
7.3.1:需求分析
分析:
关键点:
1、ID不需要被修改,需要被从JSP传递给servlet,因为若未传递ID,ID为null
2、修改逻辑:
①查询所有信息
②迭代删除被修改的信息,添加新信息 (新集合)
③新集合以覆盖方式保存新信息
3、路径更改问题
添加、修改、删除
流程:
 7.3.2:代码实现
/user/edit.jsp
<form method="post" action="<%=**pageContext.getServletContext().getContextPath()**%>/user">
<**input ****type****="hidden" ****name****="method" ****value****="modifyUser" **/>
<**input ****type****="hidden" ****name****="id" ****value****="****${**user.id**}****" **/>
UserServlet
/**
- 修改用户信息*
- ****@return***
*** *****/*
**public **String modifyUser(){
//1、获取所有表单数据
- *User param = toBean(User.class);
//2、调用service进行保存 - ***boolean **result = userService.modifyUser(param);
//3、根据service保存结果,进行展示 - *if(result){
//修改成功
}else{***return ****"redirect:/user?method=list"**;
//修改失败
}*getRequest().setAttribute(**"errorMsg"**,**"修改失败"**); **return ****"forward:/user/error.jsp"**;
}
UserService
/**
- 修改用户信息*
- ****@param ***param
*** ***** ****@return***
*** *****/*
**public boolean **modifyUser(User param) {
**try **{
//1、查询所有用户信息
   *List<User> ulist = **userDao**.searchAll();
   *//2、迭代删除被修改的用户*
***if**(ulist!=**null**){ Iterator<User> it = ulist.iterator(); **while **(it.hasNext()){ User next = it.next(); **if**(next.getId().equals(param.getId())){ it.remove(); **break**; } } } *//3、向集合追加被修改用户的新信息**ulist.add(param); *//4、以覆盖方式写回xml*
} **catch **(Exception e) {***userDao**.saveUlist(ulist);
return false;
}
return true;
}
7.4:令牌机制-数据更新操作中BUG说明及解决(
开发常见问题,
用来解决增删改中
重复刷新和恶意刷新操作
)
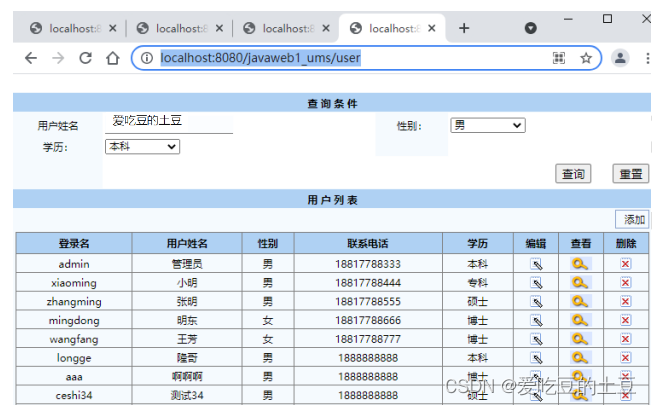
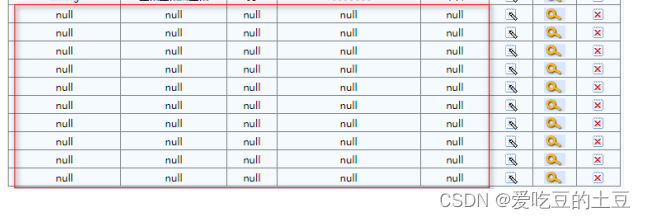
问题描述:反复刷新页面就会导致 添加功能被重复执行,添加重复数据
问题解决方案:
解决方案1:直接解决法(规避法)
/**
- 添加用户*
- ****@return***
*** *****/*
**public **String addUser(){
//1、接收表单数据
- *User param = toBean(User.class);
//2、调用service进行保存 - ***boolean **result = userService.addUser(param);
//3、根据service处理结果,做不同的跳转 - *if(result){
//添加成功
}else{***return ****"****redirect****:/user?method=list"**;
//添加失败
}*getRequest().setAttribute(**"errorMsg"**,**"添加失败"**); **return ****"forward:/user/error.jsp"**;
}
解决方案2:逻辑解决法-令牌机制(以添加操作为例)
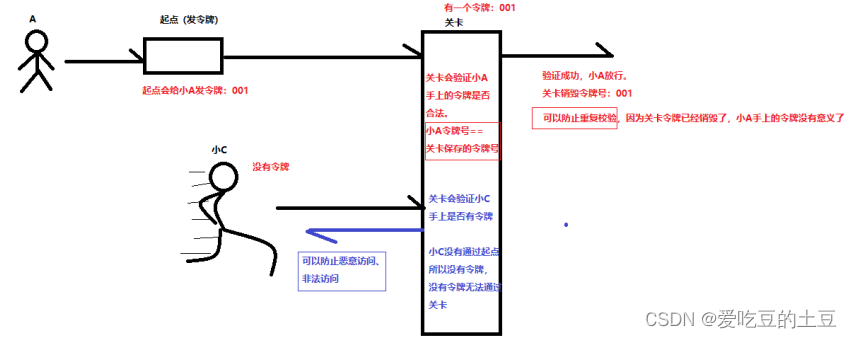
令牌:随机的字符串,唯一的不重复。
令牌机制作用:通过发令牌,比对令牌,保障你的操作是唯一不重复的。
本质防止两个基础操作:
- 重复刷新
- 恶意访问

/user/list.jsp
<a class="button_add" style="padding: 2px 4px 2px 10px; border: 1px solid #8AA2CC;" href="<%=**request.getContextPath() **%>/user?method=toAddView" id="add">添加</**a**>
UserServlet
/**
- 跳转到添加页面(起点:发令牌)*
- ****@return***
*** *****/*
**public **String toAddView(){
//1、随机生成令牌
- *String tokenId = UUID.randomUUID().toString().replaceAll("-","");
//2、将令牌备份到session中 - *getRequest().getSession().setAttribute("addUserTokenId",tokenId);
//3、跳转到添加页面 - ***return ****"redirect:/user/add.jsp"**;
}
/user/add.jsp
<*form name="Form1" method="post" action="****<%=**pageContext.getServletContext().getContextPath()**%>***/user" **>
<**input ****type****="hidden" ****name****="addUserTokenId" ****value****="****${**addUserTokenId**}****"**/>
UserServlet
/**
- 添加用户*
- ****@return***
*** *****/*
**public **String addUser(){
//一、(关卡)令牌机制校验
//1、分别获取表单传递而来的令牌(人物自带令牌) 和 session中的令牌 (关卡备份令牌)*
*String addUserTokenId = getRequest().getParameter("addUserTokenId");
String addUserTokenIdFromSession = (String) getRequest().getSession().getAttribute("addUserTokenId");
//2、进行令牌校验//如果addUserTokenIdFromSession为null或者addUserTokenId为null,说明是非法操作,展示错误信息*
//如果两个令牌不一致,说明校验失败,也存在非法操作,展示错误信息*
//令牌校验失败,跳转错误页面*
*if(addUserTokenId==null ||
addUserTokenIdFromSession==null ||
!addUserTokenId.equals(addUserTokenIdFromSession)){
getRequest().setAttribute("errorMsg","非法添加操作,请按正常流程进行");
**return ****"forward:/user/error.jsp"**;
}
//3、令牌校验成功,为了防止重复校验,将session中的令牌销毁*getRequest().getSession().removeAttribute("addUserTokenId");
//二、令牌校验完成的,才能进行添加用户操作
//1、接收表单数据*
*User param = toBean(User.class);
//2、调用service进行保存***boolean **result = userService.addUser(param);
//3、根据service处理结果,做不同的跳转*if(result){
//添加成功***return ****"forward:/user?method=list"**;}else{
//添加失败*getRequest().setAttribute(**"errorMsg"**,**"添加失败"**); **return ****"forward:/user/error.jsp"**;}
}
令牌机制:
起点:发令牌
人物:带令牌
关卡:校验令牌,校验成功销毁关卡令牌
8, UMS-用户登录【阶段2】
8.1:需求说明
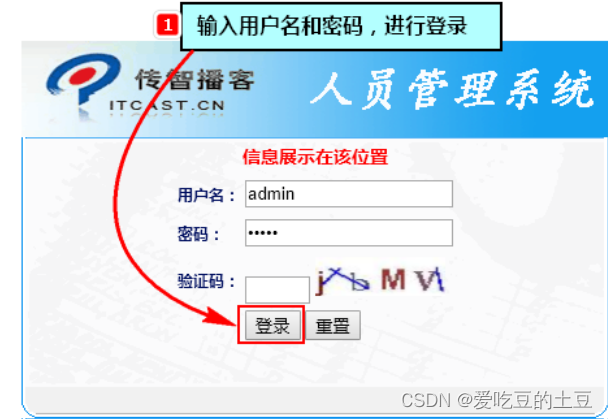

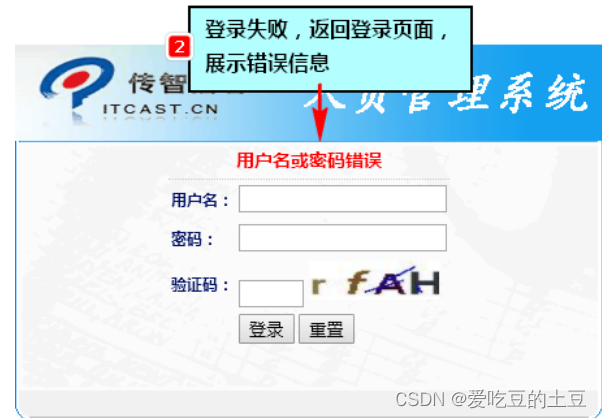
8.2:需求分析
分析:
关键点:
1、JavaBean javaBean = toBean(JavaBean.class);
2、登录校验:
service:
若用户名正确,并且密码也正确,登录成功;否则登录失败
用户名正确:遍历用户的用户名 和 表单输入的用户名相同
3、session域对象,请求重定向
登录成功,页面跳转,路径也被改变,说明使用的是请求重定向。
重定向不能使用request作用域传递数据,使用更大的session传递数据
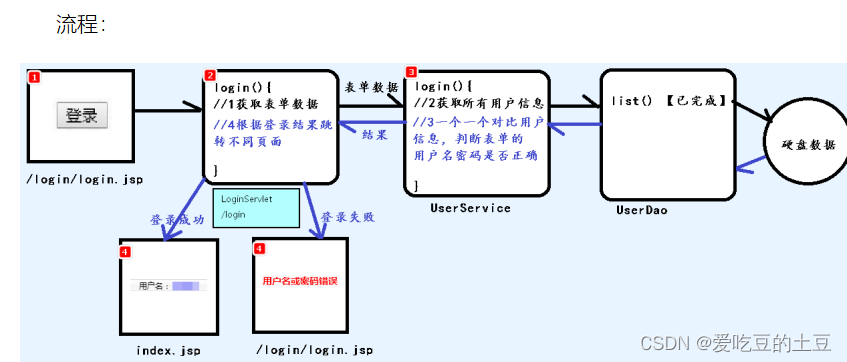
8.3:代码实现
/login/login.jsp
<form action="<%=pageContext.getServletContext().getContextPath()**%>****/login" method="post" target="_parent"**>
<**input ****type****="hidden" ****name****="method" ****value****="login"**/>
<**tr**>
<**td ****height****="30" ****nowrap**>
<**font ****color****="000F60"**><**strong**>用户名:</**strong**> </**font**>
</**td**>
<**td**>
<**input ****type****="text" ****name****="****loginName****" ****class****="test" ****style****="****width**: 160**px**;**"**/>
</**td**>
</**tr**>
<**tr**>
<**td ****height****="30" ****nowrap**>
<**strong**><**font ****color****="000F60"**>密码: </**font**> </**strong**>
</**td**>
<**td**>
<**input ****type****="password" ****name****="****loginPwd****" ****class****="text" ****style****="****width**: 160**px**;**"**/>
</**td**>
</**tr**>
/**
- 用户登录*
- ****@return***
*** *****/*
**public **String login(){
//1、接收表单参数
- *User param = toBean(User.class);
//2、调用service进行登录处理 - *User result = null;
**try **{
result = userService.login(param);
} **catch **(Exception e) {
//抛出异常,登录也是失败
}*getRequest().setAttribute(**"errorMsg"**,e.getMessage()); **return ****"forward:/login/login.jsp"**;
//3、根据返回结果,跳转不同的页面- *if(result!=null){
//登录成功
}else{*getRequest().getSession().setAttribute(**"loginUser"**,result); **return ****"redirect:/index.jsp"**;
//登录失败
}*getRequest().setAttribute(**"errorMsg"**,**"用户名或密码错误"**); **return ****"forward:/login/login.jsp"**;
}
UserService
/**
- 用户登录。 用户登录成功,返回User对象。 登录失败,返回Null*
- ****@param ***param
*** ***** ****@return***
*** *****/*
**public **User login(User param) {
//1、获取所有用户信息
- *List<User> ulist = userDao.searchAll();
//2、遍历所有用户信息 - *if(ulist!=null){
**for **(User u : ulist) {
//3、每遍历一个用户信息,对比表单用户名是否正确,对比表单密码是否正确. 都正确,登录成功
}***if**(u.getLoginName().equals(param.getLoginName()) && u.getLoginPwd().equals(param.getLoginPwd())){ **return **u; } }
//4、经过遍历,没有一个成功,登录失败- *return null;
}
/login/top.jsp
用户名: <font color="blue"**>${loginUser.userName}**</**font**></**td**>
/login/login.jsp
<strong style="font-size: 14**px;color:red;">${errorMsg}**</**strong**>
9,UMS-验证码校验【阶段2】
9.1:需求说明
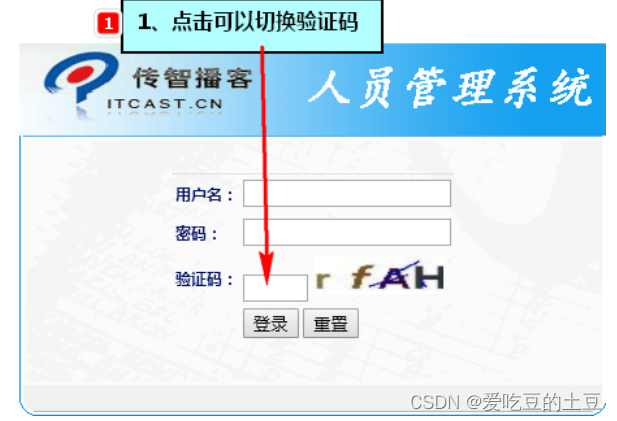
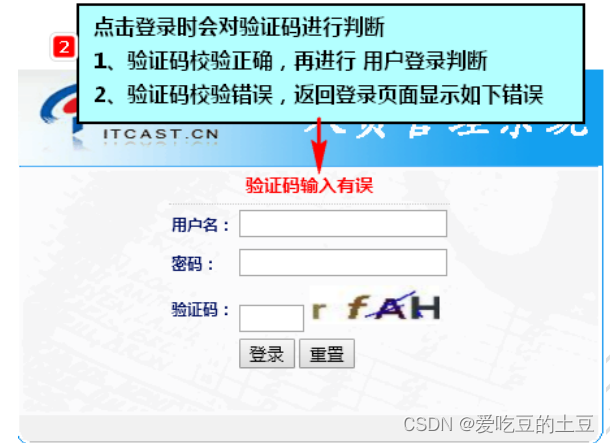
9.2:点击切换验证码
9.2.1:需求分析
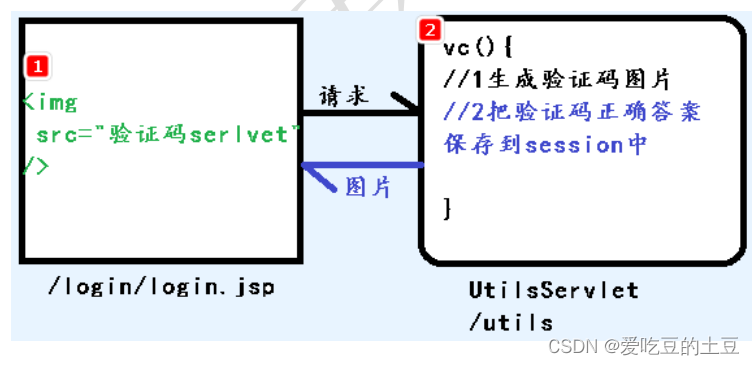
9.2.2:代码实现
/login/login.jsp
<**script ****type****="text/javascript" ****src****="****${**pageContext.request.contextPath**}****/js/jquery-1.11.3.min.js"**></**script**>
<**script ****type****="text/javascript"**>
**var *m1Src;//图片验证码src*
- ***$**(function(){
//为验证码图片绑定点击切换图片功能
});***$**(**"#m1"**).click(**function**(){ **var **m1 = **$**(**this**); **if**(***m1Src***==**undefined**){ ***m1Src ***= m1.prop(**"src"**); } m1.prop(**"src"**,***m1Src***+**"&t="**+**new *****Date***().getTime()); });
</**script**>
<tr**>
<td height="30" nowrap>
<**strong**><**font ****color****="000F60"**>验证码: </**font**> </**strong**>
</**td**>
<**td**>
<**input ****type****="text" ****name****="verifyCode" ****class****="text" ****style****="****width**: 50**px**;**"**/>
<**img ****id****="m1" ****src****="****<%=**pageContext.getServletContext().getContextPath()**%>**/vc?method=vc" style="height:30**px;width:100px;"/>
</**td**>
</**tr**>
VerifyCodeServlet
/**
- 生成验证码,正确答案保存session*
- /
**public void **vc() throws IOException {
String vci = createVerifyCodeImage();
System.out.println(vci);
getRequest().getSession().setAttribute("vci",vci);
}
9.3:验证码校验
9.3.1:需求分析
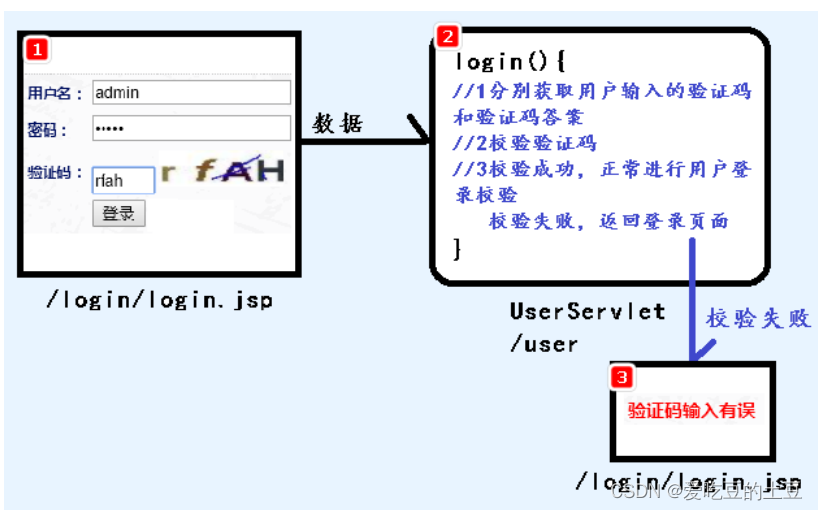
9.3.2:代码实现
/login/login.jsp
<tr**>
<*td height="30" **nowrap>
<**strong**><**font ****color****="000F60"**>验证码: </**font**> </**strong**>
</**td**>
<**td**>
<**input ****type****="text" ****name****="verifyCode" ****class****="text" ****style****="****width**: 50**px**;**"**/>
<**img ****id****="m1" ****src****="****<%=**pageContext.getServletContext().getContextPath()**%>***/vc?method=vc" style="*height:30*px;width:100px;"/>
</**td**>
</**tr**>
UserServlet
/**
- 用户登录*
- ****@return***
*** *****/*
**public **String login(){
//一、先进行验证码校验
- //1、分别获取表单验证码和正确验证码*
- *String verifyCode = getRequest().getParameter("verifyCode");
String vci = (String) getRequest().getSession().getAttribute("vci");
//2、为了防止被重复校验验证码,正确验证码使用一次,就要从session中消除 - *getRequest().getSession().removeAttribute("vci");
//3、校验判断,若校验失败,直接返回错误信息,不用进行用户登录判断 - //若用户未提交验证码 或者 正确验证码不存在 或者 两个验证码不同 ABCD和 abcd 相同*
- *if(verifyCode==**null **|| vci==**null **|| !vci.equalsIgnoreCase(verifyCode)){
//校验失败
}*getRequest().setAttribute(**"errorMsg"**,**"验证码校验失败"**); **return ****"forward:/login/login.jsp"**;
//4、校验成功,继续进行登录校验【无代码,直接向后运行】- //二、再进行用户登录校验*
- //1、接收表单参数*
- *User param = toBean(User.class);
//2、调用service进行登录处理 - *User result = null;
**try **{
result = userService.login(param);
} **catch **(Exception e) {
//抛出异常,登录也是失败
}*getRequest().setAttribute(**"errorMsg"**,e.getMessage()); **return ****"forward:/login/login.jsp"**;
//3、根据返回结果,跳转不同的页面- *if(result!=null){
//登录成功
}else{*getRequest().getSession().setAttribute(**"loginUser"**,result); **return ****"redirect:/index.jsp"**;
//登录失败
}*getRequest().setAttribute(**"errorMsg"**,**"用户名或密码错误"**); **return ****"forward:/login/login.jsp"**;
}
10,UMS-记住用户名【阶段2】
10.1:需求说明
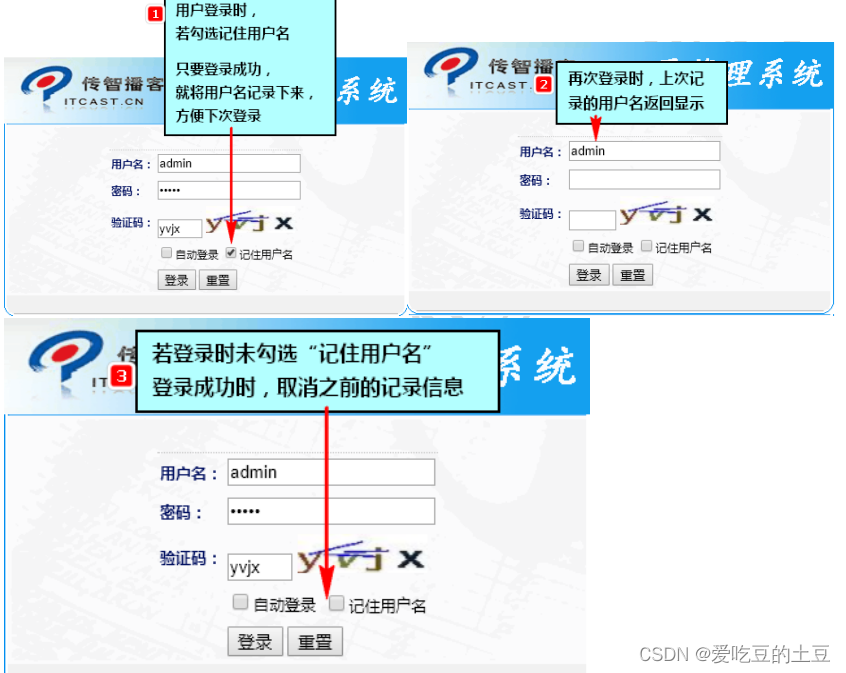
10.2:需求分析
分析:
关键点:
1、使用cookie技术保存数据到浏览器7天
Cookie c = new Cookie("key","value");
c.setMaxAge(606024*7);//秒
getResponse().addCookie(c);
2、cookie数据JSP回显
<%
//查找指定cookie的固定代码格式
Cookie[] arr = request.getCookies();
String value = "";//开关
//若浏览器没有发来任何cookie,null
if(arr!=null){
for(Cookie c:arr){
if(c.getName().equals("要查找的cookie名")){
value=c.getValue();
break;
}
}
}
//JSP数据回显
//回显
out.write(value);
%>
<%=cookieValue%>
3、cookie覆盖问题
两个cookie是追加还是相互覆盖主要看 唯一标识(域名+有效路径+cookie名)
注意:因为都是一个服务器进行编写,所以域名默认相同,我们在进行编码时,cookie名肯定相同。
有效路径统一设置为项目名: /项目名
4、cookie保存中文问题
cookie不能直接保存中文。
URL编码来保存中文,URL解码来读取中文。
URL编码:URLEncoder.encode("","utf-8");
URL解码:URLDecoder.decode("","utf-8");
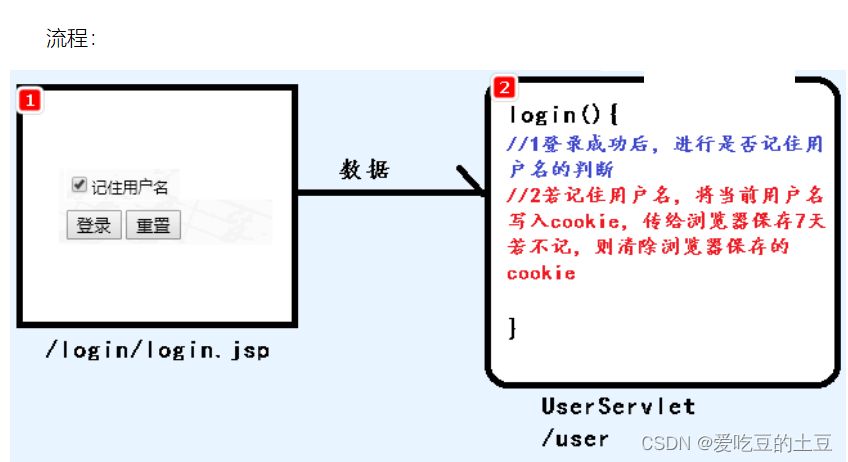
10.3:代码实现
//cookie数据保存:

/login/login.jsp
<**tr**>
<**td ****height****="30" ****nowrap**>
</**td**>
<**td**>
<**input ****type****="checkbox" ****name****="autoLogin" ****value****="yes"**/>自动登录
<**input ****type****="checkbox" ****name****="remember" ****value****="yes"**/>记住用户名
</**td**>
</**tr**>
UserServlet
/**
- 用户登录*
- ****@return***
*** *****/*
**public **String login() **throws **UnsupportedEncodingException {
//一、先进行验证码校验
- //1、分别获取表单验证码和正确验证码*
- *String verifyCode = getRequest().getParameter("verifyCode");
String vci = (String) getRequest().getSession().getAttribute("vci");
//2、为了防止被重复校验验证码,正确验证码使用一次,就要从session中消除 - *getRequest().getSession().removeAttribute("vci");
//3、校验判断,若校验失败,直接返回错误信息,不用进行用户登录判断 - //若用户未提交验证码 或者 正确验证码不存在 或者 两个验证码不同 ABCD和 abcd 相同*
- *if(verifyCode==**null **|| vci==**null **|| !vci.equalsIgnoreCase(verifyCode)){
//校验失败
}*getRequest().setAttribute(**"errorMsg"**,**"验证码校验失败"**); **return ****"forward:/login/login.jsp"**;
//4、校验成功,继续进行登录校验【无代码,直接向后运行】- //二、再进行用户登录校验*
- //1、接收表单参数*
- *User param = toBean(User.class);
//2、调用service进行登录处理 - *User result = null;
**try **{
result = userService.login(param);
} **catch **(Exception e) {
//抛出异常,登录也是失败
}*getRequest().setAttribute(**"errorMsg"**,e.getMessage()); **return ****"forward:/login/login.jsp"**;
//3、根据返回结果,跳转不同的页面- *if(result!=null){
//登录成功 *getRequest().getSession().setAttribute(**"loginUser"**,result); *//三、判断用户是否需要记住用户名*//1、尝试从请求中获取remember参数**String rememberStr = getRequest().getParameter(**"remember"**); *//2、判断remember参数,如果remember不为null,记住用户名****if**(rememberStr!=**null**){ Cookie remember = **new **Cookie(**"remember"**, URLEncoder.*encode*(result.getLoginName(), **"utf-8"**)); remember.setPath(getRequest().getContextPath()); remember.setMaxAge(60*60*24*7); getResponse().addCookie(remember); }**else**{ *//3、remember为null,删除之前记住的用户名*
}else{*Cookie remember = **new **Cookie(**"remember"**, **""**); remember.setPath(getRequest().getContextPath()); remember.setMaxAge(0); getResponse().addCookie(remember); } **return ****"redirect:/index.jsp"**;
//登录失败
}*getRequest().setAttribute(**"errorMsg"**,**"用户名或密码错误"**); **return ****"forward:/login/login.jsp"**;
}
优化UserServlet
/**
- 用户登录*
- ****@return***
*** *****/*
**public **String login() **throws **UnsupportedEncodingException {
//一、先进行验证码校验
- //1、分别获取表单验证码和正确验证码*
- *String verifyCode = getRequest().getParameter("verifyCode");
String vci = (String) getRequest().getSession().getAttribute("vci");
//2、为了防止被重复校验验证码,正确验证码使用一次,就要从session中消除 - *getRequest().getSession().removeAttribute("vci");
//3、校验判断,若校验失败,直接返回错误信息,不用进行用户登录判断 - //若用户未提交验证码 或者 正确验证码不存在 或者 两个验证码不同 ABCD和 abcd 相同*
- *if(verifyCode==**null **|| vci==**null **|| !vci.equalsIgnoreCase(verifyCode)){
//校验失败
}*getRequest().setAttribute(**"errorMsg"**,**"验证码校验失败"**); **return ****"forward:/login/login.jsp"**;
//4、校验成功,继续进行登录校验【无代码,直接向后运行】- //二、再进行用户登录校验*
- //1、接收表单参数*
- *User param = toBean(User.class);
//2、调用service进行登录处理 - *User result = null;
**try **{
result = userService.login(param);
} **catch **(Exception e) {
//抛出异常,登录也是失败
}*getRequest().setAttribute(**"errorMsg"**,e.getMessage()); **return ****"forward:/login/login.jsp"**;
//3、根据返回结果,跳转不同的页面- *if(result!=null){
//登录成功 *getRequest().getSession().setAttribute(**"loginUser"**,result); *//三、判断用户是否需要记住用户名*//1、尝试从请求中获取remember参数**String rememberStr = getRequest().getParameter(**"remember"**); *//2、判断remember参数,如果remember不为null,记住用户名**Cookie remember = **new **Cookie(**"remember"**, **""**); remember.setPath(getRequest().getContextPath()); **if**(rememberStr!=**null**){ remember.setValue(URLEncoder.*encode*(result.getLoginName(), **"utf-8"**)); remember.setMaxAge(60*60*24*7); }**else**{ *//3、remember为null,删除之前记住的用户名*
}else{*remember.setMaxAge(0); } getResponse().addCookie(remember); **return ****"redirect:/index.jsp"**;
//登录失败
}*getRequest().setAttribute(**"errorMsg"**,**"用户名或密码错误"**); **return ****"forward:/login/login.jsp"**;
}
//cookie数据回显: (用户名,复选框)
/login/login.jsp
<%
** ***//1、从cookie中获取用户名*
- //1.1、获取cookie数组*
- *Cookie[] arr = request.getCookies();
//1.2、遍历数组,寻找记录用户名cookie,取出value值 - *String rememberUsername = "";//为了在展示JSP时,不存在记录的用户名不能展示null,不利于用户体现
- if(arr!=null){
for (Cookie c : arr) {
if(c.getName().equals("remember")){
rememberUsername = URLDecoder.decode(c.getValue(),*"utf-8"**);
break;
}
}
}
%>
<tr**>
<*td height="30" **nowrap>
<**font ****color****="000F60"**><**strong**>用户名:</**strong**> </**font**>
</**td**>
<**td**>
<**input ****type****="text" ****name****="loginName" ****class****="test" ****style****="****width**: 160**px**;**" ****value****="****<%=**rememberUsername**%>***"/>
</**td**>
</**tr**>
<**tr**>
<**td ****height****="30" ****nowrap**>
</**td**>
<**td**>
<**input ****type****="checkbox" ****name****="autoLogin" ****value****="yes"**/>自动登录
<input type="checkbox" name="remember" value="yes"
** ****<%**
** ***//用户名不是空字符串,说明之前用户 记录用户名,框体就应该被回显选中*
       ***if**(!rememberUsername.equals(**""**)){
         out.write(**"checked='checked'"**);
      }
    **%>**
** **/>记住用户名
</**td**>
</**tr**>
11,UMS-MD5校验【拓展】
11.1:需求说明
密码 敏感数据可能存在泄露和丢失
担心:保存在服务器上会不会泄露
拷贝走数据(非项目组成员)
不道德程序员,记录下来
对敏感数据,例如密码进行加密操作。
**public static void **main(String[] args) {
//因为加密算法是固定的,对同一个数据加密两次,加密结果是相同的
- *String str = "爱吃豆的土豆";
String md5 = UMSUtils.getMD5(str);
System.out.println(md5);//f7370f7dc09f3ab88ea1d81283fb725f - String md52 = UMSUtils.getMD5(str);
System.out.println(md52);//f7370f7dc09f3ab88ea1d81283fb725f*
}
11.2:需求分析
添加用户:输入用户密码进行保存,对密码进行md5加密
编辑用户:密码回显和修改,对修改密码进行md5加密
用户登录:对表单输入的密码进行md5加密
11.3:代码实现
添加用户:
UserService
/**
- 添加用户*
- ****@param ***param
*** ***** ****@return***
*** *****/*
**public boolean **addUser(User param) {
//1、生成随机ID
- *param.setId(UUID.randomUUID().toString().replaceAll("-",""));
//敏感数据进行MD5加密 - *param.setLoginPwd(UMSUtils.getMD5(param.getLoginPwd()));
//2、调用Dao进行数据保存 - //3、try...catch对处理结果进行判断:没有出现异常,保存成功,否则保存失败*
- ***try **{
userDao.addUser(param);
} **catch **(Exception e) {
//出现异常,添加失败
}***return false**;
//没有出现异常,添加成功- *return true;
}
编辑用户:
可能性:
- 加密密码回显表单后,用户没有对加密密码进行过任何修改,加密密码不要被再次加密
- 加密密码回显表单后,用户对加密密码进行过修改,对密码进行重新加密
解决:
在页面添加一个隐藏域:pwdSource 源密码(加密密码)
servlet、service进行判断:
如果表单密码框数据 == 源密码,说明用户未对密码进行修改,不需要对表单密码进行再次加密
如果表单密码框数据 != 源密码,说明用户一定对密码进行了修改,需要对表单密码进行再次加密。
BUG:用户新改的密码 和 md5源加密密码一致,无法判断。
edit.jsp
<form method="post" action="<%=**pageContext.getServletContext().getContextPath()**%>/user">
<**input ****type****="hidden" ****name****="method" ****value****="modifyUser" **/>
<**input ****type****="hidden" ****name****="id" ****value****="****${**user.id**}****" **/>
<**input ****type****="hidden" ****name****="pwdResource" ****value****="****${**user.loginPwd**}****" **/>
UserServlet
/**
- 修改用户信息*
- ****@return***
*** *****/*
**public **String modifyUser(){
//获取源密码
- *String pwdResource = getRequest().getParameter("pwdResource");
//1、获取所有表单数据 - *User param = toBean(User.class);
//2、调用service进行保存 - ***boolean **result = userService.modifyUser(param,pwdResource);
//3、根据service保存结果,进行展示 - *if(result){
//修改成功
}else{***return ****"redirect:/user?method=list"**;
//修改失败
}*getRequest().setAttribute(**"errorMsg"**,**"修改失败"**); **return ****"forward:/user/error.jsp"**;
}
UserService
/**
- 修改用户信息*
- ****@param ***param
*** ***** ****@param ***pwdResource
*** ***** ****@return***
*** *****/*
**public boolean **modifyUser(User param, String pwdResource) {
**try **{
//1、查询所有用户信息
   *List<User> ulist = **userDao**.searchAll();
   *//2、迭代删除被修改的用户*
***if**(ulist!=**null**){ Iterator<User> it = ulist.iterator(); **while **(it.hasNext()){ User next = it.next(); **if**(next.getId().equals(param.getId())){ it.remove(); **break**; } } } *//在向ulist追加之前,要对密码进行处理,用户表单密码到底要不要加密*//表单密码==源密码,说明用户未修改,不要再次加密(无代码)*//表单密码!=源密码,说明用户已修改,需要再次加密****if**(!param.getLoginPwd().equals(pwdResource)){ param.setLoginPwd(UMSUtils.*getMD5*(param.getLoginPwd())); } *//3、向集合追加被修改用户的新信息**ulist.add(param); *//4、以覆盖方式写回xml*
} **catch **(Exception e) {***userDao**.saveUlist(ulist);
return false;
}
return true;
}
LoginServlet
/**
- 用户登录。 用户登录成功,返回User对象。 登录失败,返回Null*
- ****@param ***param
*** ***** ****@return***
*** *****/*
**public **User login(User param) {
//对表单密码进行加密
- *param.setLoginPwd(UMSUtils.getMD5(param.getLoginPwd()));
//1、获取所有用户信息 - *List<User> ulist = userDao.searchAll();
//2、遍历所有用户信息 - *if(ulist!=null){
**for **(User u : ulist) {
//3、每遍历一个用户信息,对比表单用户名是否正确,对比表单密码是否正确. 都正确,登录成功
}***if**(u.getLoginName().equals(param.getLoginName()) && u.getLoginPwd().equals(param.getLoginPwd())){ **return **u; } }
//4、经过遍历,没有一个成功,登录失败- *return null;
}
最后:
** 如果文章对您有帮助,就拿起小手赶紧给博主点赞💚评论❤️收藏💙 一下吧! **
愿我们在未来的日子里。熠熠生辉!!!
版权归原作者 爱吃豆的土豆 所有, 如有侵权,请联系我们删除。