

送给大家一句话:
不管前方的路有多苦,只要走的方向正确,不管多么崎岖不平,都比站在原地更接近幸福。 —— 宫崎骏《千与千寻》
自主shell命令编写
1 前言
前几篇文章,我们学习进程的相关知识:进程概念,进程替换,进程控制。熟悉了进程到底是个什么事情,接下来我们来做一个实践,来运用我们所学的相关知识。这个项目就是手搓一个shell模块,模拟实现Xshell中的命令行输入。
用下图的时间轴来表示事件的发生次序。其中时间从左向右。shell由标识为sh的方块代表,它随着时间的流逝从左向右移动。shell从用户读入字符串"ls"。shell建立一个新的进程,然后在那个进程中运行ls程序并等待那个进程结束: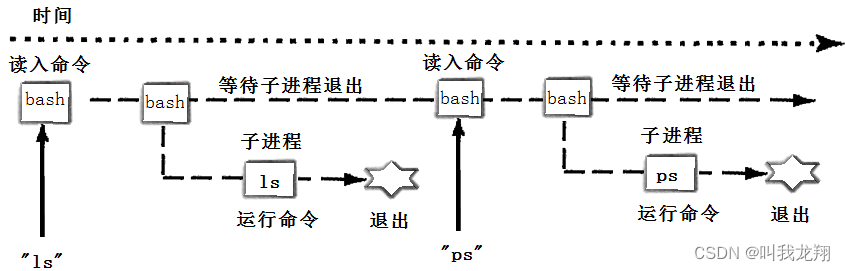
然后shell读取新的一行输入,建立一个新的进程,在这个进程中运行程序 并等待这个进程结束。
所以要写一个shell,需要循环以下过程:
- 获取命令行
- 解析命令行
- 建立一个子进程(fork),防止打扰主程序的运行
- 替换子进程(execvp),来执行对应功能。
- 父进程等待子进程退出(wait)
根据这些思路,和我们前面的学的技术,就可以自己来实现一个shell了
2 项目实现
为了保证项目文件的优雅美观,我们按照功能来书写不同函数:
- 创建自己的命令行
- 获取命令
- 分割命令
- 创建进程执行命令
2.1 创建命令行
该模块我们需要实现类似: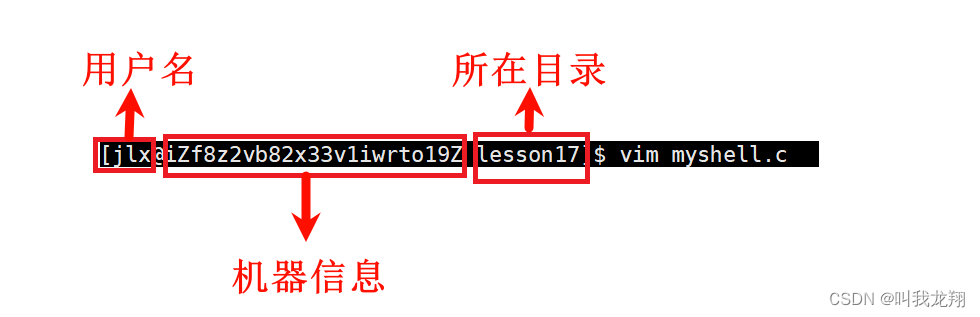
获取这些信息大家应该都知道吧!通过对环境变量我们就可以获取到这些信息。使用
getenv()
函数就可以完成操作。
#include<stdio.h>2 #include<sys/types.h>3 #include<sys/wait.h>4 #include<stdlib.h>5 #include<unistd.h>6 #include<string.h>7//大小宏8 #define SIZE 2569//获取用户名10constchar*GetUsername()11{12constchar* name =getenv("USER");13if(name ==NULL)return"NONE";14return name;15}16//获取机器信息17constchar*GetHostName()18{19constchar* hostname =getenv("HOSTNAME");20return hostname;21}22//获取当前目录23constchar*GetCwd()24{25constchar* cwd =getenv("PWD");26if(cwd ==NULL)return"NONE";27return cwd;28}2930voidMakeCommandLineAndPrint()31{//设置命令行字符串32char line[SIZE];33constchar* username =GetUsername();34constchar* hostname =GetHostName();35constchar* cwd =GetCwd();//将获取的三个数据写入命令行中 36sprintf(line,"[%s@%s %s]> ",username,hostname,cwd);37printf("%s",line);38fflush(stdout);//为了将命令行刷新出来39}4041intmain()42{43//创建我们自己的命令行44MakeCommandLineAndPrint();45int a =0;scanf("%d",&a);//阻断一下方便查看46return0;47}
这里使用的
sprintf()
函数是向流中写入格式化信息的好工具。这一段函数大家都可以看明白,就是获取三个变量,然后通过Line数组进行中转,然后打印出来。来看效果:
这时候发现,我们的所在目录全部都别打印出来了,我们可以进行一下优化:
#defineSkipPath(p)do{ p +=strlen(p)-1;while(*p !='/') p--; p++;}while(0);
通过这个宏定义就可以只保留最后的目录。
这里之所以不使用函数,是因为使用函数会涉及二级指针,会比较复杂!!!
来看效果:
这样就非常完美了!!!
2.2 获取命令
这个模块可以说是非常关键的一步了,只有正确获取了对应命令,我们才好打开新进程来执行命令。
#defineZERO'\0'45intGetUserCommand(char* command,int n)46{47if(command ==NULL)return-1;48fgets(command,n,stdin);49 command[strlen(command)-1]= ZERO;50returnstrlen(command);51}
这样我们就可以获取命令行输入的字符串了。
2.3 分割命令
获取命令之后,我们还需要对输入的一串命令来进行分割,来保证我们可以正常执行命令
12 #define SEP " "...14//全局命令 方便操作15char* gArgv[NUM];...58voidSplitCommand(char command[],size_t n)59{60(void)n;61 gArgv[0]=strtok(command,SEP);62int index =1;63// done, 故意写成=,表示先赋值,在判断. 分割之后,strtok会返回NULL,刚好让gArgv最后一个元素是NULL, 并且while判断结束64while((gArgv[index++]=strtok(NULL,SEP)));65}
我们使用来
strtok()
函数:
char*strtok(char*str,constchar*delim)
- str—要被分解的字符串
- delim—用作分隔符的字符(可以是一个,也可以是集合)在这里我们使用宏定义SEP( 代表 “ ” )
- 第一次调用strtok(),传入的参数str是要被分割的字符串{aaa - bbb -ccc},而成功后返回的是第一个子字符串{aaa};
- 第二次调用strtok的时候,传入的参数应该为NULL,这样使该函数默认使用上一次未分割完的字符串继续分割 ,就从上一次分割的位置作为本次分割的起始位置,直到分割结束。(strtok内部会记录相应信息)
这样就成功分割命令,来看效果:
我们的准备工作做完了,接下来就可以进行最终的操作:创建新进程来执行命令!
2.4 运行命令
运行命令就要使用:
- 创建子进程
- 进程替换
这两个加在一起就有了非常牛批的力量,究极POWER!。
68//执行命令69voidExecuteCommand()70{//创建子进程71pid_t id =fork();72if(id ==0)73{//进程替换 74execvp(gArgv[0],gArgv);75exit(errno);76}77else78{79int status =0;80pid_t rid =waitpid(id,&status,0);//进程等待 81if(rid >0)82{//如果错误打印错误信息 83int lastcode =WEXITSTATUS(status);84if(lastcode !=0)printf("%s:%s:%d\n",gArgv[0],strerror(lastcode),lastcode);85}86}87}
前面已经做好大部分工作了,执行命令这一步就很简单了。来看效果:
这样就完成了绝大部分的代码编写。我们在加上一个while循环,让命令行一直运行试试:
这样就实现了shell的大部分功能,但是还是有一些功能没有做到:比如我们运行cd等内建命令时,会无法运行,所以我要加上特殊情况来保证内建命令可以执行!!!
90char*GetHome()91{92char* home =getenv("HOME");93return home;94}9596char cwd[SIZE];9798voidcd()99{100constchar* path = gArgv[1];101if(path ==NULL) path =GetHome();102chdir(path);103104char temp[SIZE];105getcwd(temp,sizeof(temp));106snprintf(cwd,sizeof(cwd),"PWD=%s",temp);107putenv(cwd);108}109110//检查是否为内建命令 并单独执行111 bool CheckBuildin()112{113 bool yes = false;114//if语句判断即可,内建命令是有限的115if(strcmp(gArgv[0],"cd")==0)116{117cd();118 yes = true;119}120return yes;121}123intmain()124{125int quit =0;126127while(!quit)128{129130//创建我们自己的命令行131MakeCommandLineAndPrint();132133//获取命令行信息134char usercommand[SIZE];135int n =GetUserCommand(usercommand,sizeof(usercommand));136if(n <=0)return1;137138//分割命令行信息139SplitCommand(usercommand,sizeof(usercommand));140141 bool judge =CheckBuildin();142if(judge)continue;143144//执行命令145ExecuteCommand();146}147148149return0;150}
这样把内建命令单独进行运行就可以了,我这里只写了一个
cd
命令。来看效果:
这样就完成了我们的自主shell编写!!!
3 源代码
#include<stdio.h>2 #include<sys/types.h>3 #include<sys/wait.h>4 #include<stdlib.h>5 #include<unistd.h>6 #include<string.h>7 #include<errno.h>8 #include<stdbool.h>910 #define SIZE 25611 #define SkipPath(p)do{ p +=strlen(p)-1;while(*p !='/') p--;}while(0);12 #define ZERO '\0'13 #define NUM 3214 #define SEP " "1516//命令17char* gArgv[NUM];18int lastcode =0;19char cwd[SIZE];2021constchar*GetUsername()22{23constchar* name =getenv("USER");24if(name ==NULL)return"NONE";25return name;26}2728constchar*GetHostName()29{30constchar* hostname =getenv("HOSTNAME");31return hostname;32}3334constchar*GetCwd()35{36constchar* cwd =getenv("PWD");37if(cwd ==NULL)return"NONE";38return cwd;39}4041voidMakeCommandLineAndPrint()42{43char line[SIZE];44constchar* username =GetUsername();45constchar* hostname =GetHostName();46constchar* cwd =GetCwd();47SkipPath(cwd);48sprintf(line,"[%s@%s %s]> ",username,hostname,strlen(cwd)==1?"/":cwd +1);49printf("%s",line);50fflush(stdout);51}5253intGetUserCommand(char command[],size_t n)54{55char* s =fgets(command,n,stdin);56if(s ==NULL)return-1;57 command[strlen(command)-1]= ZERO;58returnstrlen(command);59}6061voidSplitCommand(char command[],size_t n)62{63(void)n;64 gArgv[0]=strtok(command,SEP);65int index =1;66// done, 故意写成=,表示先赋值,在判断. 分割之后,strtok会返回NULL,刚好让gArgv最后一个元素是NULL, 并且while判断结束67while((gArgv[index++]=strtok(NULL,SEP)));68}6970//执行命令71voidExecuteCommand()72{73pid_t id =fork();74if(id ==0)75{76execvp(gArgv[0],gArgv);77exit(errno);78}79else80{81int status =0;82pid_t rid =waitpid(id,&status,0);83if(rid >0)84{85 lastcode =WEXITSTATUS(status);86if(lastcode !=0)printf("%s:%s:%d\n",gArgv[0],strerror(lastcode),lastcode);87}88}89}9091char*GetHome()92{93char* home =getenv("HOME");94return home;95}969798voidcd()99{100constchar* path = gArgv[1];101if(path ==NULL) path =GetHome();102chdir(path);103104char temp[SIZE];105getcwd(temp,sizeof(temp));106snprintf(cwd,sizeof(cwd),"PWD=%s",temp);107putenv(cwd);108}109110//检查是否为内建命令 并单独执行111 bool CheckBuildin()112{113 bool yes = false;114//if语句判断即可,内建命令是有限的115if(strcmp(gArgv[0],"cd")==0)116{117cd();118 yes = true;119}120return yes;121}122123intmain()124{125int quit =0;126127while(!quit)128{129130//创建我们自己的命令行131MakeCommandLineAndPrint();132133//获取命令行信息134char usercommand[SIZE];135int n =GetUserCommand(usercommand,sizeof(usercommand));136if(n <=0)return1;137138//分割命令行信息139SplitCommand(usercommand,sizeof(usercommand));140141 bool judge =CheckBuildin();142if(judge)continue;143144//执行命令145ExecuteCommand();146}147148149return0;150}
Thanks♪(・ω・)ノ谢谢阅读!!!
下一篇文章见!!!
版权归原作者 叫我龙翔 所有, 如有侵权,请联系我们删除。