
第一关:HBase-shell命令
任务描述
使用
HBase shell
命令创建表:
exam_tb1
,向表中添加数据,表的数据与结构如下:
相关知识
略
编程要求
根据右侧窗口命令行内的提示,在
Begin - End
区域内进行命令行语句补充。
测试说明
本关需要你在命令行中启动
hbase
,并使用
hbase shell
操作命令行,操作完之后点击测评即可,平台会使用脚本通过表名获取你创建的表,并输出其中数据。
预期输出:
row-1
    class_info:class_id 201801
    class_info:class_name software
    user_info:age 32
    user_info:name jack
row-2
    class_info:class_id 201802
    class_info:class_name hardware
    user_info:age 28
    user_info:name rose
开始你的任务吧,祝你成功!
代码如下:
在命令行依次输入以下命令:

start-hbase.sh

hbase shell

create 'exam_tb1',{NAME=>'user_info'},{NAME=>'class_info'}

put 'exam_tb1','row-1','user_info:name','jack'
put 'exam_tb1','row-1','user_info:age','32'
put 'exam_tb1','row-1','class_info:class_name','software'
put 'exam_tb1','row-1','class_info:class_id','201801'

put 'exam_tb1','row-2','user_info:name','rose'
put 'exam_tb1','row-2','user_info:age','28'
put 'exam_tb1','row-2','class_info:class_name','hardware'
put 'exam_tb1','row-2','class_info:class_id','201802'
第2关:HBase Java API
任务描述
本关任务:在右侧编写代码,禁用表
step2_tb0
,删除表
step2_tb1
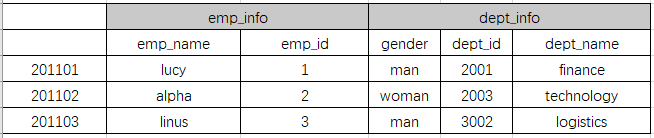
,创建表
emp_tb1
,
emp_tb1
表结构与数据如下图:
相关知识
略
编程要求
请仔细阅读右侧代码,根据方法内的提示,在
Begin - End
区域内进行代码补充。
测试说明
补充完代码后,点击测评,平台会对你编写的代码进行测试,当你的结果与预期输出一致时,即为通过。
预期输出:
表step2_tb0已禁用
step2_tb1已删除
201101
    dept_info:dept_id 2001
    dept_info:dept_name finance
    dept_info:gender man
    emp_info:emp_id 1
    emp_info:emp_name lucy
201102
    dept_info:dept_id 2003
    dept_info:dept_name techenology
    dept_info:gender woman
    emp_info:emp_id 2
    emp_info:emp_name alpha
201103
    dept_info:dept_id 3002
    dept_info:dept_name logistics
    dept_info:gender man
    emp_info:emp_id 3
    emp_info:emp_name linus
开始你的任务吧,祝你成功!
代码如下:
packagestep2;importjava.io.IOException;importjava.util.ArrayList;importjava.util.List;importorg.apache.hadoop.conf.*;importorg.apache.hadoop.hbase.*;importorg.apache.hadoop.hbase.client.*;importorg.apache.hadoop.hbase.io.compress.Compression;importorg.apache.hadoop.hbase.util.*;publicclassTask{publicvoidoperatorTables()throwsException{/********* Begin *********/Configuration conf =HBaseConfiguration.create();//使用create()静态方法就可以得到Configuration对象Connection conn =ConnectionFactory.createConnection(conf);//config为前文的配置对象Admin admin = conn.getAdmin();//使用连接对象获取Admin对象TableName tableName =TableName.valueOf("emp_tb1");//定义表名HTableDescriptor htd =newHTableDescriptor(tableName);//定义表对象HColumnDescriptor hcd1 =newHColumnDescriptor("emp_info");//定义列族对象HColumnDescriptor hcd2 =newHColumnDescriptor("dept_info");//定义列族对象
    htd.addFamily(hcd1);//添加
    htd.addFamily(hcd2);//添加
    admin.createTable(htd);//创建表// 停用表
    admin.disableTable(TableName.valueOf("step2_tb0"));// 停用表
    admin.disableTable(TableName.valueOf("step2_tb1"));// 删除表
    admin.deleteTable(TableName.valueOf("step2_tb1"));// 获取一个操作指定表的table对象,进行DML操作Table table = conn.getTable(TableName.valueOf("emp_tb1"));// 构造要插入的数据为一个Put类型(一个put对象只能对应一个rowkey)的对象Put put =newPut(Bytes.toBytes("201101"));
    put.addColumn(Bytes.toBytes("emp_info"),Bytes.toBytes("emp_name"),Bytes.toBytes("lucy"));
    put.addColumn(Bytes.toBytes("emp_info"),Bytes.toBytes("emp_id"),Bytes.toBytes("1"));
    put.addColumn(Bytes.toBytes("dept_info"),Bytes.toBytes("gender"),Bytes.toBytes("man"));
    put.addColumn(Bytes.toBytes("dept_info"),Bytes.toBytes("dept_id"),Bytes.toBytes("2001"));
    put.addColumn(Bytes.toBytes("dept_info"),Bytes.toBytes("dept_name"),Bytes.toBytes("finance"));Put put2 =newPut(Bytes.toBytes("201102"));
    put2.addColumn(Bytes.toBytes("emp_info"),Bytes.toBytes("emp_name"),Bytes.toBytes("alpha"));
    put2.addColumn(Bytes.toBytes("emp_info"),Bytes.toBytes("emp_id"),Bytes.toBytes("2"));
    put2.addColumn(Bytes.toBytes("dept_info"),Bytes.toBytes("gender"),Bytes.toBytes("woman"));
    put2.addColumn(Bytes.toBytes("dept_info"),Bytes.toBytes("dept_id"),Bytes.toBytes("2003"));
    put2.addColumn(Bytes.toBytes("dept_info"),Bytes.toBytes("dept_name"),Bytes.toBytes("techenology"));Put put3 =newPut(Bytes.toBytes("201103"));
    put3.addColumn(Bytes.toBytes("emp_info"),Bytes.toBytes("emp_name"),Bytes.toBytes("linus"));
    put3.addColumn(Bytes.toBytes("emp_info"),Bytes.toBytes("emp_id"),Bytes.toBytes("3"));
    put3.addColumn(Bytes.toBytes("dept_info"),Bytes.toBytes("gender"),Bytes.toBytes("man"));
    put3.addColumn(Bytes.toBytes("dept_info"),Bytes.toBytes("dept_id"),Bytes.toBytes("3002"));
    put3.addColumn(Bytes.toBytes("dept_info"),Bytes.toBytes("dept_name"),Bytes.toBytes("logistics"));ArrayList<Put> puts =newArrayList<>();
    puts.add(put);
    puts.add(put2);
    puts.add(put3);// 插进去
    table.put(puts);

    table.close();
    conn.close();/********* End *********/}}
第三关:HBase扫描
任务描述
本关任务:在右侧
sanTable(String tablename)
方法中扫描表中的数据并输出(
tablename
为要扫描的表名),扫描起止行要求从
row-10
开始至
row-50
,且只扫描
info:name
列。
相关知识
略
编程要求
请仔细阅读右侧代码,根据方法内的提示,在
Begin - End
区域内进行代码补充。
测试说明
补充完代码后,点击测评,平台会对你编写的代码进行测试,当你的结果与预期输出一致时,即为通过。
表名将作为方法的参数传入;
测试输入:
scan_tb1
预期输出:
row-11
    info:name lucy
row-21
    info:name alpha
开始挑战吧,祝你成功!
代码如下:
packagestep3;importjava.io.IOException;importorg.apache.hadoop.conf.*;importorg.apache.hadoop.hbase.*;importorg.apache.hadoop.hbase.client.*;importorg.apache.hadoop.hbase.util.*;publicclassTask{publicvoidscanTable(String tableName)throwsException{/********* Begin *********/Configuration config =newConfiguration();Connection conn =ConnectionFactory.createConnection(config);Admin admin = conn.getAdmin();TableName tablename =TableName.valueOf(tableName);Table table = conn.getTable(tablename);Scan scan =newScan();
scan.addColumn(Bytes.toBytes("info"),Bytes.toBytes("name"));
scan.setStartRow(Bytes.toBytes("row-10"));//设置从...开始扫描
scan.setStopRow(Bytes.toBytes("row-50"));//设置到...结束ResultScanner scanner = table.getScanner(scan);for(Result res : scanner){System.out.println(Bytes.toString(res.getRow()));for(Cell cell : res.listCells()){String family =Bytes.toString(CellUtil.cloneFamily(cell));String qualifier =Bytes.toString(CellUtil.cloneQualifier(cell));String value =Bytes.toString(CellUtil.cloneValue(cell));System.out.println("\t"+ family +":"+ qualifier +" "+ value);}}/********* End *********/}}
第四关:HBase过滤器
任务描述
在右侧
query(String tName)
中编写代码,使用过滤器查询出如下数据:
- 查询行健大于等于
row20且data:phone列的值是正确的手机号码的数据并输出该行的所有数据; 手机号的规则为:1开头,第二位是[3,4,5,7,8]中的任意一位,第三位到十一位都为0-9的数字。
编程要求
请仔细阅读右侧代码,根据方法内的提示,在
Begin - End
区域内进行代码补充。
测试说明
补充完代码后,点击测评,平台会对你编写的代码进行测试,当你的结果与预期输出一致时,即为通过。
表名将作为方法的参数传入;
测试输入:
test_tb4
预期输出:
row20
    data:name lisi
    data:phone 18701101126
row30
    data:name wangwu
    data:phone 13974036666
row40
    data:name zhaoliu
    data:phone 15897395896
开始你的任务吧,祝你成功!
代码如下:
packagestep4;importjava.io.IOException;importjava.util.ArrayList;importjava.util.List;importorg.apache.hadoop.cli.util.*;importorg.apache.hadoop.conf.*;importorg.apache.hadoop.hbase.*;importorg.apache.hadoop.hbase.client.*;importorg.apache.hadoop.hbase.filter.*;importorg.apache.hadoop.hbase.filter.SubstringComparator;importorg.apache.hadoop.hbase.util.*;publicclassTask{publicvoidquery(String tName)throwsException{/********* Begin *********/Configuration conf =HBaseConfiguration.create();Connection connection =ConnectionFactory.createConnection(conf);Admin admin = connection.getAdmin();TableName tablename =TableName.valueOf(tName);Table table = connection.getTable(tablename);//行键大于20Filter equalFilter1 =newRowFilter(CompareOperator.GREATER_OR_EQUAL,newBinaryComparator(Bytes.toBytes("row20")));//单列值过滤器 电话号码SingleColumnValueFilter valueFilter =newSingleColumnValueFilter(Bytes.toBytes("data"),Bytes.toBytes("phone"),CompareOperator.EQUAL,newRegexStringComparator("^1[3|4|5|7|8][0-9]{9}$"));List<Filter> list =newArrayList<>();
    list.add(valueFilter);
    list.add(equalFilter1);FilterList filterList1 =newFilterList(FilterList.Operator.MUST_PASS_ALL,list);Scan scan1 =newScan();
     scan1.setFilter(filterList1);ResultScanner scanner1 = table.getScanner(scan1);for(Result result : scanner1){System.out.println(Bytes.toString(result.getRow()));for(Cell cell : result.listCells()){String family =Bytes.toString(CellUtil.cloneFamily(cell));String qualifier =Bytes.toString(CellUtil.cloneQualifier(cell));String value =Bytes.toString(CellUtil.cloneValue(cell));System.out.println("\t"+ family +":"+ qualifier +" "+ value);}}
       scanner1.close();

    connection.close();/********* End *********/}}
本文转载自: https://blog.csdn.net/qq_46048008/article/details/130231411
版权归原作者 卷心菜yst 所有, 如有侵权,请联系我们删除。
版权归原作者 卷心菜yst 所有, 如有侵权,请联系我们删除。