一、下载Anaconda
二、安装Anaconda
1.将下载的安装包放在Linux系统路径下,并调到此路径下。
2.Linux命令:
bash Anaconda3-2023.09-0-Linux-x86_64.sh
3.一直按回车,或按q+yes跳过阅读
(1)默认安装在用户目录下,回车即可安装;
(2)也可自定义安装目录,直接输入安装目录,回车即可安装;
(3)直到出现“Do you wish the installer to initialize Anaconda3 by running conda init ? ”,输入no,回车。
三、配置环境变量(不然会出现conda不识别情况)
(1)输入 echo $PATH查看是否已添加到环境变量中。如果不存在或者conda不识别,则进行(2)或(3)步骤。
(base) fzx@fzx-System-Product-Name:~$ echo $PATH
/home/fzx/anaconda3/bin:/home/fzx/anaconda3/condabin:/usr/local/sbin:/usr/local/bin:/usr/sbin:/usr/bin:/sbin:/bin:/usr/games:/usr/local/games:/snap/bin
(2)永久生效
如果在安装Anaconda的过程中没有将安装路径添加到系统环境变量中,需要在安装后手工添加:
a.在终端输入$sudo gedit /etc/profile,打开profile文件。
b.在文件末尾添加一行:export PATH=/home/username/anaconda3/bin:$PATH,其中,将“/home/username/anaconda3/bin”替换为你实际的安装路径。保存。
c.重启Linux。
d.打开终端,输入conda,回车后显示帮助内容即配置成功
ps.也可以在终端中输入echo $PATH查看已有的环境变量,确认输出里是否已有Anaconda路径了。
(3)暂时性生效
将anaconda配置进环境变量。
export PATH=~/anaconda3/bin:$PATH
更新bashrc,激活环境变量;
source ~/.bashrc
(4)conda创建环境时出现NoWritableEnvsDirError: No writeable envs directories configured:原因是安装后的anaconda文件没有读写权限,解决方法:
sudo chmod 777 -R xxx/anaconda3/(此处为anaconda文件路径)
四、在Linux环境下修改Anaconda的默认虚拟环境安装位置
- 一种方法是通过修改用户目录下的.condarc文件,添加或修改envs_dirs选项,指定虚拟环境的存储路径。这种方法可以按照自己的喜好设置多个虚拟环境路径,并且按照顺序搜索和创建虚拟环境。相关命令如下:
(1) 使用命令conda info查看虚拟环境存放地址和其中的安装包的存放地址。Note:排在第一位的就是默认的地址。
package cache : /home/sxw/anaconda3/pkgs
                /home/sxw/.conda/pkgs
envs directories : /home/sxw/anaconda3/envs
                   /home/sxw/.conda/envs
(2) 在配置文件.condarc中,修改虚拟环境的默认地址
vim ~/.condarc
(3) 添加或修改以下内容:其中
/xx/xxx/new_path/new_path/new_path/envs,
就是设置的新的默认地址(放在第一位)
package cache : /home/sxw/anaconda3/pkgs
                /home/sxw/.conda/pkgs
envs directories : /home/sxw/anaconda3/envs
                   /home/sxw/.conda/envs
(4)提示: 修改文件时,不要用tab键,不然会报错如下。
Ignoring configuration file (/home/sxw/.condarc) due to error:
Unable to load configuration file.
  path: /home/sxw/.condarc
  reason: invalid yaml at line 1, column 8
使用空格键代替tab。
常用vim命令:i:进入编辑模式;esc+shift+;或者esc:返回普通模式;
以下命令都在普通模式下输入:
:q:退出文件;:q!:放弃修改退出;:wq:保存修改退出;:e!:放弃修改,重新回到文件打开的状态;u::撤销上一步的操作。
- 另一种方法是通过在创建虚拟环境时使用–prefix参数,指定虚拟环境的位置⁴。这种方法可以灵活地为每个虚拟环境单独指定位置,但是需要在激活和删除虚拟环境时也使用–prefix参数。相关命令如下:
# 创建一个名为myenv的虚拟环境,并指定其位置为/home/user/myenv
conda create --prefix /home/user/myenv
# 激活该虚拟环境
conda activate /home/user/myenv
# 删除该虚拟环境
conda remove --prefix /home/user/myenv --all
五、更换镜像下载源
(此处更换为清华源,也可换为阿里云和中科大)
各系统都可以通过修改用户目录下的
.condarc
文件来使用 TUNA 镜像源。
Windows 用户无法直接创建名为
.condarc
的文件,可先执行
conda config --set show_channel_urls yes
生成该文件之后再修改。
1.vim进入.condarc文件
vim ~/.condarc
- 将下面配置黏贴进去,并检查前面空格为空格而不是tab。
channels:
  - defaults
show_channel_urls: true
default_channels:
  - https://mirrors.tuna.tsinghua.edu.cn/anaconda/pkgs/main
  - https://mirrors.tuna.tsinghua.edu.cn/anaconda/pkgs/r
  - https://mirrors.tuna.tsinghua.edu.cn/anaconda/pkgs/msys2
custom_channels:
  conda-forge: https://mirrors.tuna.tsinghua.edu.cn/anaconda/cloud
  msys2: https://mirrors.tuna.tsinghua.edu.cn/anaconda/cloud
  bioconda: https://mirrors.tuna.tsinghua.edu.cn/anaconda/cloud
  menpo: https://mirrors.tuna.tsinghua.edu.cn/anaconda/cloud
  pytorch: https://mirrors.tuna.tsinghua.edu.cn/anaconda/cloud
  pytorch-lts: https://mirrors.tuna.tsinghua.edu.cn/anaconda/cloud
  simpleitk: https://mirrors.tuna.tsinghua.edu.cn/anaconda/cloud
如果是tab否则你的
.condarc
内容将多出一行
show_channel_urls: true
这将导致后续执行
conda clean -i
报错
# >>>>>>>>>>>>>>>>>>>>>> ERROR REPORT <<<<<<<<<<<<<<<<<<<<<<

    Traceback (most recent call last):
      File "/home/sxw/anaconda3/lib/python3.11/site-packages/conda/exception_handler.py", line 17, in __call__
        return func(*args, **kwargs)
               ^^^^^^^^^^^^^^^^^^^^^
      File "/home/sxw/anaconda3/lib/python3.11/site-packages/conda/cli/main.py", line 47, in main_subshell
        context.__init__(argparse_args=pre_args)
      File "/home/sxw/anaconda3/lib/python3.11/site-packages/conda/base/context.py", line 456, in __init__
        self._set_search_path(
      File "/home/sxw/anaconda3/lib/python3.11/site-packages/conda/common/configuration.py", line 1428, in _set_search_path
        self._set_raw_data(dict(self._load_search_path(self._search_path)))
                           ^^^^^^^^^^^^^^^^^^^^^^^^^^^^^^^^^^^^^^^^^^^^^^^
      File "/home/sxw/anaconda3/lib/python3.11/site-packages/conda/common/configuration.py", line 1417, in _load_search_path
        yield path, YamlRawParameter.make_raw_parameters_from_file(path)
                    ^^^^^^^^^^^^^^^^^^^^^^^^^^^^^^^^^^^^^^^^^^^^^^^^^^^^
      File "/home/sxw/anaconda3/lib/python3.11/site-packages/conda/common/configuration.py", line 416, in make_raw_parameters_from_file
        return cls.make_raw_parameters(filepath, yaml_obj) or EMPTY_MAP
               ^^^^^^^^^^^^^^^^^^^^^^^^^^^^^^^^^^^^^^^^^^^
      File "/home/sxw/anaconda3/lib/python3.11/site-packages/conda/common/configuration.py", line 389, in make_raw_parameters
        return {
               ^
      File "/home/sxw/anaconda3/lib/python3.11/site-packages/conda/common/configuration.py", line 391, in <dictcomp>
        source, key, from_map[key], cls._get_yaml_key_comment(from_map, key)
                     ~~~~~~~~^^^^^
    TypeError: string indices must be integers, not 'str'

`$ /home/sxw/anaconda3/bin/conda config --remove-key channels`

  environment variables:
                 CIO_TEST=<not set>
               CONDA_ROOT=/home/sxw/anaconda3
           CURL_CA_BUNDLE=<not set>
               LD_PRELOAD=<not set>
                     PATH=/home/sxw/anaconda3/bin/:~/MyApp/anaconda3/bin:~/MyApp/anaconda3/bin:~
                          /MyApp/anaconda3/bin:~/MyApp/anaconda3/bin:~/MyApp/anaconda3/bin:~/MyA
                          pp/anaconda3/bin:/usr/local/sbin:/usr/local/bin:/usr/sbin:/usr/bin:/sb
                          in:/bin:/usr/games:/usr/local/games:/snap/bin:/home/anaconda3/bin
       REQUESTS_CA_BUNDLE=<not set>
            SSL_CERT_FILE=<not set>

     active environment : None
       user config file : /home/sxw/.condarc
 populated config files :
          conda version : 23.7.4
    conda-build version : 3.26.1
         python version : 3.11.5.final.0
       virtual packages : __archspec=1=x86_64
                          __glibc=2.35=0
                          __linux=5.15.0=0
                          __unix=0=0
       base environment : /home/sxw/anaconda3  (writable)
      conda av data dir : /home/sxw/anaconda3/etc/conda
  conda av metadata url : None
           channel URLs : https://repo.anaconda.com/pkgs/main/linux-64
                          https://repo.anaconda.com/pkgs/main/noarch
                          https://repo.anaconda.com/pkgs/r/linux-64
                          https://repo.anaconda.com/pkgs/r/noarch
          package cache : /home/sxw/anaconda3/pkgs
                          /home/sxw/.conda/pkgs
       envs directories : /home/sxw/anaconda3/envs
                          /home/sxw/.conda/envs
               platform : linux-64
             user-agent : conda/23.7.4 requests/2.31.0 CPython/3.11.5 Linux/5.15.0-86-generic ubuntu/22.04.3 glibc/2.35
                UID:GID : 1000:1000
             netrc file : None
           offline mode : False

An unexpected error has occurred. Conda has prepared the above report.
If you suspect this error is being caused by a malfunctioning plugin,
consider using the --no-plugins option to turn off plugins.

Example: conda --no-plugins install <package>

Alternatively, you can set the CONDA_NO_PLUGINS environment variable on
the command line to run the command without plugins enabled.

Example: CONDA_NO_PLUGINS=true conda install <package>

If submitted, this report will be used by core maintainers to improve
future releases of conda.
Would you like conda to send this report to the core maintainers? [y/N]:
Timeout reached. No report sent.
PlanB :也可以使用命令直接增加源 (直接粘贴可能同样报上述错误,请粘贴后检查是否有误)
#添加数据源:例如, 添加清华anaconda镜像:
conda config --add channels https://mirrors.tuna.tsinghua.edu.cn/anaconda/pkgs/free/
conda config --add channels https://mirrors.tuna.tsinghua.edu.cn/anaconda/pkgs/main/
conda config --add channels https://mirrors.tuna.tsinghua.edu.cn/anaconda/cloud/pytorch/
conda config --add channels https://mirrors.tuna.tsinghua.edu.cn/anaconda/cloud/conda-forge/
conda config --add channels https://mirrors.tuna.tsinghua.edu.cn/anaconda/cloud/msys2/
conda config --set show_channel_urls yes
然后再次执行conda create ... 命令,会有一个较长的等待过程,然后提示确认或者取消,输入y 确认创建
其他镜像源,推荐使用中科大源
# 中科大镜像源
conda config --add channels https://mirrors.ustc.edu.cn/anaconda/pkgs/main/
conda config --add channels https://mirrors.ustc.edu.cn/anaconda/pkgs/free/
conda config --add channels https://mirrors.ustc.edu.cn/anaconda/cloud/conda-forge/
conda config --add channels https://mirrors.ustc.edu.cn/anaconda/cloud/msys2/
conda config --add channels https://mirrors.ustc.edu.cn/anaconda/cloud/bioconda/
conda config --add channels https://mirrors.ustc.edu.cn/anaconda/cloud/menpo/
conda config --add channels https://mirrors.ustc.edu.cn/anaconda/cloud/
# 阿里镜像源
conda config --add channels https://mirrors.aliyun.com/anaconda/
# 豆瓣的python的源
conda config --add channels http://pypi.douban.com/simple/
2.# 拓展:关于conda的数据源,另外有下述操作可做选择
#显示目前conda的数据源有哪些
conda config --show channels
#删除数据源
conda config --remove channels https://mirrors.tuna.tsinghua.edu.cn/anaconda/pkgs/free/
#回复默认源
conda config --remove-key channels
六、创建新环境
一般在~/Anaconda3/envs 路径下新建环境,这样方便管理与区分,也可以跟自己自我喜好自建目录。
- 先输入conda,进入conda环境
sxw@sxw-server:~/anaconda3$ conda
usage: conda [-h] [--no-plugins] [-V] COMMAND ...

conda is a tool for managing and deploying applications, environments and packages.

options:
  -h, --help          Show this help message and exit.
  --no-plugins        Disable all plugins that are not built into conda.
  -V, --version       Show the conda version number and exit.

commands:
  The following built-in and plugins subcommands are available.

  COMMAND
    build             Build conda packages from a conda recipe.
    clean             Remove unused packages and caches.
    compare           Compare packages between conda environments.
    config            Modify configuration values in .condarc.
    content-trust     Signing and verification tools for Conda
    convert           Convert pure Python packages to other platforms
                      (a.k.a., subdirs).
    create            Create a new conda environment from a list of
                      specified packages.
    debug             Debug the build or test phases of conda recipes.
    develop           Install a Python package in 'development mode'.
                      Similar to `pip install --editable`.
    doctor            Display a health report for your environment.
    env               See `conda env --help`.
    index             Update package index metadata files. Pending
                      deprecation, use https://github.com/conda/conda-index
                      instead.
    info              Display information about current conda install.
    init              Initialize conda for shell interaction.
    inspect           Tools for inspecting conda packages.
    install           Install a list of packages into a specified conda
                      environment.
    list              List installed packages in a conda environment.
    metapackage       Specialty tool for generating conda metapackage.
    notices           Retrieve latest channel notifications.
    pack              See `conda pack --help`.
    package           Create low-level conda packages. (EXPERIMENTAL)
    remove (uninstall)
                      Remove a list of packages from a specified conda
                      environment.
    rename            Rename an existing environment.
    render            Expand a conda recipe into a platform-specific recipe.
    repo              See `conda repo --help`.
    run               Run an executable in a conda environment.
    search            Search for packages and display associated information
                      using the MatchSpec format.
    server            See `conda server --help`.
    skeleton          Generate boilerplate conda recipes.
    token             See `conda token --help`.
    update (upgrade)  Update conda packages to the latest compatible
                      version.
    verify            See `conda verify --help`.
- 如果提示 not command,则因为第一次没有把conda写到环境变量中。输入下面命令
export PATH=~/anaconda3/bin:$PATH
source ~/.bashrc
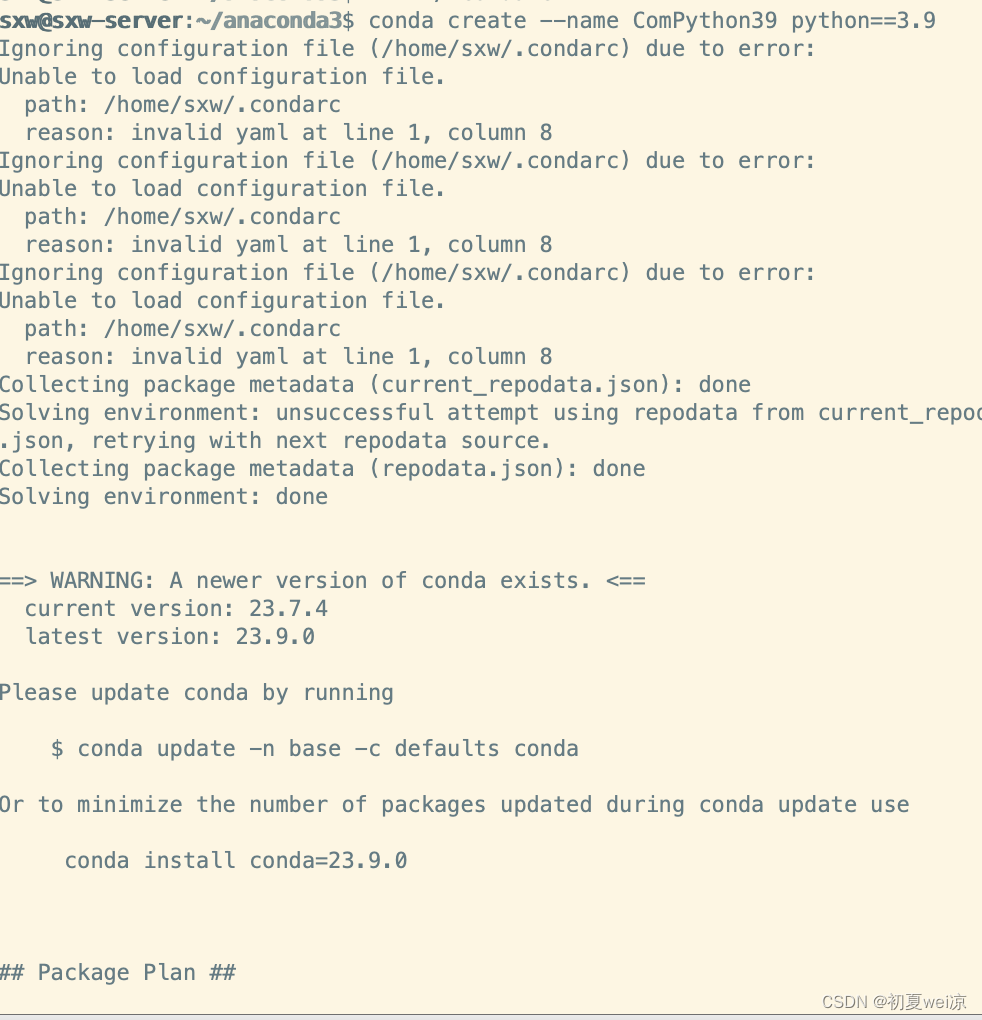
**3. **使用指令conda create --name 环境名称 python==3.9创建自己想要创建的环境(环境名称自己命名)。
 4. 输入y

5.输入conda env list 显示虚拟环境列表,可以看到自己刚才创建好的环境以及路径。
sxw@sxw-server:~/anaconda3$ conda env list
# conda environments:
#
base                     /home/sxw/anaconda3
ComPython39              /home/sxw/anaconda3/envs/ComPython39
6.source activate pytorch 【切换你的环境名,比如source activate base】,接下来可在当前环境下安装包。
sxw@sxw-server:~/anaconda3$ source activate ComPython39
(ComPython39) sxw@sxw-server:~/anaconda3$
版权归原作者 初夏wei凉 所有, 如有侵权,请联系我们删除。